HE1500N - Heating Soler & Palau - Free user manual and instructions
Find the device manual for free HE1500N Soler & Palau in PDF.

User questions about HE1500N Soler & Palau
0 question about this device. Answer the ones you know or ask your own.
Ask a new question about this device
Download the instructions for your Heating in PDF format for free! Find your manual HE1500N - Soler & Palau and take your electronic device back in hand. On this page are published all the documents necessary for the use of your device. HE1500N by Soler & Palau.
USER MANUAL HE1500N Soler & Palau
natural_image
Close-up of a car's front wheel and side panel showing internal components (no visible text or symbols)
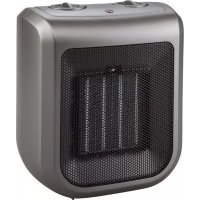
natural_image
Close-up of a cylindrical electronic device with ventilation grilles and a black connector (no visible text or symbols)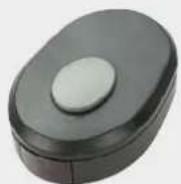
Fig.1
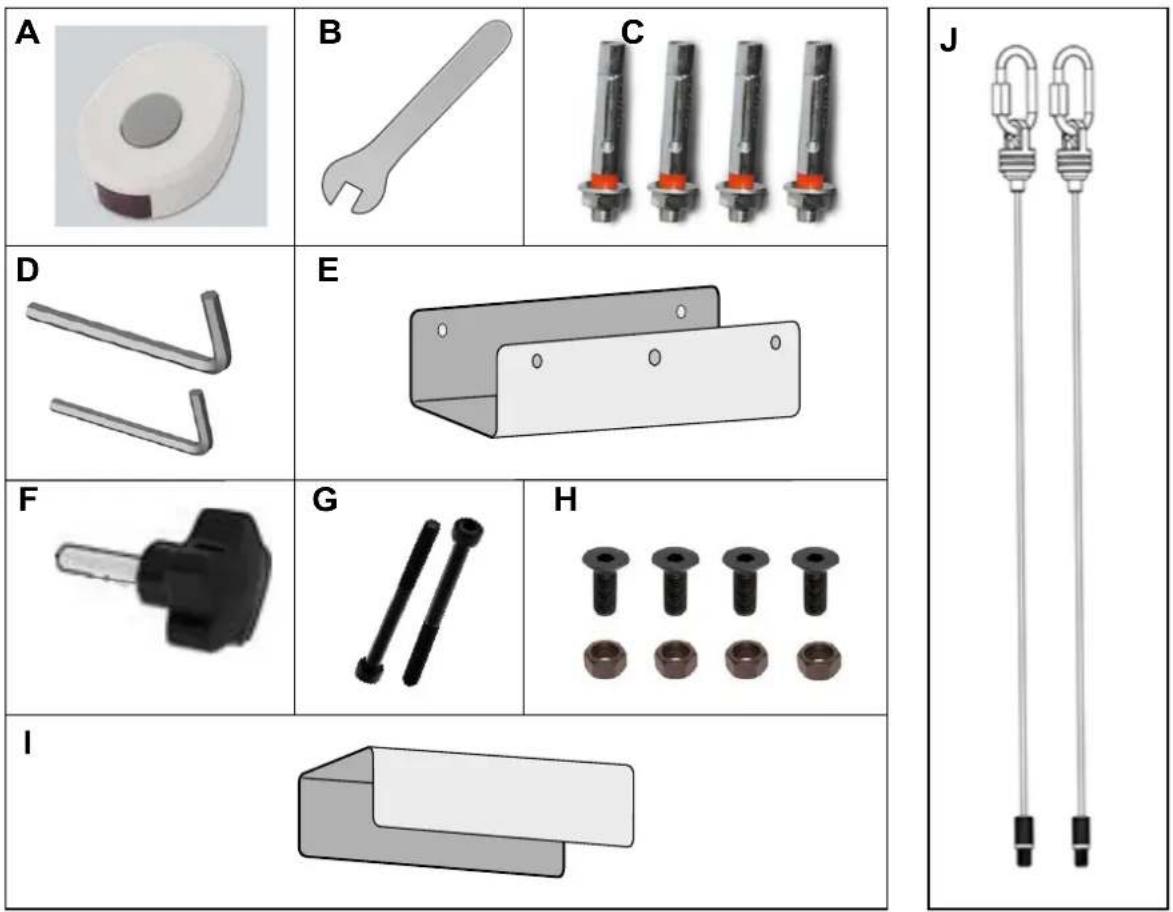
Fig.2
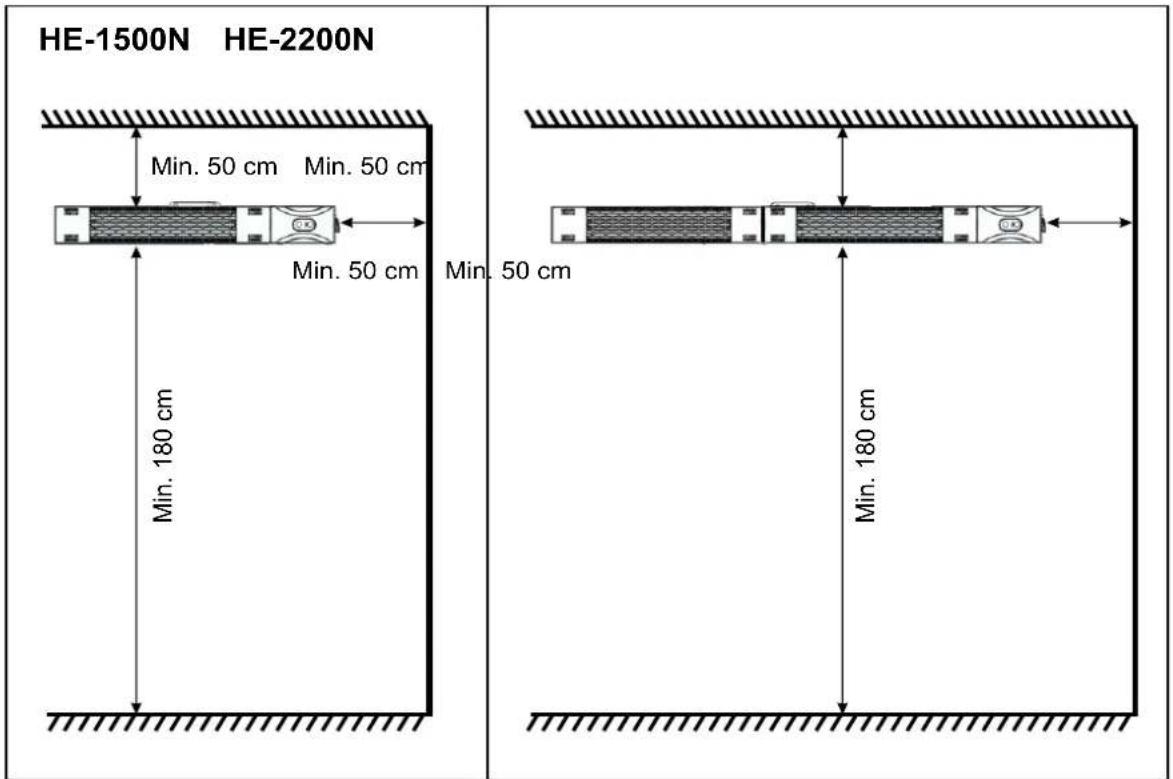
Fig.3
text_image
Min. 50 cm Min. 50 cm Min. 180 cm Min. 50 cm Min. 180 cmFig.4
text_image
HE-1500N HE-2200N Min. 50 cm Min. 180 cm Min. 180 cm Min. 50 cmFig.5
text_image
Φ8mm 80mm 20mmFig.6
text_image
Technical diagram showing a mechanical device with ON/OFF control and three close-up views of the device's internal structure.Fig.8
natural_image
Technical diagrams of mechanical assembly components, one showing a bracket with mounting holes and dashed lines, the other showing a clamping mechanism (no text or symbols)
natural_image
Technical line drawing of a mechanical device with a cylindrical component and a mounted sensor or actuator (no text or symbols present)ESPAÑOL
ÍNDICE
- THE PRODUCT ...... 10
- SAFETY WARNINGS....11
- WALL MOUNTING 12
- STRUCTURE OR FIXED SUN UMBRELLA INSTALLATION....12
- INSTALLATION DIRECTLY ON THE CEILING (FIG. 4/7)....12
- CONNECTION/ USE....13
- MAINTENANCE 13
- TECHNICAL ASSISTANCE....13
- REMOVAL FROM SERVICE, DISPOSAL AND RECYCLING 13
Please read these instructions carefully before using and installing this halogen heater, to avoid harm and hazard situations. Any use of this appliance different from that indicated in this manual could cause fire, short circuit or injury and will render the guarantee null and void.
The guarantee does not cover any defect, damage, loss, injury or harm caused by misuse of this product. All legal rights are guaranteed. No condition in the guarantee can exclude or change the guarantee conditions regulated by State legislation, which cannot be excluded or modified under any circumstance.
Before using the device, carefully remove all packaging and check the integrity of the appliance.
If you find any defect or damage, do not install it or try to repair it, please contact the distributor.
Do not leave the packaging within the reach of children and dispose of it in compliance with waste disposal regulations.
1. THE PRODUCT
In addition to the appliance you have purchased, the package also contains (Fig. 1):
- 1 x Remote control and 2x AAA 1.5V batteries ....(A)
- 1 x M6 wrench ....(B)
- 4 x Screws with metal wall plugs M6 x 50 ....(C)
- 1 x Hex key ....(D)
- 1 x Universal support for metal structures or fixed sun umbrella ....(E)
- 1 x fixing bolt M8 x 25 ......(F)
- 2 x Screws Allen M6 x 50 ......(G)
- 4 x Screws Allen M6 x 12 / 4 x M6 nut ....(H)
- 1 x Protective mat ....(I)
- 2 x Metal cable with security retainers .... (J)
• 1 x Installation and usage booklet
If any of these items are missing, please contact your distributor.
| Model Lamps Lamps power Total power | |||
| HE-1500 N 1 | 1 X 1500W | 1500W | |
| HE-2200 N 2 | 2 X 1100W | 2200W | |
2. SAFETY WARNINGS
- Make sure that your power supply corresponds to the details on the specifications plate.
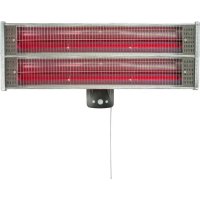
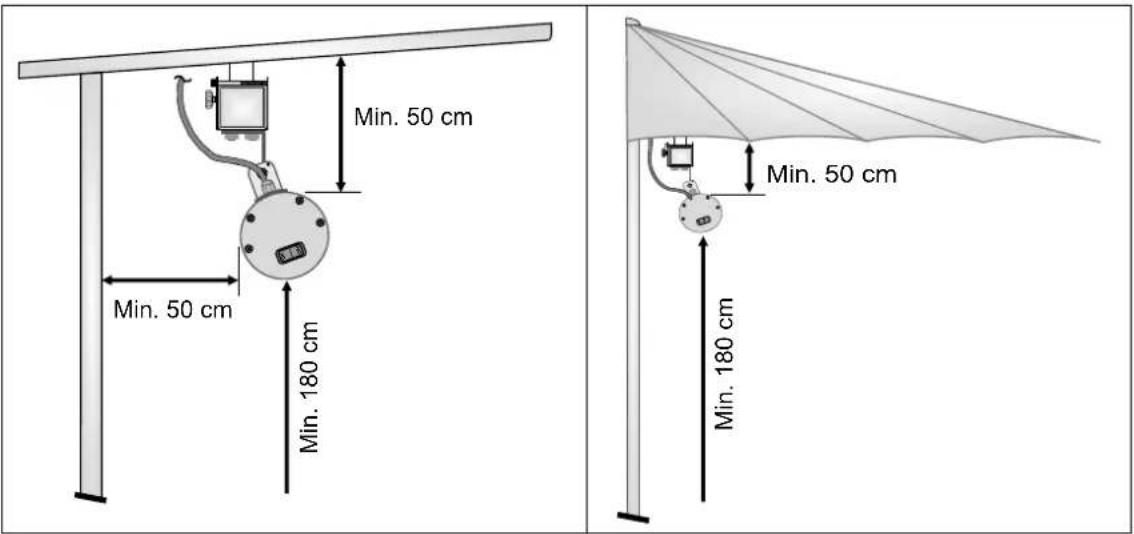
- If the appliance is installed on a wall, respect the minimum safety distances indicated in Fig. 2.
- If the appliance is installed on a structure or under fixed sun umbrella, respect the minimum safety distances indicated in Fig. 3.
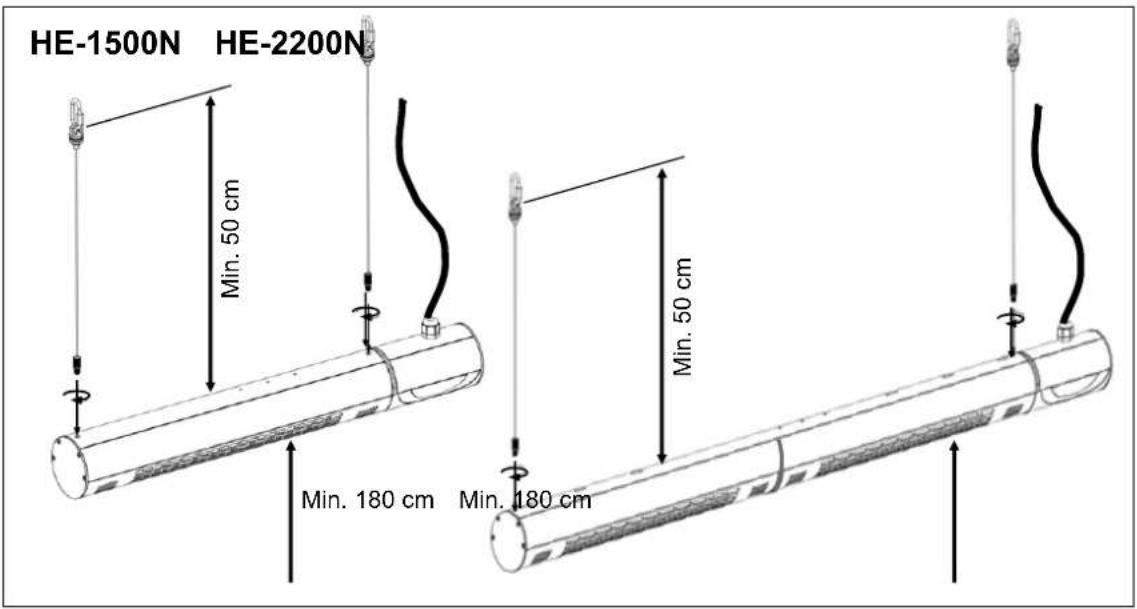
- If the appliance is installed on the ceiling, respect the minimum safety distances indicated in Fig. 4.
- There must be no infl ammable objects or objects affected by heat within 3 meters of the appliance (Curtains, furniture, plants, parasols, pets, etc.). The front of the appliance must always be unobstructed.
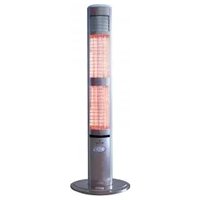
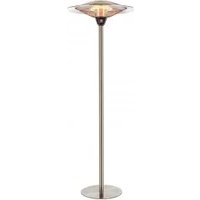
- This product has been designed to be installed in a horizontal position. It can vary the focus, until it can be focused completely towards the ground.
Attention: DO NOT INSTALL IN VERTICAL POSITION.
- The appliance can work outdoors, as long as it is under cover and the installation clearances are respected. (Fig. 2/3/4).
- Do not use the device close to baths, showers, swimming pools or saunas.
- Do not install on plastic or synthetic material walls.
- Never install the appliance under an electric power point.
- Do not use the appliance in areas containing explosive gases or vapours generated by solvents and paints, or which could autoignite.
- Make sure that the wall where it is to be fitted is sufficiently strong to bear the weight of the appliance.
- Avoid structures with movement or vibrations that could negatively affect the life of the lamps.
- The switch for disconnecting the appliance from the mains must have a gap of at least 3 mm between all the poles, enabling a complete disconnection in accordance with the excess voltage conditions Category III.
- Do not leave the appliance on when you leave your home. When leaving home, always make sure that it is switched off.
- The appliance will reach high surface temperatures; therefore do not touch it, even if it has been recently switched off.
- Do not cover the appliance, even if it has been switched off.
- Make sure that the power supply cable is not in contact with body of appliance and does not pass in front of frontal part (Radiation).
- Do not allow children or pets to play with the appliance or touch it. Warning! When in operation, the outlet grille may be very hot.
- Children of less than 3 years should be kept away unless continuously supervised.
- Children aged from 3 years and less than 8 years shall only switch on/off the appliance provided that it has been placed or installed in its intended normal operating position and they have been given supervision or instruction concerning use of the appliance in a safe way and understand the hazards involved.
- This appliance can be used by children aged from 8 years and above and persons with reduced physical, sensory or mental capabilities or lack of experience and knowledge if they have been given supervision or instruction concerning use of the appliance in a safe way and understand the hazards involved.
• Children shall not play with the appliance.
- Cleaning and user maintenance shall not be made by children without supervision.
- Children aged from 3 years and less than 8 years shall not plug in, regulate and clean the appliance or perform user maintenance.
- CAUTION: Some parts of this product may be become hot and cause burns. Particular atten-
tion should be when children and vulnerable people are present.
- Do not clean the appliance when in operation and do not immerse it in water.
- Do not manipulate the appliance with wet hands.
- Do not wrap the power cable round the appliance while it is in operation.
- If the cable is damaged it must be replaced; do not do this yourself take the appliance to an authorised repair centre, as this operation must be carried out by specialised personnel to avoid hazards or damage.
- Do not use the appliance as a clothes or towel drier.
- This heater is not equipped with a device of room temperature control. Do not use this heater in small rooms that are occupied by people who can not leave the room by themselves, unless on going monitoring is assured.
- Only for external use.
3. WALL MOUNTING
Before starting to install the appliance, carefully read the Safety warnings indicated in the section 2.
Before starting to install the appliance, make sure that once installed, the minimum security distances indicated in the Fig. 2 will be met.
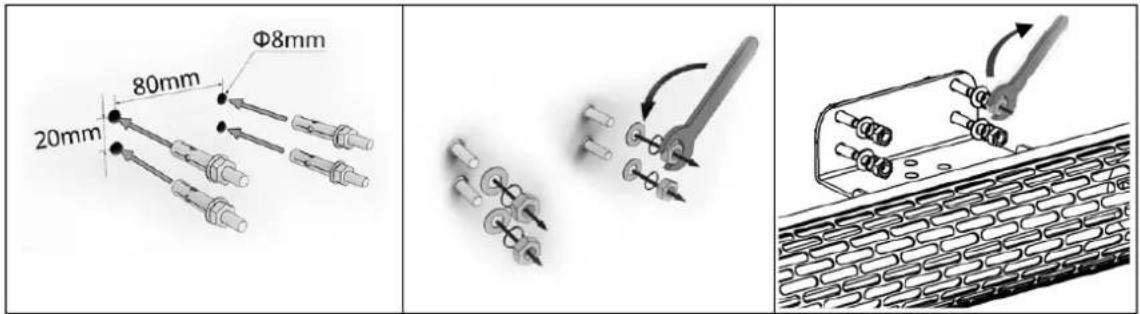
- Using the orientable support of the same device as a template, mark 4 holes in the wall. Use one level tool to ensure the support is completely horizontal (Fig. 5)
- Do 4 holes in the wall using a 8mm diameter drill bit. Insert the 4 screws with metal rods (Fig. 1C).
- With the supplied wrench (Fig. 1B), remove the 4 nuts and washers and fix the appliance on the wall.
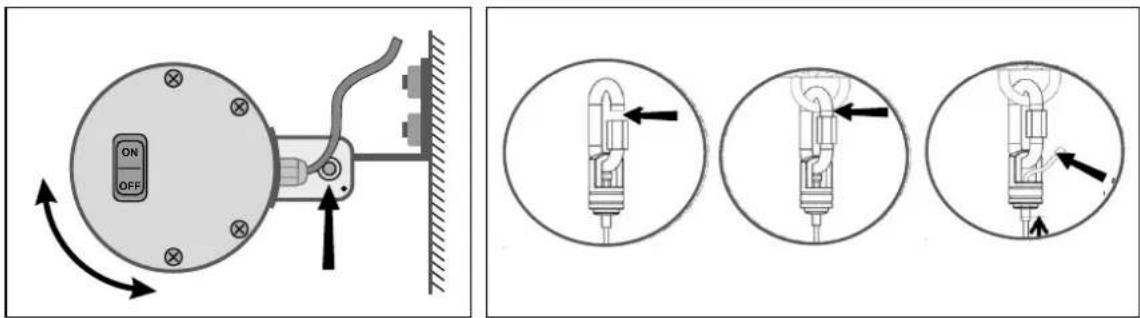
- Once fixed, and with supplied hex key (Fig. 1D), loosen the screw indicated in the Fig. 6 to orientate the appliance to its right measure.
- Once installation is finished, be sure that device is completely horizontal with help of level tool; verify that power supply cable is not in contact with body or in front of frontal lamp grille.
4. STRUCTURE OR FIXED SUN UMBRELLA INSTALLATION
Before starting to install the appliance, carefully read the Safety warnings indicated in the section 2.
Before starting to install the appliance, make sure that once installed, the minimum security distances indicated in the Fig. 3 will be met.
- To fix the appliance in a metal structure or fixed sun umbrella, universal support provided can be used (Fig. 1 E) Attention: Provided universal support, can be coupled to a metal structure/ fixed sun umbrella, if the support has dimensions of thickness: 20x20 mm minimum/ 40x40 maximum.
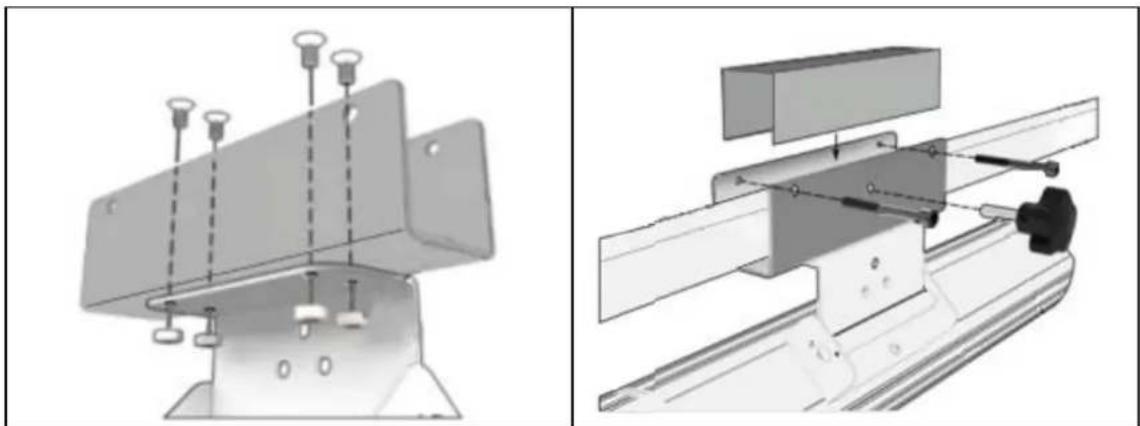
- Using 4 screws and 4 nuts (Fig. 1H), joint the universal support (Fig. 1E) to the adjustable support of the same appliance. Then attach the assembly to the structure/ fi xed sun umbrella as indicated in the Figure 8.
• Using the two hex screws (Fig. 1G) and the fixed bolt (Fig. 1F) will prevent the device is moved or fall down accidentally (Fig. 8). - To avoid scratching the paint on the structure/ fixed sun umbrella, you can put the supplied protective mat (Fig. 1 I)
- Once fixed, and with supplied hex key (Fig. 1D), loosen the screw indicated in Fig. 6 to orient the appliance to its right measure.
- Once installation is finished, be sure that device is completely horizontal with help of level tool; verify that power supply cable is not in contact with body or in front of frontal lamp grille.
5. INSTALLATION DIRECTLY ON THE CEILING (FIG. 4/7)
Before starting to install the appliance, carefully read the Safety warnings indicated in the section 2.
Before starting to install the appliance, make sure that once installed, the minimum security distances indicated in the Fig. 4 will be met.
- Depending on the ceiling where you want to fix the appliance, you must select the most appropriate type of fixation. Direct fixing to the ceiling is not supplied with the appliance.
- Remove the two screws located on the back of the metal body, which act as a plug (Fig. 4) and screw the metal cables with supplied security retainers.(Fig. 1J)
- Adjusting the useful length of the metal cable, you can adjust the final height of the appliance (Fig. 7)
- Once hung, close the security retainers to prevent the unit is picked up or accidentally dropped.
- Once the installation is finished, use a level to ensure that the appliance is completely horizontal, that the power supply cable does not touch the body of the appliance or is in front of the lamp grid.
6. CONNECTION/ USE
Before connecting the plug to the mains, carefully read the Safety warnings indicated in the section 2.
Attention: IMPORTANT FOR FRANCE:
Electrical power connection must be made by cutting off the supplied plug and using an adequate terminal, as shown below.

text_image
Mains supply L ○─●─Live = Brown ⊥ ○─●─Earth = Yellow-Green N ○─●─Neutral = Blue Device cable- Operating on the main switch, located on the side, you can permanently connect or disconnect the appliance from the electrical mains.
- REMOTE CONTROL: The remote control (Fig. 1A) can be used to switch the lamps on or off at a distance.
- MANUAL CONTROL: Clicking directly on the manual control 🔊 located in the appliance, can switch the lamps on or off.
7.MAINTENANCE
This product requires no specific maintenance. It only needs regular cleaning to avoid the accumulation of dust on the lamps, as this could cause it to overheat. Clean the lamps with a small paintbrush and the body of the appliance with a damp cloth. Do not immerse the appliance or spray water on it.
If the appliance is not going to be used for a long period of time, it is recommended to store it in a protected place.
If any parts need to be replaced, this should be done by qualified personnel, so please contact the network of Official S&P Service Agents, to ensure correct technical assistance.
8. TECHNICAL ASSISTANCE
S&P's extensive Technical Service network will guarantee adequate technical assistance.
If a fault is observed in the unit, please contact any of the mentioned technical service offices and they will attend to your problem. Manipulation of the unit by anyone other than official S&P service technicians will void your guarantee.
For any queries regarding S&P products please contact any branch of our After Sales Service network if you are in Spain, or your regular dealer in the rest of the world. To find your nearest dealer, visit our website at www.solerpalau.com
9. REMOVAL FROM SERVICE, DISPOSAL AND RECYCLING
If the appliance is not to be used for any length of time, we recommend returning it to its original package and storing it in a dry, dust-free place.
EU regulations and our commitment to future generations oblige us to recycle used materials; please remember to dispose of all unwanted packaging materials at the appropriate recycling points, and to drop off obsolete equipment at the nearest waste management point.
THE MANUFACTURER WILL NOT BE HELD LIABLE FOR DAMAGE TO PEOPLE AND/OR PROPERTY DUE TO NON-COMPLIANCE WITH THESE WARNINGS.
S&P RESERVES THE RIGHT TO MODIFY THE PRODUCT WITHOUT PRIOR NOTICE.
FRANÇAIS
ÍNDICE
- LE PRODUIT .... 14
- RECOMMANDATIONS DE SÉCURITÉ....15
- INSTALLATION AU MUR....16
- INSTALLATION SUR STRUCTURE OU PARASOL....16
- INSTALLATION DIRECTEMENT AU PLAFOND (FIG. 4 / 7)....17
- CONNECTION / UTILISATION DE L'APPAREIL....17
- ENTRETIEN....17
- ASSISTANCE TECHNIQUE....17
- MISE HORS SERVICE ET RECYCLAGE....17