
07107 - Steam cleaner Cleanmaxx - Free user manual and instructions
Find the device manual for free 07107 Cleanmaxx in PDF.
| Product type | Carpet and upholstery cleaner |
| Model | VC9391 |
| Power supply | 220–240 V ~ 50 Hz, 800 W |
| Cord length | Approx. 6.5 m |
| Suction hose length | Approx. 2.5 m |
| Main functions | Suction and washing of carpets and upholstery, cleaning solution dispensing, integrated rotating brush, nozzle for carpets and for upholstery |
| Maintenance and cleaning | Empty and rinse the water tanks after each use; regularly clean the carpet brush and nozzles with hot water; allow to dry completely before reassembly |
| Safety | Overheat protection, automatic shut-off in case of overheating, unplug before any maintenance, do not use near flammable materials |
| Spare parts and repairability | Contact DS Produkte GmbH after-sales service; use only original accessories |
| General information | Protection class II, domestic use, capacity of clean water tank up to Max mark, drain plug of dirty water tank |
Frequently Asked Questions - 07107 Cleanmaxx
User questions about 07107 Cleanmaxx
0 question about this device. Answer the ones you know or ask your own.
Ask a new question about this device
Download the instructions for your Steam cleaner in PDF format for free! Find your manual 07107 - Cleanmaxx and take your electronic device back in hand. On this page are published all the documents necessary for the use of your device. 07107 by Cleanmaxx.
USER MANUAL 07107 Cleanmaxx
natural_image
Black and white photo of a vacuum cleaner with coiled hose and control panel (no visible text or symbols)07107
DE
Gebrauchsanleitung
ab Seite 3
EN
Instruction manual
starting on page 14
FR
Mode d'emploi
natural_image
Line drawing of a curved mechanical or electrical component with no visible text or symbolsnatural_image
3D rendered image of a long-handled tool or tool handle (no text or symbols visible)1 x Griff
natural_image
Diagram showing a mechanical assembly with arrows indicating downward motion (no text or symbols)natural_image
Diagram showing a mechanical device with a lever and a separate cylindrical component, no text or symbols present.natural_image
Diagram of a mechanical device with an open lid and rotating arrow (no text or symbols)natural_image
Mechanical component diagram showing pipe connection and valve assembly (no text or symbols)natural_image
Illustration of a hand holding a lever with labeled point A (no text or symbols beyond label)natural_image
Line drawing of a person holding an object with directional arrows indicating movement (no text or symbols)natural_image
Technical diagram of a mechanical assembly with directional arrows indicating movement (no text or symbols present)natural_image
Technical line drawing of a mechanical component with no visible text or symbolsnatural_image
Mechanical assembly diagram showing a component being inserted into a housing with directional arrows indicating motion (no text or symbols)natural_image
3D diagram of a bent pipe or duct component with a dashed line labeled 'F' pointing to its side (no text or symbols beyond the label)Safety Instructions 15
Device Overview 18
Items Supplied 19
Before Initial Use 19
Use 19
After Use 22
Troubleshooting 24
Technical Data 24
Disposal 24
Explanation of the Symbols


Safety instructions: Read through these carefully and follow them to prevent personal injury.

Protection class II
Read instructions before use!

Supplementary information
Explanation of the Signal Words
DANGER warns of serious injuries and danger to life
WARNING warns of possible serious injuries and danger to life
CAUTION warns of slight to moderate injuries
NOTICE warns of damage to property
Dear Customer,
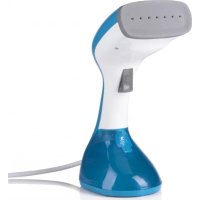
We are delighted that you have chosen this carpet cleaner.
Before using the device for the first time, please read the instructions through carefully and keep them for future reference. If the device is given to someone else, these instructions should also be handed over with it.
The manufacturer and importer do not accept any liability if the information in these instructions is not complied with.
If you have any questions about the device and about spare parts / accessories, contact the customer service department via our website:
Intended Use
- The device is designed to be used for removing light levels of dirt on carpets and upholstered furniture and for freshening up carpets and upholstered furniture. It is not a substitute for a conventional vacuum cleaner. Before using the device, the carpet or upholstered furniture which is to be treated must be thoroughly cleaned with a vacuum cleaner.
- The device is also suitable for use on tiles, stone floors and PVC.

On no account should the device be used to suck up the following:
– glowing ash, cigarette ends, matches, etc.
- i n fl ammable or explosive substances
– very fine dust (e.g. concrete dust), toner or sand
- pointed, hard objects such as pieces of broken glass
- The device is designed for personal household use only and is not intended for commercial applications.
- The device should only be used as described in these instructions. Any other use is deemed to be improper.
- The warranty does not cover faults caused by incorrect handling, damage, calcification or repair attempts. This also applies to the normal wear and tear of the individual components.
Safety Instructions
This device may be used by children aged 8 and over and by people with reduced physical, sensory or mental abilities or a lack of experience and / or knowledge if they are supervised or have received instruction on how to use the device safely and have understood the dangers resulting from failure to comply with the relevant safety precautions.
■ Children must not play with the device.
- Cleaning and user maintenance may not be carried out by children.
Children younger than 8 years of age and animals must be kept away from the device and the connecting cable! Improper use can lead to injuries and electric shock.
- The device must always be disconnected from the mains power when it is left unattended and before assembly, dismantling, before you pour water into the water tanks or empty them, and before cleaning.
- Do not make any modifications to the device. If the device, the mains cable or the mains plug of the device is damaged, it must
be replaced by the manufacturer, customer service department or an authorised retailer in order to avoid any hazards.

DANGER – Danger of Electric Shock from Water!
■ Use and store only in closed rooms.
■ Do not use the device in rooms with high humidity.
- Never immerse the device, the mains cable or the mains plug in water or other liquids. Ensure that the device, the mains cable and the mains plug cannot fall into water or become wet.
- Should the device fall into water, switch off the power supply immediately. Do not attempt to pull the device out of the water while it is still connected to the mains power!
- Never touch the device, mains cable or mains plug with wet hands when these components are connected to the mains power.

WARNING – Danger of Electric Shock from Damage and Inappropriate Use!
- Only connect the device to a socket with safety contacts that is properly installed and matches the indications on the rating plate of the device. The socket must also be readily accessible after connection so that the connection to the mains can quickly be isolated.
- Only use suitable extension cables corresponding to the indications on the rating plate of the device.
■ The device must be switched off when inserting or removing the mains plug.
In the event of a thunderstorm or damage / faults (e.g. unusual noises, odour or smoke development), switch the device off and pull the mains plug out of the plug socket. Have the device checked by an expert before it is used again.

WARNING – Danger of Injury!
- WARNING – Danger of Suffocation! Keep children and animals away from the packaging material.
- Danger of strangulation! Make sure that the mains cable is always kept out of the reach of small children and animals.
- Danger of tripping! Make sure that the connected mains cable does not present a trip hazard.

WARNING – Danger of Fire!
- Do not use the device in rooms containing easily ignitable substances or poisonous and explosive fumes.
- Do not use the device in the vicinity of highly flammable materials.
- Do not cover the device during operation in order to prevent it from catching fire. Do not insert anything into the openings of the device and make sure that these do not become clogged.
- Do not connect the device along with other consumers (with a high wattage) to a multiple socket in order to prevent overloading and a possible short circuit (fire).
NOTICE – Risk of Damage to Material and Property
The device should only be used if it is in full working order and has been completely assembled. The fresh water and dirty water containers must be inserted.
- Do not use any sharp or pointed objects to remove foreign bodies from the device. These could damage the device.
■ After use, place the device down on a cloth as residual water may escape from the nozzles after it has been switched off.
■ Use only original spare parts from the manufacturer.
■ Only ever pour the cleaning agent supplied with the device or standard carpet cleaning products for carpet cleaners into the fresh water container.
■ Never fill the water containers beyond the maximum fill level.
■ Always test the cleaning at a small spot first to check the colourfastness.
■ Make sure that the mains cable is not squashed, bent or laid over sharp edges and does not come into contact with hot surfaces. Do not wrap the mains cable around the device (danger of the cable breaking).
■ Never pull or carry the device by the mains cable. When the mains plug is removed from the plug socket, always pull on the mains plug and never the mains cable!
■ Never operate the device without water.
■ Protect the device from heat, naked flames, direct sunlight, sub-zero temperatures, strong temperature fluctuations, persistent moisture and wet conditions.
- Do not place any heavy objects on the device, the mains plug, the mains cable or the accessories. Do not subject the device to any collisions.
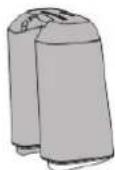
Device Overview
Front
1 Handle
2 Fresh water container
3 Handle of the dirt container
4 Mains cable
5 Carpet brush (under the main unit)
6 Carpet suction nozzle
7 Closure cap of the hose connection
8 Dirty water container
9 Closure cap of the fresh water container
10 Upper hook for winding up the cable
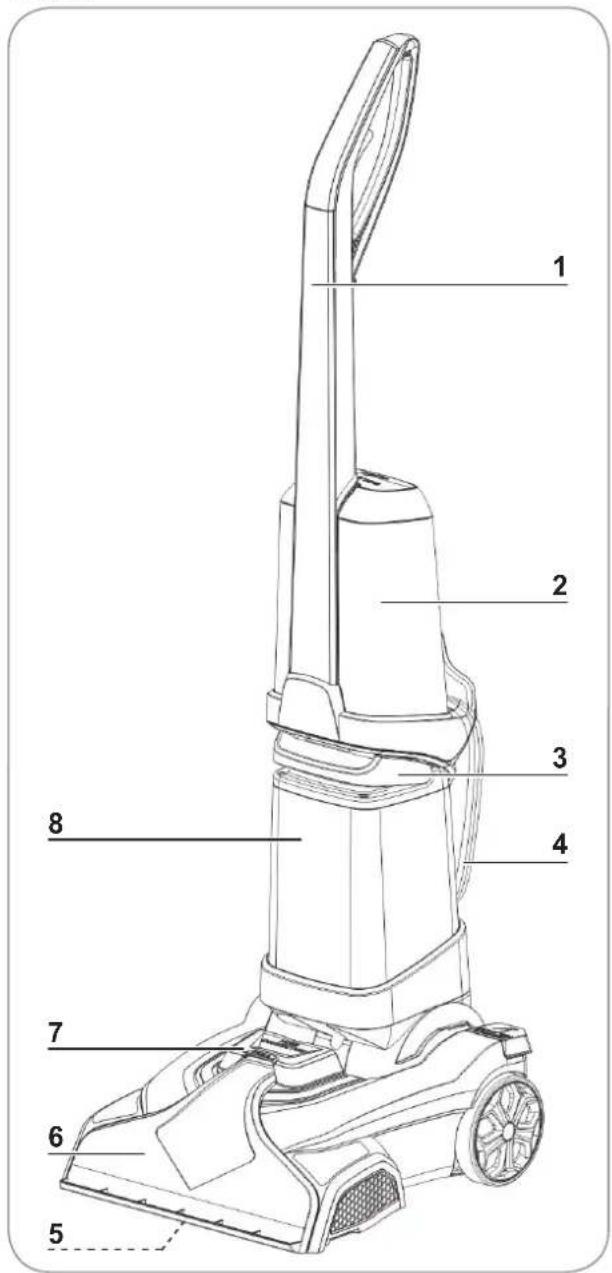
Back
11 Lower hook for winding up the cable
12 On/Off switch
13 Pedal for tipping the handle
14 Container support
15 Release lever for the fresh water container
16 Cable mount
17 Button for dispensing water or cleaning solution
Items Supplied
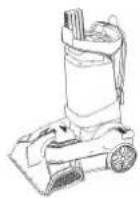
1 x main unit with dirty water container
natural_image
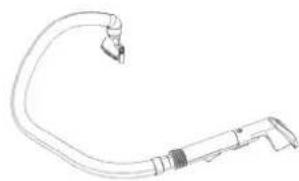
Line drawing of a curved mechanical or electrical component with a small protrusion (no text or symbols)1 x upholstery nozzle with hose

natural_image
3D rendered image of a metallic tool or bracket with a loop handle (no text or symbols)1 x handle
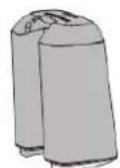
1 x fresh water con- tainer
i
2x screw (premounted on main unit)
1 x cleaning agent
Before Initial Use

A cross-head screwdriver is required for assembly.
- Check the items supplied for completeness (see the "Items Supplied" chapter) and possible transport damage. If you find any damage to the components, do not use them (!), but contact our customer service department.
natural_image
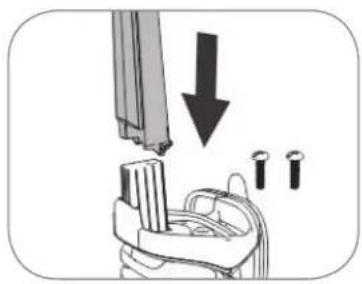
Diagram showing a mechanical assembly with a downward arrow and three circular components (no text or symbols)- Insert the handle (1) into the opening of the container support (14) and align it so that the curved end of the handle (1) points towards the back of the device. Fix the handle (1) in place using the two screws that are supplied with the device.
natural_image
Illustration of a vacuum cleaner with a spool attached to a vertical pole, showing mechanical components and motion direction (no text or symbols)- Insert the fresh water container (2) into the container support (14). When you do this, make sure that the locking lugs on the fresh water container (1) fit in the recesses in the container support (14). Press the fresh water container (2) against the handle (1) until you hear it engage.
The dirty water container (8) is already inserted in the main unit.
Use
Preparing the Carpet
-
Vacuum the carpet or upholstered furniture which is to be cleaned thoroughly with a vacuum cleaner. If possible, use a brush attachment to do this.
-
If possible, remove all furniture from the carpet. In the case of large items of furniture which cannot be moved to one side, place plastic film below or around the feet and only remove it once the carpet has completely dried after it has been cleaned. The feet could be damaged by the moisture from the carpet.
-
Check the colourfastness of the carpet or upholstered furniture. Soak a piece of white fabric with the cleaning solution supplied (see the “Preparing the Device / Filling the Fresh Water Container” section) and rub it carefully on an inconspicuous spot on the carpet. If the white fabric does not become discoloured, the carpet or upholstered furniture can be cleaned with the device. In the case of carpets or upholstered furniture with several colours, test the fastness of each colour.
Preparing the Device / Filling the Fresh Water Container

PLEASE NOTE!
- Only ever pour the cleaning agent supplied with the device or standard carpet cleaning products for carpet cleaners into the fresh water container.
- Do not use any cleaning products that produce a lot of foam as excessive foaming impedes the functioning of the device.
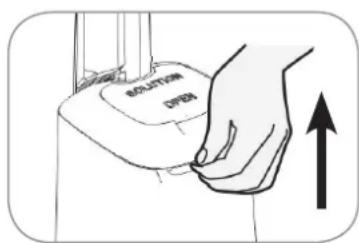
- Press the release lever of the fresh water container (15) upwards. The fresh water container (2) is released from the locking mechanism.
- Remove the fresh water container (2) from the device.
natural_image
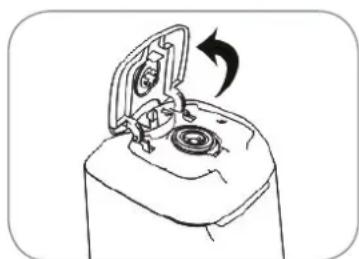
Line drawing of a mechanical device with an open lid and rotating arrow (no text or symbols)-
Flip open the seal cap of the fresh water container (9) and pour in carpet cleaning agent. Note the dosing instructions for the cleaning agent when you do this.
-
Fill the fresh water container (2) up to the Max mark with warm water (max. 40^ C). Close the seal cap again.
-
Insert the fresh water container (2) into the container support (14) (see the "Before Initial Use" chapter).
Cleaning

PLEASE NOTE!
- Switch off the device before a water container is removed.
■ Make sure that the device does not tip over. The water from the water containers could spill out. To park the device, move the handle to the vertical position in which it engages. - Do not wet the carpet or the upholstered furniture excessively.
If the device switches off during use, the built-in overheating protection has been activated. In this case, let the device cool down for approx. 60 minutes and then switch it on again using the On / Off switch.
Cleaning the Carpet
- Decide where cleaning should start and where it should stop so that you do not step on the carpet which has already been cleaned. We recommend that right-handed people should start at the right-hand edge of the carpet, and left-handed people should start at the left-hand edge of the carpet. Cleaning solution may still escape from the device even after it has been switched off. Therefore have a towel or cloth ready on which the device can be placed down after use.
- Fully unwind the mains cable from the hook for winding up the cable (10, 11), insert it into the cable holder (16) and connect it to an easily accessible plug socket whose main voltage matches the technical data of the device.
- Step on the pedal for tipping the handle (13) and tilt the handle (3) towards you.
- Step on the On / Off switch (12) to switch on the device.
- Roll the device to a corner of the carpet.
- Slide the device forwards along the edge of the carpet and hold down the button for discharging the cleaning solution (17). This applies the solution to the carpet and brushes it in. Walk to the side of the device as you do this. Do not tread on the wet carpet! Once you have reached the other end of the carpet, let go of the button.
- Pull the device backwards along the same strip. The dirty water will be sucked up.
- Start the next strip slightly overlapping the strip of carpet that has just been cleaned. Work up to the other edge of the carpet with even movements forwards and backwards. If you find more stubborn patches of dirt, go over a strip several times if necessary.
- When the dirty water container (8) is filled to the Max marking, it must be emptied (see the "After Use" chapter, "Cleaning the Water Containers" section).
- When the dirty water container (8) is to be emptied, the fresh water container (2) is to be topped up or the cleaning is to be finished, place the device on the towel or cloth provided. Switch off the device by stepping on the On / Off switch (12), and move the handle (1) to a vertical position.
- Remove the mains plug from the plug socket.
Cleaning Upholstered Furniture
natural_image
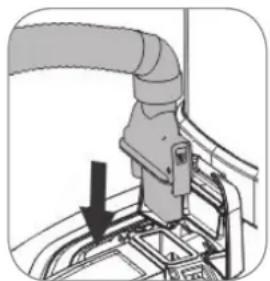
Mechanical assembly diagram showing pipe connection with a downward arrow indicating motion (no text or symbols)-
Use the upholstery nozzle for cleaning upholstered furniture. To do this, first flip up the closure cap of the hose connection (7), place the end of the hose onto the connection and press this down firmly. You must feel it engage.
-
Step on the On / Off switch (12) to switch on the device.
natural_image
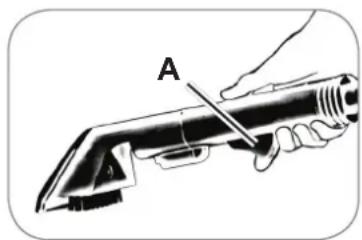
Illustration of a hand holding a tool with a labeled section A (no text or symbols on the object itself)-
Pull the upholstery nozzle along the edge of the upholstered furniture and hold down the button for dispensing the cleaning solution on the handle of the upholstery nozzle (A) (see picture). Let go of the button (A) at the other end of the strip.
-
Pull the upholstery nozzle over the same strip. The dirty water will be sucked up.
- Continue in the same way as with carpet cleaning (see the "Use" chapter, "Cleaning the Carpet" section).
After Use
• Empty both water containers after each use.
- Allow the freshly cleaned surfaces to dry completely.
- If possible, do not tread on the carpet while it is still damp. If it has to be trodden on, put down white or colourfast towels and tread on them.
• If cleaning solution has got onto wooden floors or furniture, wipe it away.
- Vacuum the dry carpet or upholstered furniture with a vacuum cleaner. If possible, use a brush attachment to do this.
Cleaning the Device

PLEASE NOTE!
■ Remove the mains plug from the plug socket before cleaning the article.
- Do not use any chemical cleaning agents to clean the device. These may damage the device.
Before the device can be stored away, the water containers must be emptied and rinsed out.
Cleaning the Water Containers
- Make sure that the mains plug has been pulled out.
natural_image
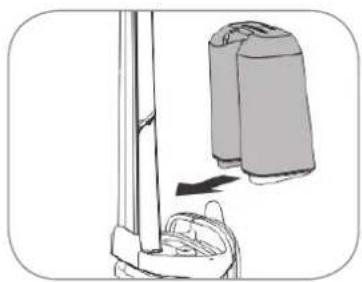
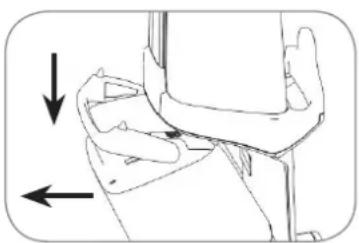
Illustration of a person's arm and wrist with directional arrows indicating movement (no text or symbols)- Empty the dirty water container (8). To do this, press down the handle of the dirty water container (3) and pull the dirty water container (8) forwards out of the main unit (see picture).
natural_image
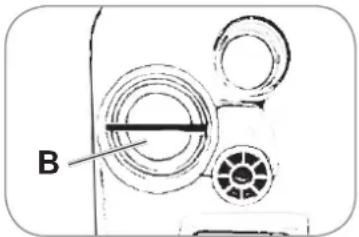
Diagram of a mechanical device with labeled component B, showing concentric circular components and a central rod (no text or symbols beyond label)- Turn the plug of the dirty water container (B) clockwise and remove.
-
Pour away the dirty water and rinse out the dirty water container (8) thoroughly with warm water.
-
Remove the fresh water container (2) from the container support (14) (see the "Preparing the Device / Filling the Fresh Water Container" section) and pour away the rest of the cleaning solution. Rinse out the fresh water container (2) thoroughly with warm water.
- Allow all parts to dry completely before assembling them.
- Insert the fresh water container (2) back into the device (see the "Before Initial Use" chapter).
- Tighten the plug counterclockwise onto the dirt container (8) and insert the dirty water container (8) into the main unit. When you do this, make sure that the recess on the
dirty water container (8) fits in the frame of the main unit. Press the dirty water container (8) against the frame of the main unit until you hear it engage.
Cleaning the Carpet Suction Nozzle
natural_image
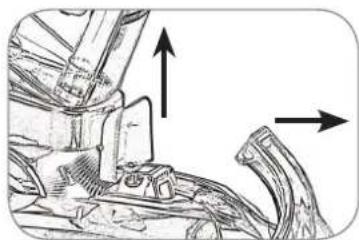
Technical line drawing of a mechanical component with directional arrows indicating movement (no text or symbols)-
After cleaning a carpet, clean the carpet suction nozzle (6). To do this, flip up the closure cap of the hose connection (7). Grip hold of the upper end of the carpet suction nozzle (6), pull it up and remove (see picture).
-
Rinse out the carpet suction nozzle (6) thoroughly with warm water.
-
Allow the carpet suction nozzle (6) to dry completely and insert it back into the main unit. To do this, place the locking lugs of the carpet suction nozzle (6) into the recesses on the main unit and press down the carpet suction nozzle (6). It must engage audibly.
Cleaning the Carpet Brush
-
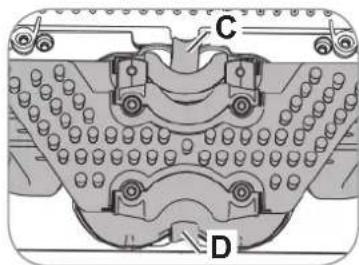
For cleaning the carpet brush (5) place the device on the floor so that the bottom of the device is accessible. Attention! Make sure you empty the water containers prior to cleaning.
-
Press together the locking device (C, D) and pull out the carpet brush (5) (see picture).
-
Rinse out the carpet brush (6) thoroughly under warm, running water.
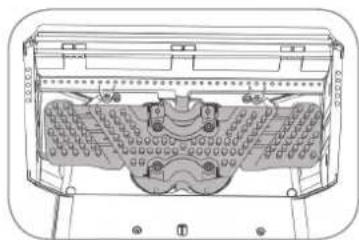
natural_image
Technical line drawing of a mechanical component with internal cavities and mounting brackets (no text or symbols)- Allow the carpet brush (5) to dry completely and insert it back into the main unit. Make sure it is in the correct position (see picture). Press together the locking device and press it into the recess on the bottom of the main unit. It must engage audibly.
Cleaning the Upholstery Nozzle

natural_image
Diagram showing a mechanical component with arrows indicating direction, no text or symbols present- Clean the upholstery nozzle. To do this, press the button on the base of the upholstery nozzle (E) and detach the upholstery nozzle from the hose (see picture).
natural_image
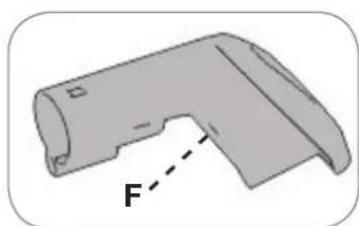
3D diagram of a mechanical part with a labeled dimension 'F' (no text or symbols beyond the label)-
If necessary, remove the brush insert from the upholstery nozzle. To do this, press down the button on the bottom of the upholstery nozzle (F) and pull out the brush insert.
-
Rinse out the upholstery nozzle and brush insert thoroughly with warm water.
-
Allow all parts to dry completely before assembling them.
Troubleshooting
If the device does not work properly, check whether you are able to rectify the problem yourself. If the problem cannot be solved with the steps below, contact the customer service department.

Do not attempt to repair a defective electrical device yourself!
| Problem Possible cause / solution | |
| The device does not work. | Is the plug inserted in the socket correctly?Is the socket defective? Try another plug socket.Check the fuse of the mains connection.Has the overheating protection been activated? Let the device cool down for approx. 60 minutes and then switch it on again using the On / Off switch. |
| The stain is not removed. | The stain is too stubborn or too old. Treat the stain speci-fi cally with a carpet cleaning product. |
Technical Data
Model: VC9391
Voltage supply: 220 – 240 V \~ 50 Hz
Motor power: 800 W
Mains cable length: approx. 6.5 m
Suction hose length: approx. 2.5 m
Protection class: II

Customer Service /
Importer:
DS Produkte GmbH
Am Heisterbusch 1
19258 Gallin
Germany
Tel.: +49 38851 314650
(Calls to German landlines are subject to charges. The cost varies depending on the service provider.)
Disposal

The packaging material is recyclable. Dispose of the packaging in an environmentally friendly manner and take it to a recycling centre.
Dispose of the device in an environmentally friendly manner. It should not be disposed of in the normal domestic waste. Dispose of the device at a recycling centre for used electrical and electronic devices. More information is available from your local authorities.
Contenu
www.service-shopping.de
natural_image
Line drawing of a curved mechanical or electrical component with no visible text or symbolsnatural_image
3D rendered image of a tool handle (no text or symbols visible)1 x poignée

natural_image
Diagram showing a mechanical assembly with arrows indicating downward motion (no text or symbols)natural_image
Diagram showing a mechanical device with a lever and a separate cylindrical component (no text or symbols)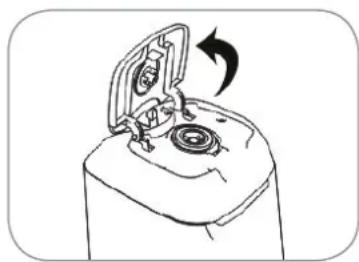
natural_image
Line drawing of a mechanical device with an open lid and rotating arrow (no text or symbols)natural_image
Mechanical assembly diagram showing pipe connection with a black arrow indicating direction (no text or symbols)natural_image
Illustration of a hand holding a tool with a labeled component 'A' (no text or symbols beyond label)natural_image
Illustration of a person's arm and wrist with directional arrows indicating movement (no text or symbols)natural_image
Diagram of a mechanical device with circular components and a labeled section B (no text or symbols beyond label)natural_image
Technical line drawing of a mechanical component with directional arrows indicating movement (no text or symbols)natural_image
Technical line drawing of a mechanical component with no visible text or symbolsnatural_image
Mechanical assembly diagram showing a component being inserted into a housing with directional arrows indicating motion (no text or symbols)natural_image
3D diagram of a bent pipe or duct component with a dashed line labeled 'F' pointing to its side (no text or symbols beyond the label)WAARSCHUWING – Verwondingsgevaar!
WAARSCHUWING – Brandgevaar!
natural_image
Line drawing of a curved mechanical or electrical component with a small protrusion (no text or symbols)natural_image
3D rendered image of a metallic tool or bracket with a loop handle (no text or symbols)1 x greep
natural_image
Diagram showing a hand holding a device with three pins and a downward arrow indicating motion (no text or symbols)natural_image
Illustration of a vacuum cleaner next to a vertical pole, showing mechanical components and airflow direction (no text or symbols)natural_image
Line drawing of a mechanical device with an open lid and rotating arrow (no text or symbols)natural_image
Mechanical assembly diagram showing pipe connection with a downward arrow (no text or symbols)natural_image
Illustration of a hand holding a tool with a labeled component (A), no text or symbols present.natural_image
Illustration of a person's arm joint with directional arrows indicating movement (no text or symbols)natural_image
Diagram of a mechanical component with concentric circles and a labeled section B (no text or symbols beyond label)natural_image
Technical line drawing of a mechanical assembly with directional arrows indicating movement (no text or symbols)natural_image
Technical line drawing of a mechanical component with no visible text or symbolsnatural_image
Mechanical component diagram showing a shaft and housing with directional arrows indicating motion (no text or symbols)natural_image
3D diagram of a mechanical part with a labeled force vector F (no text or symbols beyond the label)
- Gebrauchsanleitung
- Instruction manual
- Mode d'emploi
- Explanation of the Symbols
- Explanation of the Signal Words
- Intended Use
- Safety Instructions
- DANGER – Danger of Electric Shock from Water!
- WARNING – Danger of Electric Shock from Damage and Inappropriate Use!
- WARNING – Danger of Injury!
- WARNING – Danger of Fire!
- NOTICE – Risk of Damage to Material and Property
- Device Overview
- Items Supplied
- Before Initial Use
- Use
- Preparing the Carpet
- Preparing the Device / Filling the Fresh Water Container
- PLEASE NOTE!
- Cleaning
- Cleaning the Carpet
- Cleaning Upholstered Furniture
- After Use
- Cleaning the Device
- Cleaning the Water Containers
- Cleaning the Carpet Suction Nozzle
- Cleaning the Carpet Brush
- Cleaning the Upholstery Nozzle
- Troubleshooting
- Do not attempt to repair a defective electrical device yourself!
- Technical Data
- Customer Service /
- Importer:
- Disposal
- Contenu
- WAARSCHUWING – Verwondingsgevaar!
- WAARSCHUWING – Brandgevaar!
Brand : Cleanmaxx
Model : 07107
Category : Steam cleaner