889LM - Controller LIFT-MASTER - Free user manual and instructions
Find the device manual for free 889LM LIFT-MASTER in PDF.

| Product type | MyQ Garage Door Opener Control Panel |
| Brand | LiftMaster |
| Model | 889LM |
| Power supply | Low voltage 7-28 V (wired) |
| Communication frequency | 900 MHz (MyQ technology) |
| Garage door opener compatibility | Security+® (1998 to present); not compatible with Security+ 2.0® |
| Maximum number of programmable accessories | 12 Security+ 2.0 remotes, 2 remote lock devices, 16 MyQ accessories |
| Recommended installation height | At least 1.5 m from the floor |
| Main functions | Push bar, lighting, motion detector, timer-to-close (1/5/10 min), lock, accessory programming |
| Lock function | Prevents remote activation, allows activation by keypad or door |
| Timer-to-close (TTC) | 1, 5 or 10 minutes; disabled if obstruction |
| Motion detector | Automatically turns on light when motion is detected |
| Garage door opener light | On/off control; duration adjustment (1.5 to 4.5 minutes) |
| Light indicators | Yellow (command) and red (learn) LEDs |
| Learn button (LEARN) | To program remotes, keypads, and MyQ accessories |
| LiftMaster Internet Gateway | Compatible (model 828LM) for remote control via MyQ app |
| Maintenance and cleaning | Wipe with a dry cloth; do not use abrasive products |
| Safety | Install out of reach of children; cut power before installation; do not use on rigid/pivot doors |
| Warranty | 5-year limited warranty |
| Standards | FCC Part 15, Innovation Sciences Canada Class B |
Frequently Asked Questions - 889LM LIFT-MASTER
User questions about 889LM LIFT-MASTER
0 question about this device. Answer the ones you know or ask your own.
Ask a new question about this device
Download the instructions for your Controller in PDF format for free! Find your manual 889LM - LIFT-MASTER and take your electronic device back in hand. On this page are published all the documents necessary for the use of your device. 889LM by LIFT-MASTER.
USER MANUAL 889LM LIFT-MASTER
The MyQ Control Panel is intended to be installed with Security+® Garage Door Openers manufactured between 1998 and present. The MyQ Control Panel is NOT compatible with Security+ 2.0® Garage Door Openers. DO NOT install this door control on garage door opener systems controlling one-piece or swing doors.
OVERVIEW
The MyQ Control Panel offers a quick and convenient way to add Security+ 2.0 and MyQ technology to your existing garage door opener. MyQ technology uses a 900MHz signal to provide two-way communication between the garage door opener and MyQ enabled accessories. When programmed to the LiftMaster® Internet Gateway you can monitor and control your garage door from any internet enabled computer or smartphone. You may program up to 12 Security+ 2.0 remote controls, 2 Security+ 2.0 keyless entries and a combination of 16 MyQ accessories to the MyQ control panel.
COMPATIBLE ACCESSORIES
| Security+ 2.0® Accessories: MyQ Accessories: | |
| Model 891LM1- Button Remote Control | Model 823LMRemote Light Switch |
| Model 893LM3-Button Remote Control | Model 825LMRemote Light Control |
| Model 890MAX3-Button Mini MAX Remote Control | Model 828LMLiftMaster® Internet Gateway |
| Model 893MAX3-Button MAX Remote Control | Model 827LMmyQ Remote LED Light |
| Model 895MAX3-Button Premium MAX Remote Control | |
| Model 877LMWireless Keyless Entry | |
| Model 878MAXWireless MAX Keyless Entry |
INSTALLATION
Install the MyQ Control Panel in place of the existing door control, within sight of garage door, out of reach of small children at a minimum height of 5 feet (1.5 m) above floors, landings, steps or any other adjacent walking surface, and away from ALL moving parts of door. Due to power consumption the MyQ Control Panel cannot be used in conjunction with another wired door control connected to your garage door opener. If an additional door control is needed, the wireless door control model 885LM can be programmed to the MyQ Control Panel.
To program the 885LM to the MyQ Control Panel, follow the remote control programming steps. When in battery back-up mode, any feature using unattended operation such as Timer-to-Close, closure from a garage door and gate monitor or remote operation utilizing the LiftMaster® Internet Gateway will be disabled.
- Disconnect all electrical and battery power (if applicable) to the garage door opener.
- Remove the existing door control from the wall.
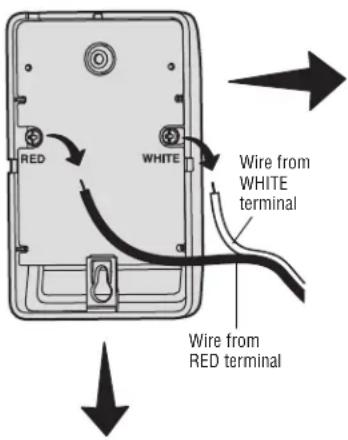
- Note the polarity of the wires connected to the existing door control.
- Label the wire connected to the RED terminal.
- Label the wire connected to the WHITE terminal.
Disconnect the wires from the existing door control.
-
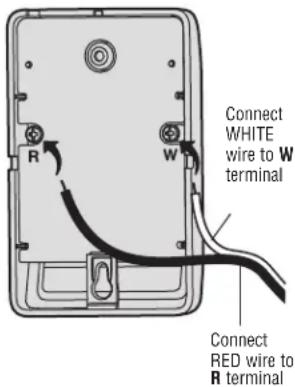
Connect the wires to the new MyQ Control Panel. Make sure the polarity is correct.
-
Red wire to the R terminal.
- White wire to the W terminal.
WARNING
To prevent possible SERIOUS INJURY or DEATH from electrocution:
- Be sure power is NOT connected BEFORE installing door control.
- Connect ONLY to 7-28 VOLT low voltage wires.
To prevent possible SERIOUS INJURY or DEATH from a closing garage door:
• Install door control within sight of garage door, out of reach of children at a minimum height of 5 feet (1.5 m) above floors, landings, steps or any other adjacent walking surface, and away from ALL moving parts of door. - NEVER permit children to operate or play with door control push buttons or remote control transmitters.
- Activate door ONLY when it can be seen clearly, is properly adjusted, and there are no obstructions to door travel.
- ALWAYS keep garage door in sight until completely closed. NEVER permit anyone to cross path of closing garage door.
- DO NOT install this door control on garage door opener systems controlling one-piece or swing doors.
To provide an adequate visual alert, the garage door opener light bulb(s) MUST be a minimum of 40 Watt (or equivalent).

WARNING: This product can expose you to chemicals including lead, which are known to the State of California to cause cancer or birth defects or other reproductive harm. For more information go to www.P65Warnings.ca.gov.
- Mount the MyQ Control Panel to the wall.
- Reconnect power. The yellow command LED and the red learn LED will blink quickly for up to 5 minutes as the control panel recharges. When the control panel is operational, the yellow command LED will glow steadily.
- To test the control panel, press the push bar to activate the garage door opener.
Existing Door Control
text_image
RED WHITE Wire from WHITE terminal Wire from RED terminalMyQ Control Panel
text_image
Connect WHITE wire to W terminal R W Connect RED wire to R terminal
Discard, donate or recycle
REMOTE CONTROL
text_image
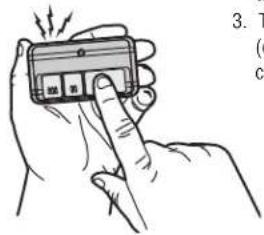
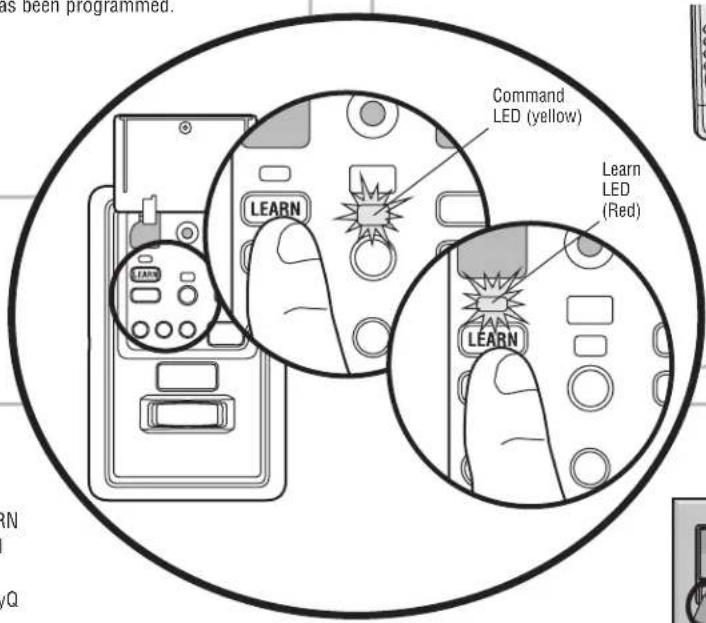
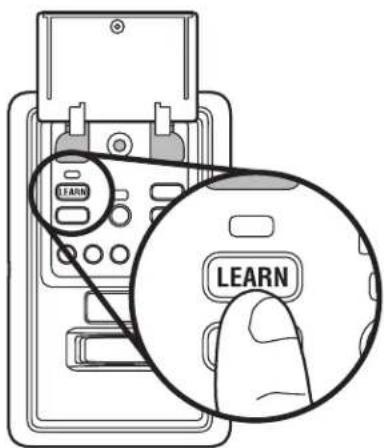
3. T ( c ) c )- Press the MyQ Control Panel LEARN button twice, the red learn LED will turn on.
- Press the button on the remote control that you wish to operate your garage door.
- The garage door opener lights will flash (or two clicks will be heard) when the code has been programmed.
KEYLESS ENTRY
- Press the MyQ Control Panel LEARN button twice, the red learn LED will turn on.
- Enter a 4-digit personal identification number (PIN) of your choice on the keyless entry keypad. Then press the ENTER button.
- The garage door opener lights will flash (or two clicks will be heard) when the code has been programmed.
text_image
as been programmed. Command LED (yellow) Learn LED (Red) LEARN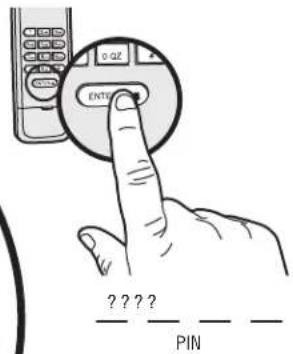
text_image
0-QZ ENTER ????? PINMyQ ENABLED ACCESSORIES
- Press the MyQ Control Panel LEARN button twice, the red learn LED will turn on.
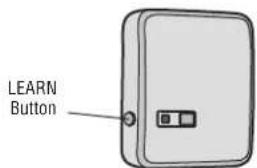
- Press the LEARN button on the MyQ device.*
text_image
LEARN Button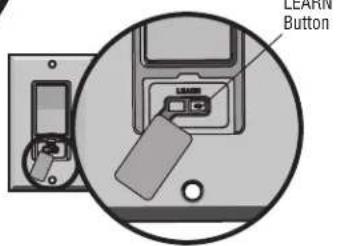
text_image
LEARN ButtonModel 823LM - Remote Light Switch
Light module can be synchronized with the garage door opener light bulbs.
Model 825LM - Remote Light Control
Light module can be synchronized with the garage door opener light bulbs.
* MyQ accessories may be programmed to the LiftMaster® Internet Gateway (Model 828LM) or the MyQ control panel. For instructions on programming to the internet gateway refer to the manual.
LIFTMASTER® INTERNET GATEWAY (NOT PROVIDED)
The LiftMaster Internet Gateway gives you control of your garage door from your internet connected computer or mobile device.
To program your MyQ Control Panel to the LiftMaster Internet Gateway:
- Download the MyQ App.
- Set up an account and connect.
- Select "Internet Gateway" and follow the instructions in the app.
IMPORTANT: When instructed to press the "Learn" Button this will be located on the MyQ Control Panel and the "Learn" button must be pressed 2 times.
For more information on connecting your garage door opener, visit LiftMaster.com/Customer-Support.
text_image
LEARN LEARN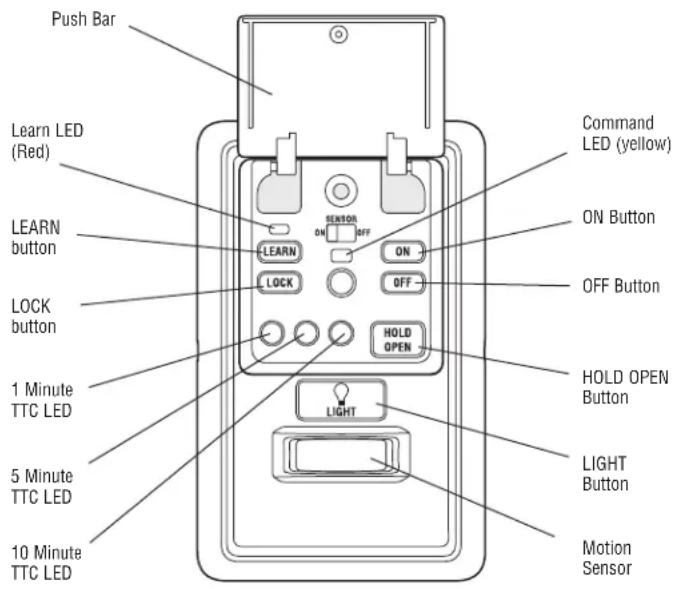
text_image
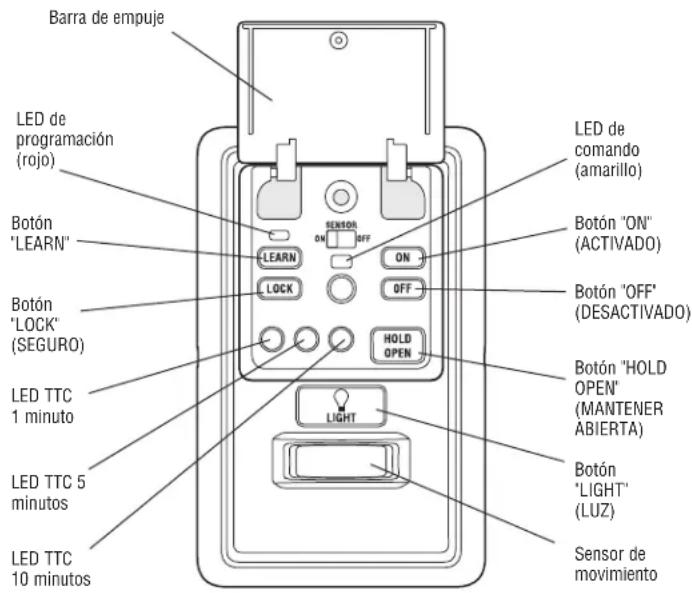
Push Bar Learn LED (Red) LEARN button LOCK button 1 Minute TTC LED 5 Minute TTC LED 10 Minute TTC LED SENATOR ON OFF ON OFF HOLD OPEN LIGHT COMMAND LED (yellow) ON Button OFF Button HOLD OPEN Button LIGHT Button Motion SensorPUSH BAR
Press the push bar to open or close the door.
LIGHTS
Press the LIGHT button to turn the garage door opener lights on or off. When the lights are turned on they will stay on until the LIGHT button is pressed again, or until the garage door opener is activated. Once the garage door opener is activated the lights will turn off after the specified period of time (the factory setting is 4-1/2 minutes). The LIGHT button will not control the lights when the door is in motion. To change the amount of time the garage door opener lights will stay on: Press and hold the LOCK button until the garage door opener lights flash.* The time interval is indicated by the number of flashes.
| NUMBER OF TIMES GARAGE DOOR OPENER LIGHTS FLASH | TIME THE GARAGE DOOR OPENER LIGHT STAYS ON |
| 1 1 12 | Minutes |
| 2 2 12 | Minutes |
| 3 3 12 | Minutes |
| 4 4 12 | Minutes |
To cycle through the time intervals repeat the step above.
* Approximately 10 seconds
MOTION SENSOR
This feature will automatically turn on the garage door opener lights when motion is sensed. The lights will come on for the set period of time, then shut off.
Activate/Deactivate:
Slide the motion sensor switch ON or OFF.
TIMER-TO-CLOSE (TTC)
NOTE: DO NOT install this door control on garage door opener systems controlling one-piece or swing doors.
The TTC feature automatically closes the door after a specified time period (1, 5, or
10 minutes). Once the TTC has been set and the door is open, the LED for the selected close interval will blink and begin to count down to close the door. The control panel will beep and the garage door opener lights will flash before closing the door.
The TTC feature will deactivate if the garage door encounters an obstruction twice; or the safety reversing sensors are incorrectly installed. The garage door will reverse open and WILL NOT close until the obstructions are clear or the safety reversing sensors are correctly installed. When the obstruction has been cleared or the safety reversing sensors have been aligned, the door will close when the garage door opener is activated.
Activate:
Press and hold the ON button until one of the TTC LEDs light up. Then press the ON button again to cycle through the time interval options (the corresponding TTC LED will light for each time interval). The garage door opener light bulbs will blink as confirmation.
Deactivate:
Press and hold the OFF button until all TTC LEDs turn off and a beep is heard from the control panel.
Temporarily hold door open (suspend TTC):
Press and release the HOLD OPEN button. The HOLD OPEN button will begin to flash. Press the HOLD OPEN button again to resume normal TTC operation.
LOCK
Your remote controls will NOT work when LOCK mode is active, however your keyless entry will still allow access to your garage.
Activate\*:
Press and hold the LOCK button for 2 seconds. The command LED will flash as long as the lock feature is activated and your handheld remote control will not operate your door at this time.
Deactivate:
Press and hold the LOCK button again for 2 seconds. The command LED will stop flashing and normal operation will resume.
* Your LiftMaster® keypad will continue to work when the LOCK has been activated.
ERASE DEVICES FROM MEMORY
Erase all remote controls and keyless entries:
- Press and hold the LEARN button on the control panel until the red learn LED goes out (approximately 6 seconds). All remote control and keyless entry codes are now erased. Reprogram any compatible accessory you wish to use.
NOTE: Erasing remote controls and keyless entries from the control panel does not erase them from the garage door opener, you need to erase the memory of the garage door opener separately.
Erase all devices (including MyQ enabled accessories):
- Press and hold the LEARN button on the control panel until the red learn LED goes out (approximately 6 seconds).
- Immediately press and hold the LEARN button again until the red learn LED goes out. All codes are now erased. Reprogram any compatible accessory you wish to use.
TROUBLESHOOTING
- If the yellow command LED does not turn on, reverse the wires connected to the R and W terminals of the control panel. Replace wire if necessary.
- If yellow and red LEDs are blinking slowly, the control panel is not compatible with your garage door opener.
- If the yellow and red LEDs are blinking quickly, the control panel is charging, and may take up to 5 minutes to become operational.
WARRANTY
FIVE YEAR LIMITED WARRANTY
LiftMaster warrants to the first consumer purchaser of this product that is free from defect in materials and/or workmanship for a period of 5 years from the date of purchase.
FOR SERVICE DIAL OUR TOLL FREE NUMBER:
1-800-528-9131
LiftMaster.com
NOTICE: This device complies with Part 15 of the FCC rules and Industry Canada's license-exempt RSSs. Operation is subject to the following two conditions: (1) this device may not cause harmful interference, and (2) this device must accept any interference received, including interference that may cause undesired operation.
Any changes or modifications not expressly approved by the party responsible for compliance could void the user's authority to operate the equipment.
This device must be installed to ensure a minimum 20 cm (8 in.) distance is maintained between users/bystanders and device.
This device has been tested and found to comply with the limits for a Class B digital device, pursuant to part 15 of the FCC rules and Industry Canada ICES standard. These limits are designed to provide reasonable protection against harmful interference in a residential installation. This equipment generates, uses and can radiate radio frequency energy and, if not installed and used in accordance with the instructions, may cause harmful interference to radio communications. However, there is no guarantee that interference will not occur in a particular installation. If this equipment does cause harmful interference to radio or television reception, which can be determined by turning the equipment off and on, the user is encouraged to try to correct the interference by one or more of the following measures:
- Reorient or relocate the receiving antenna.
- Increase the separation between the equipment and receiver.
- Connect the equipment into an outlet on a circuit different from that to which the receiver is connected.
- Consult the dealer or an experienced radio/TV technician for help.
LiftMaster®
PANNEAU DE COMMANDE MyQ®
MODÈLE 889LM
APPLICATION
text_image
Illustration of a hand holding a device with Chinese text labels and arrows indicating motion or actionnatural_image
Diagram showing a device with a labeled tag and a magnified view of its internal components (no text or symbols present)text_image
LEARN LEARN
Activer/Désactiver :
text_image
LEARN LEARN