
Resound VX8.1 - Loudspeaker SAMSON - Free user manual and instructions
Find the device manual for free Resound VX8.1 SAMSON in PDF.
| Product type | Active portable column system |
| Brand | Samson |
| Model | Resound VX8.1 |
| Category | Amplified loudspeaker |
| Subwoofer dimensions (W x D x H) | 385 x 473 x 500 mm |
| Column array dimensions (W x D x H) | 98 x 484 x 111 mm (each module) |
| Spacer dimensions (W x D x H) | 98 x 450 x 111 mm |
| Total system weight | 30.4 kg (67 lb) |
| Power supply | 100-240 V AC, 50/60 Hz, 700 W |
| Amplifier power | 700 W RMS (2 x 350 W) |
| Woofer | 1 x 12 inches |
| Mid/high drivers | 8 x 3.5 inches (with 1 inch voice coil) |
| Frequency response | 60 Hz - 20 kHz (-3 dB) |
| Maximum SPL | 125 dB @ 1 W/1 m |
| Horizontal dispersion | 120° (center) / 200° (rotated) |
| Bluetooth connectivity | Version 4.0, A2DP, range 30 m |
| Audio inputs | 2 x combo XLR/1/4" (Mic/Line/Inst), 1 x stereo RCA |
| Audio output | 1 x XLR Thru (preamp output) |
| DSP modes | Music, Live, Speech, DJ |
| Column array adjustment | Center / Rotate |
| Cabinet construction | Plywood with textured black paint |
| Protective grille | Perforated steel with foam backing |
| Maintenance and cleaning | Clean with a dry cloth only; do not expose to water |
| Safety | Do not open; no user-serviceable parts; unplug during storms |
| Spare parts and repairability | Contact an approved technical service center; do not disassemble |
| General information | FCC and CE compliant; warranty included (see manual) |
Frequently Asked Questions - Resound VX8.1 SAMSON
User questions about Resound VX8.1 SAMSON
0 question about this device. Answer the ones you know or ask your own.
Ask a new question about this device
Download the instructions for your Loudspeaker in PDF format for free! Find your manual Resound VX8.1 - SAMSON and take your electronic device back in hand. On this page are published all the documents necessary for the use of your device. Resound VX8.1 by SAMSON.
USER MANUAL Resound VX8.1 SAMSON
PORTABLE COLUMN ARRAY SYSTEM
natural_image
Black electronic speaker tower with vertical microphone and base unit (no visible text or symbols)Owner's Manual
SAMSON®
Important Safety Information

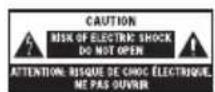
ATTENTION RISQUE DE CHOC ÉLECTRONIQUE - NE PAS OUVRIR
This lightning flash with arrowhead symbol within an equilateral triangle is intended to alert the user to the presence of non-insulated “dangerous voltage” within the product’s enclosure that may be of sufficient magnitude to constitute a risk of electric shock.

The exclamation point within an equilateral triangle is intended to alert the user to the presence of important operating and maintenance instructions in the literature accompanying the appliance.
CAUTION
To prevent electric shock hazard, do not connect to mains power supply while grille is removed.
WARNING: TO REDUCE THE RISK OF ELECTRIC SHOCK, DO NOT REMOVE COVER (OR BACK) AS THERE ARE NO USER-SERVICEABLE PARTS INSIDE. REFER SERVICING TO QUALIFIED SERVICE PERSONNEL.
If you want to dispose this product, do not mix it with general household waste. There is a separate collection system for used electronic products in accordance with legislation that requires proper treatment, recovery and recycling.
Private household in the 28 member states of the EU, in Switzerland and Norway may return their used electronic products free of charge to designated collection
facilities or to a retailer (if you purchase a similar new one).
For Countries not mentioned above, please contact your local authorities for a correct method of disposal.
By doing so you will ensure that your disposed product undergoes the necessary treatment, recovery and recycling and thus prevent potential negative effects on the environment and human health.
Copyright 2019, v4.1
Samson Technologies Corp.
278-B Duffy Ave
Hicksville, New York 11801
Phone: 1-800-3-SAMSON (1-800-372-6766)
Fax: 631-784-2201
www.samsontech.com
The Bluetooth ^® word mark and logos are registered trademarks owned by Bluetooth SIG, Inc. and any use of such marks by Samson Technologies is under license. Other trademarks and trade names are those of their respective owners."
Resound VX8.1 • Portable Column Array System 3
Important Safety Information
- Read these instructions.
- Keep these instructions.
- Heed all warnings.
- Follow all instructions.
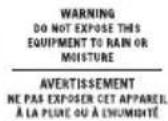
- Do not use this apparatus near water.
-
Clean only with dry cloth.
-
Do not block any ventilation openings. Install in accordance with the manufacturer's instructions.
-
Do not install near any heat sources such as radiators, heat registers, stoves, or other apparatus (including amplifiers) that produce heat.
-
Do not defeat the safety purpose of the polarized or grounding type plug. A polarized plug has two blades with one wider than the other. A grounding type plug has two blades and a third grounding prong. The wide blade or the third prong are provided for your safety. If the provided plug does not fit into your outlet, consult an electrician for replacement of the obsolete outlet.
-
Protect the power cord from being walked on or pinched particularly at the plugs, convenience receptacles, and at the point where they exit from the apparatus.
-
Only use attachments/accessories specified by the manufacturer.
-
Use only with the cart, stand, tripod, bracket, or table specified by the manufacturer, or sold with the apparatus. When a cart is used, use caution when moving the cart/apparatus combination to avoid injury from tip-over.

-
Unplug the apparatus during lightening, sort or when unused for long periods of time.
-
Refer all servicing to qualified personnel. Service is required when the apparatus has been damaged in any way, such as power supply cord or plug is damaged, liquid has been spilled or objects have fallen into the apparatus has been exposed to rain or moisture, does not operate normally, or has been dropped.
-
This appliance shall not be exposed to dripping or splashing water and that no object filled with liquid such as vases shall be placed on the apparatus.
-
Caution-to prevent electrical shock, match wide blade plug wide slot fully insert.
-
Please keep a good ventilation environment around the entire unit.
-
POWER ON/OFF SWITCH: For products with a power switch, the power switch DOES NOT break the connection from the mains.
-
MAINS DISCONNECT: The plug should remain readily operable. For rack-mount or installation where plug is not accessible, an all-pole mains switch with a contact separation of at least 3mm in each pole shall be incorporated into the electrical installation of the rack or building.
-
Warning: The apparatus shall be connected to a MAINS socket outlet with a protective earthing connection.
Important Safety Information
FCC Notice
- This device complies with Part 15 of the FCC Rules. Operation is subject to the following two conditions:
(1) This device may not cause harmful interference.
(2) This device must accept any interference received, including interference that may cause undesired operation.
- Changes or modifications not expressly approved by the party responsible for compliance could void the user's authority to operate the equipment.
FCC Statement
This equipment has been tested and found to comply with the limits for a Class B digital device, pursuant to Part 15 of the FCC Rules. These limits are designed to provide reasonable protection against harmful interference in a residential installation.
This equipment generates uses and can radiate radio frequency energy and, if not installed and used in accordance with the instructions, may cause harmful interference to radio communications. However, there is no guarantee that interference will not occur in a particular installation. If this equipment does cause harmful interference to radio or television reception, which can be determined by turning the equipment off and on, the user is encouraged to try to correct the interference by one or more of the following measures:
- Reorient or relocate the receiving antenna.
- Increase the separation between the equipment and receiver.
- Connect the equipment into an outlet on a circuit different from that to which the receiver is connected.
- Consult the dealer or an experienced radio/TV technician for help.
FCC Radiation Exposure Statement
This equipment complies with FCC RF radiation exposure limits set forth for an uncontrolled environment.
RF Warning Statement
This equipment complies with FCC's RF radiation exposure limits set forth for an uncontrolled environment. End user must follow the specific operating instructions for satisfying RF exposure compliance. This transmitter must not be co-located or operating in conjunction with any other antenna or transmitter.
Hereby, Samson Technologies Corp., declares that this Resound VX8.1 is in compliance with the essential requirements and other relevant provisions of Directive 2014/53/EU. The declaration of conformity may be consulted at:
http://www.samsontech.com/site_media/support/manuals/VX8.1_DOC.pdf
Introduction
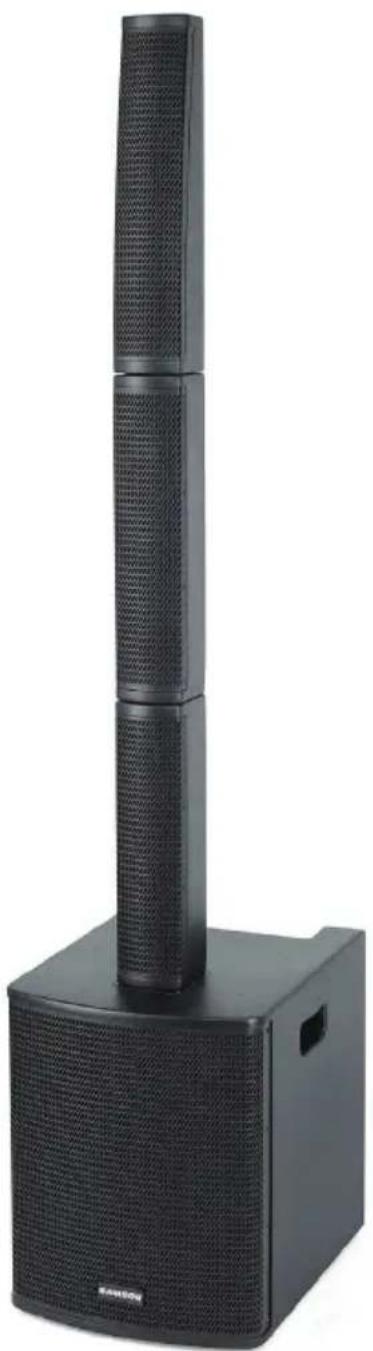
Congratulations on purchasing the Resound VX8.1 Portable Column Array System from Samson! The Resound VX8.1 is an all-in-one system featuring a12" subwoofer and eight 3.5" drivers arranged in a vertical speaker array. Installation and setup are extremely easy with the three column array pieces locking together and fitting into the subwoofer. The onboard 3-channel mixer allows the Resound VX8.1 to be used a stand alone PA, or it can be connected to a mixer an used as part of a sound reinforcement system.
The vertical array can be arranged in-line for 120° of horizontal coverage, or rotated 45° left and right for an ultra-wide 200° of coverage. The mixer has inputs for microphones, instruments and line level devices. The Resound VX8.1 also includes wireless Bluetooth® connectivity, to stream audio from your smart phone, tablet, or computer. With 700 watts of continuous power (350 watts for the subwoofer and 350 watts for the vertical array) and four DSP settings for different sound applications, the Resound VX8.1 is a perfect solution where high-quality sound reinforcement is needed.
In these pages, you'll find a detailed description of the features of the Resound VX8.1, step-by-step instructions for its setup and use, and full specifications. If your Resound VX8.1 was purchased in the United States, you'll also find a warranty card enclosed—don't forget to follow the instructions so that you can receive technical support and so that we can send you updated information about this and other Samson products in the future. Also, be sure to check out our website (www.samsontech.com) for complete information about our full product line.
We recommend you keep the following records for reference, as well as a copy of your sales receipt.
Serial number: ____
Date of purchase: ____
If you have any questions or comments regarding the Resound VX8.1 Portable Column Array System or any other products from Samson, do not hesitate to contact us at support@samsontech.com.
With proper care and maintenance, your Resound VX8.1 Portable Column Array System will operate trouble-free for many years. Should your Resound VX8.1 Portable Column Array System ever require servicing, a Return Authorization (RA) number must be obtained before shipping your unit to Samson. Without this number, the unit will not be accepted. Please visit www.samsontech.com/ra for an RA number prior to shipping your unit. Please retain the original packing materials and, if possible, return the unit in its original carton. If your Resound VX8.1 Portable Column Array System was purchased outside of the United States, contact your local distributor.
Getting Started
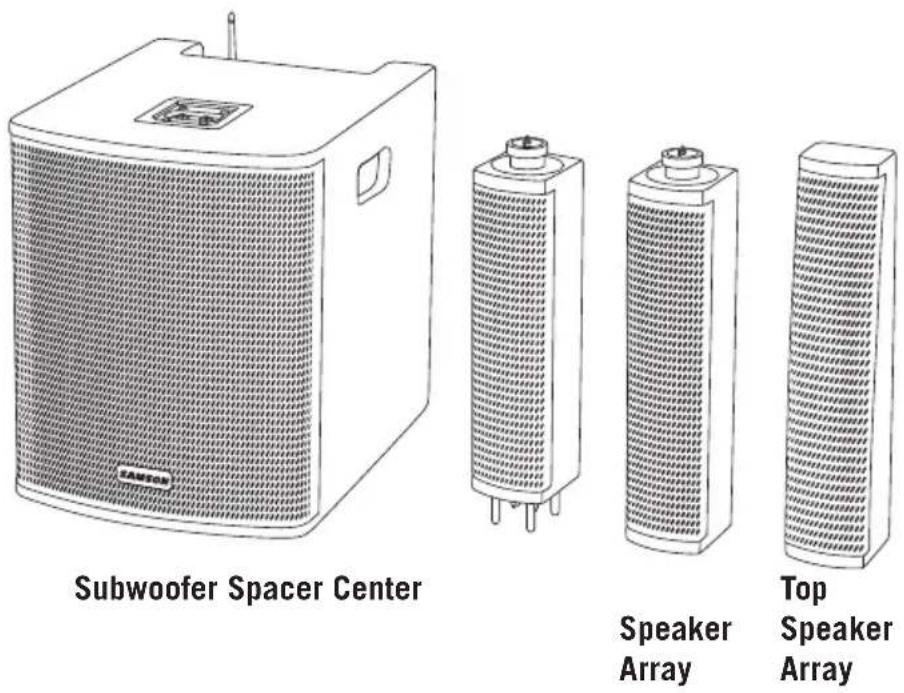
The Resound VX8.1 is made up of four sections: 12" subwoofer with built-in amplifier, spacer, center speaker array with four 3.5" drivers and the top speaker array with four 3.5" drivers. Follow the steps below to put the system together.
- Place the Resound VX8.1 subwoofer on a flat, steady surface.
- Insert the spacer section into the subwoofer, by aligning the four pins on the spacer with the four holes on the subwoofer.
- Slide the center speaker array into the top of the space until it snaps in place.
- Slide the top speaker array into the top of the center speaker array until it snaps in place.

flowchart
graph TD
    A["4"] --> B["3"]
    B --> C["2"]
    C --> D["1"]
    style A fill:#f9f,stroke:#333
    style B fill:#ccf,stroke:#333
    style C fill:#cfc,stroke:#333
    style D fill:#fcc,stroke:#333
Getting Started
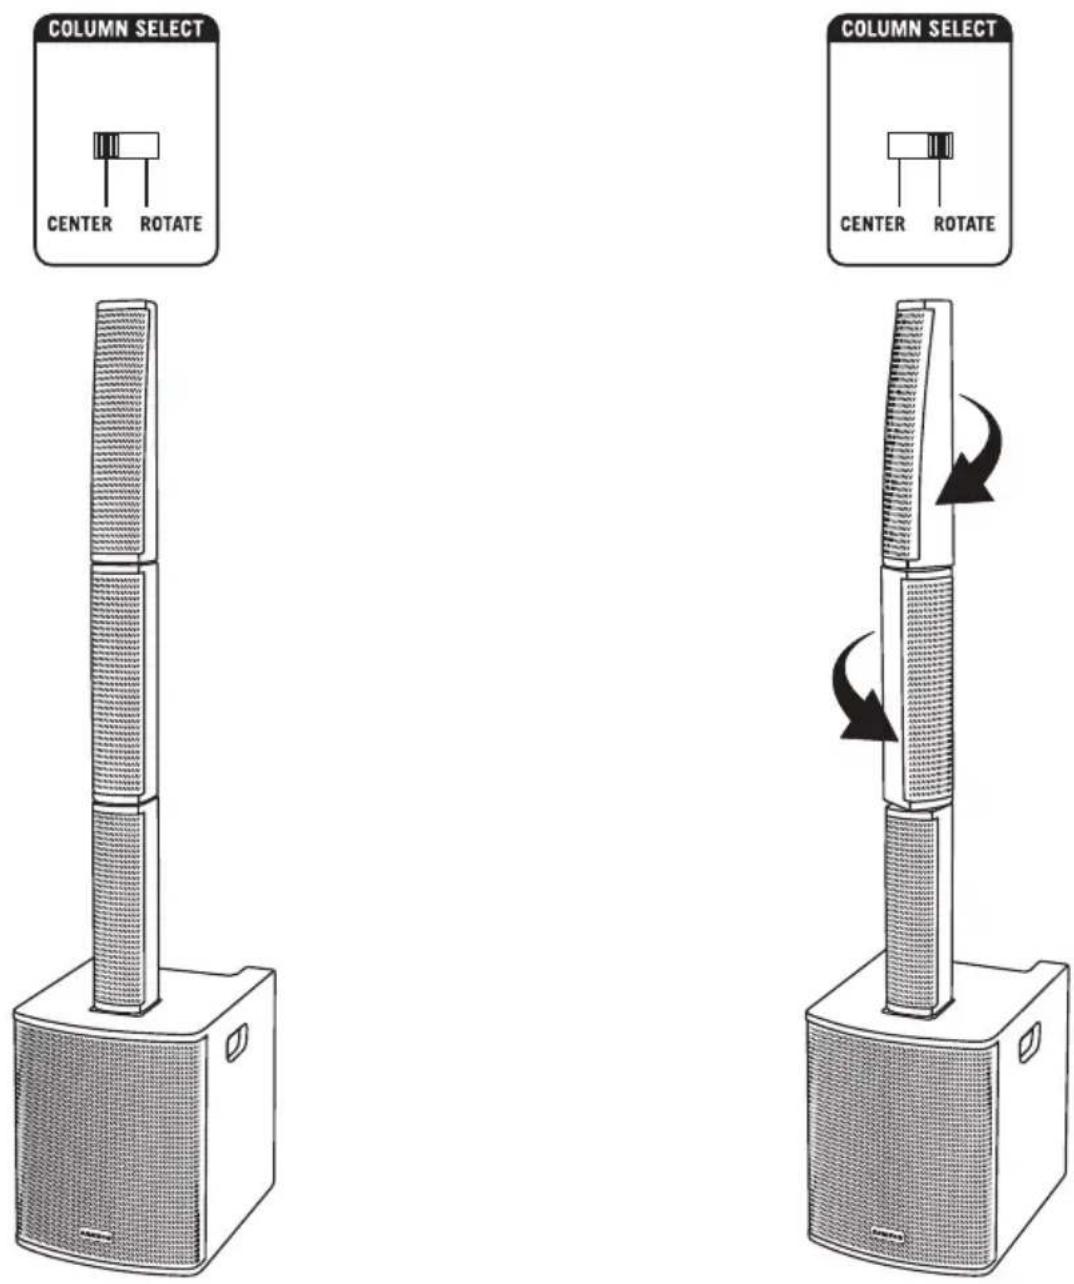
The Resound VX8.1 provides a horizontal coverage of 120^ . The unique array design allows the two speaker arrays to be rotated 45^ in opposite directions providing an exceptionally wide coverage area of 200^ .
The onboard DSP has two Column Select settings. When the speaker arrays are centered, set the COLUMN SELECT switch to the Center position. When the two arrays are rotated 45°, set the switch to the Rotate position. This will ensure the tonal response of the speaker array remains consistent in either position.
Quick Start
- Set the Resound VX8.1 power switch to the OFF position, and fully turn all of the LEVEL controls counterclockwise to 0.
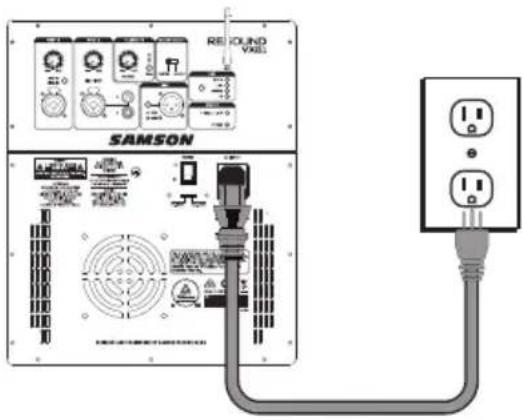
- If an outlet is available, connect the included power cord to the AC input of the speaker, and plug it into an electrical outlet.
- Set the Resound VX8.1 power switch to the ON position.
- Connect your audio sources.
- Turn the MASTER VOLUME control up and set the input levels, following the steps below.
Making Connections
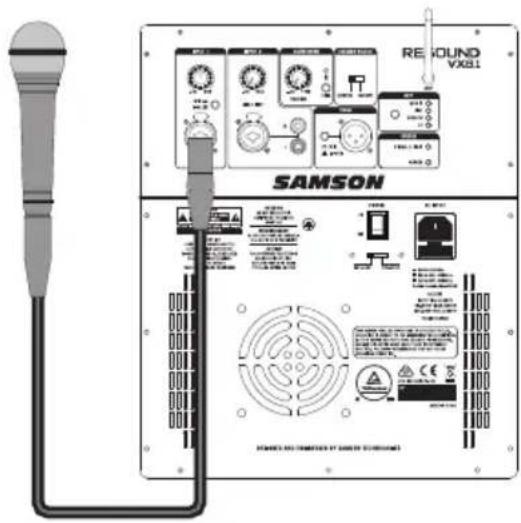
INPUT 1 (Microphone / Line Input)
- Connect a microphone using a standard XLR cable or line level equipment using a 1/4" instrument cable.
- If connecting a microphone, set the MIC / LINE switch to the down (MIC) position. If connecting a line level device, set the LINE / MIC switch to the up (LINE) position.
- While speaking into the microphone or playing music from a line level audio source, slowly raise the channel INPUT 1 Volume control until you have reached the desired level.
NOTE: If not using the Channel 1 input, turn the VOLUME control all the way down to keep out any unwanted noise.
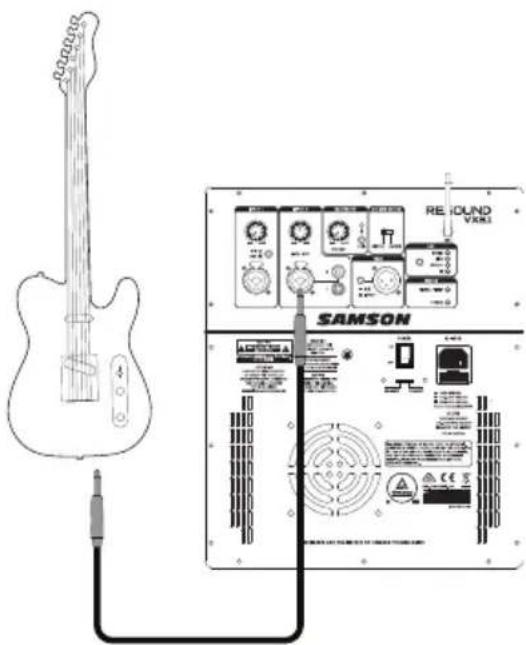
INPUT 2
Connecting an electric guitar
- Connect an electric guitar using a standard 1/4" instrument cable.
- Push the LINE/INST switch to the INST (down) position.
- While playing the guitar, slowly raise the channel INPUT 2 Volume control until you have reached the desired level.
Note: If connecting an electric guitar it is recommended to use a preamp between the instrument and Resound VX8.1 to replicate the sound of a guitar amplifier.
Quick Start
Bluetooth®
-
Turn the BLUETOOTH Volume control down counterclockwise to 0.
-
Rotate the Bluetooth antenna so that it is in the vertical position.
-
With the Resound VX8.1 and your Bluetooth device powered on; press the PAIR button on the rear panel of the Resound VX8.1 to make the speaker discoverable. The Bluetooth indicator will slowly flash blue.
-
In the settings of your Bluetooth device, set it to "discover" available devices.
-
From the Bluetooth device list, select the "SAMSON BLUETOOTH" device.
-
If your device asks for a passkey, enter digits 0000 (four zeros) and press OK. Some devices may also ask you to accept the connection.
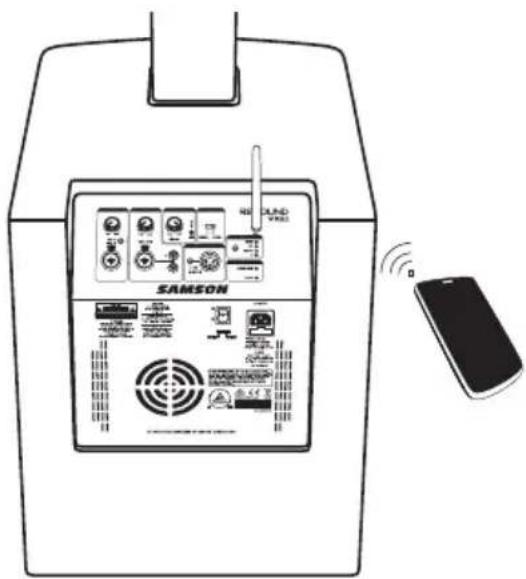
-
The Resound VX8.1 speaker indicates that pairing is complete when the indicator turns steady blue. You can now stream audio from your device to the Resound VX8.1 speakers.
-
With the volume control on your Bluetooth device turned up, play some music, and slowly raise the Resound VX8.1 BLUETOOTH VOLUME control until you have reached the desired level.
Resound VX8.1 Controls and Connections
SAMSON
ATTENTION
POUR NE PAS COMPROMETTRE
LA PROTECTION CONTRE LES
RISQUES D'INCENDIE, REMPLACER
PAR UN FUSIBLE DE MÊME
TYPE ET DE MÊMES
CARACTERISTIQUES NOMINALES

CAUTION
FOR CONTINUED PROTECTION
AGAINST RISK OF FIRE,
REPLACE ONLY WITH SAME
TYPE AND RATING OF FUSE


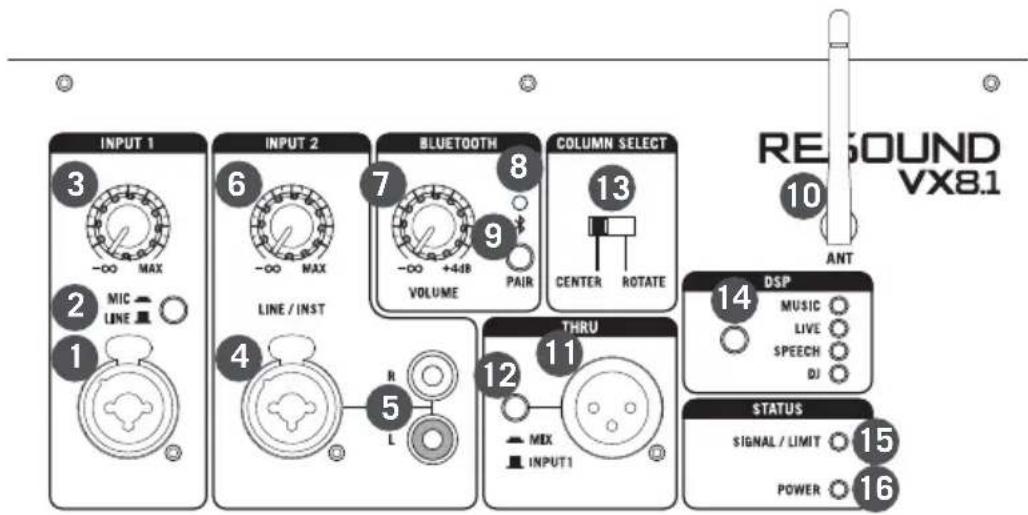
- INPUT 1 - XLR - 1/4" combo input for connecting a microphone or a device with a line level signal.
- LINE / MIC Switch - Adjusts the gain of the CH1 input for a microphone or line level device.
- INPUT 1 Volume - Controls the level of the INPUT 1 Mic/Line input.
- INPUT 2 - XLR - 1/4" combo input for connecting a instrument or device with a line level signal.
- INPUT 2 Stereo Input - Stereo RCA input connectors for connecting the output of devices such as MP3, mobile device, or any other line level device.
- INPUT 2 Volume - Controls the level of the INPUT 2 inputs.
- BLUETOOTH ® VOLUME - Controls the level of the Bluetooth input.
- Pairing Indicator - Displays the Bluetooth status of the XP208w system.
- PAIR Button - Press this button to enable pairing mode in order to connect to a Bluetooth audio device.
- Bluetooth Antenna - This antenna receives signal from a paired device and should be placed in a vertical position when using the Bluetooth. The Bluetooth receiver has a range of approximately 100' (30m).
Resound VX8.1 Controls and Connections
- LINE OUT - Line level XLR output jack to connect to the input of a another Resound VX8.1 to expand your sound system.
NOTE: When connecting another powered speaker system to the THRU Output of the Resound VX8.1, it is important to power on the main Resound VX8.1 system first, then power on the linked speaker. When powering down the system, it is recommended to turn off all linked speakers, then power off the main Resound VX8.1 system. - MIX / INPUT 1 Switch - This switch is used to select the signal that is sent to the THRU Output. When the switch is in the MIX position, the signal at the THRU Output is a mix of both the Input 1 and Input 2 signals. When the switch is in the INPUT 1 position the THRU Output carries only the Input 1 signal.
- COLUMN SELECT Switch - This switch selects the frequency response that is appropriate for the speaker array based on the position of the speakers. When the speakers are all in-line, use the CENTER setting. When the speaker arrays are rotated 45^ in opposite directions, use the ROTATE setting.
- DSP - The Resound VX8.1 has four preset EQ contour curves: MUSIC, LIVE, SPEECH and DJ.
- SIGNAL / LIMIT Indicator - This two color indicator lights green when signal is present at the inputs and red when the internal amplifier is near the clipping point and the limiter is engaged. If the indicator lights red frequently, turn down the Input Volume controls on the Resound VX8.1 or turn down the signal at the source, until the indicator does not light anymore, or lights only occasionally with high signal peaks.
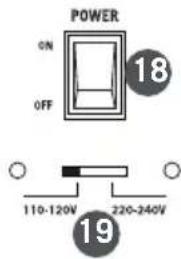
- POWER Indicator - This indicator lights green indicating the Resound VX8.1 is On and receiving power.
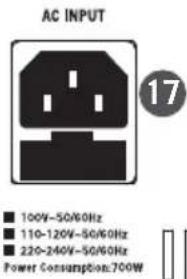
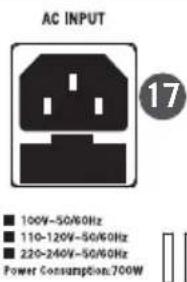
- AC Inlet - Connect the supplied 3-pin IEC power cable here.
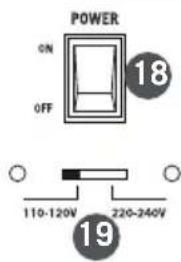
- POWER Switch – Use the POWER switch to turn power to the Resound VX8.1 on or off.
- AC Voltage selection switch - This switch is used to set the operation voltage. Be sure to check that the switch is set correctly for your country.
Using Two Resound VX8.1 Systems
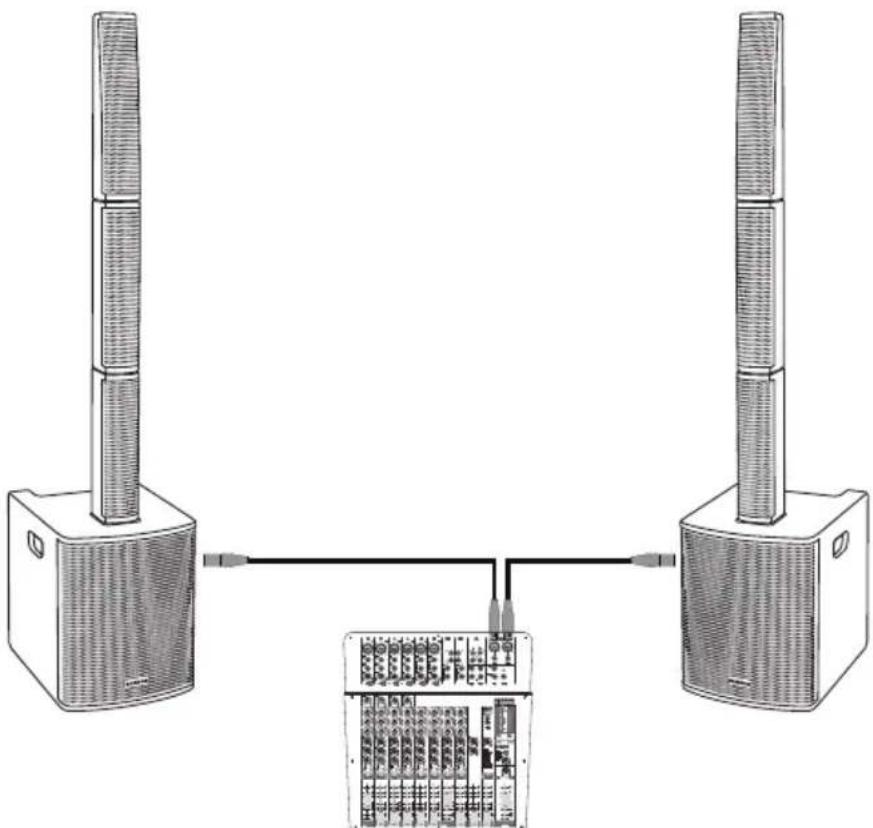
For larger sound reinforcement applications using a pair of Resound VX8.1 systems, there are two methods of connecting the systems.
Connect two Resound VX8.1 systems to a mixer
- Turn the Resound VX8.1 system's and mixer Power switch to the OFF positions.
- Turn the VOLUME controls on the rear panel of the Resound VX8.1 down, fully counterclockwise.
- Following the manufacturer's instruction, connect the audio sources to your mixer.
- Connect either a XLR or 1/4" cable from the output of your mixer to the INPUT 1 jack on the Resound VX8.1 rear panel. Set the MIC / LINE switch to the LINE position.
- Connect the supplied power cables to the IEC sockets on the back of the Resound VX8.1 systems. Plug the power cables into an AC outlet.
Note: Always make sure that the AC outlet is configured with the correct voltage as indicated on the rear panel of the Resound VX8.1. - Switch the Resound VX8.1 POWER switches to the ON position.
- Run an audio signal from your mixer and check that you are getting a good level using the mixers output meter.
- Slowly raise the Resound VX8.1 INPUT 1 Volume controls until you have reached the desired level.
- If the volume from the speakers gets really loud, or you see the LIMIT indicator blinking frequently, turn down the Volume control on the Resound VX8.1 a little until the Peak indicator does not light, or only lights occasionally with signal peaks.
Note: Before plugging in and turning on, remember the “last on, first off” rule of powered audio gear - When powering up your system, be sure that all the wires are connected, first turn on your mixer and any other outboard gear, then turn on your Resound VX8.1. When powering down, turn off your Resound VX8.1 off first and then your mixer and outboard gear.
natural_image
Diagram of two speakers connected to a rack-mounted device, showing ventilation and wiring connections (no text or labels)Resound VX8.1 • Portable Column Array System 13
Using Two Resound VX8.1 Systems
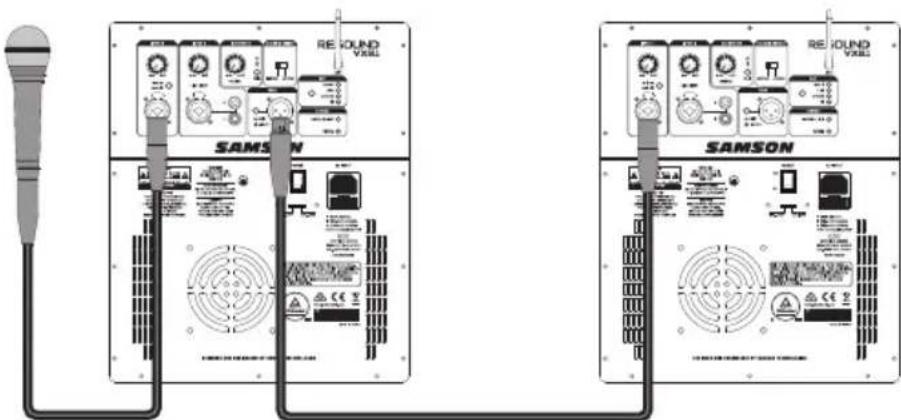
Daisy-chaining two Resound VX8.1 systems
This method is convenient when you don't have a mixer or have minimal input sources.
- Connect the all of the input sources to the main Resound VX8.1 system.
- Set the MIX / INPUT 1 switch to the down MIX position.
- Connect an XLR cable from the THRU output on the main Resound VX8.1 to the INPUT 1 of the second Resound VX8.1 system.
-
On the second Resound VX8.1, set the INPUT 1 MIC / LINE switch to the LINE position.
-
Set the level of the audio of the main Resound VX8.1 system.
-
Raise the INPUT 1 Volume control of the second Resound VX8.1 until the desired output level is reached.
NOTE: When connecting another powered speaker system to the THRU Output of the Resound VX8.1, it is important to power on the main Resound VX8.1 system first, then power on the linked speaker. When powering down the system, it is recommended to turn off all linked speakers, then power off the main Resound VX8.1 system.
Specifications
| Amplifier | |
| System Power | 700 W (2 x 350 W) continuous1400 W (2 x 700 W) program |
| Frequency Response 60Hz - 20kHz (-3dB) | |
| Max SPL 125 dB @ 1W/1m | |
| Power Consumption AC Input 100V/110-120V/220-240V 50/60Hz 700W | |
| Speakers | |
| High Frequency Drivers 8 x 3.5" drivers w/ 1" voice coil | |
| Array Left/Right Rotation 90° | |
| Horizontal Dispersion 120°-200° | |
| Low Frequency Driver 12" woofer | |
| Construction Plywood cabinet with textured black paint | |
| Grille Perforated steel grille with foam backing | |
| Mixer | |
| Input 1 | XLR - 1/4" combo (Mic/Line) |
| Input 2 | XLR - 1/4" combo (Line/Instrument), RCA |
| Outputs | XLR Thru |
| EQ DSP | Music, Live, Speech, DJ |
| Column Array DSP | Center, Rotate |
| Bluetooth® | Bluetooth 4.0 A2DP |
| Bluetooth Frequency | 2.402GHz ~ 2.480GHz |
| RF Power | <10mW |
| Status Indicators | Signal/Limit (2-color), Power, Bluetooth status |
| Dimensions and Weight | |
| Subwoofer Dimensions (LxWxH) | 15.16" x 18.62" x 19.69"385 mm x 473 mm x 500 mm |
| Speaker Array Dimensions(LxWxH) | 3.86" x 19.04" x 4.37"(Top array tapers to 2.5")98 mm x 484 mm x 111 mm(Top array tapers to 63.5 mm) |
| Spacer Dimensions (LxWxH) | 3.86" x 17.72" x 4.3798 mm x 450 mm x 111 mm |
| System Weight | 67 lb / 30.4 kg |
At Samson, we are continually improving our products, therefore specifications and images are subject to change without notice.
INPUT 2

CAUTION
FOR CONTINUED PROTECTION
AGAINST RISK OF FIRE,
REPLACE ONLY WITH SAME
TYPE AND RATING OF FUSE


natural_image
Diagram of two speakers connected to a device with an internal circuit board (no text or symbols visible)
CAUTION
FOR CONTINUED PROTECTION
AGAINST RISK OF FIRE,
REPLACE ONLY WITH SAME
TYPE AND RATING OF FUSE


natural_image
Diagram of two speakers connected to a rack-mounted device, showing ventilation and wiring connections (no text or labels)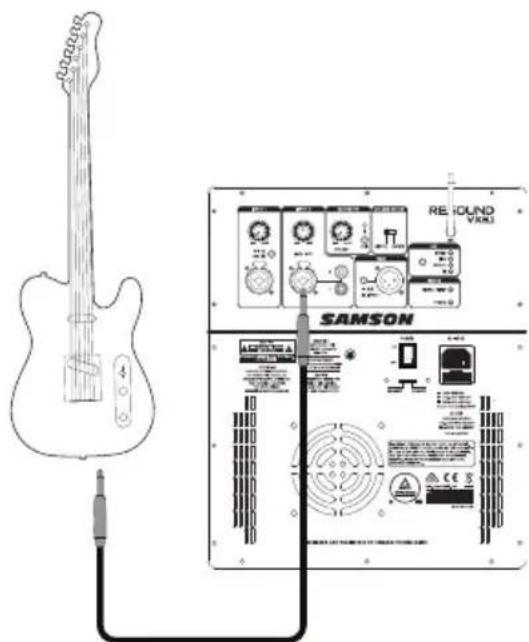
Inicio rápido
Bluetooth®
CAUTION
FOR CONTINUED PROTECTION
AGAINST RISK OF FIRE,
REPLACE ONLY WITH SAME
TYPE AND RATING OF FUSE

natural_image
Diagram of two speakers connected to a device with an internal grid layout (no text or symbols)Uso de dos sistemas Resound VX8.1

CAUTION
FOR CONTINUED PROTECTION
AGAINST RISK OF FIRE,
REPLACE ONLY WITH SAME
TYPE AND RATING OF FUSE


natural_image
Diagram of two speakers connected to a rack-mounted device, showing wiring and ports (no text or labels)Having Trouble with your Resound VX8.1? We can help!

CONTACT OUR SUPPORT TEAM: support@samsontech.com Our experts can help you resolve any issues.
Follow us:


@samson @samsontech @samson_technologies

- Important Safety Information
- CAUTION
- FCC Notice
- FCC Statement
- FCC Radiation Exposure Statement
- RF Warning Statement
- Introduction
- Getting Started
- Quick Start
- Making Connections
- INPUT 1 (Microphone / Line Input)
- INPUT 2
- Connecting an electric guitar
- Bluetooth®
- Resound VX8.1 Controls and Connections
- Using Two Resound VX8.1 Systems
- Connect two Resound VX8.1 systems to a mixer
- Daisy-chaining two Resound VX8.1 systems
- Inicio rápido
- Uso de dos sistemas Resound VX8.1
- Having Trouble with your Resound VX8.1? We can help!
Brand : SAMSON
Model : Resound VX8.1
Category : Loudspeaker