4902FL - Saucepan Flama - Free user manual and instructions
Find the device manual for free 4902FL Flama in PDF.
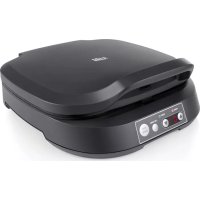
| Product type | Pancake and snack maker |
| Brand | Flama |
| Model | 4902FL |
| Dimensions (approx.) | 30 x 20 x 15 cm |
| Weight (approx.) | 2 kg |
| Power supply | 220-240 V ~ 50/60 Hz |
| Power (approx.) | 1000 W |
| Capacity | 8 pancakes per batch (4 cavities) |
| Plate material | PFOA-free non-stick coating |
| Main functions | Pancake and snack cooking, adjustable timer (30 s to 10 min), automatic preheating, Power and Ready indicators, audible alert |
| Temperature | Thermostatic regulation (not specified) |
| Safety | Cool-touch handle, non-slip feet, automatic shut-off at end of cooking, lockable lid |
| Care and cleaning | Clean with a damp cloth after cooling. Do not immerse. Occasionally grease the plates with vegetable oil. |
| Included accessories | No accessories mentioned |
| Repairability | Do not disassemble yourself. Contact a Flama authorized service center. |
| Warranty | 36 months (under conditions) |
| Usage | Domestic and indoor use only |
| Country of manufacture | Not specified |
Frequently Asked Questions - 4902FL Flama
User questions about 4902FL Flama
0 question about this device. Answer the ones you know or ask your own.
Ask a new question about this device
Download the instructions for your Saucepan in PDF format for free! Find your manual 4902FL - Flama and take your electronic device back in hand. On this page are published all the documents necessary for the use of your device. 4902FL by Flama.
USER MANUAL 4902FL Flama
natural_image
Black electric stove grater with open lid and two side dishes, no visible text or symbols4902FL
PT MÁQUINA DE PANQUECAS E SNACKS 3 ES MÁQUINA DE PANQUEQUES Y SNACKS 12 EN PANCAKE AND SNACK MACHINE 21 FR MACHINE À PANCAKES 29
MÁQUINA DE PANQUECAS E SNACKS
INSTRUÇÕES DE SEGURANÇA
natural_image
Symbol of a trash bin with crossed lines indicating no waste, and a solid black rectangle below (no text or labels)natural_image
Symbol of a trash bin with crossed x- and no text or numbers presentPlease read these instructions carefully before using the appliance for the first time and keep them for future reference. Any use not in accordance with the instructions releases FLAMA from all responsibility.
Check that the power supply voltage for the electrical installation in your home corresponds to that stated on the appliance's nameplate. This appliance must be connected to an earthed socket.
The appliance is not intended to be operated using an external timer or a separate remote control system.
This appliance is designed for domestic use only, and indoors.
This device is intended to be used in domestic and similar applications such as:
- Kitchen areas reserved for staff in stores, workshops and other professional environments
- Country houses
- By customers of hotels, motels and other residential environments
- Hotel room type environments
This appliance can be used by children 8 years of age and older and people with physical, sensory or mental disabilities or lack of experience and knowledge if they have received supervision or instruction in using the appliance in a safe manner and understand the risks involved. Children must not play with the appliance. The cleaning and maintenance of the appliance must not be carried out by children unless they are over 8 years old and are under supervision.
Keep the appliance and power cord out of reach of children under 8 years of age.
Warning - The temperature of accessible surfaces may be high when the appliance is in operation.
Disconnect the appliance from the power supply by removing the plug from the socket after each use and when cleaning.
Allow it to cool down before carrying out any cleaning or storage operation.
Before connecting the appliance, make sure you place it on a flat, stable and horizontal surface.
Do not use the appliance if the power cord or plug is damaged, have them replaced immediately by an authorized FLAMA Technical Assistance Service.
If the power cord is damaged, it must be replaced by the manufacturer, its after-sales service or similarly qualified personnel in order to avoid a hazard.
The appliance must never be used near flammable or combustible materials.
Never leave the device unattended.
Do not cover the appliance while it is in operation.
Do not disassemble the device.
The appliance must only be used for cooking food. Its use for other purposes may cause irreparable damage.
Never immerse the device in water or any other liquid.
WARNING: Charcoal or other combustibles must not be used with this appliance.
This product complies with the Electromagnetic Compatibility and Low Voltage Directives.
This instruction manual is also available in PDF format at www.flama.pt.
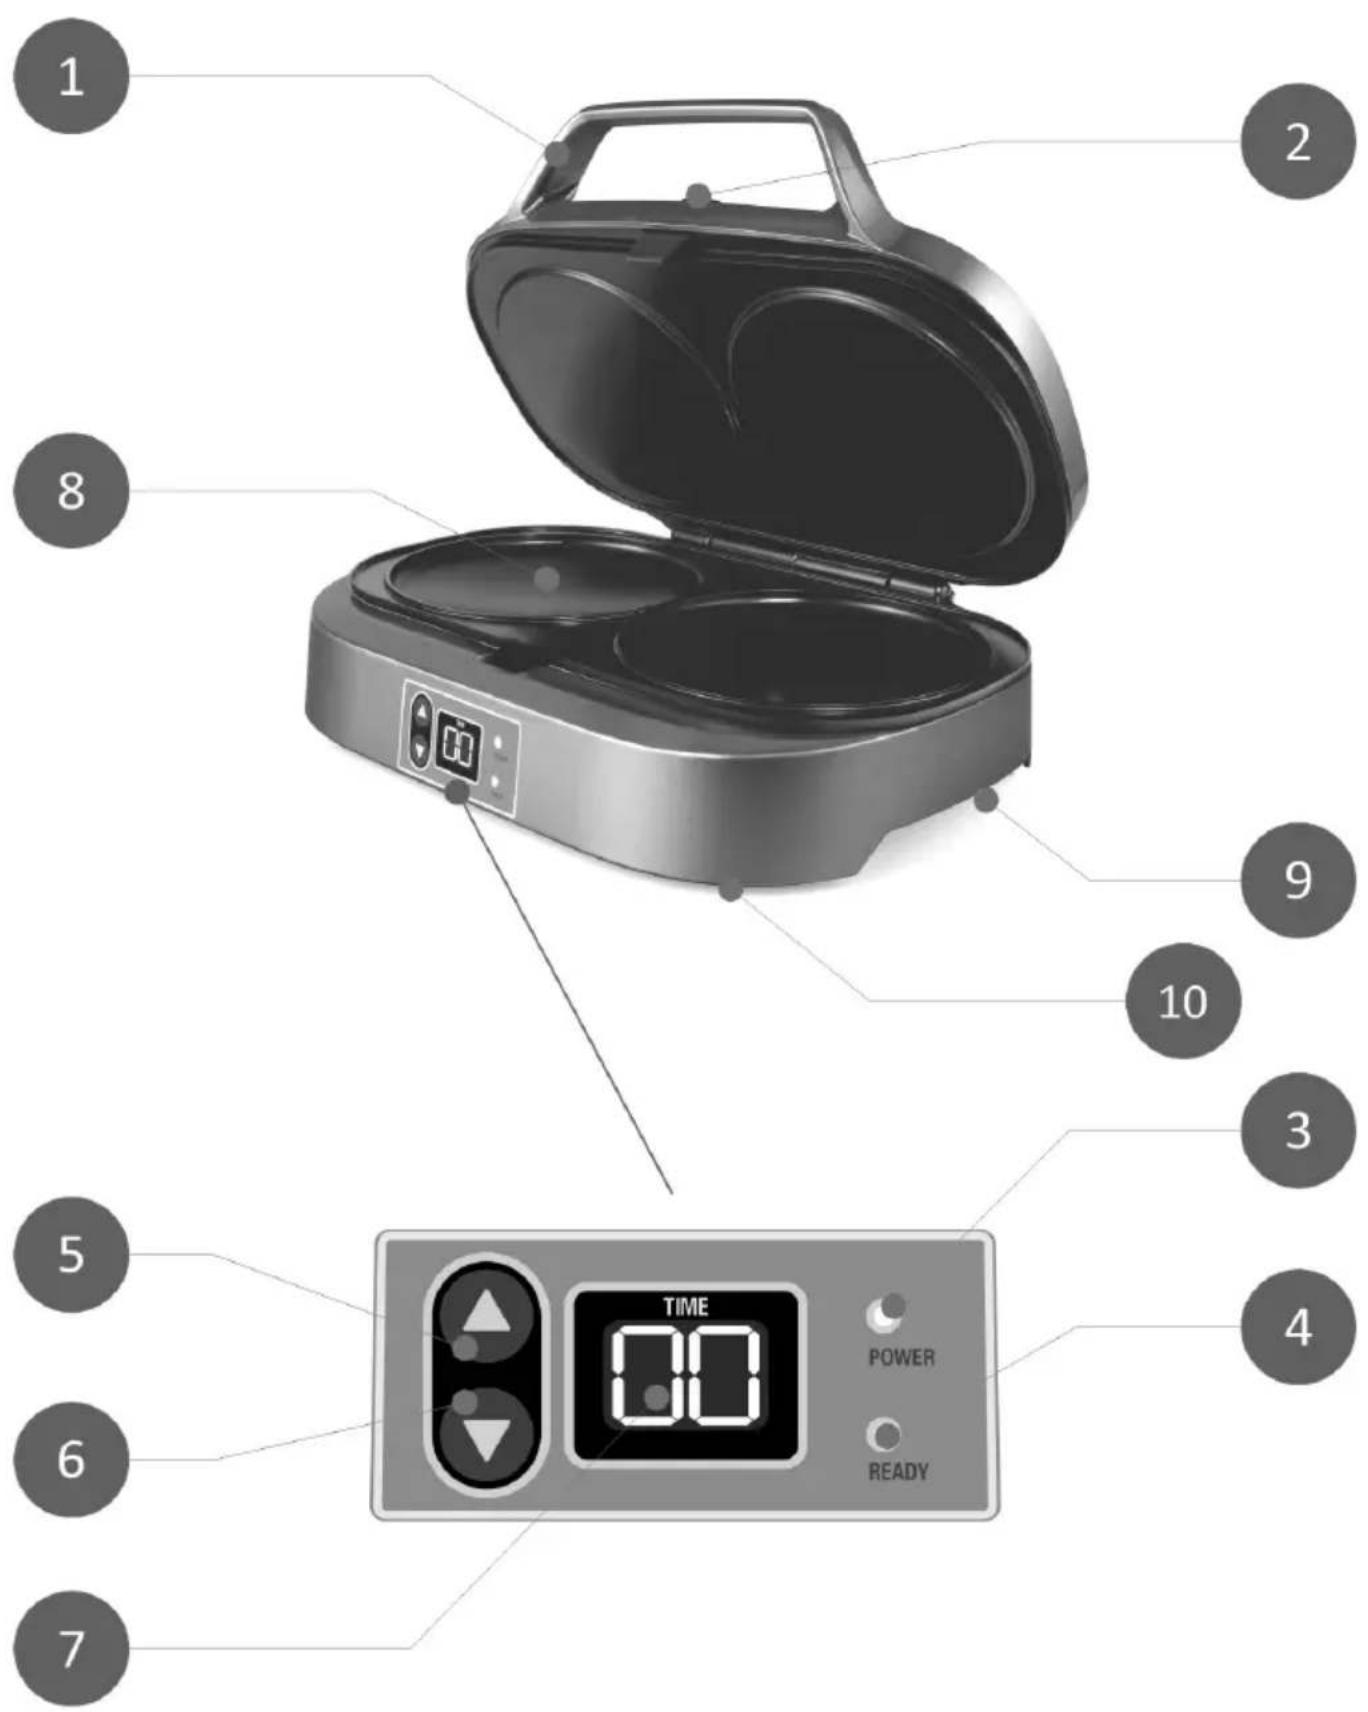
DESCRIPTION
- Anti-scalding handle
- Lid release button
- "Power" indicator light (means power is on)
- "Ready" indicator light (means ready for use)
- Increase time button
- Decrease time button
- LED control panel with countdown
- Slots for pancakes and snacks
- Integrated cable winder
10.Non-slip pads
OPERATION
Before first use
Safely remove and discard all promotional labels, clean the slots and the plates with a damp cloth, and dry them thoroughly.
Grease the plates before use according to the instructions in the “Care, Cleaning, and Storage” section of this manual.
Operating your appliance
- Insert the power cord into a socket. The appliance is ready for use.
- The "POWER" light will turn red, the control panel will show a rotating loop " " and the appliance will start preheating.
3.Once preheating is finished, the "POWER" light will remain on and the "READY" light will turn green. The machine will beep 3 times to alert you that preheating has finished and the information "00" will flash continuously on the panel. - Press the lid open button and open it using the handle. Open the lid and pour the
batter / ingredients evenly into the center of each slot. The total volume of batter / ingredients must not exceed the edge of the slot.
NOTE: Do not overfill the slots. 1/3 cup is the maximum recommended amount of batter to cook well.
-
Set the required cooking time using the increase and decrease timer buttons. Select a time between 30 seconds and 10 minutes. The timer setting is represented in half-minute increments such as 0.5, 1.0, 1.5, 2.0 minutes, etc.
-
Time will stop flashing to indicate that the timer is counting down.
NOTE: The “POWER” and “READY” lights will keep turning on and off to indicate that the machine is maintaining the correct temperature.
- The timer will count down in 0.5 minute intervals, displaying the remaining cooking time on the panel.
When reaching 1 minute, it will count down in seconds until the cooking time is over.
-
When the cooking time is over, the unit will beep 5 times and the LED panel will display the information "00". "NOTE: Never use metal utensils, as these can damage the non-stick coating.
-
Open the lid and carefully remove the pancakes or snacks with the help of a heat-resistant silicone spatula.
-
To cook another batch, close the lid and wait for the "READY" light to turn on. Then repeat steps 4 to 9, until you get the desired number of pancakes or snacks.
NOTE:
The lid must always remain closed and locked. When using the machine for the first time, you may notice a fine mist of steam/smoke. This is caused by some of the
components heating up. There is no need to worry.
Making simple pancakes takes about 2 minutes.
The exact cooking time will depend on the used filling. To keep the heat even, keep the lid closed until you are ready to add the next batch.
WARNINGS:
The temperature of the machine's exposed surfaces may be high when it is switched on.
Some steam will come out from between the baking plates when the lid is closed. Be careful not to come in contact with the steam, as it may cause burns.
CARE AND CLEANING
Before cleaning, make sure the appliance is turned off and remove the power cord from the socket.
Let the machine cool down before cleaning it. However, it is easier to clean when it is still slightly warm. Always clean your machine after each use to avoid accumulating food residue. Wipe the plates with a soft, damp cloth to remove food residue.
WARNING: Do not immerse any part of the pancake and snack machine or the power cord in water or any other liquid.
PFOA-free Non-stick Coating ^1
Cooking on a non-stick surface minimizes the need for oil, as food does not stick and cleaning becomes easier. Any discoloration that may occur will only affect the machine's appearance and will not impact the cooking performance. When cleaning the non-stick coating, do not use steel scouring pads (or other abrasive products). Wash with warm water and soap and dry thoroughly. Remove the toughest residues using a damp cloth.
Grease the plates
Grease the plates occasionally to prevent sticking and to make cleaning easier. To grease, brush the baking plates with some vegetable oil and remove the excess with absorbent paper. Do this procedure after preheating the unit.
Do not use spray on non-stick coatings, as it will affect the performance of the non-stick surface of the baking plates.
NOTE: The baking plates, hinges and slots are coated with a non-stick surface; do not use abrasive products on them.
STORAGE
To store your machine:
- Check that the appliance is turned off by removing the power cord from the socket.
- Let the appliance cool down completely and clean it according to the instructions. Close the lid.
- Wind the power cord into the storage area on the base.
- Store the machine on a flat, dry surface. Do not store anything on top of the baking plates. The machine can be stored upright to save space.
WARNING: The handle is designed to open and close the machine during cooking. It must not be used to move or transport it. When moving your pancake and snack machine, let it cool completely and transport it by holding the base.
ANOMALIES AND REPAIR
In case of malfunction, please take the appliance to an authorized Technical Assistance Service. Do not attempt to disassemble or repair the appliance, as this may be dangerous.
PROTECTING THE ENVIRONMENT

natural_image
Symbol of a trash bin with crossed lines indicating no waste or discharge (no text or labels)This symbol indicates the separate collection of electrical and electronic equipment.
The main objective of the separate collection of this waste is to reduce the quantity to be disposed of, promote re-
use, recycling and other forms of recovery in order to reduce its negative effects on the environment.
When it is no longer in use, this appliance must not be disposed of together with other unsorted municipal waste.
The user is responsible for delivering it free of charge to the selective collection facilities available for that purpose.
Pieces of equipment that are no longer in use can also be taken back at points of sale, by purchasing new pieces of equipment that are equivalent and have the same functions.
For more detailed information on collection points, please contact your City Council or a point of sale for this equipment.
RECIPES
NOTE: The pancake and snack cooking times given are specific to the recipes in this manual.
If you use store-bought mixtures, follow the manufacturer's instructions provided on the package.
Cooking times for store-bought mixtures vary from one brand to another, so cooking results may also vary.
Simple pancakes
Servings: 8
Cooking time: 2 minutes
Ingredients
160 g flour
180 ml milk
40 g sugar
2 small eggs
2 teaspoons baking powder
1 tablespoon sesame oil
Preparation
- Mix all the ingredients and blend with the help of a hand blender or a blender until smooth;
- Preheat your pancake and snack machine until the "READY" light turns green;
- Pour the recommended amount into the slots of your pancake and snack machine, close the lid, and set the timer for 2 minutes;
- Remove with a heat-resistant silicone spatula and serve plain or with toppings to taste.
Oat pancakes
Servings: 8
Cooking time: 2.5 minutes
Ingredients
250 g oat flakes
375 ml plant-based milk
1 tablespoon flax seeds
1 tablespoon honey or other natural sweetener Fruit to taste
Cinnamon powder to taste
Preparation
- Place the oats and flax seeds in a food processor and pulse until you have a flour;
- Add the plant-based milk and honey, then pulse again until liquid;
- Preheat your pancake and snack machine until the "READY" light turns green;
- Pour the mixture into the slots of your pancake and snack machine, close the lid, and set the timer for 2.5 minutes;
- Remove with a heat-resistant silicone spatula and serve with fruit, honey and some cinnamon.
Banana and oatmeal pancakes
Servings: 8
Cooking time: 3 minutes
Ingredients
2 large bananas
8 tablespoons of oatmeal
3 eggs
2 teaspoons of cinnamon
Preparation
- Cut the bananas into small pieces;
- Mix all the ingredients and blend until a homogeneous mixture is obtained;
- Preheat your pancake and snack machine until the
"READY" light turns green; - Pour the recommended amount into the slots, close the lid, and set the timer for 3 minutes;
- Remove with a heat-resistant silicone spatula and serve with toppings to taste.
Spinach pancakes
Servings: 8
Cooking time: 3 minutes
Ingredients
140 g flour
200 ml plant-based milk
100 g raw spinach
2 teaspoons baking powder 2 eggs
salt to taste
Black pepper to taste
Nutmeg to taste
Preparation
- Mix all the ingredients and blend with the help of a hand blender or blender until smooth;
- Preheat your pancake and snack machine until the "READY" light turns green;
- Pour the recommended amount into the slots of your pancake and snack machine, close the lid, and cook for 3 minutes.
Potato rosti
Servings: 8
Cooking time: 10 minutes
Ingredients
4 medium-sized potatoes, peeled and grated
30 g melted butter
3 sprigs of thyme, chopped
salt and pepper
Preparation
-
Mix all the ingredients together;
-
Preheat your pancake and snack machine until the
"READY" light turns green;
-
Place 80 g of the grated potato mixture into each slot and close the lid;
-
Set the timer to 10 minutes. When ready, remove using a silicone spatula.
Simple tortillas
Servings: 8
Cooking time: 3 minutes
Ingredients
3 medium potatoes, boiled
1 small onion
2 garlic cloves 6 eggs
parsley to taste
Salt and pepper to taste
Preparation
- Cut the potatoes into small squares and bake them;
2.Chop the onion;
-
Add the beaten eggs to the potatoes, onion, and chopped parsley and season;
-
Preheat your pancake and snack machine until the "READY" light turns green;
-
Pour the recommended amount into the
slots of your pancake and snack machine, close the lid, and set the timer for 3 minutes.
Eggs with crème fraîche and smoked salmon
Servings: 8
Cooking time: 5 minutes
Ingredients
8 eggs
200 g smoked salmon, sliced
2 tablespoons of chopped chives salt and pepper
Preparation
-
Whisk together the eggs, crème fraîche and the salt and pepper. Add the chopped chives;
-
Preheat the pancake machine until the "READY" light turns on;
-
Open the lid, pour the recommended amount of egg mixture into the slots of your pancake and snack machine, and set the timer for 5 minutes;
-
Place the eggs on a platter, divide the smoked salmon among the servings and place on top.
Bacon and mozzarella cheese omelets
Servings: 8
Cooking time: 3 minutes
Ingredients
4 eggs
75 g bacon
75 g of grated mozzarella cheese Chopped parsley to taste Pepper to taste
Preparation
- Start by beating the eggs;
- Mix together the remaining ingredients, season with pepper to taste and stir;
- Preheat your pancake and snack machine until the "READY" light turns green;
- Pour the recommended amount into the slots of your pancake and snack machine, close the lid, and set the timer for 3 minutes.
Pataniscas (codfish fritters)
Servings: 8
Cooking time: 4 minutes
Ingredients
250 g water
350 g of salted cod, soaked and shredded
300 g flour
150 g onion
10 parsley stalks 4 eggs
salt to taste
Preparation
- Poach the soaked and shredded cod.
Once it is cooked, shred it into even smaller pieces if necessary. Set aside the cooking water;
- Chop the parsley and the onion and set aside;
- In a bowl, add the eggs, the flour, and the water.
Season with salt and mix well until smooth;
-
Add the cod, the parsley and the onion to the mixture and mix well;
-
Preheat your pancake and snack machine until the "READY" light turns green;
-
Pour the recommended amount into the slots of your pancake and snack machine, close the lid, and set the timer for 4 minutes.
Butter cookies
Servings: 8
Cooking time: 4 minutes
Ingredients
250 g self-rising flour
125 g butter
125 g sugar
1 egg
12 teaspoon baking powder
Preparation
- Mix all the ingredients together and knead a little;
- Divide the dough into 8 pieces and form small balls;
- Preheat your pancake and snack machine until the "READY" light turns green;
- Place one ball per slot, close the lid of your pancake and snack machine, and set the timer for 4 minutes.
MACHINE À PANCAKES
CONSIGNES DE SÉCURITÉ
DYSFONCTIONNEMENTS ET RÉPARATIONS
- Save the proof of purchase (receipt) for this product carefully. When a repair is made under these conditions, the technician will require proof of purchase. This assistance can only be provided once you have proven, with the proof of purchase, that your appliance is within the warranty period.
- The warranty period for this appliance is 2 years from the date of purchase.
- Within the warranty period, we will repair or replace, free of charge, every parts which have deteriorated as a result of a proven material or manufacturing defect.
- Not covered by this warranty are light bulbs, delicate parts made of glass or plastic, or any other defects that do not impair its proper functioning.
5.We are not responsible for damage caused by poor or careless use of the appliance, by plugging into an electrical outlet other than that indicated on the appliance's rating label, by faulty wiring, or by weather-related, chemical, or electrochemical causes.
Other claims or demands for compensation for objects that are not an integral part of the appliance will be denied. - Providing assistance under warranty does not extend the warranty period. Warranty services are provided only within this time frame. The right to warranty is only granted to the first purchaser of the appliance and cannot be passed on to a third party.
- The warranty expires when unauthorized persons have attempted to repair, modify, or replace parts in the appliance.
- All expenses and risks of transportation to our factory or vice versa will always be borne by the buyer.
WARRANTY CONDITIONS
To benefit from the Technical Assistance service during the 24-month warranty period after the date of purchase you will need to:
Present the invoice/proof of purchase, showing the model and the manufacturing number of the product (whenever possible).
Note: Failure to present the above documents will be grounds for not providing services under warranty.