
1905FL - Vacuum packaging machines Flama - Free user manual and instructions
Find the device manual for free 1905FL Flama in PDF.


| Product Type | Vacuum Packaging Machine |
| Brand | Flama |
| Model | 1905FL |
| Dimensions (L x W x H) | Approximately 40 x 20 x 10 cm |
| Weight | Approximately 2 kg |
| Power Supply | 220-240 V, 50/60 Hz |
| Power | 120 W |
| Vacuum Function | Yes, with manual adjustment possible |
| Sealing Function | Integrated heating sealing bar |
| Manual Mode | Allows precise control of vacuum |
| Automatic Shut-off | Yes, after sealing |
| Pressure Adjustment | For delicate foods or liquids |
| Sealing Temperature Adjustment | Not specified |
| Compatible Bag Types | Smooth or textured bags |
| Bag Roll Included | Yes, one roll of standard dimensions |
| Sealing Width Capacity | 30 cm |
| Maintenance and Cleaning | Clean the sealing gasket and sealing bar after each use |
| Safety | Thermal protection, automatic shut-off in case of overheating |
| Available Spare Parts | Gaskets, sealing bars, replacement rolls |
| Repairability | Repairability index estimated at 5/10 |
Frequently Asked Questions - 1905FL Flama
User questions about 1905FL Flama
0 question about this device. Answer the ones you know or ask your own.
Ask a new question about this device
Download the instructions for your Vacuum packaging machines in PDF format for free! Find your manual 1905FL - Flama and take your electronic device back in hand. On this page are published all the documents necessary for the use of your device. 1905FL by Flama.
USER MANUAL 1905FL Flama

natural_image
White rectangular electronic device labeled 'PLAMA Vac Control System' with a circular button and central hole (no additional text or symbols visible)SISTEMA DE EMBALAGEM POR VÁCUO
PROVISIONS OF WARRANTY
- Keep the warranty certificate that is enclosed with the product package.
When a repair is performed under these circumstances, the technician will ask for the respective certificate. The repair service can only be performed after you provide the certificate to confirm that your device is within the warranty period. - The warranty period for the device is valid for 2 years from the date of purchase.
- We will repair or replace free of charge within the warranty period any parts that, during normal operation of the device, have been damaged due to proven defect in the material or workmanship.
- This warranty does not cover light bulbs, easily breakable parts made from glass or plastic or any other defects that can harm the device's normal operation.
- We are not responsible for damages caused by the misuse or mishandling of the device, connection to a power supply different than the one shown on the device specification label, defective electrical circuit and weather, chemical or electrochemical conditions. We will decline any other demands or compensation claims regarding objects that are not integral part of the device.
- The repair service performed under the warranty does not extend the warranty period. Only within this period can the repair services under the warranty be performed. The warranty is only valid for the first buyer of the device and is not transferable to others.
- The warranty expires if any repairs, modifications or parts replacement have been attempted by unauthorized persons.
- All expenses and risks concerning transportation to our factory or vice-versa shall always be on account of the buyer
PROVISIONS OF WARRANTY
To obtain our Technical Repair service during the 24 month warranty period after the date of purchase, you are required to: a) Present the warranty certificate duly completed and authenticated.
b) Present the product's invoice/sales receipt, with the model and serial number (where possible).
Note: Not presenting the above mentioned documents, will not allow for the repair service under the warranty.
CONDITIONS DE GARANTIE
CONDITIONS DE GARANTIE
natural_image
Illustration of a hand pressing down on a wooden cutting board with a close-up of the blade (no text or symbols)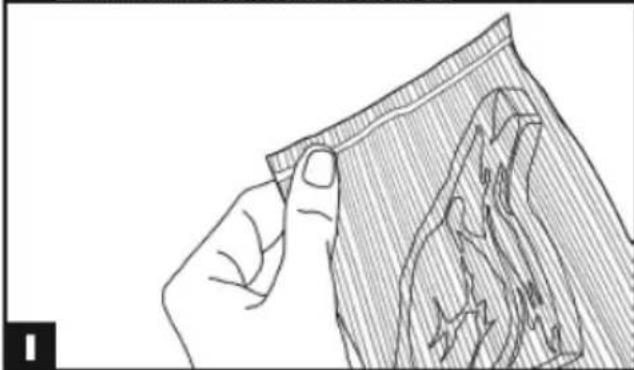
natural_image
Line drawing of a hand holding a textured surface with visible cracks and texture (no text or symbols)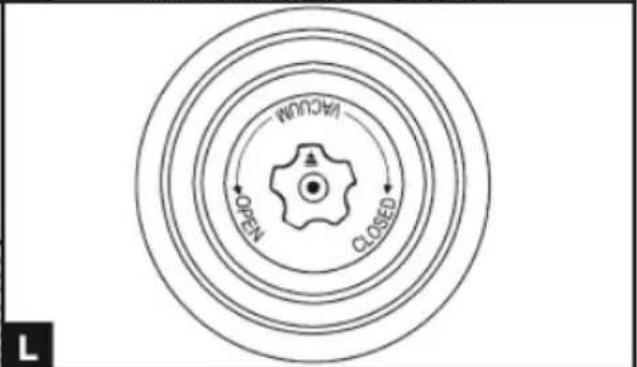


natural_image
Illustration of hands using a tool to interact with a mechanical component (no text or symbols visible)


PATENTEADO
O SISTEMA DE EMBALAGEM EM VÁCUO PARA O LAR
AS COISAS A RECORDAR
natural_image
Illustration of a hand holding a printed document with a magnified view of the cover (no text or symbols visible)

natural_image
Line drawing of a hand pressing down on a wooden object with a textured surface below (no text or symbols)
natural_image
Line drawing of a hand holding a textured fabric or material, no text or symbols present
natural_image
Illustration of a hand using a scanner to generate a textured fabric or fiber, with an inset showing the same process (no text or symbols present)

natural_image
Illustration of a hand pressing down on a wooden cutting board with a close-up of a fish inside (no text or symbols)
natural_image
Line drawing of a hand holding a textured surface with visible cracks and texture (no text or symbols)


natural_image
Illustration of hands holding a mechanical component with internal components, no text or symbols present

PATENTED
EL SISTEMA DE ENVASADO AL VACÍO PARA EL HOGAR
natural_image
Line drawing of a hand pressing down on a wooden cutting board with a sketch of a fish below (no text or symbols)
natural_image
Line drawing of a hand holding a textured surface with visible cracks and texture (no text or symbols)


natural_image
Illustration of a hand holding a tool interacting with a mechanical component (no text or symbols visible)


PATENTED
We compliment you on your purchase and thank you for your confidence in us. You are advised to carefully read these directions, which will enable you to use the Vacuum Packing System properly and obtain optimal results in terms of food preservation. Furthermore, we suggest you keep these instructions handy for further reference.
TABLE OF CONTENTS
SECTION I
- APPLIANCE NAMES AND FUNCTION page 24
- SAFETY PRECAUTIONS page 24-25
- OPERATING INSTRUCTIONS page 25-26
- INSTRUCTIONS FOR CLEANING page 27
- ENVIRONMENT PROTECTION page 27
- TROUBLESHOOTING page 27-28
SECTION 2
-INFORMATION ON VACUUM PRESERVATION OF FOODSTUFFS page 28-32
• THE ADVANTAGES OF VACUUM PACKING page 28
- STORAGE LIFE® page 29
• ABOUT VACUUM PACKING page 30
• HOW TO PRESERVE FOOD IN BAGS page 30-31
• HOW TO PRESERVE FOOD IN CONTAINERS page 31
- POINTS TO REMEMBER page 32
APPLIENCE NAMES AND FUNCTIONS
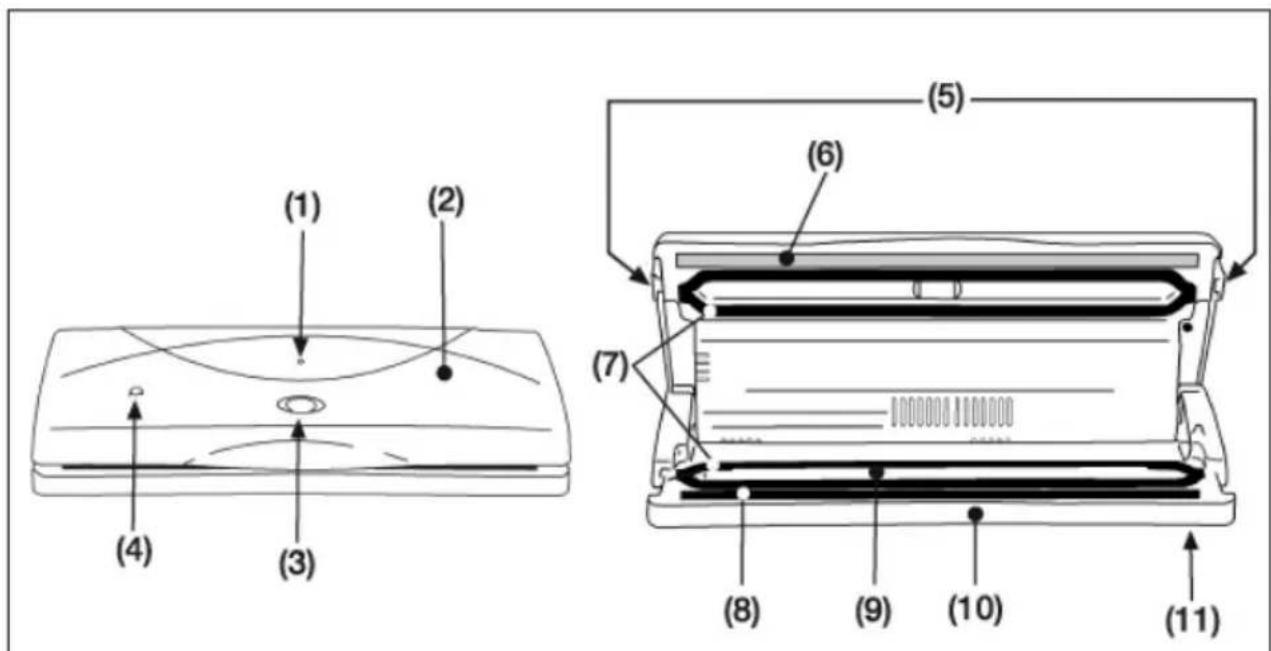
SEE ILLUSTRATIONS
(1) ON/SEAL indicator light - While the appliance is in the vacuum-forming phase the light will be steadily lit; it will then flash during the final sealing phase. When it goes off you can open the machine.
(2) Lid - Opening the lid into the fixed raised position allows you to position the bags before starting the vacuum packing process.
(3) Lid manual valve - Press it to stop the vacuum packing cycle at any time or to open the lid at the end of the cycle.
(4) Hose air inlet - To connect the hose to jars, containers, universal caps, bottle caps etc.
(5) LOCK buttons - In the locked position they secure the lid in place while the vacuum packing cycle is under way in bags, jars and containers; they release automatically.
(6) Sealing bar - Protected heating element that seals the bag and prevents it from sticking to the bar. See illustrations on page 1.
(7) Airtight gaskets - They guarantee that a vacuum will be maintained in the chamber, thus allowing air to be removed from bags and containers.
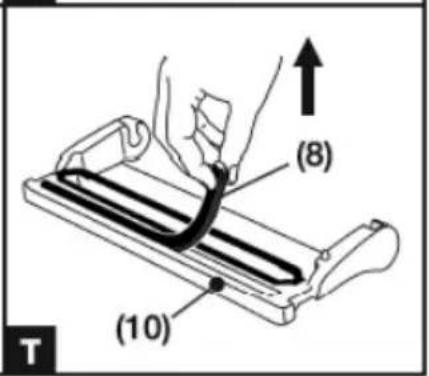
(8) Sealing gasket - It presses the bag against the sealing bar.
(9) Vacuum chamber - The open end of the bag is positioned inside the chamber; air is draw from the bag and any excess liquid is collected on the bottom.
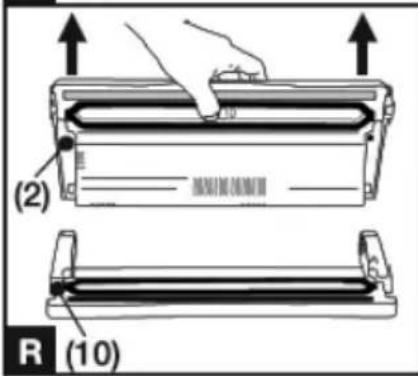
(10) Lower part - Entirely removable and washable also in dishwasher for maximum hygiene.
(II) Non-slip feet - They prevent the appliance from slipping during use.
SAFETY PRECAUTIONS
Carefully read all the instructions before using the appliance, and keep them handy for future reference.
- Inappropriate use of the appliance will render the Guarantee null and void.
- Check whether your voltage corresponds to the voltage printed on the characteristics plate of the appliance. Any error whatsoever in its connection will render the Guarantee null and void.
- This appliance was designed for exclusive domestic and inside the home.
- This appliance is not intended for use by persons (including children) with reduced physical, sensory or mental capabilities, or lack of experience and knowledge, unless they have been given supervision or instruction concerning use of the appliance by a person responsible for their safety.
- The appliance is not designed for continuous operation. Do not carry out more than one complete cycle every 2 minutes.
- In extreme ambient conditions, an intensive use of the appliance may trigger the automatic thermal protection devices. In such a case allow the appliance to cool down sufficiently to enable resetting of the protection devices.
- As with any appliance whatsoever, never allow children to use the appliance unsupervised.
- Place the appliance on a horizontal and stable surface.
- Do not use the appliance on or in proximity to hot surfaces.
- The casing of this unit is not protected again the penetration of liquids.
- Do not draw liquids into the vacuum chamber. Should this happen, immediately dry the vacuum chamber.
- Do not immerse the appliance in water and do not use it if the cord or plug are wet; should they get wet during use, immediately pull out the plug wearing dry rubber gloves.
-
Do not remove or touch the appliance under water until you have pulled out the plug.
-
Do not use the appliance after its removal from water (take it immediately to an authorised service centre or your dealer).
- To avoid burns, do not touch the sealing bar while using the appliance.
- Before using the appliance for the first time, and periodically throughout its life, check the power supply cord for any damage; if you detect any damage, do not plug it in. Take the appliance immediately to an authorised service centre or your dealer.
-
Disconnect the appliance from the electricity supply after each use and whenever cleaning. Allow it to cool before carrying out any cleaning or storage operation.
-
Do not use the appliance if it is working incorrectly or if it is damaged in any way. Any intervention besides cleaning must be carried out at a Flama Authorised Service Personnel.
- Do not use the appliance if either the electrical cable or the plug is damaged. Send them in for immediate substitution at a Flama Authorised Service Personnel.
- This product is in compliance with the requirements of Directives 2006/95/EC (Low Voltage Directive), and 2004/108/EC (Electromagnetic Compatibility Directive).
OPERATING INSTRUCTIONS
Warning: Do not store the machine with the LOCK buttons engaged
Before use, always thoroughly clean your appliance and any accessories coming in contact with food (containers, caps, jars etc.) as directed in the "INSTRUCTIONS FOR CLEANING"
I Positioning the appliance
Position the appliance in a dry place on a level surface, making sure that the work area in front of the appliance itself is clear of obstacles and there is enough room to accommodate the bags with the food to be packed. Plug the power cord into a power socket corresponding to the voltage of the appliance (see technical details).
2 Tips on using bags
The bags are available in two widths: 20 and 30 cm. Choose the bag size suited for the food you intend to preserve. Check that the bag you are going to use is at least 8 cm longer than the food to be packaged, taking into account an additional 2 cm for each time the bag will be subsequently reused.
Note: If you are using pre-cut bags, go directly to step 4 below.
3 Making bags from rolls
- Unroll a bag of suitable length and cut it using the Cutter (12) as shown in Fig. A, moving it from rim to rim. Now you can seal an open side of the cut bag as follows:
- Lift the lid (2) and turn it in the open position.
- Seal either of the two open ends of the bag by positioning it on the sealing gasket (8) with the smooth side facing down (fig. B).
Warning: be careful not to let the bag hang over into the vacuum chamber (9) or on the sealing gasket (7).
- Close the lid (2) and push down on the front corners of the lid with your thumbs, then push the LOCK buttons (5) into the locked position (fig. C). The appliance will automatically carry out the complete vacuum packing cycle. Wait until the ON/SEAL light goes off (1).
- Press down on the rounded recessed area of the manual valve (3) to release the lid (fig. D).
- Lift the appliance lid putting the fingers under the central projecting part and remove the bag.
- Check the quality of the seal obtained, which should appear
as a regular, wrinkle-free crosswise strip with no internal ridges in the bag (fig. E).
4 Vacuum packing with bags cut from a roll or pre-cut bags
- Lift the lid (2) and turn it in the open position.
- Place food in the bag without creasing it excessively or stretching surfaces. Eliminate any liquids or food residues from the area inside the bag that will be sealed.
- Place the bag and its contents in front of the appliance and place the open end inside the vacuum chamber (9) with the smooth side facing down (fig. F).
- Close the lid (2) and push down on the front corners of the lid with your thumbs, then push the LOCK buttons (5) into the locked position (fig. G). The appliance will automatically carry out the complete vacuum packing cycle. Wait until the ON/SEAL light goes off (1).
- Press down on the rounded recessed area of the manual valve (3) to release the lid (fig. H).
- Lift the appliance lid putting the fingers under the central projecting part and remove the bag.
- Check the quality of the seal obtained, which should appear as a regular, wrinkle-free crosswise strip with no internal ridges in the bag. (fig. I)
- You can interrupt a packaging cycle already in progress at any time by means of the manual valve (3), keeping it pressed until the machine turns off.
5 Vacuum packing in Executive containers or in containers sealed with Universal Caps with new knob
Executive containers and Universal Caps with star-shaped knob (see fig. L) make vacuum packing easier, because the connection hose can be directly introduced into the knob central hole (see fig. M).
Universal Caps, available in two diameters (100 mm and 125 mm), are to be used on jars for preserving food and bowls and receptacles made of tempered glass. The Universal Caps work just like the Caps for Executive containers.
WARNING: When using Universal Caps do not use plastic or glass containers that are not suitable since they could implode under the vacuum pressure of the appliance and cause injury.
- Fill the container leaving at least 3 cm of room between the contents and upper rim. Place the lid on the container and turn the knob to the "VACUUM" position (fig. L).
- Connect the container lid knob to the appliance air inlet (4) by means of the connection hose (13) (fig. M).
- Lock the lid (2) by pushing the LOCK buttons (5); the machine will carry out a vacuum packing cycle and turn off automatically on its completion.
- Remove the hose from the container lid knob.
- Turn the knob to the "CLOSED" position.
- To open the containers turn the knob to the "OPEN" position, you should hear a hissing of air as it enters the container. This sound guarantees that the contents have been packed in a vacuum.
6 Vacuum packing in Family containers
Multipurpose containers ideal for storage of frequently used products such as dry and fragile foods; powder foodstuffs; fresh, pureed or strained fruit and vegetables.
Their transparency and design makes them attractive to display on kitchen shelves while ensuring that their contents are clearly visible.
- Fill the container leaving at least 3 cm of room between the contents and upper rim and position the cap on the container.
- Connect the container lid to the air inlet (4) of the appliance (fig. N) by means of the connection hose (13).
- Lock the lid (2) by pushing the LOCK buttons (5); the machine will carry out a vacuum packing cycle and turn off automatically on its completion.
- Remove the hose from the container lid.
- Press the central button (14) to open the containers (fig. N).
7 Vacuum packing in glass jars sealed with metal caps (Leifheit type)
Use the large-sized cap attachment to pack foods in large-mouthed glass jars with a metal cap. A small-sized cap attachment is also available for narrow-mouthed jars sealed with metal caps.
- Fill the container leaving at least 3 cm of room between the contents and upper rim.
- Connect the cap attachment (15) to the air inlet (4) of the appliance by means of the connection hose (13). Place the cap attachment directly on the jar with the metal cap only (16) and press down, making sure it fits correctly (fig. O)
- Lock the lid (2) by pushing the LOCK buttons (5); the machine will carry out a vacuum packing cycle and turn off automatically on its completion. Make sure that the cap attachment holds firmly by keeping it pressed with your
hand.
- Disconnect the hose from the cap attachment. Remove the cap attachment from the jar.
- Apply the ring (17) supplied with the jar and screw it down all the way (fig. O).
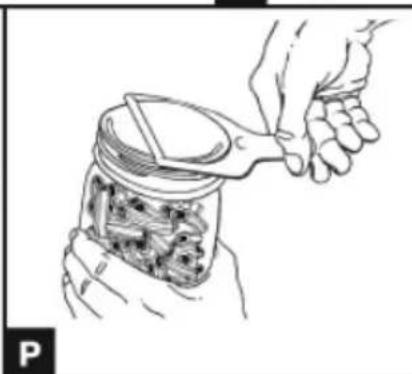
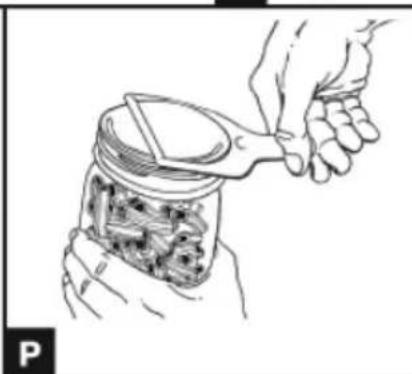
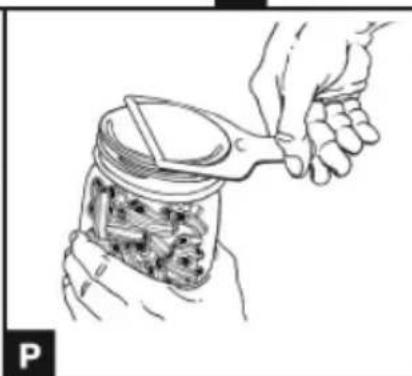
- To open a glass jar vacuum-sealed with a metal cap, use the cap opener provided (the side with writing should be turned up). Position the cap opener as shown in figure P and gently pry open the cap until the vacuum is released. Remove the metal cap. This accessory allows you to reuse the cap.
8 Vacuum packing with bottle caps
The Bottle Cap may be used to seal partly filled bottles of wine or non-fizzy beverages. Using the Bottle Cap will allow you to create a vacuum inside the bottle so as to slow down oxidisation and preserve the freshness and flavour of its contents for a longer time.
- By means of the connection hose (13) connect the air inlet (4) of the appliance to the Bottle Cap (18) (fig. Q). Press the Cap firmly into the bottle.
- Lock the lid (2) by pushing the LOCK buttons (5); the machine will carry out a vacuum packing cycle and turn off automatically on its completion.
- Disconnect the hose from both the Bottle Cap and the appliance immediately.
- To open a bottle sealed with the Bottle Cap, simply pull the cap out of the bottle. You will hear the air rushing into the bottle.
9 Vacuum packing with the cap attachment in Executive containers or in containers sealed with Universal Caps with the previous model of knob
To use the Cap Attachment in Executive containers or in containers sealed with Universal Caps with the previous model of knob, read the instructions supplied in our web page www.flama.pt
INSTRUCTIONS FOR CLEANING
IMPORTANT: Always unplug the appliance before cleaning the System.
- Carefully wash your hands before proceeding to clean the appliance and its accessories.
- Both before and after use, clean the exposed surfaces of the System using a sponge moistened with a mild, non-abrasive dishwashing detergent. If any liquids accidentally get inside the appliance, do not connect it to the mains electricity supply and do not use it; contact your nearest dealer or authorised service centre.
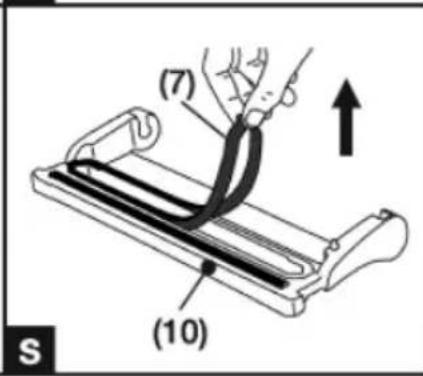
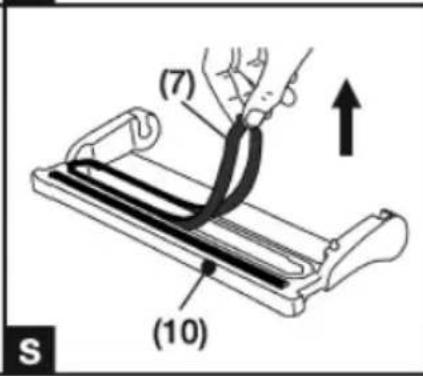
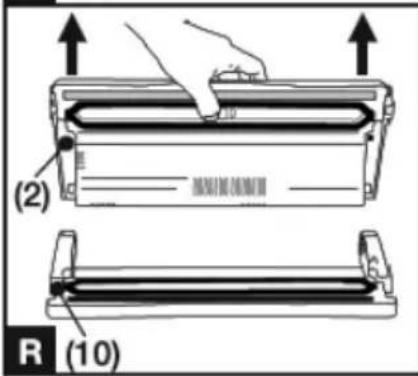
- The appliance is provided with a lower part (10) which is entirely removable and washable also on the dish-washer top rack (fig. R). Before washing the lower part, remove
both gasket (7) (fig. S) and sealing gasket (8) (fig. T). Clean both gaskets using a sponge moistened with a mild washing up liquid and leave them to completely dry before positioning them again.
Once cleaning and drying are over, carefully fit both gaskets back in their places. Then reinsert the lower part (10) in the port provided on the lid (2).
- Thoroughly wash the accessories (containers, caps, jars, etc.) like you would wash any kitchen utensils, allowing them to dry completely. If you wash the accessories in a dishwasher, be sure to place them on the top rack.
ENVIRONMENT PROTECTION

This symbol indicates the separate reclamation of electronic and electric equipment.
The main purpose of the separate reclamation of these residues is to reduce the amount of residues to eliminate, to promote the reuse, the recycling and other forms of valuation, in order to reduce its negative effect on the environment.
When this device is no longer it should not be discarded along with other non differentiated urban residues.
The user is responsible for its gratuitous delivery at the existing reclamation installations created for this purpose.
The collection of equipment no longer in use may also be performed by at the point of sale, while purchasing a new equivalent equipment with the same functions.
To get more detailed information on reclamation venues you should consult your City Council or a point of sale of these equipments.
TROUBLESHOOTING
The Vacuum Packing System does not work
- Make sure the Vacuum Packing System has been plugged in properly. Check the electric socket by plugging another appliance into it.
- The Vacuum Packing System will stop automatically if overheated.
Allow it to cool down for 15 minutes and try again. - Check for faults in the power cord or the plug.
Should you detect a fault, do not use the appliance.
The Vacuum Packing System fails to apply the first seal on the bag cut from the roll
- Make sure the bag cut from the roll is properly positioned as described in the paragraph: "Making bags from rolls"
The Vacuum Packing System does not create a complete vacuum in the bags
- To seal the bag properly, you must make sure that the open end remains completely inside the Vacuum Chamber.
- Make sure that the Sealing Bar, the Sealing Gaskets and Airtight Gaskets are free of impurities. After cleaning them, put them properly back in place.
• The Vacuum Packing System bag might have a hole in it. To
check it, seal the bag with air on the inside. Dip the bag in water and apply pressure. The appearance of bubbles means that there is a leak.
Reseal or use another bag.
The Vacuum Packing System does not seal the bag properly
- If the Sealing Bar overheats and melts the bag, you may have to raise the Lid and allow the Sealing Bar to cool down for a few minutes.
- The Vacuum Packing System is built in conformity with current safety standards. Overheating will cause it to turn off automatically. Allow the appliance to cool down for 15 minutes and try again.
The Vacuum Packing System bag does not maintain a vacuum after being sealed
- Leaks along the seam may be caused by creases, crumbs, grease or liquids. Reopen the bag, clean the upper inside part of the bag and remove any foreign material from the Sealing Bar before resealing it.
- Check that the bag has no holes in it which have caused air to leak in. Use paper napkins to protect any sharp edges on the contents of the bag.
The Vacuum Packing System does not create a vacuum in the containers
- By means of the Connection Hose, connect the container lid (or the Cap Attachment if necessary) to the Air Inlet of the appliance.
- Leave enough room (at least 3 cm) between the contents and the top of the jar or container.
- If liquids come out during the vacuum-packing process, remember that they must first be chilled in a refrigerator, not left at room temperature.
- Check that the rim of the jar or container and the universal lid are not damaged in the sealing area.
Wipe the rim and cap clean with a cloth moistened with lukewarm water and repeat the vacuum- packing process. - Make sure that the gasket of the container cap or the universal cap is set properly in place and is not damaged.
Executive containers or Universal Caps do not maintain a vacuum
- Make sure that the arrow on the knob of the container cap is positioned on "VACUUM" before creating a vacuum in the container and it is positioned on "CLOSED" after a vacuum is formed.
- Make sure that the O-ring beneath the knob of the container cap or the universal cap is set properly in place.
Family containers do not maintain a vacuum
- Make sure that the gasket beneath the central button (14) of the container cap is set properly in place and is not damaged.
THE ADVANTAGES OF VACUUM PACKING
Vacuum packing will revolutionise the way in which you buy and keep food. By keeping food under vacuum (i.e. without air), the shelf-life of foods is greatly extended, whether it is kept in the larder, fridge or freezer. Air can make food rancid and stale, it can cause it to ferment, dry out, and it may even cause freezer burns. Vacuum packing keeps your food fresher and more flavourful for longer.
Now you can pack fresh food bought from the market, or food picked from your vegetable garden, in handy portions for future use, even in large quantities. Food bought already vacuum-packed, like cheese and meat, will retain its flavour and freshness once opened, without problems of moisture and mould, if it is vacuum-packed after use in bags and containers. Meat, fish and vegetables can be frozen without the risk of frost burns and will keep their freshness and quality. Foodstuffs like coffee, rice, flour and nuts will last much longer if they are vacuum packed. Fresh or perishable foods must in any case be frozen or kept in the fridge.
The original quality of the food must be of the very highest order, in terms of freshness and environmental hygiene, when you decide to vacuum pack it.
There are in fact no preservation methods which will transform a poor product into a good one.
Always keep your bags and containers handy and you will quickly appreciate the many advantages and ease of use that offers when it comes to preserving the quality of food.
Consult the "Food preservation times" chart to see how vacuum packing can extend the life of any food without in any way altering or impairing its taste, smell, appearance, hygiene and nutritional value.
STORAGE LIFE
| Preservation times at atmospheric pressure | Preservation times with MAGIC VAC® | |
| Refrigerated foods (5 ± 2 °C) | ||
| Red meat | 3-4 days | 8-9 days |
| White meat | 2-3 days | 6-9 days |
| Whole fish | 1-3 days | 4-5 days |
| Game | 2-3 days | 5-7 days |
| Cooked pork products | 7-15 days | 25-40 days |
| Sliced pork meats | 4-6 days | 20-25 days |
| Soft cheese | 5-7 days | 14-20 days |
| Hard and semi-hard cheese | 15-20 days | 25-60 days |
| Vegetables | 1-3 days | 7-10 days |
| Fruit | 5-7 days | 14-20 days |
| Cooked and refrigerated foods (5 ± 2 °C) | ||
| Purees and vegetable soups | 2-3 days | 8-10 days |
| Pasta and risotto | 2-3 days | 6-8 days |
| Boiled and roast meats | 3-5 days | 10-15 days |
| Desserts with fillings (cream and fruit) | 2-3 days | 6-8 days |
| Frying oil | 10-15 days | 25-40 days |
| Frozen foods (-18 ± 2 °C) | ||
| Meat | 4-6 months | 15-20 months |
| Fish | 3-4 months | 10-12 months |
| Vegetables | 8-10 months | 18-24 months |
| Food at ambient temperature (25 ± 2 °C) | ||
| Bread | 1-2 days | 6-8 days |
| Packed biscuits | 4-6 months | 12 months |
| Pasta | 5-6 months | 12 months |
| Rice | 5-6 months | 12 months |
| Flour | 4-5 months | 12 months |
| Dry fruit | 3-4 months | 12 months |
| Ground coffee | 2-3 months | 12 months |
| Powder tea | 5-6 months | 12 months |
| Freeze-dried products | 1-2 months | 12 months |
| Powdered milk | 1-2 months | 12 months |
These are indicative values that in any case depend on the integrity of the package and the original quality of the food. IMPORTANT: Keep perishable foods in the freezer or fridge. Vacuum packing extends the life of food, but does not turn it into a "preserve", i.e. a stable product at ambient temperature.
ABOUT VACUUM PACKING
The deterioration of food is caused by chemical reactions that occur in food which is exposed to the air, temperature, moisture, the action of enzymes, the growth of micro-organisms or contamination by insects.
Vacuum packing reduces the absolute pressure of the air inside the package or container, by removing the oxygen and eliminating volatile compounds. The oxygen in the air causes food to deteriorate, firstly through a process of oxidation, causing the loss of nutritional values, flavour and all the food's qualities. Air also promotes the growth of most micro-organisms and causes the frost burns which occur on frozen food.
Vacuum packing extends the shelf life of many fresh foods, by reducing oxidation and preventing the proliferation of microbes (bacteria and mould). However, many fresh foods contain sufficient moisture to encourage the growth of micro-organisms that can grow with or without air. To prevent the deterioration of such foods, they must be preserved at low temperatures. Micro-organisms like mould, yeast and bacteria are present everywhere, but they can cause problems only in certain conditions.
For example, mould will not grow in environments with a low oxygen content, or in the absence of moisture or humidity. To grow, yeast requires moisture, sugar and a moderate temperature, but it can grow in the presence or absence of air. Refrigeration slows the growth of yeast and freezing blocks it completely. Bacteria can multiply with or without air, depending on their type.
Clostridium Botulinum is a very dangerous type of bacteria which can develop in environments which do not contain acids, are without oxygen and are exposed to temperatures in excess of 4^ C for long periods of time.
Foodstuffs vulnerable to attack by Clostridium Botulinum are those with low acidity (like red meat, poultry, fish, seafood, olives in brine, eggs, mushrooms and vegetables) and medium acidity foods like virtually all vegetables and many fruits (ripe tomatoes, onions, red pepper, figs and cucumbers). To prevent
contamination by this bacterium, it is essential to observe the basic rules of hygiene and, to prevent its harmful proliferation in preserved foods, they must be refrigerated for short periods and/or frozen for long-life preservation. However, such foods must be eaten immediately after heating.
Important: you must consume immediately any food which has been heated while still sealed in bags. Leaving the food to cool slowly at room temperature in the sealed vacuum bag may cause several harmful micro-organisms to multiply, in just a few hours, to values that are health-threatening.
Several enzymes found in foods cause increasingly noticeable changes in colour, structure and flavour; such changes depend on the preservation time, temperature and, above all, the presence of air. To halt the action of enzymes, vegetables must be blanched briefly using steam or a microwave oven. Food which contains a high percentage of acidity, like most fruits, do not require blanching. The absence of air created by the vacuum will in any case slow down or prevent the action of these enzymes.
Insect larvae are frequently found in many low water content or dried foods which have not been vacuum packed or frozen, and they can develop during preservation and thus contaminate the food. Some products like flour and grain might contain larvae, but using vacuum packing will stop them developing into insects.
HOW TO PRESERVE FOOD IN BAGS
Vacuum packing for the freezer
First of all, use the freshest possible food. The system will allow you to retain all the freshness of the food only if it is properly preserved.
Some foods have a soft consistency which could be damaged by vacuum packing the product when fresh. To prepare delicate foods like meat, fish, berries, bread, etc., it is advisable to pre-freeze them first. In the first twenty-four hours there is no risk of freezer burns, so you can vacuum pack the products frozen the previous day in bags, and then keep them in the freezer for long periods so as to preserve all the nutritional values and flavour of the product you have packed.
When vacuum packing soups, stews or other liquid food, pre-freeze it in a pan or high-strength dish. When the food becomes solid, vacuum pack it, add a label and replace in your freezer. To vacuum pack vegetables, peel them and then blanche them briefly in boiling water or a microwave oven until they are warm but still firm.
Then vacuum pack them in convenient portions.
If the food is not pre-frozen, leave an extra 5 cm in the length of the bag to allow for expansion due to freezing.
With regard to meat and fish, it is advisable to place the food on a paper towel and vacuum pack it with the towel in the bag. This will absorb any moisture in the food.
To preserve food like focaccia, crêpes and small hamburgers, stack them on top of each other, placing greaseproof paper or film between each piece. This will make it easier to remove some of the food, repackage the rest and replace it immediately in the freezer.
Vacuum packing for the fridge
For busy households, food can be prepared in advance, then vacuum packed and kept in the fridge for use at different times, ready to be heated as and when necessary.
Vacuum packing for the larder
Even foods that can keep at room temperature (like, for example, coffee, flour, pasta, sugar, etc.) can benefit from vacuum packing. If these products are to remain unused for several days, such as when you go away on holiday, it is advisable to protect all foods by vacuum packing.
They will keep better and moisture, mould and insects will not attack and ruin them.
Defrosting bags
To defrost vacuum packed food such as meat, fish, fruit, vegetables or other delicate foodstuffs, place it on the lowest shelf in the fridge to defrost slowly; bread and focaccia should be left at room temperature, while soups or other liquid foods should be immersed in hot water still in the vacuum bags until they reach the right temperature.
When you leave food at room temperature or heat it in a bain-marie, make sure you cut one corner of the bag to let the steam escape.
When the food has been defrosted, it must be consumed immediately.
Do not re-freeze it.
Repackaging pre-packed food
Many foodstuffs, like cheese and meat, are sold prepacked in factory-prepared vacuum bags.
To retain the flavour and freshness of these foods, repackage them in bags after the factory package has been opened.
Pre-packed foods must always be consumed by the useby date shown on the original package. They must also be handled with the greatest care and hygiene when repackaging.
Useful tips...
- For food with tapered ends or sharp edges, like bones and spaghetti, pad the edges with paper towels to prevent perforating the bag.
- Fragile and delicate foodstuffs like strawberries, crackers or biscuits should be preserved in containers.
- There are many non-food products which can be vacuum packed, such as camping equipment including matches, first aid kits and clean, dry clothes. You can even preserve the emergency triangle in the car.
Silverware and collections can also be vacuum packed to protect the items against oxidation, etc.
HOW TO PRESERVE FOOD IN CONTAINERS
Warning: Do not use plastic or glass containers that are not suitable since they could implode under the vacuum pressure of Vacuum Packaging System and cause injury.
Freezing in containers
To freeze food in plastic containers use only original containers or, in the case of glass receptacles, used tempered glass suitable for freezer temperatures.
Vacuum packing food in containers
Vacuum packing in containers is ideal for products that you use frequently. Dried foodstuffs like pasta, rice, flour, sugar, crisps, savouries or biscuits, and pet food, will maintain all their shape and freshness.
Salad foods and vegetables can be cleaned for the whole week and kept in a container. They will remain firm and fresh. To absorb excess moisture, fold a paper towel and place it on the bottom of the container.
Warning: Liquids must be cooled before vacuum packing. Hot liquids will expand and leak from the container during depressurising.
Food in powder or granule form can be covered with a paper towel before vacuum packing. This will prevent the powder or granules from getting into the vacuum paths or being deposited in the Vacuum Cap seal.
Oil used once for frying can be filtered, cooled, vacuum
sealed in a container and kept in the fridge.
This will enable you to use the oil again at least once, since it has been preserved in an airless and cold environment, thereby retaining its characteristics.
Larder items like flour, rice and cake mixes stay fresh for longer if they are vacuum packed. Nuts and condiments retain their flavour and will not become rancid.
Marinating food in containers
To marinade meat, poultry or fish, pierce the surface of the food and place it in a container, covered with the marinade of your choice. Vacuum seal the container and cool in the fridge for at least 20 minutes. The food will be as tasty as if it had been left to marinade overnight!
Tips for preserving food in jars
To preserve food in jars, use lids which have been checked and are free from defects. To create and maintain a good vacuum, the seals of the lids must be in perfect condition. To keep the lids in good condition, immerse them in boiling water for three minutes and then rub the dry seal with a drop of oil. This will restore the necessary elasticity to the seals of the lids.
POINTS TO REMEMBER
In order to optimise the preservation of foods and ensure perfect hygiene, a number of important rules must be followed:
- Make sure you wash your hands thoroughly and clean all the implements and surfaces you will be using to cut and vacuum pack the food.
- If possible, wear gloves when handling the food.
- Once perishable food has been packed, place it in the fridge or freeze it immediately, maintaining a constant fridge or freezer temperature. Do not leave the food for a long time at room temperature.
- Place the containers of vacuum packed food carefully in the fridge or freezer so that the food will cool rapidly to a low temperature.
- After opening tinned food or food that has been factory vacuum packed, it can be vacuum packed again. Follow the instructions to cool the food after opening and put it away as soon as it has been vacuum packed.
- Pre-packed foods must in any case be consumed by the use-by date shown on the original package.
- Once you have warmed up or defrosted perishable food, it must be eaten. Do not eat perishable food if it has been left at room temperature for many hours. This is especially important if the food has been prepared with a dense sauce, in a vacuum pack or in other lowoxygen content environments.
- Do not defrost food in boiling water or using other heat sources, unless the food in question is liquid (soups, juices, etc.).
• Vacuum packing extends the life of dried food. Food which has a high fat content becomes rancid due to oxygen and heat. Vacuum packing extends the life of food like nuts, coconuts, or cereal products. Store in a cool, dark place.
• Vacuum packing will not extend the life of fruit and vegetables such as bananas, apples, potatoes and several vegetables, unless it has been peeled prior to vacuum packing.
- Soft foods and food with a delicate structure (like fish, berries, etc.) must be pre-frozen for one night before they can be vacuum packed and placed in the freezer.
- Vegetables like broccoli, cauliflower and cabbage give off gas when they are vacuum packed fresh for storage in the freezer. To prepare these foods for vacuum packing, heat and freeze them.
- To ensure correct and safe vacuum packing, use only original bags, containers and accessories.


natural_image
Illustration of a hand holding a printed document with a magnified view of the cover (no text or symbols visible)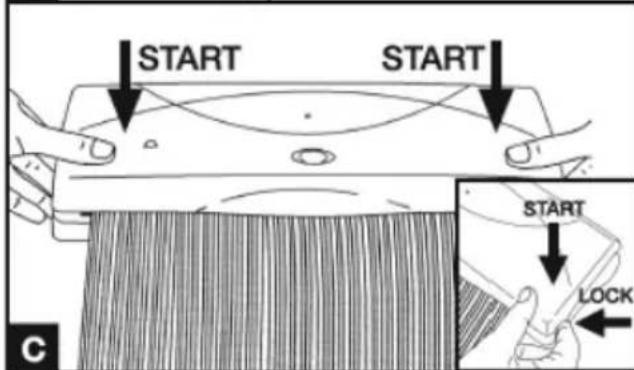

natural_image
Line drawing of a hand pressing down on a wooden surface with a textured base (no text or symbols)
natural_image
Line drawing of a hand holding a textured surface, no text or symbols present
natural_image
Illustration of a hair roller being placed on a machine, showing texture and hair follicles (no text or symbols)

natural_image
Illustration of a hand pressing down on a wooden cutting board with a close-up of a fish inside (no text or symbols)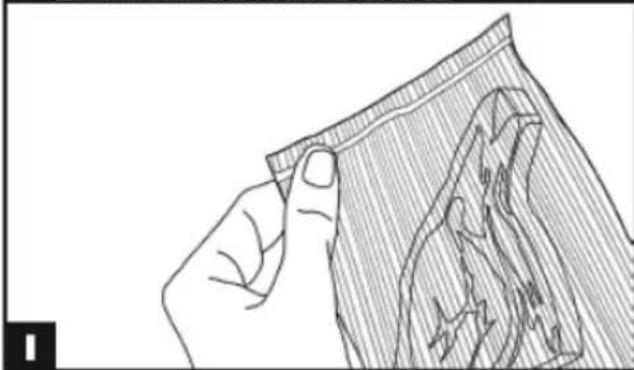
natural_image
Line drawing of a hand holding a textured surface with visible cracks and texture (no text or symbols)


natural_image
Illustration of hands holding a mechanical component with a magnified inset showing internal components (no text or symbols)

BREVETÉ
LE SYSTÈME DE CONDITIONNEMENT SOUS VIDE POUR LA MAISON
- PROVISIONS OF WARRANTY
- CONDITIONS DE GARANTIE
- PATENTEADO
- O SISTEMA DE EMBALAGEM EM VÁCUO PARA O LAR
- AS COISAS A RECORDAR
- PATENTED
- EL SISTEMA DE ENVASADO AL VACÍO PARA EL HOGAR
- TABLE OF CONTENTS
- SECTION I
- SECTION 2
- APPLIENCE NAMES AND FUNCTIONS
- SEE ILLUSTRATIONS
- SAFETY PRECAUTIONS
- OPERATING INSTRUCTIONS
- I Positioning the appliance
- Tips on using bags
- Making bags from rolls
- Vacuum packing with bags cut from a roll or pre-cut bags
- Vacuum packing in Executive containers or in containers sealed with Universal Caps with new knob
- Vacuum packing in Family containers
- Vacuum packing in glass jars sealed with metal caps (Leifheit type)
- Vacuum packing with bottle caps
- Vacuum packing with the cap attachment in Executive containers or in containers sealed with Universal Caps with the previous model of knob
- INSTRUCTIONS FOR CLEANING
- IMPORTANT: Always unplug the appliance before cleaning the System.
- ENVIRONMENT PROTECTION
- TROUBLESHOOTING
- The Vacuum Packing System does not work
- The Vacuum Packing System fails to apply the first seal on the bag cut from the roll
- The Vacuum Packing System does not create a complete vacuum in the bags
- The Vacuum Packing System does not seal the bag properly
- The Vacuum Packing System bag does not maintain a vacuum after being sealed
- The Vacuum Packing System does not create a vacuum in the containers
- Executive containers or Universal Caps do not maintain a vacuum
- Family containers do not maintain a vacuum
- THE ADVANTAGES OF VACUUM PACKING
- ABOUT VACUUM PACKING
- HOW TO PRESERVE FOOD IN BAGS
- Vacuum packing for the freezer
- Vacuum packing for the fridge
- Vacuum packing for the larder
- Defrosting bags
- Repackaging pre-packed food
- Useful tips...
- HOW TO PRESERVE FOOD IN CONTAINERS
- Freezing in containers
- Vacuum packing food in containers
- Marinating food in containers
- Tips for preserving food in jars
- POINTS TO REMEMBER
- BREVETÉ
- LE SYSTÈME DE CONDITIONNEMENT SOUS VIDE POUR LA MAISON
Brand : Flama
Model : 1905FL
Category : Vacuum packaging machines