Sweet Dreams AGHM200 - Cupcake maker BESTRON - Free user manual and instructions
Find the device manual for free Sweet Dreams AGHM200 BESTRON in PDF.

| Brand | Bestron |
| Model | Sweet Dreams AGHM200 |
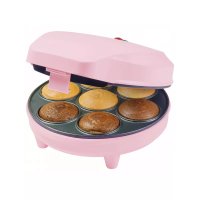
| Appliance type | Cake maker (cupcake maker) for turban or bundt cakes |
| Power supply | 230 V ~ 50 Hz |
| Power | 800 W (estimated) |
| Plate material | Non-stick coating |
| Indicator lights | Red light (power), green light (ready) |
| Capacity | Baking one turban or bundt cake per cycle |
| Cooking time | About 3 to 5 minutes depending on batter |
| Preheating | About 5 minutes (green light goes off) |
| Cleaning | Damp cloth, soapy water if necessary; do not immerse appliance |
| Safety | Do not use near birds (harmful fumes when heating); stable surface; do not cover |
| Warranty | 60 months (under conditions) |
| Weight | Approximately 1.5 kg |
| Dimensions | Not specified (approximately 30 x 25 x 15 cm) |
| Accessories | No accessories included |
| Repairability | Contact Bestron after-sales service; do not repair yourself |
Frequently Asked Questions - Sweet Dreams AGHM200 BESTRON
User questions about Sweet Dreams AGHM200 BESTRON
0 question about this device. Answer the ones you know or ask your own.
Ask a new question about this device
Download the instructions for your Cupcake maker in PDF format for free! Find your manual Sweet Dreams AGHM200 - BESTRON and take your electronic device back in hand. On this page are published all the documents necessary for the use of your device. Sweet Dreams AGHM200 by BESTRON.
USER MANUAL Sweet Dreams AGHM200 BESTRON
natural_image
White electric donut maker with open lid and four donuts in a tray (no visible text or symbols)

AGHM200 INSTRUCTION MANUAL
DE
Bedienungsanleitung
FR
Mode d'emploi
NL
Handleiding
EN
Instruction manual
IT
text_image
Handwritten signature or scribble on a line, possibly a signature or autographR. Neyman Quality control
FUNKTION - Allgemein
Marzipan-in-the-Middle-Bundt-Kuchen
Zutaten
DÉCLARATION DE CONFORMITÉ CE
text_image
Handwritten signature or scribble on a line, possibly a signature or autographR. Neyman
Contrôle qualité
WAT U MOET WETEN OVER DIT APPARAAT
text_image
Handwritten signature or scribble on a line, possibly a signature or autographR. Neyman
Quality control
WERKING - Algemeen
Congratulations with the purchase of this Bestron product. These instructions tell you how the product works and how to use it. Read the instructions carefully before you start using the appliance. Only use the appliance in the manner described in the instructions. Keep these instructions in a safe place for future reference.
Defects:
If the appliance is defective, do not try to repair it yourself. Always have a qualified mechanic carry out any repairs.
Children:
- This appliance may be used by children over the age of 8 years old and persons with reduced physical, sensory or mental capabilities or lack of experience and know-how, but only if supervised or if they have been instructed on how to use the appliance safely and are aware of its potential dangers.
• Children are not allowed to clean and maintain the appliance, except if they are over the age of 8 years old and supervised. - Keep the appliance and the cable out of reach of children under the age of 8 years old.
- Keep an eye on children to ensure that they do not play with the appliance.
WHAT YOU SHOULD KNOW ABOUT ELECTRICAL APPLIANCES
- Check that the mains voltage corresponds with that shown on the rating plate of an electrical appliance before you use it.
- Check that the socket to which you connect the electrical appliance is earthed.
• Always install electrical appliances on a stable and level surface where it cannot fall over.
• Certain parts of an electrical appliance may become warm or sometimes hot. Do not touch them as you may burn yourself.
• Make sure your hands are dry when you touch an electrical appliance, a cord or a plug. -
Electrical appliances must be able to lose their heat to avoid fire hazards. Therefore, make sure that the appliance has sufficient clearance around it and that it does not come into contact with flammable materials. Electrical appliances must never be covered.
• Make sure that electrical appliances, cords or plugs do not come into contact with water. -
Never immerse electrical appliances, cords or plugs in water or any other liquid.
- Do not touch electrical appliances if they have fallen in the water. Immediately pull the plug out of the socket. Stop using the appliance.
• Make sure that electrical appliances, cords and plugs do not come into contact with heat sources, such as a hot hob or open fire. - Never let cords hang over the edge of the sink, a worktop or a table
• Always remove plug from the socket when you are not using the electrical appliance. - Remove the plug from the socket by pulling the plug itself and not the cord.
- Regularly check if the cord of the electrical appliance is not damaged. Do not use the electrical appliance if the cord shows signs of damage. If the cord is damaged, it should be replaced by the manufacturer, a technical service provider or a person with an equivalent qualification, to avoid any danger.
- The appliance may not be switched on with the aid of an external time switch, or by a separate system with remote control.
WHAT YOU SHOULD KNOW ABOUT THIS APPLIANCE
- Be careful when using the appliance outdoors.
- Never use the appliance in damp or wet locations.
- Thoroughly clean the appliance after use (see Cleaning and Maintenance).
- Switch off the appliance and remove the plug from the wall socket in the event of a malfunction during use, and before cleaning the appliance, fitting or removing an accessory, or storing the appliance after use.
- Keep your fingers clear of all moving parts whilst the appliance is in operation.
- Do not switch on the appliance unless the accessories and the bowl are fitted properly.
- Do not switch on the appliance unless the mixer head is locked in position.
- Do not switch on the appliance with the mixer head in the raised position.
• Always switch off the appliance before changing the accessories. - Never insert objects in the mixer bowl whilst the appliance is in operation.
ENVIRONMENT

- Dispose of packaging material such as plastic and cardboard boxes in the designated containers.
Do not dispose of this product as normal domestic waste at the end of its life, but hand it in at a collection point for the reuse of electric and electronic equipment. Look for the symbol on the product, the user instructions or the packaging showing the type of waste.
- The materials can be used as indicated. By helping us reuse and process the materials or otherwise recycle the old equipment, you will be making an important contribution towards the protection of the environment.
- Your municipality can tell you where to find the designated waste collection point in your neighbourhood.
CE DECLARATION OF CONFORMITY
This product meets the requirements of European guidelines.

text_image
Handwritten signature or scribble on a line, possibly a signature or autographR. Neyman
Quality control
OPERATION - General
The Bundt Cake Maker is intended only for domestic use, not for professional use.
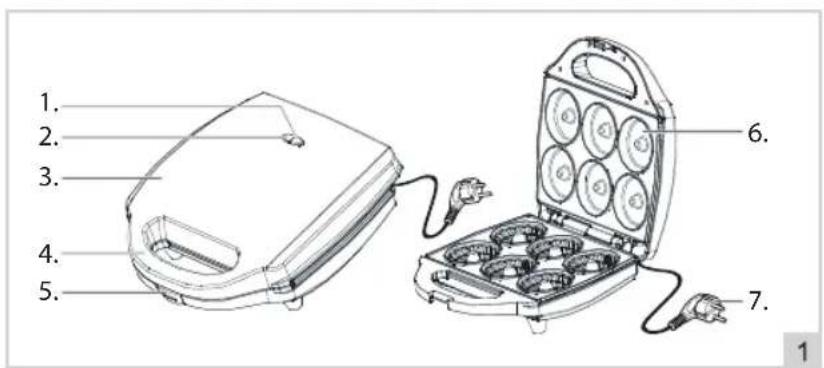
text_image
1. 2. 3. 4. 5. 6. 7.- "Ready-to-use" indicator light (green)
- "Power" indicator light (red)
- Housing
-
Handle
-
Safety lock clip
- Baking plates
- Power cord and plug
OPERATION - Using for the first time
- Remove the packaging.
- Clean the appliance (see 'Cleaning and maintenance').
- Put the plug in the wall socket and let the churros maker heat for 10 minutes. This way you remove any packaging odor from the device.
ATTENTION:
- The first time you use the device, there may be slight smoke and a specific odor. This is normal and will disappear by itself. Ensure adequate ventilation.
- Keep birds away from the device when the device is operating. Heating the non-stick coating on the baking tray can release a substance that is harmful to birds.
OPERATION - Pre-heat
- Plug in the power cord. The red and green light come on and the appliance starts preheating the baking trays.
- When the baking trays are up to temperature, the green light turns off. This takes around 5 minutes.
OPERATION - Use
- Prepare the bundt cake batter according to the recipe on the package.
- Pre-heat the device as described in "Pre-heating".
- Place the desired amount of batter on the bottom baking tray. Prevent the batter from coming over the edge of the baking tray. Close the lid.
- Bake the bundt cakes until they have the desired color.
- Open the device when the bundt cakes are ready.
- Carefully remove the bundt cakes with a heat-resistant wooden or plastic spatula do not damage the non-stick coating.
- When you have finished baking the bundt cakes, remove the plug from the wall socket and open the appliance to let the baking plates cool down.
ATTENTION:
- The normal preparation time is approximately 3 - 5 minutes. This depends on the batter used and your personal taste. Keep the appliance closed during baking, as opening in the meantime can adversely affect the appearance of the churros.
• Do not use sharp forks or knives!
CLEANING AND MAINTENANCE
Clean the device after each use.
- Remove the plug from the wall socket and let the appliance cool down completely.
- Clean the baking plates with a damp cloth. If necessary, you can clean the baking plates with soapy water. Ensure that no liquid enters the device.
- Dry the device thoroughly after cleaning.
ATTENTION:
• Make sure the device is not connected to the power outlet when cleaning.
- Do not use aggressive or abrasive cleaning agents or sharp objects (such as knives or hard brushes) when cleaning.
- Never immerse the device in water or any other liquid.
RECIPE FOR BUNDT CAKE
Ingredients
• 300 grams soft butter
• 300 grams flour
• 300 grams fine table sugar
• 6 large eggs
• 2 teaspoons baking powder
• 1 teaspoon grater of lemon
• 1 teaspoon vanilla extract
Method
- Put the soft butter together with the sugar in a mixing bowl and beat with the (hand) mixer airy.
- Then add the lemon zest and the vanilla extract.
- Add the eggs 1 by 1 and beat well after each egg.
- Then mix the baking powder and salt into the flour and sieve it over the egg / butter / sugar mixture.
- Stir everything well together again to create a smooth batter.
- Grease the turban cake maker well with butter.
- Then pour the batter into the turban molds and close the appliance lid.
- Bake the turban cake. Check the cake in between by pricking the cake with a skewer, if it comes out dry, then the cake is cooked, if it is still sticky, extend the baking time.
- As soon as the cake is cooked, remove the turban cakes from the device and allow the cake to cool down before it is served.
Ingredients
180 grams butter
225 grams caster sugar
^3/_4 teaspoon almond extract
2 teaspoons baking powder
180 grams plain flour
75 grams ground almond
3 large eggs
2 tablespoons milk
3 tablespoons cocoa powder mixed with
3 tablespoons hot water to make a paste
100 grams dark chocolate chip
30 grams icing sugar, to dust
Method
- Pre-heat the appliance. Thoroughly brush with melted butter.
- Cream the butter and sugar together until light and fluffy. Stir in the almond extract.
- Mix together the baking powder, flour and ground almonds. Beat in one egg at a time, adding a spoonful of the flour mixture in between. Repeat until all three eggs have been added, then fold in the remaining flour mixture and stir in the milk.
- Spoon half of the cake batter into a separate bowl and mix in the cocoa paste. Add the chocolate chips to the other half of the mixture. Add spoonfuls of each of the batters alternately and drag the handle of a teaspoon through the mixture to create a marbled effect.
- Bake until the cakes have a nice goldenbrown colour and then test the cake to see if a skewer inserted into the deepest part comes out clean.
- Let the cake cool in the tin for 10 minutes before turning out onto a cooling rack. Once cooled, dust the cake with a little icing sugar.
Ingredients
200g butter
3 tbsp cocoa powder
3 large ripe bananas
150ml full-fat milk, plus 1 tbsp for the icing
3 large eggs
1 tsp vanilla extract
350g self-raising flour
1 tsp bicarbonate of soda
350g soft light brown sugar
150g natural yogurt
100g dark chocolate chips or bar of chocolate, chopped into small chunks
80g salted peanuts, roughly chopped
100g dulce de leche caramel, from a can or jar
Method
-
Pre-heat the appliance. Grease appliance with some melted butter. Mix the cocoa with 50ml kettle-hot water and set aside to cool.
-
Mash the bananas, then stir in the butter, milk, eggs and vanilla. In another bowl, combine the flour, bicarb, sugar and 1/2 tsp salt. Shake the bowl a few times to encourage any lumps of sugar to come to the surface, squeeze them through your fingers and mix again.
-
Stir the banana mixture into the dry ingredients, then transfer half the cake mixture to another bowl. Add the cocoa mix, 50g yogurt and the chocolate chips to one bowl, and the remaining 100g yogurt and 50g peanuts to the other.
-
Scrape the peanut mixture into the prepared tin, then spoon over the chocolate mixture. Swirl a skewer through the two cake mixtures to create a marbled effect. Bake and check if the cakes are cooked by inserting a skewer into the centre of the sponge – if it comes out coated in any wet mixture, bake it some more. Then transfer to a wire rack to cool completely.
-
Mix the caramel with 1 tbsp milk to create a drizzly icing. Once the cake is cool, drizzle over the icing and scatter with the remaining peanuts.
Ingredients
225g unsalted butter, softened, plus extra for greasing
225g self-raising flour, plus 1 tbsp extra for the tin
250g dark muscovado sugar
4 large eggs, at room temperature, beaten
1 tsp baking powder
100g pack ground almonds
1 tsp mixed spice
1 tsp ground cinnamon, plus a pinch extra to decorate
250g grated butternut squash
250g mixed dried fruit
100g p ack walnut pieces, chopped, reserving a few whole to decorate
For the marzipan middle
flour, for dusting
200g marzipan
50g glacé cherries, roughly chopped, plus a few whole cherries to decorate zest 1 orange
For the frosting
140g full-fat cream cheese, chilled
175g icing sugar, sifted
50g unsalted butter, softened
2 tsp whole milk
1 tsp vanilla extract
Method
-
Lightly and evenly grease the appliance with soft butter, making sure you get well into any flutes or ridges. Sift 1 tbsp flour over the appliance, then tilt and turn the tin until the inside is completely covered with a very thin layer of flour. Tap to gather any excess at the bottom a few times as you go. Once the butter is coated, tap and tip out the excess flour. Pre-heat the appliance.
-
For the marzipan middle, dust the work surface with a little more flour, knead the marzipan briefly, then work in the cherries and orange zest. Roll into a sausage about 3cm thick, then press the ends together to make a ring.
- To make the cake, put the butter, flour, sugar, eggs, baking powder, almonds, spices and 1/4 tsp salt in a large bowl. Use an electric whisk to mix until smooth, then fold in the squash, fruit and walnuts.
- Spoon half the batter into the prepared tin, then press the ring of marzipan on top. Cover with the rest of the batter and smooth the top. Bake the cakes until the cakes are risen, golden and shrunk away from the sides when it's ready.
- To make the frosting, beat together half the cream cheese with the icing sugar and butter until evenly blended. When smooth, beat in the remaining cream cheese along with the milk and vanilla to make a thick, but still flowing, frosting – it should have a consistency similar to semi-whipped cream.
- When the cake is cold, spoon over the frosting, letting it drip down the sides. Sprinkle with a little cinnamon, then chill for 10 mins to set the frosting a little. Decorate with whole cherries and walnuts. Keep in the fridge and eat within 5 days.
WARRANTY CONDITIONS
Bestron offers a 60-month warranty on this equipment against defects resulting from manufacturing and/or material errors, subject to the following conditions.
-
No labour or material costs will be charged during this warranty period.
-
Any repairs carried out under the warranty will not extend the warranty period.
-
Faulty parts, or in the event of exchange, the faulty equipment itself, will automatically become the property of Bestron.
-
The warranty is valid for the first buyer only and is non-transferable.
-
The warranty is not valid for damage caused by:
- Accidents
- Improper use
- Wear and tear
- Neglect
- Faulty installation
- Connection to a different mains voltage than indicated on the type plate
• Unauthorised changes
• Repairs carried out by unqualified third parties
- Use in violation with the applicable statutory, technical or safety standards
- Careless transport without suitable packaging or other protection
- Warranty cannot be claimed:
- For damage during transport
- If the serial number of the appliance is removed or changed
- Items excluded from warranty are:
- Cords
- Lamps
- Glass parts
-
The warranty does not entitle the purchaser to compensation for any damage other than replacement or repair of the faulty parts. Bestron cannot in any event be held liable for any indirect or consequential losses caused by or in relation to the equipment it has provided.
-
Claims under a warranty may only be submitted to your (online) retailer or directly to the Bestron Service Department. Never send items without being asked to. We may refuse the parcel and you will be liable for the costs. Contact us first and we tell you how the appliance should be packaged and sent. Each claim under a warranty must be accompanied by the relevant receipt.
SERVICE
If an unexpected problem occurs, please contact the BESTRON service department: www.bestron.com/service
COMPLIMENTI!
text_image
Handwritten signature or scribble on a line, possibly a signature or autographR. Neyman
Controllo qualità
text_image
Handwritten signature or scribble on a line, possibly a signature or autographtext_image
QR code image containing encoded data, no visible human-readable textNEED HELP? CHAT WITH US! WHATSAPP CUSTOMER SERVICE

BESTRON.COM/WHATSAPP