Power Steel 5616Y - Above-ground pool BESTWAY - Free user manual and instructions
Find the device manual for free Power Steel 5616Y BESTWAY in PDF.

| Product type | Above-ground pool |
| Brand | Bestway |
| Model | Power Steel 5616Y |
| Diameter | 4.88 m (16 ft) |
| Height | 1.42 m (56 in) |
| Water capacity | Approximately 22,800 L (6,025 gal) |
| Liner material | Reinforced PVC and steel |
| Empty weight | Approximately 70 kg |
| Pump power supply | 220-240 V~, 50 Hz |
| Filtration type | Cartridge pump included |
| Pump flow rate | Approximately 3,800 L/h |
| Main functions | Filtration, circulation, rinsing |
| Chemical maintenance | Tablets or liquid via ChemConnect dispenser or floater |
| Cleaning | Skim regularly, wash cartridge |
| Safety | Adult supervision mandatory, barrier recommended, no diving |
| Spare parts and repair | Patch provided for repairs; online support |
| General information | Tool-free assembly; extended lifespan with regular maintenance |
Frequently Asked Questions - Power Steel 5616Y BESTWAY
User questions about Power Steel 5616Y BESTWAY
0 question about this device. Answer the ones you know or ask your own.
Ask a new question about this device
Download the instructions for your Above-ground pool in PDF format for free! Find your manual Power Steel 5616Y - BESTWAY and take your electronic device back in hand. On this page are published all the documents necessary for the use of your device. Power Steel 5616Y by BESTWAY.
USER MANUAL Power Steel 5616Y BESTWAY
text_image
Visit www.bestwaycorp.com/support for help WE SUGGEST NOT TO RETURN THE PRODUCT TO THE STORE QUESTIONS? PROBLEMS? MISSING PARTS? For FAQ, Manuals, Videos Or Spare Parts, Please Visit bestwaycorp.com/support
text_image
bestwaycorp.com/support ?bestwaycorp.com/support Visit Bestway YouTube channel YouTube
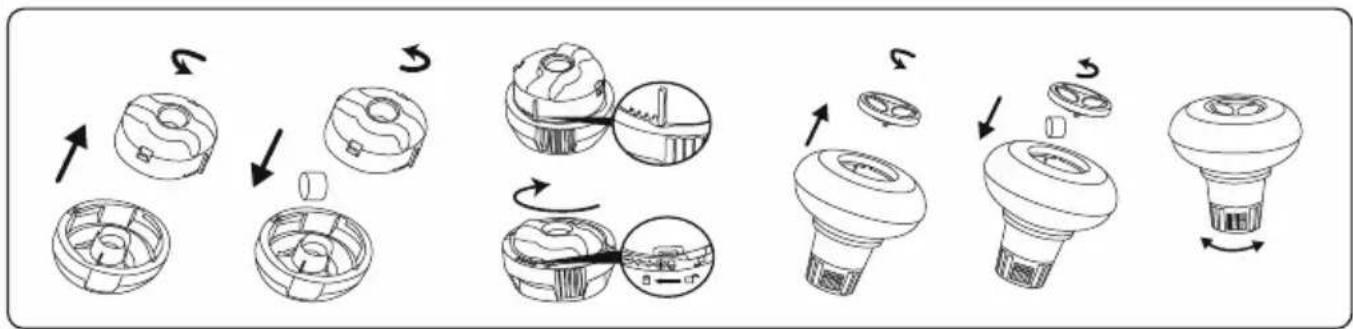
Components list: / Lista de componentes: / Lista de componentes: / Stückliste: / Komponentide Ioend: / Onderdelenlijst: / Elenco componenti: / Liste des composants : / AISTA EÄAPTHMATÖN: / Спецификация деталей: / Lista elementów: / Tartozéklista: / Komponentlista:
| A | Oberschiene A |
| Ülalatt A | |
| Bovenste rail A | |
| Guida superiore A | |
| Rail supérieur A | |
| ΕΠΑΝΩ ΡΑΓΑ A | |
| Верхняя направляющая A | |
| Top Rail A | Górna szyna A |
| Corrimão Superior A | „A" felső sin |
| Riel superior A | Övre skena A |
| SIZE / TAMANHO /TAMAÑO / GRÓSSE/ KOKO / GROOTTE/ DIMENSIONI /DIMENSION /MEΓΕΘΟΣ /PAЗМЕР / ROZMIAR/MÉRET / STORLEK | ITEM / ITEM N.° /N° ELEMENTO /ARTIKEL-NR. / OSA NRO/ ARTIKELNR. /ARTICOLO / ELEMENT /ANTIKEIMENO /No ИЗДЕЛИЯ / NR POZ./ CIKKSZ. / ARTIKEL | PART CODE / CÓDIGO DEPEÇA / CÓDIGO DE PIEZA /TEIL-CODE / OSAN KOODI /ONDERDEELCODE / CODICEDEL COMPONENTE / CODEPIECE / KODIKOΣ TMHMATOΣ/ KOD ДЕТАЛИ / KOD CZĘŚCI/ ALK. KÓDJA / DELKOD | QTY / QTDE /CANT. / MENGE/ KPL / AANT. /QTÀ / QTE /ПОΣΟΤΗΤΑ /K-BO / ILOŚĆ /MENNY. /ANTAL |
| 2.82 m x 1.96 m x 64 cm(9'3" x 6'5" x 33") | 56629 / 56631 | P05589 | 2 |
| 4.04 m x 2.01 m x 1.00 m(13'3" x 6'7" x 39.5") | 56441 / 5625156426 / 56442 / 5666056721 / 56727 | P05589 | 2 |
| 4.12 m x 2.01 m x 1.22 m(13'6" x 6'7" x 48") | 56456 / 5645756458 / 5666156722 / 56728 | P05589 | 2 |
| 4.88 m x 2.44 m x 1.22 m(16' x 8' x 48") | 56670 / 5667156672 / 5667356995 / 56996 | P05601 | 2 |
| 5.49 m x 2.74 m x 1.22 m(18' x 9' x 48") | 56465 / 5646656467 / 5646856997 / 56998 | P05608 | 4 |
| 6.40 m x 2.74 m x 1.32 m(21' x 9' x 52") | 5611Y / 5611Z5612A / 5612B | P05382 | 6 |
| 7.32 m x 3.66 m x 1.32 m(24' x 12' x 52") | 56474 / 5647556476 / 56477 | P05613 | 8 |
| 9.56 m x 4.88 m x 1.32 m(31'4" x 16' x 52") | 56623 / 56625 | P05613 | 12 |
NOTE: Some parts already have been installed on the pool.
PT
text_image
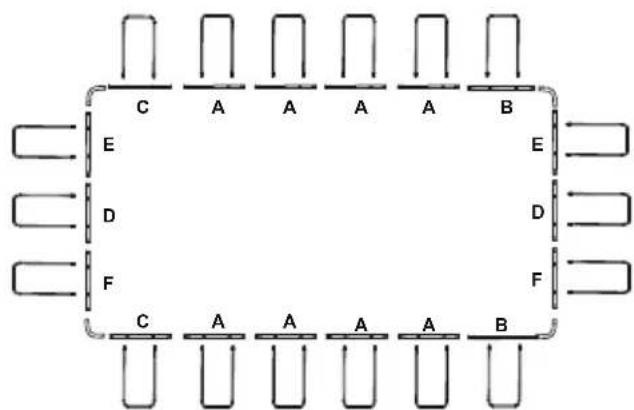
C A A A B E D C A A A B E D7.32 m x 3.66 m x 1.32 m (24' x 12' x 52")
text_image
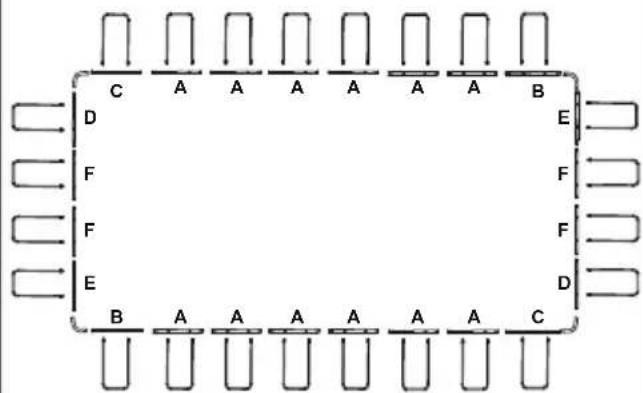
C A A A A B E D F C A A A A B E D F9.56 m x 4.88 m x 1.32 m (31'4" x 16' x 52")
text_image
C A A A A A A A B D E F F F F E D B A A A A A A A CEN
NOTE: Drawing for illustration purpose only. May not reflect actual product. Not to scale.
PT
text_image
Visit www.bestwaycorp.com/support for help WE SUGGEST NOT TO RETURN THE PRODUCT TO THE STORE QUESTIONS? PROBLEMS? MISSING PARTS? For FAQ, Manuals, Videos Or Spare Parts, Please Visit bestwaycorp.com/supportWARNING
POWER STEEL™ RECTANGULAR POOLS OWNER'S MANU
Carefully read, understand, and follow all information in this user manual before installing and using the swimming pool. These warnings, instructions, and safety guidelines address some common risks of water recreation, but they cannot cover all risks and dangers in all cases. Always use caution, common sense, and good judgment when enjoying any water activity. Retain this information for future use.
Non Swimmers safety
- Continuous, active, and vigilant supervision of weak swimmers and non-swimmers by a competent adult is required at all times (remembering that children under five are at the highest risk of drowning).
- Designate a competent adult to supervise the pool each time it is being used.
- Weak swimmers or non-swimmers should wear personal protection equipment when using the pool.
- When the pool is not in use, or unsupervised, remove all toys from the swimming pool and its surrounding to avoid attracting children to the pool.
Safety devices
- In order to prevent children from drowning, it is recommended to secure the access to the pool with a protection device. In order to prevent children climbing from the inlet and outlet valve, it is recommended to install a barrier (and secure all doors and windows, where applicable) to prevent unauthorized access to the swimming pool.
- Barriers, pool covers, pool alarms, or similar safety devices are helpful aids, but they are not substitutes for continuous and competent adult supervision.
Safety equipment
- It is recommended to keep rescue equipment (e.g. a ring buoy) by the pool.
- Keep a working phone and a list of emergency phone numbers near the pool.
Safe use of the pool
- Encourage all users especially children to learn how to swim.
- Learn Basic Life Support (Cardiopulmonary Resuscitation - CPR) and refresh this knowledge regularly. This can make a life-saving difference in the event of an emergency.
- Instruct all pool users, including children, what to do in case of an emergency.
- Never dive into any shallow body of water. This can lead to serious injury or death.
- Do not use the swimming pool when using alcohol or medication that may impair your ability to safely use the pool.
- When pool covers are used, remove them completely from the water surface before entering the pool.
- Protect pool occupants from water related illnesses by keeping the pool water treated and practicing good hygiene.
Consult the water treatment guidelines in the user's manual.
- Store chemicals (e.g. water treatment, cleaning or disinfection products) out of the reach of children.
- Use the signage as outlined below. Signage is to be displayed in a prominent position within 2m of the pool.


Keep children under supervision in the aquatic environment. No diving.
- Removable ladders shall be placed on a horizontal surface.
- Irrespective of materials used for swimming pool construction, accessible surfaces have to be checked regularly to avoid injuries.
- Regularly monitor bolts and screws. Remove splinters or any sharp edges to avoid injuries.
ATTENTION: Do not leave the drained pool outside. The empty pool is liable to become deformed and/or displaced due to wind.
- If you have a filter pump, refer to the pump's manual for instructions. WARNING! The pump cannot be used while people are inside the pool!
- If you have a ladder, refer to the ladder's manual for instructions.
- WARNING! The use of a swimming pool implies compliance with the safety instructions described in the operating and maintenance guide. In order to prevent drowning or other serious injuries, pay particular attention to the possibility of unexpected access to the swimming pool by children under 5 years by securing the access to it, and, during the bathing period, keep them under constant adult supervision.
Please read carefully and keep for future reference
Installation usually takes approximately 20 - 30 minutes with 2-3 people excluding earthworks and filling.
CHOOSE THE CORRECT LOCATION
NOTE: The pool must be set up on a completely flat and level surface. Please do not install the pool if the surface is inclined or sloped.
Correct conditions to set up the pool:
- The selected location has to be capable of uniformly supporting the weight for the entire time the pool is installed, moreover the location must be flat and must be cleared of all objects and debris including stones and twigs.
- We recommend positioning the pool away from any objects children could use to climb into the pool.
NOTE: Position the pool near an adequate drainage system to deal with overflow or to discharge the pool.
Incorrect conditions to set up the pool:
- On uneven ground the pool may collapse causing serious personal injury and/or damage to personal property and will void the warranty and prevent any service claims.
- Sand should not be used to create a level base; the ground must be dug out if necessary.
- Directly under overhead power lines or trees. Be sure the location does not contain underground utility pipes, lines or cables of any kind.
- Do not set up the pool on driveways, decks, platforms, gravel or asphalt surfaces. The selected location should be firm enough to withstand the pressure of the water; mud, sand, soft / loose soil or tar are not suitable.
- Grass or other vegetation under the pool will die and may cause odors and slime to develop, therefore we recommend removing all grass from the selected pool location.
- Avoid areas prone to aggressive plant and weed species that may grow through the liner.
NOTE: Check with your local city council for by-laws relating to fencing, barriers, lighting and safety requirements and ensure you comply with all laws.
NOTE: If have a filter pump, refer to the pump's manual for instructions.
NOTE: The ladder must match the pool size and should to be used only for entering and exiting the pool. It is forbidden to exceed the permitted payload of the ladder. Check regularly if the ladder is properly assembled.
Pool Maintenance
If you do not adhere to the maintenance guidelines below, your health might be at risk, especially that of your children.
Using chemical tablets (not included):
NOTE: Chemconnect or Chemical Floater must be used when you perform chemical maintenance with tablets. Your purchased item may not include any of those dispensers, in this case you can purchase it by visiting our website www.bestwaycorp.com or at the nearest pool dealer.
flowchart
graph TD
    A["Initial Battery"] --> B["Assembly Step 1"]
    B --> C["Assembly Step 2"]
    C --> D["Assembly Step 3"]
    D --> E["Final Bulb with Rotation Arrow"]
    style A fill:#f9f,stroke:#333
    style E fill:#bbf,stroke:#333
IMPORTANT: Don't use granulate tablets or throw the tablet directly in the water. The chemicals can deposit on the bottom, damage the material and discolor the PVC.
Using chemical liquid (not included):
IMPORTANT: Add chemical liquid in small doses and in the center of the pool to avoid direct contact between the chemicals and the PVC surface. Direct contact can damage the material and discolor the surface.
NOTE: Remove the chemical dispenser from pool when the pool is in use.
IMPORTANT: After performing chemical maintenance and before using the pool, use a test kit (not included) to test the water chemistry. We recommend maintaining your water according to the following table.
| Parameters | Values |
| Water clarity | clear view of the pool bottom |
| Colour of the water | no colour should be observed |
| Turbidity in FNU/NTU | max. 1,5 (preferably less than 0,5) |
| Nitrate concentration above that of fill water in mg/l | max. 20 |
| Total organic carbon (TOC) in mg/l | max. 4,0 |
| Redox potential against Ag/AgCl 3,5 m KCl in mV | min. 650 |
| pH value | 6,8 to 7,6 |
| Free active chlorine (without cyanuric acid) in mg/l | 0,3 to 1,5 |
| Free chlorine used in combination with cyanuric acid in mg/l | 1,0 to 3,0 |
| Cyanuric acid in mg/l | max 100 |
| Combined chlorine in mg/l | max 0,5 (preferably close to 0,0 mg/l) |
NOTE: Damage resulting from chemical imbalance is not covered by the warranty. Pool chemicals are potentially toxic and should be handled with care. There are serious health risks from chemical vapors and the incorrect labeling and storage of chemical containers. Please consult your local pool supply retailer for more information about chemical maintenance. Pay close attention to the chemical manufacturer's instructions. Pool damage resulting from misuse of chemicals and mismanagement of pool water is not covered by the warranty.
IMPORTANT: Over usage of chemicals can discolor the printing and all points of the pool material. It can also damage the structure of the pool liner.
To keep your pool clean:
- Contact your local pool supply shop for advice and purchase of chemicals and pH kits. One of the most important factors to increase the life of the liner is to keep continuously clean and healthy water. Please strictly follow the instructions from professional technicians for the water treatment through the use of chemicals.
- Locate a bucket of water next to pool to clean users' feet before entering pool.
- Cover the pool when not in use.
- Skim pool regularly to avoid settled dirt.
-
Check and wash the filter cartridge regularly.
-
Gently clean any scum from below the top ring with a clean cloth.
- Please be careful in case of rain water, kindly check that the water level is not higher than the expected. If so, YOU HAVE TO DISCHARGE THE EXCESS WATER.
- If it rains, check that the water level is not higher than the specified level. If water exceeds the specified levels, drain the pool to the specified level.
Proper maintenance can maximize the life of your pool.
During the season of use of the swimming pool, the filtration system must be necessarily put into service every day, enough time to assure at least a complete renewal of the volume of water.
NOTE: The pump is used to circulate the water and to filter small particles. In order to keep your pool water clean and hygienic, you must also add chemicals.
Repair
In the event of a leak, patch your pool using the underwater adhesive repair patch provided. You can find the instructions in FAQs on the support section of our website, www.bestwaycorp.com.
Dismantling
- Unscrew the drain valve cap on the outside of the pool counter clockwise and remove.
- Connect the adaptor to the hose and put the other end of the hose in the area where you are going to drain your pool. (Check local regulations for drainage by-laws).
-
Screw the control ring of the hose adaptor clockwise onto the drain valve. The drain valve will be open and water will start to drain automatically. ATTENTION: Water flow can be controlled with the control ring.
-
When draining is finished, unscrew the control ring to close the valve.
-
Disconnect the hose.
-
Screw the cap back onto the drain valve.
-
Air dry pool.
ATTENTION: Do not leave the drained pool outside.
Storage and Winterization
- Please remove all the accessories and spare parts of the pool and store them clean and dry.
- Once pool is completely dry, sprinkle with talcum powder to prevent pool from sticking together, fold pool carefully. If pool is not completely dry, mold may result and will damage the pool liner.
- Store liner and accessories in a dry place with a moderate temperature between 5°C / 41°F and 38°C / 100°F.
- During the rainy season, pool and accessories should be stored as per above instructions also.
- Improper draining of the pool might cause serious personal injury and/or damage to personal property.
- We strongly recommend the pool is disassembled during the off season (winter months). Store in a dry location out of children's reach.
PISCINAS RECTANGULARES POWER STEEL™ MANUAL DO PROPRIETÁRIO

flowchart
graph TD
    A["Raw Material"] --> B["Add Component"]
    B --> C["Transfer to Battery Lamp"]
    C --> D["Final Product with Arrow indicating rotation and change"]
    D --> E["Final Product with Arrow indicating reassembly or assembly"]
natural_image
Three circular icons showing people in different poses: swimming, no clear sign, and walking (no text or symbols)flowchart
graph TD
    A["Hybrid Battery"] --> B["Assembly Module 1"]
    B --> C["Assembly Module 2"]
    C --> D["Assembly Module 3"]
    D --> E["Assembly Module 4"]
    E --> F["Final Bulb with Rotation Arrow"]

    subgraph Component 1
        G["Hybrid Battery housing"]
        H["Hybrid Battery housing with internal components"]
    end

    subgraph Component 2
        I["Hybrid Battery housing with internal components"]
        J["Hybrid Battery housing with internal components"]
    end

    subgraph Component 3
        K["Hybrid Battery housing with internal components"]
        L["Hybrid Battery housing with internal components"]
    end

    subgraph Component 4
        M["Hybrid Battery housing with internal components"]
        N["Hybrid Battery housing with internal components"]
    end

    subgraph Component 5
        O["Hybrid Battery housing with internal components"]
        P["Hybrid Battery housing with internal components"]
    end

    style Component 1 fill:#f9f,stroke:#333
    style Component 2 fill:#f9f,stroke:#333
    style Component 3 fill:#f9f,stroke:#333
    style Component 4 fill:#f9f,stroke:#333
    style Component 5 fill:#f9f,stroke:#333
flowchart
graph TD
    A["Hybrid Battery"] --> B["Assembly Module 1"]
    B --> C["Assembly Module 2"]
    C --> D["Assembly Module 3"]
    D --> E["Assembly Module 4"]
    E --> F["Final Bulb with Rotation Arrow"]

    subgraph Component 1
        G["Hybrid Battery housing"]
        H["Internal components"]
    end

    subgraph Component 2
        I["Internal components"]
        J["Internal components"]
    end

    subgraph Component 3
        K["Internal components"]
        L["Internal components"]
    end

    subgraph Component 4
        M["Internal components"]
        N["Internal components"]
    end

    G --> G1["Up arrow"]
    H --> H2["Down arrow"]
    I --> I1["Up arrow"]
    J --> J1["Down arrow"]
    K --> K1["Up arrow"]
    L --> L1["Down arrow"]
    M --> M1["Up arrow"]
    N --> N1["Down arrow"]
    M --> M2["Up arrow"]
    N --> N2["Down arrow"]
natural_image
Three black circular icons showing pictograms of people swimming, no water, and a person crossed out (no text or symbols)flowchart
graph TD
    A["Raw Material"] --> B["Add Component"]
    B --> C["Transfer to Battery Lamp"]
    C --> D["Final Product with Arrow indicating rotation and change"]
    D --> E["Final Product with Arrow indicating reassembly or assembly"]
natural_image
Three circular icons representing pictograms of people swimming, no pictogram, and a person walking (no text or symbols)natural_image
Three circular icons showing people in different poses: swimming, no crossing, and walking (no text or symbols)flowchart
graph TD
    A["Hybrid Battery"] --> B["Assembly Module 1"]
    B --> C["Assembly Module 2"]
    C --> D["Assembly Module 3"]
    D --> E["Assembly Module 4"]
    E --> F["Final Lamp System"]

    subgraph Component 1
        G["Hybrid Battery with Top Cover"]
        H["Hybrid Battery with Bottom Cover"]
    end

    subgraph Component 2
        I["Hybrid Battery with Top Cover"]
        J["Hybrid Battery with Bottom Cover"]
    end

    subgraph Component 3
        K["Hybrid Battery with Top Cover"]
        L["Hybrid Battery with Bottom Cover"]
    end

    subgraph Component 4
        M["Hybrid Battery with Top Cover"]
        N["Hybrid Battery with Bottom Cover"]
    end

    subgraph Component 5
        O["Hybrid Battery with Top Cover"]
        P["Hybrid Battery with Bottom Cover"]
    end

    subgraph Component 6
        Q["Hybrid Battery with Top Cover"]
        R["Hybrid Battery with Bottom Cover"]
    end

    subgraph Component 7
        S["Hybrid Battery with Top Cover"]
        T["Hybrid Battery with Bottom Cover"]
    end

    subgraph Component 8
        U["Hybrid Battery with Top Cover"]
        V["Hybrid Battery with Bottom Cover"]
    end

    subgraph Component 9
        W["Hybrid Battery with Top Cover"]
        X["Hybrid Battery with Bottom Cover"]
    end

    subgraph Component 10
        Y["Hybrid Battery with Top Cover"]
        Z["Hybrid Battery with Bottom Cover"]
    end

    subgraph Component 11
        AA["Hybrid Battery with Top Cover"]
        AB["Hybrid Battery with Bottom Cover"]
    end

    subgraph Component 12
        AC["Hybrid Battery with Top Cover"]
        AD["Hybrid Battery with Bottom Cover"]
    end

    subgraph Component 13
        AE["Hybrid Battery with Top Cover"]
        AF["Hybrid Battery with Bottom Cover"]
    end

    subgraph Component 14
        AG["Hybrid Battery with Top Cover"]
        AH["Hybrid Battery with Bottom Cover"]
    end

    subgraph Component 15
        AI["Hybrid Battery with Top Cover"]
        AJ["Hybrid Battery with Bottom Cover"]
    end

    subgraph Component 16
        AK["Hybrid Battery with Top Cover"]
        AL["Hybrid Battery with Bottom Cover"]
    end

    subgraph Component 17
        AM["Hybrid Battery with Top Cover"]
        AN["Hybrid Battery with Bottom Cover"]
    end

    subgraph Component 18
        AO["Hybrid Battery with Top Cover"]
        AP["Hybrid Battery with Bottom Cover"]
    end

    subgraph Component 19
        AQ["Hybrid Battery with Top Cover"]
        AR["Hybrid Battery with Bottom Cover"]
    end

    subgraph Component 20
        AS["Hybrid Battery with Top Cover"]
        AT["Hybrid Battery with Bottom Cover"]
    end

    subgraph Component 21
        AU["Hybrid Battery with Top Cover"]
        AV["Hybrid Battery with Bottom Cover"]
    end

    subgraph Component 22
        AW["Hybrid Battery with Top Cover"]
        AX["Hybrid Battery with Bottom Cover"]
    end

    subgraph Component 23
        AXA["Hybrid Battery with Top Cover"]
        AZ["Hybrid Battery with Bottom Cover"]
    end

    subgraph Component 24
        BA["Hybrid Battery with Top Cover"]
        BB["Hybrid Battery with Bottom Cover"]
    end

    subgraph Component 25
        BAa["Hybrid Battery with Top Cover"]
        BAaB["Hybrid Battery with Bottom Cover"]
    end

    subgraph Component 26
        BAaC["Hybrid Battery with Top Cover"]
        BAaD["Hybrid Battery with Bottom Cover"]
    end

    subgraph Component 27
        BAaE["Hybrid Battery with Top Cover"]
        BAaF["Hybrid Battery with Bottom Cover"]
    end

    subgraph Component 28
        BAaG["Hybrid Battery with Top Cover"]
        BAaH["Hybrid Battery with Bottom Cover"]
    end

    subgraph Component 29
        BAaI["Hybrid Battery with Top Cover"]
        BAaJ["Hybrid Battery with Bottom Cover"]
    end

    subgraph Component 30
        BAaK["Hybrid Battery with Top Cover"]
        BAaL["Hybrid Battery with Bottom Cover"]
    end

    subgraph Component 31
        BAaM["Hybrid Battery with Top Cover"]
        BAaN["Hybrid Battery with Bottom Cover"]
    end

    subgraph Component 32
        BAaO["Hybrid Battery with Top Cover"]
        BAaP["Hybrid Battery with Bottom Cover"]
    end

    subgraph Component 33
        BAaQ["Hybrid Battery with Top Cover"]
        BAaR["Hybrid Battery with Bottom Cover"]
    end

    subgraph Component 34
        BAaS["Hybrid Battery with Top Cover"]
        BAaT["Hybrid Battery with Bottom Cover"]
    end

    subgraph Component 35
        BAaU["Hybrid Battery with Top Cover"]
        BAaV["Hybrid Battery with Bottom Cover"]
    end

    subgraph Component 36
        BAaW["Hybrid Battery with Top Cover"]
        BAaX["Hybrid Battery with Bottom Cover"]
    end

    subgraph Component 37
        BAaY["Hybrid Battery with Top Cover"]
        BAaZ["Hybrid Battery with Bottom Cover"]
    end

    subgraph Component 38
        BAaXo["Hybrid Battery with Top Cover"]
        BAaYx["Hybrid Battery with Bottom Cover"]
    end

    subgraph Component 39
        BAaYx["Hybrid Battery with Top Cover"]
        BAaYx["Hybrid Battery with Bottom Cover"]
    end

    subgraph Component 40
        BAaYxO["Hybrid Battery with Top Cover"]
        BAaYxO["Hybrid Battery with Bottom Cover"]
    end

    subgraph Component 41
        BAaYxP["Hybrid Battery with Top Cover"]
        BAaYxP["Hybrid Battery with Bottom Cover"]
    end

    subgraph Component 42
        BAaYxQ["Hybrid Battery with Top Cover"]
        BAaYxQ["Hybrid Battery with Bottom Cover"]
    end

    subgraph Component 43
        BAaYxQo["Hybrid Battery with Top Cover"]
        BAaYxQo["Hybrid Battery with Bottom Cover"]
    end

    subgraph Component 44
        BAaYxQx["Hybrid Battery with Top Cover"]
        BAaYxQxx["Hybrid Battery with Bottom Cover"]
    end

    subgraph Component 45
        BAaYxQxy["Hybrid Battery with Top Cover"]
        BAaYxQxy["Hybrid Battery with Bottom Cover"]
    end

    subgraph Component 46
        BAaYxQxz["Hybrid Battery with Top Cover"]
        BAaYxQxz["Hybrid Battery with Bottom Cover"]
    end

    subgraph Component 47
        BAaYxQxz["Hybrid Battery with Top Cover"]
        BAaYxQxz["Hybrid Battery with Bottom Cover"]
    end

    subgraph Component 48
        BAaYxQxzP["Hybrid Battery with Top Cover"]
        BAaYxQxzP["Hybrid Battery with Bottom Cover"]
    end

    subgraph Component 49
        BAaYxQxzQ["x HYbrid Body"]
flowchart
graph TD
    A["Brush with inner brush"] --> B["Arrow 1: Rotation"]
    B --> C["Arrow 2: Rotation"]
    C --> D["Arrow 3: Rotation"]
    D --> E["Arrow 4: Rotation"]
    E --> F["Arrow 5: Rotation"]
    F --> G["Arrow 6: Rotation"]
    G --> H["Arrow 7: Rotation"]
    H --> I["Arrow 8: Rotation"]
    I --> J["Arrow 9: Rotation"]
    J --> K["Arrow 10: Rotation"]
flowchart
graph TD
    A["Hybrid Battery"] --> B["Internal Components"]
    B --> C["Assembly of Internal Components"]
    C --> D["Final Bulb with Internal Component"]

    subgraph Initial Assembly
        A1["Hybrid Battery with Top Cover"]
        A2["Hybrid Battery with Bottom Cover"]
        A3["Hybrid Battery with Inner Cover"]
    end

    subgraph Mid-Close Assembly
        B1["Hybrid Battery with Top Cover"]
        B2["Hybrid Battery with Bottom Cover"]
        B3["Hybrid Battery with Inner Cover"]
        B4["Hybrid Battery with Inner Cover"]
    end

    subgraph Final Assembly
        C1["Hybrid Battery with Top Cover"]
        C2["Hybrid Battery with Bottom Cover"]
        C3["Hybrid Battery with Inner Cover"]
        C4["Hybrid Battery with Inner Cover"]
    end

    A1 --> B1
    A2 --> B2
    B1 --> C1
    B2 --> C2
    C1 --> D1
    C2 --> D2
    D1 --> E1
    D2 --> E2
    E1 --> F1
    E2 --> F2
    F1 --> G1
    F2 --> G2
    G1 --> H1
    G2 --> H2
    H1 --> I1
    H2 --> I2
    I1 --> J1
    I2 --> J2
    J1 --> K1
    J2 --> K2
    K1 --> L1
    K2 --> L2
    L1 --> M1
    L2 --> M2
    M1 --> N1
    M2 --> N2
    N1 --> O1
    N2 --> O2
    O1 --> P1
    O2 --> P2
    P1 --> Q1
    P2 --> Q2
    Q1 --> R1
    Q2 --> R2
    R1 --> S1
    R2 --> S2
    S1 --> T1
    S2 --> T2
    T1 --> U1
    T2 --> U2
    U1 --> V1
    U2 --> V2
    V1 --> W1
    V2 --> W2
    W1 --> X1
    W2 --> X2
flowchart
graph TD
    A["Initial Battery with Internal Components"] --> B["Assembly Step 1"]
    B --> C["Assembly Step 2"]
    C --> D["Assembly Step 3"]
    D --> E["Final Motor with Internal Component"]
    E --> F["Final Motor with Internal Component"]
natural_image
Three black circular icons showing pictograms: a person swimming, a no-drawn cross symbol, and a human figure (no text or numbers)flowchart
graph TD
    A["Raw Material"] --> B["Add Component"]
    B --> C["Transfer to Battery Lamp"]
    C --> D["Final Product with Stabilization"]
    style A fill:#f9f,stroke:#333
    style D fill:#bbf,stroke:#333
natural_image
Three black circular icons showing pictograms: a person swimming, a crossed-out hand holding a cross, and a human figure walking (no text or symbols)flowchart
graph TD
    A["Raw Material"] --> B["Add Component"]
    B --> C["Transfer to Battery Lamp"]
    C --> D["Final Product with Arrow indicating rotation and change"]
    D --> E["Final Product with Arrow indicating reassembly or disassembly"]
natural_image
Diagram of an electronic component with a magnified inset showing internal structure (no text or symbols)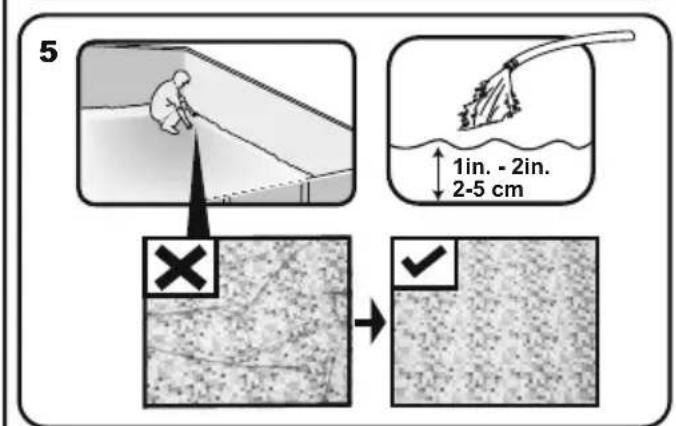
text_image
5 1in. - 2in. 2-5 cm × ✓EN Assembly without tools
To lengthen the life of your pool, it is important to sprinkle the top rail with the Talcum Powder before assembly. Talcum Powder is not included and easily available in the market. Bestway Inflatables will not be responsible for damage caused to the pool due to mishandling or failure to follow these instructions.
- Lay out all parts and check that you have the correct quantities as listed in the components list. For assistance or FAQs, please visit the support section on our website, www.bestwaycorp.com.
- Spread out the pool and make sure the pool is right side up, let it sit exposed to direct sunlight for 1 hour or more so that the pool is more flexible during set up.
- Place the pool near an adequate drainage system to deal with overflow water and ensure the pool's inlet A and outlet B are correctly positioned to allow your filter pump to connect to a power source.
Note: Do not use extension power cords to power your pump.
ATTENTION: Do not drag the pool on the ground, this can damage the pool.
natural_image
Diagram of mechanical components and gear assembly (no text or labels)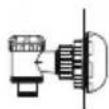
natural_image
Diagram showing mechanical components and motion lines without any text or symbols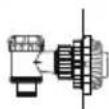
natural_image
Technical diagram showing mechanical assembly components with no visible text or symbolsEN
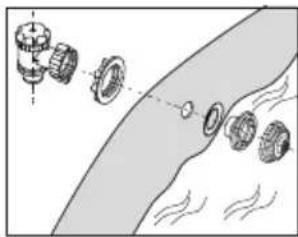
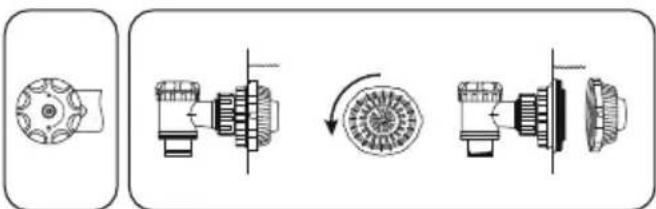
Connection Valve Assembly
For pool with connection valve.
NOTE: If you want to connect other pool cleaning kits to the pool through the connection valve, disassemble the Debris Screen from the Connector.
PT
text_image
30% 70% 90%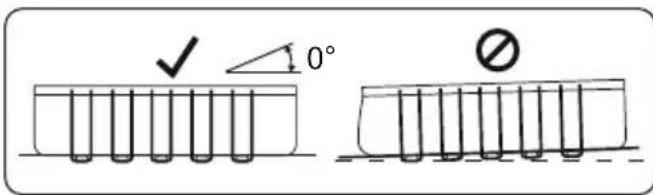
text_image
✓ 0° ØEN
Filling Pool with Water
ATTENTION: Do not leave pool unattended while filling with water.
-
Fill pool until water capacity is 90%, DO NOT OVERFILL as this could cause the pool to collapse. In times of heavy rainfall you may need to empty some of the water to ensure the level is correct.
-
When filling the pool is completed, check that the water is not collecting on any side to ensure the pool is level. IMPORTANT: If pool is not level, drain water and re-level ground by digging out.
Never attempt to move the pool with water in it, serious personal injury or damage to the pool may result.
WARNING: Your pool may contain a great deal of pressure. If your pool has any bulge or uneven side then the pool is not level, the sides may burst and the water may discharge suddenly causing serious personal injury and/or damage to property.
- Check pool for any leaks at valves or seams, check any evident water loss. Do not add chemicals until this has been done.
PT
For support please visit us at: bestwaycorp.com/support
©2020 Bestway Inflatables & Material Corp.
All rights reserved/Tous droits réservés/Todos los derechos reservados/Alle Rechte vorbehalten/Tutti i diritti riservati ®™ Trademarks used in some countries under license to/
Bestway Inflatables & Material Corp., No.3065 Cao An Road, Shanghai, 201812, China.
Manufactured, distributed and represented in the European Union by/
Bestway (USA) Inc., 3411 E. Harbour Drive, Phoenix, Arizona 85034, United States of America
Tel: +86 21 69135588 (For U.S. and Canada)
Distributed in Australia & New Zealand by Bestway Australia Pty Ltd, Unit 2/98-104 Carnarvon St Silverwater, NSW 2128, Australia
Tel: Australia: (+61) 29 0371 388; New Zealand: 0800 142 101
Exported by/Exporté par/Exportado por/Exportiert von/Esportato da
Bestway (Hong Kong) International Ltd./Bestway Enterprise Company Limited
Suite 713, 7/Floor, East Wing, Tsim Sha Tsui Centre, 66 Mody Road, Kowloon, Hong Kong
www.bestwaycorp.com