ProfiScale 20 PS 7520 - Rangefinder Burg Wächter - Free user manual and instructions
Find the device manual for free ProfiScale 20 PS 7520 Burg Wächter in PDF.

User questions about ProfiScale 20 PS 7520 Burg Wächter
0 question about this device. Answer the ones you know or ask your own.
Ask a new question about this device
Download the instructions for your Rangefinder in PDF format for free! Find your manual ProfiScale 20 PS 7520 - Burg Wächter and take your electronic device back in hand. On this page are published all the documents necessary for the use of your device. ProfiScale 20 PS 7520 by Burg Wächter.
USER MANUAL ProfiScale 20 PS 7520 Burg Wächter
natural_image
Technical illustration of a mechanical assembly with labeled components (A, B, C) and no visible text or symbolsnatural_image
Illustration of a handheld electronic device with an attached cable (no text or symbols visible)natural_image
Two identical mobile phones with vertical arrows indicating direction (no text or symbols)Congratulations on the purchase of this BURG-WÄCHTER quality product! The laser distance meter LASER METER 20 PS 7520 is designed for precise measuring of distances, spaces in between and to calculate surfaces. Through indirect distance measuring, even difficult to access distances can be measured. With appropriate use and care, the LASER METER 20 PS 7520 will give you satisfactory services for a long time.
Illustration
A Measuring button (single and steady measuring)
B Button for surface and indirect measuring
c Button for selecting a reference plane
D Power-on and power-off button, clearing button for the last measured value, abandonment
1 Laser active
2 Basis point of measurement front
3 Basis point of measurement back
4 Distance/steady measuring
5 Variable measuring functions surface measurement indirect distance measurement
6 Battery status indicator
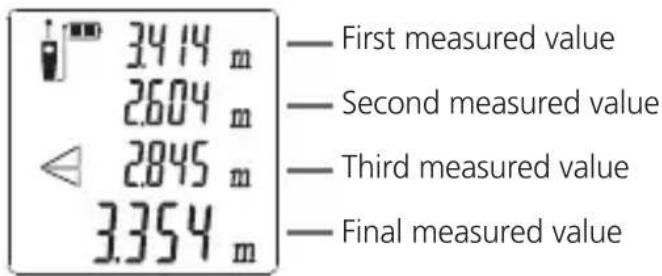
7 First measured value
8 Second / min. measured value
9 Third / max. measured value
10 Result measured value of the last measurement or calculation result
Security advice
Personal damages may occur when following instructions are not being considered:
-
Read the instruction manual carefully before operation. Store it away well.
-
The warning labels on the device must never be effaced or removed. The device is being delivered with English warning labels. Prior to the first commissioning, please paste them over with the included warning labels in your respective language.
LASER RADIATION

Avoid direct eye exposure Laser Class 2
IEC 60825-1:2014 Pmax≤1mW; λ=630-670nm
-
Do not focus on eyes of other people or animals. Do not look into the laser beam and do not bundle the laser beam with optical tools. This can damage your eyes.
-
Do not let children use the laser meter unattended. They can harm themselves or others unintentionally.
-
Do not use the device in the presence of flammable or explosive substances. Inside the meter, sparks can emerge that may inflame the environment.
-
Only let the meter be repaired by qualified personnel and with only the appropriate genuine parts. This way, the safety of your device will be maintained.
Attention: Through severe shocks or falls, the meter might lose its measurement precision. For safety in a case of doubt, always perform a precision test at a known distance. The meter is to be protected from moisture and high heat exposure, e. g. direct insolation. Calculate some additional time to let the meter adjust to the ambient temperature.
| Technical data | |
| Effective range of measurement | 0.2 bis 20 m* |
| Precision | ±0,0015 m* |
| Resolution | 0,001 m |
| Measurement unit | m |
| Laser type | λ=630-670 nm; Pmax<1 mW |
| Laser class | Class II |
| Power supply | 2 x AAA Micro LR03 batteries |
| Automatic shutdown | The laser will automatically be deactivated after 30 sec. The device will automatically shut down after 3 minutes. |
| Operating temperature | 0°C to 40°C |
| Storage temperature | -10°C to 60°C |
| Dimensions | 120×48×27 mm |
| Weight with batteries | ca. 120 g |
* Precision within measuring range ≤ 10 m, precision ± 0,0025 m within measuring range ≤ 20 m. The range and precision are dependent on the environmental conditions. With inconvenient conditions like strong insolation and / or poorly reflecting measuring surfaces, the measurements listed might deviate
Operation
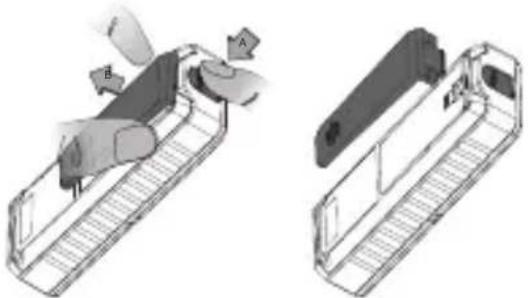
Applying and removing the clamp
Through snapping-in, the mounting clap can easily be attached to the back of the device. To remove it, push the button on the bottom of the device and simultaneously slide off the clamp.
natural_image
Technical illustration of a mechanical assembly with labeled parts (A, B, C) showing internal components and alignment views (no text or symbols beyond labels)III. 1: Removing the mounting clamp
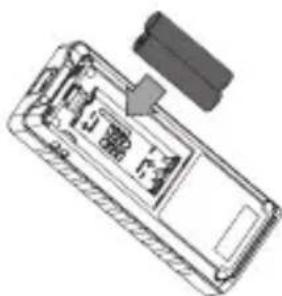
Inserting / exchanging batteries
If the mounting clamp is attached, you need to remove it first. The battery case cover can now be removed by pushing up the looking hooks and at the same time pull the cover up. Now, insert the batteries according to the marking inside the battery case. Please consider the appropriate polarity.
natural_image
Diagram of a device casing with internal components and a separate connector (no text or symbols)III. 2: Inserting batteries
Subsequently, close the battery case cover again.
Attention: Remove the batteries from the device if not in use for a longer period of time.
Turning on/off
Turn the device on or off by pressing the on / off button until a short audio signal can be heard. The laser distance meter is immediately ready for measuring distances. After 30 seconds of disuse, the laser is being deactivated automatically, after 3 minutes without activity the entire device shuts down automatically.
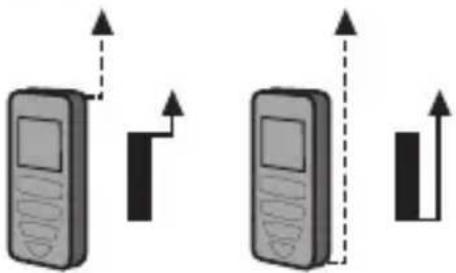
Setting the reference plane
At the meter, two different reference planes can be selected:
- Front edge of the device, to e. g. measure from an edge
- Back edge of the device, to e. g. place it against a wall
To change the reference plane, please push the button. The activated plane is being shown on the display.
natural_image
Two identical mobile phones with vertical arrows indicating movement or signal direction (no text or symbols)III. 3: Possible reference planes
With every turn-on of the device, the reference plane is set on back edge.
Measuring functions
Note: With every successful measurement, with selecting / abandon a function or with turning on or off of the device, a short audio signal sounds. If an error occurs during measuring, this will be indicated through a longer audio signal.
Measuring distance
Press the button ⬆ to turn on the device. The distance measuring mode is pre-set with every turning on of the meter and the symbol of distance measuring appears on the display. Target the end of the about to be measured distance and press the measuring button ⬆. The measured value appears on the display on the bottom line and a short audio signal sounds. Press the measurement button for another measuring to activate the laser. Target the end of the distance and initiate measuring by pressing the measurement button again. With every new measuring, the last measured value is displayed one line above before it will be deleted after three further measurements. This way, the last three values can be compared to the current value. With a short pressing of the button ⬆ the respective last value can be deleted.
Measuring surfaces
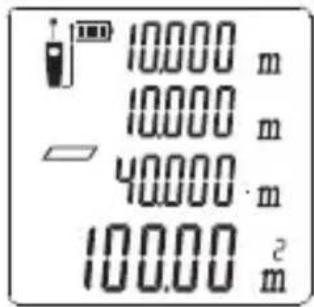
With the device turned on, press the button once to select measuring a surface. The symbol for surface measurement □ appears on the display, the first distance of the surface flashes. Target the end of the about to be measured distance and press the measurement button once to perform the measurement. The measured value appears on the top display line while the second distance of the surface flashes. With the laser, target the end of the next distance and press the measurement button to perform a second measuring. The second measured value will be displayed in the second line. Simultaneously, the resulting surface is being calculated and is shown in the bottom line of the display. The circumference of the measured surface is additionally listed in the third display line.
If you want to delete one of the measured lengths during measuring a surface, press the button
once. Afterwards, you can proceed with the measuring as before.
text_image
10.000 m 10.000 m 40.000 m 100.00 m²— First distance
— Second distance
— Circumference
— Surface
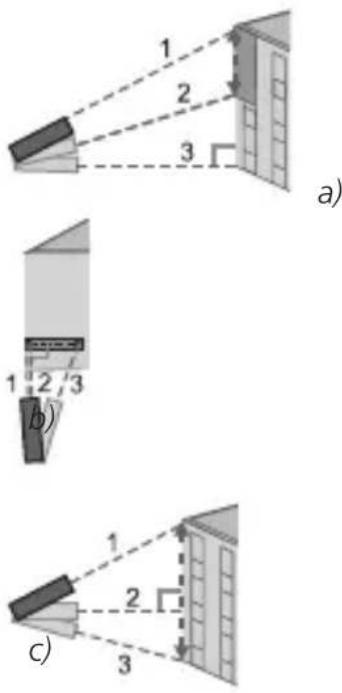
Measuring indirect distance (Measurement via three distances)
With the help of this function, you can measure hard-to-access distances (e. g. heights of exterior walls) by linking three measureable distances via trigonometrical functions with one another.
With the device turned on, press the button twice to select the indirect distance measuring via three distances. The symbol for indirect distance measuring appears on the display, the first distance flashes. Target the end and press the measuring button once to perform the first measurement.
The measured value appears in the top line of the display, while the second distance flashes. With the laser, target the end of the next distance and press the measuring button to measure.
The measured value is being shown on the display. Continue with the third distance in an analogously way. The measured value will be listed on the display. At the same time, the resulting distance will be calculated and listed in the bottom line.
For measuring an indirect distance, the three measured points need to be in one line and one measurement needs to be in a 90^ angle to the measured object.
If the first or last measuring point is being seized in a 90° angle (Ill. 5 a and b), the distance of the other two measuring points is respectively being listed in the bottom line of the display. If the total distance between the first and the third point is to be measured, the second point needs to be seized in a 90° angle. (Ill. 5c).
text_image
1 2 3 a) 1 2 3 b) 1 2 3 c)III. 5: Measuring indirect distances
text_image
34.14 m 2604 m 2845 m 3354 m — First measured value — Second measured value — Third measured value — Final measured valueSteady measuring
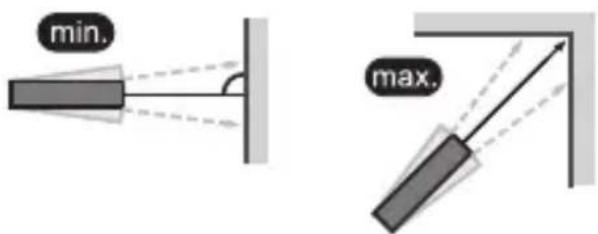
With the steady measuring you can easily seize minimum and maximum values. For this, the meter needs to be moved relatively towards the target whereby the measured value will update every 0.5 sec. The minimum distance is being displayed in the second line and the maximum value in the third line. In the bottom line, the most current value is being displayed always.
Press the measuring button 📄 until a long audio signal can be heard and you receive the readout. Move the meter, the measured distances will be listed on the display. Short audio signals constantly indicate that the laser is active. To cancel this function, press the measuring button again or the ⬆ button.
text_image
min. max.III. 6: Examples for the seizing of minimum or maximum values during the steady measurement
Fault causes and remedies
The device helps you with measuring problems by showing different codes on the display.
| Code | Fault cause Remedy | |
| 204 | Calculation error Repeat process | |
| 208 | Over-current Please contact deliverer | |
| 220 | Low battery Replace batteries | |
| 252 | Temperature too high Cool down meter to operating temperature | |
| 253 | Temperature too low Warm up meter to operating temperature | |
| Code | Fault cause Remedy | |
| 255 | Received signal is too weak or the measurement time is too long | Measuring with a target plate |
| 256 | Received signal is too strong | Measuring with a target plate, do not direct to strong light sources |
| 261 | Measurement out of the measuring range | Perform measurement within range ≤ 20 m |
| 500 | Device error Turn the device off and on several times. If the error report appears still, please contact your retailer | |
Warranty
To provide you with a qualitative impeccable and valuable product and to optimally help you in the case of service or repair, it is necessary that flawed or defective devices are handed back to your retailer together with the original proof of purchase. With returning according to your cancellation right, all components need to be in factory setting and the seal on cylinder and knob need to be undamaged. In the case of a disregard, warranty expires.
Disposal of your device
Dear customer,
please help to avoid waste. If you consider to dispose of this device, please note that many components of it consist of valuable materials that can be recycled.
We point to the fact that electric and electronical devices as well as batteries are not to be disposed in the household rubbish but need to be collected separately. Please inform yourself at your local competent authority about respective collecting points for batteries and electric waste.

For questions about the EG declaration of conformity please contact info@burg.biz.
Printing and typographical errors as well as technical alterations reserved.