
DECT10 - Telephone Sunstech - Free user manual and instructions
Find the device manual for free DECT10 Sunstech in PDF.

| Product type | DECT Cordless Phone |
| Brand | Sunstech |
| Model | DECT10 |
| Power supply | Mains adapter supplied (base) and rechargeable battery (handset) |
| Max number of handsets | Up to 5 handsets per base, up to 4 bases per handset |
| Display | 3-line LCD display with backlight |
| Phonebook | 50 contacts (name 12 characters, number 20 digits, assignable melody) |
| Call log | 30 entries (missed, received, dialed calls) |
| Ringtones | 10 melodies, 5 volume levels, can be turned off |
| Main functions | Intercom, call transfer, 3-way conference, hands-free, pre-dialing, redial, pause, keypad lock, mute, alarm, auto/manual answer, call barring |
| Interface languages | 16 languages including French, English, Spanish, German, Italian, etc. |
| Adjustable flash time | 100/300/600/1000 ms |
| Dialing mode | Tone or pulse |
| Caller ID | Type I and II (on number display) |
| Cleaning | Unplug before cleaning, use a soft damp cloth (no liquid detergents or aerosols) |
| Safety | Do not expose to moisture, water, excessive heat. Unplug during storms. Use only the supplied adapter. |
| Spare parts | Use parts specified by the manufacturer or equivalent. Contact customer service for replacement. |
| Repairability | Have maintenance done by qualified personnel. Do not open the case yourself. |
| Warranty | 2 years from date of purchase (excluding misuse) |
Frequently Asked Questions - DECT10 Sunstech
User questions about DECT10 Sunstech
0 question about this device. Answer the ones you know or ask your own.
Ask a new question about this device
Download the instructions for your Telephone in PDF format for free! Find your manual DECT10 - Sunstech and take your electronic device back in hand. On this page are published all the documents necessary for the use of your device. DECT10 by Sunstech.
USER MANUAL DECT10 Sunstech
Read the following recommended safety precautions carefully.
Moisture and Water

Do not use this device in a humid and damp place (avoid the bathroom, the sink in the kitchen, etc). Do not expose this device to rain or water, as this may be dangerous and do not place objects filled with liquids, such as flower vases, on top.
the connected device(s) If any solid object or liquid falls into the cabinet, unplug immediately and have it checked by qualified personnel before operating it any further.
Cleaning

natural_image
Simple line drawing of spray bottles and a crossed-out X symbol (no text or labels)Before cleaning, unplug this device from the wall outlet. Do not use an aggressive liquid or aerosol cleaners. Use a soft and dry cloth.
Ventilation
The slots and openings on the device are intended for ventilation and to ensure reliable operation. To prevent overheating, these opening must not be blocked or covered in anyway. When installing this unit make sure to leave space sufficient around the unit to ensure the ventilation to improve heat radiation.
Do not expose the unit to extreme conditions of heat, cold or moisture
Heat and Flames

natural_image
Illustration of a burning flame next to a lit candle (no text or symbols)The device should not be placed near to open flames or sources of intense heat such as an electric heater. Ensure that no open flame sources, such as candles, are placed on top of the device. Batteries should not be exposed to excessive heat such as sunshine, fire or the like.
Replacement Parts
When replacement parts are required, make sure that the service technician has used replacement parts, which are specified by the manufacturer or have the same
specifications as the original one. Unauthorized substitutions may result in fire, electrical shock or other hazards. Please contact the brand or manufacturer that will redirect you to the nearest technical service which will supply or change the replacement parts
Servicing

natural_image
Simple line drawing of a screwdriver crossed with a cross mark (no text or symbols)Please refer all servicing to qualified personnel of the brand. Do not remove the cover yourself as this may result in an electric shock.
Risk of electric shock
The lightning flash with arrowhead symbol, within an equilateral triangle, is intended to alert the user to the presence of not insulate, “dangerous voltage” within the product’s enclosure that may be of sufficient magnitude to constitute a risk of electric shock of persons.
The exclamation point within an equilateral triangle is intended to alert the user to the presence of important operating and maintenance (servicing) instructions in the literature accompanying the appliance.


Waste Disposal
Instructions for waste disposal:
- Packaging and packaging aids are recyclable and should principally be recycled. Packaging materials, such as a plastic bag, must be kept away from children.
- Batteries, including those which are heavy metal-free, should not be disposed of with household waste. Please dispose of used batteries in an environmentally friendly manner. Find out about the legal regulations which apply in your area- Do not try to recharge batteries, can have a danger of explosion. Replace batteries only with the same or equivalent type.
This symbol on the product or on its packaging means that your electrical device should be disposed at the end of its service life, separately from your household wastes. There are separate collection systems for recycling in the EU. For more
information, please contact the local authority or the dealer where you purchased the product.

Symbol for equipment

Headphone Volume

natural_image
Line drawing of a stylized telephone handset with a bulb (no text or symbols)In your device has headphones jack, please note that excessive sound pressure from earphones and headphones can cause hearing loss.
Installation
To prevent injury, this device must be securely attached to the wall in accordance with the installation instructions when mounted to the wall (if the option is available).
Warning:
Do not leave your device in standby or operating mode when you leave your house.

natural_image
Illustration of weather symbols including sun, rain, thermometer, shower, and bathtub (no text or labels)The Standby / On button does not fully switch off this product. Moreover the device continues to consume power in standby mode. In order to separate the device completely from mains, the mains plug has to be pulled from the mains socket. Because of that the device should be set up in a way, that an unobstructed access to
the mains socket is guaranteed, so that in case of emergency the mains plug can be pulled immediately. During periods of prolonged non-use, the device should be disconnected from the mains power supply.
Electrical device not in the hands of children
Never let children use electrical devices unsupervised. Children cannot always recognize any possible dangers. Batteries / accumulators can be life threatening when swallowed. Store batteries out of the reach of children. In case of swallowing a battery, medical aid has to be sought immediately. Also keep the packaging away from children as there is danger of suffocation.
INTRODUCTION
Thank you for purchasing our newest DECT single model, the manual is designed to familiarize you with this phone.
To get the maximum use from the phone, we suggest that you read this instruction manual carefully before using.
Important Notice:
1) Please charge the battery for at least 12 hours before using. You hear a beep when the handset is correctly in position on the charging cradle.
2) To keep the batteries charged, whenever you don't need to use the handset (such as overnight, or when you go out), leave the handset on the charge cradle.
3) When the unit is powered on initially, the date and time will be blinking, please use the method of DATE and TIME to set the date and time first.
SAFETY INSTRUCTION
When using your telephone equipment, the following basic safety precautions should always be followed to reduce the risk of fire, electric shock and injury to persons:
Read, understand and follow all warnings and instructions
✿ Unplug the product from the wall outlet before cleaning. Do not use liquid cleaners or aerosol cleaners. Use a soft damp cloth for cleaning.
Do not place this product on unstable surfaces. The product may drop, causing serious damage to the product.
Do not overload wall outlets and extension cords as this can result in fire or electric shock.
Never push foreign objects of any kind into this product through cabinet slots as they may affect dangerous voltage points or short circuit parts that could result in fire or electric shock. Never spill liquid of any kind on the product.
Do not move or disconnect this unit during a heavy storm, as there may be a remote risk of electric shock from lightning and thunder.
IMPORTANT – The base unit must be used with the mains adapter supplied with the unit.
Use any other adapter will may invalidate any approval given to this apparatus.
✿ Unprofessional person are not supposed to open the telephone even meets troubles, please send it to the service center.
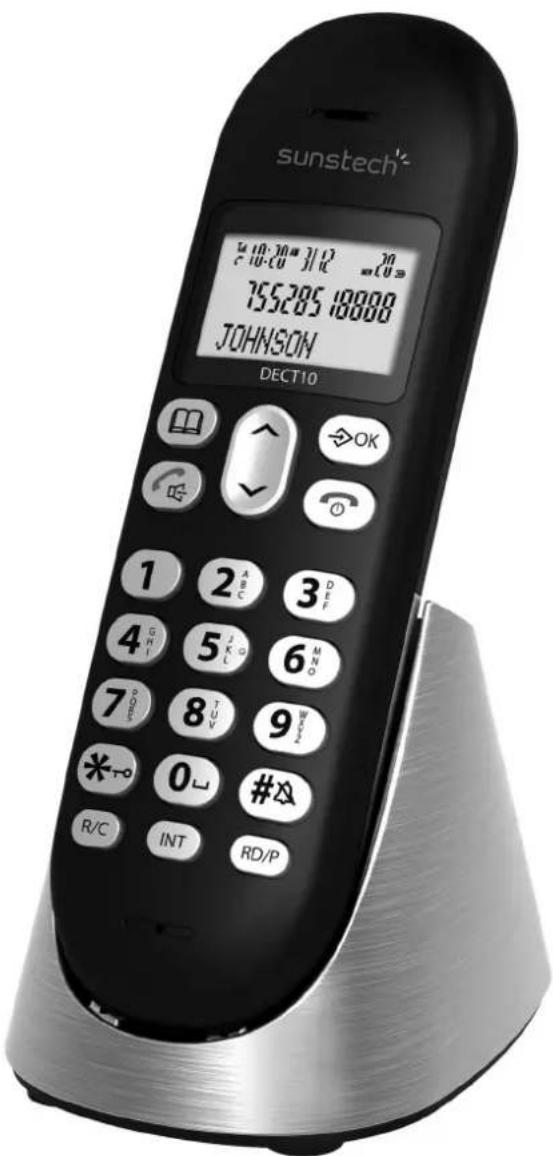
FEATURES
LCD 3 lines display
➢ Maximum 5 handsets can be linked to the same base unit, and maximum 4 bases per handset.
16 kinds of interface languages: Spanish, Portuguese, English, German, Italian, Dutch, Hungarian, Greek, Polish, Danish, Norwegian, Swedish, Turkish, Russian, Ukrainian and French,
Pre-dial and edit function
Redial and pause function
30 incoming numbers memories
50 Phone book memories with 12 characters & 20 digits maximum
- Call transfer to other handset and Intercom call between two handsets
Conference call between external call and two handsets
➢ 10 ringing tones for selection
Ringing tone/earpiece/hands free volume adjustable
Different melodies for different calls available
▶ Alarm clock function
▶ Tone/Pulse dialing mode can be set
Flash time 100/300/600/1000ms for selection
LCD backlight function
Auto/manual answering function.
▶ Dialing barring function.
Key lock function.
Mute function.
ECO friendly
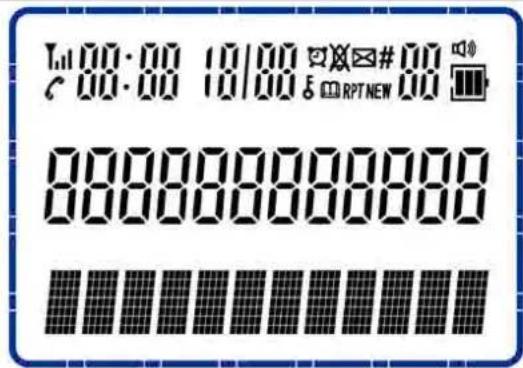
| Icon | Function |
 | The antenna icon will always be shown on the LCD, it indicates for Signal strength, flashes when registration to base is lost or when RSSI is low. |
 | Displayed when the user has pressed 📋 key. |
| Displayed when the handset keypad is locked. | |
| The alarm icon will be shown as steady on when the alarm is set.The alarm icon will flash when the alarm is triggered. | |
| Displayed when external ring set to off | |
| Displayed when viewing the phonebook entries. | |
| Displayed when a new voice message is received from the network. | |
 | Displayed when the same missed call received more than one time. |
 | Displayed when a new call comes and hasn't been viewed yet. |
| When you press ∧ or ∨ key directly to scroll and review the numbers, it appears along with the digit to indicate the sequence of the call. | |
| Displayed when press 🔊 key twice | |
| Displayed charging indication and indication of the current battery status. | |
| AM If time is morning 0 to 11:59:59' o'clock, the "AM" icon will be displayed. | |
| PM | If time is 12:00 to 23:59:59' o'clock, the "PM" icon will be displayed. |
Key pad

① LCD
⑤ DOWN
⑨ SET/OK
⑬ DC 6V
② UP
⑥ NUMERICAL KEY
⑩ HANG UP/POWER OFF
⑭ PAGE
③ BOOK
⑦ R/C
⑪ RD/P
④ TALK/H.F
⑧ INT
⑫ LINE
| ICON | FUNCTION DEFINITION |
| [2YAW] | When there is new call coming, press this key to receive the call with handset mode.During conversation, press this key to transfer handset and hands-free mode.When there is new call coming, press this key to receive the call with hands-free mode.During conversation, press this key to transfer handset and hands-free mode. |
| SET/OK | Entry to the menu functions from idle mode;Confirming selections & actions.In talk mode press the key to perform mute function. |
| [KAYW] | In talk mode, press once to hang up the call;In standby mode, hold for 3 seconds to power off the handset and hold for 3 seconds to power on. |
| [YTC4] | Press it to enter the phonebook in standby mode or in talk mode;Turn back during menu settings; |
| ^ | Scrolling up through lists and menu options;Increasing the volume;In standby mode, press it to review incoming number. |
| ∨ | Scrolling down through lists and menu options;Decreasing the volume.In standby mode, press it to review outgoing number. |
| R/C | The key is used to delete memory.Delete the current input by a short pressing during menu edit.To set up an internal call to another handset;To transfer an incoming call to another handset;To set up a conference call with an external line and an internal handset. |
| RD/P | In talk mode, press it firstly to redial the last dialed number;Press it to insert a pause time between two digits. |
 | A Long press (3s) to activate or inactivate key lock;To set up a conference call. |
| [47CR] | In addition to its use for text and number entry,To activate or inactivate silence function by long press for 3s. |
| [XO10] | Page the handset,Register the handset to the base. |
INSTALLATION
1) Plug the main power lead into the bottom of the base unit.
2) Plug the main adapter into mains socket with the switch on the socket set to off.
3) Switch on main power at the socket.
4) Fit the batteries in the handset.
Note: If you do not modify the password yourself, all the passwords in this manual are default as 0000.
MENU SETTINGS
During idle state, press the SET/OK key to enter the menu setting, press ∧ or ∨ key to select the above items and
then press SET/OK key to enter. Press 📷 to quit the setting state, or press 📄 to back to the previous menu.
Details of each item are shown in next parts. The menu tree as follow:
| HANDSET MENU TREE | ||
| PHONE BOOK | LIST | |
| NEW ENTRY | ||
| EDIT RECORD | ||
| DEL RECORD | ||
| DELETE ALL | ||
| MEM STATUS | ||
| CALL LOG | MISSED | |
| RECEIVED | ||
| DIALED | ||
| BS SETTINGS | DELETE HS | |
| DIAL MODE | TONE | |
| PULSE | ||
| FLASH TIME | 100/300/600/1000MS | |
| MODIFY PIN | default 0000 | |
| BS DEFAULT | default 0000 | |
| HS SETTINGS | ALARM | ON (SNOOZE ON/OFF) |
| OFF | ||
| RING SETUP | INT RING | |
| EXT RING | ||
| TONE SETUP | KEY TONE | |
| BATTERY LOW | ||
| RANGE ALARM | ||
| LANGUAGE | ||
| HS NAME | ||
| AUTO ANSWER | ON | |
| OFF | ||
| BARRING | default 0000 | |
| DATE&TIME | ||
| SELECT BASE | BASE 1,2,3,4 and AUTO | |
| HS DEFAULT | default 0000 | |
| REGISTRATION | BASE 1(2.3.4) | |
Handset Menu function1: PHONE BOOK
Each individual handset has its own phonebook, independent of each other handset, with a maximum of 50 entries, each name a maximum of 12 characters, each number a maximum of 20 digits and a melody selected between 1 and 10.
Press SET/OK key, LCD displays PHONE BOOK. Then press SET/OK key to confirm.
LIST
LCD displays LIST. The function allows the user to review the phone book record lists by pressing ∧ or ∨ key. When the desired number is displayed, press ⏻ key dialing out the number automatically.
NEW ENTRY
Press ∧ or ∨ key to select NEW ENTRY item. This function allows the user to add an entry to the phone book.
1) Press SET/OK key to enter, the cursor for the name flashes.
2) Enter the name using the numerical keys.
3) If you make a mistake, press R/C key to correct. Press SET/OK key to confirm
4) Enter the number and press SET/OK key to confirm.
5) Press ∧ or ∨ key to select the melody to be stored and press SET/OK key to confirm.
Input method as follow:
| PRESS TIMESKEY | 1st | 2nd | 3rd | 4th | 5th | 6th | 7th | 8th | 9th | 10th | 11th | 12th | 13th |
| 1 | 1 | . | , | : | ; | ! | i | ? | i | * | # | & | % |
| 2 | A | B | C | 2 | |||||||||
| 3 | D | E | F | 3 | |||||||||
| 4 | G | H | I | 4 | |||||||||
| 5 | J | K | L | 5 | |||||||||
| 6 | M | N | O | 6 | |||||||||
| 7 | P | Q | R | S | 7 | ||||||||
| 8 | T | U | V | 8 | |||||||||
| 9 | W | X | Y | Z | 9 | ||||||||
| * | * | ||||||||||||
| 0 | space | 0 | - | + | = | - | ( | ) | ' | ||||
| # | # |
EDIT RECORD
Press ∧ or ∨ key to select EDIT RECORD item. This function allows the user to modify a phonebook record.
1) Press SET/OK key to enter, the first record in the phone book will be displayed.
2) Press ∧ or ∨ key to select the designated record to change. Once a record has been selected, the user will have the option to edit each of the name/number and change melody.
DEL RECORD
Press ∧ or ∨ key to select DEL RECORD item. This function allows the user to delete a phonebook entry.
DELETE ALL
Press ∧ or ∨ key to select DELETE ALL item. This function allows the user to delete all phonebook entries.
MEM STATUS
Press ∧ or ∨ key to select MEM STATUS item. If show 10/50, it means total 50 records can be stored in the phonebook and 10 records has been stored in it already.
Handset Menu function 2: CALL LOG
1) You can enter CALL LOG by pressing SET/OK key to enter missed call lists, received call lists or dialed call lists.
2) The LCD will show the last record. (If no entries are available in the list, the LCD will be shown EMPTY).
3) Press ∧ or ∨ key to view other record.
4) When the desired number is shown on LCD and press key to dial out the number automatically.
When the record is show, press SET/OK key, press ∧ or ∨ key to choose among ADD TO PB? DELETE? DELETE
ALL? Then press SET/OK key to confirm
ADD TO PB: this function allows the user to add an entry from the caller list to the phone book.
DELETE: this function allows the user to delete the currently selected entry from caller list
DELETE ALL : this function allows the user to delete all numbers
Note: In idle state, press ∧ key once to incoming records or press ∨ key to review outgoing records.
Handset Menu function 3: BS SETTINGS
The user is able to change the base setting in base settings item, press SET/OK key and press ∧ or ∨ key to select this item. Then you can do below:
DELETE HANDSET
This function allows the user to delete a handset registration from the base.
1) Press SET/OK key, the first show is DELETE HS.
2) Press SET/OK key to enter, the user will be prompted to enter the PIN code.
3) Input the correct 4-digit pin code using digit key.
4) Press ∧ or ∨ key to scroll the handset names list up and down.
5) Press SET/OK key to confirm. The delete handset will be deleted from the list on registered handset on the base, and the handset will behave according to the out of range condition.
Note: Press and keep •••• key for 6 s, then press •••• key 7 times swiftly. Then the handset has logout the base successfully.
DIAL MODE
The user can select to change the mode in which the base will dial.
1) Press SET/OK key, then press ∧ or ∨ key to select DIAL MODE item.
2) Press SET/OK key to enter, and the display shows TONE.
3) Press ∧ or ∨ key to select the TONE or PULSE dial mode.
4) Press SET/OK key to confirm your selection.
FLASH TIME
The user can select to change the flash time (100ms, 300ms, 600ms and 1000ms).
1) Press SET/OK key, then press ∧ or ∨ key to select FLASH TIME item.
2) Press SET/OK key to enter.
3) Press ∧ or ∨ key to select the desired flash time among 100ms, 300ms, 600ms and 1000 ms.
4) Press SET/OK key to confirm your selection.
MODIFY PIN
This function allows the user to change the pin number of the currently active base.
1) Press SET/OK key to confirm.
2) Then press ∧ or ∨ key to select MODIFY PIN item.
3) Press SET/OK key to confirm, and the display shows PIN?.
4) The user will first be requested to entry the existing PIN code for the base by using numerical keys, then press SET/OK to confirm.
5) If the old code is validated, the user will be prompted to enter a new PIN code (4 digits), press SET/OK to confirm.
6) Once a new PIN code has been entered, the user will be requested to repeat to input the new PIN code.
7) Press SET/OK to confirm, the code will be stored to the base and a tone sounded.
BASE DEFAULT
This function allows the user to restore the base setting to the factory default.
1) Press SET/OK key, then press ∧ or ∨ key to select BS DEFAULT item.
2) Press SET/OK key to confirm.
3) The user will be prompted to enter the PIN CODE, the display shows PIN? , then press numerical keys to input
code.
4) If the PIN code is validated all base settings will be returned to the factory default.
Handset Menu function 4: HS SETTINGS
The user is able to change a number of the settings for the handset to their own individual preferences. Press or key to select HS SETTINGS. Then you can do below:
ALARM
The user is able to set the alarm on the handset and adjust the alarm settings.
1) Press SET/OK key, the first sub-menu is ALARM item.
2) Press SET/OK key to confirm.
3) Press ∧ or ∨ key to select ON or OFF, and press SET/OK to confirm .Selection of ALARM OFF will turn the alarm off, and the user is dropped back to the "ALARM" menu. Selection of ALARM ON option will turn the alarm on, then the user will be requested to set the alarm time.
4) After select ON, press SET/OK key to start the time settings of alarm, 12-00 displayed with "12" flashing,
5) Press ∧ or ∨ key to edit the alarm time.
6) Press SET/OK key, the user will be presented with a further option to select to SNOOZE ON or SNOOZE OFF to enable or disable the snooze function on the alarm.
7) Press SET/OK key to confirm your selection. And the alarm icon will show on LCD.
Startup alarm:
In idle state, the alarm will ring at very sharp hour you have set.
Intermit alarm:
During the alarming, press any key except 🔒 key, and will begin to ring after 6 minutes. When a call comes, the alarm will be intermitted too.
Close alarm:
Press 🔍 key to close alarm or enter alarm setting state, select OFF.
RING SETUP
The user is able to change the handset ringing on internal calls and External calls. There are 10 ringer melodies and 5 different volume levels can be set.
1) Press SET/OK key, then press ∧ or ∨ key to select "RING SETUP" item.
2) Press SET/OK key to enter.
3) Press ∧ or ∨ key to select the INT RING and EXT RING setup.
4) Press SET/OK key to confirm.
5) Press ∧ or ∨ key to select the MELODY and VOLUME setup.
If select MELODY,
a) Press SET/OK key to confirm.
b) Press or key to select desired melody, the corresponding melody sound can be heard with the selection.
c) Press SET/OK key to confirm your selection.
If select VOLUME,
a) Press SET/OK key to confirm.
b) Press ∧ or ∨ key to select desired ringer volume 1-5, the corresponding volume sound can be heard. If you want to switch off select VOLUME OFF.
c) Press SET/OK key to confirm your selection.
Notes:
1) If you select VOLUME OFF for INT RING, when transfer call to this unit, it will not ring;
2) If you select VOLUME OFF for EXT RING, there will be a ringing off icon ✗ display on LCD and when there is an incoming call, the handset will not ring.(Shortcut key: press and hold # key to switch the handset external call ring on/off)
TONE SETUP
The user is able to change the handset tone settings.
1) Press SET/OK key, then press ∧ or ∨ key to select TONE SETUP item.
2) Press SET/OK key to enter.
3) Press ∧ or ∨ key to select the KEY TONE and BATTERY LOW, RANGE ALARM setup.
4) Press SET/OK key to confirm.
5) Press ∧ or ∨ key to select the ON or OFF to enable/disable the sounding of a beep respectively.
6) Press SET/OK key to confirm your selection.
Notes: after this setting,
1) a beep for key tone will sound when a key is pressed on the handset.
2) a beep for battery low then the battery is low.
3) a beep for range alarm will sound when the handset is out of ringed of the base.
LANGUAGE
1) Press SET/OK key, then press ∧ or ∨ key to select LANGUAGE item.
2) Press SET/OK key to enter.
3) Press ∧ or ∨ key to select the language from ESPAÑOL (Spanish), ENGLISH (English), DEUTSCH (German), FRANÇAIS (French), ITALIANO (Italian), PORTUGUES (Portuguese), PYCCKNÑ (Russian), TÜRKÇE (Turkish), ΕΛΛΗΝΙΚΑ (Greek), YKPAIHCЬKNÑ (Ukrainian), POLSKI (Polish), MAGYAR (Hungarian), SVENSKA (Swedish), NEDERLANDS (Dutch), DANSK (Danish) and NORSK (Norwegian). Each language will display in its own native translation.
4) Press SET/OK key to confirm your selection.
HANDSET NAME
The operation will allow the user to change the handset name
1) Press SET/OK key, then press ∧ or ∨ key to select HS NAME,
2) Press SET/OK key, when the function is selected, the screen will display the current handset label.
3) Enter the handset label, input the handset name.
4) If you make a mistake, press R/C key to correct.
5) Press SET/OK key to confirm.
AUTO ANSWER
The Handset can be set to answer an incoming call automatically when it is on the cradle. The user is able to select to enable/disable this auto answer feature.
1) Press SET/OK key, then press ∧ or ∨ key to select AUTO ANSWER,
2) Press SET/OK key to enter. Press ∧ or ∨ key to select On or OFF
3) Press SET/OK key to confirm your selection. Exit from this sub-menu will return the user to the AUTO ANSWER
BARRING
The Handset can be set to disable 5 groups outgoing calls. The user is able to select to enable/disable this feature. But the internal calls to intercom or conference will still be available.
1) Press SET/OK key, then press ∧ or ∨ key to select BARRING,
2) Press SET/OK key the user will be prompted to enter the PIN code, input 4-digit code (defaulted as 0000).
3) Press SET/OK key to confirm, then press ∧ or ∨ key to select ON or OFF, press SET/OK key to confirm.
4) If select ON, the display shows NUMBER 1, press ∧ or ∨ to choose NUMBER i(i=1\~4).
5) Then press SET/OK to confirm, using the numerical key to input number (maximum 4 digits) you want to bar. (For example: if you set barring number is 1234, then the numbers begin with 1234 will be not allowed to be dialed out, and LCD display CALLS BARRED.)
6) Press SET/OK to confirm. Repeat the above steps to set the rest of 3 groups.
DATE & TIME
The user is able to set the date and time on the handset, by selecting the following option. Press SET/OK key to enter date and time settings.
1) Press SET/OK key, then press ∧ or ∨ key to select DATE & TIME,
2) Press SET/OK key and the last two digits of the year flashes.
3) Edit the year, month, time and date by pressing ∧ or ∨ key.
4) Press SET/OK key to confirm the setting, and return to the DATE & TIME menu.
Note: The date and time will be automatically set when the first caller ID message is received.
SELECT BASE
This function allows the user to register the handset to existing base (with other handset registration)
1) Press SET/OK key, then press ∧ or ∨ key to choose SELECT BASE.
2) Press SET/OK key and the LCD displays BASE 1 +.
3) Press ∧ or ∨ to select base (BASE 1\~4) or AUTO.
4) Press SET/OK to begin searching, if you hear a sound of "di-du", means register successful.
HANDSET DEFAULT :
This function allows the user to restore the handset setting to the factory default.
1) Press SET/OK key, then press ∧ or ∨ key to select HS DEFAULT item.
2) Press SET/OK key to confirm.
4) If the PIN code is validated all base settings will be returned to the factory default.
3) The user will be prompted to enter the PIN CODE, the display shows PIN?, then press numerical keys to input code.
Handset Menu function 5: REGISTRATION
Maximum 5 handsets can be linked to the same base unit by the follow ways,
Maximum 4 bases can be linked to the same handset by the follow ways:
1) In idle state, press SET/OK key, then press ∧ or ∨ key to select REGISTRATION item.
2) Press SET/OK key to enter, then press ∧ or ∨ key to select BASE from BASE1, BASE2, BASE3 or BASE 4.
3) Press SET/OK key to confirm, LCD displays PIN? Then enter the pin code (defaulted as 0000, if input wrong number, press R/C to delete).
4) When finished press SET/OK key to confirm. LCD display SEARCHING, then press and hold •••• key until you has get DI-DU- DU- sound. The handset and base have registration successfully.
Notes:
1) If the handset and base is fail to registration successfully, the handset will return to the standby mode.
2) You can repeat the above steps to register another handset for the same base, and the successfully registered handset will displays HS2 or HS3 on the LCD according to the registration sequence.
3) Press key to page the handset when difficult to look for.
ADVANCED OPERATION
Handset and hands-free mode
1) In idle state, press key once to obtain a dial tone, dial your number, when you hear the called party answers the phone, you can begin your conversation.
2) During the conversation, press key to transfer the conversation mode between handset and hands-free.
3) When you finished press to hang up.
Hands-free and handset volume control
During handset mode, press ∧ or ∨ key to adjust the handset volume. There are 5 levels for selection.
During hands-free mode, press ∧ or ∨ key to adjust the speaker volume. There are 6 levels for selection.
MUTE FUNCTION
When making a phone call, if you need a temporal talk with someone else and you don't want the phone receiver hear you speaking, press SET/OK key to mute your voice sending, LCD displays MUTE.
Press SET/OK key again to return to conversation mode, and MUTE will disappear.
Caller ID - type I & II
TYPE I
After you have applied the caller ID service, you can see the caller phone number during an incoming ring.
TYPE II
During the conversation, the phone number of the incoming call of the second caller can be seen in the unit.
This function can be worked when the user applied the Telecom service.
Flash
When dial a number and the line is busy, press and hold R/C key for 3 seconds, then press RD/P key to dial it out again.
Pause
Press RD/P key will insert a 3.6 seconds pause time between two digits.
Pre-dialing
The unit has pre-dialing function, when you may enter and edit the number before dial it out.
1) In idle state, enter the number you want to dial. During entering, you can press R/C key to delete wrong digit one by one.
2) Press key, the unit will dial out the number show on the LCD.
Redial function
In idle state, press key, press RD/P key, the last dialed number will be dialed again
To Lock/Unlock the keypad
To lock the keypad
Press and hold the ✗→ key for about 2 seconds.
You will hear a beep tone, the icon ⬆ will appear on the top of display, "HS LOCKED" will appear on LCD. While the keypad is locked, any key you press is invalid.
To unlock the keypad
Press and hold the ✗∞ key for about 2 seconds.
You will hear a beep tone, the icon ⬆ will disappear from the display and it will go back to idle mode.
MULTI-HANDSET OPERATION
Maximum 5 handsets can be linked to the same base unit. Maximum 4 bases can be linked to the same handset.
If you have two handsets registered with one base, operation it by the follow ways:
Intercom
The intercom feature is activated by pressing the INT key.
1) In idle mode, press INT key once.
2) The destination handset will ring, press key to enter conversation mode. To end intercom mode, either handset can hang up the call by press key.
Call transfer
During a call, it's to transfer the call to another handset.
1) During a phone call, press INT key once. The destination handset will ring.
2) Press key of the other handset to accept the call.
3) The two internal handsets will be connected. To complete the transfer of the call, the initiating handset should be placed on the cradle and the external call will now be connected to the second handset.
Three-way conference call
1) When a call comes, Press (HS1) key
2) Then press (HS1) INT key once. The destination handset will ring.
3) Press (HS2) key to accept call.
4) Press (HS1) then the ✕→ key then you can talk all together.
5) Press to quit the three-way conference mode, then other parties can also continue to communication.
If you have more than two handsets registered with one base, operation it by the follow ways:
Intercom
The intercom feature is activated by pressing the INT key.
1) In idle mode, press INT key once.
2) The user will be prompted to select the number of the internal handset with which you wish to connect.
3) The destination handset will ring, press 📋 key to enter conversation mode. To end intercom mode, either handset can hang up the call by press 🔒 key.
Call transfer
During a call, it's to transfer the call to another handset.
1) During a phone call, press INT key once, you will be prompted to select the number of the internal handset with which they wish to connect.
2) The destination handset will ring. With the melody defined for an internal call.
3) Press key of the other handset to accept the call.
4) The two internal handsets will be connected. To complete the transfer of the call, the initiating handset should be placed on the cradle and the external call will now be connected to the second handset.
Three-way conference call
1) When a call comes, Press (HS1) key
2) Then press (HS1) INT key once, you will be prompted to select the number of the internal handset with which you wish to connect.
3) The destination handset will ring.
4) Press (HS2) key to accept call.
5) Press (HS1) then the ✗ ∞ key then you can talk all together.
6) Press to quit the three-way conference mode, then other parties can also continue to communication.
TROUBLE SHOOTING
✨ No signal bar is displayed on the screen
√ The handset is out of range. Move it closer to the base station
No dialing tone
√ Check your phone connections
√ The handset is out of range. Move it closer to the base station
No docking tone
√ The handset is not placed properly on the base station/ charger
√ The charging contacts are dirty. Disconnect the power adaptor first and clean the contact with proper damp cloth.
The handset on the charger does not charge
√ Make sure the batteries are inserted correctly.
√ Make sure the handset is placed properly on the base station/ charger
√ Batteries are defective. Purchase new ones for replace.
No display
√ Make sure the batteries are charged
√ Make sure there is power and the phone is connected
The handset no ring
√ Make sure the handset ring tone is turned on.
✨ Ring volume too low
√ Check if the ringing volume is set improper, reset it.
Receive only
√ Check if P/T mode is properly set.
√ Check if you have set the barring number, if you want dial out this number, reset the barring number.
✨ The base can not page the handset
√ Repeat the registration operations to register the base and handset again.
Most of the functions failed
√ Check if the batteries are strong enough, charge the batteries.
√ If batteries are OK, remove the battery, unplug the lines and reinstall after 10 minutes.
Note: Due to continuous product development, all features and specifications are subject to change without prior notice.
Warranty conditions
- The warranty of this product is for 2 years since the purchase date.
- The warranty will exclude breakdowns caused by bad use of the product, wrong installation or installation in not desirable places for a proper maintenance of the product, rips, updates of the products that are not the supplied by the brand, pieces wore away for its use or for not domestic or inappropriate use. Also are excluded breakdowns caused for manipulations of the products by people or companies alien to our company.
- For any request regarding the warranty terms, the purchase receipt must be attached.
Correct disposal of this Product
(Waste Electrical & Electronic Equipment(WEEE)
Your product is designed and manufactured with high quality materials and components which can be recycled and reused.
This symbol means that electrical and electronic equipment, at their end of-life should be disposed of separately from your household waste.
Please dispose of this equipment at your local community waste collection/recycling centre.
In the European Union there are separate collection systems for used electrical and electronic products. Please help us to conserve the environment we live in!

DECLARATION OF CONFORMITY
Council Directive(s) to which conformity is declared:
Directive (1999/5/EC) - R&TTE
Directive (2011/65/EU) - RoHS
Application of the Standards:
EN 301 489-6 V1.4.1(2015-05)
EN 301 489-1 V1.9.2(2011-09)
EN 60950-1:2006+A11:2009+A1:2010+A12:2011+A2:2013
EN 301 406 V2.1.1(2009-07)
EN 50360:2001+A1:2012
EN 50385:2002
IEC 62321-3-1:2013
Manufacturer's name:
AFEX SUNS, S.A.
Manufacturer's address:
c/Metall 6-8, 08110, Montcada i Reixac
Type of equipment:
Cordless phone
Trade:
SUNSTECH
Model no.:
DECT10
(Serial number range:160600001 - 160601364)
We, the undersigned, hereby declare under our sole responsibility that the specified equipment is in conformity with the above Directive(s) and Standard(s)
Place: Barcelona

(Signature)
Víctor Planas Bas
(Full name)
Date: 26 - May - 2016
General Manager
(Position)
sunstech
DECT10
Teléfono DECT
MANUAL DE USUARIO
natural_image
Simple line drawing of spray bottles and a crossed-out X symbol (no text or labels)natural_image
Illustration of a burning flame next to a lit candle (no text or symbols)natural_image
Simple line drawing of a screwdriver crossed with a cross mark (no text or symbols)natural_image
Line drawing of a stylized telephone handset with a button (no text or symbols)natural_image
Illustration of weather-related symbols including sun, rain, shower, and toilet (no text or labels)
① LCD
⑤ DOWN
⑨ SET/OK
⑬ DC 6V
② UP
⑥ NUMERICAL KEY
⑩ HANG UP/POWER OFF
⑭ PAGE
③ BOOK
⑦ R/C
⑪ RD/P
④ TALK/H.F
⑧ INT
⑫ LINE
1 PANTALLA 5 ABAJO 9 CONFIGURAR/OK 13 CC 6V
2 ARRIBA 6 TECLADO NUMÉRICO 10 COLGAR/APAGAR 14 LOCALIZADOR
3 AGENDA 7 R/C 11 RELLAMADA/PAUSA
4 HABLAR/ALTAVOZ 8 INT 12 LÍNEA
natural_image
Simple line drawing of spray bottles and a spray bottle with a crossed-out X symbol (no text or labels)natural_image
Illustration of a burning flame next to a lit candle (no text or symbols)natural_image
Simple line drawing of a screwdriver crossed with a cross mark (no text or symbols)natural_image
Line drawing of a stylized telephone handset with a button (no text or symbols)natural_image
Illustration of weather and outdoor activities including sun, rain, shower, toilet, and shower (no text or symbols)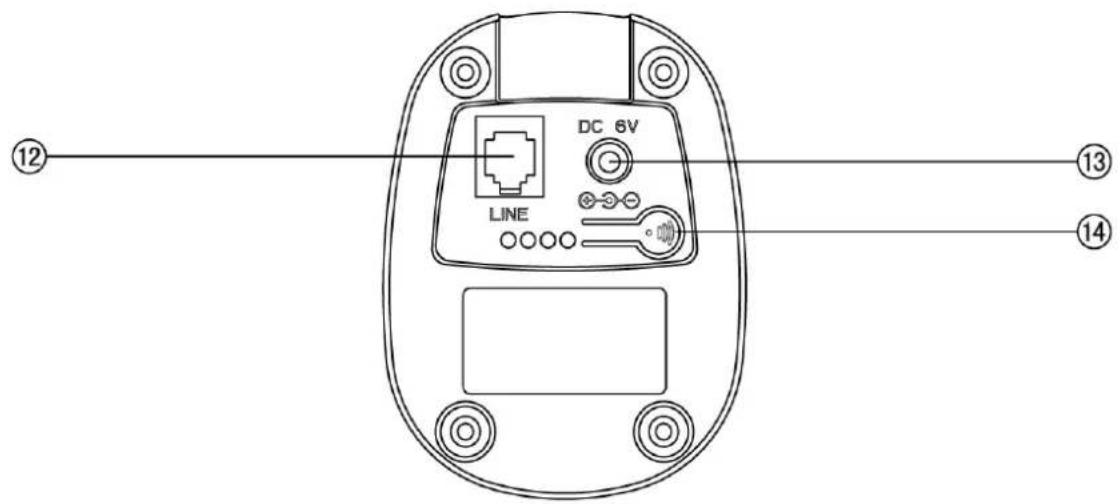
① LCD
⑤ DOWN
⑨ SET/OK
⑬ DC 6V
② UP
⑥ NUMERICAL KEY
⑩ HANG UP/POWER OFF
⑭ PAGE
③ BOOK
⑦ R/C
⑪ RD/P
④ TALK/H.F
⑧ INT
⑫ LINE
1-LCD
5-BAS
9-REGLER/OK
13-DC
2-HAUT
6-TOUCHE
NEMERIQUE
10-RACCROCHER/ETEINDRE ^14 -PAGE
3-LIVRE
7-R/C
11-RD/P
4-PARLER/H.F
8-INT
12-LIGNE
DÉCLARATION DE CONFORMITÉ
Directive (1999/5/EC) - R&TTE
Directive (2011/65/EU) - RoHS
natural_image
Simple line drawing of a spray bottle, a spray can, and a spray bottle with a crossed-out black X (no text or symbols)natural_image
Illustration of a burning flame next to a lit candle (no text or symbols)natural_image
Simple line drawing of a pair of scissors crossed out by a black X (no text or symbols)natural_image
Line drawing of a stylized telephone handset with a button (no text or symbols)natural_image
Illustration of weather-related symbols including sun, rain, shower, and water drop (no text or labels)
① LCD
⑤ DOWN
⑨ SET/OK
⑬ DC 6V
② UP
⑥ NUMERICAL KEY
⑩ HANG UP/POWER OFF
⑭ PAGE
③ BOOK
⑦ R/C
⑪ RD/P
④ TALK/H.F
⑧ INT
⑫ LINE
1 VISOR LCD
5 PARA BAIXO
9 SET/OK
13 DC 6V
2 PARA CIMA
6TECLAS NUMÉRICAS
10 DESLIGAR CHAMADA/TELEFONE
14 PAGER
3 LISTA TELEFÓNICA
7 R/C
11 RD/P
4 ATENDER/ALTIFALANTE
8INT
12 ENTRADA DE LINHA


- Moisture and Water
- Cleaning
- Ventilation
- Heat and Flames
- Replacement Parts
- Servicing
- Risk of electric shock
- Waste Disposal
- Headphone Volume
- Installation
- Warning:
- Electrical device not in the hands of children
- INTRODUCTION
- Important Notice:
- SAFETY INSTRUCTION
- FEATURES
- MENU SETTINGS
- Handset Menu function1: PHONE BOOK
- LIST
- NEW ENTRY
- EDIT RECORD
- DEL RECORD
- DELETE ALL
- MEM STATUS
- Handset Menu function 2: CALL LOG
- Handset Menu function 3: BS SETTINGS
- DELETE HANDSET
- DIAL MODE
- FLASH TIME
- MODIFY PIN
- BASE DEFAULT
- Handset Menu function 4: HS SETTINGS
- ALARM
- RING SETUP
- Notes:
- TONE SETUP
- LANGUAGE
- HANDSET NAME
- AUTO ANSWER
- BARRING
- DATE & TIME
- SELECT BASE
- HANDSET DEFAULT :
- Handset Menu function 5: REGISTRATION
- ADVANCED OPERATION
- Handset and hands-free mode
- Hands-free and handset volume control
- MUTE FUNCTION
- Caller ID - type I & II
- Flash
- Pause
- Pre-dialing
- Redial function
- To Lock/Unlock the keypad
- To lock the keypad
- To unlock the keypad
- MULTI-HANDSET OPERATION
- If you have two handsets registered with one base, operation it by the follow ways:
- Intercom
- Call transfer
- Three-way conference call
- If you have more than two handsets registered with one base, operation it by the follow ways:
- TROUBLE SHOOTING
- Warranty conditions
- Correct disposal of this Product
- DECLARATION OF CONFORMITY
- Directive (1999/5/EC) - R&TTE
- Directive (2011/65/EU) - RoHS
- sunstech
- DECT10
- Teléfono DECT
- MANUAL DE USUARIO
- DÉCLARATION DE CONFORMITÉ
Brand : Sunstech
Model : DECT10
Category : Telephone