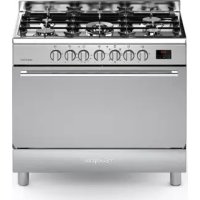
BO643MLN - Cooker BOMPANI - Free user manual and instructions
Find the device manual for free BO643MLN BOMPANI in PDF.

User questions about BO643MLN BOMPANI
0 question about this device. Answer the ones you know or ask your own.
Ask a new question about this device
Download the instructions for your Cooker in PDF format for free! Find your manual BO643MLN - BOMPANI and take your electronic device back in hand. On this page are published all the documents necessary for the use of your device. BO643MLN by BOMPANI.
USER MANUAL BO643MLN BOMPANI
Operating Instructions COOKER
Contents
Warnings 15
Warning Installation 16-18
Installation 16
Ventilation 16
Using the safety chain. 16
Positioning 16
Gas connection. 16
Adapting to different types of gas 17
Replacing the injectors 17
Minimum setting 17
Regulating the burner air 17
Electrical connection. 17
Electric ignition 18
Safety device. 18
Technical data and specifications 18
For the user 20 - 24
Ventilation. 20
Igniting the burners 20
Igniting the gas oven 20
Igniting the gas grill 20
Safety device 20
Electrical switch-on. 22
Using the gas hob. 20
Using the electric hot-plates 20
Using the gas oven 20
Using the gas or electric grill 20
Using the static electric oven "4 New" 21
Using the multi-function electric oven 6 programs 21
Using the Multi7 electric oven. 21
Using the rotisserie. 21
Using the minute minder. 21
Using the single-control cooking timer. 21
Using the electronic timer 21
Using the analogic timer with push knob.....22
Using the self-cleaning oven 23
Using oven accessoires. 23
Using the ceramic hob 23
Removing the oven door 23
Cleaning of the ceramic hob. 23
Advice and precautions 24
European Directive 2012/19/EEC (WEEE)....24
European Regulation 1935/2004. 24
Figures. 36 - 38
Mode d'emploi
CUISINIÈRE
Sommaire
Advertissements 25
resistenza circolare forn0 2,0 kW
grill 2,0 kW
luce forno
motorino girarrosto
5W
EQUIPAGGIAMENTO
- The appliance and its accessible parts become hot during use. Care should be taken to avoid touching heating elements. Children less than 8 years of age shall be kept away unless continuously supervised.
- This appliance can be used by children aged from 8 years and above and persons with reduced physical, sensory or mental capabilities or lack of experience and knowledge if they have been given supervision or instruction concerning use of the appliance in a safe way and understand the hazards involved.
- Children shall not play with the appliance. Cleaning and user maintenance shall not be made by children without supervision.
- WARNING: Unattended cooking on a hob with fat or oil can be dangerous and may result in fire. NEVER try to extinguish a fire with water, but switch off the appliance and then cover flame e.g. with a lid or a fire blanket.
- The internal surfaces of the compartment (where present) may become hot.
- Remove any liquid from the lid before opening it.
- WARNING: Ensure that the appliance is switched off before replacing the lamp to avoid the possibility of electric shock.
- The appliance becomes very hot during use. Care should be taken not to touch the heating elements inside the oven.
- Accessible parts may be hot when the heating element is in use. Keep children well away.
- Always disconnect the power supply before any work inside the oven or where live parts may be accessed.
- Never use the warming compartment for storing in-flammable liquids or items which do not withstand heat, such as wood, paper, aerosol cans, matches, etc.
- Make frequent checks on the rubber connection hose, ensuring that it is well away from hot surfaces, that there are no sharp bends or kinks, and that it is in good condition. The hose must be replaced at the latest at the indicated date and must be secured at both ends using a standard hose clamp.
- If taps become stiff to operate over time, contact the After-Sales service.
- Wash enamelled or chrome-plated parts with soapy lukewarm water or non-abrasive detergents. A metal brush may be used to remove deposits from hob burners and flame caps. Dry thoroughly.
- Never use abrasives to clean enamelled or chrome-plated parts.
- Do not use too much water when washing the hob. Take care that no water or other substances enter
the burner housing holes, as this may be dangerous.
- The spark plugs for electric ignition must be kept clean and dry; always check after use, particularly if there have been drips or overflows from pans.
- Never close glass lids until the hob burners or hotplates have cooled completely; it might shatter or crack.
- Never knock enamelled parts or ignition spark plugs (where present).
- The main or wall gas tap should be turned off when the cooker is not in use.
- Never move the cooker by means of the handle.
- Do not clean the glass doors of the oven with rough, abrasive materials or sharp metal scrapers, since they may scratch the surface and cause the glass to shatter.
- Do not use vapor jets to clean the appliance.
-
The appliance is not intended to be controlled by an external timer or a separate remote control device.
-
CAUTION: The use of a gas cooking appliance results in the production of heat, moisture and products of combustion in the room in which it is installed. Ensure that the kitchen is well ventilated especially when the appliance is in use: keep natural ventilation holes open or install a mechanical ventilation device (mechanical extractor hood).
- CAUTION: This appliance is for cooking purposes only. It must not be used for other purposes, for example room heating.
No liability is accepted for injury or damage caused by poor installation or improper use of the cooker.
In case of malfunctions, particularly gas leaks or short-circuits, contact your engineer without delay.
If the supply cord is damaged, it must be replaced by the manufacturer, its service agent or similarly qualified persons in order to avoid a hazard.
GB
Warning Installation
WARNING INSTALLATION
- The cookers must not be installed on a pedestal.
- The appliance must not be installed behind a decorative door in order to avoid overheating.
Fix the cookers with the chains available on the back of the appliance and secure them to the wall.
- When the oven and grill are switched on for the first time there may be a typical smell and smoke may come out of the oven. This is because of the treatment applied to the surfaces. Operate the oven empty before placing foods inside.
- For direct connection to a power mains, a device that ensures disconnection from the mains must be installed, with a opening distance for the contacts that allows for a complete disconnection under conditions of category III electrical overload, in conformity with the installation instructions.
For Australia and New Zealand only:
- For stationary appliances permanently connected to the fixed wiring. Means providing full disconnection under overvoltage category III conditions must be incorporated in the fixed wiring in accordance with AS/NZS 3000.
INSTALLATION
The appliance must be installed by qualified staff working in accordance with the regulations in force.
Before installing, ensure that the appliance is correctly preset for the local distribution conditions (gas type and pressure).
The presettings of this appliance are indicated on the nameplate shown on the cover. This appliance is not connected to a flue gas extractor device. It must be installed and connected in accordance with the regulations in force.
This appliance may only be installed and may only operate in rooms permanently ventilated in accordance with national regulations in force.
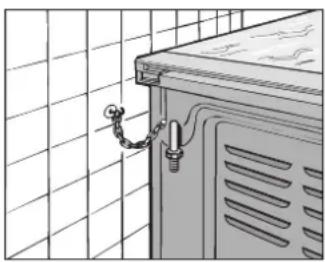
SAFETY CHAIN
! In order to prevent the appliance from overturning accidentally, for example in case of a children climbing onto the oven door, the safety chains MUST be installed !
The cooker is provided with safety chains that must be fixed with a screw (not supplied as accessory) on the wall behind the appliance, at the same height as the fixing point on the appliance.
Make sure that the chains are fixed in the back of the cooker, as shown in the fig. 17, in such way to be tight and parallel to the floor.
! When the installation process is complete, the chains must be kept in tension!
VENTILATION
The rooms in which gas appliances are installed must be well ventilated in order to allow correct gas combustion and ventilation.
The air flow necessary for combustion is at least 2m^3 /h for each kW of rated power.
POSITIONING
Remove the packaging accessories, including the films covering the chrome plated and stainless steel parts, from the cooker.
Position the cooker in a dry, convenient and draft free place. Keep at an appropriate distance from walls which may be damaged by heat (wood, linoleum, paper, etc.). The cooker may be installed alone or between two kitchen units; in this case, the sides of the units must withstand a temperature of 100 degrees C and they must not be higher than the cooker hob.
CONNECTING TO THE GAS SUPPLY
Before connecting the cooker, check that it is preset for the gas to be used. Otherwise, make the conversion as described in the section headed "Adapting to different gas types". The connection is on the right; if the pipe has to pass behind the cooker, it must be kept low down where the temperature is about 50 degrees C.
- Rigid connection (see Figure 3, diagram D):
The connection to the mains gas supply may be made using a rigid metal pipe (D). Remove the hose connector and screw the rigid union onto the threaded connection of the gas train. The union for rigid connection is amongst the cooker accessories. - Connection using a rubber hose (see Figure 3, diagrams B and C):
- Connect a rubber hose carrying the conformity mark currently in force to the hose connector. The hose must be replaced at the date indicated, and must be secured at both ends using standard hose clamps. It must be absolutely accessible to allow its condition to be checked along its entire length.
- Connection using a metal hose (see Figure 3, diagram D):
Make the connection using a hose which complies with national standards, screwing it onto the connector with a ring seal, which is delivered amongst the cooker accessories. - After installation, check that all connections are airtight.
- For operation with butane/propane, check that the gas pressure is as indicated on the nameplate.
IMPORTANT:
- Use only standard rubber hoses. For LPG, use a hose which complies with the national regulations in force.
- Avoid sharp bends in the pipe and keep it well away from hot surfaces.
References to the regulations covering the gas connection to the appliance: ISO 7-1.
GB
Warning Installation
ADAPTING TO DIFFERENT TYPES OF GAS
If the cooker is not already preset to operate with the type of gas available, it must be converted. Proceed as follows:
- Replace the injectors (see table on page 23);
- regulate the primary air flow;
- regulate the minimum settings.
N.B.: every time you change the type of gas, indicate the new type of gas on the serial number label.
REPLACING THE HOB BURNER INJECTORS (Fig. 4)
- Remove the grid, the burner caps (A), and the burners (B);
- Unscrew and remove the injector in the bottom of each injector holder (C);
- replace the injector in accordance with the table in page 23, using a 7mm socket wrench, tighten and screw right down;
- check that the system is gas-tight;
- replace the burners, the burner caps and the grid.
IMPORTANT:
- Never over-tighten the injectors;
- after replacing, check that all the injectors are airtight.
REPLACING THE OVEN BURNER INJECTOR (Fig. 5a)
- Loose the screw securing the oven bottom;
- remove the oven bottom (push back and raise);
- remove the oven burner, after taking out its fixing screw;
- replace the injector, using a 7 mm socket wrench.
REPLACING THE GRILL BURNER INJECTOR (Fig. 5b)
- Remove the burner after taking out the two screws which secure it;
- replace the injector using a 7 mm socket wrench.
IMPORTANT:
- Never over tighten the injectors;
- after replacing, check that all the injectors are airtight.
SETTING HOB BURNER MINIMUM LEVELS
If the cooker is to work on bottled gas (butane/propane), the tap by-pass must be screwed right down.
The cooker may be equipped with type A taps, with bypass inside (accessed by inserting a small screwdriver into the rod) or type B taps, with by-pass on the outside on the right (accessed directly). See figure 6.
If the cooker is to work on natural gas, proceed as follows for both types of tap:
- Ignite the burner at maximum flame;
- pull off the knob, without using a lever against the control panel, which might be damaged;
- access the by-pass with a small screwdriver and back off by about 3 turns (turning the screwdriver anticlockwise);
- turn the tap rod anti-clockwise again until it stops: the burner will be at maximum flame;
- screw the by-pass slowly back in, without pushing the screw-driver, until the flame has apparently shrunk to 1/4 of the maximum size, checking that it is sufficiently stable even in quite strong draughts.
SETTING OVEN BURNER MINIMUM LEVELS
If the cooker is to work on bottled gas (butane/propane), the thermostat by-pass must be screwed right down. If the cooker is to work on natural gas, proceed as follows:
- Remove the oven bottom (push towards the back and raise);
- ignite the oven burner, turning the knob pointer to the maximum setting;
- shut the oven door;
- access the thermostat or tap by-pass (see fig. 7);
- back off the thermostat by-pass by about 3 turns;
- after 5 or 6 minutes, turn the knob pointer to the minimum setting;
- slowly retighten the by-pass, watching the flame decrease in size through the window in the closed oven door until the tongue of the flame is about 4mm long. Never keep the flame too low. It must be stable even when the oven door is opened or closed quickly;
- turn off the burner and replace the oven bottom.
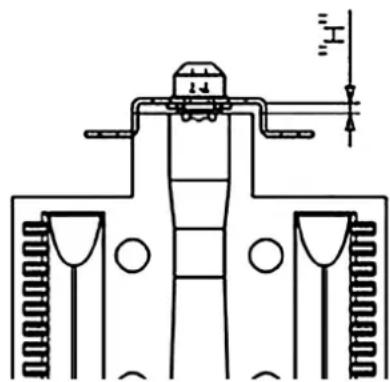
REGULATING THE BURNER AIR
Refer to the table below for regulation of the gap H in mm:
Check operation of the burner:
- Ignite the burner at maximum flame;
- the tongue of the flame must be clear and with no yellow tip, and must adhere closely to the burner. If too much air is supplied, the flame detaches from the burner and may be dangerous. If the air supply is insufficient, the flame has a yellow tip and soot may form.
CONNECTING TO THE ELECTRICAL MAINS
Before making the connection, check that:
- the mains voltage is as indicated on the nameplate;
- the earth connection is in good working order.
If the appliance power lead is not fitted with a plug, use an approved standard type, remembering that: - the green-yellow wire must be used for the earth connection;
- the blue wire is the neutral;
- the brown wire is live;
- the lead must never touch hot surfaces over about 75 degrees C;
- replacement leads must be of type H05RR-F or H05V2V2-F of suitable size (see diagrams in fig. 2).
- if the appliance is supplied without lead, using type H05RR-F or H05V2V2-F cable of suitable size (see diagrams in fig. 2).
GB
Warning Installation
Technical data and specifications
IMPORTANT:
The manufacturer declines all liability for damage due to failure to comply with the regulations and standards in force. Check that the appliance is correctly connected to the earth (see diagrams in fig. 2 at the back of the manual).
FOR COOKERS WITH ELECTRIC IGNITION
The correct gaps between the electrode and the burner are shown in figures 5a,5b.
If no spark is generated, do not keep on trying as this might damage the generator.
Possible causes of malfunctions:
- spark plug damp, dirty or broken;
- electrode-burner gap not correct;
- spark plug wire broken or without sheathing;
- spark discharging to earth (to other parts of the cooker);
- generator or microswitch damaged;
- air has built up in the pipes (particularly if the cooker has been out of use for a long time);
- air-gas mixture incorrect (poor fuel setting).
THE SAFETY DEVICE
The correct gap between the end of the thermocouple sensor and the burner is shown in figures 5a,5b.
To check that the valve is working properly, proceed as follows:
- ignite the burner and leave it to work for about 3 minutes;
- turn off the burner by returning the knob to off position () ;
- after 90 seconds for hob burners, 60 seconds for oven and grill burners, turn the knob pointer to the "on" position;
- release the knob in this position and move a burning match towards the burner; IT MUST NOT IGNITE.
Time needed to excite the magnet during ignition: 10 seconds approx.
Automatic tripping time, after flame has been turned off: not more than 90 seconds for hob burners; not more than 60 seconds for oven and grill burners.
IMPORTANT:
- Before doing any work inside the cooker, disconnect the mains plug and shut the gas tap.
- Never use matches to check the gas circuit for leaks. If a specific control device is not available, foam or very soapy water can be used.
- When re-closing the hob, check that the electrical wires of the spark plugs (if present) are not close to the injectors, so that they cannot run across them.
| Nominal external dimensions Cookers | 60x60 |
| Height at hob | cm. 86,5 |
| Height with lid raised | cm. 143 |
| Depth with door closed | cm. 60 |
| Depth with door open | cm. 104 |
| Width | cm. 60 |
| Usable dimensions | 60x60 static oven | 60x60 fan oven |
| Width | cm. 45 | cm. 41 |
| Depth | cm. 47 | cm. 38 |
| Height | cm. 34 | cm. 31 |
| Volume | l. 72 | l. 50 |
GAS BURNERS (injectors and flow-rates)
| Gas Burner Injector low | flow-rate (kW) | nominal flow-rate (kW) | ||
| G20 | auxiliary | 77 | 0,40 | 1,00 |
| 20 | semi-rapid | 97 | 0,58 | 1,65 |
| mbar | rapid | 123 | 0,80 | 2,80 |
| oven | 130 | 1,00 | 3,00 | |
| grill | 99 | - | 1,85 | |
| ultra-rapid ec. | 145 | 1,70 | 4,00 | |
| TC Ecoring | 107 | 1,6 | 3,8 | |
| G30 | auxiliary | 50 | 0,40 | 1,00 |
| 28-30 | semi-rapid | 65 | 0,58 | 1,65 |
| mbar | rapid | 83 | 0,80 | 2,80 |
| G31 | oven | 86 | 1,00 | 3,00 |
| 37 | grill | 68 | - | 1,85 |
| mbar | ultra-rapid ec. | 98 | 1,70 | 4,00 |
| TC Ecoring | 69 | 1,6 | 3,5 | |
| G110 | auxiliary | 150 | 0,40 | 1,00 |
| 8 | semi-rapid | 185 | 0,58 | 1,65 |
| mbar | rapid | 265 | 0,80 | 2,80 |
| oven | 300 | 1,00 | 3,00 | |
| grill | 200 | - | 1,85 | |
| ultra-rapid ec. | 350 | 1,70 | 4,00 | |
| TC Ecoring | 220 | 1,6 | 3,5 | |
Cat.:seename plate on cover;Class 1 or 2.1
Type "X" cookers
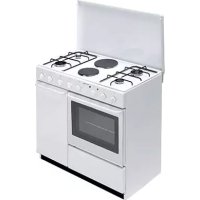
ELECTRIC HOTPLATES
0 145 1,2 kW - High-Light hotplate
0180 1,5 kW - Normal hotplate 1,8 kW - High-Light hotplate 2,0 kW - Rapid hotplate
210-120 2,1-0,7 kW-High-Light hotplate
265-170 2,2-1,4 kW-High-Light hotplate
HEATING ELEMENT POWERS
bottom element 1.1 kW
top-bottom element 1.1 - 1.5 kW
circular element 2,0 kW
grill 2,0 kW
oven light 40W
roaster motor 5W
GB
Introduction
EQUIPMENT
All models are equipped with safety device for oven and grill burners.
Depending on the models, cooker may also have:
- Safety device for one or more hob burners
- Electric ignition on top burners
- Electric ignition on oven and grill burners
- Self-cleaning enamelled liners
- Oven thermostat (or tap)
Electric oven lighting - Rotisserie
- Grill burner
- Mechanical timer
- Pan retainers
- One or more electric plates
- Single-control end of cooking timer
- Electronic timer
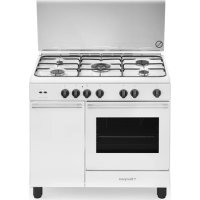
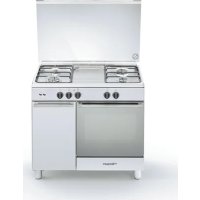
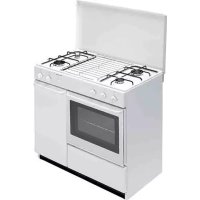
For the LAYOUT OF HOB BURNERS see the models illustrated in figure 1 at the back of this manual.
For the ELECTRIC WIRING DIAGRAM see figure 2 at the back of this manual.
The electrical power is stated on the nameplate visible inside the warming compartment (if present) or on the back of the cooker. A copy of the nameplate is glued to the cover of this manual (for gas or gas-electric products only).
- Thank you for choosing one of our quality products, capable of giving you the very best service. To make full use of its performance features, read the parts of this manual which refer to your appliance carefully. The Manufacturer declines all responsibility for injury or damage caused by poor installation or improper use of the appliance.
- To ensure its appliances are always at the state of the art, and/or to allow constant improvement in quality, the manufacturer reserves the right to make modifications without notice, although without creating difficulties for users.
-
When ordering spare parts, inform your dealer of the model number and serial number punched on your appliance's nameplate, visible inside the warming compartment (if present) or on the back of the cooker.
-
APPLIANCE COMPLYING WITH THE FOLLOWING DIRECTIVES:
- EEC 2009/142/CE Gas (30/11/2009)
- 2006/95/EC Low Voltage (12/12/2006) and subsequent amendments)
- EEC 2004/108 (radio-frequency interference) 15/12/2004
- European Regulation 1935/2004 (materials in contact with food)
- European Regulation 1275/2008
- EEC 40/2002
- EEC 92/75
-2012/19/EC (WEEE) - 2005/32/CE (Energy-using Products)
FOREWORD
- Refer only to the headings and sections covering accessories actually installed on your cooker.
Useful information concerning the energy consumption of electric ovens.
This information completes and expands on the figures provided on the technical data sticker supplied with the instruction manual.
| Oven 66 N static | Oven 66N fan | Oven 66 N multifunctions | |
| EU environmental quality mark No No | No | ||
| Time required to cook a normal load in conventional mode in minutes. | 43,2 ... 43,8 | ||
| Timerequiredtocookanormalload in fan mode in minutes. | ... 44,9 | 44.9 | |
| Power consumption in stand-by setting in Watts | ...... | ||
| Usable area of the dripping pan in cm2 | 1300 114 | 1143 |
HOW TO USE THE COOKER
VENTILATION
All gas cooking appliances produce heat and moisture in the rooms where they are installed. Take care to ensure that the kitchen is well ventilated; keep the ventilation openings unobstructed or install an extractor hood with fan. In case of intensive or prolonged use, additional ventilation may be required; open a window, or increase the extractor fan power.
IGNITING THE HOB BURNERS
- Press the knob and turn it anti-clockwise until it reaches the symbol on the control panel (maximum flame position);
- at the same time, move a burning match towards the burner head;
- to reduce the flame, turn the knob further in the same direction until its pointer is against the symbol (minimum flame position).
FOR HOB BURNERS EQUIPPED WITH SAFETY DEVICE
- Press the knob and turn it anti-clockwise until it reaches the symbol on the control panel (maximum flame position);
- move a burning match towards the burner, keeping the knob pressed right down for about 10 seconds;
- then release the knob and check that the burner remains on. Otherwise, repeat the operation.
IGNITING THE OVEN BURNER
- Open the oven door;
- press the knob and turn it anti-clockwise to the maximum flame position;
- move a burning match towards the hole in the centre of the oven bottom and press the knob right down (see fig. 8);
- look through the two holes in the sides of the bottom to check that the burner has ignited, keeping the knob pressed down;
- after about 10 seconds, release the knob and check that the burner remains on. Otherwise, repeat the operation.
IGNITING THE GRILL BURNER (GAS GRILL)
- Fit the control knob guard as shown in fig. 11;
- press the oven knob and turn it to the right until it reaches the stop;
- move a burning match towards the perforated burner pipe and press the knob right down (see fig. 9);
- check that the burner has ignited, keeping the knob pressed down;
- after about 10 seconds, release the knob and check that the burner remains on. Otherwise, repeat the operation.
SAFETY DEVICE
Burners equipped with this device have the advantage that they are protected if they accidentally go out. If this occurs, the supply of gas to the burner concerned is automatically cut off, preventing the hazards deriving from a leak of unburnt gas. The gas supply must be cut off within no more than 60 seconds for the oven and grill burners or 90 seconds for the hob burners.
FOR COOKERS WITH ELECTRIC IGNITION
All the above applies, except that the match is no longer required; a spark is obtained by pressing the button on the control panel once or more, or by pressing the knob of the burner to be ignited. If electronic ignition is difficult with some types of gas, set the knob on the low (small flame) setting.
- For cookers with electric ignition of the oven and grill burners, ensure the oven door is completely open when these burners are ignited;
- Do not operate the ignition device for more than 10 seconds when igniting the oven and grill burners. If the burner has not lit after these 10 seconds, stop using the device, leave the door open and wait one minute before trying again to ignite the burner. If the ignition device malfunctions again, light the burner with a match and call the after-sales service.
IMPORTANT:
- Difficulty in igniting burners is normal if the cooker has been out of use for some time. The air accumulated in the pipes will be expelled in a few seconds;
- Never allow too much unburnt gas to flow from the burners. If ignition is not achieved within a relatively short time, repeat the procedure after returning the knob to the off position (
- when the oven and grill are lit for the first time, a smell may be noticed and smoke may come out of the oven. This is because of the surface treatment and oily residues on the burners.
HOW TO USE THE HOB BURNERS
Use pans of diameter suitable for the burner type. The flames must not project beyond the base of the pan. Recommended sizes:
-
for auxiliary burners = pans of at least 8 cm using the adjusting grid supplied with the cooker
-
for semi-rapid burners = pans of at least 14 cm
- for rapid and triple flame burners = pan of at least 22 cm.
N.B.: Never keep the knob at settings between the maximum flame symbol and the off position ( )
FOR COOKERS EQUIPPED WITH ELECTRIC HOTPLATES
The different heat settings are obtained as follows:
- 1 = minimum setting for all hotplates;
- 6 = maximum setting for normal and rapid hotplates (with red disc);
-0=off.
Pans must never be smaller in diameter than the hotplates and their bottoms must be as flat as possible (see fig. 10).
IMPORTANT:
- Never leave hotplates on without pans, except when first used; leave for about 10 minutes to dry oil or moisture residues;
- if the hotplate is to be out of use for a long time, apply a little grease to its painted surface;
- do not allow spills to burn onto the hotplate, requiring the use of abrasive cleaners.
- After igniting the burner, leave the oven to heat up for about 10 minutes;
- place the food for cooking in an ordinary oven dish and place it on the chrome-plated shelf;
- place in the oven on the highest possible runners, and turn the knob pointer to the setting required;
- cooking can be observed through the window in the door with the oven light on. This will avoid opening and closing the door frequently, unless oil or fat has to be added to the dish.
N.B.: For cookers without thermostat:
- with the knob on the maximum setting = 280 degrees C
- with the knob on the minimum setting = 150 degrees C
- All other temperatures between 150 and 280 degrees C are obtained approximately by positioning the knob between the maximum and minimum settings.
Never leave the knob in positions between the maximum symbol
and the off setting (
- fit the knob guard (see fig. 11);
- light the burner and wait a few minutes to give the burner time to warm up;
- place the foods on the chrome-plated shelf;
- insert on the highest runner;
- insert the drip tray on the bottom runner;
- gently close the oven door, resting it against the knob guard;
- after a few minutes, turn the food to expose the other side to the infrared radiation (the cooking time depends on the type of food and personal taste).
The table below "Food to be grilled" will serve as a guide.
N.B.: the first time the grill is used smoke will come out of the oven.
Before inserting foods for cooking, wait until any oil residues on the
GB
For the user
burner have completely burnt away. The grill must only be used at its full rated heat.
The appliance becomes very hot during use. Care should be taken not to touch the heating elements inside the oven.
ATTENTION: Accessible parts may be hot when the heating element is in use. Keep children well away.
| Food to be grilled Time minutes | ||
| 1st side | 2nd side | |
| Thin pieces of meat | 6 | 4 |
| Fairly thick pieces of meat | 8 | 5 |
| Thin fish or fish without scale | 10 | 8 |
| Fairly thick fish | 15 | 12 |
| Sausages | 12 | 10 |
| Toasted sandwiches | 5 | 2 |
| Small poultry | 20 | 15 |
HOW TO USE THE ELECTRIC GRILL WITH GAS OVEN
- ignite the grill heating element;
- place the foods on the chrome-plated shelf;
- insert on the highest runner;
- insert the drip tray on the bottom runner;
- gently close the oven door;
- after a few minutes, turn the food to expose the other side to the infrared radiation (the cooking time depends on the type of food and personal taste). To see table "Food to be grilled"
The grill element in the top of the oven is switched on by turning the thermostat knob clockwise to the grill symbol on the control panel. The red light will come on to show the element in operation.
STATIC ELECTRIC OVEN " 4 New "
With different heating elements controlled using a selector switch and regulated by a thermostat, starting from the 0 (off) position, the knob can be turned clockwise to the following settings:
- symbol 滑en lamp on (it will remain on even if the knob pointer is turned to the other settings).
- symbol slow cooking using the bottom element; the oven temperature is regulated using the thermostat knob.
- symbol :conventional "static" oven cooking, the oven temperature is controlled using the thermostat knob.
symbol on.
N.B. - The yellow light switches on and off as the thermostat is tripped.
Before placing food inside, allow the oven to heat up for at least 10 minutes.
MULTIFUNCTION ELECTRIC OVEN WITH 6 COOKING PROGRAMS
With different heating elements controlled using a selector switch and regulated by a thermostat (from 50 to 250^ ), starting from the position 0 (off) the selector knob can be turned clockwise to the following positions:
symbol Aen light and red warning light on (in some models the light turns on with the button on the dashboard)
symbol 穿行 light and red warning light on, operation of fan.
- symbol :conventional "static" oven cooking, the oven temperature is controlled using the thermostat knob.
- symbol cooking with fan oven, on one or two levels, the oven temperature is controlled using the thermostat knob.
- symbol grll on (on oven top element), the thermostat knob must be set at maximum temperature.
- symbol tick cooking using the fan oven, the oven temperature is controlled using the thermostat knob.
In all positions except zero (0) the red warning light and the oven light are on.
NOTE: The yellow warning light comes on according to thermostat
variations. Before putting food in to be cooked, the oven should be pre-heated for at least 10 minutes.
ELECTRIC OVEN MULTI7
- symbol given light and red warning light on, operation of fan.
- symbol :conventional "static" oven cooking, the oven temperature is controlled using the thermostat knob.
- symbol smoking with fan oven, on one or two levels, the oven temperature is controlled using the thermostat knob.
- symbol :grill on (on oven top element), the thermostat knob must be set at maximum temperature.
-symbol: infra-red cooking with fast grill, advised for long grilling: the thermostat knob must be set at the maximum temperature. - symbol quick cooking using the fan oven, the oven temperature is controlled using the thermostat knob.
- symbol - slow cooking using fan oven, the oven temperature is controlled using the thermostat knob.
NOTE: The oven light is activated by pressing the button next to the knob that selects the type of cooking.
NOTE: The yellow warning light comes on according to thermostat variations. Before putting food in to be cooked, the oven should be pre-heated for at least 10 minutes.
HOW TO USE THE ELECTRIC GRILL WITH ELECTRIC OVEN
- For models with "Electric Oven" only, controlled by two knobs separately (selector-thermostat), grilling is permitted with the door closed, without using the front side. Temperatures above 180^ must not be used when grilling with the door closed.
HOW TO USE THE ROTISSERIE
a)Grilling with the door open.
- fit the control knob guard as shown in figure 12.
- ignite the grill burner, or switch on the grill element;
- impale the meat for cooking on the spit and fix it in the centre of the two forks;
- insert the end of the spit into the motor drive socket;
- remove the handle from the spit;
- place the drip tray on the bottom runner of the oven;
- gently close the oven door, resting it against the knob guard;
- start the rotisserie motor by pressing the switch on the symbol.
- baste the meat from time to time. When cooked, screw the handle onto the spit and remove from the motor drive socket.
b)Grilling with the door closed.
- as above without using the knob protection as shown in fig.12
CAUTION: The spit forks may have sharp points. Handle with care.
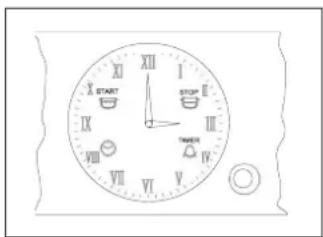
HOW TO USE THE MINUTE MINDER (Fig. 13)
Set the cooking time considered necessary by turning the timer knob clockwise. An alarm will sound at the end of the preset time.
USE OF SINGLE-CONTROL END OF COOKING TIMER (WITHOUT CLOCK) (Fig. 14)
This allows the cooking time to be programmed. Operation:
- Move the knob to the desired cooking time (120 mins max. for the electric oven; 100 mins max. for the gas oven).
- Choose the temperature using the thermostat knob and move the selector knob to the required cooking method.
- When the programming knob is at the 0 position the oven will switch itself off. This is automatic.
- Move the thermostat knob back to symbol
- Move the selector knob to symbol 0.
N.B. If the timer is not used, the oven programming knob is to be set to the manual position .
USE OF THE ELECTRONIC TIMER (Fig. 15)
This allows the start time and cooking duration time to be programmed. If food does not need to be watched, this timer can be
GB
selected even when the user is absent. Soon after installation and at any electrical supply cut-outs the display flashes; the clock must then be synchronized again to allow programming.
SETTING THE TIMER TO THE CURRENT TIME
- The current time is set by pressing the 2 buttons (COOKING TIME and STOP) and the "+" or "-" button at the same time. Any previous programmes are cancelled and the AUTO symbol flashes.
NOTE: when the AUTO symbol is flashing the oven cannot be used manually.
"+" AND "-" BUTTONS
-
Pressing the "+" or "-" buttons makes time go up or down at variable speed according to how long the button is pressed for.
MANUAL USE -
Press the MANUAL button: the AUTO symbol goes out (if flashing or permanently on) the SAUCEPAN symbol lights up and the oven can be used by adjusting the thermostat knob and the selector switch according to the instructions given in the manual.
AUTOMATIC OPERATION WITH END OF COOKING AND DURATION TIMERS
-
Let's use an example: it is 9:25 am; you want the oven to switch on at 11 am and switch off at 12 pm (cooking time 1 hour).
-
Press the COOKING DURATION button and within 5 seconds press "+" button until it shows 01.00, adjust using "-" button if necessary. The AUTO and PAN symbols come on permanently.
-
Press the END OF COOKING button and within 5 seconds press "+" button until it shows 12.00. The PAN symbol goes out but the AUTO symbol remains permanently on.
-
Move the oven thermostat knob to the desired temperature, and the selector switch to the required cooking method; the red warning light comes on the oven light comes on and the timer is ready to start: at 11am the oven will come on automatically and the PAN symbol will light up.
-
When cooking is over (12 am) the AUTO symbol flashes, the PAN symbol goes out and a buzzer sounds; to turn off the buzzer press any button.
-
Move the thermostat and selector knob to the OFF position.
SEMI-AUTOMATIC OPERATION WITH COOKING DURATION
Selection -
Let's take an example: it is 11:35 am and you want the oven to stay on for 25 minutes from now on.
-
Press the COOKING DURATION button and within 5 seconds press the "+" button until it shows 00.25, adjusting the time with the "-" button if necessary. The AUTO and PAN symbols light up permanently.
-
Turn the oven thermostat knob to the desired temperature and the selector switch to the required cooking method; the red warning light comes on, the oven light comes on and the oven starts to operate.
-
After 25 minutes the oven and the PAN symbol go out. The AUTO symbol flashes and the buzzer tells you that cooking is over: to turn off the buzzer press any button.
-
Then move the oven thermostat knob and the selector switch to the OFF position.
MINUTE MINDER
-
Press the MINUTE MINDER button and choose the desired time using the "+" or "-" button.
-
The BELL symbol lights up when the minute minder is in use.
-
When the pre-set time is over, the buzzer sounds and the BELL symbol goes out.
BUZZER
- The buzzer sounds at the end of a programme and lasts for a maximum of 7 minutes.
- To turn it off, press any button.
- Pressing the "-" button without having previously selected a function the frequency of the signal changes. A selection from 3 possibilities can be made. The selected signal is audible as long as the "-" button is pressed.
STARTING AND CHECKING A PROGRAMME
- The programme starts after about 4 seconds of it being set.
- The set programme can be checked at any point by pushing the corresponding buttons.
PROGRAMMING ERRORS
- Example: at 12:15 pm a COOKING DURATION time of 30 minutes is set and a END OF COOKING is programmed in at 12:30 pm.
- The programme error can be rectified by changing the duration or the end of cooking time, or by pressing the MANUAL button and programming again.
- If there is a programming error the oven will not come on. ANNULLING A PROGRAMME
- A programme can be cancelled by pressing the COOKING DURATION button and then the "-" button until the display shows 0.00.
IMPORTANT:
AT THE END OF EVERY PROGRAMMED COOKING OPERATION YOU ARE ADVISED TO PRESS THE BUTTON, OTHERWISE THE OVEN CANNOT BE OPERATED MANUALLY.
USING THE ANALOGIC TIMER WITH PUSH KNOB
GENERAL OPERATION
This timer governs the time display (with analog hands) and the operation of the oven (using push knob and indicator icons). Pushing on the knob, you can: adjust the time, program the start time and end of cooking, set the alarm (Minute Minder).
SETTING TIME
To adjust the clock press the knob briefly 4 times until you get the flashing of the "CLOCK" icon. Hence to increase or decrease the time, turn knob clockwise or counterclockwise.
After 10 seconds of the last adjustment the electronic timer automatically exit time setting mode.
MANUAL COOKING
During default condition, timer allows manual firing of the oven using the general oven switch (external to the timer).
PROGRAMMING END COOKING TIME
Cooking end programming allows you to start immediately and stop cooking in an automatic manner based on the time scheduled. To program the end of cooking time briefly press 2 times the knob until you get the flashing of "END TIME" icon. To increase or decrease the cooking time, turn knob clockwise or counterclockwise. The flashing of "END TIME" icon continues for some seconds after the last rotation. The program can be confirmed by pressing the knob (at least 2 minutes of cooking time).
Upon confirmation of the program, the cooking is started and the alarm is automatically activated. Cooking stops when "Programmed End Time = Present Time". To view the program press and release the knob and the timer show the selected program. When cooking stops the "END TIME" icon flashes and the alarm beeps. After 1 minute beeps are disabled and the icon "END TIME" remains flashing until you press the knob. To cancel the program before the end, press the knob for some seconds and the program will be canceled and the timer returns to manual cooking mode.
START AND END COOKING TIME PROGRAMMING
Cooking start programming allows to start end stop cooking automatically based on the time scheduled. To program the cooking start time, briefly press 1 time the knob until the flashing of the "START TIME" icon. Increase or decrease the cooking start time turning knob clockwise or counterclockwise. The flashing of "START TIME" icon continues for some seconds after the last rotation. If within this time you don't turn or press the knob the hands return automatically to display the time and the program is canceled. If you press the knob the cooking start time is stored ("START TIME" icon is turned on) and timer switches to cooking end programming (the "END TIME" icon from off becomes flashing). The cooking time end programming will follow the procedure in the preceding section. Cooking will begin
when "Programmed Start Time = Present Time".
MINUTE MINDER PROGRAMMING
Minute Minder programming allows you to have a simple alarm after a scheduled time without activating the cooking (mode Minute Minder). To schedule an "alarm" (Minute Minder mode), press the knob 3 times until the flashing of "ALARM" icon. Minute Minder setting is identical to end of cooking time setting (see the corresponding paragraph).
It's possible to use Minute Minder only when there is no current cooking program active.
DISPLAYING THE PROGRAM SET
The timer allows the display of the program. To view the program set press and release the knob, at the same time the programmer will display the program set by moving the hands on the set times and highlighting the steps with the flashing of the icons. The controller then returns automatically to display the current time and continues with the execution of the program.
CANCELLATION OF PROGRAM SET
The timer allows the cancellation of the program. To delete the program set to press knob for a few seconds until the icons shut off and emission of the second beep.
The programmer then automatically returns to the manual cooking. BLACKOUT INDICATION
The timer signals every lack of power supply through the flashing of the symbol "CLOCK". In this case, to disable it briefly press the knob.
FOR COOKERS WITH SELF-CLEANING OVEN
The two side walls and the back are coated with a catalytic self-cleaning enamel.
Every 10-15 times it is used, leave the oven empty at full heat. The time required for cleaning depends on the condition of the oven. Some splashes tend to set hard and may clog the pores of the special coating, preventing oxidation and eliminating its self-cleaning properties. In this case, as soon as the oven has completely cooled apply very hot water to soften the deposits and use a soft brush, without detergent, to remove them. Then switch the oven back on at maximum heat for a few minutes.
(Important: never use metal brushes or abrasive substances).
HOW TO USE OVEN ACCESSORIES
- The oven shelf is designed to take normal oven dishes for cooking sweets or roasts, or is used without a pan for cooking foods under the grill.
- The drip pan under the grill is used to collect juices, which drip from the food that is cooked directly on the grill. The drip pan can also be used for cooking.
- Remember that cooking times may vary if food is cooked on two shelves at the same time.
- The oven is provided with a stop system to extract the racks and prevent them from coming out of the oven (1). As shown in the drawing, to extract them completely, simply lift the racks, holding them on the front part, and pull (2), see fig.18
REMOVING THE OVEN DOOR
The door can be removed to clean the oven in an easier way following this instructions:
1) Open the door completely.
2) Turn the two levers "B" bringing them from position 1 to position 2 (see fig.19).
3) Close the door slowly to a stop, grab it with both hands from side to side, close it further and pull it by lifting it upwards.
4) To replace the door you must follow the procedure in reverse order, insert the two hinges in their seats and open the door completely.
5) Turn the two levers "B" bringing them back in position 1.
6) Close the door normally.
HOW TO USE THE CERAMIC HOB
The hotplate power has a sequential control device which ensures excellent control of the cooking temperature.
The heat settings are from 1 to 6. The knob can be set in the required position by turning it to right or left.
On dual circuit plates, the knob only turns clockwise and the heat settings are from 1 to 6, for the central zones of the plates only.
If the knob is turned forward another notch after the last heat setting, the other zones of the plates will switch on.
When one of the cooking zones is hot, the warning light E (see fig. 1) comes on; it will not go off until the temperature of all the hotplates has dropped below about 60 degrees C).
The four cooking zones are indicated by the outlines screen-printed on the hob. For good efficiency and appropriate energy consumption, only use saucepans and utensils with thick, perfectly flat bottoms (see fig.10). The diameter of the base of the pan must be at least as large as the outline marked on the hob. If the bottom of the pan does not cover the heating area, energy will be wasted. Preferably, it should be slightly larger in diameter.
Pan bottoms and the cooking surface must be clean and dry. Otherwise heat, and thus energy, will be wasted.
Note:
-
Never cook directly on the hotplates.
-
To save time, cooking with the hotplates may be started at full heat (knob on 6), turning down to the ideal temperature once the contents of the pan have heated up.
-
All the hotplates are equipped with a temperature limiter which prevents them from overheating, even if a hotplate is operated at the highest setting with no pan, or if pans with uneven bottoms are used.
The table below will serve as a guide, bearing in mind that cooking times and temperatures may vary depending on the type and amount of foods cooked and personal taste.
| Knob setting | Cooking process |
| 1 - 2 Keeping foods warm, bechamel sauce, custard | |
| 2 - 3 Reheating foods | |
| 3 - 4 Past a, vegetable soups, ragout | |
| 4 - 5 Boiling, roasting | |
| 5 - 6 Steamed vegetables, steaks, fish | |
| 6 Grilling, omelettes, lamb chops | |
CAUTION
- Do not look directly at the halogen hotplates while they are on, as the light emitted from the hotplates may be harmful to your eyes.
- The ceramic glass surface is very tough but it is not shatterproof and it may not be used to place objects upon it.
- It may be damaged if struck violently by sharp or very hard objects.
- If breakages, crazing or cracks appear on its surface, stop using it and contact the after-sales service immediately.
- Do not place aluminium foil or plastic film wrappings on the hob while it is still hot.
- Soon after installation, the hob may give off a burnt smell; this will disappear after the first few times it is used.
IMPORTANT:
Because of their height, children may fail to see the residual heat warning light. Take care that they do not touch the hob, even if the heating elements are switched off.
CLEANING OF THE CERAMIC HOB
The ceramic hob is much easier to clean than a hob with conventional hotplates. Light dirt can be removed with a sheet of damp kitchen paper.
To remove tougher dirt, use the same cleaning methods as for glass, with specific detergents. If a pan boils over onto the hob, use a spatula to remove the deposit formed.
Sugar or syrup must be removed immediately before it forms caramel on the glass. Any residues of aluminium foil or plastic film wrappings accidentally placed on the hob while it is still hot must
also be removed at once.
Water marks and traces of scale can be removed with white wine vinegar. Always remember to rinse and dry the surface with kitchen paper after use.
Never use abrasive or corrosive detergents, such as oven sprays, greasers, rust-removers, powder polishing detergents or abrasive sponges. Do not allow grains of sand to be left on the hob when cleaning vegetables, for example, as they may scratch the surface.
Do not slide pans with rough bottoms over the hob; they may mark or even scratch the glass.
GENERAL PRECAUTIONS
A number of fundamental precautions must be complied with when using household electrical appliances. In particular:
- The ceramic-glass hob has good mechanical strength and thus withstands small accidental knocks. If the knob is broken or cracked by a knock, do not use the appliance, disconnect the power supply and contact your dealer.
Advice in case of malfunctions
Before contacting your After-Sales Service, check that:
-
the plug is fitted properly into the mains socket;
-
the master pilot is on.
If the problem persists, consult a qualified, authorised technician capable of repairing the fault. If the oven light does not work, proceed as follows:
- Disconnect the power supply. Remove the protective glass on the back of the oven and replace the bulb.
No liability is accepted for injury or damage caused by poor installation or improper use of the cooker.
In case of malfunctions, particularly gas leaks or short-circuits, contact your engineer without delay.
EUROPEAN DIRECTIVE 2012/19/EEC (WEEE): INFORMATION FOR THE CONSUMER


Fig. A
This information is strictly addressed to those who have a product showing the symbol below (Fig.A). This symbol is indicated on the technical data sticker (rating label) placed on the product itself.
This symbol indicates that the appliance is considered as Waste Electrical and Electronic Equipment and complies with the European directive 2012/19/EC (WEEE).
Therefore this product is not to be treated as household waste.
Instead it shall be handed over to the applicable collection point for the recycling of electrical and electronic equipment or it can be handed back to the retailer when you want to purchase a new equivalent product.
The consumer is responsible for a correct disposal of the product towards an appropriate collection point.
Otherwise the consumer can be exposed to a penalty sanction by laws in force for waste disposal.
Appropriate separate waste collection followed by recycling the product, the treatment and compatible environmental disposal contributes to avoid negative effects towards the environment and health and helps to recycle material which the product is composed of. For more detailed information regarding the available waste collection systems of this product please contact your local city office or contact the retailer where the product was purchased.
The manufacturers and importers will obey to their responsibility for recycling, treatment and compatible environmental disposal by participating directly and through a joint cooperative system.
EUROPEAN REGULATION NO 1935/2004 - MATERIALS IN CONTACT WITH FOOD. NOTICE TO USERS.
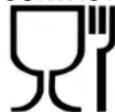
The symbol shown here, which appears on the packaging, indicates that the materials in this product which may come into contact with food are compliant with the requirements of European Regulation No 1935/2004.
Inside the oven chamber, food might come into contact with oven shelves, dripping pans, pastry trays, oven door glazing, rubber gaskets, rotisserie spits, and the sides of the oven itself.
On the hob, contact is possible with pan stands, burners and the hob skin.
In the food-warmer, contact may occur with the sides of the compartment.

Français
Advertisements
1,5 kW - Plaque Normale 1,8 kW - Plaque High-Light 2,0 kW - Plaque Rapide
210-120 2,1-0,7 kW - Plaque High-Light
265-170 2,2-1,4 kW - Plaque High-Light
RECOMMANDATIONS IMPORTANTES:
FUNCTIONNEMENT MANUEL
ANNULATION D'UN PROGRAMME
ANNULATION DU PROGRAMME
E = SPIA CALORE RESIDUO
RESIDUAL HEAT WARNING LIGHT
=HILTNKATOPIIARJAMTOUKA
OCTATOHOFOFEIDIA
=EVδεικικηλuxviaθερμοτητας
= VOYANT CHALEUR RESIDUELLE
=CONTROLELAMPJE RESTWARMTE
C3=PIASTRA 210-120
= HOTPLATE
210-120
-
=BLAQLF 210-120
=PLAATJE 0.210-120
C4=PIASTRA 265-170