BO683MAN - Cooker BOMPANI - Free user manual and instructions
Find the device manual for free BO683MAN BOMPANI in PDF.
User questions about BO683MAN BOMPANI
0 question about this device. Answer the ones you know or ask your own.
Ask a new question about this device
Download the instructions for your Cooker in PDF format for free! Find your manual BO683MAN - BOMPANI and take your electronic device back in hand. On this page are published all the documents necessary for the use of your device. BO683MAN by BOMPANI.
USER MANUAL BO683MAN BOMPANI
Operating Instructions COOKER
Contents
Warnings 6
Technical data and specifications 23
Installation 24-26
Using the safety chain 24
Ventilation 24
Positioning 24
Fitting the feet 24
Balancing the lid 24
Fitting the oven door handle 24
Gas connection 25
Adapting to different types of gas 25
Replacing the injectors 25
Minimum setting 25
Electrical connection 25
Electric ignition 25
Safety device 26
For the user 26-31
Ventilation 26
Igniting the burners 26
Igniting the gas oven 26
Igniting the gas grill 26
Safety device 26
Electrical switch-on 26
Using the gas hob 27
Using the gas oven 27
Using the electric hotplates. 27
Using the gas grill 27
Using the electrical grill oven gas 27
Multifunction electric oven 27
Using the multifunction electric oven
with 6 cooking programs 27
Using the electrical grill electric oven 28
Using the "Touch Timer 3 Keys. 28
Using the rotisserie 29
Oven light / rotisserie switch 29
Using the self-cleaning oven 29
Multiple spit kit 29
Fitting the multiple spit. 29
Using the spring clock 29
Use of the electronic timer 29
Using the oven accessories 30
Removing the oven door 30
Using the ceramic hob 30
Cleaning the ceramic hob 31
Advice and precautions. 31
Directive 2012/19/EEC (WEEE) 31
European Regulation 1935/2004 31
Figures 70-72
RU yccckn
YCTAHOBKA
NTbI
Copepkanne
BHIMAHNE 7
TexHHueckHe daHHbIe HxapaKaTePncTHKn 32
YcTaHOBka 33-35
LENOUKNBE3OJNACHOCTNI 33
BentnlaIyI IOMeHn. 33
Pa3MeIeHne 33
MOHTaX HOKeK PJIHTbI 33
ypaBHOBeIIIBaHHe KpbIIKN 33
MOHTaXpyKINJIAIDBepuIyXOBKN 34
HacTpoKaHa pa3JnUHbIe TnBbIra3a 34
3aMeHa XIKJepOB 34
PerylnpOBka noaun Bo3nyxa 34
PerylnpoBka MHHMaJbHOro
IIaMeHN 34
IoiKJIoueHHe K 3JIeKTPoCeTH 34
3JIeKtpueeckoe 3aXnraHne 35
PpeOxpaHntelbHoe
ra3OKOHToJIbHoe yCTpOHeCTBO 35
KAK HcIOJIb3OBATb IJITY 36-41
BeHTnJIaIyI IOMeIeHn 36
3aKnraHne ropeJok 36
BkIIOueHHe ra3OBOI dyXOBKn 36
BkIIOueHHe ra3OBOrO rpnJra 36
PpeOxpaHnteJIbHOoe yCTPOHcTBO
ra3OKoHTpOJIa 36
3JIeKtpnueckoe 3aXnHaHne 36
HcnoJIb3OBaHHe rA3OBbIX ropeJIOK
pa6oueH IOBepxHOCTN IJNTbI 36
HcnoJIb3OBAHHe 3JIeKTpHueckHX KOHΦopOK 37
HcnoJIb3OBaHHe Ra3OBOrO rPnJIa
HcIOJIb3OBAHNE 3JEKTPNueCKOFO TPHJIA 37
3JIeKTPnueCKA NOJHΦY HKUHOHAJIbHA
ДУХOBKA 37
BbIKIOaTeJIb-KOHTPoJIbHaJaAMIOKa/Bep..38
DyXOBKa C TePMOpeRyJIArTOPOM 38
HcnoJIb3OBaHHe cAmOoUHIIaIOIeNc dyXOBKn ...38
KOMnJIeKTH HacaDOK BepTeJa 38
MOHTaX HacaIOK 38
HcnoJb3OBaHne TaHMepa 38
HcIOJIb3OBAHNE 3JIeKTPOHHO
IPOPTPAMMHPYIOIEYO YCTPOICTBA 38
IIPIHAAJIEXKHOCTN DYXOBKN 39
DEMOHTAX DBEPUbI DUXOBKN. 39
MCNOJIb3OBAHNECTEKIOKEPAMUeCKOI
IOBEPXHOCTI IINITbI 40
CHCTKA CTEKJIOKEPAMNUECKOM
IIOBEPXHOCTNIJIITbI 40
Директуba 2012/19/EEC (WEEE):нфорmaць дя..
noJIb3OBaTeJIeI 41
EBPOENCKN PEGJAMEHT No 1935=2004. 41
PncyHKn 70-72
GR ελληνικα
ERKATAASTAH
Kouzivες
περιεχόμενα
PPOOXH 8
Texvika xapaktnploTiká 42
Eykataoataon 43-45
AAYIaEz AzΦAeIAZ 43
AEPIMOE TOY XQPOY 43
TOnoEeTHsH 43
IΩΣ NA TOIOθΕTHΞΕTE TA ΠΟΔΑΙΑ. 43
I2OPPONH2H TOY KAAYMMATOE 43
SYNAPMOAONH XEPOYAIOY ME TZAMI NOPTA
ENTOIXI\SENOY FOYPNOY 44
SYN△EESHTOADIKTYOYΓPAEPIOY 44
IIA THN ANTIKATAZTAH TON MNEK ΣTOYKAYTHPEO TOY ΠΑΚΟΥ EPΛΙΑΣ.44
PYOMIH TOY MINIMOYM KAYETHPEE EETION 44
SYN△ESH ΣTO HAEKTPIKO ΔIKTYO 44
IIA KOYZINE ME HAEKTPIKH ANAΦAΕΗ 44
IPOEIOHOIHSEI 44
Tla to xrhoTn 45-48
AEPIEMO2 TOY XQPOY 45
ANAMMA TON KAYETHPQN TON EETION 45
ANAMMA TOY KAYΣTHPA ΦOYPNOY 45
ANAMMA TOY KAYSTHPA GRILL 45
IATA H A A EIA 45
IIA KOYZINEZ ME HAEKTPIKH ANAΦAEEH 46
IΩΣ XPHEIMONIOIoyNTAI OIEETIEE 46
TIA KOYZINE ME HAEKTPIKE EETIE 46
IΩΣ XPHESIMONIOIEITAI O ΦOYPNOZ
YΓPAEPIOY 46
IΩXPHZIMONIOIEITAI TO GRILL YΓPAEPIOY
O FOYPNOZ YFPAEPOYL 46
IΩΣ XPHESIMONIOIEITAI TO HAEKTPIKO
GRILL O ΦOYPNOZ YΓPAEPIOY 46
HAEKTPIKOZ FOYPNOI NOAANJN XPHSEQN 47
HAEKTPIKO ΦOYPNO ΠΟΑΑΝΑΩN
ΛEITOYPRΩN 47
IΩΣ XPHSIMONIOIEITAI TO HAEKTPIKO
ΓKPIA ME HAEKTPIKO ΦOYPNO.47
- The appliance and its accessible parts become hot during use. Care should be taken to avoid touching heating elements. Children less than 8 years of age shall be kept away unless continuously supervised.
- This appliance can be used by children aged from 8 years and above and persons with reduced physical, sensory or mental capabilities or lack of experience and knowledge if they have been given supervision or instruction concerning use of the appliance in a safe way and understand the hazards involved.
- Children shall not play with the appliance. Cleaning and user maintenance shall not be made by children without supervision.
- WARNING: Unattended cooking on a hob with fat or oil can be dangerous and may result in fire. NEVER try to extinguish a fire with water, but switch off the appliance and then cover flame
e.g. with a lid or a fire blanket.
- The internal surfaces of the compartment (where present) may become hot.
- Remove any liquid from the lid before opening it.
- WARNING: Ensure that the appliance is switched off before replacing the lamp to avoid the possibility of electric shock.
- The appliance becomes very hot during use. Care should be taken not to touch the heating elements inside the oven.
- Accessible parts may be hot when the heating element is in use. Keep children well away.
- For direct connection to a power mains, a device that ensures disconnection from the mains must be installed, with a opening distance for the contacts that allows for a complete disconnection under conditions of category III electrical overload, in conformity with the installation instructions.
- Always disconnect the power supply before any work inside the oven or where live parts may be accessed.
- Never use the warming compartment for storing inflammable liquids or items which do not withstand heat, such as wood, paper, aerosol cans, matches, etc.
- Make frequent checks on the rubber connection hose, ensuring that it is well away from hot surfaces, that there are no sharp bends or kinks, and that it is in good condition. The hose must be replaced at the latest at the indicated date and must be secured at both ends using a standard hose clamp.
- If taps become stiff to operate over time, contact the After-Sales service.
- Wash enamelled or chrome-plated parts with soapy lukewarm water or non-abrasive detergents. A metal brush may be used to remove deposits from hob burners and flame caps. Dry thoroughly.
- Never use abrasives to clean enamelled or chrome-plated parts.
- Do not use too much water when washing the hob. Take care that no water or other substances enter the burner housing holes, as this may be dangerous.
- The spark plugs for electric ignition must be kept clean and dry; always check after use, particularly if there have been drips or overflows from pans.
- Never close glass lids until the hob burners or
hotplates have cooled completely; it might shatter or crack.
- Never knock enamelled parts or ignition spark plugs (where present).
- The main or wall gas tap should be turned off when the cooker is not in use.
- Never move the cooker by means of the handle.
- Do not clean the glass doors of the oven with rough, abrasive materials or sharp metal scrapers, since they may scratch the surface and cause the glass to shatter.
- Do not use vapor jets to clean the appliance.
- The cooker does not have an installation stand.
- The appliance is not intended to be controlled by an external timer or a separate remote control device.
- CAUTION: The use of a gas cooking appliance results in the production of heat, moisture and products of combustion in the room in which it is installed. Ensure that the kitchen is well ventilated especially when the appliance is in use: keep natural ventilation holes open or install a mechanical ventilation device (mechanical extractor hood).
- CAUTION: This appliance is for cooking purposes only. It must not be used for other purposes, for example room heating.
No liability is accepted for injury or damage caused by poor installation or improper use of the cooker.
In case of malfunctions, particularly gas leaks or short-circuits, contact your engineer without delay.

pycckn
- Pnp6op n ero doctynhble qactn cnIbHO HaraTcB O Bpempaobt. CneDyet npraTb octopoxHoctb. Heib3 kacaTbcr HaraTeNbHbIX 3JemeHTOB. DeTN B Bo3pacte Do 8 JeTdoJIxHbI HaxOuTbcr Ha paCCTOAHN, INI NOD pncMOTPOM B3POcblX.
-Данhoe yctpoiCTBO MOKET 6bITb NcNoIb3OBAHO DeTbMn B BO3pacte OT 8 JET N IINaMn C OrpaHueHHbIMN Φn3nueCKIMN, INJYMCTBeHHbIMN CnOCo6HoCTaMn INI C HeIOCTaTOUHbIM ONbITOM IN 3HaHnAIMN, pni YCNOBNI, YTO OHN HaxOJaTcN POn
PnncmOTpOM HIN NOJyUHIn Yka3aHHe O TOM, KaK npabNbHO N 6e30NaCHO NcNoJIb3OBaTb Pnp6Op, UTO6bl NOHMAtb PNCKN.
-ДeTN He ДОЛЖны ИграТь C пибором.ЧИСТкAn OБслжИВаHne He ДОЛЖны OсуцEcTBЯТьСЯДeТBMn 6e3 npICMOTpa.
-BHIMAHHE: octabJb6e3 npncmToPa ropayu ropekky cKnpaMn N MacJaMn MoKe 6bIb onaChbIM m MOKeT npnbEcTN K NOxApy HNKoIgA He nCnoJIb3ObaTb BODy dJa TyuSeHn nnameHn /OrHa:HaIO BbIKNoHTb yCTpoNcTBO n TyuNTb PJaMra: N O Bo3MOXHOCTn HaKpbITb Oyar Bo3ropaHn ORHeynOpHbIM OJeIOM Nn OrHeynOpHoN KpbIshKoN.
-BHyTpEHnHe NOBepxHocTn JaNka DJIa NocyDbI (ecnn nMeetc),MOrT cTaTb ropaymN.
- YdaJInte BO3MOXHbIe XnIDKOCTN 13 KpbIshKIn, neped OTKpbITHeM.
-BAXKHO: npe3aMeHOnJaAMnbl, BHyTpN dYXOBORO ⅢkaΦa, y6eINTbCRA YTO yCTPONCTBO BBIKIOUHeHO N3 ceTNI, UTO6bI N36ExKaTb BO3MOXHOCTN NOPaJHexNIAJIKTPNueCKNM TOKOM.
-BoBpempa60tbI np6bOp cnIbHO HarpBaetc. Heo6xoJIMO 6paataBHNMaHne Ha To, YTO6bI He KacaTbcra HarpBaTeJIbHbIX 3JeMeHTOB BHyTpN dYXOBKN.
-Дя Bынолненя пямого NOДКIOUчENЯ K CETи HeOBxODIMO NOДROTOBNTb UCTPOIcTBO, KOToPoe 6ydeT obecneuBaTb OTKIOUChEne OT Cetn, paCCTOHNE OTKpbITN KONTaKTOB B KOTOpOM DOJXHO N03BOJrTb NOJIHoe OTKIOUChEne B YcNoBnIX NepeHaNPJxKeHne KaTeOpIN III N B COOTBeTCTBn IN PpaBnIamN yCTaHOBKn.
- Ipepe JIO60I ONEpaHneI NO TexO6cJyXHBaHHIO, YNCTKe HIN peMOHTy BHyTpN DxyOBKN N Be3De, TDE cyuieCTByET ONaCHOCb COpNKOCHOBEN C HaxOJaUMnCn IOI HaNPJKeHNm DeTaJIAMN, OTKJIouaHe PINTy OT 3JIeKTPocetN.
-He hCIOJb3yIte OTdeJIeHHe pa3OgpeBa TapeIOK HOTDeJIeHHe pa3MeIeHHra3OBOro 6aJIHOHa IJIaXpaHEHHBocPJIaMeHHOIIxxCsJHKoCTei HIN HeycToHNBbIX K DeIcTBIO TeMnepaTypbI MaTePnaJIOB, TaKHX KaK DepeBO, bymara, a3pO3OJIH, XIKKOCTN H Ra3bl IOd DaBJIeHHem, cNtUKN H T. D. - YacTo IpoBepaIte COcTOAHHe ⅢJaHra, coeHHHIOUeI OIIHTy C HCTOuHNKOM IOJaHr Ra3a. O6paTInTe BHHMaHHe Ha To, UTObI OH bJI DoCTaTOUHO yJaJIeH OT HaRpeBaIOUHXcA CTeHOK., UTObI He 6blIO CNJbHbIX H3rNoB, NpeXaTHn HIN IOBpeXJeHm ⅢJaHra. Pn O6HApYkeHHN
IOBpeKJHeHn HaNo HeMeJIeHHo IPOH3BeCTN 3aMeHy IIaHa. B JIObOM cIyuae erO Heo6XOnIMo 3aMeHHTb BycTaHOBJeHHbI cPOK. Oba KOHua IIIaHra DOJxHbI 6bITb 3aKpeJIeHbI pR NOMII H CTaHdapTHbIX rapaHTnpUxh 6e3OpacHOCTb 3aXHMOB.
-BcIyue,ecJHcoBpeMeHemKpaHnoaunra3a 6yTeT OKpbBaTbCn TpyDom,peKOMeHnyetcR Bbl3BaTb CneuaJIHCTaTexHHueckoClyxkbI.
-Для Oчнстkn эмалноьаHHbIX HIN XPOMHPOBaHHbIX qacTei ПИNTbI PrIMeHЯITE TeNJIyO MblbHyIO BODY HIN Hea6pa3HBHbie MOIOUIne cpeIcTBA.Для Oчнстkn ropeJok paBOueH IO-BepxHOCTn I paccKaTeJIeN PJIaMeHN MOKHO NcIOJIb3OBaTB MeTaJIInueCKyIO ΜeTOUkyДлЯ YdaJIeHnHaKnII. AKKypaTHO BbICyUHbaITe OUnIeHHbIe IOBepxHOCTn.
-He npimHeTe a6pa3HBHbIe MOIOIIe cpeCTBa IJIa YNCTKN 3MaJIINPOBaHHbIX HJIN XpOMHPOBaH-HbIX YaCTei.
-ПиЧNTKe CTapaNTecb He 3aJIHBAbB BOIOI pa-bOCHyIO IOBepXHOCTb IIHTbI. H36eRaTe IOnaJaHnRA BObl NIN MOIOIeTO cpeIcTBA B OTBepCTNr IopeJIOK.
-BcerdaNoDdepKnBaHTeBCHCTOTEcBeuNДJI 3JIeKTPo3aXnIraHn(ecJIN HMeOTc)N IpocyINBaHTeNXPOCJIeKaXDOrOHCNOJb3OBaHnPIIITbI,OCObEHNOeCJIN BnpOceCEPnFOTOBJeHnIIHIN3KacTpOJIb BBITEKaJa XnIKOCTb.
- EcJH NJIHTa yKOMJIeKTOBaHa cTeKJIHHOHN KpbIHKoH, HNKOrDa He 3aKpbIBaHrTe KpbIIky Do Tex NOp, NOKa HE OCTbHyr T OpeJKN HIN 3JIeKTPOKOHΦOpKn pa6Oey NOBepxHOCTN. KpbIIka MoXeT TpeCHyTB HIN pa3bHTbcra.
-He nOdBepraTe ydaPam 3MaJInpOBaHHbIe YacTNIJNTbI H CBeuN 3JIeKTpO3aXHrAHH (ecJIn ecTb).
- He 6epeTecb 3a pyky dny nepeHoc a nIITbl.
-Данньприбор He npedHa3NaueHдя
ИСПОЛБ3OBaHЯ ЛЮДBMN C OрраичeHHbIMN
ФИЗЧЕСКИМ NЛN ДВИТЕЛБHbIMN
СПОСБНOCCTЯМN (ВКПЮЧА ДЕТЕ), ЛбО
HEONыTHьIMN ИЛN He3HAKOMbIMN C yCTPОИCTBOM,
3a ИСКПЮЧЕНЕСЛУЧАВ ПРIMЕHENЯ рпбора
ПОД HAДЗОРМ ИЛN СLEДУ NHCTPyKUЯМ ЛИca,
OTВETCTBEHHO 3a 6e3OJaNACHOCtB. СлдNTь,
ЧTOБы DeTи He INrpaJIи C рпбором.
-ДячNTКСTeKJIHHbIXДВepeUdYOBKNHe CNeJyET NcNoIb3OBAbT rpy6bIe abpa3INBHbIe MaTePnaIbI INI OCTpbIE MeTaIIuYeCKne CKpe6Kn, TAK KAK OHN MOrTy NOцapanaTb NOBepXHOCTb I
pa3bntbCTeKNo.
- He IncNoJIb3OBaTb napObIe noInpOuNk nIpy ChCTKn yCTpOyCTBa.
-Дя yctahOBKN ППNTBI NOINUM He npedyCMOTpeH.
-Прибор He npedHa3NaueH ДЯ BBeDeHnB
экплyaTaCNUO C NOMOUBIO BHeUHero TaIMepa
ин OTdeJIbHOI CNCTeMOJ DInCTaHcNHOHOrO
уnpabNeHn.
-BHIMAHNE:IcnoJb3OBAHne ra3OBon IINITbI DnI rOTOBKn PpNBODNT K O6pa3OBaHIO N36bIToUHO TEnla, BnAIXHOCTN INPOyKTOB RopeHHB NOMeUeHHN, rDe OHa yCTaHOBNeHa. Y6eINTecb, qTO KxOHHOe NOMEUeHHne XopoWo npOBETPNBaETCs,OCo6EHNO pN BKNIOUeHHoN IInTe:He 3akpbIbAIte eCTeCTBeHHbIe BEHTNJRAUONHHbIe OTBepCTN,OTKpoTNe HNN yCTaHOBtE yCTPOnCTBO MEXAHueCKO BEHTNJLAuNN (BbITJXKA).
-BHIMAHHE: 3Ty pIHTy MoXHO nCNoB3OBaTb TOnbKO dIpy npiroTOBLeHnPyN. He IcNoJIb3yIte ee dIy INbIX ceJe, HApPmep, dIy o6OrpeBa nOMeUeHn.
Φa6pɪka - n3rTOBHTeJIb He Hecet OTBeTCTBeHHOCTn 3a NOBpeKdEHH, HeHCπpaBHOCtN HeCuaCThIe CJIyauH, Bbl3BaHHbIe HECo6JIIODeHHempekOMeHdaUH No yCTaHOBKe I KcπJIyaTaUHIIHTbl.
B cIyuae HencnpaBHOCTH nJHTbI, o6HapyKeHHyTeuKn r3a HIN NOBpeKDeHHN 3JIeKTPoPBOdkn HeMeJJIeHHO o6paTHTecb B IeHTp Texo6CJIyXHBaHHN H Bbl3OBHTe CIIeUHaJIhCTa.
GR ελληνικα
PPOEOXH
-H oukeun kai ta Tpooaiau maepn Tns Zeaivovtai kata n diapkeia tnc xpnons. Povtiote va aTTOPOUYTE TO ayiyua twv aviTaoewv. KpatnoTe Ta PAIDIA katwTwv 8 ETW VAKPIA aTTO N OUKEUN, EKTOS KA AV TA ETITnpEITE OUVEXwC.
- Autn n ouokun mTOpEi va xnpoiotoine i anto Taiia naiic 8 etuv kai avw kai ano atoua e uowevc oomegake, aoNTpiakcs n diavontikcs ikavotntes n EAAeun EPTepiaac kai yywns, e Tnv TpoTOn Oti EITnpouvtai
ACCENSIONEL BRUCIATORE FORNO
USO ACCESSORI DEL FORNO
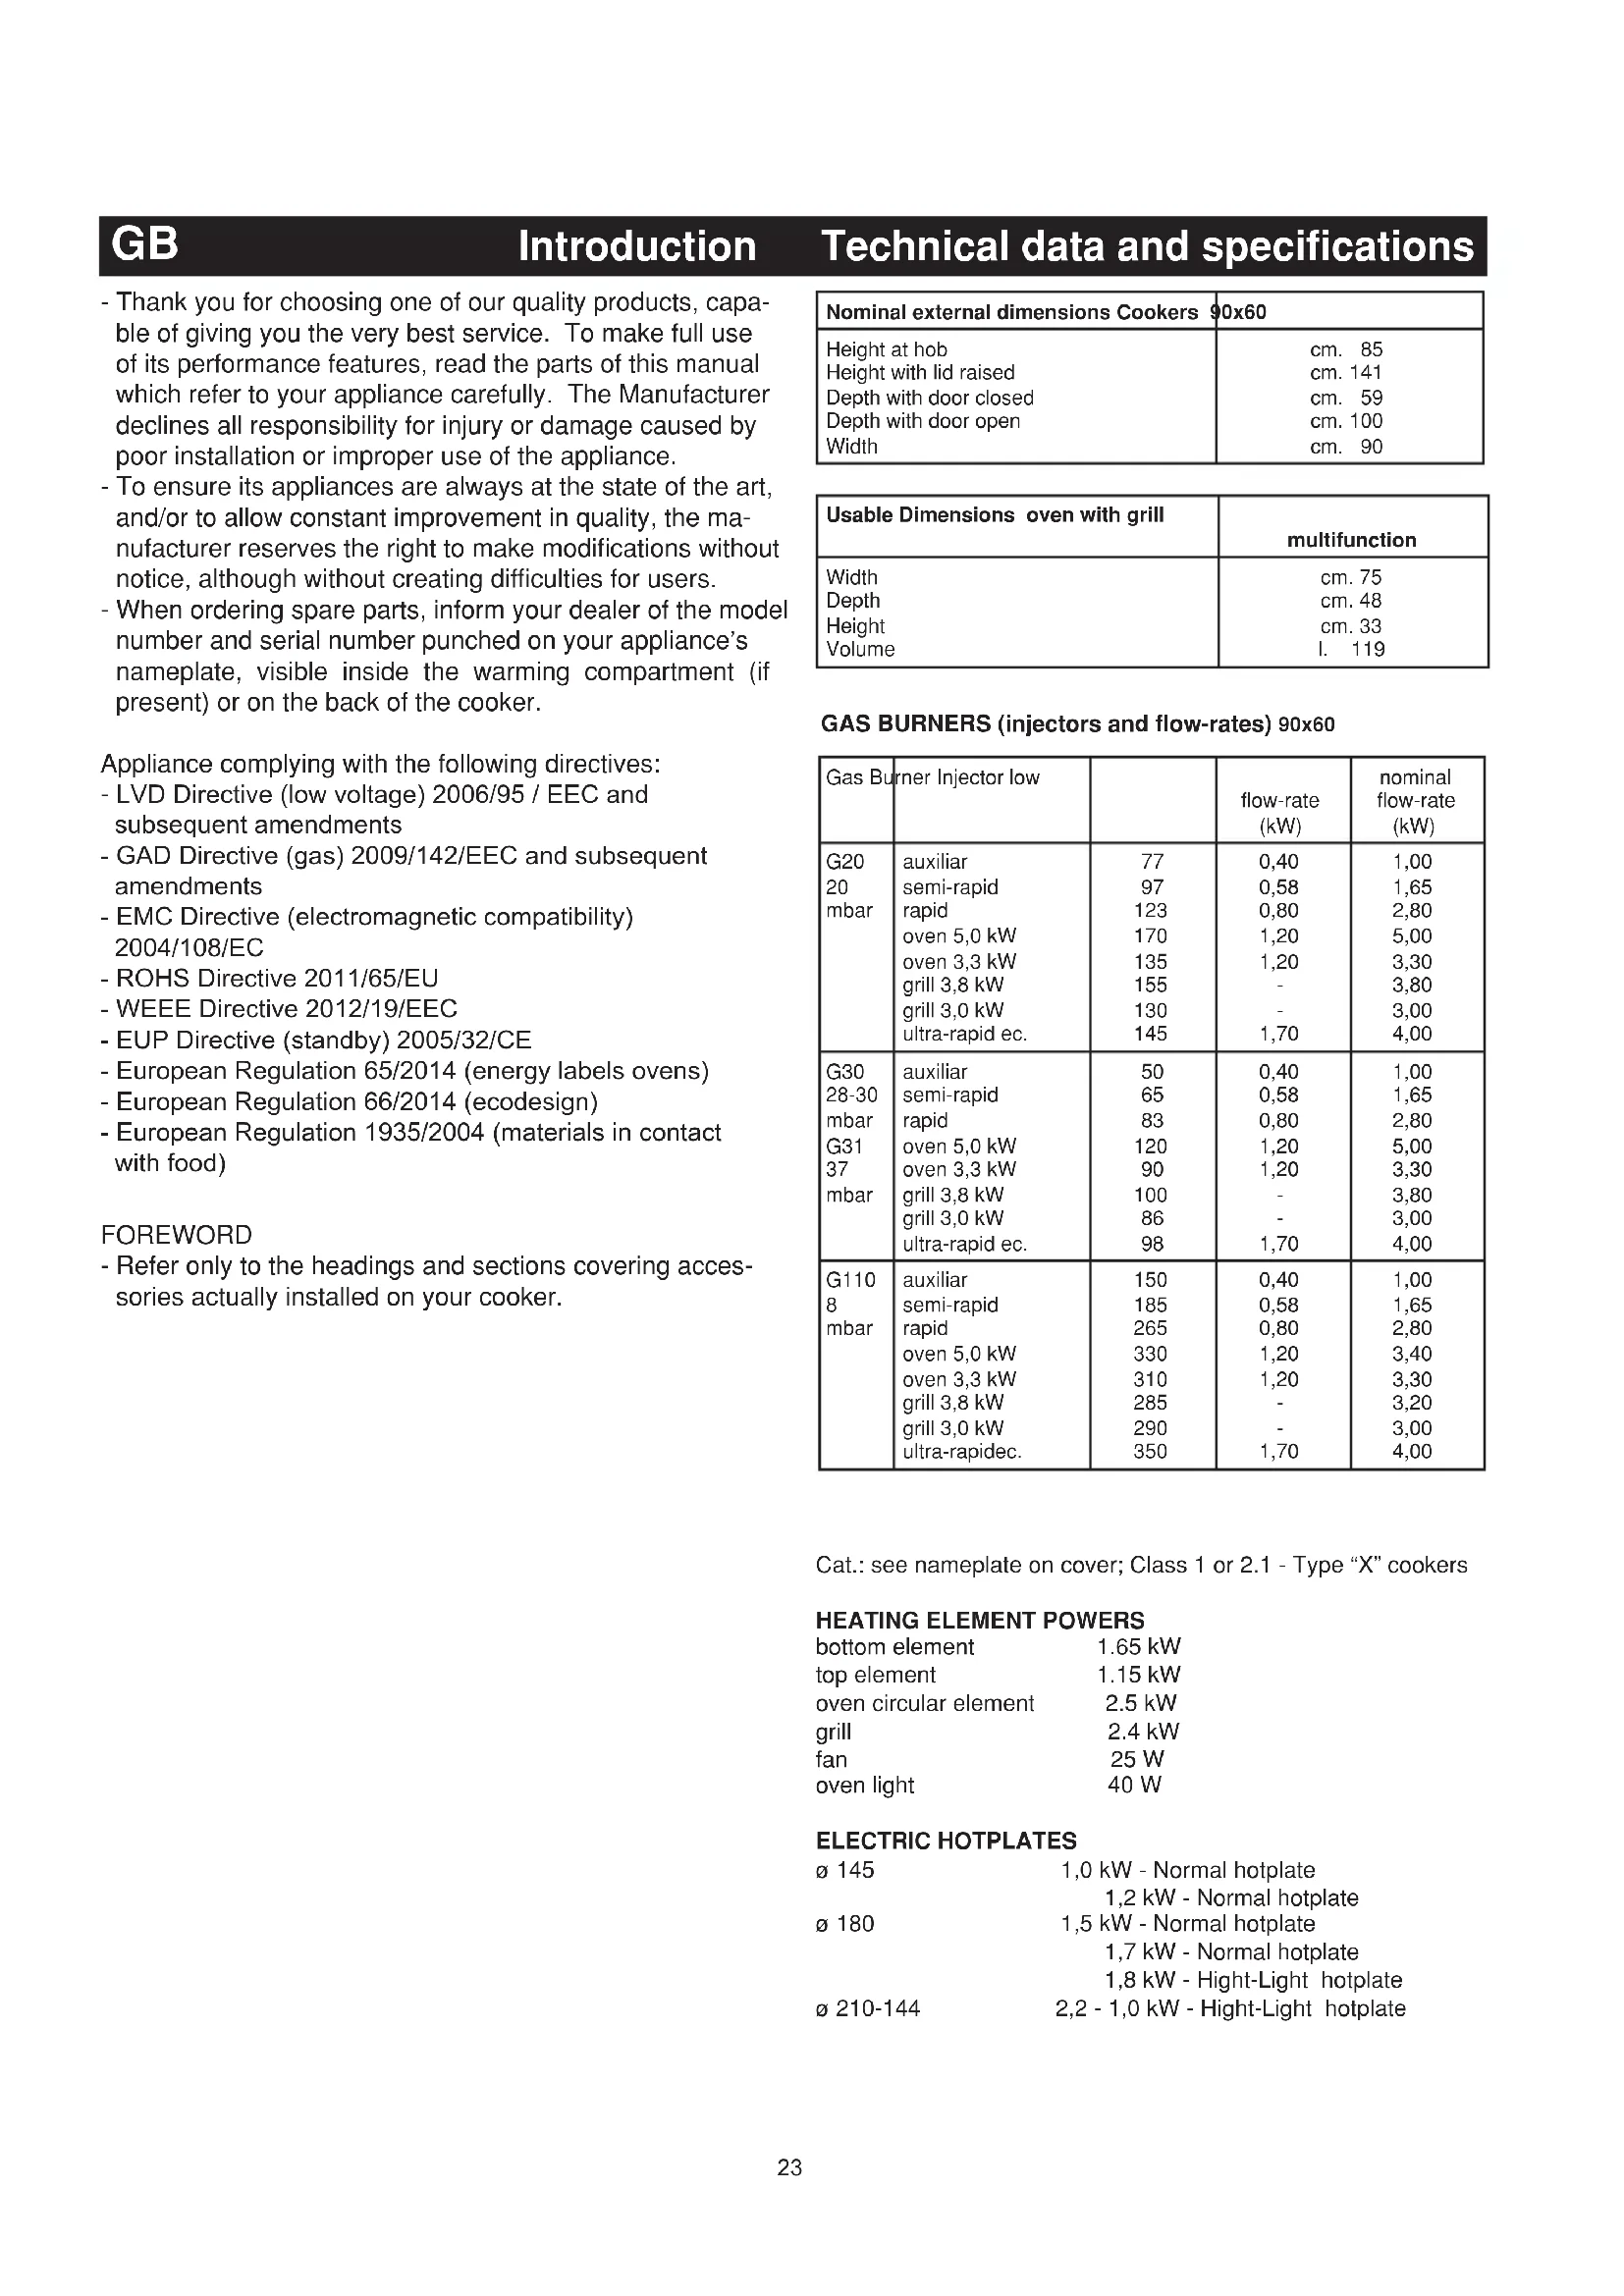
Technical data and specifications
- Thank you for choosing one of our quality products, capable of giving you the very best service. To make full use of its performance features, read the parts of this manual which refer to your appliance carefully. The Manufacturer declines all responsibility for injury or damage caused by poor installation or improper use of the appliance.
- To ensure its appliances are always at the state of the art, and/or to allow constant improvement in quality, the manufacturer reserves the right to make modifications without notice, although without creating difficulties for users.
- When ordering spare parts, inform your dealer of the model number and serial number punched on your appliance's nameplate, visible inside the warming compartment (if present) or on the back of the cooker.
Appliance complying with the following directives:
- LVD Directive (low voltage) 2006/95 / EEC and subsequent amendments
- GAD Directive (gas) 2009/142/EEC and subsequent amendments
- EMC Directive (electromagnetic compatibility) 2004/108/EC
- ROHS Directive 2011/65/EU
- WEEE Directive 2012/19/EEC
-EUP Directive (standby) 2005/32/CE - European Regulation 65/2014 (energy labels ovens)
- European Regulation 66/2014 (ecodesign)
- European Regulation 1935/2004 (materials in contact with food)
FOREWORD
- Refer only to the headings and sections covering accessories actually installed on your cooker.
| Nominal external dimensions Cookers | 90x60 |
| Height at hob | cm. 85 |
| Height with lid raised | cm. 141 |
| Depth with door closed | cm. 59 |
| Depth with door open | cm. 100 |
| Width | cm. 90 |
| Usable Dimensions oven with grill | multifunction |
| Width | cm. 75 |
| Depth | cm. 48 |
| Height | cm. 33 |
| Volume | l. 119 |
GAS BURNERS (injectors and flow-rates) 90x60
| Gas Burner Injection low | flow-rate (kW) | nominal flow-rate (kW) | ||
| G20 | auxiliar | 77 | 0,40 | 1,00 |
| 20 | semi-rapid | 97 | 0,58 | 1,65 |
| mbar | rapid | 123 | 0,80 | 2,80 |
| oven 5,0 kW | 170 | 1,20 | 5,00 | |
| oven 3,3 kW | 135 | 1,20 | 3,30 | |
| grill 3,8 kW | 155 | - | 3,80 | |
| grill 3,0 kW | 130 | - | 3,00 | |
| ultra-rapid ec. | 145 | 1,70 | 4,00 | |
| G30 | auxiliar | 50 | 0,40 | 1,00 |
| 28-30 | semi-rapid | 65 | 0,58 | 1,65 |
| mbar | rapid | 83 | 0,80 | 2,80 |
| G31 | oven 5,0 kW | 120 | 1,20 | 5,00 |
| 37 | oven 3,3 kW | 90 | 1,20 | 3,30 |
| mbar | grill 3,8 kW | 100 | - | 3,80 |
| grill 3,0 kW | 86 | - | 3,00 | |
| ultra-rapid ec. | 98 | 1,70 | 4,00 | |
| G110 | auxiliar | 150 | 0,40 | 1,00 |
| 8 | semi-rapid | 185 | 0,58 | 1,65 |
| mbar | rapid | 265 | 0,80 | 2,80 |
| oven 5,0 kW | 330 | 1,20 | 3,40 | |
| oven 3,3 kW | 310 | 1,20 | 3,30 | |
| grill 3,8 kW | 285 | - | 3,20 | |
| grill 3,0 kW | 290 | - | 3,00 | |
| ultra-rapidec. | 350 | 1,70 | 4,00 | |
Cat.: see nameplate on cover; Class 1 or 2.1 - Type "X" cookers
HEATING ELEMENT POWERS
| bottom element | 1.65 kW |
| top element | 1.15 kW |
| oven circular element | 2.5 kW |
| grill | 2.4 kW |
| fan | 25 W |
| oven light | 40 W |
ELECTRIC HOTPLATES
| ø 145 | 1,0 kW - Normal hotplate |
| 1,2 kW - Normal hotplate | |
| ø 180 | 1,5 kW - Normal hotplate |
| 1,7 kW - Normal hotplate | |
| 1,8 kW - Hight-Light hotplate | |
| ø 210-144 | 2,2 - 1,0 kW - Hight-Light hotplate |
GB
Installation
EQUIPMENT
All models are equipped with safety device for oven and grill burners. Depending on the models, cooker may also have:
- Safety device for one or more hob burners
- Electric ignition on top burners
- Electric ignition on oven and grill burners
- Oven thermostat
Electric oven lighting - Rotisserie
- Grill burner
- Mechanical timer
- Electronic timer
For the LAYOUT OF HOB BURNERS see the models illustrated in figure 1 at the back of this manual.
For the ELECTRIC WIRING DIAGRAM see figure 2 at the back of this manual.
The electrical power is stated on the nameplate visible inside the warming compartment (if present) or on the back of the cooker. A copy of the nameplate is glued to the cover of this manual.
Useful information concerning the energy consumption of electric ovens.
This information completes and expands on the figures provided on the technical data sticker supplied with the instruction manual.
| Cooker 96N Multifunction | |
| EU environmental quality mark No | |
| Time required to cook a normal load in conventional mode in minutes. | 61,6 |
| Time required to cook a normal load in fan mode in minutes | 81,6 |
| Power consumption in stand-by setting in Watts. ... | |
| Usable area of the dripping pan in cm2 | 2729 |
INSTALLATION
The appliance must be installed by qualified staff working in accordance with the regulations in force. Before installing, ensure that the appliance is correctly preset for the local distribution conditions (gas type and pressure). The preset settings of this appliance are indicated on the nameplate shown on the cover. This appliance is not connected to a flue gas extractor device. It must be installed and connected in accordance with the regulations in force. This appliance may only be installed and may only operate in rooms permanently ventilated in accordance with national regulations in force.
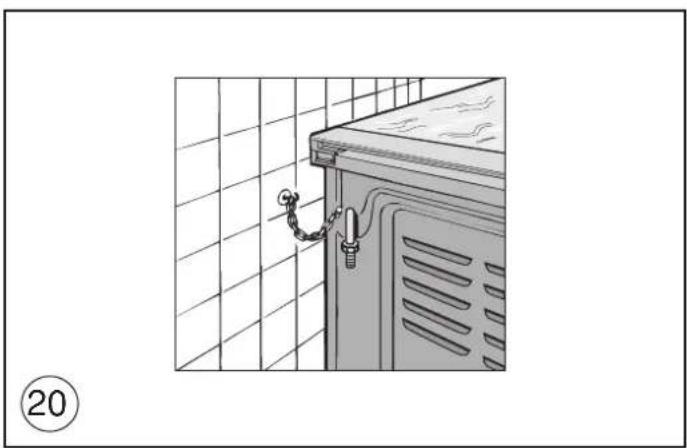
SAFETY CHAIN
! In order to prevent the appliance from overturning accidentally, for example in case of a children climbing onto the oven door, the safety chains MUST be installed !
The cooker is provided with safety chains that must be fixed with a screw (not supplied as accessory) on the wall behind the appliance, at the same height as the fixing point on the appliance. Make sure that the chains are fixed in the back of the cooker, as shown in the fig. 20, in such way to be tight and parallel to the floor.
! When the installation process is complete, the chains must be kept in tension!
VENTILATION
The rooms in which gas appliances are installed must be well ventilated in order to allow correct gas combustion and ventilation.
The air flow necessary for combustion is at least 2~m / h for each kW of rated power.
VENTILATION OF FOOD WARMER WITH GAS OVEN
Dripping pans, saucepans and other large items which may interfere with the ventilation required by the oven burner should not be placed in the food warming section
POSITIONING
Remove the packaging accessories, including the films covering the chrome-plated and stainless steel parts, from the cooker.
Position the cooker in a dry, convenient and draft-free place. Keep at an appropriate distance from walls which may be damaged by heat (wood, linoleum, paper, etc.).
The cooker may be installed alone or between two kitchen units; in this case, the sides of the units must withstand a temperature of 100 degrees C and they must not be higher than the cooker hob.
FITTING THE FEET (LEVELLING)
Cookers are equipped with adjustable feet to be screwed into their front and rear corners respectively. The feet allow the height of the appliance to be adjusted, in order to set it flush with the adjoining unit, to level it with other worktops and to ensure even distribution of the liquids in pans. See fig. 3.
BALANCING THE LID
Models equipped with plate glass lids are fitted with special balanced springs. These are fitted into the hinge to provide smooth, gentle lid closure.
FITTING OVEN DOOR HANDLE
- fully open the door.
- apply gentle leverage with the handle of a fork or spoon in the three recesseshi on the upper of the inside of the door, one at a time.
- once released from the three springs, the glass can be extracted from the lower seat of the inside of the door.
- Fix the handle using the 2 screws provided. See fig. 4.
After fitting oven door handle, repeat the same procedure in reverse order.
- fit the glass into the lower seat of the inside of the door.
GB
Installation
- press gently on the upper side of the glass so that the three pins, with silicone on the inside, fit into their holes.
- make sure that the door closes completely.
CONNECTING TO THE GAS SUPPLY
Before connecting the cooker, check that it is preset for the gas to be used. Otherwise, make the conversion as described in the section headed "Adapting to different gas types". The connection is on the right; if the pipe has to pass behind the cooker, it must be kept low down where the temperature is about 50 degrees C.
- Rigid connection (see Fig. 5, diagram D):
The connection to the mains gas supply may be made using a rigid metal pipe (D). Remove the hose connector and screw the rigid union onto the threaded connection of the gas train. The union for rigid connection is amongst the cooker accessories.
- Connection using a rubber hose (see Fig. 5, diagrams B and C): Connect a rubber hose carrying the conformity mark currently in force to the hose connector. The hose must be replaced at the date indicated, and must be secured at both ends using standard hose clamps. It must be absolutely accessible to allow its condition to be checked along its entire length.
- Connection using a metal hose (see Fig. 5, diagram D):
Make the connection using a hose which complies with national standards, screwing it onto the connector with a ring seal, which is delivered amongst the cooker accessories.
- After installation, check that all connections are airtight.
- For operation with butane/propane, check that the gas pressure is as indicated on the nameplate.
IMPORTANT:
- Use only standard rubber hoses. For LPG, use a hose which complies with the national regulations in force.
- Avoid sharp bends in the pipe and keep it well away from hot surfaces.
References to the regulations covering the gas connection to the appliance: ISO 7-1.
ADAPTING TO DIFFERENT TYPES OF GAS
If the cooker is not already preset to operate with the type of gas available, it must be converted. Proceed as follows:
- Replace the injectors (table on page 22);
- regulate the primary air flow;
- regulate the minimum settings.
N.B.: every time you change the type of gas, indicate the new type of gas on the serial number label.
REPLACING THE HOB BURNER INJECTORS (fig. 6)
- Remove the grid, the burner caps (A), and the burners (B);
- unscrew and remove the injector in the bottom of each injector holder (C);
- replace the injector in accordance with the table in page 22, using a 7mm socket wrench, tighten and screw right down;
-
check that the system is gas-tight;
-
replace the burners, the burner caps and the grid;
IMPORTANT:
- Never over-tighten the injectors;
- after replacing, check that all the injectors are airtight.
REPLACING THE OVEN BURNER INJECTOR (fig. 7a)
- Loose the screw securing the oven bottom;
- remove the oven bottom (push back and raise);
- remove the oven burner, after taking out its fixing screw;
- replace the injector, using a 7 mm socket wrench.
REPLACING THE GRILL BURNER INJECTOR (fig. 7b)
- Remove the burner after taking out the two screws which secure it;
- replace the injector using a 7 mm socket wrench.
IMPORTANT:
- Never over-tighten the injectors;
- after replacing, check that all the injectors are airtight.
SETTING HOB BURNER MINIMUM LEVELS
If the cooker is to work on bottled gas (butane/propane), the tap by-pass must be screwed right down. The cooker may be equipped with type A taps, with by-pass inside (accessed by inserting a small screwdriver into the rod) or type B taps, with by-pass on the outside on the right (accessed directly). See figure 8.
If the cooker is to work on natural gas, proceed as follows for both types of tap:
- Ignite the burner at maximum flame;
- pull off the knob, without using a lever against the control panel, which might be damaged;
- access the by-pass with a small screwdriver and back off by about 3 turns (turning the screwdriver anti-clockwise);
- turn the tap rod anti-clockwise again until it stops: the burner will be at maximum flame;
- screw the by-pass slowly back in, without pushing the screw-driver, until the flame has apparently shrunk to 1/4 of the maximum size, checking that it is sufficiently stable even in quite strong draughts.
SETTING OVEN BURNER MINIMUM LEVELS
If the cooker is to work on bottled gas (butane/propane), the thermostat by-pass must be screwed right down.If the cooker is to work on natural gas, proceed as follows:
- Remove the oven bottom (push towards the back and raise);
- ignite the oven burner, turning the knob pointer to the maximum setting;
- shut the oven door;
- access the thermostat by-pass (fig. 9);
- back off the thermostat by-pass by about 3 turns;
- after 5 or 6 minutes, turn the knob pointer to the minimum setting;
- slowly re-tighten the by-pass, watching the flame decrease in size through the window in the closed oven door until the tongue of the flame is about 4mm long. Never keep the flame too low. It must be stable even when the oven door is opened or closed quickly;
- turn off the burner and replace the oven bottom.
CONNECTING TO THE ELECTRICAL MAINS
Before making the connection, check that:
- the mains voltage is as indicated on the nameplate;
- the earth connection is in good working order
If the appliance power lead is not fitted with a plug, use an approved standard type, remembering that: - the green-yellow wire must be used for the earth connection;
- the blue wire is the neutral;
- the brown wire is live;
- the lead must never touch hot surfaces over about 75 degrees C;
- replacement leads must be of type HO5RR-F of suitable size (see diagrams in fig. 2).
- if the appliance is supplied without lead, using type HO5RR-F cable of suitable size (see diagrams in fig. 2).
IMPORTANT: the manufacturer declines all liability for damage due to failure to comply with the regulations and standards in force. Check that the appliance is correctly connected to the earth (see diagrams in fig. 2 at the back of the manual).
FOR COOKERS WITH ELECTRIC IGNITION
The correct gaps between the electrode and the burner are shown in figures 7a,7b.
If no spark is generated, do not keep on trying as this might damage the generator.
Possible causes of malfunctions:
- spark plug damp, dirty or broken;
- electrode-burner gap not correct;
GB
Installation
For the user
- spark plug wire broken or without sheathing;
- spark discharging to earth (to other parts of the cooker);
- generator or microswitch damaged;
- air has built up in the pipes (particularly if the cooker has been out of use for a long time);
- air-gas mixture incorrect (poor fuel setting).
THE SAFETY DEVICE
The correct gap between the end of the thermocouple sensor and the burner is shown in figures 7a,7b.
To check that the valve is working properly, proceed as follows:
- ignite the burner and leave it to work for about 3 minutes;
- turn off the burner by returning the knob to off position );
- after 90 seconds for hob burners, 60 seconds for oven and grill burners, turn the knob pointer to the "on" position;
- release the knob in this position and move a burning match toward the burner; IT MUST NOT IGNITE.
Time needed to excite the magnet during ignition: 10 seconds approx. Automatic tripping time, after flame has been turned off: not more than 90 seconds for hob burners; not more than 60 seconds for oven and grill burners.
IMPORTANT:
- Before doing any work inside the cooker, disconnect the mains plug and shut the gas tap.
- Never use matches to check the gas circuit for leaks. If a specific control device is not available, foam or very soapy water can be used.
- When re-closing the hob, check that the electrical wires of the spark-plugs (if present) are not close to the injectors, so that they cannot run across them.
HOW TO USE THE COOKER
VENTILATION
All gas cooking appliances produce heat and moisture in the rooms where they are installed. Take care to ensure that the kitchen is well ventilated; keep the ventilation openings unobstructed or install an extractor hood with fan.
In case of intensive or prolonged use, additional ventilation may be required; open a window, or increase the extractor fan power.
IGNITING THE HOB BURNERS
- Press the knob and turn it anti-clockwise until it reaches the symbol on the control panel (maximum flame position);
- at the same time, move a burning match towards the burner head;
- to reduce the flame, turn the knob further in the same direction until its pointer is against the symbol (minimum flame position).
FOR HOB BURNERS EQUIPPED WITH SAFETY DEVICE
- Press the knob and turn it anti-clockwise until it reaches the symbol on the control panel (maximum flame position);
- move a burning match towards the burner, keeping the knob pressed right down for about 10 seconds;
- then release the knob and check that the burner remains on. Otherwise, repeat the operation.
IGNITING THE OVEN BURNER
- Open the oven door;
- press the knob and turn it anti-clockwise to the maximum flame position;
- move a burning match towards the hole in the centre of the oven bottom and press the knob right down (see fig. 10);
- look through the two holes in the sides of the bottom to check that the burner has ignited, keeping the knob pressed down;
- after about 10 seconds, release the knob and check that the burner remains on. Otherwise, repeat the operation.
IGNITING THE GRILL BURNER
- Fit the control knob guard as shown in fig. 13;
- press the oven knob and turn it to the right until it reaches the stop;
- move a burning match towards the perforated burner pipe and press the knob right down (see fig. 11);
- check that the burner has ignited, keeping the knob pressed down;
- after about 10 seconds, release the knob and check that the burner remains on. Otherwise, repeat the operation.
SAFETY DEVICE
Burners equipped with this device have the advantage that they are protected if they accidentally go out. If this occurs, the supply of gas to the burner concerned is automatically cut off, preventing the hazards deriving from a leak of unburnt gas. The gas supply must be cut off within no more than 60 seconds for the oven and grill burners or 90 seconds for the hob burners.
FOR COOKERS WITH ELECTRIC IGNITION
All the above applies, except that the match is no longer required; a spark is obtained by pressing the button on the control panel once or more, or by pressing the knob of the burner to be ignited. If electronic ignition is difficult with some types of gas, set the knob on the low (small flame) setting.
- For cookers with electric ignition of the oven and grill burners, ensure the oven door is completely open when these burners are ignited;
- Do not operate the ignition device for more than 10 seconds when igniting the oven and grill burners. If the burner has not lit after these 10 seconds, stop using the device, leave the door open and wait one minute before trying again to ignite the burner. If the
and call the after-sales service.
ignitio
IMPORTANT:
- Difficulty in igniting burners is normal if the cooker has been out of use for some time. The air accumulated in the pipes will be expelled in a few seconds;
- Never allow too much unburnt gas to flow from the burners. If
procedure after returning the knob to the off position (
- when the oven and grill are lit for the first time, a smell may be
of the surface treatment and oily residues on the burners.
ignitio
notice
HOW TO USE THE HOB BURNERS
Use pans of diameter suitable for the burner type. The flames must not project beyond the base of the pan. Recommended sizes:
- for auxiliary burners = pans of at least 8 cm using the adjusting grid supplied with the cooker
- for semi-rapid burners = pans of at least 14 cm
- for rapid and triple flame burners = pan of at least 22 cm.
N.B.: Never keep the knob at settings between the maximum flame symbol and the off position ( )
IMPORTANT:
- Never leave hotplates on without pans, except when first used; leave for about 10 minutes to dry oil or moisture residues;
- if the hotplate is to be out of use for a long time, apply a little grease to its painted surface;
- do not allow spills to burn onto the hotplate, requiring the use of abrasive cleaners.
GB
For the user
FOR COOKERS EQUIPPED WITH ELECTRIC HOTPLATES
The different heat settings are obtained as follows:
- 1 = minimum setting for all hotplates;
- 6 = maximum setting for normal and rapid hotplates (with red disc)
-0=off.
Pans must never be smaller in diameter than the hotplates and their bottoms must be as flat as possible (see fig. 12).
IMPORTANT:
- Never leave hotplates on without pans, except when first used; leave for about 10 minutes to dry oil or moisture residues;
- if the hotplate is to be out of use for a long time, apply a little grease to its painted surface;
- do not allow spills to burn onto the hotplate, requiring the use of abrasive cleaners.
- After igniting the burner, leave the oven to heat up for about 10 minutes;
- place the food for cooking in an ordinary oven dish and place it on the chrome-plated shelf;
- place in the oven on the highest possible runners, and turn the knob pointer to the setting required;
- cooking can be observed through the window in the door with the oven light on. This will avoid opening and closing the door frequently, unless oil or fat has to be added to the dish.
N.B.: For cookers without thermostat:
a) oven burner 5kW
- with the knob on the maximum setting = 280 degrees C
- with the knob on the minimum setting = 160 degrees C
b) oven burner 3,3 kW:
- with the knob on the maximum setting = 275 degrees C
- with the knob on the minimum setting = 160 degrees C Never leave the knob in positions between the maximum symbol
and the off setting ()
fit the knob guard (see fig. 13);
- light the burner and wait a few minutes to give the burner time to warm up;
- place the foods on the chrome-plated shelf;
- insert on the highest runner;
- insert the drip tray on the bottom runner;
- gently close the oven door, resting it against the knob guard;
- after a few minutes, turn the food to expose the other side to the infrared radiation (the cooking time depends on the type of food and personal taste). To see table "Food to be grilled".
| Food to be grilled Time (minutes) | ||
| 1st side | 2ndside | |
| Thin pieces of meat | 6 | 4 |
| Fairly thick pieces of meat | 8 | 5 |
| Thin fish or fish without scale | 10 | 8 |
| Fairly thick fish | 15 | 12 |
| Sausages | 12 | 10 |
| Toasted sandwiches | 5 | 2 |
| Small poultry | 20 | 15 |
N.B.: The first time the grill is used smoke will come out of the oven. Before inserting foods for cooking, wait until any oil residues on the burner have completely burnt away. The grill must only be used at its full rated heat. Accessible parts may be hot when the grill is in use! Keep children well away.
IMPORTANT: on some models of cooker without knob guard, the door has to be closed during grilling.
HOW TO USE THE ELECTRIC GRILL WITH GAS OVEN
- ignite the grill heating element;
- place the foods on the chrome-plated shelf;
- insert on the highest runner;
- insert the drip tray on the bottom runner;
- gently close the oven door;
- after a few minutes, turn the food to expose the other side to the infrared radiation (the cooking time depends on the type of food and personal taste).
To see table " Food to be grilled"
The grill element in the top of the oven is switched on by turning the thermostat knob clockwise to the grill symbol on the control panel.
The red light will come on to show the element is in operation.
MULTI-FUNCTION ELECTRIC OVEN
With different heating elements controlled using a selector switch and regulated by a thermostat, this oven offers various cooking methods. There are three principle sources of heat:
a) Forced heat diffusion (fan oven)
b) Spontaneous heat diffusion (static oven)
c)Infra-red rays (grill)
Starting from the 0 (off) position and turning the selector knob clockwise, the following settings are obtained:
symbol oven light and red light on, fan running.
- symbol : conventional oven cooking without fan, the oven temperature is regulated by means of the thermostat knob.
- symbol fan oven cooking on one or two levels, the oven temperature is regulated by means of the thermostat knob.
- symbol fan oven cooking on one or two levels, the oven temperature is regulated by means of the thermostat knob.
- symbol ☑: grill (in top of oven) on, the thermostat knob must be on the maximum temperature setting.
- symbol grill (in top of oven) on, the thermostat knob must be on the maximum temperature setting. The roaster is in operation.
- symbol fan oven cooking and grill (in top of oven) on, the oven temperature is regulated by means of the thermostat knob. The roaster is in operation.
In all positions except zero (0) the red warning light and the oven light are on. The yellow warning light comes on according to thermostat variations. Before putting food in to be cooked, the oven should be pre-heated for at least 10 minutes.
MULTIFUNCTION ELECTRIC OVEN WITH 6 COOKING PROGRAMS
With different heating elements controlled using a selector switch
and regul.
the knob can be turned clockwise to the following settings:
- symbol 0 oven light and red warning light on
- symbol oven light and red warning light on, operation of fan.
- symbol :conventional "static" oven cooking, the oven temperature is controlled using the thermostat knob.
- symbol + cooking with fan oven, on one or two levels, the oven temperature is controlled using the thermostat knob.
-
symbol grill on (on oven top element), the thermostat knob must be set at maximum temperature.
-
symbol quick cooking using the fan oven, the oven temperature is controlled using the thermostat knob. In all positions except zero (0) the red warning light and the oven light are on.
NOTE: The yellow warning light comes on according to thermostat variations. Before putting food in to be cooked, the oven should be pre-heated for at least 10 minutes.
HOW TO USE THE ELECTRIC GRILL WITH ELECTRIC OVEN For models with "Electric Oven" only, controlled by two knobs separately (selector-thermostat), grilling is permitted with the door closed, without using the front side. Temperatures above 200^ must not be used when grilling with the door closed.
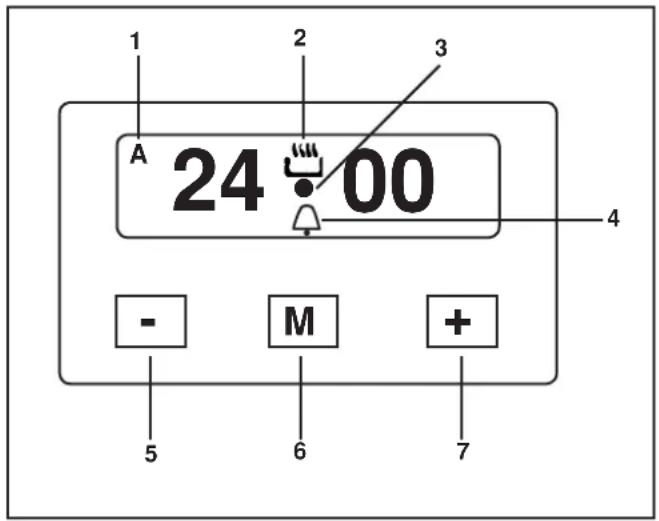
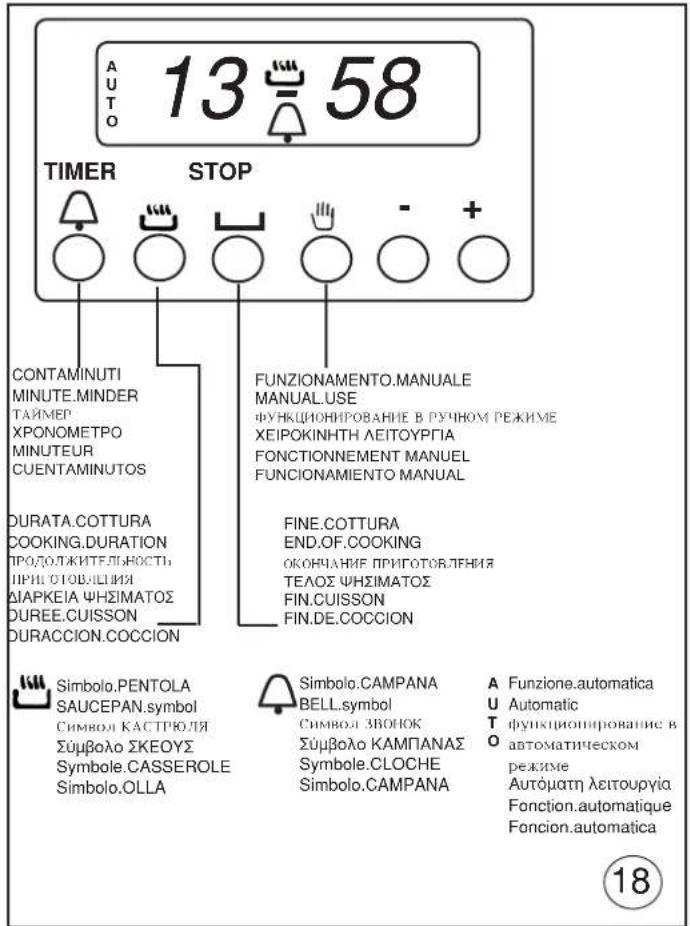
USE OF THE TOUCH TIMER 3 KEYS The first start up
The numbers and the A letter on the display are blinking when the oven is switched on for the first time, or after a power cut:the appliance cannot be operated in this condition.To set the hour and/or to enable the appliance to operate press the M key for at least 2 seconds: the A letter turns off and the numbers now are steady on the display.The dot (3) starts blinking:press the-or ^+ key to set the hour.The hour is accepted by the programmer just few second after having released the key.
N.B. the appliance can be correctly used for cooking only when you will see on the display the symbol (2).
The symbols on the display
| 1 | A* | Automatic programme is working. (* in some models there is the writing " Auto instead of A) |
| 2 | The appliance is ready for manual use (not automatic). | |
| 3 | ● | When blinking, the programmer is in setting hour mode. |
| 4 | Timer set. | |
| 5 | - | Decreasing numbers when setting the timer. Also for choose your desired sound level (3 levels available) |
| 6 | M | "Mode" key to access the programming options of the pro- gramme. |
| 7 | + | Increasing numbers when setting the timer. |
Timer
The purpose of the timer is just of a sound signal, which can be set for a maximum time of 23h 59min. Once elapsed the set time, the (4) symbol turns off and a sound signal is heard; this sound set off automatically in 7min, or you can stop it by pressing any key of the programmer. To set the timer press the M key for 2 seconds, or anyway just to see the (4) symbol blinking. Set the timer by using the + or - keys. Release the + or - key when you have matched your desired time. In a few seconds the current time appears on the display together with the (4) symbol. The countdown starts immediately from now on.
Semi-automatic cooking
Cooking time
Once having selected a cooking function and set the desired temperature, press the M key for a 2 seconds time to access the programming mode. The (4) symbol appears. Release and press again the M key.
On the display, the A symbol starts blinking and the "dur" writing appears on the display, then it changes to 0^*00 .
Set the cooking time with the - or + keys. (max available time: 10h). The selected time is automatically processed by the programmer in a few seconds, or you can also touch the M key many times just to see again the current time. The A and (2) symbols will be on the display.
Once the set cooking time is finished, a sound will be heard and the oven automatically switches off. Please see the following paragraphs about how to disable the sound alarm and restarting the oven.
End of cooking
Once having selected a cooking function and set the desired temperature, touch the M key to access the programming mode for at least 2 seconds. The (4) symbol switches on. Release and touch again the M key. On the display the A symbol starts blinking and the writing "dur" appears. Touch again the M key. On the display the writing "End" appears. The last one changes few seconds after with the symbol 0^*00
Set the end of cooking time with the keys - or +. (maximum avail-able time: 10h 00m). The selected time is automatically processed by the programmer in a few seconds, or you can also touch the M key many time just to see again the current time. The cooking immediately starts, while on the programmer display the current time is shown again in a few seconds.
The A and (2) symbols will be on the display.
Once the set end of cooking time is finished, a sound will be heard and the oven automatically switches off. Please see the following paragraphs about how to disable the sound alarm and restarting the oven.
Automatic cooking
Set a cooking time following the instructions on the cooking time paragraph, then set the end of cooking time following the instruc-tions on the previous paragraph.(maximum available end of cooking time 24h).
The oven automatically switches on at a determined time which is the difference between the end of cooking time and the cooking time.
During the waiting time before cooking, which goes from the oven start to the heating, on the display appears the A symbol to show that an automatic program is on and the current time. The oven on is marked by the (2) symbol.
Once the set end of cooking time is finished, a sound will be heard and the oven automatically switches off. Please see the following paragraphs about how to disable the sound alarm and restarting the oven.
GB
For the user
How to disable the sound alarm
To disable the sound just touch one of the keys.
Operating again the oven
Once a semi-automatic or automatic cooking has expired, on the display appear the current time and the blinking A symbol. In this condition, the heating elements and the light bulb of the oven are disabled.
To enable again the oven, just touch and keep the M key up to see the symbol (2) on the display and the A symbol disappears.
THE OTHERS PROGRAMMER FUNCTIONS
How to delete a cooking time - Semi- automatic or Automatic
To delete a semi-automatic or automatic cooking program, with the A symbol on, touch together the - and + keys for at least 2 seconds or anyway up to see the (2) symbol and the disabling of A symbol.
How to delete the countdown timer
To delete the counting of the timer, which symbol is (4), touch the M key for at least 2 seconds or anyway up to see the (4) symbol blinking.
Touch together the - and + keys.
Checking the function settings
The set or remaining time of every cooking function of the programmer can be recalled to the display by entering in program mode with the M key. Touch and keep the M key for almost 2 seconds or anyway up to see the (4) symbol. The remaining time appears on the display, or a series of zero numbers if the timer is disabled. Touch again the M key. On the display appears the "dur" writing, then alternately the remaining time or a series of zero number (disable timer).
By touching again the M key, the end of cooking time appears together with the "End" writing.
How to change the current time or the sound level
With the programmer in standard mode, the (2) symbol is on touch together the - and + keys for at least 2 seconds or anyway up to see the dot (3) blinking.
To update the hour on the display: touch the - and + keys.
To change the sound level: touch the M key.
On the display appears the writing : to n... followed by a number. Select whit the - key your favourite sound level.
Note: number 1 is referred to the highest sound level. The avail-able levels are 3.
Warning:
Power cut causes the loss of any program, even the clock. That means the programmer will have to be set again.
GENERAL PRECAUTIONS
A number of fundamental precautions must be complied with when using household electrical appliances. In particular:
- The ceramic-glass hob has good mechanical strength and thus withstands small accidental knocks. If the knob is broken or cracked by a knock, do not use the appliance, disconnect the power supply and contact your dealer.
Advice in case of malfunctions
Before contacting your After-Sales Service, check that:
-
the plug is fitted properly into the mains socket;
-
the master pilot is on.
If the problem persists, consult a qualified, authorised technician capable of repairing the fault.
If the oven light does not work, proceed as follows:
- Disconnect the power supply. Remove the protective glass on the back of the oven and replace the bulb
No liability is accepted for injury or damage caused by poor installation or improper use of the cooker.
HOW TO USE THE ROTISSERIE
a)Grilling with the door open.
- fit the knob guard as shown in fig. 13;
- impale the meat to be cooked on the spit and fix it in the centre using the two forks provided;
- insert the tip of the spit into the rotation hub on the frame (see fig. 14);
- take the handle off the spit;
- place the spit support frame in the central runner of the oven, at the same time inserting the rotation shaft into the motor hub (see fig. 15);
- place the drip tray on the bottom runner of the oven and pour a little water into it;
- light the grill burner;
- close the door gently, resting it on the knob guard;
- start the motor by pressing the switch on the control panel;
- baste the meat from time to time. When it is cooked, remove the fat
spit.
b)Grilling with the door closed.
- as above without using the knob protection as shown in fig.13
CAUTION: The spit forks may have sharp points. Handle with care.
OVEN LIGHT/ROTISSEIRE SWITCH
- Gas cooker models are fitted with a round switch;
- press this to turn on both the oven light and the rotisserie motor;
- gas-electric cookers (1 or 2 electric plates) are equipped with a round switch with a red pilot light;
- his light comes on while 1 or 2 electric plates are in operation.
OPTIONAL MULTIPLE SPIT KIT
- Your rotisserie (which has 2 forks) can be equipped with an additional multiple spit mechanism.
- This can be ordered from your dealer at an additional charge.
FITTING THE MULTIPLE SPIT
- Remove the standard forks;
- place and secure the flanges on the spit element as shown in figure 16;
- impale the foods on the spits;
- insert the spits on the flanges as shown in figure 16;
- CAUTION: the two identical flanges "A" must be placed at the ends.
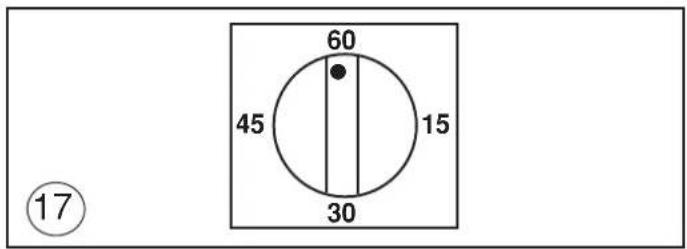
FOR COOKERS WITH MECHANICAL SPRING CLOCK (fig.17)
The spring clock can be set for a maximum time of one hour by turning the regulator knob clockwise to the time required. After the pre-set time, a buzzer sounds and will stop automatically. When the buzzer sounds, the spring clock does not cut out operation of the oven.
USE OF THE ELECTRONIC TIMER (fig. 18)
This allows the start time and cooking duration time to be programmed. If food does not need to be watched, this timer can be selected even when the user is absent. Soon after installation and at any electrical supply cut-outs the display flashes; the clock must then be synchronized again to allow programming.
SETTING THE TIMER TO THE CURRENT TIME
- The current time is set by pressing the 2 buttons (COOKING TIME and STOP) and the "+" or "-" button at the same time.
Any previous programmes are cancelled and the AUTO symbol flashes.
NOTE: when the AUTO symbol is flashing the oven cannot be used manually.
" +" AND " -" BUTTONS
- Pressing the "+" or "-" buttons makes time go up or down at variable speed according to how long the button is pressed for.
MANUAL USE
- Press the MANUAL button: the AUTO symbol goes out (if flashing or
be used by adjusting the thermostat knob and the selector switch according to the instructions given in the manual.
AUTOMATIC OPERATION WITH END OF COOKING AND DURATION TIMERS
- Let's use an example: it is 9:25 am; you want the oven to switch on at 11 am and switch off at 12 pm (cooking time 1 hour).
- Press the COOKING DURATION button and within 5 seconds press "+" button until it shows 01.00, adjust using "-" button if necessary. The AUTO and PAN symbols come on permanently.
- Press the END OF COOKING button and within 5 seconds press "+" button until it shows 12.00. The PAN symbol goes out but the AUTO symbol remains permanently on.
- Move the oven thermostat knob to the desired temperature, and then select
comes on the oven light comes on and the timer is ready to start: a 11am the oven will come on automatically and the PAN symbol will light up.
- When cooking is over (12 am) the AUTO symbol flashes, the PAN symbol goes out and a buzzer sounds; to turn off the buzzer press any button.
- Move the thermostat and selector knob to the OFF position.
SEMI-AUTOMATIC OPERATION WITH COOKING DURATION SELECTION - Let's take an example: it is 11:35 am and you want the oven to stay on for 25 minutes from now on.
- Press the COOKING DURATION button and within 5 seconds press the
if necessary. The AUTO and PAN symbols light up permanently.
- Turn the oven thermostat knob to the desired temperature and the selector switch to the required cooking method; the red warning lig comes on, the oven light comes on and the oven starts to operate.
- After 25 minutes the oven and the PAN symbol go out. The AUTO
off the buzzer press any button.
- Then move the oven thermostat knob and the selector switch to the OFF position.
MINUTE MINDER
- Press the MINUTE MINDER button and choose the desired time using the "+" or "-" button.
- The BELL symbol lights up when the minute minder is in use.
- When the pre-set time is over, the buzzer sounds and the BELL symbol goes out.
BUZZER
- The buzzer sounds at the end of a programme and lasts for a maximum of 7 minutes.
- To turn it off, press any button.
- Pressing the "-" button without having previously selected a function the frequency of the signal changes. A selection from 3 possibilities can be made. The selected signal is audible as long as the "-" button is pressed.
STARTING AND CHECKING A PROGRAMME
- The programme starts after about 4 seconds of it being set.
- The set programme can be checked at any point by pushing the corresponding buttons.
PROGRAMMING ERRORS
- Example: at 12:15 pm a COOKING DURATION time of 30 minutes
is set and a END OF COOKING is programmed in at 12:30 pm. The programme error can be rectified by changing the duration of the end of cooking time, or by pressing the MANUAL button and programming again.
- If there is a programming error the oven will not come on.
ANNULLING A PROGRAMME
- A programme can be cancelled by pressing the COOKING DURATION button and then the "-" button until the display shows 0.00.
IMPORTANT:AT THE END OF EVERY PROGRAMMED COOKING
OPERATION YOU ARE ADVISED TO PRESS THE BUTTON, rmanently on the SAICEPAN SNOBOL lights up and the oven can OTHERWISE THE OVEN CANNOT BE OPERATED MANUALLY.
HOW TO USE OVEN ACCESSORIES
- The oven shelf is designed to take normal oven dishes for cooking sweets or roasts, or is used without a pan for cooking foods under the grill.
- The drip pan under the grill is used to collect juices, which drip
also be used for cooking
- Remember that cooking times may vary if food is cooked on two shelves at the same time.
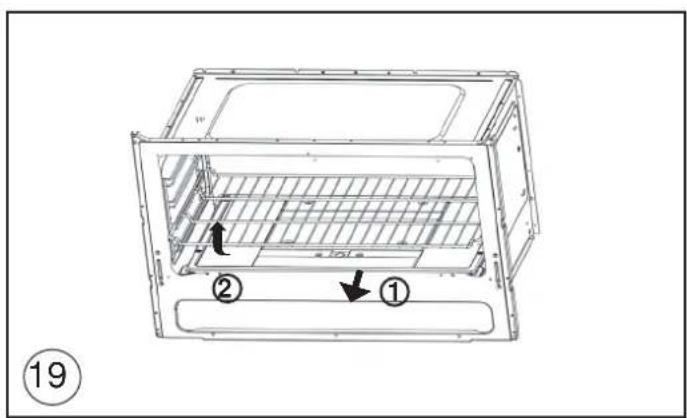
- The oven is provided with a stop system to extract the racks and prevent them from coming out of the oven (1). As shown in the drawing, to extract them completely simply lift the racks holding them on the front part, and pull (2), see fig.19
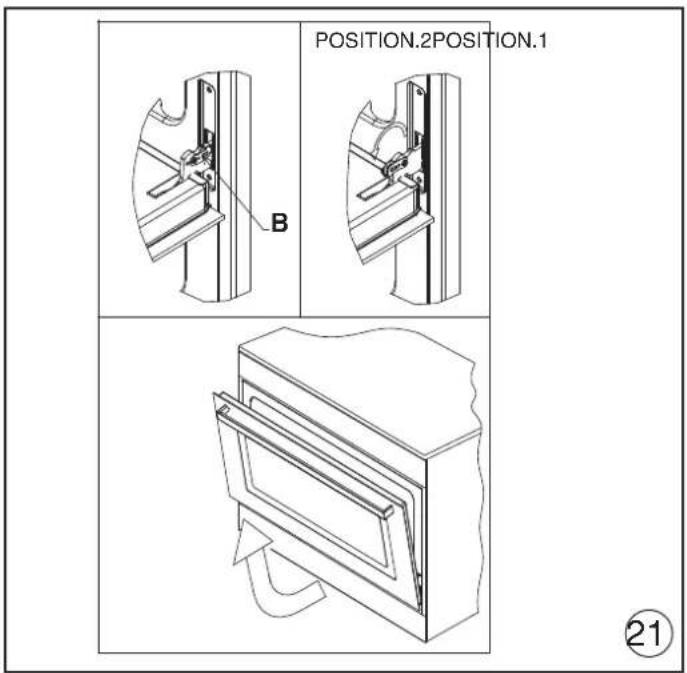
REMOVING THE OVEN DOOR
The door can be removed to clean the oven in an easier way following this instructions:
1) Open the door completely.
2) Turn the two levers "B" bringing them from position 1 to position 2 (see fig.21).
3) Close the door slowly to a stop, grab it with both hands from side to side, close it further and pull it by lifting it upwards.
4) To replace the door you must follow the procedure in reverse order, insert the two hinges in their seats and open the door completely.
button until it shows 00.25, adjusting the time with the "-" button 5) Turn the two levers "B" bringing them back in position 1.
6) Close the door normally.
HOW TO USE THE CERAMIC HOB
The hotplate power has a sequential control device which ensures excellent control of the cooking temperature.
symboflaseatasinghaneurzerteltsyTheandocotangie seintheurequired position by turning it to right or left.
On dual circuit plates, the knob only turns clockwise and the heat settings are from 1 to 6, for the central zones of the plates only. If the knob is turned forward another notch after the last heat setting, the other zones of the plates will switch on.
When one of the cooking zones is hot, the warning light E (see fig. 1) comes on; it will not go off until the temperature of all the hotplates has dropped below about 60 degrees C).
The four cooking zones are indicated by the outlines screen-printed on the hob. For good efficiency and appropriate energy consumption, only use saucepans and utensils with thick, perfectly flat bottoms (see fig.12). The diameter of the base of the pan must be at least as large as the outline marked on the hob. If the bottom of the pan does not cover the heating area, energy will be wasted.
Preferably, it should be slightly larger in diameter.
rPan bottoms and the cooking surface must be clean and dry. Otherwise heat, and thus energy, will be wasted.
Note:
- Never cook directly on the hotplates.
- To save time, cooking with the hotplates may be started at full heat (knob on 6), turning down to the ideal temperature once the contents of the pan have heated up.
- All the hotplates are equipped with a temperature limiter which
GB
prevents them from overheating, even if a hotplate is operated at the highest setting with no pan, or if pans with uneven bottoms are used.
The table below will serve as a guide, bearing in mind that cooking times and temperatures may vary depending on the type and amount of foods cooked and personal taste.
| Knob setting | Cooking process |
| 1 - 2 Keeping foods warm, bechamel sauce, custard | |
| 2 - 3 Reheating foods | |
| 3 - 4 Pasta, vegetable soups, ragout | |
| 4 - 5 Boiling, roasting | |
| 5 - 6 Steamed vegetables, steaks, fish | |
| 6 Grilling, omelettes, lamb chops | |
CAUTION
- Do not look directly at the halogen hotplates while they are on, as the light emitted from the hotplates may be harmful to your eyes.
- The ceramic glass surface is very tough but it is not shatterproof and it may not be used to place objects upon it.
- It may be damaged if struck violently by sharp or very hard objects.
-
If breakages, crazing or cracks appear on its surface, stop using
it and contact the after-sales service immediately. -
Do not place aluminium foil or plastic film wrappings on the hob while it is still hot.
- Soon after installation, the hob may give off a burnt smell; this will disappear after the first few times it is used.
IMPORTANT:
Because of their height, children may fail to see the residual heat warning light. Take care that they do not touch the hob, even if the heating elements are switched off.
CLEANING OF THE CERAMIC HOB
The ceramic hob is much easier to clean than a hob with conventional hotplates. Light dirt can be removed with a sheet of damp kitchen paper. To remove tougher dirt, use the same cleaning methods as for glass, with specific detergents. If a pan boils over onto the hob, use a spatula to remove the deposit formed. Sugar or syrup must be removed immediately before it forms caramel on the glass. Any residues of aluminium foil or plastic film wrappings accidentally placed on the hob while it is still hot must also be removed at once. Water marks and traces of scale can be removed with white wine vinegar. Always remember to rinse and dry the surface with kitchen paper after use. Never use abrasive or corrosive detergents, such as oven sprays, degreasers, rust-removers, powder polishing detergents or abrasive sponges. Do not allow grains of sand to be left on the hob when cleaning vegetables, for example, as they may scratch the surface. Do not slide pans with rough bottoms over the hob; they may mark or even scratch the glass.
GENERAL PRECAUTIONS
A number of fundamental precautions must be complied with when using household electrical appliances. In particular:
- The ceramic-glass hob has good mechanical strength and thus
cracked by a knock, do not use the appliance, disconnect the power supply and contact your dealer.
- WARNING: If the surface of the hob is cracked, switch the appliance off to avoid the risk of electric shocks.
Advice in case of malfunctions
Before contacting your After-Sales Service, check that: - the plug is fitted properly into the mains socket;
- the master pilot is on.
If the problem persists, consult a qualified, authorised technician capable of repairing the fault.
If the oven light does not work, proceed as follows:
- Disconnect the power supply. Remove the protective glass on the back of the oven and replace the bulb.
No liability is accepted for injury or damage caused by poor installation or improper use of the cooker.
In case of malfunctions, particularly gas leaks or short-circuits, contact your engineer without delay.
EUROPEAN DIRECTIVE 2012/19/EEC (WEEE): Information for the consumer.
Fig.A
This information is strictly addressed to those who have a product showing the symbol below (Fig.A). This symbol is indicated on the technical data sticker (rating label) placed on the product itself. This symbol indicates that the appliance is considered as Waste Electrical and Electronic Equipment and complies with the European directive 2012/19/EEC (WEEE).
Therefore this product is not to be treated as household waste. Instead it shall be handed over to the applicable collection point for the recycling of electrical and electronic equipment or it can be handed back to the retailer when you want to purchase a new equivalent product. The consumer is responsible for a correct disposal of the product towards an appropriate collection point.
Otherwise the consumer can be exposed to a penalty sanction by laws in force for waste disposal.
Appropriate separate waste collection followed by recycling the product, the treatment and compatible environmental disposal contributes to avoid negative effects towards the environment and health and helps to recycle material which the product is composed of.
For more detailed information regarding the available waste collection systems of this product please contact your local city office or contact the retailer where the product was purchased.
The manufacturers and importers will obey to their responsibility for recycling, treatment and compatible environmental disposal by participating directly and through a joint cooperative system.
EUROPEAN REGULATION No 1935/2004 - materials in contact with food.
Notice to users.

The symbol shown here, which appears on the packaging, indicates that the materials in this product which may come into contact with food are compliant with the requirements of European Regulation No
with small accidental knocks. If the knob is broken or Inside the oven chamber, food might come into contact with oven shelves, dripping pans, pastry trays, oven door glazing, rubber gaskets, rotisserie spits, and the sides of the oven itself.
On the hob, contact is possible with pan stands, burners and the hob skin.
In the food-warmer, contact may occur with the sides of the compartment.
RU
BcTyIJIeHHe TexHHueckne daHHbIe I xapaKTePncTnKn
-Haama pma 6laorapnBac 3a Bb6op n Nokynky Ondoro H3 Haixx BBICOKOKaueCTBCHbIX H3deJIM. MblrpoH Hadeemc, YTO B BaHHx pykax Hain PHT b6yDyT yHKUHOHPoBaTc MaKCHMaJIbHOI OTdyeH HAnLYuHMHpe3yJIbTaTaMH, ONpabBbBAe BCE BaHHO xKnHaHH. C3ToI cJeTbIO ppeJaaraEM BaBMHMaTeJIbHO IPOHTaTB HAcTOJlEe PYKOBOCTBO H npH-DepXHBaTbCerTexeroYkaaHH. rDe peYb HETO npHbopaX HcCTeMAX, KOTOpbMn OchauHeaBaaN PAbPKa - H3-ROTOBHTeJB CHMaet CceBcRAkyIO OTBeCTBEHHOCb 3a NOBpeKJDeHH, HeHCnpaBHOCTn HecHuactHbIe ClyuaH, Bb3BaHHbE HCCOBIODEHcEM PekOMeHdaun No yCTaHOBKe n KcIIpyaunn NJIHTbl.
TTO,TO6bI BnYCKaTB NHTBBCOTBCTBn COBpeMeHHbIMTexHOLOrueckHM peeHnH/nnIIOCTOHNHOIOBbUChnKaueCtBa HnHex H3cJIn,fapnkaocTabJIaTe3a c0oIN PpABOB HceHn KaKHX-Jn6o H3meHn DaKe 6e3IpcdBapHTcJIbHO TpEpyuPecKHeHH.1TO,OHaKO,He BB3bIbAcTnp6JIem Hn3aTpPyHHeHH npn KcnNyaTaHH
- Ecln Bo3HKnHe T Heo6xOaHMoocTb 3aKa3a 3aNuaCTe, HAO CTeJaTb 3aPoc BaIemy PPOaBHy, rIe CJIeIyET Yka3aTb HOMep MoEJIu HOMep cepHH IINr, «PPOHTaMIOBaHHBe Ha fapnHOn OIO3HaBaTeJbHO TaBJNuKe. 3Ta TabJNUka MOKeT 6bITbpacNoLoKeHa BHyTpN OTJeIeHna pa3OrpeBa TapeJIOK (ecJIncctb) Hn Ha 3aHHe CTOpOHe IINrbl.
JIINTa COOTBETCTBYeT HOpMaTHBaM:
-Директва LVD (Low Voltage) 2006/95 / EEC n HocneIyIoUne
ПОправки
-ImpeKtNaGAD (ra3) 2009/142/EEC n IocneIyIOuNe IIOpBaKN
-ДиректнБА EMC (ДиЕКТРOMАПНИТHA COBMecTUMOCtB) 2004/108/EC
Директва ROHS 2011/65/EU
-Директва WEEE 2012/19/EEC
Директва EUP (standby) 2005/32/CE
- Ebponeckn PerynpobAHne 65/2014 (3heprna 3TKeTNIeun)
- Ebponeckm PerynpoBaHne 66/2014 (EcoDesign)
- Ebponeckn PerynpoBaHne 1935/2004 (KoHTaKTbIe MaTePnaBn IIpoaykTob HtAHn)
IIOJCHEHNE
B HactoHem pyKOBOCTBe npeCTabJIOT hHTepec ToIbKO Te npaparpafo Hn pa3deJbI, Ie ROBOPHTbcra O pHbopaX, KOTOpbMn ochaneHa Bama nnTa.
Дя onpedenenHa DaTb BBynucka np6opa npoBepbTe 9-3HaHbI cepHbI Homep, yKaa3HaHbI Ha cepe6pncToI 3TNKeTke, Ha pyKOBODCTBe NO 3KcnnyaTaunn Ha caMOM np6ope:
AABBCDDD
ΓA3OBblE FOPEJIKN (KHKJIepeH MOnuHOCTN)
KaT:cmOTPHΦa6pHHyTObJIHyKHa o6IIO)Ke
Knae 1
CTeneHb TENJIIN3OJIARUNN X
KOMJIIEKTAUH
IIHTB BCEX MoJeJeyKOMJIeKTOBaHbI PpeIOxpaHHTeJIbHbM yCTPOINCTBOM IJIa TOpEJOK DyXOBKN IprNJ.
KpOME TORO, B 3aBnCHMOCTN OT MOeJIH. B KOMJIeKTAUHO IIHTBb BXOJNT:
- IpeoxpaHHTeJIbHOe ycTpoHCTBO r3OKOHPTOJRA OJHOI HHECKoJIbKHX ropeJok paOoyen NOBepxHOCTN JNTbI
-3Jektpnueckoe 3aKnHaHne rOpelok paOoue HOBepxHOCTN
-3Jektpnueckoe 3aKHaHHe ropeIOK dyXOBKn HrpNJIa - CaMoOuHuaUeecr 3MaJIHpOBaHHoe IOKpbITHe CTcHOK dyXOBKn
- TepMoperyJrTOp dYXOBKN
3JKeKTPnueckocOCBeueHHe nyXOBKN
-Bepten
RU
YCTAHOBKA
-TopeJaIaIgIrpIJIa
MexaHHueckn TaHmep
3JIKTPNUECKNE KOHΦOPKN
145 1,0 KBT - O6bHuHa KaHOpKa
1.0 KBT - 06bHuHa KOHΦOpKa
01801.5KBT-ObbHnKaOHΦopKa
1.7 KBT - 0bHuHa KOHΦopKa
1,8 KBT-High-Light KOHΦopKa
0 210-144
2.2-1.0BT-High-Light KOHΦopKa
PACIOLOXEHHNE FOPEJOK HA PAOUEH IOBEPXIOCTH CMOTPNMOeHN Ha pncyHke 1 B KOHc HAcTOruero pyKOBOdCTBa.
CXEMYIOIKIIOUeyHNAJIKETPCETCNMOtPHa pHyHKe 2 B KOHc HAcTOHcTo pyKOBOdCTBa.
3Jektpnuecka MoHoctb yKa3aHa Ha qab OOn03HbATEbHO Tabnuk. 3Ta TaBnukka MoKet 6bItb pacnoIooKeHa BHyTPn OTdeJeHHra pa3OrpeBa TapeIOK (ecJH ecTb) HJI HA 3aDHe CTOpOHE PNTbI. OINH 3K3EmIIp 3ToN TaBnUHK HaKJIeEH Ha 06IOKHe HAcTOAIErO PYKOBOCTBa (TOJbKO DJIra Ra3OBbIX HJI KOMBHNPOBAHHbIX PINT).
Ione3HbIe CBeJeHnB O6JIaCTn 3HeprONOTpe6JIeHnA 3JIeKTpUHeCKNX dyXOBOK.
3Tn CBeHeHna 3aBepwaIOT n DOnoJIHHaIOT HnHΦOpMaIIO, npBHeEHHyO Ha HAKNeKe C TexHnueCKmN daHHbIMN B pykoBOdCTBe NO 3KcNpyatau.
BByx YcTaHOBHTb Ha IpeKHee MecTo RopeJKN, pacceKaTeJIN PJaMeHN H peWETky.
BAKHBIEPEKOMEHDAUHH
-HN B KOEM CJyuae He 3aTnBaTb N3JIHHe HJKeKTopbl.
-ПОИЗБЕД 3aMEHy, ПОКΟHTРОЛHPOBaTb REpMeTHUHOCTb Ra3a. BCEX HIXKETOPOB
3AMEHA KHKJIEPOB IOPENKHNyXOBKN(pnc.7
-OTKpyTHTe BnHT KpeIJIeHnA DA yXOBKn.
CHHMHTe IHO IyXOBKN (CDBHrae ero Ha3aI IN NOHHMa)
-CHIMHTe RopeJky LyxOBKn, PpeBapHTeJbHO OTKpyTnB KpePnH Hc e BnHT
-3aMeHHTe KHKJep, HcnoJIb3yra TopueBOI Tpy6uAtbKJIou Ha 7 MM.
3AMEHA KHKJIEPOB FOPEJIKN TPHJIA (pnc.7b)
- CHMMTe RopeJky, npeBapHTeJbHo OTKpyTnB Dba KpePnIne ee BNHTa
-3aMCHHTC KHKJIcP, HIOJIb3yra TOpueBOH Ty6uATbI KJIou Ha 7 MM.
PEKOMEHDAUHH
- Ipn yCTaHOBKe JHKJIepoB HIKoTJa H3JINHe He 3aTARHBaITeHX KJIIOYOM
IocJte 3aMeHb BcEx XHKJIepOB IPOBepbTe Hx Ra3OHeIPOHHa-CMOCTb
PENJINPOBKA MNHIMAJbHOIIOJIAMEHN TOPEJOK PAOUEH IOBEPXHOCTN IINTbl
B cIyueae, ecnnnI nIHTa yHKUHOHpyet Ha CxKHeHHOM r3e (6/II), pcryIINPOuHbI BnHT doJIXeH 6bITb 3akpyCH Do yIopA.
IIHTa MoKet 6bIb OcHaUeHa KpaHAM TnA 一 ^ 心 C yCTaHOBJIeH HBIM BHyTpN peYJINPOBOUHbM BNHTOM (peyJINPOBaTb KOtOpbI MOXHO pN INOMOHN MaJIeHbKOI OTBepTKH uepe3 cTepxHeH) HIN TnIIA 一 ^ 心 C HApYKHbIM peYJINPOBOUHbM BNHTOM C IpaBOI CTopo HbI (ero MOXIO peYJINPOBaTb IIeONCpeDCTBEHH), CMOTPi PHc 8. Ecln dIyHKUHOHPOBaHH NITbI HCIOJIb3yETcH HaTypaJIbHbI ra3,TO He3aBHCHMO OT THNa KpaHa DeIcTBoBaTb CJeDyIOHM 06pa3OM:
3aXHTe ropeky H ycTaHOBHe MaKCHMaJIbHOe IJaM
-CHMMHTe pyky peryIaTopa,notHyB ee Ha ce6b,He HaxHMaHa IpepeHIOI PAIEJIb IIHTb BO II36ekAHne ee NOBpeKdHHA
-IIPNOMOINMAJIeHbKOIOTBepTKOHKtpyTHPepeRyJNPOBOUHbBNHTIIN3HTeJIbHOHaTPhOBOPa(BpaaaorOTBepTKyIpoTHUBaCOBOICTpeJIKN)
-IOBepHHe eue pa3 cTepeKHe KpaHa npOTHB yacOBOH cTeJIKN Do erO bLOKHPOBKn. B 3TOM cIyuae Byet MAKCMaJIbHOe PnAm
OueHb MeIeHNO 3aKpyTHe peryIHpOBuHb BnHT, He HaXHMaHa OTBcPTKy, Do Tex IOP. IOKa IIaMaHE yMeHbIHTcRa Ha 3/4.Ipn 3tOM ObaPHTe OC06oe BHHMaHHe HA TO, UTObI IIaMa6bIIO DOCTaTOHIO YcTOHINBBm DaKe IPh yMepeHHOM ITOKEBO3dyxa.
PERYJINPOBKA MNHIMAJbHOI OJIAMEHN TOPEJKN DYXOBKN B clyuae,ecJIN PIIHTa FyHKUOHHPye HA CxKHeHHOM rae (5/II). peryJINpOuHb BNHT IOnJKeH 6bTb 3akpyeH Do ynpa. EcJIN dJyHKUHOHPOBaHH NHTb HcNOJb3yeTc HaTypaJIbHbI ra3, To He3aBHCMO OT TnHa KpaHa peRyJINPobKa MNHIMAJbHOrO PJIaMeHN BbIOJINHETC JJeDyUoHM O6pa3OM:
-CHIMHTe IHO IyXOBKN (cBnraerero K 3aHHei cTeHKe HIOHNMa).
RU
YCTAHOBKA
-3aXHTe ropeIky dyxOBKn I yCTaHOBHTe yka3aTeIb peryIInpoBOUHON pyuKN BIOJIOKCHNE MaKCHMaJIbHOr OIIaMeHN.
3aKpOHTe DBePuy DyXOBKN.
-HaHnHTepepyIINPOBOUHbBnHTTePMOperyIaTopaHInKpaHa (pnc.9)
- OTKpyTHTe peryJnpoBOUHbBnHT npu6JIH3HTeJIbHO Ha TpH 06opota.
-Yepe35-6 MInHyT yCaHOBnTe yKa3aTeJIb pyuKN B NOJIOKeHHe MHIMMaJIbHOrO IIJaMeHH.
-MeIeHNO 3aKpyTHTe peryHnPoBOuHbBnHT,Ha6JIIOJa yMeHbWeHHe IJaMeHH uepe3 CTekIO B DBepeue dYXOBKn (Dbepua 3aKpbTa) Do Tex NOp, POKA KOHyc IJaMeHH He yMeHbHITcTcdo
4 MM. pnp6JIH3IeJIbHo. He peKOMeHdyETc cIIHKOM yMeHbIaTb IIaM. OHO 0JIOJXHO 6bITb CTaHJIbHbIM Jaxe npn 6bICTpOM OTKpbIBAHHH 3aKpbIBAHHH DBePcbl dyXOBKN.
BbIKJIOHTe RopeIky H ycTaHOBHTe IHO dyXOBKN Ha MeCTO
IOJIKJIIOUQEHHK 3JEKTPOCETH
IpeKJe qem noDKJIOuATb IANTy K 3JIeKTPOcETH, HeoXoHMO y6eHTbCRA, YTO:
HaPnpeHHe BHeHHe ceTH COOTBeTcByET npaMeTpam, yka3aHHbIM Ha a6pHHOI OIO3HaBaTeJIbHOI TaJHKe
-po3eTka 3a3emJIeHnIyHKnIOHHPyET
EcHn nHTa yKOMNIEKTOBaHa CeTeBbIM HHypom 63 BNIKH, TO IIOIKJIOUeHH MoXHO NcIIOJB3OBA Tb CTaHApTHYIO BNJKY. Ipn 3TOM Heo6xOdmo yuHTbBa Tb CJeDyiouee:
-JEIHO-3EJCHbH IIPOBOIDIOJIJKH NIOJB3OBaTbCRA 3a3CM
-罗Iy60H npOoD JIA HeITpaJIN
-KOPHHeBbI npOBd Ia HApJxKeHnCetN
Hyp He DOJIKeH COINPKacatbCn CO CTeHKamn IIHTbl, HArpeBaIOIMMnC6 60Jee 75^
B Cnyae 3aMeHb CEteBOrO HHypa HcIOJIb3OBaTb HHyp TIIa HO5RR-F IOxOJIeRo ceEHn (CMOTPN CXEmbHa pHC.2).
-ecINIINTAIOCTABLeHa6e3ceTeBOHOHypa,IPnIOKJIIOUeHHNHCIOB3OBaTBHHPTHNA HO5RR-F IOxOJgero CeueHHA (CMOTPH CXEmbHa pnc.2).
BHIMAHHE.
IpOu3BOIDTeJIb He Hecet OTBeTCTBHeHOCTH 3a NOBpeKJdeHHN, Bb3BaHHbIe HECo6LIODeHHem BblweyKa3AHbX Tpe6oBaHHn H DeiCtByIOUHX npaBnI IO TexHKe 6e3OnacHOCT NpH NOkJIoueHHN IIHTbI. O6raTeJIbHO IPOBepbTe, YTO IPOBOd 3a3EmJIeHHN IIHTbI npaBnIbHO CoeHNHe C CeTbIO 3a3EmJIeHHN (CMOTPN CXEMbHa pHC.2).
IHTbOCHAUEHHBIECHCTEMOJ3JEKTP03AXHAFHNA
ToHbIe pacCToHHa MeKdy 3JIeKTPoDOM H RopeJKOYka3aHbHa pHc.7a.76.
EcHn HcKpa He BbIbHbAeTcH, He yNOpCTByHTe, T. K. MoKHO IOBpe IITb reHepaTOP. CnCTema 3aJxHraHHaMOKe He cpaBaTBaTB NO CJIeMyoHm PrnHHAM:
-BnKaHHa,HeHCpPaBHHa HIN 3aFp3HeHHa CBeua
- HenpaBbHbHO yCTaHO bHeHO paCToHHe MeKdy 3JeKtpoDM I ropeKoI.
- TOKONPOBODAHIN PPOBODK CBEH NOBpeKDeH Hn OROJIeH.
HCKPOBOI pa3pA IYXOHTB 3eMJIIO (B DpyTHX HaCTx IIANTbI).
- NOBpeKdEHNrHepaTOp HIN MKNPOBbIKJIOuAteJIb.
CKOIIIEHNE BO3Dyxa B Tpy60npoBOdax (OC6eHHO NocJIe JINTeJbHOrO NEpNOa HEnCIOJIb3OBAHnI JNTbl).
HEINpaBnIbHO COCTaBJIeHa Ra3OBO3dUHHa CMEcB (HEINpaBnIbHOE ropeHne)
IPEOXPAHNTJIbHOE YCTPOINCTBO FA3OKOHPTOJI
PpABHbHOe paCCToHHHe MEXdy KOHuaMn YyBCTBHTeJIbHOr OJIeMeHTa TepMonapbI H ropeJIKoN IokaHa Ha pnc 7a,76
JIa KOHTPOJIa FyHKUHOHPOBaHH KlaIaHa Ra3OKHTPOJIaIeINCTBOBaTb CJeDyIOHm Obpa3OM
-3axrnte ropeIky I OCTaBbTe ee BKJIIOueHHO npIN3HTeJIbHO
Ha 3 MHHyTbI.
- BbIKIOHTe rOpElyH NOBepHHTe pyuKy peryIaTopa B noJIOKeHHe 3aKpbITo, 0oO3HaueHHoe CHMBOJIOM (
- Uepe3 90 cekyH B cIyuae KOHTPOJRA RopeIOK pa6oey I NOBepXHOCTH H Uepe3 60 cekyH B cIyuae RopeIOK DYXOBKN H rPHJIA NOBepHyTb pyky B NIOJOKeHne OTKpbTO.
OCTaBBTe pyKU B 3OM IIOJIOKeHH N IIpH6JIHN3NTb 3aJKeHHyIO CCnHcy K ropeJIke: TPEJIKA HE DOnJIKH A KEyBcR.
Bo Bpem 3aXnHaHr Tpe6yOTc npHbIh3HTeJIbHO 10 cekyHd
JIra Bo36yKJdeHn MaHHTa.KJaapan Ra3oKOHTpoJIc pa6aTbBAeT
ABTomATHueCKN IocJIe BbIKJIOUeHHN IIaMeHN He 6OJIee YEm Upe3
90 cekyHd JIra RopeJOK pa6oey NOBepxHOCTN IIITbIu Upe3
60 cekyHd JIra RopeJOK dYXOBKn rpnJI.
NPE/UYIPPEKJEHNE
- Ipeed Jnoepaunne no nctke HnTexo6nyxhaHHO OTKIOHaeIHTyOT 3JIeKTPocetn H 3aKpbBaHTe KpaH NOdaH ra3a.
PnIOKJIoueHHIINHtB K HCTOuHHky IOnaun Ra3a He IpoBepRte repmetuHOCTb CTbIKOB np NOMoUINIJaMeHN.EcINB BaaemC paONOPJxckHHN HCT CIIeuaJIbHBIX PnH6OpOB DJIa KOHTPOJIra30HePONHuaEMOCTH,MOXHOHCIOJIb3OBaTb NeHy INKOHcHTpPOBaHHU MOJIbHUYO BODY.
YcTaHaBJIHBA Ha MeTo pa6OuyIO NOBepXHocTb IINTbI y6eIN-TeCb, UTO 3JIeKtpnueckne IpPOBOdk CBeuey (ecJH HMeIOTc) He COIIpHKACAIOCTC KHKJIepaMH H He NepeKpbBAIOH X.
RU
HHΦOPMAUЯДЯ NOTPEBNTEJIEN
KAK HClIOJIb3OBATb IINTY
BEHTIITIINIITIOEIIHH
3KcnIyataaRa3OBOnPiHTb COIPOBQKaAeTcB BbldeJeHHem
TeIIOTbH BJaXHOCTNB IOMeHNN, rDe OHa yCTaHOBJHeHa.
IO3OMy, HeoXoHMo ObecneHTb BeHTNIAuHIO NOMEeHHN
H IOIDepKHBaTB OTkpytBMn ECTeCTBeHHBc BEHTNIAUHOHHBc
OTBepCTHn HIN YCTaHOBTb BbTTXHOH 3OHT.
B Clyueae JInTEJbHOrO HINTeHCNBHOrO HCIOJIb3OBAHHN PJIHTb
BO3HNkaeT HeoXoHMOCTb DOIOJIHNTeJbHOH BeHTNJUaHH, KaK,
HAIIpHMep, OTkpytB OKHO HIN YBEJIHHTb MOIHOCTh BBIHYKeHH
HO BEHTNJAAH N BbTTXHO T0HTa.
BKJIOUOHEHNE TOPEJIOK PAOUEI IOBEPXHOCTIN UINITBI
-HaxMMTe H NOBepHnTe peryJInpOBOuHyo pyUky npOTHB accoBoi cTpeJKN H yCtHaOBHTb OTMeTKy HaPpOTHB CmBOJa
06o3HaueHHoro Ha IpeDHeH NaHeH NHTbI (IOLOXeHc MAKCHMaJIbHOrO NJaMeHH).
-3aTeM NOdHeCHTe 3aKxKeHHyIO cNnUky K TpeJke.
-ДЯУMeHbIeHnIПaMeHnIOBopaHbAHTe pyKy B TOM KeHaIpaBJIeHH, yCTaHaBJIHbAra OTMeTKy HAnpOTHB CHMBOJa(ПОJOKeHHe MHHMaJIbHOrO ПЛaMeHH).
BKJIIOUOHEHNEIPOEJOKPABOOENIOBEPXHOCTH,OCHAIIUEHHbIX KJIATAHOMI3OKOHPTOJI
-HaxMMTe HIOBepHHTe peryIINPOBOUHyO pyky IpoTHB aCOBOI CTpeKN H YCTaHOBHTE OTMeTKY HAIpOTHB CHMBOJla
.06O3HaueHHoro Ha nepeHHe nHaHeHn IInTbI (NOIOKeHne MAKCHMaJIbHOrO NJaMeHN).
-3aTeM NOHeCHTe 3aKkeHHyIO cHnUky K rOpEJIke H HaKMnTe Ha pyuKy Do yIopAp H DePKeHTe ee IpnXkAToB TeueHHnp6JIn3HTeJIbHO 10 cekyHd.
OTNCTHTe pyuKy H y6eINTecb. YTO ropejka 3aKrJaCb. B npoTHBOM cIyuae NOBtOpHTe BCE CHaHaJ.
BKIOUOUEHNE TOPEJIKN DYXOBKN
-OTKpoITe DBePuy DYXOBKN
-HaMMHTe Ha pyKu H NOBepHHTe ee IPOTHB YacOBn CTpeJKN DO NIOJOKeHHMaKCHMaJIbHOrIJaMeHN.
-3aTeM NOIHeCHTe 3aXKeHHyIO CnHcy K UeHTpaJIbHOMy OTBepCTHO Ha IHe dyXOBKn H HaXMITE Ha pyuKy Do yNopa (CMOTpn pnc.10).
-HeOTnyckarpyuKy6eHTecbTOM,UTOROpeJka3aKrJaCbHaBIOdaIJIaMnYepe3DBA6OKOBbIXOTBepCTHnHaDHEdyXoBKN
- Pn6JIn3HTeJIbHO uepe3 10 ckyHd OTNyCTHTe pyky npoBepbTe, He NotyXJa Jn ropejka. B npOTNBOM cIyuae IOBTOPHTb BCE CHaJa.
BKJIOUeHHe TOPEIKN TPNJI (FA3OBbI IN PUNJIb)
- yctahOBHTe pJAHky JJIa3aHHTb peRyHNPBOUHbIX pyueK OT NOTOKA ropqeryo BO3dyxa, kak yka3aHO Ha pnc.13.
HaKMHTe Ha peryJHPOBOUHyIO pyKy IyXOBKn H NOBepHHTe ee BnpaBO DO KOHua. - 3aTeM IOAnHeCnTe 3aKxEHHyO CnHcy K IepΦopnpoBaHHoIpy6e ropeJIKN HaKMITE Ha pyky Do ynpa (CMOTpn pnc.11).
-HeOTnyckaypykyy6eHTecb.HTO ropeIka3axrIacb.
-Пиблн3nteьно chepe3 10 cekyHД OTnyctHTe pyky n y6eHnTEcB. YTO ropejka He NoTyXJa. B IpoTHBHom Clyuae IOBtOpHTe BCE CHaHaJa.
IPEIOXPAHHTIEBHOE YCTPONCBO I3OKOHPTOJI IpeHMyIeCTBO OCHIIeHHbIX 3THM yCTPOHC BOM RopeJOK CO CTOnT B TOM, TTO B Clyuae HeNpON3BOJbHOrO rAIIeHNr NAmEH cpaabaIBaET ChTeMa 3aIHTbI. DeHCTBHTeJbHo, B 3TOM cLyuae ABToMAthueckn IpeKpaIIaeeTcnoIaua ra3a KnotyXIII eropeJIke,
IO3BOJRA TAKHM Obpa3OM H36eKaTb ONaCHOCTH yTeuKN r3a.IIO CJIe HENPON3BOJbHOrTO RaWeHHI IJIaMeHH KJIaHaH r3OKoHTPOJIc CpabaTbBaet ABTOMaTHueckn He 60JIee Yem Upe3 90 cekyHd JIra RopeJok paOouen IOBepxHOCTH IIHTb H Upe3 60 cekyHd JIra RopeJok dYXOBKn H rPHJI.
IINITbI, OCHAUHHe CNTEMO3AXNFAHNAOT 3JEKTPNUE CKOH NCKPbI
PnHHHII 3aXHrAHH TaKo Ke KaK OINHcHo BbIe, 3a HckJIIOueHHem TORO, YTO BMEcTo cNHyKn HcNoJb3yETc Hckpa, NOLyuaMaJ npn HaKaTHH, DaKe MHOrOKpA THOM, PaCNOJOKeHHo HA NepeHHe NaHeHN KHOKN, HIn Ke HaXHMa Ha pyKoTky RopeKN, KOtopa DOJxHa 6bITb BkLIouHeA. B clyae, ecIn ropeJa He 3aXHraetc, NOnpOBoBaTa eIe pa3, yCTaHOBb PERyJHPOBOUHyIO pyKy B NOJIOxe HmHmAlbHorO PJIaMeH
- EcJH NJIHTa OCHHeHa CnCTeMOI 3JIeKTPo3aXHraHHrOpeJOK DyXOBKn IprNIA, pRn Hx BKNIOUeEHNN 063aTeJbHO epKaTb DBepUY DyXOBKn POJIHOCTbIO OTKpBtOn.
-BoBpEmBaKJIoueHnRApoJOKdyXOBKnIrpHJI,OCaUeHHbIX CnCTeMOH3JIeKTPo3aKnHaHnH,HeHaKHMITEHaKHONKY3aKnHa Hn6boJeueHnHa10cekyH.EcInuepe310cekyndropeKa HC 3aKKTcH,OTNycHTe KHOKNy,OTKPOITe DBepuy dyXOBKn I NOIOxHNTE NkpaHHe Mepe MmHyTu PpeKdYe HmIOBtOpHTb BKJIOUeHne. EcInKe TpeLka He BkJIOuAcTcH IO pNINHe HcCnPabHBocTH CNCTeMb3JIeKTPo3aKnHaHn,TO 3aKTHTe RopeJky BpyHyIO pHi NOMOUn CnHcKn, a 3aTeM Bbl3OBHTe CneuaJIHCTa No TeXObcJyKHBaHHIO.
IPEyIPEKJDEHNE
-06bHNO NOCJe JINHTeJIbHOro HeHCIOJb3OBaHHN PJIHTbI cpa3y He ydaTcra 3aKeueb ropeKn. Ipeed 3axHraHHe IOCTaTOUHO IODOxTaTB HECKOJbKO CeKyH, IOKa HE BbIeT CKOINBUnCBA TpyboNPoBOdAX BO3dyX.
-CTapaHTecb, YTO6bI BMeCTe C BByIyCKaEMbIM H3 RopeJIOK BO3dyXOM He BBIIIO MHOIRO Ra3a. EcJH ROpeJIka He 3axKeTcB TeueHHN HECKOJIbKHX CekYH, NOBTOPHTe 3axHnTaHHe, INpeDBapHTeJIbHO IOBePHyB peryJInPOBOUHyIO PYkY B IIOLOKeHHe 3aKpbBaHHA ( ), a 3aTeM BHOBb OTKpbIB ee.
KOrdaIyXOBKa HINrPHJbHCNOJIb3yIOCTBnepBbIE,II3OTBepCTHNAIyXOBKNMOKeT NOBHTbcra DbIMHNHePNTHbI 3aIax,Bb3BaHHbPa3ORpeBaHHemMaJIHpOBaHHORIOKpbITHcTeHOKIyXOBKnHOCTaTKOBMacJIaHHCTOnCMa3KNTOpeJOK.
NCIOJIb3OBAHNE KOHΦOPOK ΓA3OBONIJIINTBI
Cleayet NOIb3OBaTbC KxOHHO NocyO, dHaMeTp DHA KOToPbIX COOTBeTcByET TnYrOpeJok. DeIO B TOM, UTO IJaM He IOJIxHO BbCTynaTb CO DA KaCTpOJIN. KaCTpOJIN C BblNyKbIM DHOM (BOrTHyTbIM HIN BBHHTbM) HE OONyCKaOTcR. PeKOMeHdyTeC:
-ДЯ BCNOMORATeJIbHOI TOpEJIKN = EMKOCtB C DnAmETpOM He MeHee 8 CM;
-ДЯ He OyeHb ьICTpoI rOpeJIKN = EMKOCtbcДHaMeTpOM He MeHee 14 cm;
-ⅡIa6bIcTpOINrOpeJIKNHINrPoIHARrOpeJIKN=EMKOCbCINHa-METPOMHeMeHee22cm.
TpoHra ropeKn npiroHa nIyncnoB3ObaHn KacTpioB Wok. IPIMMEUAHNE: H N B KOe M clyuae He octaBJIaRb pyky B npoMexKyTOUHbX NOJIOKeHHx Mekdy CMBOJOM MaKcHMaJIbHOTo IJaMeHH H NOJOKeHHem "3akpbIto" ().
JIHTbIC 3JEKTPHUECKHM KOHΦOPKAMH
KOHOPKN NMEOT pa3JNUHHy HHTCHCNBHOCTb HaPCBaHH B 3aBHCIMOCTN OT NOJOKeHH peryJITopA.
IOJOXCHNE1-MHHHMAJIbHOcHaRpcBaHHe BCCX KOHOpOK
- NOLOXKeHHe 6 = MaKCHMaJIbHOe HaIgpeBaHHe O6bIuHbIX H6bICTpbIX KOHΦOPOK (C KpaCHbIM IINCKOM)
-IOJIOKeHHe 0 = BbIKJIIOUeHHe BcEx KOIIΦOPOK
He HcHIOJIb3yIte KaCTpOJIH C dHaMeCTPOM dHa MeHbIe dHaMeTpa KOHΦoPKN. DHO KAcTpOJIN DOJIKHO 6bITb KaK MOJHO 60JIee
RU
HHΦOPMAUЯДЯ NOTPEBNTEJIEN
IIIOCKHM, UTObI LyuHHe npHJIeRaTb K IOBepXHOCTN KOHOpKN (pnc. 12).
TIPE/LYIPIEK/LEHNE
- He octablaHte KOHΦopky BkIoueHHo 6e3 KAcTPOHN. Ecln Jee BbI HcIOJIb3yTe KOHΦopky BnepBbIe, To peKOMEHdyeTc oCTa BHTb ee BKIOUeHHO nPiHbIMn3HTeJIbHO Ha 10 MHHyt dJa TOrO, YTObblPocCyIHNTb BIArgy II OCTaTKN CMa3KN Ha ee NObepXHOCTH.
- Ecln KOHOPKa He HcNOJb3yeTcB TeueHH dJIHTeJbHOIpeHoJa BpeMeHH, peKOMEHyTeCJIerKa CMa3aTb KHPoBOI cMA3KOe 3MaJIHpOBaHHyIO NOBepxHocTb.
H36eRaTe npHMHeHHa 6pa3HBbIX cpeCTB npH ouHcTKe NO BepxHOCTN KOHfOpKN
Bo BpcmI npHOTOBJIeHN HnHn Ha TpNJIe He IpcBbIaTb HOMHaJIbHyIO YcTaHOBJeHHyIO TeMnepaTyPy.
BHIMAHHE:IIpH NcNoJb3OBAHHrPJIa HApyKHbIe YacTH dyXOBKN MOrY cHbHO HaPeBaTbcR. He IOnIpyKaITe DeTeN 6JIN3KO K DxyOBKe.
BhmaHHe:Ha HeKOTOpbIX MoDeJIx PnIT 6e3 3aunTbI DnI pyek roTOBka Ha rPUNe DOXKa HbINONHrTBc PnI 3akpbIToI DBepue.
HIOJIb3OBAHNEIa3OBOIOTPNJINCHIOJIb3OBAHNEIa3OBOJN DYXOBKN
-3axHTe ropeKny H NOIOxJHTE HeckOJIbKO MHHyT, NOKa HarpeETcA DYXOBKa, HJN JKe BKJIIOHTe 3JIeKTPHueCKyO cINHpAJIb TPHJIA
- Pa3MecTHe Ha peIeTKe IprHroToBJIraEMoE Ha rPiJe KyyHaHbe.
- YcTaHOBHTpepeWetky BdyXOBky BCaMOe BepxHee NOJIOKeHHe.
- 4yTb Hxke peMeTKn NOCTaBBTe NpOTHBeHb
-3akpoTe DBepuDyXOBKN.
-Yepe3 HeckoIbKO MHyT NepeBepHHTe KApHBIIyIOcHa rPHJIe HNUY TaKHM O6pa3OM, UTO6bl O6e CTOpOHbI NOBBePrlncb OHNHaKOBOMy DeIcTBHIO HH6paKpacHOr H3JyEHHN 3aKaqHINCb paBHOMepHO. (Bpem IprHrOToBJIeHHN 3aBHCnT OT Tnna IPOdYkTa H NHNHBNyAIBHO RkyCa). IIPrHrOToBJIeMoe Ha rPHJIe 6JIOHO BHMAMHHe: IIpi HCNoJb3OBAHHI rPHJr HapyXHbIe YactH dYxO-BKN MOyT CHIbHO HArpcBaTbc. He IIOIIyckaHTe DetcN 6JH3KO K dYXOBKe.
3JIeKTPHuecka CnHPaJIb DYXOBKn, PAcIOJOKeHHaB B BepxHee ee acTH, BKIOUaeTc npN NOMOIN IOBOPoTa peryJINHOPOBOHOn pyKn NO yacOBON CTpeJIke. OTMeTKa yka3aTeJI Ha pyKe IOnJKH aCOBIIaTb C CHMBOJOM TPHJIHa NepeIHei NaHeJe IIHTbl.
PnB KJIIOUeHHI rHJIa 3aRopaAeTc KpaChHa JAMnoOka, O6o3HaauO aB KJIIOUeHHE 3JckTpNueCKO cnHpaII.
KOMHHPOBAHHA 3JIEKTPPHUECKAR DYXOBKA
IanaOdaIpa3IHHbIM HaRpeBaIOUHm 3JIeMeHTaM, INPBODHMbIM B DeIcHbE IIOCPeIcTBOM IHepeKIOuATEJIN PeYIHPyEMbIM IIINOMOITepMOpEpyIITopa, HauHnHa C HlyJEBOrIO NOJOKeHN0 (BbIKHOcHO) INOBopauHBa pyky IO YAcOBON CTpeJIke MOXHO ycTaHOBITbe E B CJIeIyIOUHne IIOJOKeHN:
-CMBOJ 3aRopaHne JAMnbI DyXOBKn KpachOn INDnKaTOPHOJ lamNbI.
-CMBOJ:3aropahne JAMNbI DyXOBKn KpachOH INHdkaTOPHOJAMNbI,pa6Ota BEHTINJrTOPA.
- CIMBOJ :KOHBEKUHnaI ROTOBKa B "CTaTnueckoIyXOBKe", TempepaTypa IyxOBKn peryInpyETc npn NOMOuTIepMoperyIaTopa.
-CMBOJ TROBKA B DyXOBKe C CNTeMoI BeHTnJIaUN, HA ODNOM NIN DByx ypoBHx, TEMpepaTpa DxyOBKn peryNInpyeTc npn NOMOu TepMOperyIaTopa.
-CMBOJ 3aKunraHne rpuinna (Ha nlafohe DuyxOBKn), pyka TepMoperynITopa DOJIXHa HaxoDITbC8 B NIOJOKeHHN MaKCmuaJIbHOI TEMpepaTpybl.
-cmbon 6bictpa roTOBka C BENTUNpyeMoI dYxOBKO, TemnepaTpa dyXOBKn peryNpyeTc npn nOmoi TepMoperyJrTopa.
Bo Bcex NoJoleHnax, 3a HckJIIOueHHem HyJIA, IPOHCXODHT 3a)HraHne KpaCHOH HnDnKaTOpHON JAMNOUKN JAMNbI DyXOBKn. 3AMEAHNEJEITa HnDnKaTOpHa JAMNOUKA 3a)HraeTcB 3a-BNCMHOCHT O T BKJIIOueHHa TepMOCTaTa.
IpeIe Yem cTaBHTb B DyXOBky IPOJyKtB IJIa BapKN, OHa JOnJIHa pa3orpeTbC B TeueHHe NO KpaHHe Mepe 10 MNHyT.
RU
HHΦOPMAUЯДЯ NOTPEBNTEJIEN
3JEKTPPHCKA HJINHOFHKUNHOJAIBHAJ DYXOBKA
Jaroappa3HHbHm HArpeBaIOHM 3JEMeHTaM, npHBODHMbIM B DeHCTBHe NocpeIcTBOM NepeKIOUaTeH n peryJHypeMbIM nPH NOMOII H TepMOpeyIITopa, 3TOT THN dyXOBKn IpeIOCTaBIAET MHOFO BO3- MoXHOCTeI Jn PnHrTOBJIeHHN NINHN Ha OCHOBE Tpex pa3HHbIX CNOOCOB HarpeBaHH:
a) BbIHyKJdeHHoe pacIpoCtpaHeHHe TeIIJa (DyXOBKa C BO3DyXOdy BKOJI)
B) ECTCtBeHHoe pacIpOcTpHaHeHHe TenJa (KOHBeKnHn HIN KOH BEKUNOHnA dyXOBKa).
c) HhφpaKpaChoe H3JyHeHHe (rPHJB)
HaHHa C HyeBOrO NoJoxeHH 0 (BbIKIOueHO) N IOBopauHBa peryIaTOp IIO yacOBoCtpeJIke MoKHO BbIpaTb OHO H3 CJeDyUHX NOJIOxeHH:
CnMBOJ:BKJIIOUCHHNEJaMIIOUKN dyXOBKN INKpaCHOJJaMIIOUKNyKa3aTeJIyHKIIHOHHPOBaHHe KpbIbHaTKN.
- CHMBOJI : BKJIOUHHe KOHBekuH IN
-CHMBOJ BKIOUeHHe DyXOBKn C BO3DyOxyBKOHa ODHOM HNE HeCKoJIbKnx yPOBHX. TempepaTypa DyXOBKn peRyIHPyeTc npn IOMOHTepMOperyJITopa.
CHMBOJI BKJIOHHeIyXOBKn C BO3IyXoYBKOHa OINOM Hn HeCKoJIbKnx yPOBHX. TempepaTypa IyXOBKn peryIpyetc IIHNOMOIIh TepMOpEpyJIaTopa.
-CHMBOI BKIOUeHHe rHnB (B BepxHen qactn DyXOBKn) PeryIIOPOOuHa pyuKa TepMoperYJrTopa DOJkHa 6bTb pyuKa TepMoperYJrTopa DOJkHa 6bTb yCTAHOBJeHa B COOTBeCTBYIOoee MaKCHMaJIbHOI TEMIEpaType IOJOxKHe.
-CHMBOJ BKJIIOUeHHe rPHJRA (B BepxHae YAcTH IyXOBKn. PeryIINPOBOUHn pyuKa TepMoperYJrTOpa DoJkHa 6bItb pyuKa TepMoperYJrTOpa J0JkHa 6bItb yCTaHOBJHa B COOTBeTCTBYOIIee MaKCHMaJIHOI TEMIEpaType NoIOJOKeHHe. BepTe pa6oTaet.
-CIMBOI TOBKa C NcNoJIb3OBAHMe BHTNJIaUN I rPnJI (Ha nlafohe dyxOBKn), TEmnpaTpya dYxOBKn perynnpyetc npn nOMoU npuKn TepmoperyJrTopa. Bepten pa60Taet.
Bo Bcex IIOLOXeHHx, 3a HCKIIOUeHEm HJyI, IPOHCXODHT 3aKHaIIHe KpacOH HINHKaTOPHO JAMIOOHN JAMNBI DYXOBKN. 3AMEUAHHE:KjTaa HINHKaTOPHa JAMIOOka 3aKHaETCB 3aBHCMOCTH OT BKIOUeHHa TepMOCTaTa.
IpeKTe cEm CTaBHTb B DxyOBky npOyKtbl BapKH OHa JOJXHa pa3oRpeTbc B TeueHHe No KpaHHe Mepe 10 MHHT.
KAK NOJb3OBATbCRA 3NEKTPUeCKM TPNIEM B 3NEKTPUeCKO JYXOBKE
-ПишьТолькоДпmaМодeнс "3NeKtpnuecko dYxOBko",уnpabIЯEmbIX DByMpa3dJIbHbIMn pyKaMn (ceJIeKTop -TePMOperyJrTOp),MOxHO rOToBnTb Ha rPnne npn 3aKpbIToN DBepue,He nOJIb3yJcB 3aUnrToN pyKe.
Pn roTOBKe Ha rPnne C 3aKpbIToN DBepuee HEnb3r HcNoJIb3OBAtB TeMnpeaTpybl, npeBbIshaIoune 200^
-BoBpempa6oTb npn6op cnIbHOHarpBaetc. Heo6xoJIMO 6paataB BHMamHe Ha To, YTObI He KacaTbc HarpBaTeJIbHbIX 3JIEMeHTOB BHyTpN DxyOBKn.
HICIOJIb3OBAHNE BEPTEA
a)Дя npriroTOBneHnHa rpnne C OTKpbTOn DBepeN.
-YcTaHOBHTe NlaHcyIa3aunhtbpeyInpoBOuHbIXpyeKOT ITOKA Ropqero BO3dyxa, KaYka3aHO Ha pnc.13.
- IomeCTHTe Kycok MraCa JIJI NOJkaHbAHHa Ha BepTe, 3aKpeHHB CROB UCHTPC CINCAHbHbIMN BNJKaMn.
- BCTaBbTe OCTpHe BepTeIa BpacNoJIOKeHyO B ONOpHOpaMe CTyINu KoHTpPiHBOda.
CHMMTe CBePeTa cPteHaJIbHyIO pyKy.
- YcTaHOBHTe OIOpHyO paMy BcPTeJa B CEHTp DyXOBKn, ODNHOpeMeHHo BCTaBJIra BaJI KOHTpPHBOda B CTynHcy MHKPOdBnTaTeJIA
CMOTPNPHC.15
- YCTAHOBHTe IPOTHBEHb CAMOM Hn3y DxyOBKN He 3a6yTe HaJIHTb Ha Hero HeoBJIIOE KOJIueCTBO BOIbl.
-3axgnte ropeIky rphJIA
MgKo 3aKpOte DBePuy DyXOBKn, pHcJIOHra ee K 3aIHTHOIJIaHKe.
3aIyCTHTe BepTeJI, HaxHMma Ha CIIHaJIbHbI paCNOJIOKeHHbI Ha IpeDHe IIaHEJIbIKIOuATEJIb.
BpemrOT BpeMeHH NIOJIHbAHTe KHPOM MRCIO OOKHuaHHN pHROTOBJIeHH CHHMITE ONOPHYO paMy CO CTyHnCb MHKPOB-BHraTeJH 3aKpyTHHe Ha BepTeI CneHaJIbHyO pyKy.
b)ДлпnpuroToBneHnHa rpnIe c 3akpbIToN DBepcei.
- kak yka3aHO BbIe, 6e3 nCNoJIb3OBAHnra 3auNTbI pyuKn, KaK noka3aHo Ha pnc.13 BHIMAHNE: BHNKIN BepTeJa MOrYT HMeTB octpblc KOHcy. BydTe OCTOPOXHbl.
BbIKJIOHATEJIb-KOHTPoJIbHAJIAMIOUKA/BEPTEJI
BceMOeJIHra3OBbIXIJIHTHMcOTKpyROBOB BbIKJHOaTeJIb
- Hn HaxaHn Ha BblIOuateJB OHOBpeMeHHo BKIOUaOTcO CBeHcHne dyXOBKn H pHXoHTB DeHCTBnMEHKPODBHrTaTeJIb BePeTJa
-ΠιntbI KOMθHnHpOBaHHbIX MoDEJIeN (C 1 HII 2 ΣIeKtpOKOHΦOpkAMH) OCHAIIEHI KpyTOBbIM BbIKJIIOaTeJIcM C KOHTPOJbHOJJaMTOUKOI KpaCHOrO ΒBeTa.
JaAMIOUka 3aIopaeTcB BO BpEmyHKuHOHPOBaHH 1 HJIN 2-X 3JIeKTPOKOHΦOPOK.
KOMILIEKT DIOJHHTBbIX HACAOK JER BEPTEA
- No 3aka3y BaIb BepTeJ MoKeT 6bIb OChaIIeH DOnOJIHHTeJIbHbIMN HacaJkAMN, N03BOJIAIOIHMM ODHOBpeMeHHOE PnHrTOBJIeHHe HECKOJIbKHX KYCKOB MCA.
-3TOT KOMILJEKT MOKHO 3aKa3aTb y BaIeRO IPOdaBua, CdeJIaB ONJIaTy.
MOHTAK KOMILIEKTA
CHIMMTe C BepTeJa CTHApTThIe BHJIK
- YcTaHOBnTe H 3aKpeHnTe Ha BepTeJe aHcbl, KaK IOKa3aHo Ha pnce16.
-HaHn3aIte KcKmMaHaIIaMnpybI
BCTaBBTe IaAMNpybHa aHbI, KaK NOKa3aHO Ha pHC. 16.
-BHIMAHHE:INBaOINHAKObBIXMeKJycooBnAHHaA''A''NOJXHBi 6bIb,ycTaHOBJeHbHa KOHuax BepTeJa.
JIHTbIC MEXAHHUECKHM TAIIMEPOMpHc.17
MaKChMaJIbHoe BpEmHa KOtOpoe MoJHo 3aBecTH BaII TaImepe, coCTaBIAET I aac. DIA 3TOI IOBepHITe peryINPPOBOHyO pyKy TaImepa No YACOBON CTpeJIke DO NOJyueHn XeJaEMoR O BpEmHN. NIO HCTeueHHN yCTaHOBJEHHORO BpEmHN PPO3BeHHT 3BOHOK, KOTOpBn 3aTeM aBTOMaTHueckn BBKJIQUHTcR. B MOMENT IOnaH N 3ByKOBOrO CNHaJa TaImepe He OTKJIQUHaet dyXOBky.
HcIOJIb3OBAHHe 3JEKTOPOHHOIO IPOPGAMMNPYIOIIEI
YCTPOHCTBA (pnc.18)
IIO3BOJIAETIPOrpaMMHpOBaHHe BpeMeHH HaayJa IpiHrTOBJIeHHN I IPOJOIXHTeJIbHOCTb IIPIHrTOBJIeHHN IIINII. EcJH HeT HeoXoHN MocTH HABIOJATb 3a IPOUecCOM IpiHrTOBJIeHHN, To IOCTaTOUHO YCTaHOBTb Bpem, NO HCTeueHHKOTOPORO dyXOBKa ABTomATHueckn OTKIOUHTC. IocJe MOHTaKa HJN IocJe BpeMeHHOrO OTKIOUeHHN OT 3JIeKTPoCeTH 3JIeKTPoHHbI DHCJIeM MHaet. B TaKOM Clyuae, JIAI IIpaBHJIbHOTo IIPOrpaMMHpOBaHHra HCOxOdHMo BblCTaBHt TOOHOC BpeM.
HACTPOHKA YACOB
- HaKHMa oJHOBpeMeHNo Ha 2 KhoNk (IPOOJOXHTbHOCTb IPNFOTOBJIENH, OKOHAHHE IPNFOTOBJEHNA H a KhoNky + HJH - - , MOxHO yCTaHOBHtB BpeM IIHN 3TOM aBTOMaTHueckn CTHPaOTcpaHe cYCTaHOBJEHHbIe IPOrpaMMbI MmIaCt HAJIINCb AUTO, Oo3HaauOuaa FyHKUHOHPOBaHne B aBTOMaTHueCKOM peKHME.
IPMHMEAHHE:ccnHaINncb AUTO Mrraet,pyHKUHOHPOBAHne
RU
HHΦOPMAUJIЯДЛЯ NOTPEBNTEJIEN
DyXOBKn BpyuHOMpeKHMHeBO3MOxHO.
KHONK H
-HaKHMaj KHONKN "N -MOXHO yBEJNUHBaTB HJN yMeHBHaTb yCTaHOBJIEHHOE BpEM. CKOPoCTb H3MeHeHH 3aBHCNT OT JHTeJIbHOCTNaKaTHRA KHONK
ФУHKUHNOHPOBAHNE B PUYHOMPEKHM
HaKaTa Ha KhoNky PyHOn PEKHM HaIINcB AUTO IORaHET (ecn OH a Do 3TOO MInra Hn rOpela NoCToAHbIM CBETOM) H 3aRopacTc CHMBOI KACTPIJIA Teepb MoKHO BKIOHTb DyXOBKY, NOBOPaunBa B COOTBeTCTBn C yKa3aHHMaPyKOBoADCTBa pyKy TepMOperyJITopAp HpykY IIpeKJIouaTeJia Jla BblOpa CnoCoba npHrTOBJeHH
ФИКИОПОВАHЕ B ABTOMATNHIECKOM PEXKIME C IПОТРММИPOBAHEM BPEMEH NIOJIOJIKNIIEbHOCTN OKOHUAHNIIPIHOTOBJIENH
-PaccMOrPHn pHmep:ceuac 9 25 MHH. BBy JeJaTe, yTObIyXoBkBA BKIOUHJIaCb B11 q.H OTKIOUHJIaCb B12(HTeJIbHOCTb npHrOToBJIeHN 1 qac)
-HaKaTaB KHOHkny IPOJOJIXHTEJIbHOCTb IIPNFOTOBJEHn,3aTeM B Tcuchnn 5 CCKyHd HaxaTaB KHOHky +' IOKa Ha DHCIIIEC He IIO- RBNTCB Bpemr 01.00.B Clyuae HAO6HOCTH HCNOJB3OBaTB KHOHky .HaINHcB AUTO H CHMBOJI KACTPLOJ 3aFOPRTCAIOCTOHHBM CBETOM.
HaKaTaB KHOIIky OKOIINAIHE INPHTOOTOBJIENH, 3aTeM B TceHHN 5 cekyHa KaTaB KHOIky +' Do Tex nop, NOKa Ha IIcNJIee IONBHCTCBPEM12.00.CHMBOJ KACTPOJIA IORacHCT,a HADINCB AUTO OCTaHETCROpeTBIOCTOAHHHBM CBTOM.
- YcTaHOBHTe pykTy TepMOpEryIITopa Ha JeklaCMOM 3HaueHHN TempeATpyb H pH NOMOIN NepeKIOUaTeJRA Bb6epHTe CnOCOB npHrTOBJIeHN HNIuH. PnH 3tOM 3aRopaETc KpaCHaJaAMNoUka, BKJIOUaeTc8 3eKTPuueckoe OCBeIIeHHe DyXOBKN H BXOHT B DeHCT BHe npOrpamMHyIOHIE yCtpoNCTBO C 3aJAHHOI npOrpamMOH. B 11 qAcOB dYxOBKa aBTOMaTHueCKN BKJIOUaETc H 3aRopaETc CHMBON KACTPOJIA.
HcTeueHHBpeMeHH npHrOToBJIeHHaHaNnCb AUTO 3AMHraET H CMBOJ KACTPIOJI NoracHeT 3BOHOK H3BeCTHT Bac O6 OKOHuaHH yCTaHOBJeHHoI pOgpaMMbl JIA BIKIOUeHH 3BOHKa IOCTaTOHHO HaKaTb I0bYIO KHONKY.
-NoBepHnRE B HnyIeBOe IIOJIOKeHHe peryIaTOp TEMIePaTypbl dyXOBKn HnepeKJIouaTeJI cnoOc6a IIHHrTOBJIeHH
ФУHKUHOHPOBAHNE B IIOJYABTOMATUHECKOM PEXKIME C IIPO-TPAMMPOBAHHEMBPEMEHHIPOJOJIJKHTIELBOCTHIPNFOTOBJIEHN
-Paccmptnnpmepeceuac11435MH,BbXeIaete,yTO6blNYXOBKaBKIOHJACbHa25MHHY,HAHHaC3TOTO MOMEHTA
-HaKaTb KHOKny IPOJOJXHTEJIbHOCTb IPNFOTOBJIENH N B TeueHH 5 cekyHd HaKaTb KHOKNY +' ,Noka H AnCnIe He NOBHTcB BPem 00.25.B Cnyae HADo6HOCTH HcNOJIb3OBaTB KHOKNY -HaINCb AUTO H CHMBOL KACTPLOJRA aroprTcHIOCTOHHBM CBETOM.
YcTaHOBHTe pykTy TepMOpEpyIaTopa Ha XeJaemOM 3HaueHHN TemnepaTpyb H npn NmOoH nepeKJIOaTey Bb6epHe CnOCoB npHrTOBJIChHn IIuH. PpH 3tOM 3aRopaeTcKpaCHa KOHTPOJIbHa JAMNOUka, BKIOuaeTcN 3JKeKTPuueckoe OCBIIeHHe NyXOBKn IyXOBKa HAHHAcF FyHKUHOHHPOBaTb.
Yepe3 25 MHyT IyXOBKa BkJIIOHTcI CHMBOJ KACTPIJN IORA-CHET, a HADINHCB AUTO MHrae. 3BOHOK H3BecHTN Bac 06 OKOHuaHHYcTaHOBJEHHO INPpOrpaMMb. JIA BIKIOHeHH 3BOHKA IOCTaTOHHO HaxKaTB JIO6yIO KHONKy.
-OBepHnRE BHyIeBOE IOIOXcHNE peTyIaTOp TcMIpePaTypbl dyXOBKn HnepeKIOuateJIb cnoOba npHrTOBJIeHH.
TAIMEP
-HaKMHTe KHOKNy TAHMEP n npn NMOOHN KHOONK "HJN BbCTABHTc XeJIACMOB Bpcm.
Bo BpeMryyHKUHIOHPOBaHHraMepa3arOpaTeCCHMBoT 3BOHOK
IIO HCTCCHHH yCTaHOBJIHCHO BPEMHN IIOAACTCA 3BYKOBOI CHHAII H CMBOJ 3BOHOK IORACHT.
3BOHOK
-IO OKOHuaHHI pOgpaMMbI HaHHaet 3BeHETb 3BOHOK B TeueHHN 7 MHHT.
ДЯ BBKIOHCHN3BOHKa HAKMHTe JIO6yHO KHOIky.
HaKMnAa KHOIky 6e3 Bb6opa peKHMa QYHKINHOHPoBaHHa, MOxHO N3MeHbT bAcOTy 3ByKOBOrO CHHaJa.MoXHO Bb6paTb OHH H3 TpEx THIOB CHHaJa.Bb6paHHBm 3ByKOBoH CnHaJ6yDet 3BOHHTb DO TEX NOp, NOKA He OTNUCTHE KOHIIky
HAJIOIPOPGPAMMBI IN KOHTPOJIb
- IporpmaBxOHT BJeHCTBHe IpiHbH3HTeJbHO uepe3 4 cekyHIO NOcJIe ee yCtAHOBKN
-BJIOBOH MOMENT, HAKHMAR COOTBETCTBYIOIyIO KHOKNY, MOKHO npOBepHTb yTaHOBJIeHHyIO npOrpaMMy.
OIIINKNIPIHIIPOIPTAMMPOBAHH
- HanpHMeP, B 12 u. 15 MHH. Bby yctaHOBNH INPOIOJXHTEJIbHOCTb INPHOTOBJIeHn30 MHHyT, a BpeMg OKOHAAHn INPHOTOBJIeHnB 12 u. 30 MHH.
OuH6ky nporpaMMHOBAHH MoKHO HcIIpaBHTb H3MCHy IpOdoJIHXTeJbHOCTb HIN BpEm OKOHaHH pHrTOBJeHH, HIN Ke HaKaTb KHOUY PYHOPEKM. NocIe 3TOIIOBTOPHTe nporpa MHPOBaHHe.
-Пин haINHIN OIN6KII INPOrpaMMHPOBaHHI dyXOBKa Hc BKIOuAcTcR.
CPOC IPOIPOPMMBi
-YcTaHOBJIeHHyI nporpaMMy MoXHO CTpeTb, HaxHMa Ha KONKy IPOJOJIXHTEJIbHOCTb IIPIIOTOBJIEHNA 3aTeM KONKY -11 Do Tex nop, NOKa Ha dncnlee He BbcBETcra 0.00. BHIMAHHE.
IO OKOHAHNN KAKJOI IPOPGPAMMBI PEKOMEHJYETCA HAXATb KHONKY , HAHCY FUYHKUHOHPOBAHNE DYXOBKN BYPHOM PEXKIME HEBO3MOXHO.
IIPIHIAJIEKHOCTN DYXOBKN
Ha pueKtky dYxOBKN CTABRTCA HmEOUHnCEB HPODAKe IPOTNBBH JIINPHROTOBJIeHH CJaIKHX 6JIOJ, KApKOHO H3 Mca H T Mco MoKHO paCIOJOXHTb IIpMaHO Ha peWetke, -TakOH cIOOCo Ha3bBAeTcMco HA rPHJe.
IpoTnBeHb pa3MeuaeTcnopeWetKoN CnyKNT DnC60paCTeKaIOUeO COKa npiroTAbNBAeMbIX npOdyKTOB Ha peWetKe.IpoTnBeHb MoXHO NcNOJb3OBaTB NdIra RotOBKn 6nO.
- Ecln Bapka npOHBOHNTcB D yXOBKe C cHCTeMOB BEHTNIAH, TO MOXHO ONDOBpEMeHHO NOMEcTb JBe peIETKN. Ipn 3OM HxKHO IMETb B BHy, YTO eCLN IPOyKTb OTJNuAOTcMEXdY COoON NO KaueCTBy N KOJIuHcTeBtY, To, eCTeCTBeHHO, H CpOKH IOTOBHOCTH MoYt 6bITb Pa3HbIMH.
- DyXOBOI WkaΦ OchaueH CnCTeMOn KpeIeHnpeWetOK, YTO N03BOJRAET N3BLeYb Ix, He N3BLeKAR IN NOHOCTBIO N3 DyXOBORo WkaΦa (1). YTo6bl NOJIHOCTbIO N3BLeYb peWetKN DOCTaTOHOPINIOHNrTb INOTAHyTb peWetKN Bnepei, KaK NOKa3aHO Ha pncyHke (2), CM. PNC. 19
DEMOHTAK DBEPUbI DYXOBKN
Дьерцamoket ChmatabcдяболгуdбнOчNTKdYXOBKN, BbINOJIHЯ CNeDyUHne HCHTpKUN:
1)Плноctью OTKpoTe Деру.
2)ПовернiteДва рычara“В”,певOrderиИЗ пооженя 1 В поожене 2 (сm. рс. 21).
3)MeIeHHO 3aKpOte DBepuy Do ee ocTaHOBKn.Bo3bMnte ee cnpaba n CneBa 06eIMn pykam, 3akpoTe ee DOONHHTenbHo n CHIMTe ee, NOHMAR BBepx.
4)ДЯ yctahOBKn DBepuBHa MeCTO Heo6xOIMMO BbIOnHHT npoueDpy DeMOHTaxa B O6paTHoNocJeOBATeNbHOCTn, BCTaBtB DBe NpTIN B COOTBETCTByIOUne THe3Da N IOJIHOCTbO OTkpblB DBepuy.
5) NobepHnTe Dba pbyara "B", cHOba yCTaHaBnBaJnx B noJoxKeHne 1.
6) 3aKpoTe DeBepu obbHbIM o6pa3oM.
RU
HHΦOPMAUЯДЛЯ NOTPEBNTEJIEN
NCIOJIb3OBAHHe CTEKJIOKEPAMUHECKO IOBEPXHOCTI NNITbI
MoHocTb 3IeKtpnuecknx KOHOpok perynpyetcnoCIOEoBaTeBbIM yCTpoiCTBOM, oBecneuBaIOUm OTNHyOpeRynpOBky TemnepaTybl npriOTobHeHpa3NHyBe yPoBNHa TpAynpObaHbOt 1 Do 6. PyKa MoXeT 6bIt bYcTaHOBHeHa Ha XeJenaemyO OTMETky, NOBopauBaBae BnPaBO Nn BnBO.
Длг КОнфорOK C ДВОньIM KОHTypOM pyчka BpauaeTcЯ TOnbKO NO yacOBONCTpeNke; nHTeHcNBHOCTb TEnla rpaaynpoBaHa OT 1do6 NmBToNko DnIg CEHTpaNbHbIX 3OH KOHΦopOK.
Pn nocneIyouem ueJyke Bnpeed noce nocJeHero dene HnBknOuATcOCTaNbHbIe 30HbI KOHOpok.
Ioka Onda H3 3neKtpnuecknx KOHcpok ropra, CnHaNbHa JAmna E (cmoTpn pnc.1) BkJIOHTcN He OTKJIIOHTcN Do Tex nop, Ioka TempepaTypa BCex 30H npiroTOBHeHr HE ONyCTNTcN Hnke 60^
YeIbe 30Hb npiroTOBHeHn O6O3HaueHb HaHeceHHbIMn
Ha nobepxHOCTn OTMeTkAMn. Ia HauBbcUeW ot Daun n
cbaIahCnpoBaHHoro pacxoJa 3NeKtpo3Heprn Heo6XoJIMo
NCNoIb3OBaTb ToJIbKO KAcTpOJIn N pINHaJNExHXOCTn C TOJCTbIM
COBepWeHHo POBbIM dHIuEEM (CMOTp PNC.12). DnaMeTp dHnua
EMKocTn DOJIkeH 6bITb He MeHee HaHeceHHbx HA nobepxHOCTn
OTMeTOK.Ecn dHnue EMKocTn He NOKpbIbAet HarpeBaIOyU
3OHy,To 3Heprn paCXoDyETc BncyTyo.Lyuue BCero,ecnn
dHnue HemHoro 6OJIbwe HarpeBaIOse 30HbI.
HnIe EMKoCTe npabOaH NOBepxHOCTb DOJXHB6bITb HCTbIMn C cyxMn. HecobNoDeHne 3Toi peKOMHaauu BLeueT 3a co6oN oTePio Tepna n, cJeIOBaTeJIbHo, 3Heprn.
Примочаня:
-HnB KcOe Cnyue He roTOBtB 6NIOHa HENOCpeCTBeHHo Ha 3JIeKTPnuecknx KOHOpkax.
- YTO6bI COKpaTnTB BpEMr PnPIROTOBNeHnHa N3JyauOuNX KOHΦoPkax MOxHO HaayTaB PnPIROTOBHeHnHa MaKcMaJIbHOI OTMeTke 6, NOcne Yero CHOBa yCTaHOBnTB pyKv B Bbl6paHoe dIpyPiROTOBHeHn NIOXKeHne.
-Bce 3neKtpnueckne KOHΦopKn O6OpydoBaHbI ORpaHnHTeJem Tempeatpybl, npeoTbpauaiouIMnx NpeperpeB daKe B cnyae paobtbi KOHΦopKn Ha MaKcImaJIbHOI OTMeTke 6e3 KAcTpIOJI bINB Cnyae npimHeHn EMKoCTe C HepOBhIM dHIuIeM.
Hnke npBBeHeOpneHTnpoBOOHa Ta6nuapeKIma npiroTOBnHnpa3nNHybIX 6nIOd.He 3abBaIe, YTO 3TN npaMeTpblMOrT N3MeHrTaC B 3aBNCMOCtN OT KOJIueCTBa IN Tnna ppiroTOBnREMO nnnn HnDnBuDyAalbHO BKyca.
1,0 kW - Kavovik Eotia
1,0 kW - Kavovik Eotia
0 180
1,5 kW - Kavovikn Eotia
1,7 kW - Kavovik Eotia
1,8 kW - Eotia High-Light
0 210-144
2,2-1,0 kW - Eotia High-Light
Katy.: 3eivakiia npooioiuou oKaImu
Klaon 1 - Kouzivec Turiou "X"
GR
EykaTaOtaoN
EONAIEMO2
Ola ta movTeLa eivai evoiaoueva e iataa aopaaiaac yia kauotnpec, pfupvo kal grill.
Avaloya ta oikouice enionc va exouv:
XPHSH TON KEPAMIKQN EETION
H 1oxuc twv eotiw pvpuojuicra ano ma diatae nou eoopaaizui apiota npuoiin ts cepkoepaiaac ayepmuatoc.
Olaopotkec evtace tcepuotntac ivai diaathetaevc ano to 1eoc to 6. Oiaokontns mnpei va tonoetnei otyn etuumtn Theon npiotpovtac tov npoc ta dexi a npoc ta apotepa.
Tia TIC eoties ME dIIO KUKLWMA, O diaKoTTNG YUPVA mOvo
DEiooTPOPA,OI dIaPopec EVtAOEIG 0EPuOTNTC KuaivovTAt IO
1 EWC 6 MVO VIA TIC KEVTPIKEC ZWECT Wv EOTIW. To EIOeV KOIK
MPTPOTA,ETA aTO TIV TEAEuta IA KAAL, Ovauei Tc UTIOAITIE
ZWECT TWV EOTIWOTAV MIA anTO TCEOTIEC Eiva CEOTN, N EvDekTKH
Luxvia E (BLENE EIK. 1) avaei kai dev th aOBnoei av n 0epukpaia
OAW TWV EOTIW DEV KATeBI KATw anTO TOC 60^ TEPINou.
OI Teoepic Zwecmuepaoc KaBopiovta ano ta
Tepiypamata nou eivai oxediogeva oTo nlatw. Ia va exTe
mu kaan anoobon kai xaunn katavalwon evepyiaac, eivai
anapaittova xnpoionoieite anokleiotika oekun twv onoiw
o natoC va eivai npuckai evtalewc erineboc.H diaeptoc
tou natou tou okouc npentla v eivai toulaxiotov ion me
Tepiypamata nou eivai oxediogeva oTo nlatw. Av o natoC tou
okouc dev kaluntte tn thepaivovyn cwn, exoume anwela
evepyiaac. Oa hav kalutepo va eivai eaappoc meyalauteposc.
O natoC twv okeuw kai oI eTIEc maeyipaeMaTO npTeI va eivai KaBapec kai otEyveC. H mI npnon autwTwv ouuouawmuopei va enupepl anwlae aepoTNTac kai enoEvoc evpyeiaac.
ZHMEIΩ∑H
resistance sole 1,65 kW
resistance plafond 1,15 kW
resistance circulaire four 2,50 kW
grilloir 2,40 kW
ventilateur 25 W
eclairageelectricudour 40W
PLAQUES ÉLECTRIQUES
0 145
1,0 kW - Plaque Normale
1,2 kW - Plaque Normale
0 180
1,5 kW - Plaque Normale
1,7 kW - Plaque Normale
1,8 kW - Plaque High-Light
0 210-144
2,2 -1,0 kW - Plaque High-Light
FR
Installation
EQUIPMENT
RECOMMANDATIONS IMPORTANTES:
FUNCTIONNEMENT MANUEL
ANNULATION D'UN PROGRAMME
Characteristicas techniques
145 1,0 kW - Placa Normal
1.2 kW - Placa Normal
1,5 kW - Placa Normal
1.7 kW - Placa Normal
1,8 kW - Placa Hight Light
2,2-1,0kW-PlacaHight Light
ES
Instalación
EQUIPAMENTO
m = 311
1
21
0-1
:
=3AEKTPOKOHOPOKA 210-144
= 801d 210-144
= PLAQUE 0 210-14
=PLACA
4
44
m = 311
m = 311
(1)
m = 311
SCHEMA DI COLLEGAMENTO CONNECTION DIAGRAM

CXEMAIIOKJIIOUeyHnK3JEKTPOCETH
HAEKTPIKO DIAPAMMA
SCHEMA DES BRANCHEMENTS
CUADRO DE CONEXIONES
230V BIFASE/TWO-PHASE/DBYXΦA3HUII/△ΦA2IKOBIPHASE/BIFASICO


3.5kW 3x2.5mm
2.2-3.5kW 3x1,5mm
0-2.2 kW
3x1 mm²
Sez. cavo
Wire gauge
CueHHe KaBn
AIT. Kaawoiou:
Section cable
Section cable

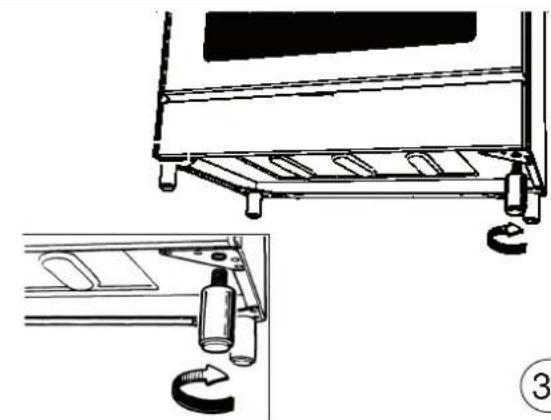

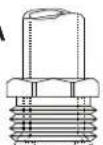
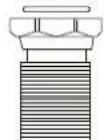


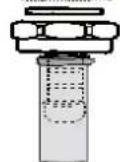

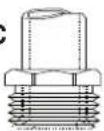
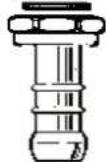

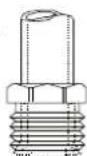
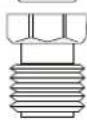


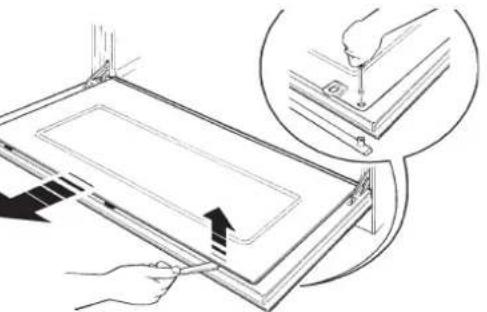

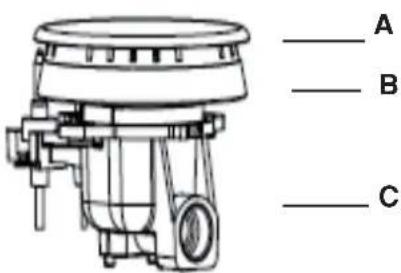

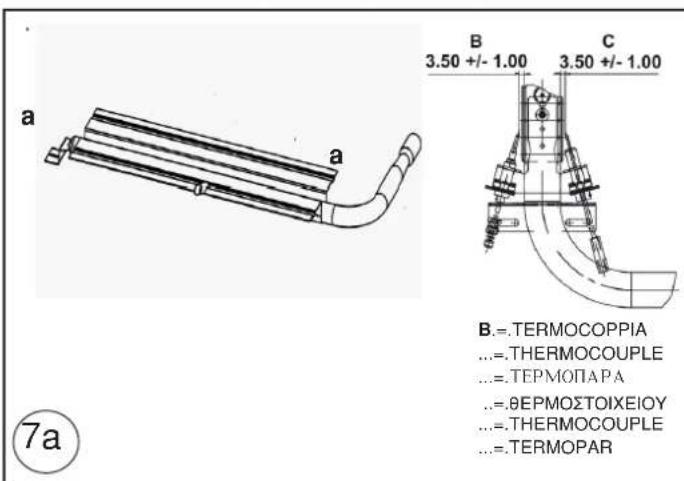
Figure / Figures / PnCyHKn/.Eikovεç/Figures / Figuras
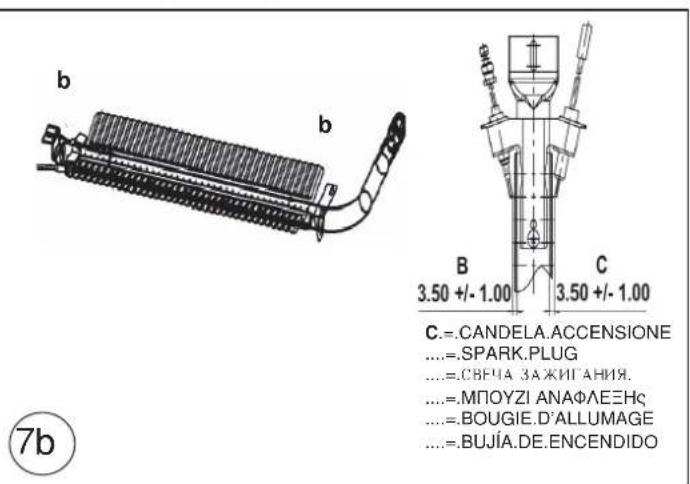
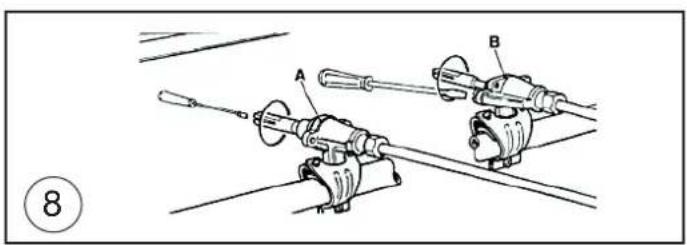
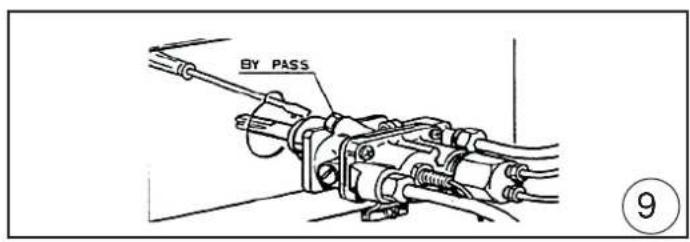
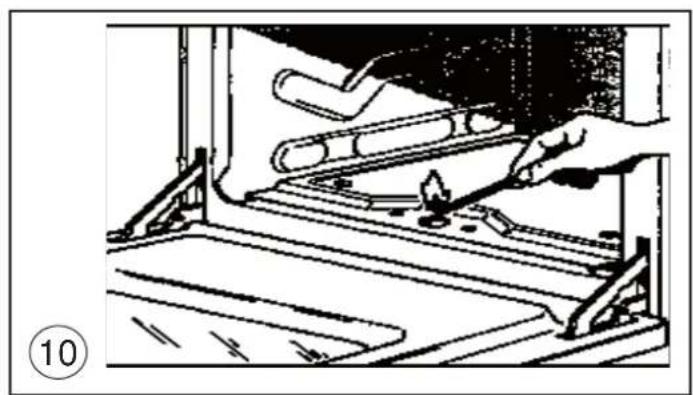
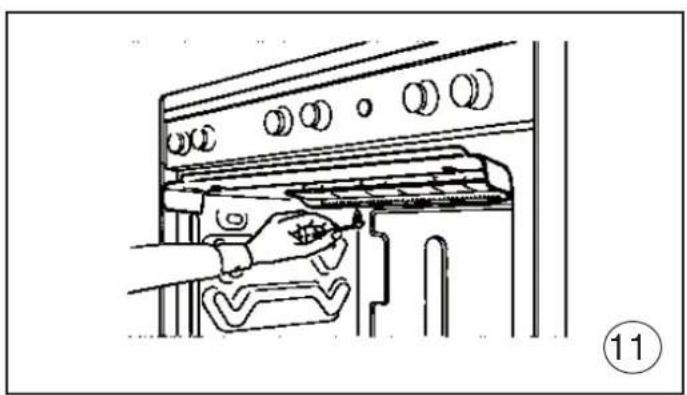
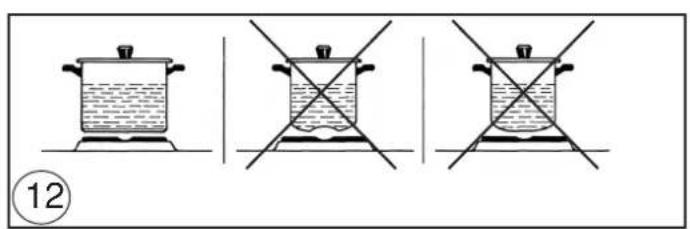
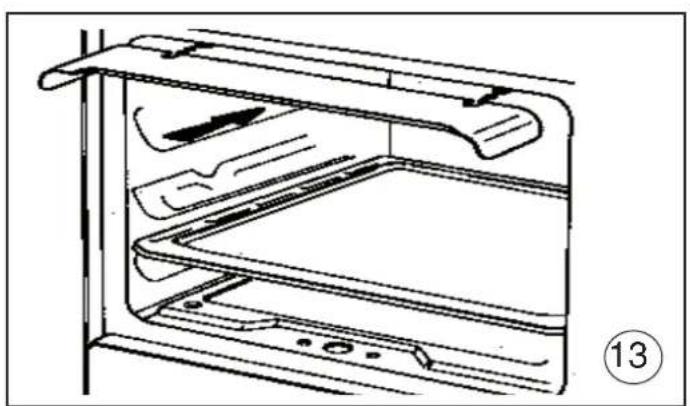
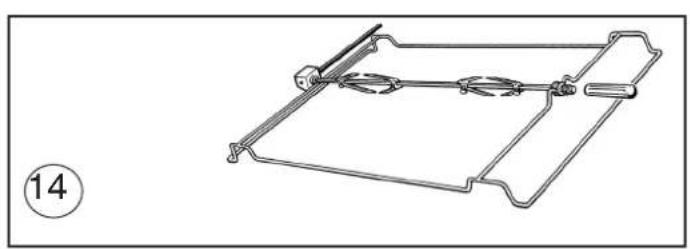
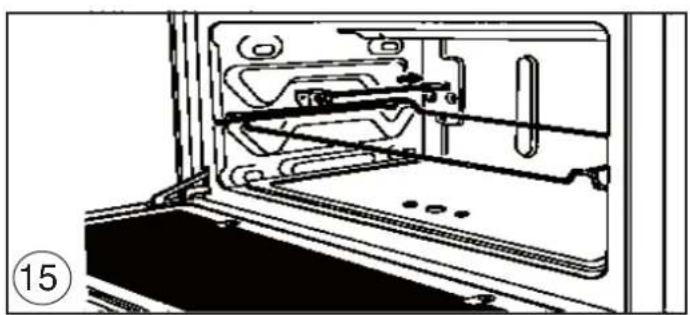
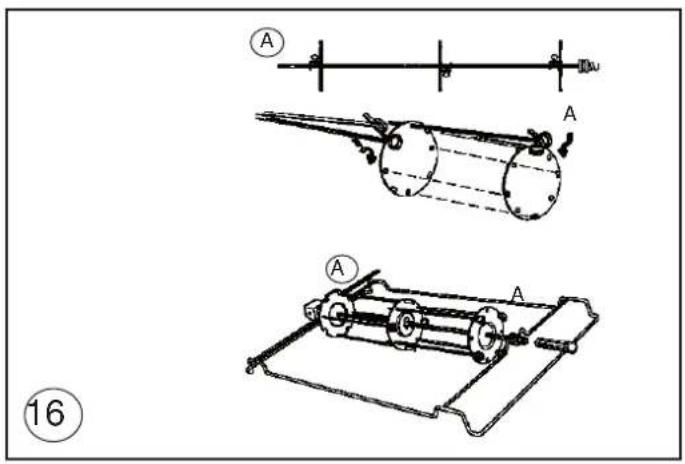
Figure / Figures / PincyHKI/.Eikovεç/Figures / Figuras