LE 2055 wes - Blender Exquisit - Free user manual and instructions
Find the device manual for free LE 2055 wes Exquisit in PDF.
| Product type | Dehumidifier |
| Brand | Exquisit |
| Model | LE 2055 wes |
| Power supply | 220-240 V ~ 50 Hz |
| Rated power | 365 W (27 °C / 60 % RH) |
| Maximum power | 420 W (32 °C / 90 % RH) |
| Rated current | 2.10 A |
| Refrigerant | R134a / 90 g |
| Dehumidification capacity | 20 L/day (30 °C / 80 % RH); 10 L/day (27 °C / 60 % RH) |
| Condensate tank capacity | 5.5 L |
| Air flow | 195 m³/h |
| Weight | 14.5 kg |
| Operating temperature | 5 to 35 °C |
| Protection class | I |
| Operating modes | Normal, laundry drying, air circulation |
| Special features | Automatic defrost, timer (24 h), child lock, adjustable louver (5 positions), continuous drainage |
| LED panel | Humidity indicator: blue (<50 %), green (50-70 %), red (>70 %) |
| Fan speed | Low and high |
| Cleaning and maintenance | Clean the filter every 2 weeks; wipe the exterior with a soft cloth |
| Safety | Overheat protection, automatic shut-off when tank is full |
Frequently Asked Questions - LE 2055 wes Exquisit
User questions about LE 2055 wes Exquisit
0 question about this device. Answer the ones you know or ask your own.
Ask a new question about this device
Download the instructions for your Blender in PDF format for free! Find your manual LE 2055 wes - Exquisit and take your electronic device back in hand. On this page are published all the documents necessary for the use of your device. LE 2055 wes by Exquisit.
USER MANUAL LE 2055 wes Exquisit
natural_image
Exquisit air purifier device with digital display and green indicator lights (no visible text or symbols on device body)16 Operating modes 34
16.1 Normal operation 34
16.2 Drying laundry.... 35
16.3 Air circulation 35
16.4 Using the hose connection.... 36
17 Cleaning 37
17.1 Cleaning the dehumidifier 37
17.2 Cleaning the filter 37
17.3 Emptying the water tank.... 37
18 Technical Information 38
19 Disposal 39
20 Warranty Conditions 39
21 Description de làppareil.... 43
22 Leurs Sécurite 46
natural_image
Technical line drawing of a battery housing and its internal component (no text or symbols)aa: Wassertankgriff
QR codes (Quick Response codes) are graphic codes, which are read by means of a Smartphone camera and lead quickly and easily to further information (e.g. seeinternet site, product video or contact information).
And this is how it works
To scan the QR codes all you need is a Smartphone, a QR code reader app (available free of charge in the App Store) and an internet connection. *
When reading QR codes additional costs may be incurred for the internet connection depending on the rate you pay.
Thank you for purchasing our appliance.
You have made a good choice. Your Exquisit appliance was built for use in a private household and is a quality product that combines the highest technical requirements with practical ease of operation like other Exquisit appliances as well that function all over Europe to the complete satisfaction of their owners.
Please read this user manual carefully before you start up your appliance for the first time. It contains important safety instructions and information concerning the installation, operation and maintenance of the appliance. Correct handling will contribute to efficient use and will minimize energy consumption during operation.
Improper use could lead to dangerous situations, particularly for children. Keep this user manual for later use. Pass it on to any future owner of this product. In case of doubt concerning questions or topics, which are not dealt with in detail in this manual, please contact your dealer or an authorized technician or go to our homepage: www.ggv-service.de
The manufacturer is constantly working to further develop all types and models. We reserve the right to make changes to the design, features and equipment of all types and models without previous notice.
Purpose of use
The dehumidifier is designed exclusively for dehumidifying air in enclosed areas. It is intended exclusively for private use and is not suitable for the industrial sector.
Use the dehumidifier only as described in this user manual.
Any other use will be deemed to be out of compliance with the regulations and can lead to material damage or even to personal injury.
The manufacturer or dealer assumes no liability for damage that was caused by improper or incorrect use.
Scope of delivery / components
11 Scope of delivery / components

text_image
1 2 7 8 4 9 3
text_image
A 25
text_image
1 2 6 3 4 5
Scope of delivery / components
text_image
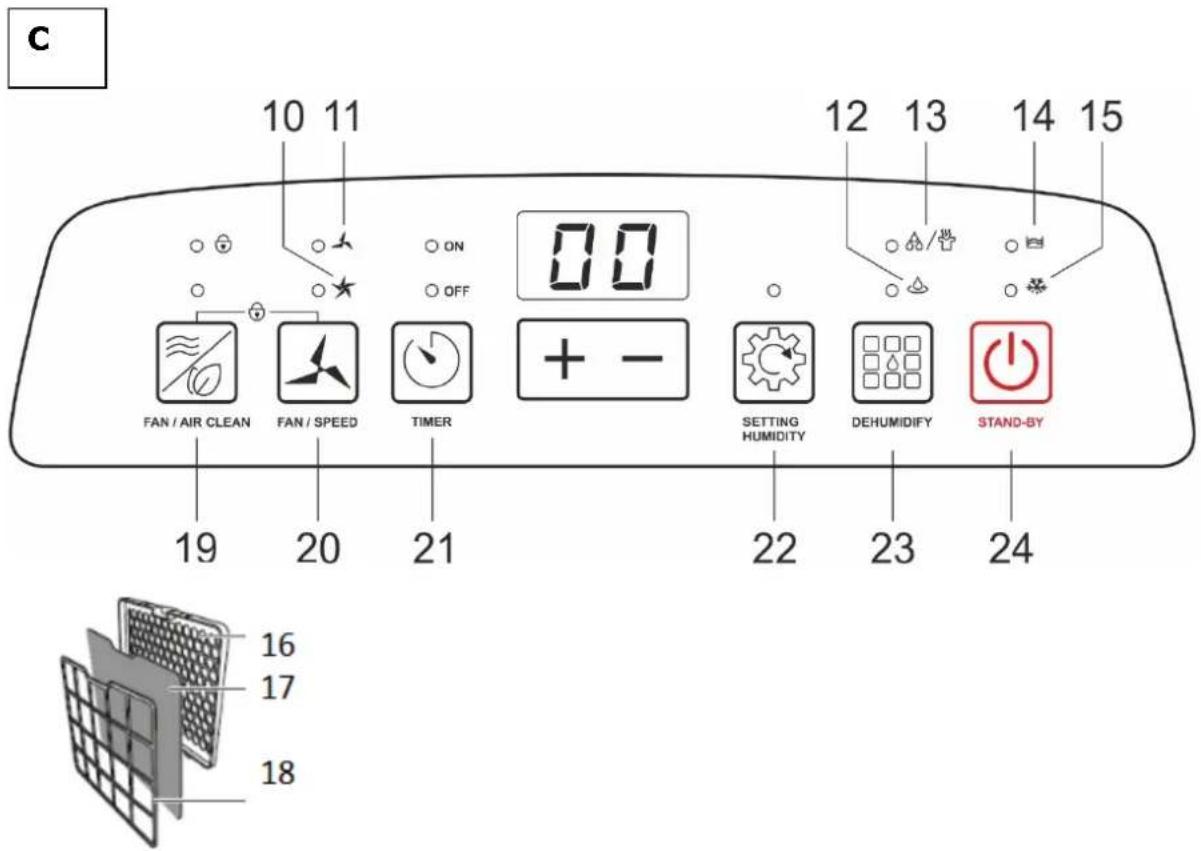
c 10 11 12 13 14 15 ON OFF 00 FAN / AIR CLEAN FAN / SPEED TIMER + - SETTING HUMIDITY DEHUMIDIFY STAND-BY 19 20 21 22 23 24 16 17 181 Exhaust flap
2 Recessed grip (for transportation)
3 Condensed water tank
4 Lateral recessed grip
5 Transport castors (4x)
6 LED panel
7 Air filter
8 Hose connection
9 Fill level indicator
10 Control light (high fan stage)
11 Control light (low fan stage)
12 Automatic dehumidification
13 Operating mode control light (air circulation / laundry draining)
14 Control light (emptying the condensed water tank)
15 Control light (de-icing function)
16 Filter housing
17 Foam material
18 Filter holder
| 19 |  | Ventilator / air purifier | |
| 20 |  | Ventilator speed | |
19 +20  | Child safety locking function:Press both the Ventilator and Ventilator Speed buttons for 5 secondsThe child safety feature is activatedTo deactivate the child safety feature: press on both the Ventilator and Ventilator Speed buttons againThe child safety feature is de-activated | ||
| 21 |  | Setting the operating period of the timerSetting the timerPress on the Timer buttonThe LED above the timer comes on | |
| 22 |  | Hours / minimum operating period of up to 24 hours | |
| 23 |  | Humidifier settings and operating modes | |
| 24 |  | Dehumidification | |
| 25 |  | On/Off button | |
12 Safety directions
Explanation of the safety directions
DANGER
Refers to a dangerous situation that result in death or serious injury!
WARNING
Refers to a dangerous situation that could result in death or serious injury
CAUTION
Describes a situation that can cause substantial damage to property or the environment.
Safety of children and people with limited capacities
WARNING
Danger of electrocution!
Incorrect electrical installation or excessively high mains voltage can lead to electric shock!
Connect the dehumidifier only to a properly
installed earthed outlet
- This appliance can be used by children of 8 years old or above and by people with reduced physical, sensory or mental capabilities or a lack of experience and/or knowledge if they are supervised or instructed in the safe use of the appliance and understand the hazards involved. Children must not play with the appliance. Cleaning and user maintenance should not be performed by children without supervision.
- Children may only use microwave appliances if they have been trained to do so. Children must be able to operate the appliance correctly and must understand the risks, to which reference is made in the user manual.
- Children must be supervised while they are using the appliance so that they don't play with it.
Safety directions
- WARNING For anyone other than a person who is trained for that purpose, it is very dangerous to conduct any maintenance or repair work, which requires the removal of a cover that provides protection against exposure to radiation from microwave energy.
- Children younger than 8 years are to be kept away from the equipment and the mains cable.
Connect the dehumidifier only if the mains voltage of the plug socket is compatible with the specification on the name plate.
- Never operate several devices by means of the same earthed outlet, e.g. using a multiple plug socket.
- Connect the dehumidifier only to an easily accessible outlet so that you can unplug it quickly from the mains in the event of a malfunction.
- If you connect the dehumidifier to the mains by means of an extension cord, the extension cord must be in compliance with the valid safety conditions.
- Do not operate the dehumidifier if it exhibits visible damage or the mains cable and/or the mains plug is defective.
- If the mains cable of the dehumidifier is damaged, it must be replaced by the manufacturer or its customer service representative or a similarly qualified person in order to avoid risks.
- Do not open the housing but leave repairs to professional experts. Consult a specialist workshop for this.
In the event of independently performed repairs, an inappropriate connection or improper operation, liability and warranty claims are excluded.
WARNING
Danger of poisoning and explosion!
This dehumidifier contains the refrigerant R134a. This is a fluoridated greenhouse gas with a relative global warming potential (GWP) of 1,430, which was recorded by the Kyoto protocol. This greenhouse gas can be dangerous for the environment and contribute to global warming if it gets into the atmosphere. If the dehumidifier is handled improperly, there is a danger of poisoning and explosion.
- Do not operate the dehumidifier in a potentially explosive environment.
- Do not operate the dehumidifier under any circumstances in an environment containing sulphur, chlorine, salt or oil and do not store it in such an environment.
- Follow the Instructions for Disposal in Chapter 9
CAUTION
Danger of injury!
If the dehumidifier is handled improperly, there is a danger of injury.
- Make sure that no loose items, such as curtains and blinds, long hair, ties or other objects, are introduced into the ventilation openings.
• These could be sucked in by the air flow.
- Allow the dehumidifier to cool down completely before you clean it or stow it away.
ATTENTION
Danger of damage!
Improper handling of the dehumidifier can lead to damage to the appliance.
2.2 Safety and Warning
- Operate the humidifier only at
- an ambient temperature of 5 -35 °C.
- Set up the dehumidifier in an easily accessible place, on an even, dry and sufficiently stable surface.
- Do not place the dehumidifier on the rim or on the edge of a surface.
- Close the exhaust flap completely when you are operating the dehumidifier.
Never cover the ventilation openings on the top and the back of the dehumidifier.
- Clean the ventilation openings regularly, in order to avoid their becoming clogged.
- Do not place any objects on the device.
- When setting up the dehumidifier keep a minimum distance of 30 cm between the dehumidifier and walls or objects above it or beside it.
- Never set up the dehumidifier on or in the vicinity of hot surfaces (e.g. hotplates etc.).
- Do not bring the mains cable into contact with hot parts.
- Never expose the dehumidifier to high temperatures (a heater, etc.) or to adverse weather conditions (rain etc.). Never pour liquid into the dehumidifier.
- Never immerse the dehumidifier in water to clean it and don't use a steam cleaner.
- Do not use the dehumidifier any longer if its plastic components have tears or cracks or have been deformed.
- Replace damaged structural units only by suitable, original spare parts.
- Always transport, operate and store the dehumidifier in an upright position.
13 Unpacking the appliance
ATTENTION
Danger of damage!
If you open the package carelessly with a sharp knife or other pointed objects the dehumidifier will soon be damaged.
Proceed very carefully when opening the packaging.
- Take the dehumidifier out of the package.
- Check whether the scope of delivery is complete (see figs. A and B).
- Check whether the dehumidifier or the individual parts show signs of damage.
If this is the case do not use the dehumidifier. Go to the customer service homepage www.ggv-service.de
14 Before using the dehumidifier for the first time
The manufacturer recommends that the dehumidifier be operated for approx. one hour with an open window before it is used for the first time in order to eliminate any possible manufacturing residue.
Any odour that may arise during this time is normal and will disappear after a short time. It is not an indication of a malfunction. Ensure that there is sufficient ventilation.
Thorough cleaning
- Before using the dehumidifier for the first time, clean it and all the individual parts as described in the Cleaning section in order to remove any remaining packing dust (see figs. A and B).
15 Operating functions
This dehumidifier works according to the condensation mode. The ambient air drawn in by the fan inside the dehumidifier flows over a refrigeration unit, whereby the humidity in the air condenses and drips into the condensation water tank (3) [see fig. B]. Then the cooled air is slightly warmed up and transferred to the space.
15.1 De-icing function
The dehumidifier has an automatic de-icing function, which is activated if the compressor or the cooling unit freezes over.
Follow the instructions below concerning the de-icing function:
- You cannot switch the de-icing function on or off manually. It is only activated and terminated automatically.
- If a period of time that was set by the timer function runs out during the de-icing process, the dehumidifier will carry out the de-icing process in its entirety first before switching itself off.
- During the de-icing process control light 22 comes on (see fig. B).
Operating functions
- Do not switch the dehumidifier off during the de-icing process and do not disconnect it from the mains.
- During the de-icing process the dehumidifier will stop the dehumidifying function but the fan will remain in operation.
- The lower the ambient temperature, at which you operate the dehumidifier is, the more likely and/or frequently the de-icing function will be activated.
- Once the de-icing process is completed the dehumidifier will continue to function in the previously selected operating mode. Please note that the dehumidifying process will run again with a delay of approx. 3 minutes only to prevent overheating of the dehumidifier or of the compressor.
15.2 Aligning the exhaust flap
- Do not completely close the exhaust flap at the air discharge opening under any circumstances while you are operating the dehumidifier.
- You can align the exhaust flap (1) at the air discharge opening in 5 stages (small opening to maximum opening) in order to guide the air that is being discharged in a certain direction, e.g. towards laundry that is being dried (see figs. A and C).
ATTENTION
Danger of damage!
If the dehumidifier is handled improperly, you can damage it.
15.3 Using the timer function
The dehumidifier possesses a timer function, with which you can pre-set the desired running time (in hours). Upon expiration of the operating time the dehumidifier will switch itself off automatically.
- Press key 21 (see fig. C) The running time that was set most recently will blink in the display.
- While the display is blinking, you can set the running time as described in step 2.
- If you make no adjustment,
- the display will change back to the current air humidity.
- Press the key + or - once or several times, in order to set the running time (in hours).
- For a few seconds the adjusted running time will blink in the display.
- Subsequently, the display will change back again to showing the current air humidity.
- The control light above the Timer button 21 (on) is lit up constantly while the timer function is active.
- Press button 21 in order to have the remaining running time of the timer function displayed.
- The remaining running time will blink in the display. After a few seconds the display will change back again to show the current air humidity.
- Press button 21 a second time while the remaining running time is blinking in the display in order to switch the timer function off before the set time period has expired.
Operating modes
15.4 LED panel
Slight deviations (approx. 3 %) in the indicated values are possible. That means that the LED panel will already change colour if the air humidity is 3% lower or higher than indicated. In this way a permanent change of the lighting colour ought to be avoided. LED panel 5 at the front of the dehumidifier shows the degree of the air humidity in the environment of the dehumidifier (see fig. A):
The LED panel lights up:
- in blue if the relative air humidity is slight in the environment (under 50%)
- in green if the relative air humidity in the environment is in the medium range (approx. 50–70 %).
- in red if the relative air humidity is high in the environment (above 70%).
16 Operating modes
If there is a change in the operating mode or interruptions in operation, the exhaust stage is implemented/activated immediately during the dehumidifying process and will possibly only run again with a delay of approx. 3 minutes to prevent overheating of the dehumidifier or of the compressor.
A tolerance of approx. 3% must be factored into the air humidity values indicated. That means that D. h. the dehumidifying function switches off if the air humidity is approx. 3% under the set value and switches on again if the air humidity is approx. 3% above the set value.
16.1 Normal operation
With the normal operating mode you can determine settings yourself such as the degree of air humidity that should be reached in the space and the exhaust stage.
If the air humidity in the space exceeds the set value the dehumidifier will begin the dehumidifying function. As soon as the set air humidity is reached, the dehumidifying function is switched off while the exhaust will still run for approx. 3 minutes to prevent overheating of the dehumidifier or of the compressor and then switches off as well. The control light above button 19 indicates that the desired air humidity was reached (see fig. C)
As soon as the air humidity in the space rises above the set value, the dehumidifying function is re-activated and the exhaust runs in the set exhaust stage.
Operating modes
Setting options:
-
- 30% to 80% air humidity (in five-per cent increments)
- CO (desired air humidity of under 30% during continuous air dehumidification)
-
- low exhaust stage
-
- high exhaust stage
Proceed as follows when setting the normal operating mode:
- Press button 22, until the control light above button 22 blinks for normal operation.
- The control light blinks for a few seconds. As soon as the control light is constantly on, the dehumidifier works in the normal operating mode.
- Press the + button in order to increase the desired air humidity or press the - button in order to reduce the desired air humidity.
- The selected air humidity blinks for a few seconds.
- Subsequently, the display on the screen changes to the current air humidity.
- Press button 20 in order to select the desired exhaust stage.
- Control light 10 or 22 will indicate which exhaust stage you have set.
- Press button 23 in order to select another operating mode and to terminate the normal operating mode.
16.2 Drying laundry
In the laundry drying operating mode the degree of air humidity (CO) and the high exhaust stage are pre-set and cannot be changed. You can select this operating mode for example to guide the air flow with dehumidified air via the exhaust flap (1) to laundry which is to be dried.
- Press button 23, until the control light (13) for drying laundry blinks (see fig. C). The control light will blink for a few seconds.
- As soon as the control light is constantly on, the dehumidifier works in the laundry drying mode.
- Control light 10 indicates that the high exhaust stage is set.
- The current air humidity is indicated in the display.
- Press button 23 in order to select another operating mode and to terminate the laundry drying operating mode.
16.3 Air circulation
In the air circulation operating mode only the selected exhaust stage is active whereas the dehumidifying function is deactivated. For example, you can select this operating mode in order to let the room air circulate, without dehumidifying it.
- Press button 19 until the control light above button 19 blinks for air circulation (see fig. C). The control light will blink for a few seconds.
Operating modes
- As soon as the control light is constantly on, the dehumidifier will work in the air circulation mode. The current air humidity is indicated in the display.
- Press button 20 in order to select the desired exhaust stage.
- Control light 11 or 20 will indicate which exhaust stage you have set.
- Press button 23 in order to select another operating mode and to terminate the air circulation operating mode
16.4 Using the hose connection
ATTENTION
Property damage due to erroneous operation!
Improper cleaning of the dehumidifier can lead to damage.
- Please note that the drain hose attached to the dehumidifier may not run above the position of the hose connector on the dehumidifier. Otherwise condensation can flow back into the dehumidifier and damage it.
Remove the condensation container from the dehumidifier as described in the section on Emptying the condensation container
1 Stick the drain hose on the
ATTENTION
If you handle the dehumidifier improperly, you can damage it.
- Switch off the dehumidifier and unplug it from the mains before you attach a drain hose to it or remove one from it.
- You can attach the enclosed drain hose (29) to the hose connector (27) of the dehumidifier and thus drain the condensation from the dehumidified air (see fig. C). In this way there is no need to empty the condensation container (3) and you can operate the dehumidifier continuously. hose connection.
2 Guide the free end of the drain hose into a suitable drain ir a suitable container, into which the condensed water is supposed to drain.
3 Push the condensed water container fully back into the dehumidifier.
Cleaning
17 Cleaning
- Do not use any harsh cleaning agents, brushes with metal or nylon bristles or any sharp or metallic cleaning tools such as knives, a hard scraper or the like.
- These can damage the surfaces.
- Clean the ventilation openings and the filter regularly
- (approx. every 2 weeks), in order to avoid a deterioration in the performance of the dehumidifier.
17.1 Cleaning the dehumidifier
- Wipe the dehumidifier off from the outside with a dry or slightly dampened, well wrung out cloth.
- Then rub the dehumidifier completely dry.
- Clean the ventilation openings.
- Remove dust and contamination from the ventilation openings with the use of a suitable soft brush.
17.2 Cleaning the filter
- Remove the filter mounting plate 7/18 from the dehumidifier by - carefully loosening it from the locking mechanism and then pulling it out downwards (see fig. C).
- Remove the filter grate 34 and the foam material filter 17 out of the filter mounting plate (see fig. C).
- Clean the filter grate, the foam material filter and the filter mounting plate with a suitable brush or a suitable vacuum cleaner.
- Insert the foam material filter and the filter grate back into the filter mounting plate.
17.3 Emptying the water tank

natural_image
Technical line drawing of a mechanical component with a labeled part 'aa' (no text or symbols beyond label)aa: Water tank handle
- Remove the water tank from the dehumidifier.
- Hold the water tank by the handle (aa) and carefully take it out.
• Empty the water tank. - Insert the empty water tank back into the dehumidifier.
Please note
If the water tank is full, a signal sounds for 20 seconds.
18 Technical Information
| Elektrical connection (voltage - frequency) 220-240 V~50 Hz |
| Power 2000-2200 W |
| Model LE 2055 wes |
| Nominal power: 365 W (27 °C/RH 60%) |
| Nominal current: 2,10 A (27 °C/RH 60%) |
| Maximum power: 420 W (32 °C/RH 90%) |
| Maximum current: 2.12 A (32 °C/RH 90%) |
| Protection class: I |
| Operating temperature: approx. 5-35 °C |
| Refrigerant/amount: R134a/90 g |
| Weight: 14.5 kg |
| Dehumidifying capacity: approx. 20 l/day (30 °C/RH 80%) approx. 10 l/day (27 °C/RH 60%) |
| Condensation container capacity: approx. 5.5 l |
| Air flow volume: 195 m3/h |
| Suction pressure: 1.0 MPa |
CE-Marking
At the time of launch of the product meets the requirements that were laid down in the directive for harmonizing the laws of the Member States relating to electromagnetic compatibility 2014/30 / EU of electrical equipment within certain voltage limits (2014/35 / EU). This product is identified with the CE mark and is supplied with a declaration of conformity for inspection by the market surveillance authority. * Subject to change *
19 Disposal

This product is marked according to the European Waste Framework Directive 2012/19 / EU. The Directive regulates the proper disposal of the product. The environmentally friendly disposal will prevent possible negative health consequences caused by incorrect disposal. The symbol on the product or its packaging indicates that this product may not be disposed of with normal household waste. The user must return the product to / at a collection point for the recycling of electrical and electronic equipment.
The disposal must comply with the current local regulations. For more information contact
20 Warranty Conditions
Warranty conditions
As the purchaser of a Gutfels appliance you are entitled to the legal guarantees from the sales contract with your dealer. In addition, we grant a warranty to you under the following conditions:
Period of indemnification
The warranty shall run for 24 months starting from the purchase date (proof of purchase must be submitted). During the first 6 months defects in the appliance will be eliminated free of charge, provided that the appliance is accessible for repairs without any particular effort. In the further 18 months the buyer undertakes to prove that the defect already existed at the time of delivery of the appliance.
In the case of commercial use (e.g. in hotels or cafeterias), or in the event of community use by several households, the warranty amounts to 12 months starting from the date of purchase (proof of purchase must be submitted). During the first 6 months defects in the appliance will be eliminated free of charge, provided that the appliance is accessible for repairs without any particular effort. In the further 6 months the buyer undertakes to prove that the defect already existed at the time of delivery of the appliance.
If a claim is made on the warranty, the warranty shall not be extended either for the appliance or for the newly incorporated parts.
Warranty Conditions
Scope of the Defect Removal
Within the periods mentioned we will eliminate all defects from the appliance, which are to be demonstrably attributed to unsatisfactory execution or material defects. Replaced parts are transferred to our ownership.
The following are excluded:
Normal wear, deliberate or negligent damage, damage that is caused by non-compliance with the operating instruction, inappropriate setup or installation or due to connection to the wrong mains voltage, damage due to a chemical or an electro-thermal effect or due to other abnormal environmental conditions, glass, lacquer or enamel damage and possibly differences in colour as well as defective bulbs. Likewise, appliance defects are excluded if they are to be attributed to transport damage.
Also, we don't provide any services if work is undertaken on appliances by unauthorized persons at Exquisit or if parts of foreign origin are used without our specific written permission. This restriction does not apply to defect-free work performed by a qualified specialist with our original parts to adjust the appliance to comply with the technical protection regulations of another European Union country.
Area of applicability
Our warranty applies to appliances that were purchased in a country of the European Union and that are in operation in the Federal Republic of Germany or Austria.
For appliances that were purchased in a country of the European Union and brought into another European Union country, services are provided under the customary warranty conditions of the particular country. An obligation to perform under the terms of the warranty only exists if the appliance is in compliance with the technical regulations of the country, in which the warranty claim is enforced.
For repair orders outside of the warranty period, the following shall apply: If an appliance is repaired, the repair invoices are to be paid immediately without any deduction.
If an appliance is examined and/or a repair that has been started has not been completed, lump sums will be calculated for travel expenses and work. Consultation with our customer advisory service centre shall be free of charge.
natural_image
Technical line drawing of a mechanical component with two views: top shows internal structure, bottom shows exploded view (no text or symbols)natural_image
Technical line drawing of a device with two views: top shows internal components, bottom shows external wiring (no text or symbols)aa: Handvat waterreservoir
GGV HANDELGES. MBH & CO. KG
AUGUST-THYSSEN-STR.8
D-41564 KAARST
GERMANY
LE2055wes
5010065_IM_Multil_V1.1_2018_02_27.
docx