MU 3001 we - Blender Exquisit - Free user manual and instructions
Find the device manual for free MU 3001 we Exquisit in PDF.
| Brand | Exquisit |
| Model | MU 3001 we (KM 3001 we) |
| Product type | Blender |
| Power supply | 220-240 V, 50-60 Hz |
| Power | 500 W |
| Bowl capacity | 3.8 L |
| Speed levels | 2 speeds (1, 2) + pulse (P) + stop (0) |
| Pulse function | Yes, for short operation at full power |
| Minimum filling capacity | 250 ml |
| Maximum filling capacity | 1500 ml (MAX mark) |
| Maximum continuous operation time | 60 seconds |
| Safety | Double lock: bowl and lid must be correctly positioned |
| Blade material | Stainless steel (very sharp blades) |
| Cleaning | Manual cleaning, do not put in dishwasher |
| Included accessories | Graduated cup (30/40/50 ml), safety lid, mixing bowl, blade set, sealing ring |
| EAN code | 4016572021288 |
| Intended use | Domestic use only for blending |
| Non-slip suction cups | Yes, on the drive unit |
| Control type | Rotary knob |
Frequently Asked Questions - MU 3001 we Exquisit
User questions about MU 3001 we Exquisit
0 question about this device. Answer the ones you know or ask your own.
Ask a new question about this device
Download the instructions for your Blender in PDF format for free! Find your manual MU 3001 we - Exquisit and take your electronic device back in hand. On this page are published all the documents necessary for the use of your device. MU 3001 we by Exquisit.
USER MANUAL MU 3001 we Exquisit
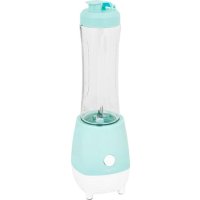
natural_image
White exquisit blender with clear glass and handle, labeled 'exquisit' (no other text or symbols visible)text_image
QR code image containing encoded data, no visible human-readable text21226
14.1 Explanation of the safety instructions 23
14.2 General safety instructions.... 24
15 Usage....25
16 Initial start-up 25
16.1 Check blender and delivery 25
16.1 Check blender and delivery 25
16.2 Basic cleaning.... 25
16.3 Set up blender.... 25
16.4 Compose blender 26
17 Operating instructions.... 27
17.1 Adjust speed 28
17.2 Use blender.... 28
17.3 Ingredients refill 28
17.4 Using pulse function 29
17.5 Crush ice cubes 29
18 Cleaning 29
18.1 Clean drive unit 29
18.2 Clean mixing bowl 30
text_image
Diagram showing a kettle with liquid and a lid, illustrating a rotating process with red arrows indicating rotation direction.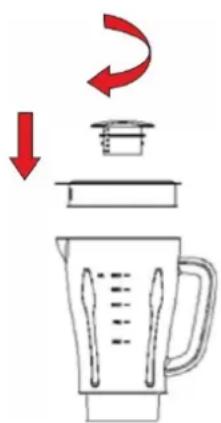
natural_image
Illustration of a blender with a lid and arrow indicating rotation (no text or symbols)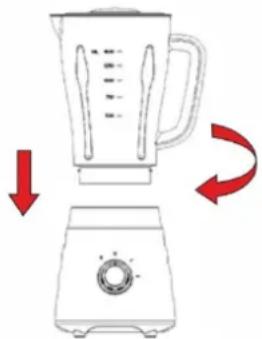
natural_image
Illustration of a blender with a side panel and red directional arrows indicating rotation (no text or symbols)Thank you for purchasing our device.
You have made a good decision. Your exquisite unit has been built for domestic use and is a quality product that meets the highest technical demands with a useful range of operating convenience, like other exquisite units, that are also working to the full satisfaction of their owners throughout Europe.
Read the instruction manual carefully before using the unit. This leaflet contains important safety instructions and information regarding the installation, operation and maintenance of the unit. Proper handling contributes to efficient use and minimize energy consumption during operation.
The incorrect use could lead to dangerous situations, especially for children. Keep this booklet for future reference. Pass the instructions on to any future owner of this product. If there is doubt regarding any questions or issues that are not described in detail in this manual, contact your dealer, an authorized technician or go to our homepage www.ggv-service.de
The manufacturer is always working on the development of all types and models. For all types and models the changes to the design, features and equipment are subject to be changed without notice.
PACKAGE / UNIT PARTS
11 Description of the unit
Delivery accessories
01 Lid insert + measuring cup 50 ml
02 Security cover
03 Jug
04 Blade
05 Seal
06 Knife drive
07 Drive unit
08 Step controller

text_image
1 2 3 4 5 6 7 8Step controller

text_image
P O 1 NEN
Compose the blender
- Unpack the unit and spread all parts on a horizontal surface before the first use.
- The parts (measuring cup, lid, gasket, glass, knife drive) are already installed in the drive unit. Take the various parts apart, wash and dry these.
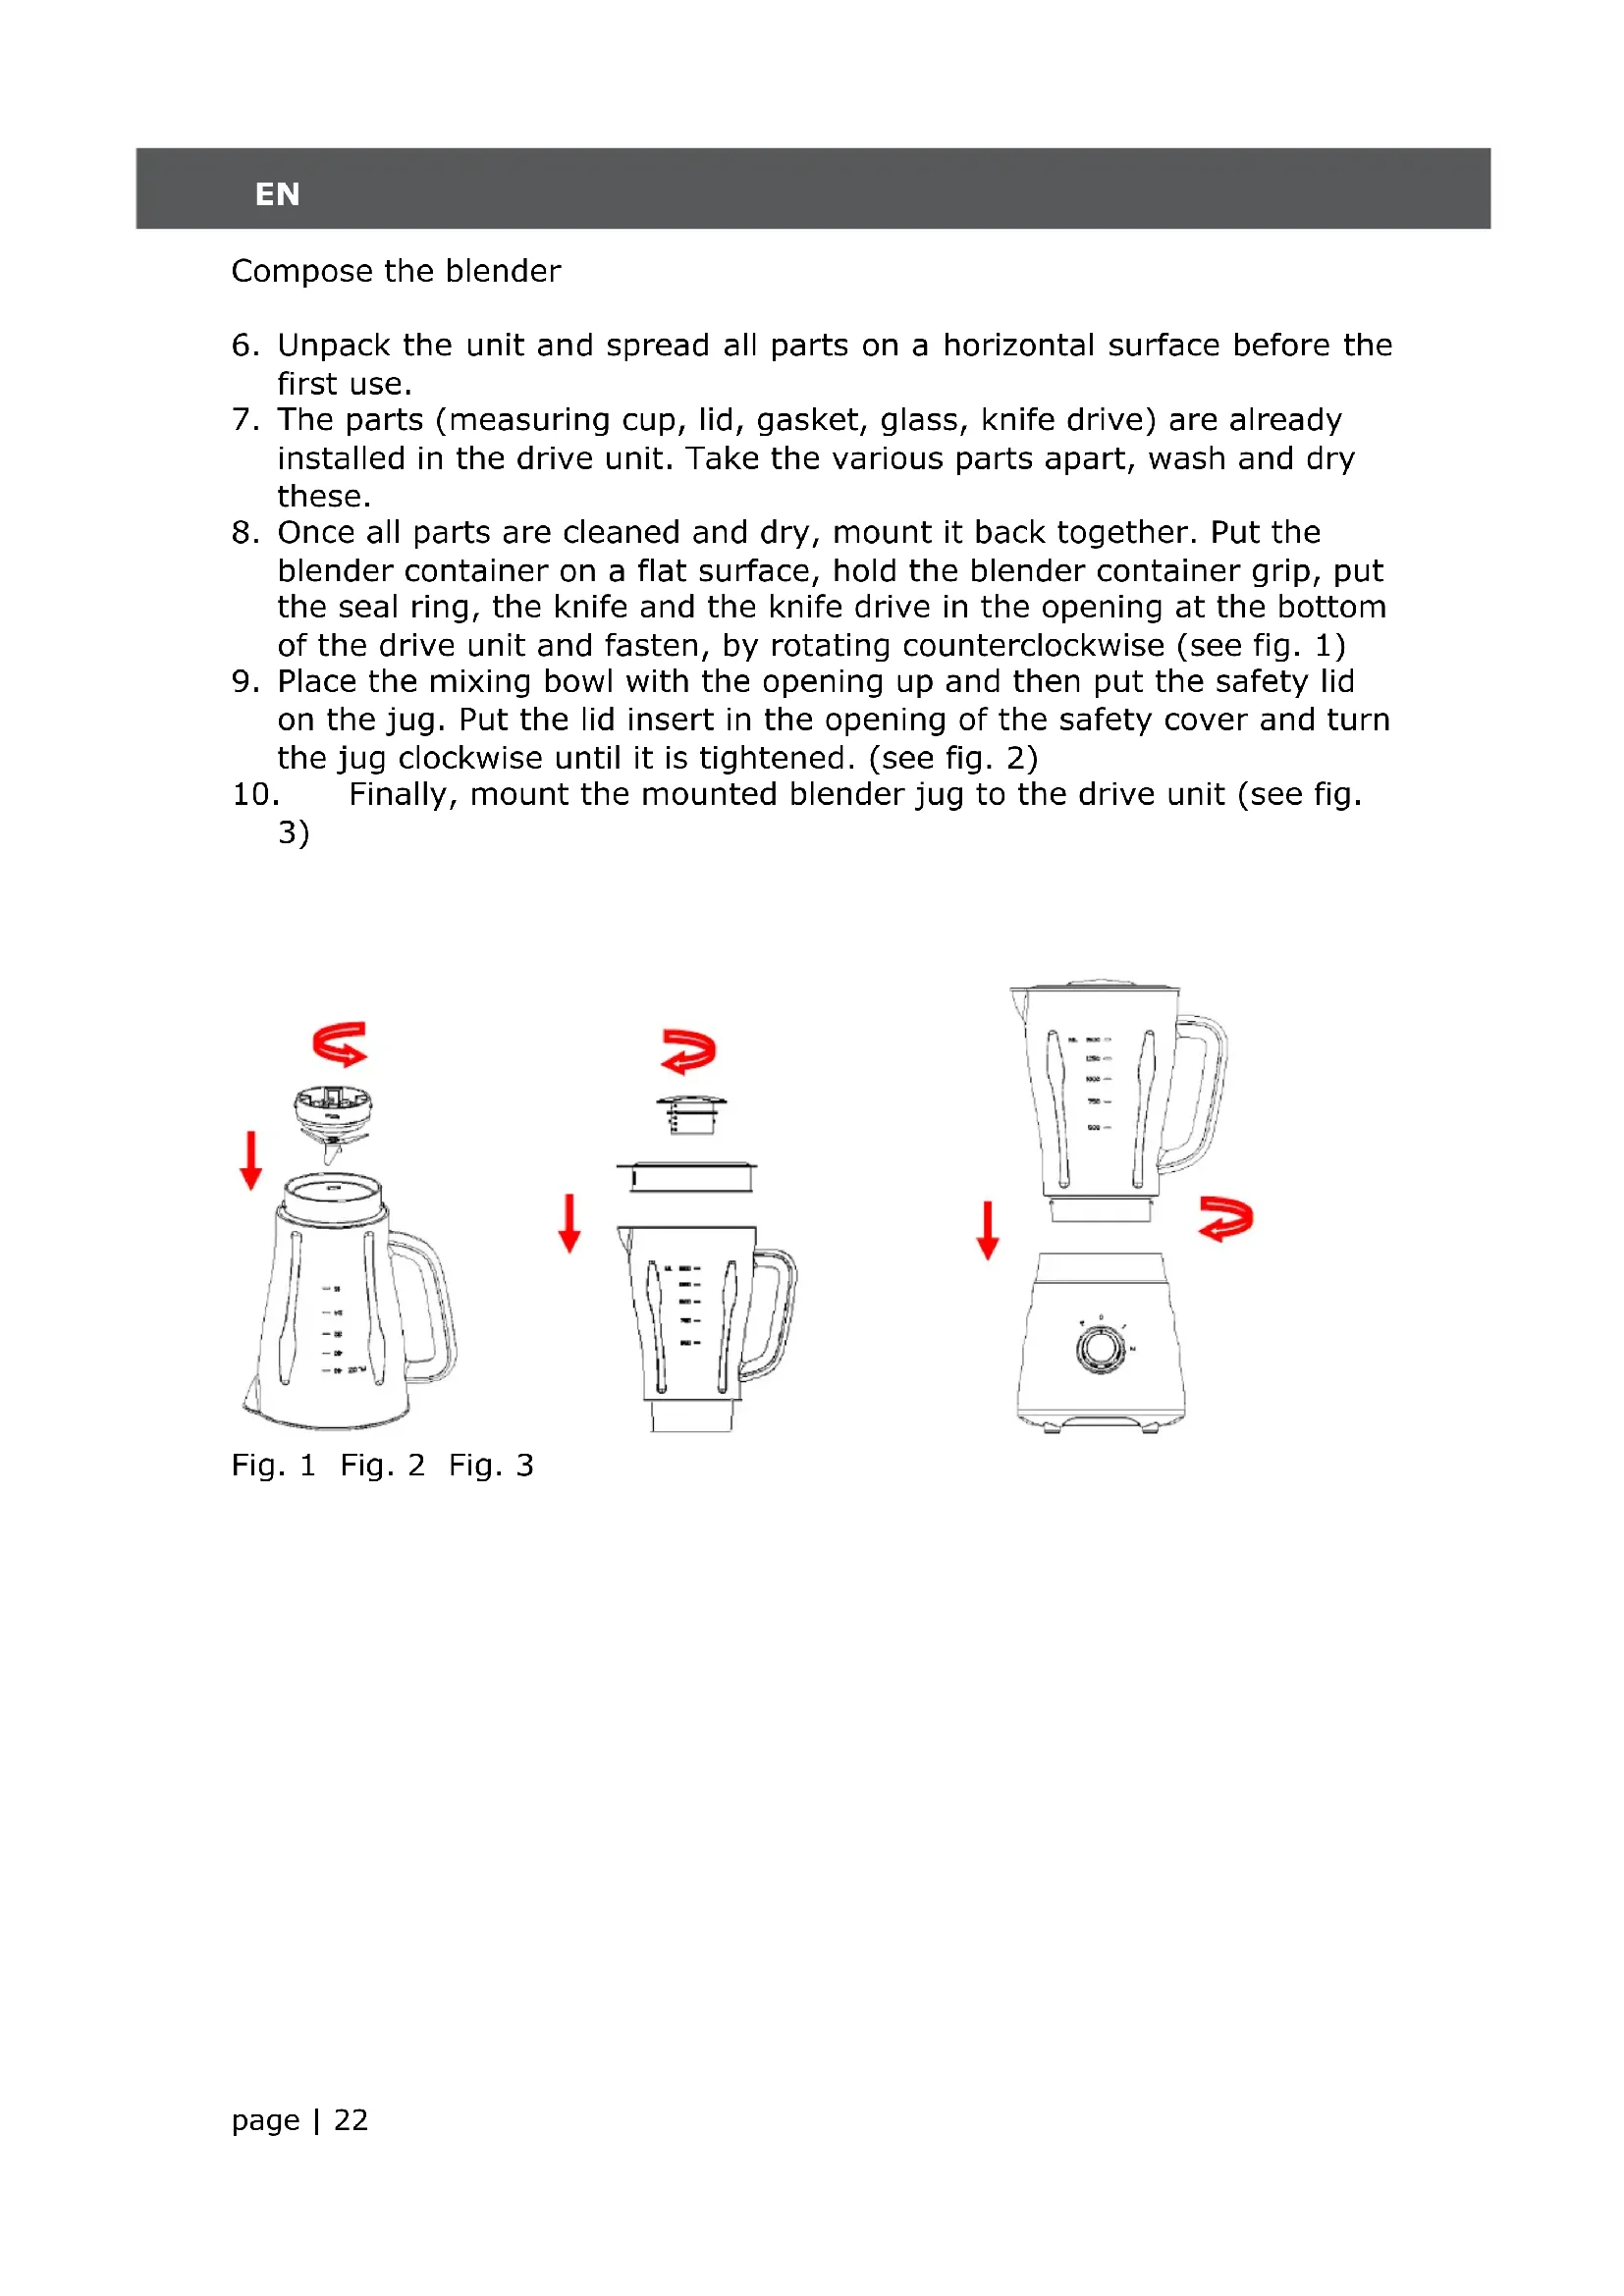
- Once all parts are cleaned and dry, mount it back together. Put the blender container on a flat surface, hold the blender container grip, put the seal ring, the knife and the knife drive in the opening at the bottom of the drive unit and fasten, by rotating counterclockwise (see fig. 1).
- Place the mixing bowl with the opening up and then put the safety lid on the jug. Put the lid insert in the opening of the safety cover and turn the jug clockwise until it is tightened. (see fig. 2)
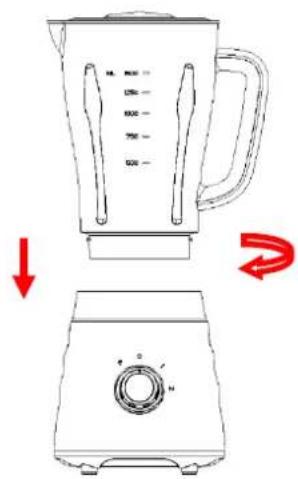
- Finally, mount the mounted blender jug to the drive unit (see fig. 3)

text_image
Diagram showing a blender with a handle and lid, indicating a drop or compression process with red arrows.
text_image
Diagram of a blender with red directional arrows indicating rotation or motion, showing liquid level and lid structure.
text_image
Diagram showing a blender with labeled parts and a side-view view of the front panel with a knob.At the time of launch of the product it meets the requirements that were laid down in the directive for harmonizing the laws of the Member States relating to electromagnetic compatibility 2014/30/EU of electrical equipment within certain voltage limits (2014/35/EU). This product is identified with the CE marking and is supplied with a declaration of conformity for inspection by the market surveillance authority. *subject to change*
13 Disposal of old units

This product is marked according to the European Framework Waste Directive 2012/19/EU. The Directive regulates the proper disposal of the product. The environmentally friendly disposal will prevent possible negative health consequences caused by incorrect disposal. The symbol on the product or its packaging indicates that this product may not be disposed with normal household waste. The user must return the product to/at a collection point for the recycling of electrical and electronic equipment.
The disposal must comply with the current local regulations. For more information contact :
14 Safety instructions
14.1 Explanation of the safety instructions
All safety instructions in this manual are labeled with a warning symbol. They show potential hazards at an early stage. It is essential to read this information and follow it up.
Explanation of safety instructions: The following symbols and warnings are indicated in these instructions, on the blender or on the packaging.

WARNING
Refers to a dangerous situation that could result in death or serious injury!

DANGER
Refers to a dangerous situation that can lead to minor or moderate injury.
IMPORTANT
Describes a situation that can cause substantial damage to property or the environment.
14.2 General safety instructions
- Avoid injuries and damage by transporting the appliance in the packaging.
• Install and connect the appliance only as directed in this manual. - The plug must be accessible after installation. In an emergency, immediately disconnect the device.

WARNING
When connecting or removing the plug and the power cable do not touch it with wet hands.

WARNING
After removing the packaging, check all equipment parts and accessories were delivered. If in doubt, do not use it and contact a qualified technician. The packaging materials (plastic bags, polystyrene, metal clips, etc.) must not be left within reach of children as they are potentially dangerous and must be disposed of in accordance with applicable regulations.

WARNING
The unit must be outside the reach of pets, children or people who can not use it. Do not let the unit be unattended when it is connected to a power source.
• Take the necessary precautions to prevent children from playing with the unit.
- The unit can only be used by children over eight years and by people whose physical, mental or emotional capacity is limited or impaired or lack the experience or knowledge when they are supervised, after they receive instructions on the safe use of the device and they understand the dangers.
• Children should not play with the appliance.
- Cleaning and maintenance that must be performed by the user, may not be performed by children, unless they are supervised.
- The unit can only be used by children over eight years and by people whose physical, mental or emotional capacity is limited or impaired or lack the experience or knowledge when they are supervised, after they receive instructions on the safe use of the device and they understand the dangers. Children should not play with the unit. The cleaning and maintenance should not be performed by children unless they are older than 8 years and are supervised.
15 Usage
The unit is exclusively designed for mixing. The blender is intended solely for private use and not for commercial use.
Use the blender just as described in this manual. Any other use is considered improper and can result in property damage or even personal injury.
The manufacturer or dealer will not accept liability for damage caused by improper or incorrect use.
16 Initial start-up
16.1 Check blender and delivery
If you open the package carelessly with a sharp knife or other pointed object, the blender can be easily damaged.
Be very careful when opening. The blender is protected from damage during transport by the packaging.
- Take the blender from the packaging.
- Check that the blender or the installation parts have damage.
If this is the case, do not use the blender. Contact our specified service centre. - Check whether the delivery is complete.
16.2 Basic cleaning
- Remove the packaging materials, and protective films.
- Clean all the parts of the blenderd before the first use as described in "Cleaning".
16.3 Set up blender

WARNING
- If you place the blender improperly, it can cause damage.
- Place the blender on a flat, dry and non-slip work surface. The work area should be easy to clean, since you can not always prevent splatter.
Don't place the blender on or near the edge of the working surface.
Never place the blender on or near hot surfaces (eg. hobs, heating pipes, etc.).
Note that the surface coatings of furnitures sometimes contain chemical additives which affect and soften the suction cups of the blender. In this way, residues can arise on the furniture surfaces. Therefore place a non-slip surface under the blender. The drive unit 5 is equipped with suction cups which provide a secure grip for the blender. Set the blender up that it is easy accessible and near a power outlet.
16.4 Compose blender
Improper handling of the blender or individual instruments can cause serious injury.
Turn the blender off, and remove the plug from the socket when you assemble or disassemble the blender.
The blender has two safety devices. It can only be used with a properly attached mixing bowl and properly attached safety covers.
The mixing container 3 is marked at the lower end with a triangle. On the drive unit 7 is an open and a closed lock illustrated.
- Place the jug on the drive unit so that the triangle on the jug points to the open lock.
- Turn the jug clockwise until the triangle points to the closed lock. Hold the drive unit. It will be heard and felt when the mixing bowl locks.
- Place the safety cover 2 on the jug so that the long edge, looked from the handle, is placed to the right of the handle.
- Turn the safety cover clockwise until it stops.
The long lead is now under control. - Put the lid insert 1 in the filling opening, so that the two lugs fit into the recesses in the filling opening on the lid and fix the lid insert by rotating clockwise till it stops.
You have successfully assembled the blender jug
17 Operating instructions

WARNING
- Improper handling of the blender or individual instruments can cause serious injury. Do not touch the knife with bare hands, the blades are very sharp.
- Do not remove the safety cap until the blades have completely stopped.
- Do not change the location of the blender while the blender is running.
Make sure that hands, hair, clothing, jewelry or another object during the mixing process, and as long as the mixing container is located on the drive unit, are not getting in the jug. Always make sure that the speed controller is at level "0" (off) before connecting the blender to a socket.

WARNING
When processing hot mixing goods it can cause scalding. Do not put hot or boiling mixing goods (such as soups) in the jug.

WARNING
- Improper handling of the blender can lead to damage of the blender.
- Take note of the level marks. Fill the mixing bowl at least to the lowermost mark (250 ml) and do not exceed the "MAX" (1500 ml) mark.
- Do not operate the blender without mixing goods.
- Observe the maximum operating time of 60 seconds.
- A too long operating time can lead to overheating of the engine. Allow the blender to cool on room temperature before using it again.
- Before turning on the blender, make sure no cutlery or the like is in the mixing bowl.
- Do not place over-sized pieces in the blender jug.
- Make sure when you use frozen fruit that you always use the fruit in small pieces.
- Do not mix nuts in shell or seeds.
- Always remove any existing stems or stalks from mixing goods before you start the mixing process.
- Do not place meat in the blender.
- Never open the safety cover during the mixing process.
- Clean the mixing bowl after each use as described in "Cleaning".
17.1 Adjust speed
The speed control is used to select between two speed levels "1" and "2" a pulse level "P" as well as to turn off the blender, level "0".
- Start the mixing process at the lowest speed "1".
- Later set the speed on the higher level.
- You turn off the blender, if you set the speed control to the "0" level.
- If you set the speed control to the pulse level "P", you are using the pulse function. Refer to the section "Pulse function".
17.2 Use blender
To facilitate the handling of the blender, the blender container 3 is provided with level markings. The numbers indicated there refer to the respective level in milliliters. The lowest mark has no level indication. It corresponds to a level of 250 ml. Operate the blender with at least 250 ml of liquid.
Do not fill more liquid in the blender as the 1500 ml mark "MAX".
Always cut solid ingredients before adding it in the bowl in small pieces so you prevent jamming of the knives. If you want to process solid and liquid ingredients to the blender at the same time, first enter the liquid ingredients into the mixing bowl and mix the ingredients.
Then enter the solid, finely chopped ingredients, and continue the mixing process. In order to obtain the structure of the food, it is best to do the mixing process in a few seconds.
- Assemble the blender jug onto the drive unit as described in "Compose blender".
- Remove the safety cover by turning it counter-clockwise, until you can take it off.
- Fill the desired ingredients into the blender jug.
- Close the jug with the security cover.
- Make sure that the speed control is set to "0".
- Connect the blender to a properly installed socket.
- To start the mixing process, turn the speed control slowly up, until the desired speed is reached.
- To stop mixing for a while, turn the speed control to level "0".
- Wait for a complete stop of the blades before you take the safety lid off.
17.3 Ingredients refill
During the current mixing process you can add other ingredients.
- Turn the lid insert counterclockwise until it stops and take it out.
- Fill ingredients through the filler or add small amounts of liquid.
Use the lid insert to refill other ingredients.
Use the cover as a measuring cup. It is suitable for measuring 30 ml, 40 ml and 50 ml of liquid.
-
Close the safety cover 2 with the lid insert.
-
Turn the lid insert clockwise until it clicks.
17.4 Using pulse function
The blender has a pulse function. It means short operation at full power. By using the pulse function is the maximum speed is immediately available.
Use the pulse function if you want to mix for a short time but intense. For example, for foaming a liquid, or for crushing ice (see "Crush ice cubes").
In order to enable this feature,
- Turn the speed control 6 to the pulse level "P" and hold it in this position for as long as you want to mix. Use this function only sporadically and never exceed the maximum operating time.
- Stop the mixing process by releasing the speed control.
17.5 Crush ice cubes
- Fill ice cubes into the blender jug 3. Do not crush more than 10 to 12 ice cubes per mixing process. Make sure that the ice is not greater than 2.5 cm edge length. With a small amount of ice cubes you get the best results.
- Close the mixing bowl with the safety cover 2 and the lid insert 1 (see section "Compose blender").
- Set the speed control 6 to level "0".
- Connect the blender to a properly installed socket.
- Turn the speed control several times for a short time to the pulse level "P" and let it go again.
- To end the crushing operation, set the speed control to level "0".
- Unplug the blender from the socket.
18 Cleaning
WARNING
Improper handling of the blender can be cause an electric shock. Water penetrated in the housing can cause a short circuit.
Turn the blender off, and remove the power plug from the socket before cleaning the blender. Make sure that no water gets into the housing of the drive unit. Never immerse the blender in water.
Improper handling of the blender can lead to damage. Do not place the blender or individual parts in the dishwasher.
Do not use abrasive cleaners or scouring agents, sharp or metallic cleaning objects such as knives and the like. These can damage the surface.
18.1 Clean drive unit
- Unplug the power plug before cleaning.
- Allow to cool the blender entirely.
- Wipe the drive unit 7 with a dry, possibly slightly damp cloth.
- Rub the drive unit then dry. Use a soft cloth for this.
EN
18.2 Clean mixing bowl
The blades are very sharp. A touch of the knife during cleaning can cause injury.
Use care and caution when cleaning and drying the blender container and the knife.
Do not touch the knife with bare hands.
-
Place the jug on the drive unit as described in "Compose blender".
-
Pour some lukewarm water with detergent into the mixing bowl.
- Cover the mixing bowl with the safety cover 2 and the lid insert 1 (see "Use blender").
- Set the speed control 8 to level "0".
19 Troubleshooting
| Error | Possible reason | Solution |
| The blender is not functioning | The jug is not sitting correctly on the drive unit. | Set the speed control to level "0" and unplug the power cord from the socket.Put the jug on the drive unit, as described in "Compose blender". |
| The security cover does not sit correctly on the mixing bowl. | Set the speed control to level "0" and unplug the power cord from the socket.Place the safety lid on the blender jug, as described in "Compose blender". | |
| The power cord is not properly connected in the socket. | Connect the power cord correctly to a socket. | |
| The socket has no electricity. | Check the socket by connecting another device. | |
| The speed control is not turned up far enough. | Turn the speed control clockwise until the blender starts. | |
| The blades do not rotate. | A not suitable for mixing good is in the mixing bowl. | Set the speed control to level "0" and unplug the power cord from the socket. Empty the mixing bowl. |
When in doubt, consult a qualified expert.
20 Technical specifications
| Model | KM 3001 we |
| Rated voltage (V) | 220~240 |
| Frequency (Hz) | 50~60 |
| Power [W] | 500 |
| Power Settings | 5 |
| Bowl capacity [L] | 3,8 |
| EAN | 4016572021288 |
text_image
QR code image containing encoded data, no visible human-readable text21226
text_image
Diagram showing a blender with a handle and lid, indicating a drop or compression process with red arrows.Fig. 1 Fig. 2

text_image
Diagram of a blender with red directional arrow indicating rotation or change, showing liquid level and lid structure.Fig. 3
text_image
Diagram showing a blender with volume measurement and a side-view of its front view, annotated with red arrows indicating rotation.22 Marque CE
text_image
QR code image containing encoded data, no visible human-readable text21226
text_image
Diagram showing a blender with a handle and lid, indicating a drop in volume or change.
text_image
Diagram of a blender with red directional arrows indicating rotation or movement, showing liquid level and lid structure.
text_image
Diagram showing a blender with volume measurement and a side-view of the front view of a toaster with a knob.Fig 1. Fig.2. Fig.3.
32 CE-markering
GGV HANDELGES. MBH & CO. KG
August-Thyssen-Str.8
D-41564 KAARST
DUITSLAND
MU3001we_5010023_E1.0_2017_11_08.docx