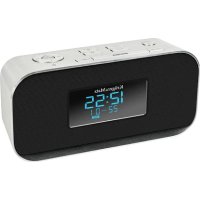
KM0815 - Radio Krüger&Matz - Free user manual and instructions
Find the device manual for free KM0815 Krüger&Matz in PDF.
User questions about KM0815 Krüger&Matz
0 question about this device. Answer the ones you know or ask your own.
Ask a new question about this device
Download the instructions for your Radio in PDF format for free! Find your manual KM0815 - Krüger&Matz and take your electronic device back in hand. On this page are published all the documents necessary for the use of your device. KM0815 by Krüger&Matz.
USER MANUAL KM0815 Krüger&Matz
natural_image
Completely black image with no visible content or text.text_image
① ② ③ ④ ⑤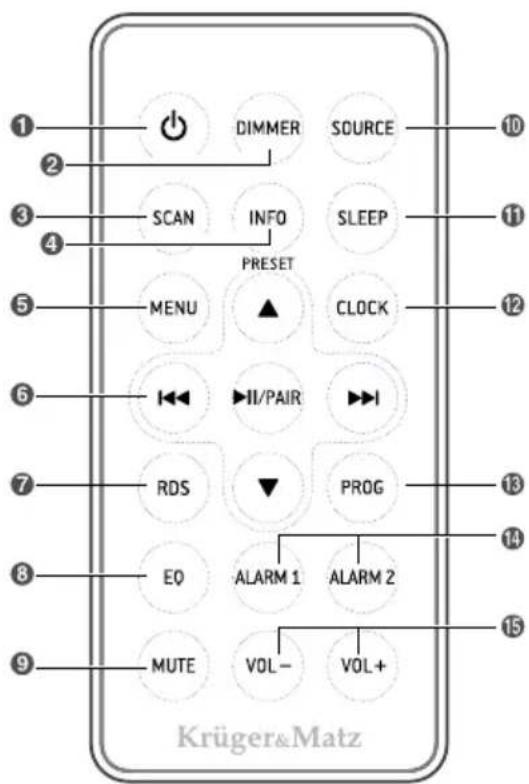
text_image
1 2 3 4 5 6 7 8 9 DIMMER SOURCE SCAN INFO SLEEP PRESET CLOCK MENU ▲ ▶II/PAIR ▶ RDS ▼ PROG EQ ALARM 1 ALARM 2 MUTE VOL- VOL+ Krüger&Matznatural_image
Diagram of a hand pressing a button with a downward arrow indicating compression or force (no text or symbols)text_image
Diagram showing a hand holding a smartphone with labeled parts and a close-up of the device's internal components, including a plus button and a battery.text_image
Diagram showing battery charging process with labeled components and battery symbol insertionnatural_image
Diagram showing a device with ports and cables connected to a cable outlet, no text or symbols presentRead the instruction manual carefully before first use and keep it for future reference. Producer is not responsible for damages caused by inappropriate handling and use of the device.


The lightning flash with arrowhead symbol, whithin an equilateral triangle is indicated to alert the user the presence of uninsulated, dangerous voltage, within the product enclosure that may be of sufficient magnitude to constitute risk of electric shock to persons.

The exclamation point within an equilateral triangle is intended to alert the user the presence of important operation and maintenance (servicing) instructions in the literature accompanying the appliance.
-
Do not operate the unit it does not operate correctly or if it has been damaged in any way. In such case, switch it off, withdraw the mains plug and consult authorized service point.
-
Place the unit on a dry, flat and stable surface.
-
Avoid extreme temperatures during transportation, storage or use of the product.
-
Avoid exposure to direct sunlight and other sources of heat.
-
Do not expose this unit to humidity, water or any direct contact with liquid.
-
Do not place the unit on or near appliances which may cause electromagnetic interference. If you do, it may adversely affect the operating performance of the unit, and cause a distorted picture or sound.
-
Make sure the ventilation vents are not blocked and the proper air-circulation is not obstructed in any way.
-
Keep the device as well as its batteries beyond the reach of children. Make sure the battery compartment is always securely closed.
-
This appliance may be used by children who are above 8 years old and by persons with reduced physical, sensory or mental capabilities, or lack of experience and knowledge, if they are supervised and guided by a person who is responsible for their safety in a cautious manner, and all the safety precautions are understood and followed. Children should not play with this device. Children should not perform cleaning and servicing of the device unsupervised.
-
Fixed power cable may only be replaced in an authorized service point.
-
Do not attempt to repair this device on your own. Any repair should be carried out exclusively by authorized service point.
-
Disconnect the unit from power supply if it is not going to be used for a longer period of time.
- Use only authorized accessories.
- ALWAYS disconnect this device from power supply mains before cleaning.
- Clean this device with soft, dry cloth. Do not use any abrasives or chemical agents to clean this product.
PRODUCT DESCRIPTION Front panel
-
SNOOZE/DIMMER
-
Repeat the alarm
- Adjust the display brightness
-
Enter into time setup
-
ON/OFF/SOURCE
-
Switch the unit on and off
-
Select the play function
-
PHAIR
- In Bluetooth mode, press this button to start or pause music playback - In Bluetooth mode, press and hold this button to enable Bluetooth pairing mode
• In FM mode, press this button to search for available radio stations
• In DAB mode, press this button to start full scanning
4.
- In Bluetooth mode, press these buttons to go to the previous/next track
• In FM mode, press these buttons to search for available radio stations -
In DAB mode, press these buttons to navigate to select an item on a menu screen
-
ALARM 1/ALARM 2
-
Set the alarm timer
• View alarm settings -
VOL - / VOL +
- Press these buttons to decrease/increase volume level
- Display panel
Back panel
- AC power supply cable
- Battery compartment
- Line input
- USB port
- DAB antenna
text_image
SNODZE DINNER 1 2 3 4 5 6 7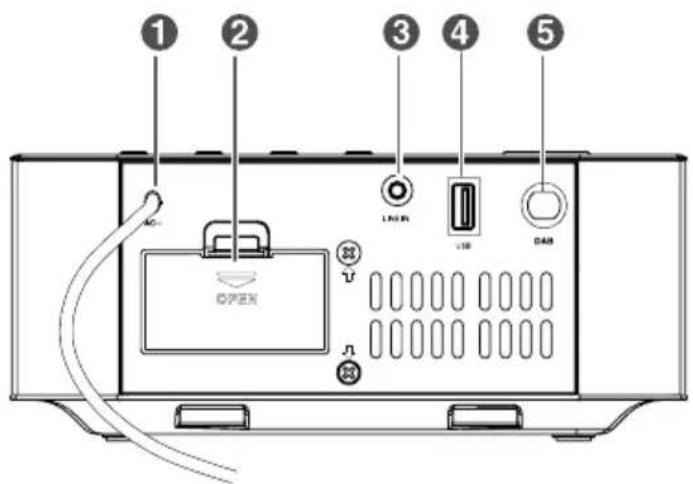
text_image
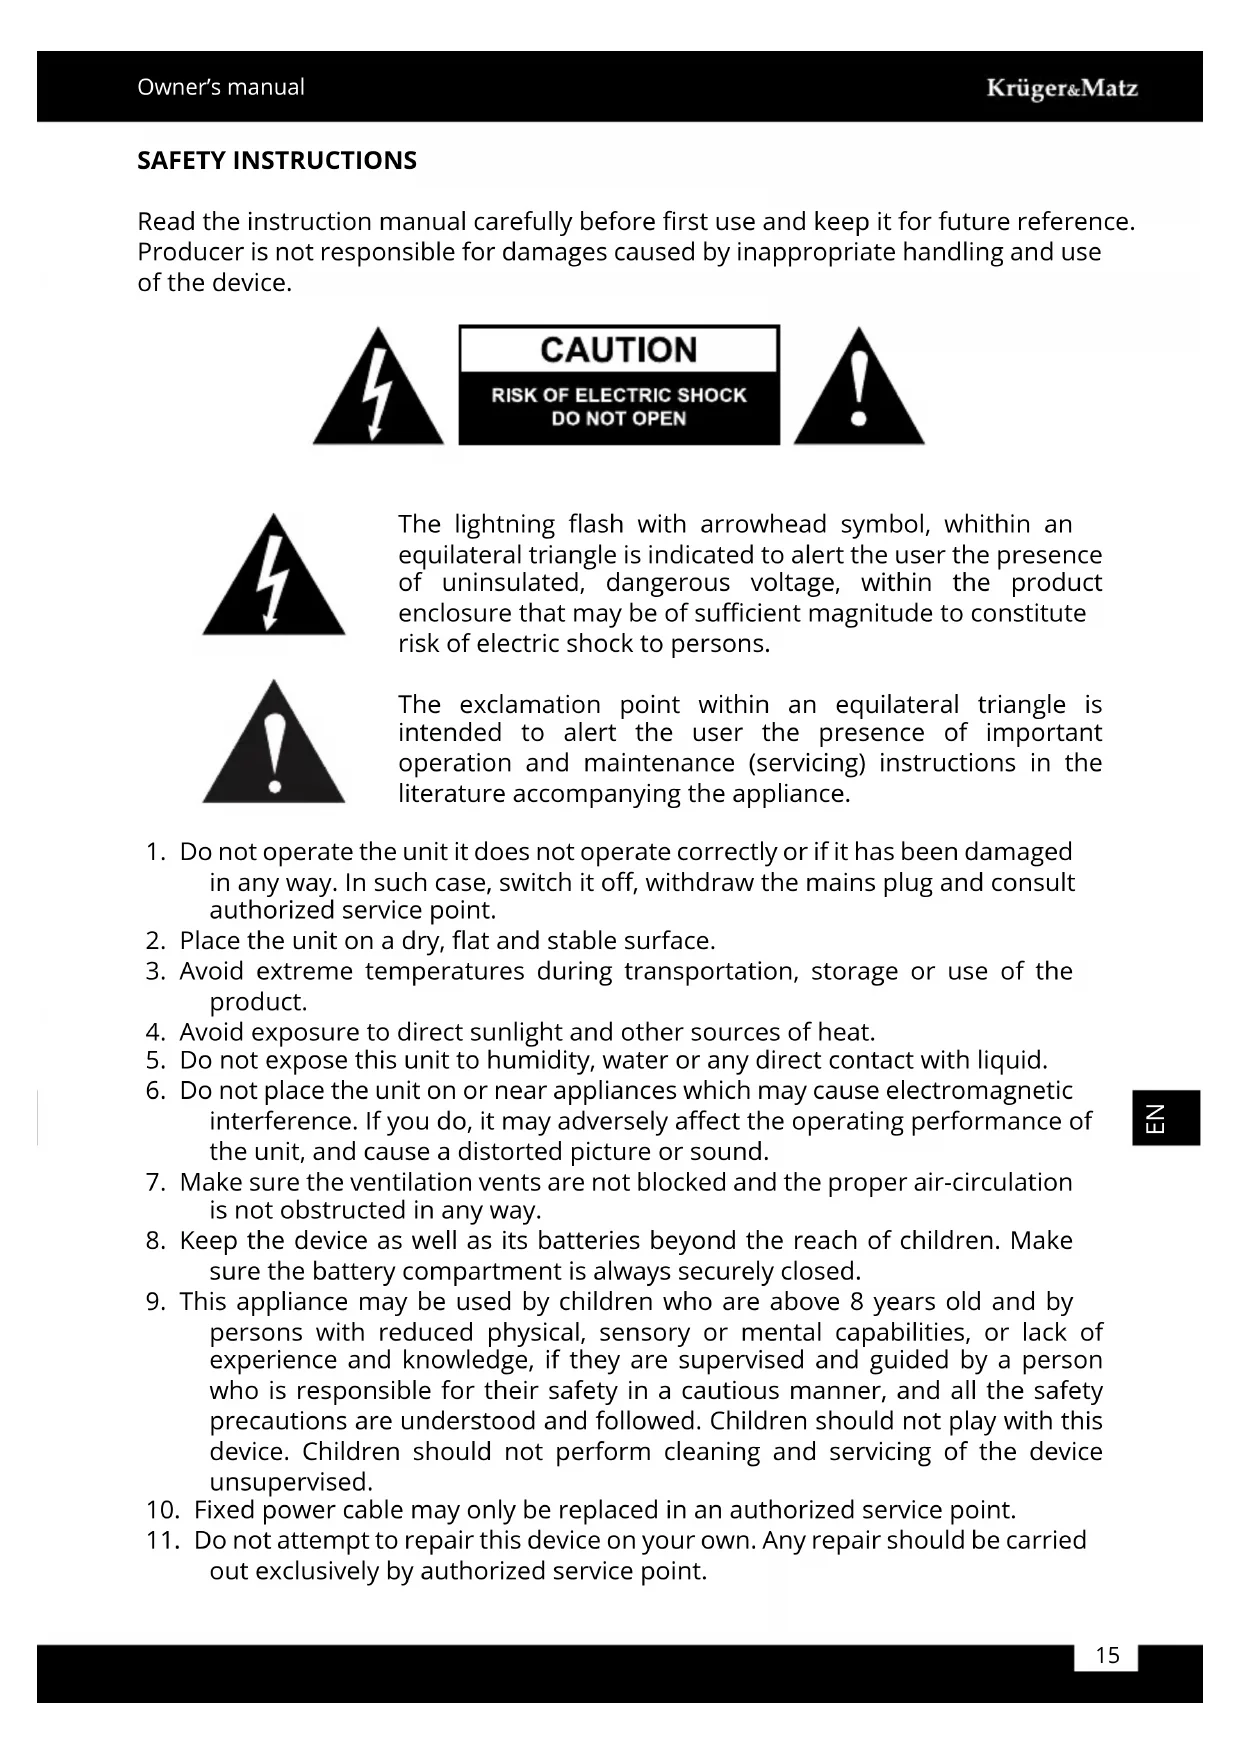
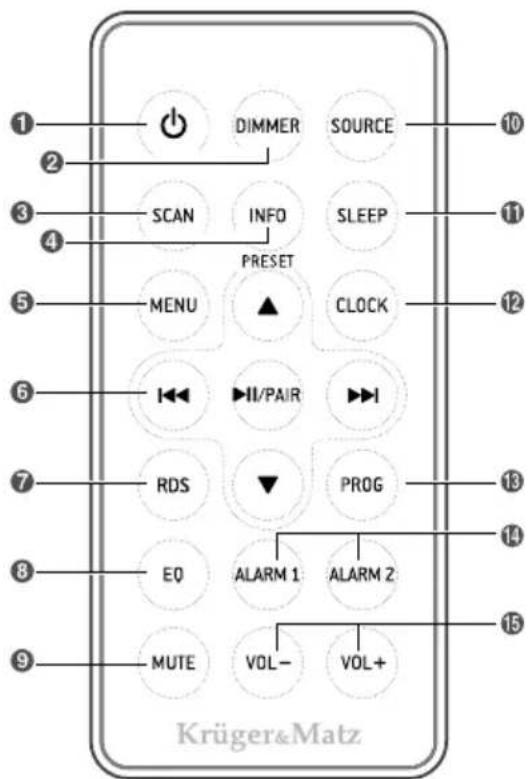
① ② ③ ④ ⑤ USB CAN OPEXRemote control
- Power button
- DIMMER: adjust display brightness
- SCAN: scan for available radio stations in DAB/FM mode
- INFO: view information about DAB/FM stations
- MENU
-
/▲ ▼
-
Select previous/next preset station
- Adjust the time

- In Bluetooth mode, go to previous/next track
• In FM mode, search for a radio station - In DAB mode, navigate to select an item on a menu screen
• In DAB mode, select radio stations

• In Bluetooth mode, start or pause music playback
- In Bluetooth mode, press and hold to enable Bluetooth pairing mode
- Confirm the selection on a menu screen
- RDS: in Tuner mode, press this button to show RDS information
- EQ (Equalizer): select a preset sound effect: POP/CLASSIC/ROCK/JAZZ/FLAT
- MUTE: mute or resume the sound
- SOURCE: select the play function
- SLEEP: set the sleep timer
- CLOCK: in the Standby mode, press and hold this button to set the clock
- PROG: preset radio stations
-
ALARM 1 / ALARM 2
-
Set the alarm timer
• View alarm settings -
VOL - / VOL + : decrease/increase the volume level
text_image
1 2 3 4 5 6 7 8 9 DIMMER SOURCE SCAN INFO SLEEP PRESET MENU ▲ CLOCK I← II/PAIR ►I RDS ▼ PROG E0 ALARM 1 ALARM 2 MUTE VOL- VOL+ Krüger&MatzBATTERY INSTALLATION
Prepare the remote control
The provided remote control allows the unit to be operated from a distance.
- Even if the remote control is operated within the effective range, remote control operation may be impossible if there are any obstacles between the unit and the remote control.
- If the remote control is operated near other products which generate infrared rays, or if other remote control devices using infrared rays are used near the unit, it may operate incorrectly.
- When the remote control is not to be used for a longer period of time, remove the battery to prevent it from leaking.
First time use:
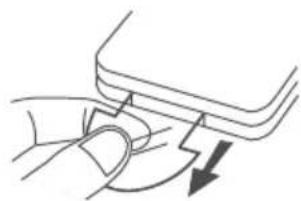
The unit has a pre-installed CR2025 battery. Remove the protective tab to activate the remote control battery.
natural_image
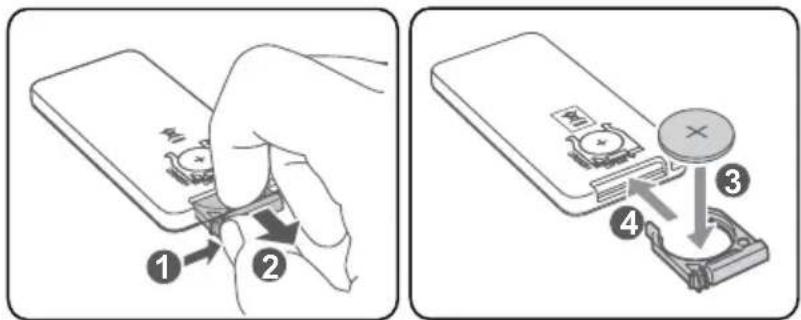
Diagram of a hand pressing a button with a downward arrow indicating motion (no text or symbols)Replacing the remote control battery:
- Pull out the battery tray and remove the old battery.
text_image
Diagram illustrating a device being inserted into a smartphone, showing step-by-step instructions for adding a button.- Place a new CR2025 battery into the battery tray with correct polarity (+/-) as indicated.
- Insert the battery tray back into the slot.
Installing backup batteries:
- Open the batteries compartment.
- Install two AAA batteries (not included) with correct polarity and the install steps as indicated.
- Close the battery compartment.
Notes:
- You can only use AC power as power supply. Batteries (not included) are for backup purpose.

text_image
Diagram showing battery charging process with labeled components and battery symbol- If the system is unplugged or if a power failure occurs, all setup of the unit will be erased unless there are batteries in the unit and they are not being changed at this time. Once setup had been erased, please reset all items you desire.
- If the batteries leak, wipe away the leakage inside the battery compartment and replace the batteries with new ones.
- Do not use any batteries other than those specified.
- Do not heat or disassemble batteries. Never throw them in fire or water.
- Do not carry or store batteries with other metallic objects. Doing so could cause batteries to short circuit, leak or explode.
- Never recharge a battery unless it is confirmed to be a rechargeable type.
CONNECTIONS
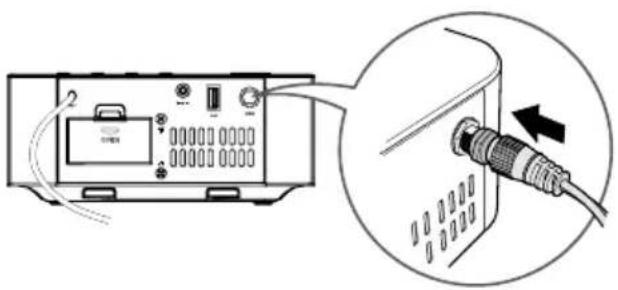
Connect the DAB antenna
- Connect the supplied DAB antenna to the DAB socket on the rear of the unit by turning the antenna's screw cap clockwise. Do not over tighten as this could damage the antenna.
• To avoid noisy interference, keep the antenna away from the unit, the connecting cord and the power cord. - You may need to reposition the aerial for optimum reception.
- The best position is dependent on the station and the strength of the signal.
natural_image
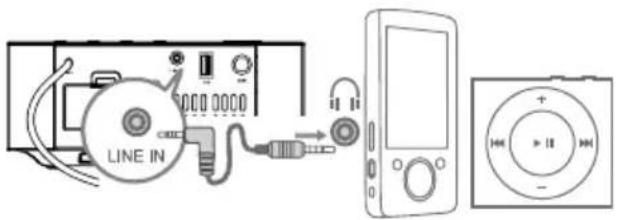
Diagram showing a device connected to a cable with an arrow indicating connection (no text or symbols present)Use Line input
Use a 3,5 mm audio cable to connect the audio player's headphone socket to the line input on the unit.
text_image
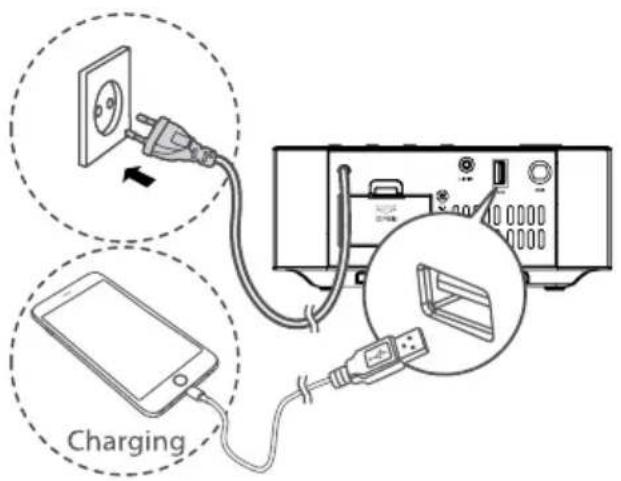
LINE INConnect power
Connect the AC power cord to the wall socket.
Notes:
- Ensure that the power supply voltage corresponds to the voltage printed on the rating label on the back or the underside of the unit.
- Be sure to unplug the power cord from the outlet when the system is not in use for an extended period of time.
text_image
ChargingUse USB charging port
Connect a USB cable (not included) to USB port of the device to charge your smartphone or tablet PC.
GENERAL OPERATION
Standby/ON
When you first connect the unit to the mains socket, the unit will be in STANDBY mode.
- Press the ON/OFF/SOURCE button on the main unit or the button on the remote control to switch the main unit on. Press this button again to switch it off.
- Disconnect the plug from the mains socket if you want to switch the unit off completely.
Select Modes
Press the ON/OFF/SOURCE button on the main unit or SOURCE button on the remote control to select between LINE IN, BLUETOOTH, DAB and FM mode.
Note:
- If there is no signal under the LINE IN and BLUETOOTH mode, the unit will automatically switch off within 15 minutes.
Set the Sleep Timer
This unit can switch to standby automatically after a set period of time.
-
To activate sleep timer, press the SLEEP button repeatedly to select a set period of time (in minutes). When the sleep timer is activated, the display show zZZ, the volume will gradually decrease before the unit power off.
-
To deactivate this function, press the SLEEP button repeatedly until [00] is displayed. When the sleep timer is deactivated, zzz disappears from the display.
Adjust the Brightness
Press the DIMMER button repeatedly to select different levels of display brightness.
Adjust the Volume
- Press the VOL+/- buttons to adjust the volume level.
- Press the MUTE button to mute the sound. Press this button again or press the VOL +/- to cancel the effect.
Select the Equalizer
During music playback, press the EQ button repeatedly to select: POP, CLASSIC, ROCK, JAZZ, FLAT.
SETTING THE CLOCK Clock synchronization
- In the standby mode, press and hold the MENU button on the remote control and the unit will enter the CLOCK SYNC mode.
- Press the ▲ buttons on the remote control or / button on the main unit to switch the clock synchronization modes:
• RDS- synchronize with RDS radio station only - OFF- turn off the clock synchronization function; manual clock adjustment
- Press the ▶PAIR button on the device or the button on the remote control to confirm.
Setting the clock manually
- In STANDBY mode, press and hold the CLOCK button on the remote control or the SNOOZE/DIMMER button on the main until the hour indicator blinks.
-
Set the hour with ▲ buttons on remote control or / buttons on main unit.
-
Press the CLOCK button on remote control or SNOOZE button on main unit to confirm.
-
Repeat steps 2-3 to set the minutes.
Note:
- During Time Setup, press the button to select 12/24 hour format.
SETTING THE ALARM TIMER
Before setting the alarms ensure the time shown on the clock is correct.
- Press and hold the ALARM (1 or 2) buttons in standby mode for a few seconds and the hour digits will flash. Press the ▲/▼ buttons on the remote control or the ▲▲ buttons on main unit to set the desired hour.
- Press the ALARM (1 or 2) button and the minutes digits will flash. Press the ▲ /▼ buttons on the remote control or the ◀ buttons on main unit to set the minutes.
- Press the ALARM (1 or 2) button again and press the ▲ buttons on the remote control or the ◀ buttons on main unit to select an alarm sound. You can select either FM, DAB or beeps (BUZZER).
- Press the ALARM (1 or 2) button again and the flashing volume level will be displayed. Press the ▲/▼ buttons on the remote control or the ▶◀◀ ▶◀◀ buttons on main unit to select the volume level.
Note:
- Set the volume to at least level 5. You can increase the level to ensure the alarm can be heard.
Activate and Deactivate the Alarm Timer
- Press the ALARM 1 or ALARM 2 button to activate the alarm.
- The alarms are active when ① or both are shown in the display on the front of the unit.
- To deactivate the alarms, press the ALARM (1 or 2) button. The find/or will disappear from the display on the front of the unit.
Repeat Alarm
You can press SNOOZE/DIMMER button to adjust the interval to repeat alarm. When the alarm rings, press the SNOOZE/DIMMER button on main unit, the alarm repeats ringing 9 minutes later.
Stop Alarm Ring
When the alarm rings, press the corresponding ALARM (1 or 2) button. The alarm stops but the alarm settings remain.
View the Alarm Settings
Press the ALARM 1 or ALARM 2 buttons to view the alarm settings.
RADIO MODE
Auto Scan and Save Preset Station
-
Press the ON/OFF/SOURCE button on the unit or press the SOURCE button on the remote control repeatedly to select FM mode.
-
Press and hold the ▶NR button on the main unit or press the SCAN button on the remote control to activate automatic programming. All available stations are programmed in the order of waveband reception strength.
- The first programmed radio station is played automatically.
- Press the ▲ buttons to go to the previous/next radio station.
Tuning in a Station
- Tune in radio stations automatically
Press and hold the button; the frequency changes down or up automatically until a station is found.
Note: The search may not stop at a station with a very weak signal.
- Tune in radio stations manually
Press the 17 buttons repeatedly until you find the station you want.
Note: If reception is still poor, try to adjust the position of the aerial or try to move the radio to another location.
Presetting Stations Manually
You can store up to 20 of your favourite stations to the memory.
-
Tune in the desired station, then press the PROG button.
-
Press the ▲ buttons to select the preset number.
-
Press the PROG button to store the station.
-
Repeat the above steps (1 to 3) for each station you want to store in memory with a preset number.
DAB RADIO MODE
- Your DAB radio will automatically tune to all available stations when the unit switching to DAB mode for the first time.
- To retune, or search for new stations, press and hold the /AIR button on the main unit or press the SCAN button to perform a full scan.
- To select the DAB station press the ◄◀/▶◀ buttons and then press the ▶∥/PAIR button on the remote control to confirm.
Manual DAB tuning
- In DAB mode press the MENU to enter the DAB menu.
- Press the /buttons to select MANUAL.
- Press the MR to confirm the selection. The DAB radio frequency will be displayed.
- Press the ▶ button to select a frequency you want to scan, then press the ▶ AIR button to start the scan.
Saving your favourite stations
- Press and hold the PROG button. The number of preset positions will appear and flash on the display.
- Press the ▲ buttons repeatedly to select the desired preset position from 01 to 20.
- Press the PROG button to confirm your selection. The message STORE will appear on the display.
Listening to a saved favourite station
To select and listen to a saved radio station, press the ▲ or ▼ buttons on the remote control to go to the previous/next preset radio station.
Radio information
When using the radio in DAB or FM mode you can view the programme information display by pressing the INFO button on the remote control repeatedly to scroll through the list of features.
Radio system reset
- Press the SOURCE button to select FM or DAB mode.
- Press the MENU button, and use the ◀◀/▶buttons to select „SYSTEM“ and then press ▶/PAIR button to confirm the selection. The display shows „RESET”.
- Press the /▶ AIR button, the display shows „RESET N”.
- Press the /AIR button to cancel or press the /buttons to select „RESET Y” and press the /PAIR button to confirm.
- When the reset is complete, the unit will start scanning for DAB channels immediately.
BLUETOOTH MODE
Pairing
- Make sure the device is turned on.
- Press the ON/OFF/SOURCE button repeatedly on the unit or press the SOURCE button on the remote control to select Bluetooth mode. "NO BT" will show on the display if the unit is not paired to any Bluetooth device. The system has entered pairing mode.
- Enable the Bluetooth function on the external device and search for new Bluetooth devices.
- Select and connect with this device (KM0815). Enter the password "0000" if necessary. Display panel show "BLUET" while the pairing succeeds.
Notes:
- Compatibility with all Bluetooth devices is not guaranteed.
- The operational range between this player and a Bluetooth device is approximately 8 meters (without any object between the Bluetooth device and the unit).
- Any obstacle between this unit and a Bluetooth device can reduce the
operational range.
- If the signal strength is weak, your Bluetooth receiver may disconnect, but it will re-enter pairing mode automatically.
- If a connection exist, press and hold AIR button on remote control or on unit for a few seconds to re-activate the pairing mode, the connection will be interrupted.
- If no other Bluetooth device pairs with this player within two minutes, the player will recover its previous connection.
- The player will also be disconnected when your device is moved beyond the operational range.
- If you want to reconnect your device to this player, place it within the operational range.
- If the device is moved beyond the operational range, when it is brought back, please check if the device is still connected to the player.
- If the connection is lost, display panel show „NO BT“. Follow the instruction above to pair your device to the player again.
- If the connected Bluetooth device supports Advanced Audio Distribution Profile (A2DP), you can listen to the music stored on the device through the player.
- If the device also supports Audio Video Remote Control Profile (AVRCP), you can use the player's remote control to play music stored on the device.
LINE IN MODE
You can listen to an external audio device through this unit.
- Ensure that the unit is connected to the TV or audio device.
- Make sure the unit is turned on. Press the ON/OFF/SOURCE button on the main unit or press the SOURCE button on the remote control repeatedly to select the LINE IN source.
- Press the VOL+/VOL- buttons to adjust the volume.
- In LINE IN mode, operate your audio device directly for playback features.
TROUBLESHOOTING
| Problem Possible solution | |
| No power • Ensure that the AC cable is connected properly• Ensure that the unit is switched on | |
| Remote control does not work • Make sure you selected correct source• Reduce the distance between the remote control and the unit• Insert the battery with its polarities (+/-) aligned as indicated• Replace the battery• Point the remote control directly at the sensor on the front of the unit | |
| Poor radio reception • Increase the distance between the unit and your TV or VCR | |
| Clock setting erased • Power has been interrupted or the power cord has been disconnected• Reset the clock | |
| No response from the unit • Disconnect and reconnect the AC power plug, then turn on the unit again | |
| Cannot find Bluetooth name of this unit on my Bluetooth device | • Ensure the Bluetooth function is activated on your Bluetooth device• Ensure you have paired the unit with your Bluetooth device |
SPECIFICATION
- Bluetooth 3.0
• DAB+ digital radio (band III 174.928 - 239.200 MHz) - FM Radio
• 20 preset stations memory - Dual alarm
• Output power: 2x 5 W
• THD: 1% (1 kHz, 1 W) - Input sensitivity: 500 mV
• Frequency response: 40 Hz - 20 kHz - Impedance: 2 Ohm
• External devices charging (5 V; 2,1 A)
• I/O:
• USB port (external devices charging) - Line input
- LCD display
- Remote Control
• Power consumption: 25 W
• Power supply: 220-240 V; 50/60 Hz
LEARN MORE
For more information on this product, go to www.krugermatz.com.
Visit www.krugermatz.com website for more products and accessories.
In case of any doubts or questions reach out to our Frequently Asked Questions section.
"The Lechpol company declares that product KM0815 is consistent with the essential requirements and other relevant provisions of directive 2014/53/UE. The proper declaration for download from www.lechpol.eu"
Z
English
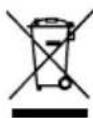
Correct Disposal of This Product
(Waste Electrical & Electronic Equipment)

(Applicable in the European Union and other European countries with separate collection systems) This marking shown on the product or Its literature, indicates that It should not be disposed with other household wastes at the end of its working life. To prevent possible harm to the environment or human health from uncontrolled waste disposal, please separate this from other types of wastes and recycle it responsibly to promote the sustainable reuse of material resources. Household users should contact either the retailer where they purchased this product, or their local government office, for details of where and how they can take this item for environmentally safe recycling. Business users should contact their supplier and check the terms and conditions of the purchase contract This product should not be mixed with other commercial wastes for disposal.
Made in China for LECHPOL ELECTRONICS Sp. z o.o. Sp.k., ul. Garwolińska 1, 08-400 Miętne.
QUESTIONS DE SECURITE
natural_image
Simple line drawing of a hand pressing a button with a downward arrow (no text or symbols)text_image
Diagram showing a hand holding a smartphone with labeled parts and a close-up of the device's internal structure, marked with numbered instructions.text_image
Diagram showing battery charging process with labeled components and a magnified view of the battery charging device.natural_image
Diagram showing a device with labeled ports and an attached cable, no text or symbols presentEntrée ligne
natural_image
Simple line drawing of a hand pressing a button with a downward arrow (no text or symbols)text_image
Diagram showing a hand holding a smartphone with labeled parts and a close-up of the device's internal structure, marked with numbered annotations.text_image
Diagram showing battery charging process with labeled components and battery stack diagramLet op:
natural_image
Diagram showing a device with labeled ports and an attached cable, no text or symbols presenttext_image
Diagram of a device rear panel with labeled ports and control buttons, including USB, USB, and SIM components.natural_image
Simple line drawing of a hand pressing down on a curved object with a downward arrow (no text or symbols)Wymiana baterii pilota:
text_image
Diagram showing a hand holding a smartphone with labeled parts and a close-up of the device's internal structure, including numbered steps 1 to 4.text_image
Diagram showing battery charging process with labeled components and battery insertion stepsnatural_image
Diagram showing a device with labeled ports and cables, connected to an external cable (no text or symbols present)Wejście liniowe
text_image
① ② ③ ④ ⑤ OPEN USB SIMTelecomanda
- Buton Pornire
- DIMMER: Control luminozitate
- SCAN: Cautare posturi de radio disponibile in modul DAB/FM
- INFO: vizualizare informatii posturi DAB/FM
- MENU
-
▲ ▼
-
Selectare posturi de radio anterior/urmator
- Setare ora

natural_image
Simple line drawing of a hand pressing a button with a downward arrow (no text or symbols)text_image
Diagram showing a hand holding a smartphone with labeled parts and a close-up of the device's internal structure, marked with numbered annotations.- Amplasati o baterie noua CR2025, respectand polaritatea corecta asa cum se arata in figura.
- Impingeti la loc suportul bateriei.
Instalare baterii de back-up:
text_image
Diagram showing battery charging process with labeled components and battery stack diagramNote:
natural_image
Diagram showing a device with labeled ports and an attached cable, no text or symbols presentUtilizarea intrarii de linie
natural_image
Completely black image with no visible content or text.

text_image
QR code image containing encoded data, no visible human-readable textwww.krugermatz.com
Krüger&Matz is a registered trademark