
KM0816 - Radio Krüger&Matz - Free user manual and instructions
Find the device manual for free KM0816 Krüger&Matz in PDF.


| Product Type | Internet radio with FM/DAB+ |
| Display | 2.4" color LCD |
| Speakers | 2x 3" drivers, 2x 5 W output |
| Frequency Response | 40 Hz - 20 kHz |
| Signal-to-Noise Ratio | 70 dB |
| Radio Bands | FM (87.5-108 MHz), DAB+ (Band III 174.928-239.200 MHz), Internet radio |
| Connectivity | Wi-Fi 802.11 b/g/n, Bluetooth 2.1+EDR, UPnP/DLNA |
| Bluetooth Range | Up to 10 m |
| Inputs/Outputs | AUX input (3.5 mm), Earphone jack, DAB antenna socket, DC-in |
| Power Supply | AC/DC adapter: Input 220-240 V, 50/60 Hz; Output 12 V, 1.67 A |
| Power Consumption | 20 W (operating), <1 W (standby) |
| Remote Control | Included, requires 2x AAA batteries (not included) |
| Supported Audio Formats | MP3, AAC/AAC+, WMA, WAV, FLAC |
| Alarm | 2 alarms with snooze, nap timer, wake to buzzer, FM, DAB, or Internet radio |
| Sleep Timer | Off, 15, 30, 60, 90, 120, 150, 180 minutes |
| Equalizer | Presets: Normal, Flat, Jazz, Rock, Soundtracks, Classical, Pop, News, my EQ |
| Additional Features | AirMusic Control app, voice message, intercom, weather display |
| Safety | Indoor use only; keep away from moisture, heat; use original adapter; do not disassemble |
Frequently Asked Questions - KM0816 Krüger&Matz
User questions about KM0816 Krüger&Matz
0 question about this device. Answer the ones you know or ask your own.
Ask a new question about this device
Download the instructions for your Radio in PDF format for free! Find your manual KM0816 - Krüger&Matz and take your electronic device back in hand. On this page are published all the documents necessary for the use of your device. KM0816 by Krüger&Matz.
USER MANUAL KM0816 Krüger&Matz
Read the instruction manual carefully before first use and keep it for future reference. Producer does not claim liability for any damage caused by inappropriate use and handling or any mechanical damage.
-
Protect this product from moisture, humidity, water and any other liquid. Avoid using / storing it in extreme temperatures or strong magnetic environment. Do not expose it to direct sunlight and sources of heat.
-
Product suitable for indoor use only.
-
Do not handle the device with wet hands.
-
Before connecting the device to power supply socket, make sure the voltage indicated on the appliance corresponds to the voltage in the power supply socket.
-
Disconnect this device from power supply if it is not going to be used for a long period of time.
-
When you disconnect the power cord of the device, grasp and pull the plug, not the cord/cable.
-
Use only authorized accessories. This device may be used only with original power adapter.
-
This appliance may be used by children who are above 8 years old and by persons with reduced physical, sensory or mental capabilities, or lack of experience and knowledge, if they are supervised and guided by a person who is responsible for their safety in a cautious manner, and all the safety precautions are understood and followed. Children should not play with this device. Children should not perform cleaning and servicing of the device unsupervised.
-
Keep the volume at a reasonable level throughout entire time of using the speaker. To prevent damage to your hearing, do not raise the volume too high.
-
Never use this device if the power adapter or the device itself is damaged.
-
Do not attempt to repair/disassemble this device yourself. The device does not have any user-serviceable parts. In case of damage, contact with an authorized service point for check-up/repair.
-
ALWAYS disconnect this device from power supply mains before cleaning. Clean this device with soft, slightly damp cloth. Do not use any abrasives or chemical agents to clean this product.
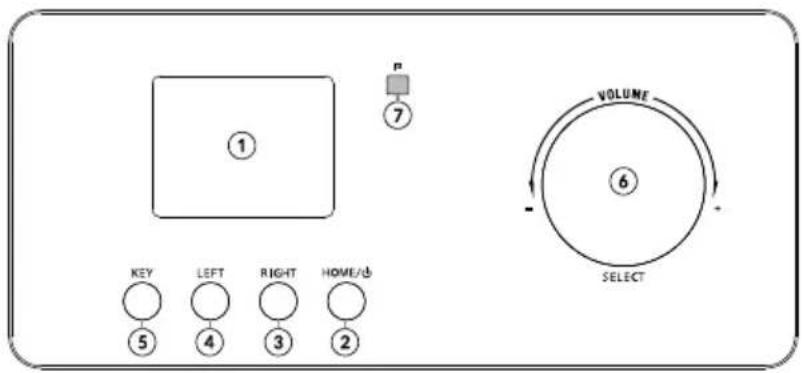
PRODUCT DESCRIPTION
- Display
- Home/Standby button
- Right button
- Left button
- Key button
- Volume/Select knob
- IR sensor
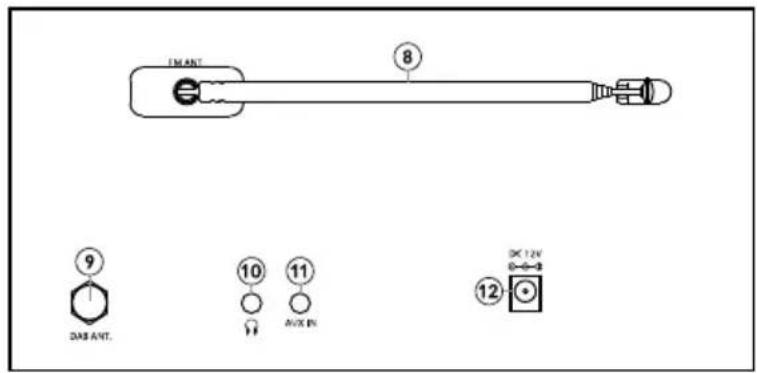
- FM antenna
- DAB antenna socket
- Earphone Jack
- AUX input
- DC-in
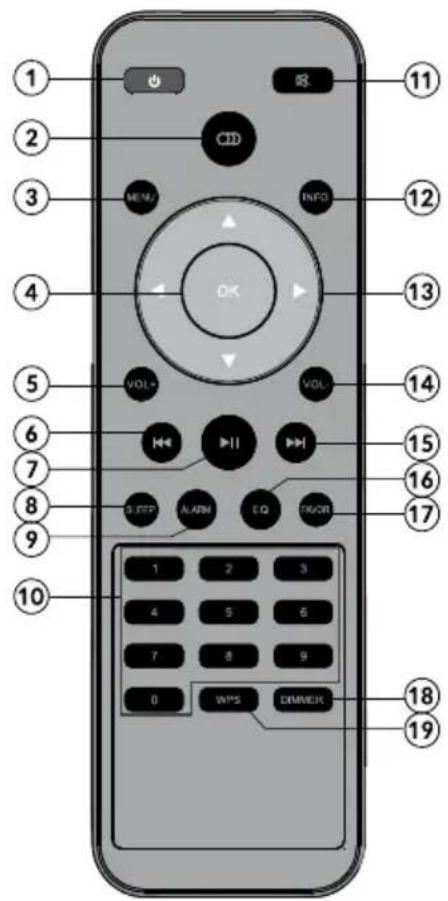
REMOTE CONTROL
- Standby button
- Key button (same function as the Key button on the device)
- Menu button
- OK button
- Volume+
- Previous
- Play/ Pause
- Sleep timer
- Alarm
- Numeric buttons
- Mute
- Info button
- Direction buttons
- Volume-
- Next
- EQ button
- Favorite button
- Dimmer button
- WPS button
GETTING STARTED
-
Connect the device to power supply mains with an included power adapter: plug the supplied power adapter into the DC-in socket (on the rear of the speaker) and the other end into a power mains socket.
-
Press the standby button on the device or on the remote control to switch the device on. The screen will display "Welcome" notification.
-
When switched on for the first time, the radio will scan for available networks. User can configure network manually, via WPS or withhold from connecting with a network. Use direction buttons on the remote control or Select knob on the device to navigate through options.
-
Select "Yes" to configure network manually: Choose the desired network you want to connect. Then enter password if necessary. Enter each sign using numeric buttons on the remote or by rotating Select knob on the device, and press button on the remote or RIGHT button on the device to move to next sign. Press OK button on the remote or press Select button on the device to confirm.
-
Select "Yes (WPS)" to configure network with use of WPS function: the speaker will request pressing the WPS button on your router within 120 seconds. When pressed, the device will automatically connect with network.
-
Select "No" to withhold from connecting to network.
-
When connected successfully, you will see the Wi-Fi logo in the upper left corner.
OPERATION
Standby
Press the standby button on the remote control or press the home/standby button on the front panel to wake up the unit or switch to the standby mode.
Note: the device has to be connected to power supply beforehand!
E
Source change
Press the Key button to switch between sound sources: AUX, Bluetooth, UPnP, Internet radio, DAB, FM.
Note: by default, the Key button is set to change mode. The button's action can be adjusted in Configuration.
Menu
Press the MENU button on the remote control to enter the menu. Press ◀ /▶ buttons or rotate the volume/select knob to select appropriate.
Volume
Press the VOL+/- buttons on the remote control or rotate the volume knob on the front panel to adjust the volume.
Mute
Press the mute button on the remote control to mute the sound. Press the button again, press the VOL+/- buttons on the remote control or rotate the volume knob on the front panel to unmute.
Previous/Next
In Bluetooth mode, press the ◄◄◄ / ►► buttons on the remote control or press the Left/Right buttons on the front panel to skip to previous or next song.
In FM mode, press the ◀◀◀ / ▶buttons on the remote control to tune to previous/ next stored station.
Play/Pause
In Bluetooth mode, press the ▶ button to pause the playback, press again to resume.
EQ
Press the EQ button on the remote control repeatedly to choose between different equalizer settings.
Dimmer
Press the dimmer button to change between dimmer modes: power saving / turn on.
OK & direction buttons
Press the ◀ /▶ buttons on the remote control or press the left/right buttons on the front to select the items. Press the OK button on the remote control or press the volume knob to enable the selected items.
CONFIGURATION
Press the MENU button on the remote control and rotate the volume knob on the front panel or use the direction buttons on the remote control to select Configuration; press OK button or select knob to enter.
Press the direction buttons or rotate the volume knob to select the item, then press the OK button or press the select knob to confirm.
Time display
Select analog or digital clock.
Manage my mediaU
Enter My MediaU and manage the account.
Note: before using this function for the first time, you need register in
http://www.mediayou.net and set up account (otherwise the display will show information that the link to an account is not valid). Enter related data of the device into your account. You will need to add the device to the list: name and the series number (SN number is available in Information Center > System Information > Wireless Info; SN is the MAC address).
Network
1. Wireless network configuration
Select the tab to configure your network. The device will automatically scan for available wireless networks. Once displayed, select desired network and press OK on the remote or press select knob on the device. The device will prompt you to input password (use numeric buttons to input a letter/number and press ▶ button to move to next letter – note correct capitalization!). When the full password has been input, press OK on the remote or press select knob on the device to confirm). The device will automatically connect with the network, and a network symbol will be displayed in the upper left corner of the screen.
2. Wireless Network (WPS PBC)
For WPS connection with router, enter the tab and follow instructions displayed on the radio's screen.
3. Manual configuration
Enter the tab to manually connect with a network (DHCP: on/off; Enter SSID; Manage: Select the Wi-Fi and either delete or not).
- Check network when power on (enable or disable).
Date&Time
User can manually set date and time, select automatic detection (automatic detection is only available only when connected to a network), set the time format, set date format and set daylight saving time (only when time and date have been set manually).
Alarm
User can set 2 alarms. When alarm set to ON, you can adjust repetition mode, time of the alarm and its sound. User can also adjust nap time and alarm volume.
- Note: when set the alarm sound to FM, DAB or Internet radio, there have to be saved favorites beforehand.
- Nap alarm will issue sound after a certain, previously selected time will pass. You can choose from 5, 10, 20, 30, 60, 90, 120 minutes.
- Press any key to activate snooze. Press standby button to switch off alarm when it's ringing.
- Note: If alarm is set to wake you up with an internet station, but it does not work in 1 minute, the device will automatically switch to buzzer.
Timer
Press the ◀ / ▶ buttons to adjust the time. You will hear the sound until the countdown is over.
Language
Enter to select the language.
Dimmer
Select display dimmer mode: power saving (after pressing a button, the backlight will be on. When no button is pressed within 15 seconds the backlight will be dimmed) / turn on (the brightness will be in the set level. It will in power saving level when in standby).
Display
Select color or monochrome.
Power management
Select power management settings (the device will turn off automatically after set period when there is no sound output): off, 5 minutes, 15 minutes, 30 minutes.
NOTE: This unit will enter STANDBY mode automatically after 15 minutes of inactivity by default. Press the HOME / Standby button to wake the unit.
Sleep timer
Set a predefined time to enter standby mode automatically: off, 15 minutes, 30 minutes, 60 minutes, 90 minutes, 120 minutes, 150 minutes, 180 minutes.
Buffer
Select buffer time for internet radio playing (2, 4, 8 seconds).
Weather
Select location, temperature unit, and whether to display the information when on standby.
FM setup
Set mono/stereo mode and select threshold settings (if the device is located in relatively weak FM reception, this function will help to enhance the FM reception).
Local radio setup
Select method of localization setup (manual or automatic)
Playback setup
Select playback repeat mode (off, repeat all, repeat one, shuffle). Function supported only in UPnP mode.
Device
-
Rename: user can change default name of the device.
-
AirMusic Control App: Scan the QR code from the display (Google Play or AppStore according to your mobile device operating system). Download and install the app on your mobile device to manage the device through the mobile app.
Key
User can ascribe a function to the Key button: Alarm, Dimmer, Equaliser, Local Radio, Mode, Preset, Sleep timer, Timer.
Equaliser
Enter to choose one of equaliser mode: Normal, Flat, Jazz, Rock, Soundtracks, Classical, Pop, News, my EQ.
Resume when power on
Allows to resume the last radio station after turning the radio on.
Software Update
Enter this tab to check whether an update is available.
Note: do not disconnect the device from power supply during software update, as this may damage the unit.
Reset to Default
Select yes to reset to default settings.
AIRMUSIC CONTROL APP
Once the user downloads and installs the app on theirs mobile device, the app serves for remote managing of the device. Please note, the KM0816 radio and the mobile device with the AirMusic Control app need to be connected to the same network, otherwise the two devices won't be able to connect with each other. Open the app and there will be displayed list of available devices. Click on the appropriate to connect.
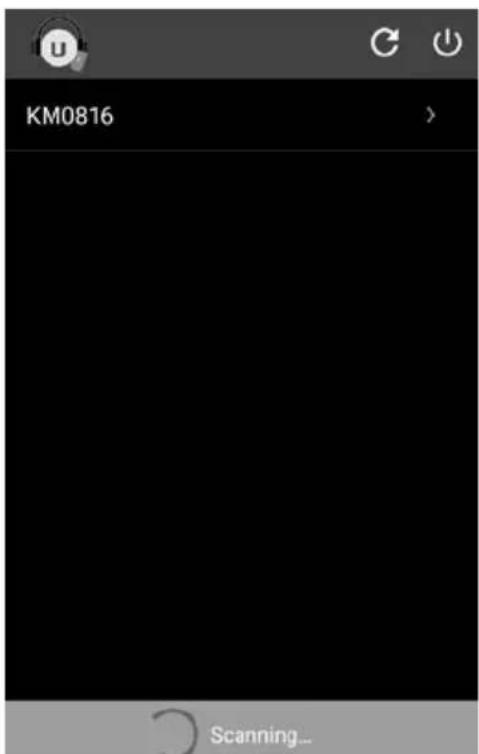
Note: the device will automatically adjust language of the KM0816 radio to the language set in the mobile device with AirMusic Control app.
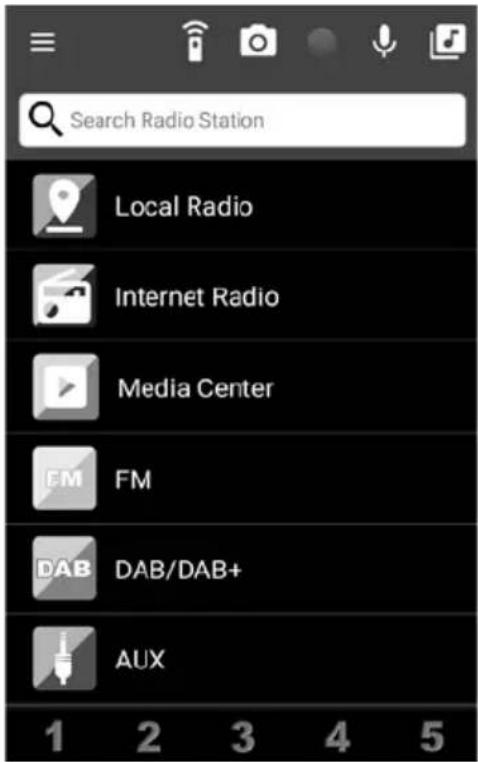
The app lets user control the device via mobile phone:
- Choose appropriate tab to manage the radio.
- Press icon to display side tab. Select Settings to enter more options (change device name, check software updates, scan for other devices or display more information).
- Press to enter remote control mode. The app will serve as a remote control, and the mobile device with AirMusic Control App will display remote control buttons.

-
Turn off the device
-
OK button
-
Mode button
-
Menu button
-
Display favorite stations
-
Key button (same function as the Key button on the device)
-
Sleep timer
-
Alarm
-
Dimmer
-
Equalizer settings
-
Previous
-
Play/Pause
-
Next
-
1 button
-
2 button
-
3 button
-
4 button
-
5 button
-
Mute
-
Volume +
-
Volume -
-
Direction buttons
-
Back to app main menu
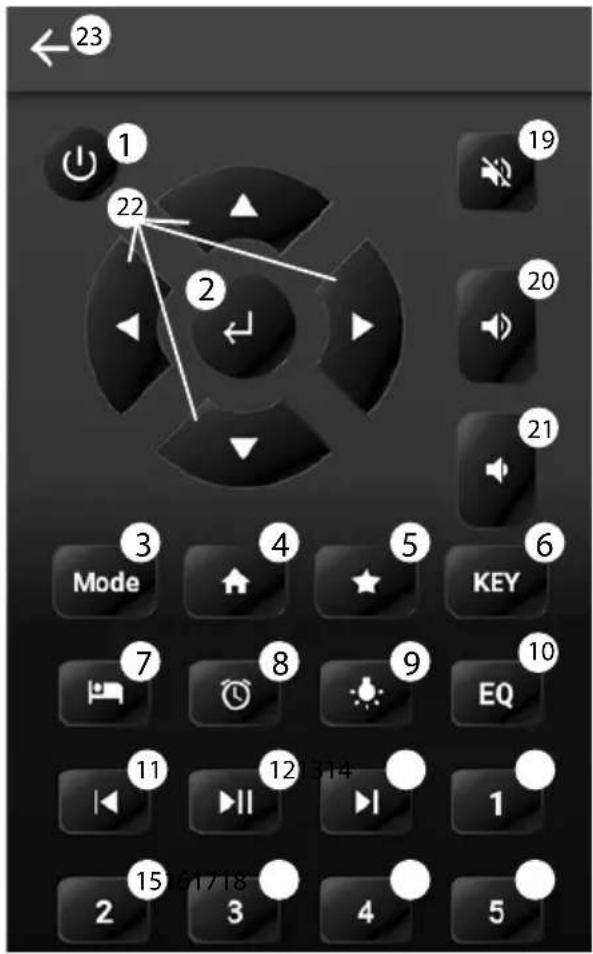
E

- Press to enter standby screen selection setting. Then choose or take a picture to set as a screen saver on the standby display.


- Press to enter voice message option. Press and hold to record voice message; release to stop recording. The red flashing circle will be displayed on the upper left corner of the screen of the radio. To play the voice message, enter any tab in menu recording will be streamed via radio speaker.


- Press to enter intercom option. Press and hold to record; release to stop recording. The recording will be streamed via radio speaker.

- Press ;enter local music directory stored on the mobile device to stream through the radio.
- Press five favorite stations. to stream one of the first
BLUETOOTH
Prior to use via Bluetooth, pair the speaker with an external Bluetooth device, to play the music through the speaker. Once the devices are paired, the speaker will automatically connect with the external device whenever it will be placed within operational range and both appliances will have Bluetooth function ON.
To pair the speaker with an external device:
- Press the Key button to switch to the Bluetooth mode.
- Place your mobile device within operational range (the closer the better). Turn ON the Bluetooth on the mobile device.
- Search for other BT devices on your mobile device and pair it with the KM0816 speaker.
- Input default password "0000" if necessary.
NOTE: The speaker can only connect with one device at a time. To connect to a different device, disconnect from the device that has been paired as a first one and follow the pairing procedure once again with the new device.
AUX IN
- Press the Key button to switch to the AUX mode.
- Plug the Jack 3,5 mm cable into the AUX input on the back of the unit.
- Insert the other plug of the Jack 3,5 mm cable into AUX output of an external audio player.
- Play the music from the external audio player
INTERNET RADIO
Press the Key button to switch to the Internet Radio mode.
- My favorite:
Enter the tab or press the FAVOR button on the remote control, to display your stored favorite stations.
When listening to a radio station, press and hold FAVOR button to store the station.
- Radio Station/Music
User can select the one of four station type: Global Top 20, Genre, Country/Location or Highlight, and press the OK button to enter. Select the radio station you want to listen.
- Local Radio
Select your location beforehand and choose one of the station to listen.
- History
Lists history of played stations.
-
Service
-
You can use the NUMBER/LETTER buttons to search radio station.
-
You can use the NUMBER/LETTER buttons to add the new radio station (input a new link address by yourself).
FM RADIO
- Extend the FM antenna before listening to FM radio to enhance the signal reception.
- Press the Key button to switch to the FM mode.
- Press the ◀/▶buttons on the remote control or LEFT/RIGHT buttons on the front panel to adjust the frequency by 0,05 MHz.
- Press and hold the ◀/▶buttons on the remote control or LEFT/RIGHT buttons on the front panel to perform automatic station search and tune to the next available station with strong reception.
- Press the ▶ button to perform automatic station search from low to high frequency.
- Press the /▶buttons on remote control to go to previous/next stored station.
- When listening to a radio station, press and hold the FAVOR button on the remote control to store the station. Press the FAVOR button on the remote to check the stored stations.
E
DAB RADIO
Press the Key button to switch to the DAB mode. The device will automatically start scanning for stations and display list of found stations once the scanning is finished.
Stored favorite stations
When listening a to station, press and hold the FAVOR button on the remote control to store the station.
Press the FAVOR button on the remote to check the stored stations.
Radio information
Press the INFO button on the remote control, the display will show the radio information.
MEDIA CENTER
This device connects with shared folder on your PC through UPnP. Note: the speaker and your computer must be connected to the same network and in the homegroup.
In order to share music files with the speaker, you need to install an appropriate UPnP media server on your computer. If you operate on Windows PC, Windows Media Player (11 or later) works as an UPnP sharing server.
Note: Ensure to disable Windows firewall from blocking access for sharing files. Don't confuse your PC firewall with your routers firewall - do not switch off your routers firewall.
Within Windows Media Player 12, click the „stream“ and make sure „automatically allow devices to play my media“ is enabled.
Make sure the KM0816 device is in the same homegroup as your PC with the shared folder, and is allowed to stream from other devices (Homegroup settings in Control Panel).
After configuring WMP and home group settings, enter Media Center and go to UPnP. The device will scan for all available UPnP servers.
Note:
- It may take a few seconds for scanning. The radio will display "Empty" before it's completed.
• The device supports only MP3, AAC/AAC+, WMA formats.
INFORMATION CENTER
Press menu button on the remote control and use ▶ /▶ buttons to go to Information center tab. Use direction buttons and press OK button to enter weather, financial information and system information.
Weather information
Keep your weather information up to date. This option gives you insight to 5 days weather forecast in a chosen place.
Add to Standby Display
You can also add the chosen location weather forecast to standby display. After selecting desired location, press OK when the city is highlighted. The screen will display "Add to standby display", press OK button again to confirm.
Financial information
Option allows you to stay in touch with current the information of stock markets all over the world.
System information
Entry consists of information on Version / Wireless Info.
CLEANING AND MAINTENANCE
To clean the casing, unplug the unit and wipe it with a soft, damp cloth (do not use abrasive polishes nor other chemicals).
SPECIFICATION
Main parameters:
• Radio: FM / DAB+ / Internet
• FM radio frequency range : 87,5-108 MHz
• DAB+ radio frequency range: (band III) 174,928-239,200 MHz
- RDS function: yes
• Display: 2,4", color
• Streaming music directly from PC
• Supported formats: WAV, WMA, FLAC, MP3, AAC, AAC+
Speakers:
- Drivers: 2x 3"
• Output power: 2x 5 W - Impedance: 8
- THD: 10%
• Frequency response: 40 Hz - 20 kHz - S/N: 70 dB
Connectivity:
• Wi-Fi: 802.11 b/g/n
- Bluetooth: 2.1+EDR
- Bluetooth range: up to 10 m
- Bluetooth frequency bands: 2402 - 2480 MHz
- Bluetooth transmit max. power: < 1,98 dBm
• UPnP/DLNA: supported
I/O:
- AUX input
- Earphone Jack
• DAB antenna socket - DC-in
Power supply:
- AC/DC adapter:
- Input: 220-240 V; 50/60 Hz
- Output: 12 V; 1,67 A
- Remote control: 2x AAA battery
• Power consumption: 20 W - Standby power consumption: < 1 W
LEARN MORE
For more information on this product, go to www.krugermatz.com.
Visit www.krugermatz.com website for more products and accessories.
In case of any doubts or questions reach out to our Frequently Asked Questions section.
Lechpol Electronics Sp. z o.o. Sp.k. hereby declares that Internet radio KM0816 is consistent with directive 2014/53/UE. Full text of the EU Declaration of Conformity is available at following Internet address: www.lechpol.eu.


English Correct Disposal of This Product (Waste Electrical & Electronic Equipment)

(Applicable in the European Union and other European countries with separate collection systems) This marking shown on the product or its literature, indicates that it should not be disposed with other household wastes at the end of its working life. To prevent possible harm to the environment or human health from uncontrolled waste disposal, please separate this from other types of wastes and recycle it responsibly to promote the sustainable reuse of material resources. Household users should contact either the retailer where they purchased this product, or their local government office, for details of where and how they can take this item for environmentally safe recycling. Business users should contact their supplier and check the terms and conditions of the purchase contract. This product should not be mixed with other commercial wastes for disposal.
Made in China for LECHPOL ELECTRONICS Sp. z o.o. Sp.k., ul. Garwolińska 1, 08-400 Miętne.
VEILIGHEIDSKWESTIES
PIERWSZE KROKI
CENTRUM INFORMACYJNE
2. Retea Wireless (WPS PBC)

2. Radio Station/Music
Add to Standby Display
natural_image
Completely black image with no visible content or text.

www.krugermatz.com
Krüger&Matz is a registered trademark


- PRODUCT DESCRIPTION
- REMOTE CONTROL
- GETTING STARTED
- OPERATION
- Standby
- E
- Source change
- Menu
- Volume
- Mute
- Previous/Next
- Play/Pause
- EQ
- Dimmer
- OK & direction buttons
- CONFIGURATION
- Time display
- Manage my mediaU
- Network
- Wireless network configuration
- Wireless Network (WPS PBC)
- Manual configuration
- Date&Time
- Alarm
- Timer
- Language
- Display
- Power management
- Sleep timer
- Buffer
- Weather
- FM setup
- Local radio setup
- Playback setup
- Device
- Key
- Equaliser
- Resume when power on
- Software Update
- Reset to Default
- AIRMUSIC CONTROL APP
- BLUETOOTH
- AUX IN
- INTERNET RADIO
- FM RADIO
- DAB RADIO
- Stored favorite stations
- Radio information
- MEDIA CENTER
- Note:
- INFORMATION CENTER
- Weather information
- Add to Standby Display
- Financial information
- System information
- CLEANING AND MAINTENANCE
- SPECIFICATION
- Main parameters:
- Speakers:
- Connectivity:
- I/O:
- Power supply:
- LEARN MORE
- VEILIGHEIDSKWESTIES
- PIERWSZE KROKI
- CENTRUM INFORMACYJNE
- Retea Wireless (WPS PBC)
- Radio Station/Music
Brand : Krüger&Matz
Model : KM0816
Category : Radio