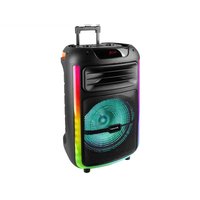
XF 4200 DJ - Speaker Trevi - Free user manual and instructions
Find the device manual for free XF 4200 DJ Trevi in PDF.
| Product type | Portable amplified speaker with DJ effects |
| Brand | Trevi |
| Model | XF 4200 DJ |
| Power supply | 100-240 V ~ 50/60 Hz |
| Maximum audio power | 400 W |
| Frequency response | 60 Hz - 16 kHz |
| Signal-to-noise ratio | > 65 dB |
| Channel separation | > 40 dB |
| Sensitivity | 500 mV ± 50 mV |
| Bluetooth | Class 3, transmission power 1 mW, band 2.4 GHz |
| Operating temperature | 0 °C - 40 °C |
| Operating humidity | 5 % - 90 % |
| Main functions | Bluetooth, USB, AUX-In (2 channels), microphone (2 inputs), USB recording, manual and automatic DJ effects (Smart DJ), 5-band adjustable equalizer, Disco Light lighting, remote control |
| Inputs | 2 x USB, 2 x AUX-In (3.5 mm jack), 2 x MIC (6.35 mm jack) |
| Outputs | 1 x AUX-Out (3.5 mm jack) |
| Remote control batteries | 2 x AAA (not included) |
| Care and cleaning | Use a soft, slightly damp cloth. Do not use solvents or abrasive substances. |
| Safety | Do not expose to moisture, dust, vibrations or heat sources. Leave a space of 5 cm around for ventilation. Do not block the ventilation slots. In case of liquid penetration, unplug immediately and contact an authorized service center. |
| Weight and dimensions | Not specified in the manual |
Frequently Asked Questions - XF 4200 DJ Trevi
User questions about XF 4200 DJ Trevi
0 question about this device. Answer the ones you know or ask your own.
Ask a new question about this device
Download the instructions for your Speaker in PDF format for free! Find your manual XF 4200 DJ - Trevi and take your electronic device back in hand. On this page are published all the documents necessary for the use of your device. XF 4200 DJ by Trevi.
USER MANUAL XF 4200 DJ Trevi
HIGH POWER PORTABLE SPEAKER WITH DJ EFFECTS Connection and Operation Manual
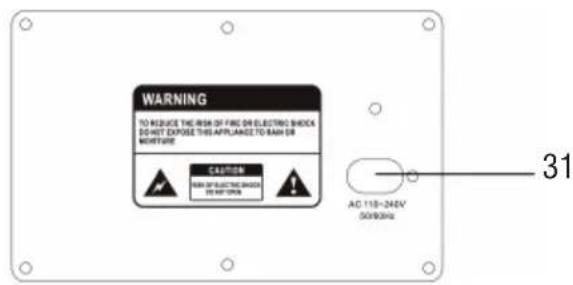
WARNING: DO NOT OPEN THE SET. NEITHER CONTROLS OR SPARE PARTS TO BE USED BY THE USER ARE TO BE FOUND INSIDE IT. APPLY TO AUTHORISED TREVI CENTERS FOR SERVICE OPERATIONS.
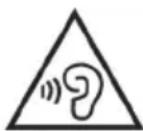
To avoid possible hearing damage, limit the listening time to high volumes
This is a precision electronic appliance; avoid using it in the following cases:
- Listening to high volume for a long time could damage your hearing.
- Do not close the ear to the loudspeaker during step setting and volume adjustments, and in particular keep the volume down at the ignition
- Near strong heat sources, such as central heating plants or stoves.
- In very humid places such as bathrooms, swimming pools, etc.
In very dusty places. - In places subject to strong vibrations.
- Position the appliance in such a way that there is always enough room for free air circulation (at least 5 cm).
- Do not block the air inlets.
If any liquid enters the appliance, unplug it immediately from the socket and take it to the nearest TREVI authorised service centre. - Before switching on the appliance, always check that the power cable and the connection cable are properly installed.
The apparatus shall not be exposed to dripping or splashing water. No objects filled with liquid, such as vases, should be placed on the unit. - No naked flame sources, such as lighted candles, should be placed on.
- Keep this manual.
CARE AND MAINTENANCE
Use a slightly damp soft cloth for cleaning. Do not use solvents and abrasive substances.
IMPORTANT
This device is designed for home use (not professional use). This appliance has been carefully built to ensure long-lasting perfect performance. However, should any inconvenience occur, please contact your local authorised TREVI Service Centre.
TREVI follows a policy of ongoing research and development. Therefore products may have different features from those described.
OVERVIEW OF THE MAIN UNIT
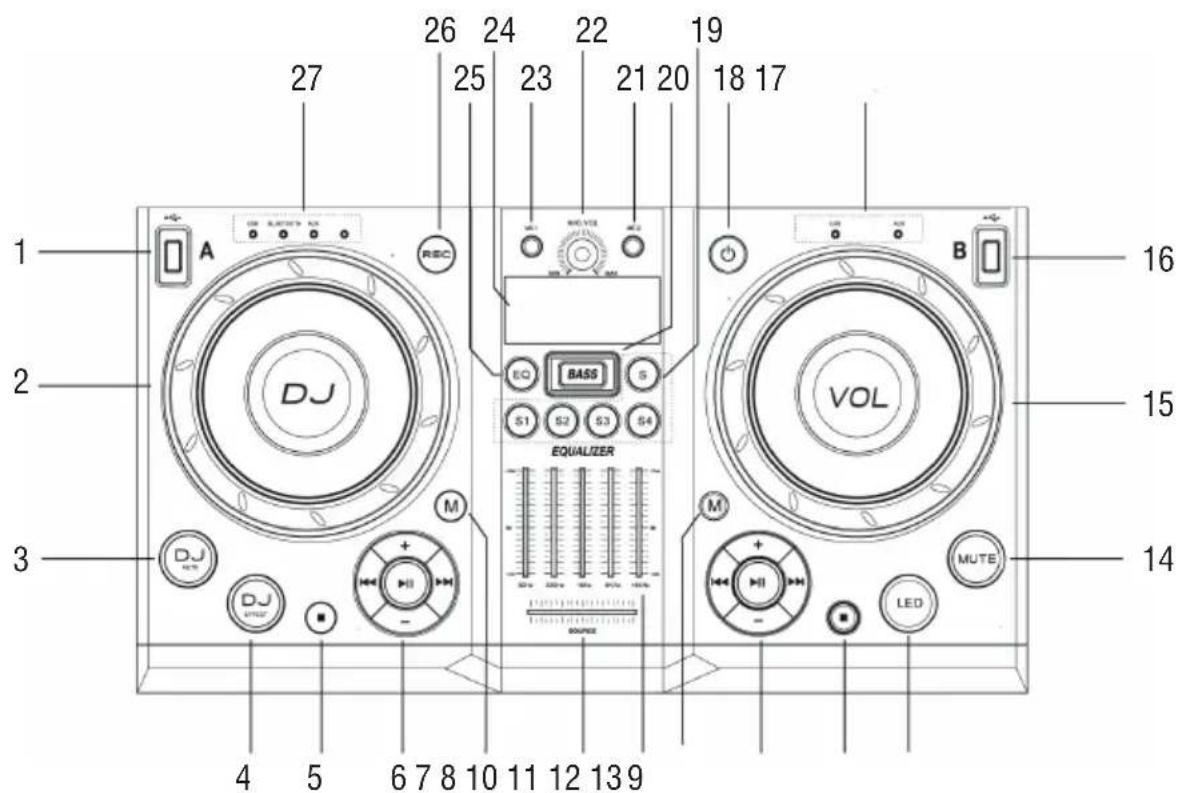
- USB-A Input
- DJ EFFECT DIAL, DJ SOUND EFFECTS
-
AUTO DJ (SMART DJ), in USB-A MODE Smart DJ effect automatically
-
DJ EFFECT, USB-A/Bluetooth/AUX-IN-A DJ effects manually
- Stop button
In USB A mode, stop playing
In USB A mode, erase programs, Exit the process of recording
or auto installing radio station.
- Hold over 2 seconds to enter the new device in the Bluetooth connection mode
- CONTROL PLAY PANEL
- Control play for Source A modes (including USB A, Bluetooth and Audio in A modes)
- MODE SELECTION (A)
- Select a source
- LEFT-RIGHT BALANCE CONTROL
- Adjust the left/right input balance during playback
- CUSTOM EQUALIZER
- Move the slider bars to adjust the equalizer settings for each of the 5 frequency ranges.
- MODE SELECTION (B)
- Select a source
- CONTROL PLAY PANEL (RIGHT)
- Control play for Source B models (including USB B and Audio in B mode)
- Stop button
- In USB B mode, stop playing
- In USB B mode, erase programs
- LED
- Turn on or off the lighting effect
- MUTE
-
In playback state, turn off and turn on the sound
-
VOLUME
- rotate to increase/decrease volume
- USB-B Input
- INDICATOR LIGHT (B)
- When the input mode corresponds to the indicator light
- button
- Turn on the unit or switch to stand-by mode
- DJ AUDIO/MUSICAL INSTRUMENT
- Press the S key to select a preset DJ sound/musical instrument
-
Press S1-S4 to output a preset DJ sound/musical instrument
-
BASS KEYS
-
Turn on/off dynamic bass enhancement
-
MIC 2, jack for a microphone
- MIC VOLUME DIAL
- Rotate to adjust microphone volume
- MIC 1, jack for a microphone
- Display panel
25.EQ - Select a preset sound equalizer setting. When holding more than 2 seconds to enter the state of Custom Equalizer
- REC, record to a USB-A
- INDICATOR LIGHT (A)
- When the input mode corresponds to the indicator light
BACK PANEL
- POWER SWITCH
29.AUX-OUT - Stereo audio output socket (3.5mm)
Can access the headset or output to other audio amplifier equipment
- AUX-IN (A/B)
- Power supply socket
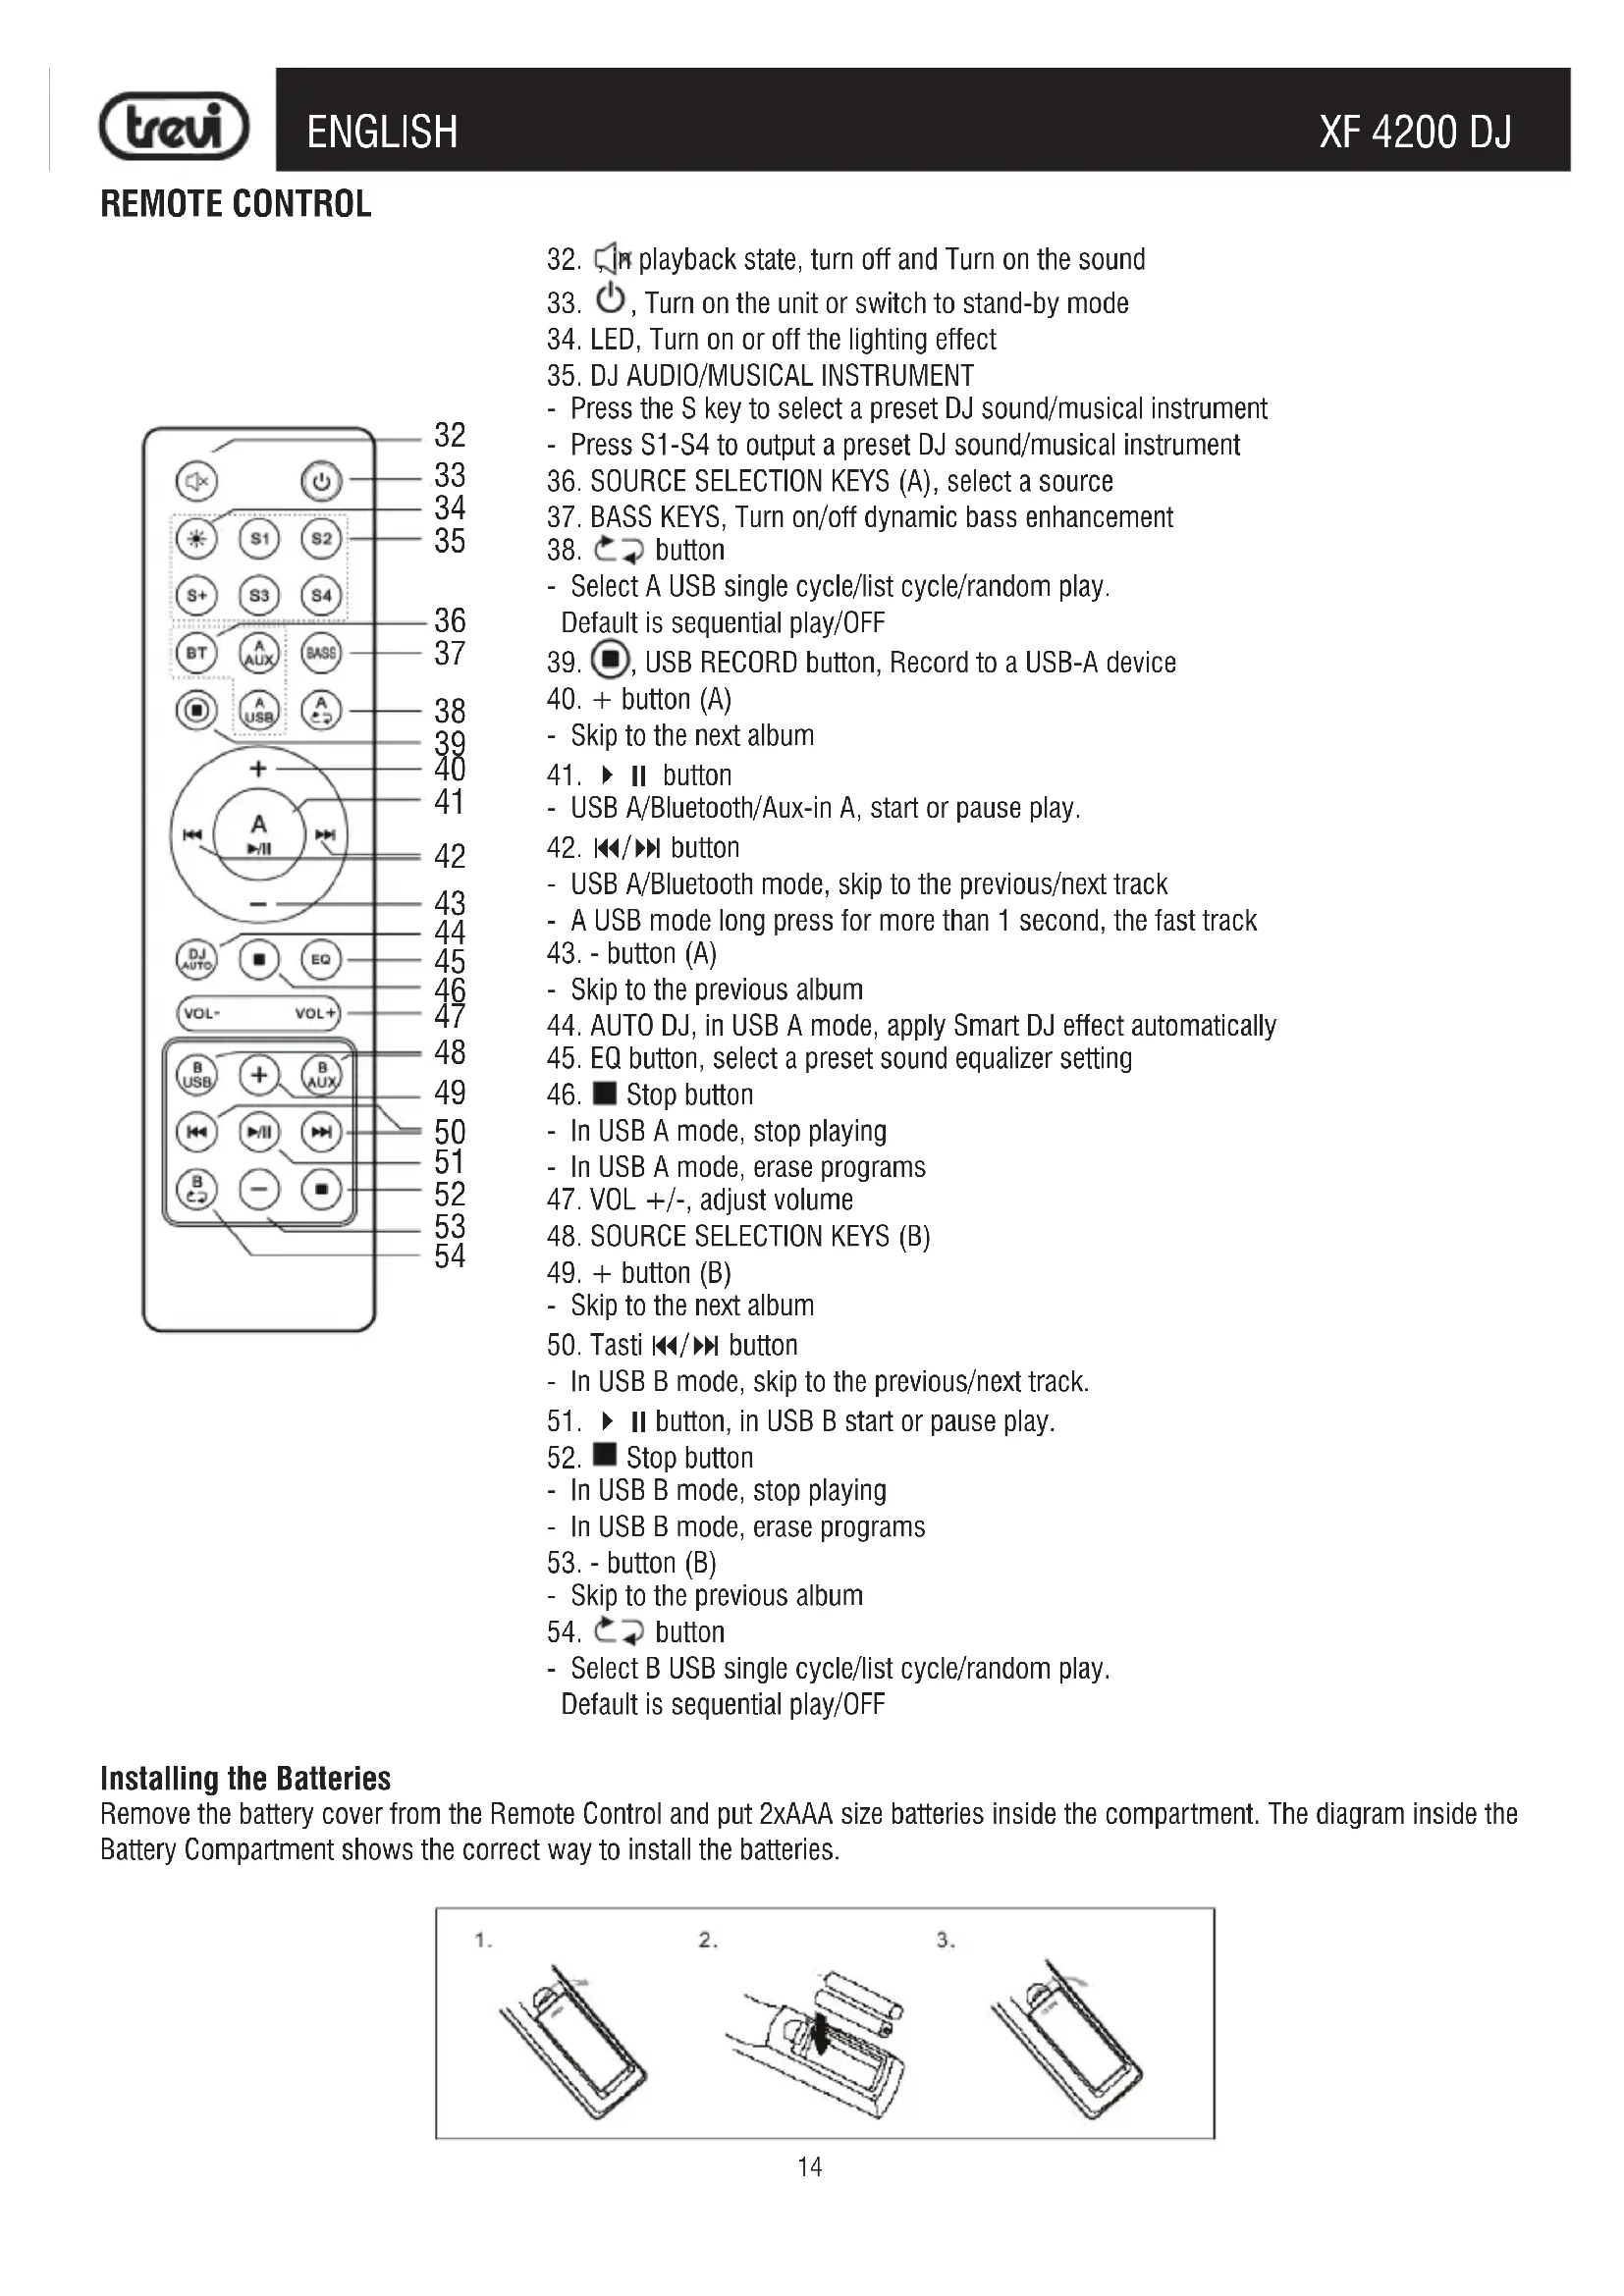
REMOTE CONTROL
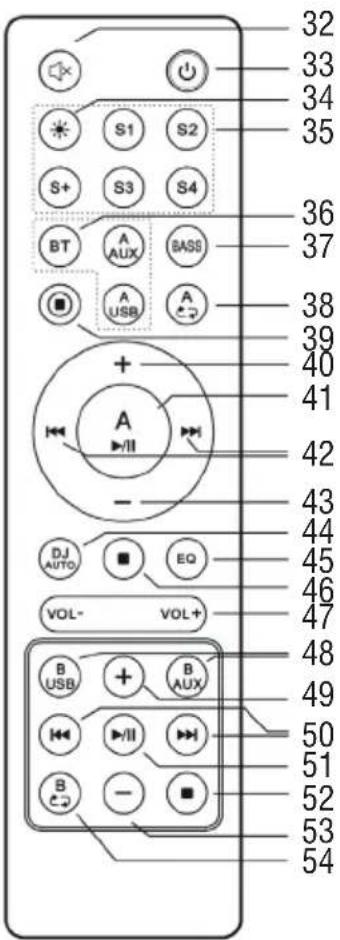
- playback state, turn off and Turn on the sound
- , Turn on the unit or switch to stand-by mode
- LED, Turn on or off the lighting effect
- DJ AUDIO/MUSICAL INSTRUMENT
- Press the S key to select a preset DJ sound/musical instrument
- Press S1-S4 to output a preset DJ sound/musical instrument
- SOURCE SELECTION KEYS (A), select a source
- BASS KEYS, Turn on/off dynamic bass enhancement
- button
- Select A USB single cycle/list cycle/random play.
Default is sequential play/OFF
- USB RECORD button, Record to a USB-A device
-
- button (A)
- Skip to the next album
- II button
- USB A/Bluetooth/Aux-in A, start or pause play.
- button
- USB A/Bluetooth mode, skip to the previous/next track
- A USB mode long press for more than 1 second, the fast track
43.-button(A) - Skip to the previous album
- AUTO DJ, in USB A mode, apply Smart DJ effect automatically
- EQ button, select a preset sound equalizer setting
- Stop button
- In USB A mode, stop playing
- In USB A mode, erase programs
- VOL +/-, adjust volume
- SOURCE SELECTION KEYS (B)
-
- button (B)
- Skip to the next album
- Tasti button
- In USB B mode, skip to the previous/next track.
- button, in USB B start or pause play.
- Stop button
- In USB B mode, stop playing
- In USB B mode, erase programs
53.-button(B) - Skip to the previous album
- button
- Select B USB single cycle/list cycle/random play.
Default is sequential play/OFF
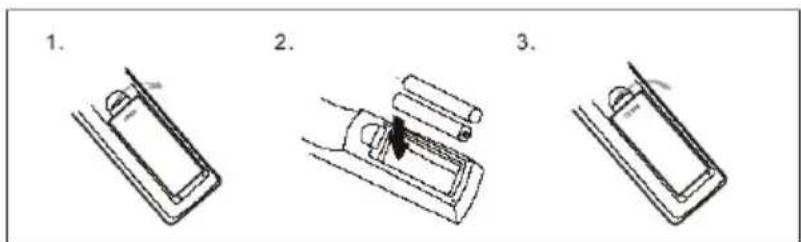
Installing the Batteries
Remove the battery cover from the Remote Control and put 2xAAA size batteries inside the compartment. The diagram inside the Battery Compartment shows the correct way to install the batteries.
TRANSPORTATION
For transportation use the two side handles placed the device or the two top handles, slightly bend the device and exploit the two rear wheels.
POWER
This unit works with power supply 230V - 50Hz.
To activate the unit, insert the power cord into the socket on the device (31) and plug into a power outlet.
Do not connect the appliance to electrical outlets other than those indicated.
BASIC FUNCTIONS
POWER ON
- Set the main POWER ON/OFF switch (28) to the "ON" position;
- Wait for 5 seconds until the message appears on the display;
- Press the button (18) on the unit, the center console will light up.
POWER OFF/STAND-BY
- It is possible to bring the appliance into Stand-by mode by using the button (18) on the unit or the button (33) on the remote control;
- Set the main POWER ON/OFF switch (28) to the "OFF" position to completely switch off the appliance.
Caution:
- There is no LED that signals the activation of the Stand-by function, only the display shows a scrolling text.
SELECTION OF THE FUNCTION ON CHANNEL A AND CHANNEL B
A CHANNEL
For channel A, the following functions are available: BLUETOOTH, USB, AUX-IN.
- Move the balance control (8) on the unit to the left (Channel A);
- To change the operating mode, press the M button (7) on the unit several times or press the corresponding function button (36) on the remote control.
B CHANNEL
For channel B the following functions are available: USB, AUX-IN.
- Move the balance control (8) on the unit to the right (Channel B);
- To change the operating mode, press the M key(10) on the unit several times or press the corresponding function key(48) on the remote control.
VOLUME CONTROL
- Turn the VOLUME knob(15) on the unit to increase or decrease the general playback volume or use the buttons (47) on the remote control.
- Turn the MIC VOL knob(22) to adjust the volume of the signal on the MIC1(23), MIC2(21) inputs of the microphones.
PRESET EQ AND ADJUST EQUALIZER SETTING
This unit has a pre-set audio equalization system. Press the EQ button (25) on the unit repeatedly or the button (45) on the remote control to select one of the 5 audio equalizers available and which is best suited to the current sound reproduction.
Holding down the EQ button (25) on the unit for 2 seconds or the button (45) on the remote control will access the "personal equalization" status; this allows you to increase/decrease the gain for specific frequency ranges and adjust the audio output according to your preferences.
- Move the slider bars to adjust the equalizer settings for each of the 5 frequency ranges.
DISCO-LIGHT EFFECTS
To activate the disco-Light effects on the speakers, press the LED button (13) on the unit or the button (34) on the remote control. To deactivate the disco-Light effect, press the LED button (13) on the unit or the button (34) on the remote control again.
APPLY DJ EFFECT MANUALLY
EFFECTI 1.
You can also add preset DJ effects by yourself in A channel.
- Press DJ EFFECT(4) on unit repeatedly to select one of the 6 preloaded effects;
- Turn the DJ EFFECT dial(2) on the unit to play back the selected effect;
- To turn off the DJ effects, press DJ EFFECT(4) on unit repeatedly to select OFF.
EFFECT12.
During normal playback of channel A:
- Press keys S1 to S4 on the unit or keys(35) on the remote control to select one of the 4 preloaded effects;
- Press the S key(19) on the unit or the S + key(35) on the remote control to switch to the drum sounds;
- Press the S1 to S4 buttons on the unit or the buttons(35) on the remote control to select one of the preloaded drum sounds.
Note:
- Effects are only reproduced on channel A playback. They are not played if channel B is selected.
APPLY SMART DJ EFFECT
The SMART DJ function adds various sound and playback effects to your music automatically:
-
To apply SMART DJ effects, press AUTO DJ(3) repeatedly to select from:
-
[SMART DJ PARTY] (PARTY)
-
[SMART DJ METAL] (METAL)
-
To turn off the SMART DJ effects, press AUTO DJ(3) repeatedly to select [SMART DJ OFF];
- To adjust the occurrence frequency and sound level of the added effects, rotate the DJ EFFECT dial.
BLUETOOTH FUNCTION
ONLY ON A CHANNEL
- Switch the appliance on and move the balance control(8) on the unit to the left (Channel A);
- Press the M key(7) on the unit or the BT key(36) on the remote control and select the bluetooth function; "BT" appears on the display;
- In the Bluetooth mode, the word "SEARCH" on the display will start to flash, the system will automatically go into search;
- Activate the Bluetooth functionality on the external device to be paired;
- Start the device search and select the "XF 4200 DJ" device;
- Enter the password "0000" if required;
- Start playback from the paired external device;
- Press the button II on the control keyboard (6) on the unit or the A II (41) on the remote control to pause playback, press it again to resume normal playback;
- Use the , (6) buttons on the unit or the , (42) buttons on the remote to select tracks.
PLAY ON USB INPUT
- Turn on the unit;
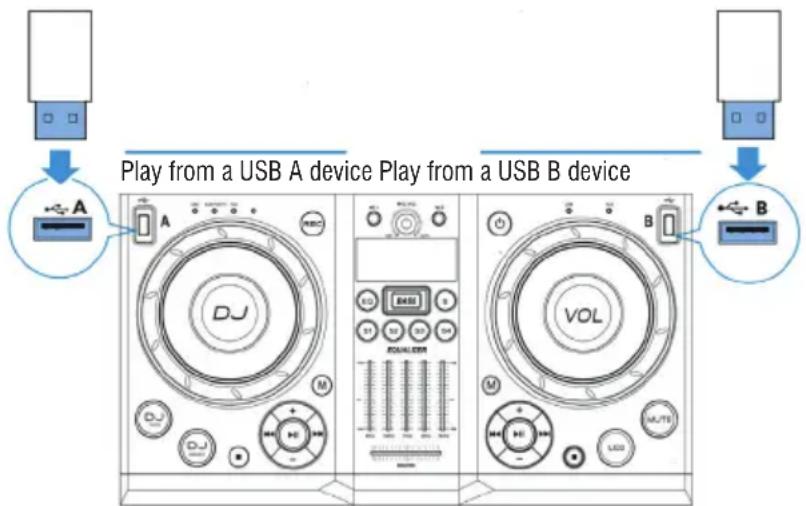
- Insert a USB memory in the corresponding inputs: (1) for channel A, (16) for channel B;
A CHANNEL - Move the balance control (8) on the unit to the left (A Channel);
-
Press the button on the control keyboard (6) on the unit, or the A (41) button on the remote control to start playback;
-
Press again to pause playback, press it again to resume normal playback;
- Press the Stop button (5) on the unit, or the button(46) on the remote control to stop playback completely;
- Press the , (6) buttons on the unit, or the , (42) buttons on the remote control while listening to go to the previous/next track;
- Press the - / + keys on the controller (6) on the unit, or the + (40) and - (43) keys on the remote control to move to the previous/ next folder;
- Press the A (38) button on the remote control once, the display will show the word "RPT ONE", to reproduce the same track continuously; press it a second time, the word "RPT ALL" will appear on the display, to continuously play all the tracks in the folder or USB device. Press it a third time, the display will show the word "RANDOM", to play the songs randomly; press it a fourth time, the display will show the word "OFF", repetition function disarmed.
B CHANNEL - Move the balance control (8) on the unit to the right (B Channel);
- Press the button on the control keyboard (11) on the unit, or the button on the remote control to start playback;
- Press again to pause playback, press it again to resume normal playback;
- Press the Stop button (12) on the unit, or the button(52) on the remote control to stop playback completely;
- Press the , (11) buttons on the unit, or the , (50) buttons on the remote control while listening to go to the previous/next track;
- Press the - / + keys on the controller (11) on the unit, or the + (49) and - (53) keys on the remote control to move to the previous/next folder;
- Press the A (54) button on the remote control once, the display will show the word "RPT ONE", to reproduce the same track continuously; press it a second time, the word "RPT ALL" will appear on the display, to continuously play all the tracks in the folder or USB device. Press it a third time, the display will show the word "RANDOM", to play the songs randomly; press it a fourth time, the display will show the word "OFF", repetition function disarmed.
Note:
- The player may not support some USB devices, this is due to the incompatibility of some processors.
- To avoid harmful interference, always connect USB devices directly to the unit, do not use extension cords.
- From the computer to format the USB memory FAT (16 or 32).
AUX-IN
- Connect any unit with audio output through the appropriate 3.5mm jack cable to the AUX IN-A input (30) channel A or AUX IN-B (30) channel B;
- Switch the appliance on and move the balance control(8) on the unit to the left (Channel A) or right (Channel B) according to the connected AUX-IN input;
- Press the M(7) or M(10) button on the unit and select the "AUX" function; or directly press the A AUX(36) or B AUX(48) button on the remote control;
- Use the external device from their commands.
- Connect the supplied microphone into the jack MIC1(23) or MIC2(21);
- Turn on the microphone using the switch on the handle of the microphone to the ON position;
- Adjust the microphone input volume, using the control (22) on the unit.
Note: You can use two microphones simultaneously.
RECORDING
You can record the track played by channel B (USB or AUX-IN) or channel A (AUX-IN). Recording is performed only on USB A. The first time you record on a USB device, a folder called "EXT_REC" is automatically created within the device and each time you record, the files are stored and named numerically in the order in which they were created..
- Connect a USB memory to the USB A channel jack (1), all audio files will be saved to this memory;
- Press the REC recording button (26) on the unit, or the (39) button on the remote control to start recording, the display will show 00:01 the recording duration.
The recording volume depends on the listening volume, eg if the playback is at low volume even the recording will be at low volume.
AUX-OUT
This output can be used to connect the unit to other devices (via AUX-IN) for audio amplification and to increase the total power. It can also be used to connect headphones, but keep in mind that the unit's speakers are not excluded.
WARNING LISTENING WITH HEADPHONES / AURICOLARS
To avoid possible hearing damage, limit the listening time to high volumes.
TROUBLESHOOTING
If a problem occurs, follow the steps in the table below.
If the problem still can't be solved, please contact your retailer.
| Problem Possible | cause Solution | |
| No response from the unit | Power cable disconnected or not connected properly | Disconnect and reconnect the AC power plu, then turn on the unit again |
| No sound when power is turned ON | 1. No input sound source comes2. Volume knob in the lowest position3. USB not plugged | 1. Input AUX signal2. Adjust volume3. Plug USB,play MP3 |
| Distorted sound 1. Volume | s too loud2. Audio file error | 1. Turn the volume down2. Check and change the audio file |
| No sound from the microphone | 1. Microphone socket may not be plugged properly.2. Microphone switch may not be on.3. Microphone volume is on lowest mode. | 1. Ensure the microphone is correctly plugged into the socket.2. Turn on the microphone3. Adjust the microphone volume as per users wish |
| No sound comes after inserting USB | 1. Incorrect file format2. USB may not be plugged properly | 1. File format should be MP32. Plug USB correctly |
| Remote control does not work | 1. The source has not been selected.2. The remote control is very far from the unit.3. The batteries have not been inserted correctly.4. Low batteries.5. The remote control receiver on the unit is covered or unable to receive the signal properly. | 1. Before you press any function button, first select the correct source with the remote control instead of the main unit.2. Reduce the distance between the remote control and the unit.3. Insert the batteries with their polarities (+/- signs) aligned as indicated.4. Replace the batteries.5. Aim the remote control directly at the sensor on the front of the main unit. |
| Cannot apply sound effects when playing from a USB B device | USB B mode does not support DBB, DSC,DJ EFFECT or Smart DJ effects. | |
| If Speaker makes loud noises | 1. Microphone switched on but may too close to the speaker2. Microphone switched on but is not being used3. Microphone volume may be too loud4. Mobile phone is being used too close to the speaker5. Other wireless equipment may be placed very close to the speaker | 1. Keep the microphone 2 meters away from the speaker2. Turn off microphone if not in use.3. Adjust microphone volume to lower mode4. Keep mobile away from the speaker whilst a ending a call.5. Keep the speaker away from other wireless equipment |
INFORMATION TO USERS
pursuant to Legislative Decree No. 49 of March 14, 2014
"Implementation of Directive 2012/19/EU on Waste Electrical and Electronic Equipment (WEEE)"
This wheeled bin symbol on the product indicates that at the end of its life must be collected separately from other waste. The user must, therefore, take the remote control integrates the essential components that got to its life to the appropriate differentiated collection centers for electronic and electro-technical waste, or return it to the dealer when purchasing a new appliance of equivalent type, in terms of one to one, or one to zero for equipment having longer side of less than 25~cm . Appropriate separate collection for the decommissioned equipment for recycling, processing and environmentally compatible disposal helps prevent negative impact on the environment and human health and promotes recycling of the materials making up the product. Illegal dumping of the product by the user entails the application of administrative sanctions stated in Legislative Decree n. Legislative Decree No. 49 of March 14, 2014.
TECHNICAL SPECIFICATIONS
| Power Supply: | 100-240V ~ 50/60Hz |
| Power consumption: | Max 130W |
| Channel Separation: | >40dB |
| Operating temperature: | 0° ~ 40°C |
| Humidity: | 5% ~ 90% |
| Output Audio power: | 400W |
| Frequency response: | 60Hz - 16KHz |
| S/N ratio: | >65dB |
| Sensibility: | 500mV +/- 50mV |
| Class Bluetooth: | 3 |
| Bluetooth peak transmission power: | 1mW |
| Bluetooth max power transmission: | 0,8mW |
| Band transmission Bluetooth: | 2,4GHz |
| Dimensions: | 574x340x1200mm |
| Weight: | 27 kg |
NOTES D'EMPLOI
Consommation: Max 130W
Dimensions: .574x340x1200mm
Poids: 27 Kg
GEBRAUCHSHINWEISE
GroBe: .574x340x1200mm
Gewicht: 27 Kg
NOTAS PARA EL USO
| Problema Posibles | causes Solución | |
| El aparato no enciende Cable de | red desconnectado o mal conectado | Desconecte y vuelva a conectar el cable de alimentación, y bajo vuelva a encender laupon. |
| No hay sonido cuando la unidad está encendida | 1. No hay sonido de la fuente2. Regulador de volumen en el nivel 03. No hay ningún dispositivo USB conectado | 1. Conectar un dispositivo a la toma AUX-IN2. Ajuste el volumen3. Conexión USB, reproducir MP3 |
| Sonido distorsionado 1. El volumen | en es demasiado alto2. Error de archivo de audio | 1. Bajar el volumen2. Comprobar y reproducir除外 archivo deaudio |
| No hay sonido desde el mi-crófono | 1. La toma de micrófono no se pueda conectar correctamente.2. El interruptor de encendido en el micrófono puede estar en la posición"off".3. Volumen del micrófono bajo. | 1. Asegúrese de que el micrófono está conec-tado correctamente.2. Encender el micrófono.3. Ajuste correctamente el volumen del micrófono |
| No hay sonido cuando seinserta una tarjeta de dispositivo USB | 1. Formato de archivo no admitido2. USB no está conectado correcta-mente | 1. El formato de archivo de audio debe ser MP32. Conectar el dispositivo de tarjeta USBcorrectamente |
| El control remoto no funciona 1 | La fuente no ha sido selecciónada.2. El control remoto está muy lejos de laupon.3. Las baterías no se han insertado correctamente.4. Baterías bajas.5. El receptor de control remoto en laupon está cubierto o no peut recibir la signaled correctamente. | 1. Antes de presionar cualquier tecla, primero selecciónla fuente correcta con el control remoto en lugar de en laupon principal.2. Reduzca la distancia entre el control remoto y laupon.3. Inserte las baterías con las polaridades(signos +/-) alineados como se indica.4. Reemplcase las baterías.5. Apunte el control remoto directamente al sensor en la parte frontal de laupon principal. |
| Los efectos de sonido no seSEOSEOSEOSEOSEOSEOSEOSEOSEOSEOSEOSEOSEOSEOSEOSEOSEOSEOSEOSEOSEOSEOSEOSEOSEOSEOSEOSEOSEOSEOSEOSEOSEOSEOSEOSEOSEOSEOSEOSEOSEOSEOSEOSEOSEOSEOSEOSEOSEOSEOSEOSEOSEOSEOSEOSEOSEOSEOSEOSEOSEOSEOSEOSEOSEOSEOSEOSEOSEOSEOSEOSEOSEOSEOSEOSEOSEOSEOSEOSEOSEOSEOSEOSEOSEOSEOSEOSEOSEOSEOSEOSEOSEOSEOSEOSEOSEOSEOSEOSEO SEOSEOSEOSEOSEOSEOSEOSEOSEOSEOSEOSEOSEOSEOSEOSEOSEOSEOSEOSEOSEOSEOSEOSEOSEOSEOSEOSEOSEOSEOSEOSEOSEOSEOSEOSEOSEOSEOSEOSEOSEOSEOSEOSEOSEOSEOSEOSEOSEOSEOSEOSEOSEOSEOSEOSEOSEOSEOSEOSEOSEOSEOSEOSEOSEOSEOSEOSEOSEOSEOSEOSEOSEOSEOSEOSEOSEOSEOSEOSEOSEOSEOSEOSEOSEOSEOSEOSEOSEOSEOSEOSEOSEOSEOSEOSEOSEOSEOSEOSEOseoSEOSEOSEOSEOSEOSEOSEOSEOSEOSEOSEOSEOSEOSEOSEOSEOSEOSEOSEOSEOSEOSEOSEOSEOSEOSEOSEOSEOSEOSEOSEOSEOSEOSEOSEOSEOSEOSEOSEOSEOSEOSEOSEOSEOSEOSEOSEOSEOSEOSEOSEOSEOSEOSEOSEOSEOSEOSEOSEOSEOSEOSEOSEOSEOSEOSEOSEOSEOSEOSEOSEOSEOSEOSEOSEOSEOSEOSEOSEOSEOSEOSEOSEOSEOSEOSEOSEOSEOSEOSEOSEOSEOSEOSEOSEOSEOSEOSEOSEOSEQEOSEOSEOSEOSEOSEOSEOSEOSEOSEOSEOSEOSEOSEOSEOSEOSEOSEOSEOSEOSEOSEOSEOSEOSEOSEOSEOSEOSEOSEOSEOSEOSEOSEOSEOSEOSEOSEOSEOSEOSEOSEOSEOSEOSEOSEOSEOSEOSEOSEOSEOSEOSEOSEOSEOSEOSEOSEOSEOSEOSEOSEOSEOSEOSEOSEOSEOSEOSEOSEOSEOSEOSEOSEOSEOSEOSEOSEOSEOSEOSEOSEOSEOSEOSEOSEOSEOSEOSEOSEOSEOSEOSEOSEOSEOSEOSEOSEOSEOSEOEQSEOSEOSEOSEOSEOSEOSEOSEOSEOSEOSEOSEOSEOSEOSEOSEOSEOSEOSEOSEOSEOSEOSEOSEOSEOSEOSEOSEOSEOSEOSEOSEOSEOSEOSEOSEOSEOSEOSEOSEOSEOSEOSEOSEOSEOSEOSEOSEOSEOSEOSEOSEOSEOSEOSEOSEOSEOSEOSEOSEOSEOSEOSEOSEOSEOSEOSEOSEOSEOSEOSEOSEOSEOSEOSEOSEOSEOSEOSEOSEOSEOSEOSEOSEOSEOSEOSEOSEOSEOSEOSEOSEOSEOSEOSEOSEOSEOSEOSEOEOSEOSEOSEOSEOSEOSEOSEOSEOSEOSEOSEOSEOSEOSEOSEOSEOSEOSEOSEOSEOSEOSEOSEOSEOSEOSEOSEOSEOSEOSEOSEOSEOSEOSEOSEOSEOSEOSEOSEOSEOSEOSEOSEOSEOSEOSEOSEOSEOSEOSEOSEOSEOSEOSEOSEOSEOSEOSEOSEOSEOSEOSEOSEOSEOSEOSEOSEOSEOSEOSEOSEOSEOSEOSEOSEOSEOSEOSEOSEOSEOSEOSEOSEOSEOSEOSEOSEOSEOSEOSEOSEOSEOSEOSEOSEOSEOSEOSEOSEQEQSEOSEOSEOSEOSEOSEOSEOSEOSEOSEOSEOSEOSEOSEOSEOSEOSEOSEOSEOSEOSEOSEOSEOSEOSEOSEOSEOSEOSEOSEOSEOSEOSEOSEOSEOSEOSEOSEOSEOSEOSEOSEOSEOSEOSEOSEOSEOSEOSEOSEOSEOSEOSEOSEOSEOSEOSEOSEOSEOSEOSEOSEOSEOSEOSEOSEOSEOSEOSEOSEOSEOSEOSEOSEOSEOSEOSEOSEOSEOSEOSEOSEOSEOSEOSEOSEOSEOSEOSEOSEOSEOSEOSEOSEOSEOSEOSEOSEOSEQ EQEQEQEQEQEQEQEQEQEQEQEQEQEQEQEQEQEQEQEQEQEQEQEQEQEQEQEQEQEQEQEQEQEQEQEQEQEQEQEQEQEQEQEQEQEQEQEQEQEQEQEQEQEQEQEQEQEQEQEQEQEQEQEQEQEQEQEQEQEQEQEQEQEQEQEQEQEQEQEQEQEQEQEQEQEQEQEQEQEQEQEQEQEQEQEQEQEQEQEQEQ EQEQEQEQEQEQEQEQEQEQEQEQEQEQEQEQEQEQEQEQEQEQEQEQEQEQEQEQEQEQEQEQEQEQEQEQEQEQEQEQEQEQEQEQEQEQEQEQEQEQEQEQEQEQEQEQEQEQEQEQEQEQEQEQEQEQEQEQEQEQEQEQEQEQEQEQEQEQEQEQEQEQEQEQEQEQEQEQEQEQEQEQEQEQEQEQEQEQEQ EQ EQ EQ EQ EQ EQ EQ EQ EQ EQ EQ EQ EQ EQ EQ EQ EQ EQ EQ EQ EQ EQ EQ EQ EQ EQ EQ EQ EQ EQ EQ EQ EQ EQ EQ EQ EQ EQ EQ EQ EQ EQ EQ EQ EQ EQ EQ EQ EQ EQ EQ EQ EQ EQ EQ EQ EQ EQ EQ EQ EQ EQ EQ EQ EQ EQ EQ EQ EQ EQ EQ EQ EQ EQ EQ EQ EQ EQ EQ EQ EQ EQ EQ EQ EQ EQ EQ EQ EQ EQ EQ EQ EQ EQ EQ EQ EQ EQ EQ EQEQ EQ EQ EQ EQ EQ EQ EQ EQ EQ EQ EQ EQ EQ EQ EQ EQ EQ EQ EQ EQ EQ EQ EQ EQ EQ EQ EQ EQ EQ EQ EQ EQ EQ EQ EQ EQ EQ EQ EQ EQ EQ EQ EQ EQ EQ EQ EQ EQ EQ EQ EQ EQ EQ EQ EQ EQ EQ EQ EQ EQ EQ EQ EQ EQ EQ EQ EQ EQ EQ EQ EQ EQ EQ EQ EQ EQ EQ EQ EQ EQ EQ EQ EQ EQ EQ EQ EQ EQ EQ EQ EQ EQ EQ EQ EQ EQ EQ EQEQEQ EQ EQ EQ EQ EQ EQ EQ EQ EQ EQ EQ EQ EQ EQ EQ EQ EQ EQ EQ EQ EQ EQ EQ EQ EQ EQ EQ EQ EQ EQ EQ EQ EQ EQ EQ EQ EQ EQ EQ EQ EQ EQ EQ EQ EQ EQ EQ EQ EQ EQ EQ EQ EQ EQ EQ EQ EQ EQ EQ EQ EQ EQ EQ EQ EQ EQ EQ EQ EQ EQ EQ EQ EQ EQ EQ EQ EQ EQ EQ EQ EQ EQ EQ EQ EQ EQ EQ EQ EQ EQ EQ EQ EQ EQ EQ EQ EQEQ EQEQ EQ EQ EQ EQ EQ EQ EQ EQ EQ EQ EQ EQ EQ EQ EQ EQ EQ EQ EQ EQ EQ EQ EQ EQ EQ EQ EQ EQ EQ EQ EQ EQ EQ EQ EQ EQ EQ EQ EQ EQ EQ EQ EQ EQ EQ EQ EQ EQ EQ EQ EQ EQ EQ EQ EQ EQ EQ EQ EQ EQ EQ EQ EQ EQ EQ EQ EQ EQ EQ EQ EQ EQ EQ EQ EQ EQ EQ EQ EQ EQ EQ EQ EQ EQ EQ EQ EQ EQ EQ EQ EQ EQ EQ EQ EQ EQ EQEQEQEQ EQ EQ EQ EQ EQ EQ EQ EQ EQ EQ EQ EQ EQ EQ EQ EQ EQ EQ EQ EQ EQ EQ EQ EQ EQ EQ EQ EQ EQ EQ EQ EQ EQ EQ EQ EQ EQ EQ EQ EQ EQ EQ EQ EQ EQ EQ EQ EQ EQ EQ EQ EQ EQ EQ EQ EQ EQ EQ EQ EQ EQ EQ EQ EQ EQ EQ EQ EQ EQ EQ EQ EQ EQ EQ EQ EQ EQ EQ EQ EQ EQ EQ EQ EQ EQ EQ EQ EQ EQ EQ EQ EQ EQ EQ EQ EQEQEQEQEQ EQ EQ EQ EQ EQ EQ EQ EQ EQ EQ EQ EQ EQ EQ EQ EQ EQ EQ EQ EQ EQ EQ EQ EQ EQ EQ EQ EQ EQ EQ EQ EQ EQ EQ EQ EQ EQ EQ EQ EQ EQ EQ EQ EQ EQ EQ EQ EQ EQ EQ EQ EQ EQ EQ EQ EQ EQ EQ EQ EQ EQ EQ EQ EQ EQ EQ EQ EQ EQ EQ EQ EQ EQ EQ EQ EQ EQ EQ EQ EQ EQ EQ EQ EQ EQ EQ EQ EQ EQ EQ EQ EQ EQ EQ EQEQEQEQ EQEQEQEQEQ EQ EQ EQ EQ EQ EQ EQ EQ EQ EQ EQ EQ EQ EQ EQ EQ EQ EQ EQ EQ EQ EQ EQ EQ EQ EQ EQ EQ EQ EQ EQ EQ EQ EQ EQ EQ EQ EQ EQ EQ EQ EQ EQ EQ EQ EQ EQ EQ EQ EQ EQ EQ EQ EQ EQ EQ EQ EQ EQ EQ EQ EQ EQ EQ EQ EQ EQ EQ EQ EQ EQ EQ EQ EQ EQ EQ EQ EQ EQ EQ EQ EQ EQ EQ EQ EQ EQ EQ EQ EQ EQ EQ EQ EQEQEQEQEQ EQEQEQEQEQ EQ EQ EQ EQ EQ EQ EQ EQ EQ EQ EQ EQ EQ EQ EQ EQ EQ EQ EQ EQ EQ EQ EQ EQ EQ EQ EQ EQ EQ EQ EQ EQ EQ EQ EQ EQ EQ EQ EQ EQ EQ EQ EQ EQ EQ EQ EQ EQ EQ EQ EQ EQ EQ EQ EQ EQ EQ EQ EQ EQ EQ EQ EQ EQ EQ EQ EQ EQ EQ EQ EQ EQ EQ EQ EQ EQ EQ EQ EQ EQ EQ EQ EQ EQ EQ EQ EQ EQ EQ EQ EQEQEQEQEQ EQ EQ EQ EQEQEQEQEQ EQ EQ EQ EQ EQ EQ EQ EQ EQ EQ EQ EQ EQ EQ EQ EQ EQ EQ EQ EQ EQ EQ EQ EQ EQ EQ EQ EQ EQ EQ EQ EQ EQ EQ EQ EQ EQ EQ EQ EQ EQ EQ EQ EQ EQ EQ EQ EQ EQ EQ EQ EQ EQ EQ EQ EQ EQ EQ EQ EQ EQ EQ EQ EQ EQ EQ EQ EQ EQ EQ EQ EQ EQ EQ EQ EQ EQ EQ EQ EQ EQ EQ EQ EQ EQ EQ EQ EQ EQ EQ EQEQEQEQ EQ EQ EQ EQ EQEQEQEQEQ EQ EQ EQ EQ EQ EQ EQ EQ EQ EQ EQ EQ EQ EQ EQ EQ EQ EQ EQ EQ EQ EQ EQ EQ EQ EQ EQ EQ EQ EQ EQ EQ EQ EQ EQ EQ EQ EQ EQ EQ EQ EQ EQ EQ EQ EQ EQ EQ EQ EQ EQ EQ EQ EQ EQ EQ EQ EQ EQ EQ EQ EQ EQ EQ EQ EQ EQ EQ EQ EQ EQ EQ EQ EQ EQ EQ EQ EQ EQ EQ EQ EQ EQ EQ EQ EQ EQ EQ EQ EQEQEQEQEQ EQ EQ EQ EQ EQEQEQEQEQ EQ EQ EQ EQ EQ EQ EQ EQ EQ EQ EQ EQ EQ EQ EQ EQ EQ EQ EQ EQ EQ EQ EQ EQ EQ EQ EQ EQ EQ EQ EQ EQ EQ EQ EQ EQ EQ EQ EQ EQ EQ EQ EQ EQ EQ EQ EQ EQ EQ EQ EQ EQ EQ EQ EQ EQ EQ EQ EQ EQ EQ EQ EQ EQ EQ EQ EQ EQ EQ EQ EQ EQ EQ EQ EQ EQ EQ EQ EQ EQ EQ EQ EQ EQ EQ EQ EQEQEQEQEQ EQ EQ EQ EQ EQ EQ EQ EQEQEQEQEQ EQ EQ EQ EQ EQ EQ EQ EQ EQ EQ EQ EQ EQ EQ EQ EQ EQ EQ EQ EQ EQ EQ EQ EQ EQ EQ EQ EQ EQ EQ EQ EQ EQ EQ EQ EQ EQ EQ EQ EQ EQ EQ EQ EQ EQ EQ EQ EQ EQ EQ EQ EQ EQ EQ EQ EQ EQ EQ EQ EQ EQ EQ EQ EQ EQ EQ EQ EQ EQ EQ EQ EQ EQ EQ EQ EQ EQ EQ EQ EQ EQ EQ EQ EQ EQ EQ EQEQEQEQEOQEQEQEQEQEQEQEQEQEQEQEQEQEQEQEQEQEQEQEQEQEQEQEQEQEQEQEQEQEQEQEQEQEQEQEQEQEQEQEQEQEQEQEQEQEQEQEQEQEQEQEQEQEQEQEQEQEQEQEQEQEQEQEQEQEQEQEQEQEQEQEQEQEQEQEQEQEQEQEQEQEQEQEQEQEQEQEQEQEQEQEQEQEQEQEQEQEQEQEQEOQEQEQEQEQEQEQEQEQEQEQEQEQEQEQEQEQEQEQEQEQEQEQEQEQEQEQEQEQEQEQEQEQEQEQEQEQEQEQEQEQEQEQEQEQEQEQEQEQEQEQEQEQEQEQEQEQEQEQEQEQEQEQEQEQEQEQEQEQEQEQEQEQEQEQEQEQEQEQEQEQEQEQEQEQEQEQEQEQEQEQEQEQEQEQEOQEQEQEQEOQEQEQEQEQEQEQEQEQEQEQEQEQEQEQEQEQEQEQEQEQEQEQEQEQEQEQEQEQEQEQEQEQEQEQEQEQEQEQEQEQEQEQEQEQEQEQEQEQEQEQEQEQEQEQEQEQEQEQEQEQEQEQEQEQEQEQEQEQEQEQEQEQEQEQEQEQEQEQEQEQEQEQEQEQEQEQEQEQEQEQEQEQEQEQQQEQEQEQEQEQEQEQEQEQEQEQEQEQEQEQEQEQEQEQEQEQEQEQEQEQEQEQEQEQEQEQEQEQEQEQEQEQEQEQEQEQEQEQEQEQEQEQEQEQEQEQEQEQEQEQEQEQEQEQEQEQEQEQEQEQEQEQEQEQEQEQEQEQEQEQEQEQEQEQEQEQEQEQEQEQEQEQEQEQEQEQEQEQEQEQEQEQEQEQ素数 | ||
Simplified EU Declaration Of Conformity
Hereby TREVI S.p.a declares that the radio equipment type "High power portable speaker with DJ effects" model XF 4200 DJ is in compliance with Directive 2014/53/EU.
The full text of the EU declaration of conformity is available at the following internet address https://www.trevi.it/dms/zidi/TREVI/DOCXF4200DJ.pdf


EN If you will not find your language on the instruction manual, please go on our website www.trevi.it to find it