AIR 201 - Doorbells Apelson - Free user manual and instructions
Find the device manual for free AIR 201 Apelson in PDF.
| Product type | Doorbell |
| Brand | Apelson |
| Model | AIR 201 |
| Power supply | AC 110-240 V |
| Integrated lighting | LED lamp 1 x 2 W (ref. DBS-2/65-H-120/33) |
| Mounting type | Wall or cabinet mounting |
| Cleaning | Unplug before cleaning. Use a soft cloth and mild detergent. Do not use steam cleaner. |
| Filters | Washable mesh grease filter; optional activated carbon filter (not supplied) |
| Lamp replacement | Must be carried out by the manufacturer or a qualified person |
| Safety | Disconnect power before maintenance. Do not use without filter. Risk of fire if not cleaned. |
Frequently Asked Questions - AIR 201 Apelson
User questions about AIR 201 Apelson
0 question about this device. Answer the ones you know or ask your own.
Ask a new question about this device
Download the instructions for your Doorbells in PDF format for free! Find your manual AIR 201 - Apelson and take your electronic device back in hand. On this page are published all the documents necessary for the use of your device. AIR 201 by Apelson.
USER MANUAL AIR 201 Apelson
- __ Safety instructions
2....Installation
3....Start using your cooker hood - Troubleshooting
5....Maintenance and cleaning
6.Environment protection
SAFETY INSTRUCTIONS
This manual explains the proper installation and use of your cooker hood, please read it carefully before using even if you are familiar with the product. The manual should be kept in a safe place for future reference.
Never to do:
- Donottrytousethe cookerhoodwithoutthe greasefiltersorifthe filtersareexcessively greasy!
- Donotinstallabovea cookerwithahighlevel grill.
- Donotleavefryingpans unattendeduringuse becauseoverheatedfats oroilsmightcatchfire.
- Neverleavenaked flamesunderthecooker hood.
- If the cookerhood is damaged, donot attempttouse.
- Donotflambéunderthe cookerhood.
CAUTION:Accessible partsmaybecomehot whenusedwithcooking appliances. - CAUTION: This applianceisnot intended to be used with gashobs.
- Theminimumdistance betweenthesupporting surfaceforthecooking vesselsonthehoband thelowestpartofthe cookerhood.(Whenthe cookerhoodislocated aboveagasappliance, thisdistanceshallbeat least65cm)
Theairmustnotbedischargedintoafluethatisusedforexhaustingfumesfromappliancesburninggasorotherfuels.Cookerhoodsandothercookingfumeextractorsmayadverselyaffectthesafeoperationofappliancesburninggasorotherfuels(includingthoseinotherrooms)duetobackflowofcombustiongases.Thesegasescanpotentiallyresultincarbonmonoxidepoisoning.Afterinstallationofacookerhoodorthercookingfumeextractor,theoperationofopenfluedgasapplianceesshouldbetestedbyacompetentpersonaontoensurethatbackflowofcombustiongasesdoesnotoccur.
Always to do:
- Important! Always switch off the electricity supply at the premises during installation and maintenance such as lightbulb replacement.
Thecookerhoodmust beinstalled in accordancewiththe installationinstructions andallmeasurements followed. - Allinstallationworkmust becarriedoutbya competentpersonor qualifiedelectrician.
- Pleasedisposeofthe packingmaterial carefully. Children are vulnerable to it.
- Payattentiontothe sharpenedgesinsidethe cookerhoodespecially duringinstallationand cleaning.
-
Makesuretheducting hasnobendssharper than90degreesasthis willreducetheefficiency ofthecookerhood.
-
Warning:Failureto installthescrewsof fixingdevicein accordancewiththese instructionsmayresultine electricalhazards.
- Warning:Before obtainingaccessst terminals, all supply circuits must be disconnected.
Ifthevoltageratingof thelampislesssthantheratedvoltageofthe appliance,thevoltageratingofthelampshall alsobemarkedonor nearhelampholder.
Always to do:
Alwaysputlidsonpots andpanswhencooking onagascooker.
- When in extraction airintheroomisbeing removedbythecooker hood. Please makesure thatproperventilation measuresarebeing observed. The cooker hoodremovesodours fromroombutnotsteam.
Thereshallbeadequate ventilationoftheroom whenthecookerhoodis usedatthesametime asappliancesburning gasorotherfuels.
Cookerhoodisfordomesticuseonly.
- Ifthesupplycordis damaged, it must be replaced by the manufacturer, its service agents similarly qualified persons in ordertoavoidahazard.
Thisapplianceisnot intendedforuseby persons(including children)withreduced physical,sensoryormentalcapabilities,or lackofexperienceand knowledge,unlessthey havebeengiven supervisionor instructionconcerning useoftheapplianceby
apersonresponsiblefor theirsafety
Childrenshouldbesupervisedtoensurethattheydonotplaywiththeappliance.
Thisappliancecanbe usedbychildrenaged from8yearsandabove andpersonswith reducedphysical, sensoryormental capabilitiesorlackof experienceand knowledgeiftheyhave beengivensupervision orinstructionconcerning useoftheapplianceina safewayand understandthehazards involved.Childrenshall notplaywiththe appliance.Cleaningand usermaintenanceshall notbemadebychildren withoutsupervision.
Always to do:
- Caution: The appliance and its accessible parts can become hot during operation. Becareful to avoid touching the heating elements. ChildrenyOUNGERthan8 yearsoldshouldstay awayunlessthey are underpermanent supervision.
There is a fire risk if cleaning is not carried out in accordance with the instructions.
Regulationsconcerning thedischargeoffairhavetobefulfilled.
- Cleanyourappliance periodicallybyfollowing themethodgiveninthe chapterMAINTENANCE.
- Forsafetyreason, pleaseuseonlythesamesizeoffixingormountingscrewwhich areerecommendedinthis instructionmanual.
- Regardingthedetails aboutthemethodand frequencyofcleaning,
pleasereferto maintenanceand cleaningsectioninthe instructionmanual.
- Regarding the information about how the applianceistobe fixed to its support pleasereferto Operationsection, the Installationprocedures inthismanual.
- Cleaninganduser maintenanceshallnot bemadebychildren withoutsupervision.
- Whenthecookerhood andappliancessupplied
withenergyotherthan electricityare simultaneouslyin operation,thenegative pressureintheroom mustnotexceed4Pa(4 x 10^-5 bar).
- WARNING:Dangerof fire:donotstoreitems onthecookingsurfaces.
A steamcleanerisnotto beused.
NEVERtrytoextinguish a fire with water, but switchofftheappliance andthencoverflamee.g. withalidorafire blanket.
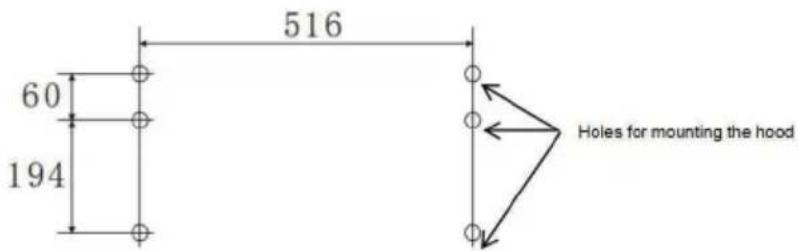
INSTALLATION (VENT OUTSIDE)
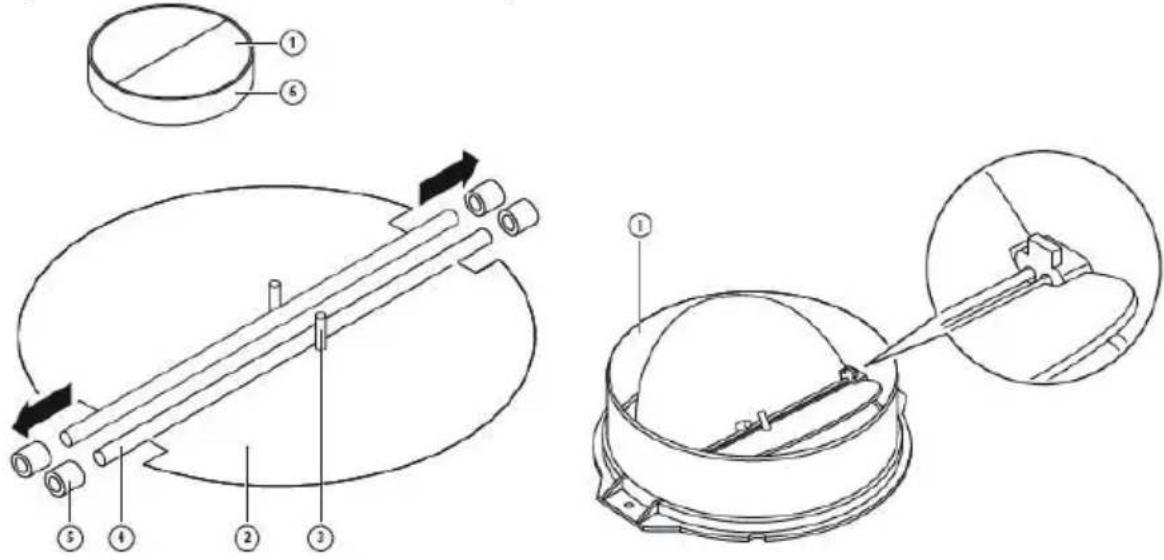
MOUNTING OF THE V-FLAP
If the cookerhood does not have an assembled V-flap, you should mount the half-partstoits body. The images on display show an example of how to mount the V-flap, the outlet may be various according to different models and configuration.
TomounttheV-flap1youshould:
- Mounttwohalf-parts2intothebody6
- apin3shouldbetoporiented;
-theaxis4shouldbeinsertedintheholes5onbody;
-repeatalltheoperationsforthe2ndhalf-part
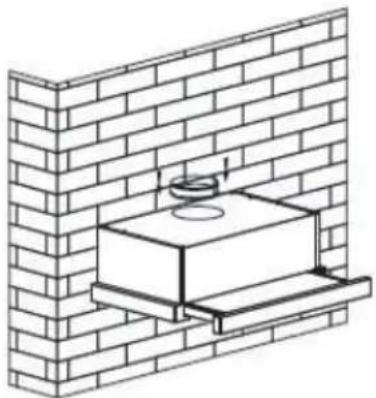
INSTALLATION(WaIIMounting)
- The cookerhood should be placed at distance of 65-75cm from the cooking surface for the best effect. Seepic1.
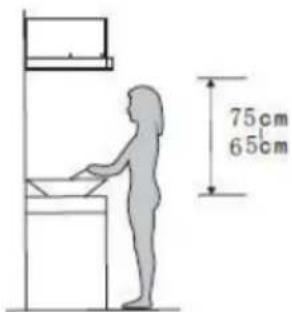
Pic1
2.InstalltheL-shapedbracketonthetopofthehoodbytwoscrews(4mmx10mm). Seepic2.
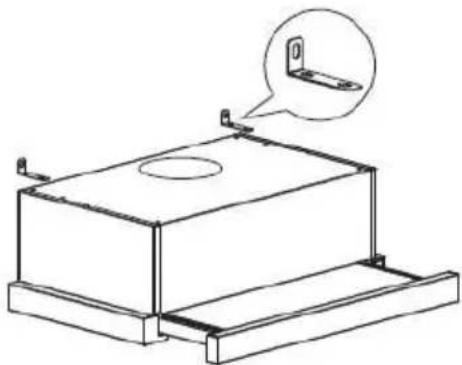
Pic2
- Thecookerhoodiswallmountedby4screws(4mmx30mm)andwallplugs. Mounttbeakerhoodonthewallonthebackofthecookerhoodby2screws (4mmx30mm)andwallplugs.Thenfixtbeakerhoodonthewallby2screws (4mmx30mm)andwallplugsthroughthesmallL-shapedbracket.Seepic3.
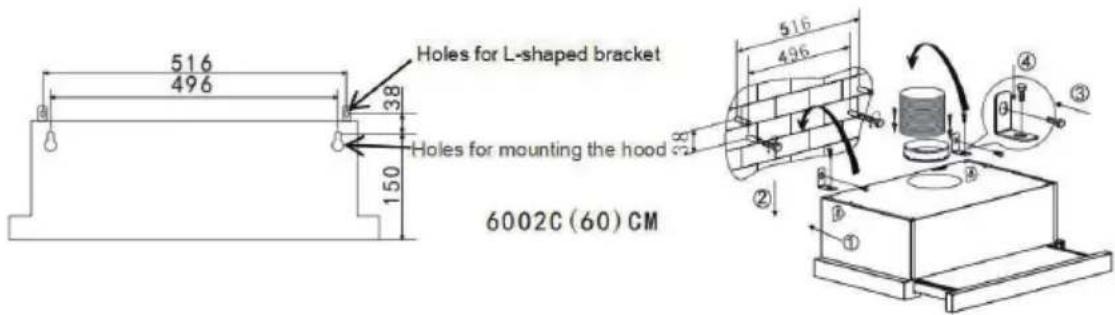
Pic3
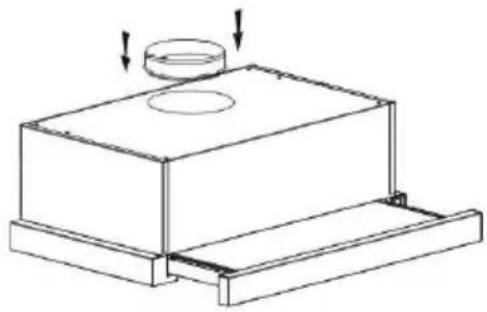
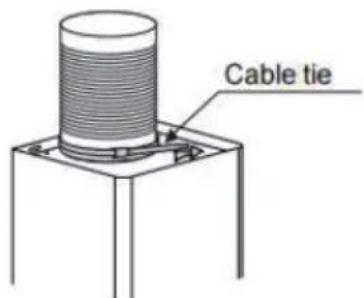
4.Fixtheone-way-valvetotheairoutletofthecookerhoodandlaytheexpansion pipetothewalloutlet.Fixtheexpansionpipewithacabletieandleaditoutside. Seepic3/4.
Pic4
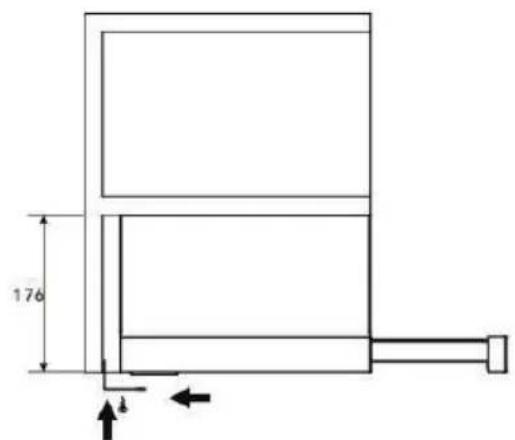
INSTALLATION(CabinetMounting)
1.Fixtheone-way-valvetotheairoutlofthecookerhoodandlaytheexpansion pipetothewalloutlet.Fixtheexpansionpipewithacabletieandleaditoutside.
- Mounttthecookerhoodonthecabinetby6screws(4x35mm)andflatwashers.
6002C(60)CM
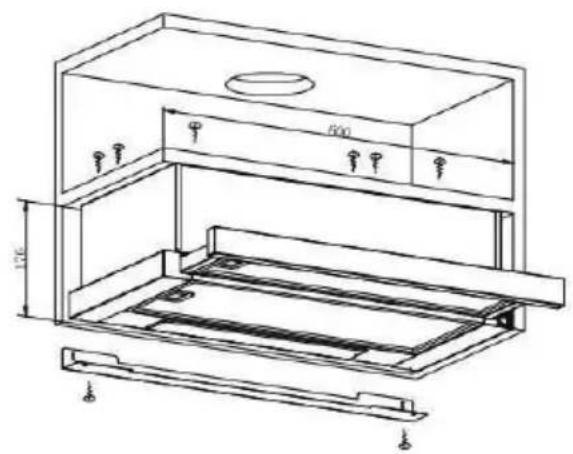
Ifthereisgapbetweenthewallandthecookerhood,youmayinstalltheL-shaped bracketonthebottomofthehoodwithtwoscrews(3x12mm).
TheinstallationoftheL-shapedbracketisoptional.
Note:Theexpansionpipeisnotincludedintheproduct.
ElectricallInstallation
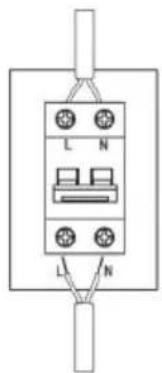
Allinstallationmustbecarriedoutbyacompetentpersonorqualifiedelectrician. Beforeconnectingthemainssupplyensurethatthemainsvoltagecorrespondstothe voltageontheratingplate.
DirectConnection
Theappliance must be connected directly to themains using anomnipolar circuit breaker witha
minimumopeningof3mmbetweenthecontacts.
Theinstallermustensurethatthecorrectelectricalconnectionhasbeenmade and thatitcomplieswiththewiringdiagram.
Thecable must not beentorcompressed.
Regularlycheckthepowerplugandpowercordfordamage.Ifthesupplycordis damaged,itmustbereplacedbyaspecialcordarassemblyavailablefromthe manufactureroritsserviceagent.
Thisapplianceissuppliedwitha2coremainscablecolouredasfollows:
Brown=LorLive
Blue=NorNeutral
WARNING:

Forsafetyreason,pleaseuseonlythesamesizeoffixingormountingscrewswhicharerecommendedinthisinstructionmanual.
Failuretoinstallthescrewsorfixingdevicein accordancewiththeseinstructionsmayresult in electricalhazards.
Start Using Your Cooker Hood
Rocker switch
Rockerswitch

- Insert the power plug into the socket.
- Push switch ① to, the lamp will be on; push switch ① to “0”, the lamp will be off.
- Push the switch ② into "I、II", the motor will be on "low、high" two speeds, push into "0", the motor will be off.
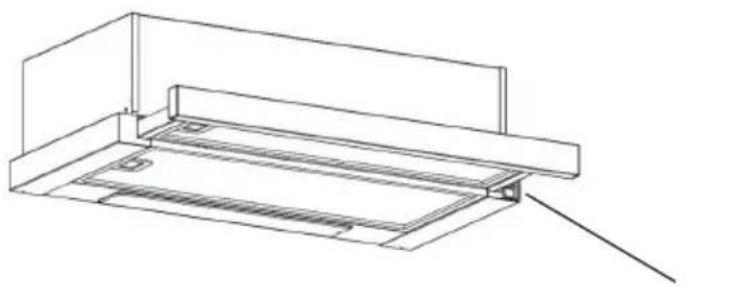
- The power will be connected when pull out the front panel. Conversely, the power will be automatically disconnected.
TROUBLESHOOTING
| Fault Possible Cause Solution | ||
| Lighton,butmotor doesnetwork | F an s w i t c h t u r n e d o f f | Selectafanswitchposition. |
| Fanswitchfailed | Contactservicecenter. | |
| Motorfailed | Contactservicecenter. | |
| Lightdoesnot work,motordoes network | Housefusesblown | Reset/Replacefuses. |
| Mainspowercableislooseor disconnected | Refitmainspowercableto poweroutlet.Switchpoweroutleton. | |
| Oilleakage | Onewayvalveandtheoutlet arenottightlysealed | Takedowntheonewayvalve andsealwithsealant. |
| Leakagefromtheconnectionof chimneyandcover | Takechimneydownandseal. | |
| Lightsnotworking | Brokenorfaultybulbs | Replaceblubsasperthis instruction. |
| Insufficientsuction | Thedistancebetweenthe cookerhoodandthegastopist toofar | Refitthecookerhoodtothe correctdistance. |
| TheCookerhood inclines | Thefixingscrewisnottight enough | Tightenthehangingscrewand makeithorizontal. |

NOTE:
Anyelectricalrepairstothisappliancemustconformtoyourlocal,state and federallaws.Pleasecontacttheservicecentrereifinanydoubtbefore
undertakinganyoftheabove.Alwaysdisconnecttheunitfromthepowersourcewhen openingtheunit.
MAINTENANCE AND CLEANING
Caution:
- Before maintenance or cleaning is carried out, the cookerhood should be disconnected from themainspowersupply. Ensure that the cookerhood isswitched off atthewallsocket.
- Externalsurfacesaresusceptibletoscratchesandabrasions,sopausefollowthe cleaninginstructionstoensurethebestpossibleresultisachievedwithoutdamage.
GENERAL
Cleaning and maintenance should be carried out with the appliance colds especially when cleaning. Avoid leavingalkaline or acid substances (lemon juice, vinegar etc.) on
thesurfaces.
STAINLESSSTEEL
Thestainlesssteelmustbecleanedregularly(e.g.weekly)toensurelonglife expectancy.Drywithacleanssoftcloth.Aspecializedstainlesssteelcleaningfluidmay beused.
NOTE:
Ensurethatwipingisdonealongwiththegrainofthestainlesssteeltopreventany unsightlycrisscrossscratchingpatternsfromappearing.
CONTROLPANELSURFACE
Theinlaycontrolpanelcanbecleanedusingwarmsoapywater.Ensuretheclothis cleanandwellwrungbeforecleaning.Useadrysoftclothremoveanyexcess moistureleftaftercleaning.
Important
Usingneutraldetergentsandavoidusingharshcleaningchemicals,stronghousehold detergentsorproductscontainingabrasives,asthiswillaffecttheappearanceofthe applianceandpotentiallyremoveanyprintingofartworkonthecontrolpanelandwill voidmanufactureswarrantee.
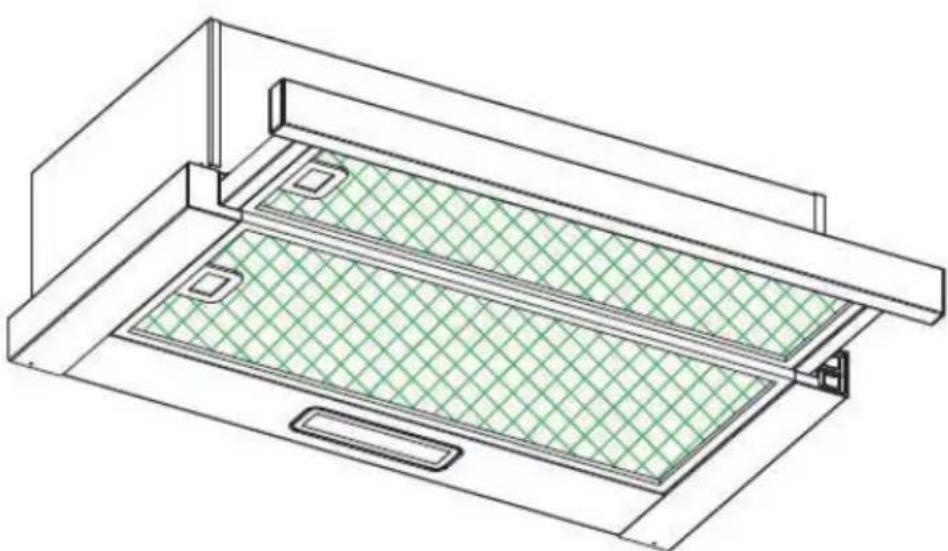
GREASEMESHFILTERS
Themeshfilterscanbecleanedbyhand.Soakthemforabout3minutesinwaterwith amilddetergentandthenbrushitgentlywithasoftbrush.Donotapplytoomuch pressuresoastoavoidanydamagetoit.(Leavetodrynaturallyyoutofdirectsunlight).
Filtersshouldbewashedseparatelytocrockeryandkitchenutensils.Itisadvisable nottouserinseaid.
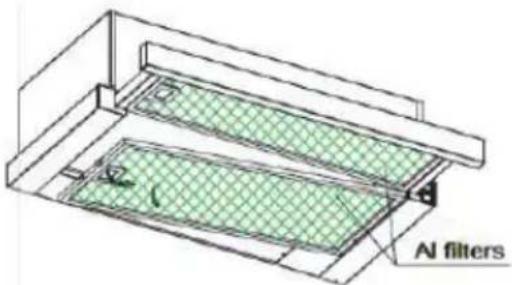
INSTALLINGGREASEMESHFILTERS
- Toinstallfiltersforthefollowingfoursteps.
-Anglethefilterintoslotsatthebackofthehood.
-Pushthebuttononhandleofthefilter.
-Releasethehandleoncethefilterfitsintoarestingposition.
-Repeattoinstallallfilters.
CARBONFILTER-notincludedintheproduct
Activatedcarbonfiltercanbeusedtotrapodors.Normallytheactivatedcarbonfilter shouldbechangedevery3to6monthsaccordinglyourcookinghabits.The installationprocedureofactivatedcarbonfilterisasbelow:
(1)Slidethefrontpartofthecookerhood.
(2)Thealfiltersshouldbedetachedfirst.Pressthelockandpullitdownward.
(3)Takeoutthecarbonfilterbyrotatingthecarbonfilteranti-clockwise.
(4)Replacethenewcarbonfilter.
NOTE:
- Make sure the filter is securely locked. Otherwise, it would loosen and cause dangerous.
- Whenactivatedcarbonfilterattached,thesuctionpowerwillbelowed.
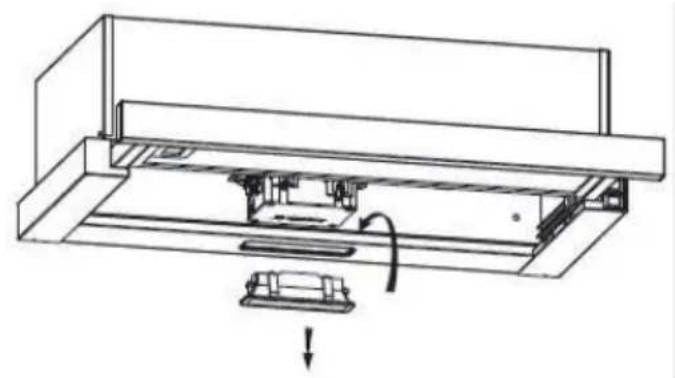
BULBREPLACEMENT

Important:
Thebulbmustbereplacedbythemanufacturer,its serviceagentsimilarlyqualifiedpersons.
Always switch off the electricity supply before carrying out any operations on the appliance. When handling bulb, makes sureithas completely cooled down before any direct contact with hands.
- Whenhandlingbulbsholdwithaclothorglovesto ensureperspirationdoesnotcomeincontactwith thebulbastthiscanreducechelifeofthebulb.
Note:
- Before Replacement light that the cooker hood can be isolated from the supply mainsbymeansofaplugoranall-poleswitch.
- Protect against danger when changing lights, such as wearing gloves.
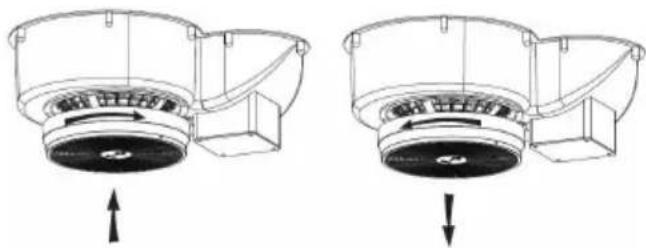
Changingthelight
UsethescrewdriverloosentheST4*8MMselftappingscrew(2pcs)fromthelighting panel, takeoutthelightingfixture. Opentheterminalboxthatconnectedwiththewire, disconnectthewireconnectorandreplacethelamp.
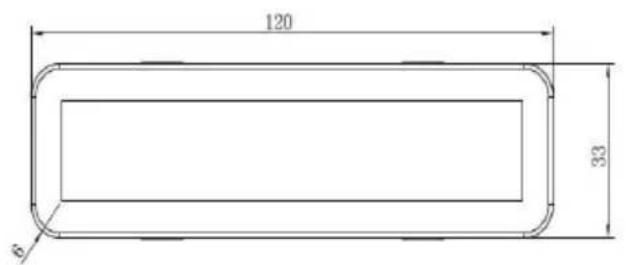
-ILCOSDcodeforthislampis:DBS-2/65-H-120/33
-LEDmodules-rectanglelamp
-Maxwattage:1X2W
-Voltagerange:AC110-240V
-Dimensions:
ENVIRONMENTAL PROTECTION:
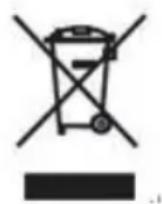
Thisproductismarkedwiththesymbolontheselectivesortingof wasteelectronicequipment. Thismeansthatthisproductmustnot bedisposedofwithhouseholdwastebutmustbesupportedbyasystemofselectivecollectioninaccordancewithDirective 2012/19/EU.Itwillthenberecycledordismantledtominimize impactsontheenvironment,electricalandronicproductsare potentiallydangerousfortheenvvironmentandhumanhealthdueto thepresenceofhazardoussubstances.Formoreinformation,please contactyourlocalorregionalauthorities.
NOTE:
The followingshowshowtoreducetotalenvironmentalimpact(e.g.energyuse)ofthe cookingprocess).
(1)Installthecookerhoodinproperplacewherethereisefficientventilation.
(2)Cleanthecookerhoodregularlysoasnottoblocktheairway.
(3)Remembertoswitchthecookerhoodlightaftercooking.
(4)Rememberswitchthecookerhoodaftercooking.
INFORMATIONFORDISMANTLING
Donotdismantletheapplianceinawaywhichisnotshownntheusermanual.The appliancecouldnotbedismantledbyuser.Attheendoflife,theapplianceshould notbedisposedofwithhouseholdwaste.CheckwithyourLocalAuthorityorretainer forrecyclingadvice.
Campana extractor Manual de instructiones