
EWUS040B8B - Wine cellar ELECTROLUX - Free user manual and instructions
Find the device manual for free EWUS040B8B ELECTROLUX in PDF.
| Product Type | Wine Cellar |
| Brand | Electrolux |
| Model | EWUS040B8B |
| Overall Dimensions (H x W x D) | 818 x 595 x 577 mm |
| Required Service Space (H x W x D) | 820 x 600 x 580 mm |
| Total Required Service Space (with door opening) | 820 x 600 x 1162 mm |
| Capacity | Up to 40 bottles (0.75 L) |
| Ambient Temperature Range | 10 °C to 38 °C |
| Adjustable Temperature Range | +5 °C to +20 °C |
| Default Temperature | 12 °C |
| Refrigerant | Isobutane (R600a) |
| Lighting | LED, energy efficiency class E |
| Air filter | Charcoal, replace every 6 months |
| Child Lock | Yes |
| Open Door Alarm | Yes, after 5 minutes |
| Temperature Alarm | Yes (high and low) |
| Door Reversibility | Yes |
| Number of shelves | 6 shelves (level 1: 5 bottles, levels 2 to 6: 7 bottles each) |
| Defrost | Automatic |
| Electrical Connection | 220-240 V, 50 Hz (refer to rating plate) |
Frequently Asked Questions - EWUS040B8B ELECTROLUX
User questions about EWUS040B8B ELECTROLUX
0 question about this device. Answer the ones you know or ask your own.
Ask a new question about this device
Download the instructions for your Wine cellar in PDF format for free! Find your manual EWUS040B8B - ELECTROLUX and take your electronic device back in hand. On this page are published all the documents necessary for the use of your device. EWUS040B8B by ELECTROLUX.
USER MANUAL EWUS040B8B ELECTROLUX
OBCJNYKBAHE HA KJIneHTN
BnHaHn n3noJ3BaIte opuHnHaJIHn pe3epBn qactn.
Korato ce cBbP3BaTe c HauHnOToPn3IpaH OToJeN „ObcnykBaHe“, Tp6Ba da IMaTe nD pKa cJeHaTaNHOpMaunr: Moen, PNC, cepneH Homep.
HΦopMaζηraTamaKcde OTKpntaHa Ta6eJkata C OCHOBn daHHN
!PpeDynpexKeHne/BnMaHne-INΦopMaun3a6e3OnacHOCT
① Ośza uHΦopMaζη n CbBeTn
HΦopMaζηa 3a OKoJHaTa cpea
3ana3BaMe cn npaBTo Ha n3MeHeHn.
1. HOPMALI 3A BE3OJACHOCT
Ppei moHTnpaHTo n ynoTpe6aTa ha ypeDa BHNMaTeJIHo npOteTe ppeIOCTaBeHnte INHcTpkyCnI.
Ipon3BODNTeTHe e OTROBOpEn 3a HapaHЯBaHnYIINOBpeDN B pe3yJITaT Ha HenpaBnHa IHCTaJaCnYIInyNoTpe6a.BinHarN dpbXTe INHCTpyKcNtTe Ha 6e3ONaCHOI JIecHO DoCTbNHO MAcTO 3a CnpaBka B 6bDeSe.
1.1 Be3oNaChOcT 3a Deca N Iuca B HepaBHOCTOHOIPOJXeHne
To3n ypei moKe da 6bIe n3noJ3BaH OT deca na 8- ITOINuHa Bb3pact, KaKTo N OT IuCa C HamaJIeHN fN3UeCKN, CETNBn I yMCTBeHn Bb3MOXHOCTN IIN OT IuCa 6e3 OINT I IO3HaHnA, CaMo aKO Te ca IOD Ha6JIIODeHne IIN 6bDat IHCTpyKTnpaHn OTHOCHO 6e3OJaCHaTa yNoTpe6a Ha ypeDa n pa3bnpaT Bb3MOxHnTe pNCKOBe.
-Дeца Ha Bb3pact ot 3do8 roDHH MoRat da NOCTaBrt nIIN N3BaXdA T cbIbPjKHaHne B/OT ypeDa, pIu YcNoBHe Ye ca 6nI npaBnIHO INHCTpykTnpaHn.
To3n ypei MoKe Da Ce n3noJ3Ba OT IuCa C TeKKn JIn KOMPJIeKCHN YBpeKdAnHna, PnYcNoBne Ye ca 6nI npaBnIHO INCTpyKtnpaHn.
-Дeца под 3-юшна Вьзрас Тябва да се дьржат далец OT урEDA, оCBeH aKO He ca по постонно habл�ден.
-
- Deuata Tp6Ba Da 6bDat noi Ha6JIOeHne, 3a da ce rapaHTnpa, Ye He cn irpaT cypeDa.
- Deça He TpЯБВa Да ИЗВьршВaT NOчиСТВaHе ИПИ ПОДРьЖКa Ha ypeDa, KOraTo ca 6e3 HaNДЗOp.
-ДрьжTe BCnUKN OnaKOBKn Далеу ot Deça И n3XBbPJIeTe ONaKOBKInTe NO MecTHInTe npaBnJa.
1.2 O6ua 6e3oNaChocT
To3n ypeI e npedHa3NaueH cAmO 3a cbxpaHeHne Ha BInHO.
To3n ypeE npedHa3NaueH 3a domaunha ynotpe6a B 3aTBOpeHn NOMEeHn.
To3n ypei MoKe Da Ce n3noJ3Ba B Oocn, CTaB XOTeI, CTAu B MOTeI, KbU 3a RoCTn I dpyrN POno6Hn
MeCTa 3a HacTaHЯBaHe, KbIeTO TOBa I3NoJ3BaHe He NaBnShaBa (cpeiHo) HnBOTO Ha DomaSha yNtpe6a.
- ПЕДУПЕЖДЕHINE: ВнимаВайт ВеHTиlaцноHHITE OTBOPиВ Корпуca Ha урEDA Или ВьВ BrpaДeHaТСтуКТура Дa He ca Вь3пpenЯTCTВаHI.
- ПЕДУПЕЖДEHNE: He n3poJ3BaIte mexaHnHyCTPOIcTBA nIIpyrN cpeIcTBA 3a yCKOpRAHe Ha npOceCa Ha pa3Mpa3YBaHe, OCBeH npEIpOpbUaHInTe OT npON3BOdnteJI.
- ПЕДУПЕЖДЕНЕ: He по蜱ождайтешашинота ВерURA.
- ПЕДУПЕЖДЕНЕ: He n3noJ3BaIte eI. ypeiB OТдeЛeHЯТа 3a CBxpaHEne Ha XpaHa, OCBeH aKO He ca OT Tnna,ПрeNoPbUaH OT pOn3BoDInTeJIa.
He n3noJ3BaIte BODHa cTpya nn npapa, 3a da nouchntte ypeda.
-Почисте урета с мokра, мека кьрп. Използайтесамо HeyТрали поочистваши пpenapatn. HeИЗПОЛ3Вайтес abpa3иВн Кьрп, pa3TBOPNTeЛи ИлиMeТални пpeДмETN.
Korato ypeiBcT cTOn npa3eH 3a IbIbI nepnoi - n3KIOUcTe rO, pa3Mpa3eTe rO, nouNCTeTe ypeDa n OCTaBeTe BpTaTa OTBOpeHa, 3a Da n36eHHeTe o6pa3yBaHcTo Ha Myxan BvB BbTpEshNoCTTa Ha ypeDa.
He cxbxpaHbAte ekCnIO3NBHc y6ctaHcnn, KaTo KyTn aeP03oJ CbC 3aIaNIMO rOpINBO B To3N ypei.
Ako 3axpaHbauT Ka6e n e NobpeDeH, ToT Tp8Ba da ce 3aMeHN OT npOn3BOdnteJIa, OT yIbJHOMOueH cepBn3eH ZeHTbp IJIu OT IINca Cbc CXoDHa KBaIIΦnKauzna, 3a Da Ce n36eRhe pNcK.
2. INHCTPYKUN 3A BE3OJACHOCT
2.1Инстацnia

BHIMAHNE!
Camo KBaIIINΦnIpaH YOBek MoKe Ia N3BbPSh MOHTaJa Ha ypeDa.
Maxhete BCnukn ONAKOBKn.
He moHTnpaIte n He n3PON3BaITe NOBpeDen ypei.
He n3no3BaIte ypea, npeI da ro HnHCTaIInpaTe BbB BrpaJeHata KOHCTpyKpIra 3apaIb 6eONaChocTta.
CneBaaTe HNCTpyKunTe 3a HnHctaJInpaHe, npINIOKeHN KbM ypeDa.
BnHaBn BnHmBaIe, KOraTo MeCTInTe ypeDa, Tb' KaTo e TeKbK. BnHaR n3NoJ3BaIe IpeDna3Hn PbKaBnU n 3aTBopeHn O6yBKn.
- YBepTe ce, Ye mMa CBO6OHa UnpKyJaun Ha Bb3DyXa OKoJIo ypeDa.
- Пи пьрв Инста的答案 Ипслд реверсане на вразчкataичakайт пое 4 уаса,пpeида CBbpжete урета Кьм 3axpaHbaHeto.Тoba ce halara,зд може macnotо д по teve obpatho B komnpecopa.
-Преди Да ИЗБьршВATE КАКВИТО И Д
бино DeиctBnA Вьрху урEDA (HAnp.
peВерсиране На Враза), ИЗВадеТe
шЕпсELA OT KOHTaKТa.
He moHTnpaIte ypeDa 6n3o do paHaTOpN, neuKn, fypHn nJIn KOTJHOH.
He n3naarTe ypeHa Ha IbXkI.
He MoHTnpaIte ypeHa Ha MeCTa, KbTeTo mMa npraKa CJIbHueBa CBETJINHa.
He nHCTaJInpaIte To3n ypeIHa MeCTa, KOnTO ca IpeKaJIeHO BJIaXHN INI N CTyJeH.
Korato npemectbaTe ypeda, NOBdHHeTe ro OTkbM npeDnna pb6, 3a da u36eHHe TaPacKBaHe Ha noDa.
2.2 EneKtpnuecko Cbbp3BaHe

BHIMAHNE!
PnCK OT NOxap NIN TOKOB yap.

BHIMAHNE!
Pn no3uohnpaHe na ypea ce ybepTe, ye 3axpaHbuaT Ka6eI He e 3aKaueH IIN NOBpeDeH.

BHIMAHNE!
He n3noJ3BaIte pa3KIOHITeJI NJIa aIaNTepn C MHO BOxOIOBE.
- YpeT Tp8Ba Da e 3a3EmeH.
- YBepTe ce, Ye napaMeTpnte Ha TaBeJIkata C TexHnueCKn DaHHn Ca CbBMEcTUMC eJeKtpnueCKnte DaHHN Ha 3axpaHbauTa Mpeka.
Bunar n3non3BaIte npabnHO MOHTnpaH KOHTaKT CbC 3aUuTa OT TOKOB yap. - YBepete ce, che He HapaHbATE en. KOMnoHEtN (HaNP. OCHOBEH KOHTaKT 3a 3axpaHbAHe, 3axpaHbAu Ka6en, KOMnpecOp). CbpxKeTe ce c OTOpn3nPaHnca cepBn3eH ueHTbp nIeNEKtpoTeXnK, 3a Da cMeHN eNEKtpnuecknte KOMnoHEtN.
3axpaHbauT Ka6eI Tp8Ba Da e IoN HIBOTO Ha OCHOBnKoHTaKT 3a 3axpaHbAHe.
CbpxkeTe ka6ena 3a 3axpaHbaHeTo KbM KOHTaKTa eINHCTBeHO B KpaHa INHCTaJaunra. YBepTe ce, ye IeNceIbT 3a 3axpaHbaHe e DOCTbNeH cIeN HCTaJInpaHETo.
He n3dbpnbaiTe 3axpaHbau na Ka6en, 3a da n3knIOuHTe ypeDa. Bnharn n3dbpnbaiTe uenceHa ha 3axpaHbaHeto.
2.3ИЗползванe

BHIMAHHE!
PnCK OT KOHTy3Hn,
n3rapaHn,eJekTpnuCeKn
yDap nnn noXap.

YpeBbTcbDbpKa3anaJIMra3,
n306yTaH (R600a), npipoJeH ra3 c BnCOKO HnBO Ha ekOJOnuHa CbBMeCTmOcT. BnImaBaIte Da He npUHHTe NOBpeHa Ha xJaDiJIHaTa Bepnra CbC cbDbpxKaHne Ha n306yTaH.
He npomeHnTe npedHa3NaueHneTo Ha ypeDa.
Bcya ynoTpe6a Ha Brpaednna npoaykT kaTo CBObOndHo cTOnu e cTporo 3a6paHeHa.
He nocTaBnTe eNeKtpnueckn ypei (Hanp.Maunn 3a cnaOJeD) Bypeda,OCBeH aKO TOBa He e IIOCOUeHO OT pON3BOIDTeJI.
AkoBb3HnKHe NOBpeHa Ha XlaIINHaTa Bepura, yBepTe ce,Ye HrMa INaMbucn Nn3ToUHnCn Ha Bb3PnAmEHaBaHe B NOMeueHneTO. PpOBeTpTe cTara.
He no3BOJBAaTe Ha ropeu npedMeTn Da DOKOCBaT nlaCTMaOBtE qactn Ha ypeDa.
He cxbxpanhaBte 3anaIIM ra3 n TeuHOCT B ypeDa.
He nocTabaIte 3anaIIMn npOdyKTNI INI INpeDMETN, KOUTO ca HAMOKpeHNCbC 3anaIIMn npOdyKTN, B6JIN3OCTdo ypeDa INI INBbpxy Hero.
He DoKocBaIte KOMnpecopa IIN KOHDeH3aTopa. Te ca ropeu.
3 BUCOuHaTa, uHnHaTa n
IbJIbOuHaTa Ha XJaAnJHnKa,
BKnIOHTeJIHO DpbXKaTa Ha BpaTaTa,
IIIOc IPOCTpAHCTBOTO, Heo6xOdmo 3a
CBO6OHa cNpKUaun Ha OxJaDaun
Bb3dYx, IIIOc IPOCTpaHCTBOTO,
Heo6xOdmo 3a OTBaPare He Ha BpaTaTa Do
MInHMaJIHn bTbI, N03BOJRAu
IN3BaJdaHe Ha BCnUKN BbTppeHN
npncnoc6JeHH
3.2 Pa3noJaRaHe
3a Bb3MOxHnHa-no6po
fynKUHOHpaHe Ha ypeHa, He ce
npenOpBvBa ToI Da Ce nHCTaHpa B
6bn3OcT Do n3TOuHNu Ha TOnnHa
(ypHn, neuKn, padNaTopn.
MUTNKyKbpN nn KOTNOH) nn Ha
MaCTo C npra Ka CnBHyEBA CBETnHa.
YBepTe ce, ye nMa CBO6OHa
UnPkyJaHn Ha Bb3DyX OKONo 3aHaTa
CaCT Ha Kopnyca.
UpeIbT Tp6Ba Da ce HcTaInpa Ha cyXO I npOBETpUBO MAcTO,Ha 3akpnto.
YpeBt e npedHa3HaueH 3a pa6oTa B OKoJHa cpeJa c TempepaTypa oT 10^ do 38^

IpaBnHaTa pa6Ota Ha ypeDa e rapaHTnpaHa cAmo npEeKnloaTaun B nocOueHn TEmpeAtyeH dNaNa3OH.

Ako mATE cBmHeHna 3a MRCTOHa HnCTaInpaHe Haypeda,ce ObhpTe KbM DOCTABuNka,KbM HaUNr OTdeJ 3a 06cJIyKBaHe Ha KJIneHTn NIN KbM Ha- 6IIIN3KNr OToPn3npaH cepBN3eH ueHTbp.

Tp6Ba Da e Bb3MOxHo ypeBt Da ce N3KJIIOyBa OT MpeXOBOTO 3aXpaHbaHe. Toba O3HaayBa, ye cIeN HCTaIIpaHTo Tp6Ba Da IMa JIecEH DcTbN Do IeNCEJa.
3.3 EneKtpnuecko Cbbp3BaHe
- PpeiBKNIOUBAHe KbM eJektpo3axpaHbauaTa Mpeka npOBepTe DaJIH HanpeXeHneTo I YecTOTata Ha Ta6eIkKaTa C daHHN OTROBaprT Ha Te3n OT DomauHaTa Bn eJektpo3axpaHbaua Mpeka.
- YpeIbT TpI6Ba Da e 3a3EmeH. 3a ZeIITa ZIeNCEJIbT Ha 3axpaHbAun Ka6eI NMa CneuAnHe H KOHTaKT. Ako DOMaHnRT KOHTaKT Ha eNEKTPo3axpaHbAHeto He e 3a3EmeH, CBpbXKeTe YpeDa KbM OTdEIneH 3a3EmraU Ka6eB B CbOTBETCTBHe C DeiCTBaUHTe HopMaTINBHN pa3npoeDbCJeD KOHCyJtAuaC KBaIIuΦnUpaH TexHnK.
- PpOu3BODHTeJIaT He HOCN OTROBOPHOCT, aKO rOpEnOCoHITe MePKn 3a 6e3OnaCHOCT He ca Cna3EHN.
- YpeIbT CbotBETCTBa Ha ДиpeKtINBITE Ha ENO.
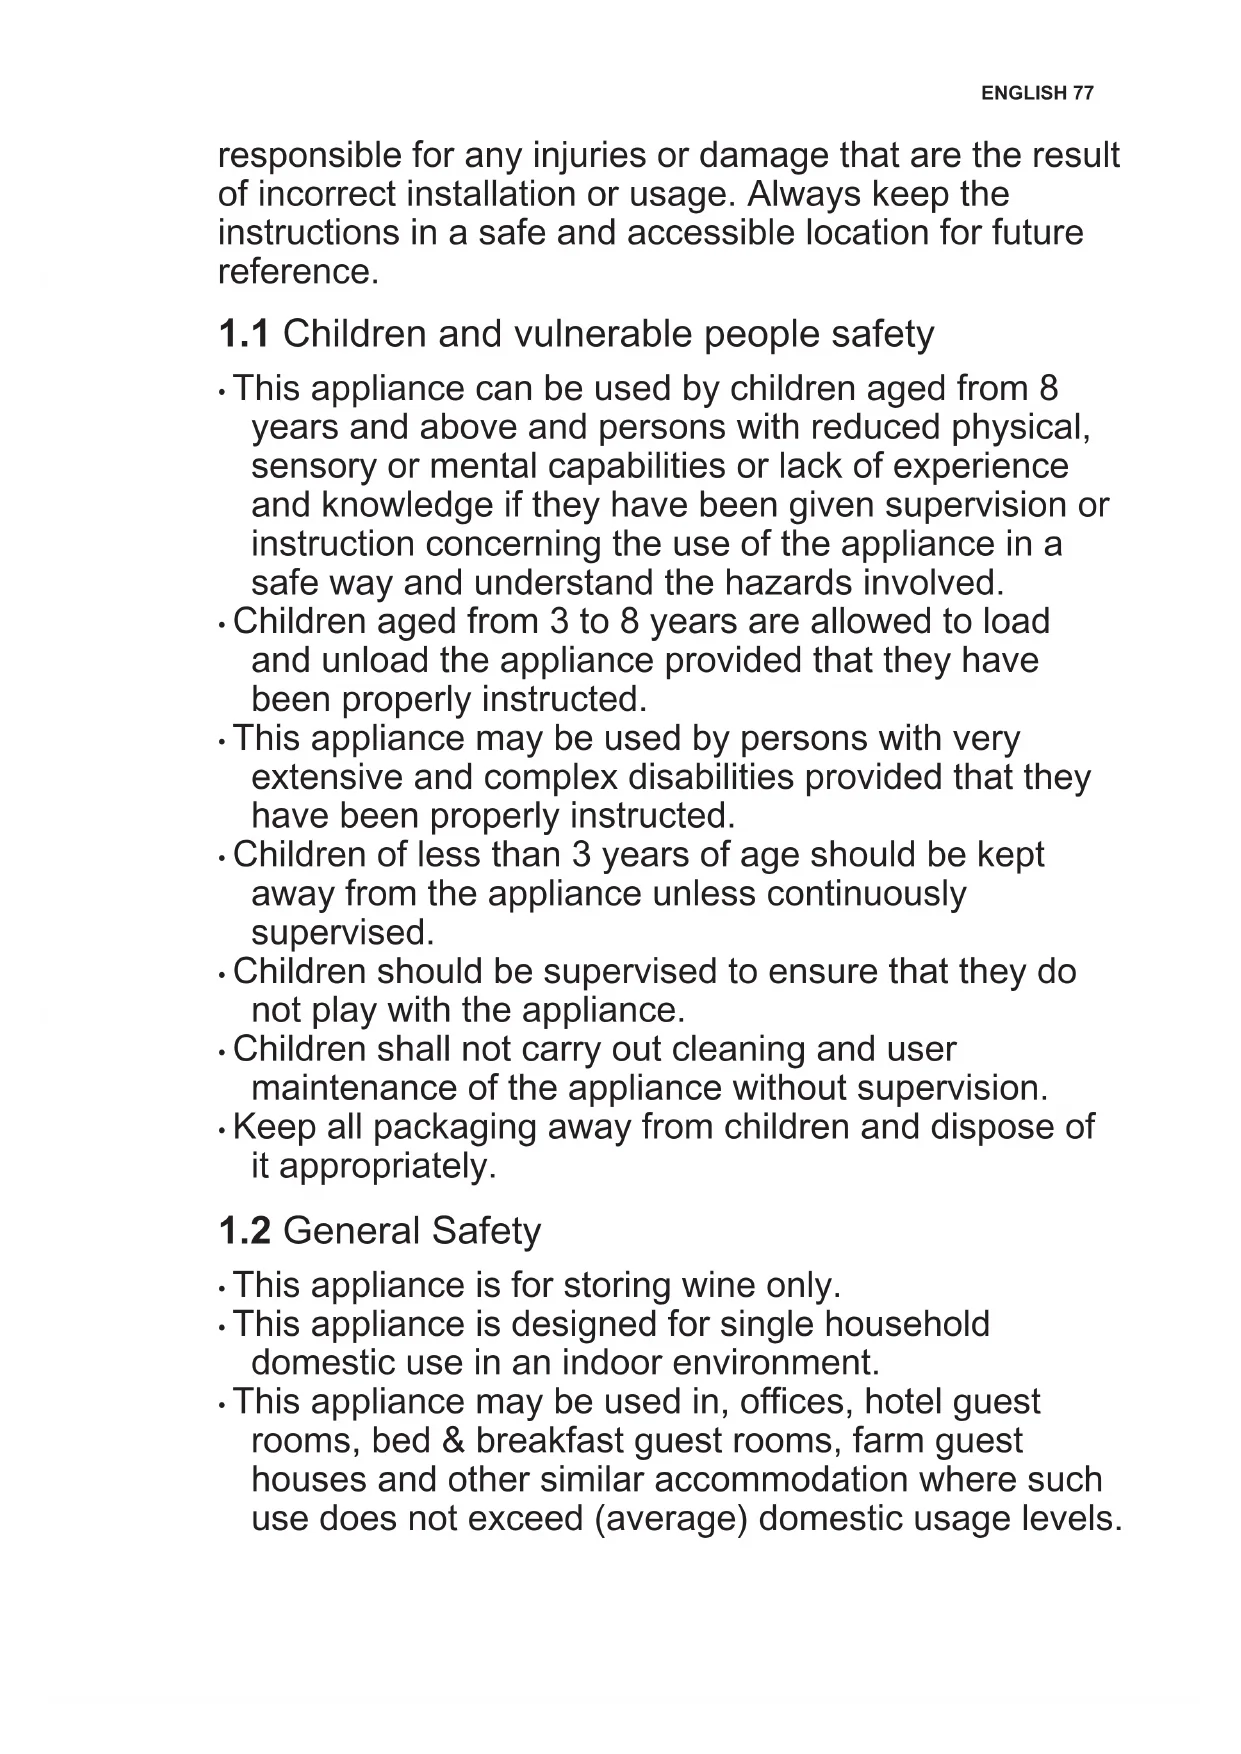
3.4 HnBeJInpaHe
Ipn HnctanipaHTo Ha ypea Toi Tp6Ba da ce HnBeJnpa. ToBa MoKe da ce NoCTnRhe Ype3 YeTnp PerynpyEm Kpaeta B DoHHata YacT Ha ypea.
CBeTnHaTa He BInRe OtpuCaTeJHo Bbpxy KaueCTBOTO Ha BnHOT.
Moxete da perynapate noBeDeHneTo I npKocTtHa hCBeTnHaTa.
IobedeHHe Ha CBeTInHaTa (A):
1A OTBOpHa BpTa-CBeTbHa HaHnBnCOKOTO HnBO Ha DmMnpaHe,3aTBOpHa BpTa-CBeTJINHInTe ceN3KJIIOvBaT
2A OTBOpHa BpaTa - CBeTbHa Ha HnBnBCOKOTO HnBO Ha DnMnpaHe, 3aTBoPeHa BpTa - CBeTbHa Ha N36paHOTo HnBO Ha DnMnpaHe
3A OTBOpeHa 3aTBopeHa BpaTa -CBETBa Ha n36paHOTo HnBO Ha dIMnPaHe
4A OTBOpEHa Bpata-CBeTbHa Ha 36paHOTo HNBO Ha dIMnPaHe, 3aTBopeHa BpATnUka-CBeTbHa Ha-NBCOKOTO HNBO Ha dIMnpaHe RaKoCT ppe3 HOuTa (L):
- 9L e Hau-ЯрkaTа HacTpOиKa, DOKaTO 1L e Hau-TbMHaTa.
3a da HacptponTe NOBeDeHneTo Ha CBETJINHaTaNII npKocCTTa:
1.ДOKOCHTeи 3aApbXte6yToHa 3a OCBETJIeHHeTO 3a 3ceKyuHn,3aJa BJIe3eTE B MeHIO TO C HAcTpoiKaTa Ha CBETJIiHaTa.
2.ПОЯВа ce NOBEdHHe Ha CBETJIINHATA A.ДOKOCHete OTHOBO 6yToHa 3a OCBETJIeHNeTO,3a Da OTnDETe Ha JRPKoCT Ha CBETJIINHATA L.
3.ДOKOCHTeperylaTopnTeHa Tempepatpata HeKoJIKOKpaTHO,3a Da 3aJaTe JKeJahOTo NOBeHHe NIIЯPkOCT Ha OCBETJIeHNeTO.
5.6 Cellaring
BTo3npeKm ypebT npeBknUoyBaHa npedBapntEnHO 3aAdeHaTa TemepaTypa no nopda36npahe ot 12^
3a da aKTbnpaTe pexma Cellaring, Dokochete 6yToHa Cellar Mode. CE ha ekpaHa 3anoYBa da Mira. N3uakaTte 5 cekyni. Pexmbl e aKTbEn, KoraTO CE cnpe da Mira n CBETn HanoNoBnHa.
3a da deakntbnpate pexma Cellaring, Dokochete Cellar Mode oue BeHbX.
5.7 Pexim Child Lock
AKTINBIPAepeXmMa Child Lock,3a da 3aknIOHTe6yToHITe cpeuY HeymuJHeHa paBoTa.
3a da akTbupate Child Lock,doKocheTe n 3aDpBxTe Cellar Mode 6yToHa 3a 3 ceKyni. KoraTo peXmBt e BKnIOUeH, INdNkAToPbT 3a 3akIIOuBaHe CBETBa npn PbInHa JRPoCT.CneJ 3 ceKyni INdNkAToPbT 3a 3akIIOuBaHe HamaJIraBa HANOIOBnHa JRPoCTTa cn.

AkoHaTnchTe 6yToH,
pa3nueH ot Cellar Mode,
INdNkATOpbT 3a
3aKnUOVAHe Mrra TpN nBtN.
3a da deaktnbnpate Child Lock pexnma, HATNCHETe OTHOBO CbOTBeTHn8 6yTOH.

PexmbT Child Lock ce
DeakTNBnpa Cnei
PpeKbcBaHe Ha
eNEktpo3axpaHbHeTo NIn
N3KNIOUbaHe Ha ypeHa.
5.8 HuyipaHe Ha Bb3dUshnna
3a da Hynipate anapMaTa Ha Bb3dUshnA qnTbp:
1.CmeHe TBrIepoHnBb3dyWeH 6nTbp.BxKTe pa3Je,CMHa Ha Bb3DyHnA CnITbP".
2.ДOKOCHTeи 3aДрБЖTe 6yToHnTe 3a yBeJIuHaBaHe Ha TempePaTypaTa n 3a OCBETJIeHNeTO eHOBpeMeHHO 3a 5 cekHydN.
3.ИндикаторьТ haФиNTьра ce n3КЛЮчВа 3a сLEДВацHTe 6 Meceua.

Cne6 Mececa ekpaHbT noka3Ba INdkaTopa Ha cnIbpa, 3a da Bn HApOMHn Da CMeHnTe cnIbpa.
5.9 3aIyUbaHe nII nYcKaHe Ha 3ByKOBn CnHaJIu
3ByKOBInTe CnHaN Ca aKTbBpuHn no nOpa3bpuAne.
3a 3arnyuabaHe Ha 3BykoBn CnHaHn:
1.Дokocheteи 3aApbXte 6yToHnTeCellarMode n 6yToHnTe 3ayBelenuabaHeHa TempeatypataeHNOBpemHo 3a5ceKHyn.
- EkpaHbT noka3Ba Of 3a 2 cekyHdi, KOraTo 3ByKOBITE CnHaHn Ca 3arLyweHn, Hn On 3a 2 cekyHdi, KOraTo 3ByKOBITE CnHaHn He ca 3arLyweHn.
6.1 CbXpaHHeHnE Ha BnHO

To3n ypeI e npedHa3HaueH Da Ce N30JI3Ba N3KJIIOUHTeJIHO 3a CbXpaHeHne Ha BInHO.

OTdeneHneTo 3a CbXpaHeHne Ha BnHO e MapKnpaHOTo (Ha TaBeIkaTa c DaHH) C
BpeMeTo 3a cxbxpaHHe Ha BnHOTO 3aBnCn OT Bb3pactTa, aIKOXOJIHOTO CbDbpxKaHne, BnDa rpo3De n HNBOTO Ha φpyKTO3a n TaHH B Hero. No BpeMe Ha NOKyPkata npOBepTe daNN BnHOTo Beye oTJeXaNo nIe ce noDo6pn C BpeMeTo.
IpenopbHTeHn Tempeatypn 3a cxbxpaHeHne:
-3a WAMnHcKO INeHJIINBn BnHaMeKdV +6°C n +8°C.
- 3a 6eJn BnHa MeKdy +10°C n +12°C.
3a po3e n IeKn YepBHeN BnHa MeXdY +12^ n +16^
-OTnEkaHn YepBHeH BnHa MeKdY +14^ n +18^
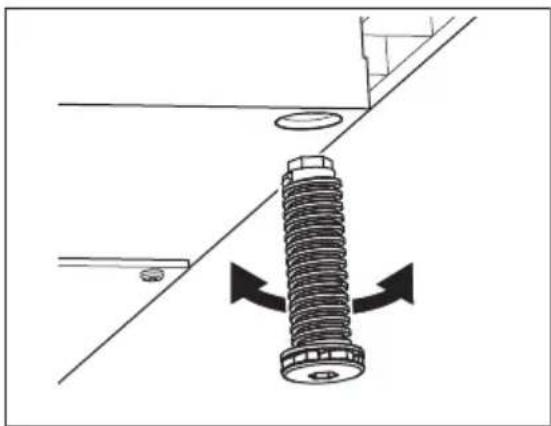
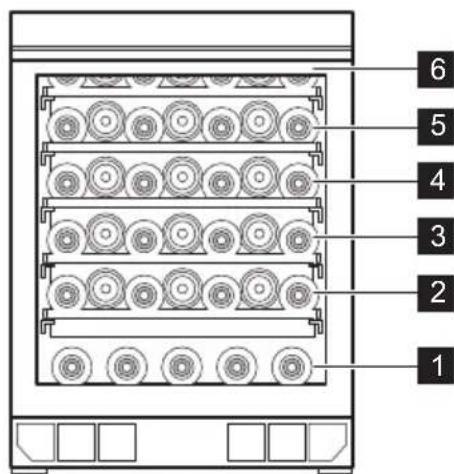
UpeIbTe npedHa3NaueH 3a cbxpaHeHne Ha do 40 6ytnKn c 6opdo (0,75 n) Upe3 NoCTabRHe Ha:
-56ytvnKHa HnBO 1,
- 76ytjnknHaHnBO2,3,4,5,6
3aONOyBaT Da MURAT N ekpaHbT NOKa3Ba NocNeIOBAteHNO dr n OP.CneI oue 2 MNHyTN Ce UyBa 3ByK.
AnapMaTa Cnpa CneI 3aTBapRHe Ha BpaTata NnCneI HATNCKaHE Ha HrKO6yToH Na KOMaHDoTO Ta6No.

AnapMaTa ce n3KIOUyBa OTHOBO CNeD 5 MInHyTu, aKO BpaTAt e BCE oSe OTBOpeHa.
- HnBa Ha padToBeTe
PbJen paT HnBa 2,3,4,5,6
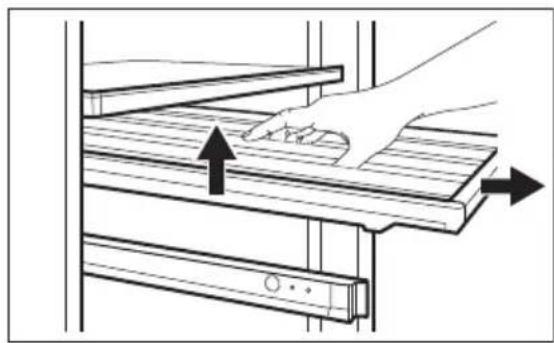
6.2 CbajHe n noCTaBHe Ha paTOBe
CbaJHe Ha paTOBete
3a da n3BaDnTe ckapaTa:
- OTBOPeTe n3qAno BpaTaTaHa 1kaΦa 3a BnHO.
2.ИздьрnaiteckekapataHaBbH.
3. XbaHete ckapata cpeData, NOBdHETe JIeKO IaN3BaTe OT 1kaΦa 3a BnHO.
dani n e noctaBeH n 3axBaHaT npabnHO Bbpxy peIcnte, n ro 6yTHete o6paTHo BVypea.
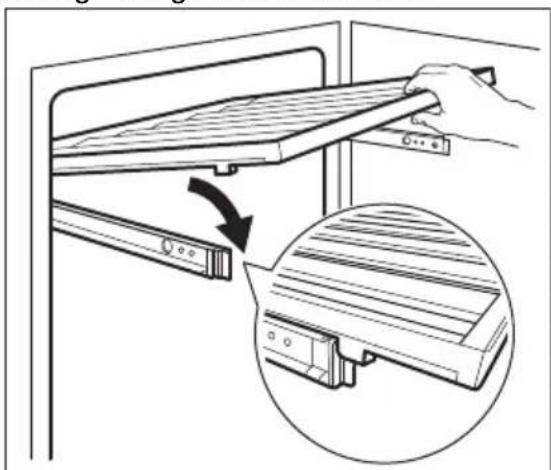
NocTabrHe Ha paTObe
3a da Bbpe TaB IIbpBOHaayanHOT My NOJoxHe:
1.ИЗдьрnaite penciTe Ha paФтадokpaI.
2. NocTaBeTe 3aHnTe OOpn Ha paTb BbpxpeIcnte, Taka Ye da ca 3axBaHaTN OT DBeTe CtpaHn.
- NopapbHete BODaunTe OTnped.
- HatncheTe 3aHaTa YacT Ha paTa 3dpaBO HaOny, 3a Da npOBepnte,

PENEYNPEXKDEHNE!
IpeNi Da NoctaBnte 6byTnIKN 3a BInHO Bbpxy paTOBte, yBepTe ce, ye Te ca npabNJHO 3akpeNeHn Bbpxy peNCITE.
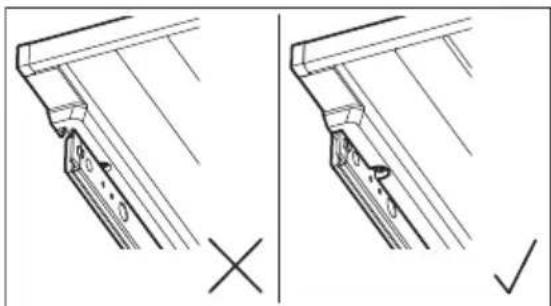
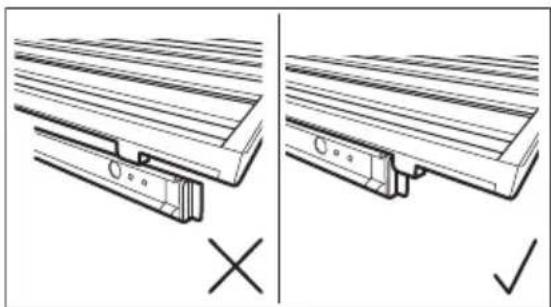
PpOBepeTe 3a Bb3MOxHo HnPaBnHNO nO3nUHOHa paT:

I3no3BaTe DbPBeHnTe paTOBe cmo 3a cbXpaHeHne Ha 6yTNKn.
6.3 CmHa Ha Bb3dUshnnaΦnntbp
Baunrypee cnaedc BbIepoeh Bb3dyweh pniTbp,pa3noJoxeH do KOMaHnHOTo Ta6No.BnxTe rnaBa "OnncAHne Ha npOyKta".
ФИЛТьрБТпpeиNTBaВь3ДухаOT НжеланMuPиЗМВШkaФа3aВИнО, КATOПОДОБРЯВKaЧECTBOTOHa СьхpaHeHne.
3a da cMeHnTe Bb3dUwHnA pNITbp:
- HamepeTe qntbpa n ro n3BaTe otypea. OtcpaheTe kanaka My.
- OtrpaheTe cTapnA nnTbp.
3.ИЗВадеTe HOBЯФЛТьр OT NOПЕТUILЕHOBЯ ППИК. - NocTabete HOBNA HNTbp, KATO BHIMaBaTe CtpaHaTa C TeKCTa Da COuH Harope.
- NocTaBete O6paTHO KanaKa Ha cnIbpa I rO nocTaBete O6paTHO BypeDa.
- OTnIeTe Ha KOHTpOJIHnI NaHeI n HynpaIte 0nTbpa, 3a Da DeakTNBupate anapMaTa. BnxKTe pa3dEn, HynpaHe Ha Bb3dUshnIy PhnTbp".
3a da ce nondbpxka Han-dobpa efeKTNBHOCT, fNITbPbT Tp6Ba da ce CMeHRA BeHNbX Ha BCEK 6 Mececa. Hob AKTNBEH fNITbP MOKeTe Da 3aKynite OT Baunr MeCTeH DoCTaBvNK INIype3 ye6caIra. Homept Ha qactTa e OTneuataH Bbpy NOnnEtNHeOBn IINK.
7. NOJE3HN CbBETN
7.1 CbBcTn 3a eHeprocncctraBaHe
Bbtpewhata KOHqnrypaunHa ypea e Ta3n, KOrTO OcNpyra HaiepeKTHBHO 3nON3BaHe Ha eheprna.
He OTBaprTe BpaTaTa YecTo H He octabnTe OTBOpeHa NO-DbJIro OT Heo6xOdMOTO.
8. Глижам поочьбаHE

BHIMAHNE!
BnKTe rnaBa
"Be3onachOCT".
- YBepTe ce, Ye BeHTnlaaunraTa e do6pa. He nokpnbaiTe BEHTnlaauHHnte peweTkn N OTbOpN.
8.1 O6u npdynpejdeHna

PPEyynPEXKDEHNE!
I3KJIIOUcTe ypeDa OT KOHTaKTa npei N3BbPbWbAHeTo Ha KaKBInTO I Da 6nlo onepaunn PoNpDpBxKaT.

To3n ypeI cblbpxa
BbIeBOOpOuN B
OxJaXdaUa 6Jok;
CneIOBaTeJHo
NoDpBxxKaTa N
npE3apeJxDaHeto Tpr6Ba da
Ce n3BbPWBat OT
yNbJIHOMOueHn TEXHnU.

PnHaJnEJXHOCTIe N
yactte Ha ypeDa He ca
NoDxOJaU 3a MneHe B
CbDOMJIHa MaUNHa.
8.2Поунствае на Вьтpeшноctta
IpeHn Da n3noJ3BaTe ypea 3a nbpBn
PbT, Tpa6Ba Da NOUcHTnte
BbTpEWHOCCTTa H BCNUK BbTpEHN
PnHaJLeXHOCTN C XlaJaCa canyHeHa
BOda N MaNKo HeyTpaneH canyH, 3a Da
OTcTpaHNTe TINuHaT a HOBtE
n3DeJIy Mnpu3Ma, a CneD TOBa
NoCDyWeTe HAnbHNO.

NPEyynPEXKDEHNE!
He n3no3BaIte npenapatn, abpa3nBn nydpn, xlop nnn nouchTbaun npenapatn Ha MacJeHa OCHOBA, TbK KaTo ige NOBpeJr TOKPNTNeTO.
Tp6Ba Da npednpneMeTe npaBnHnTe CTbKN, ONncAHn NO-rope.
9. OTCTPAHЯBAHE HA HEN3ПРABHOCTN

BHIMAHHE!
BuxTe rnaBa
"Be3onacnoct".
9.1 KaK da nocTbNITE, aKO...
| ПюбLEM Вьзможна рripsуна Peшениe | |
| Хладиликьт He paBOTи. Xладиликьт e ИЗКЛIO-уен. | Вклочete урEDA. |
| ШеньеBJT He e CBp3ан | Свьржete правлино сelen-ceлa B контакta Na 3axpaH-BAцаТа МрЕжa. |
| В Контакta Няма наpane-Жениe. | Вклочete дpyг селкову-pondд КьМ Контакta, за дп探测ite Даллима ТOK.Акюсяma, повkaиу Te KBалл-фицеран селкову.TeKnotexнik. |
| Пюкьсвачыт e ИЗКЛIO-чIL ИПИ ИМa ИЗrogenл пеклдпгел. | Вклочete пекьсвача ИПИ сmedе пеклдпел. |
| Компесорьт пбOTи He-прекьсато. | Tempepatypata e Ha-ctrpoeha Нравлино. |
| Temпесорьота вnome-шениTo e TBьрde BINO-Ka. | Вжte галв „Равotas". |
| Вразата ce OTваря | He Дрьжte Вразата OTворе-на по-Дьлro ot HeobхODn-MOTO. |
| Вразата He e Добpe 3a-TBорега. | Вжte pa3delen „Затаряпс"Ha Вразата". |
| Освettingе提到 He pa6OTи. Лампчкatable He сВети. Вклочete освettingе提到. | Вжte pa3delen „Настояк"Ha CBETПINHATA". |
| Урдане He e ВКлочeВ KOHTAKTa. | Свьржete урEDA. |
| Пюкьсвачыт e ИЗКЛIO-чIL ИПИ ИМa ИЗrogenл пеклдпгел. | Вклочete пекьсвача ИПИ сmede特有的пюзпел. |
9.3 3aTbapnHe Ha BpaTaTa
- NocTeTe yNtHeHnTa Ha Bpata.
2.Ako e Heo6xOIMO,peynpaIte Bpata.BnxTe rnaBa "HcTaJaunia.
3.AKoe Heo6xOIMO, CMeHeTe DeΦeKTHnte yNtBTHEnHa BpaTata.CBpKeTe ce c OToPn3npaH cepBn3eH ueHTbp.
10. LjyMOBE

11. TEXHnueCKn DAHHN
TexnueckaTnHOpmaCnCeHamnpa HaTabeIkaTa CdaHHNOTBbTpewHaTa cTpaHaHa ypeDa NHa eTuKeTa 3a eHeprnHa KaTeopn.
QR KoIbT Bbpy etKeta 3a eHepnHa KaTeOpn, npedocTabeH cypea, CbIbPka ye6 Bpb3ka, BOeua do INHopMaun, CBp3aHa C cyHKUHOHaHNOCTTa Ha ypea B 6a3ata DaHHN EPREL Ha EC. 3ana3eTe etKeta 3a eHepnHa KaTeOpn 3a cnpaBka, KATo n pbKOBoCTBOTO 3a NOTpeBntIn N BCNUdpyrDOKyMeHTN, PpeoCTaBeHcypea.
Bb3MOxHoe da OTKpneTe cBuaTa
HHOpMaunB EPREL, KaTo
n3NoJ3BaTe Bpb3KaTa
https://eprel.ec.europa.eu IN BbBeJeTe
HMeto Ha MoDeJa N Homepa Ha
npOdykta, KOITO Ce HAMnPaT Bbpxy
TabeKnata C DaHn Ha ypeHa.
BuxTe NnHa www.theenergylabel.eu 3a noDpo6Ha INΦopMaζη 3a etNkeTa 3a eHeprHnHaT KaTEROpN.
12. INHΦOPMAÇIЯ 3A IN3ΠNTBAΙΝΙΑБOPATΟΝΙ
MOHTaXbT N ODoTROBkata Ha ypeDa 3a BcKa BepnФkaCua 3a ekOdn3aH Tp6Ba Da cbOTBeTCTBaT Ha EN 62552. YcNoBnTa 3a BEHTnlaCua, pa3MePnte Ha HnWata N MmHmMaJIHnTe OTCToRnHa
OT 3aHaTa CTeHa Tp86Ba Da 6bDaT
CbIaCHO NocOeHTo B rIaBa 3 Ha ToBa
PbKOBOdCTBO Ha Notpe6nte.3a
DOnbJIHnTeJHa HOpMaucy,
BKnUChTEJHo CXemn 3a 3apeKdaHe, ce
CBbpXeTe C npOn3BOdTeJ.
13.ОПАЗBAHEHAOKOLHATA CPEДA
PeuKnpaTe MaepnaIte cbc CmBOJa TIOCTaBnTe OAnKOKBnTe B CbOTBeTHnTe KOHTeHepn 3a peuKnpaHeTo m. IOMOrHeTe 3a ONa3BaHeTo Ha OKoJHaTa CpeDa N YOBeShKOTO 3dpaBe, KaKTo n 3a peuKnpaHeTo Ha OTndaTbU O
eIektpnueeckn n eIektpoHn ypeNi. He
n3xBbpIyIte ypeInte, 03NaueHn CbC
cIMBONa 3aeIDHO C6bITOBaTc MTe.
BbpHete ypeDa B MeCTHnI pyHKT 3a
peuKInpaHe NnI ce O6bpHeTe KbM
BaWata 06UHcKa cnyk6a.
OBSAH
- BEZPEČNOSTNI INFORMACE 22
- BEZPECNOSTNI POKNY 23
- INSTALACE 25
- POPIS VYROBKU 28
5.PROVOZ. 28
6.DENNIPOUZIVANI 31 - TIPY A RADY 33
8.CISTENIA A UDRZBA. 34 - ODSTRANOVÁNÍ ZÁVAD 35
- HLUK 37
- TECHNICKÉ UDAJE 37
- INFORMACE PRO ZKUŠEBNY 37
- POZNÁMKY K OCHRANE ZIVOTNIHO PROSTREDI 38
MYSLIME NA VÁS
6.3 Udskifting at luftfilter
WE'RE THINKING OF YOU
Thank you for purchasing an Electrolux appliance. You've chosen a product that brings with it decades of professional experience and innovation. Ingenious and stylish, it has been designed with you in mind. So whenever you use it, you can be safe in the knowledge that you'll get great results every time.
Welcome to Electrolux.
Visit our website to:

Get usage advice, brochures, trouble shooter, service and repair information: www.electrolux.com/support

Register your product for better service: www.registerelectrolux.com

Buy Accessories, Consumables and Original spare parts for your appliance: www.electrolux.com/shop
CUSTOMER CARE AND SERVICE
Always use original spare parts.
When contacting our Authorised Service Centre, ensure that you have the following data available: Model, PNC, Serial Number.
The information can be found on the rating plate.

Warning / Caution-Safety information

General information and tips

Environmental information
Subject to change without notice.
1. SAFETY INFORMATION
Before the installation and use of the appliance, carefully read the supplied instructions. The manufacturer is not
responsible for any injuries or damage that are the result of incorrect installation or usage. Always keep the instructions in a safe and accessible location for future reference.
1.1 Children and vulnerable people safety
- This appliance can be used by children aged from 8 years and above and persons with reduced physical, sensory or mental capabilities or lack of experience and knowledge if they have been given supervision or instruction concerning the use of the appliance in a safe way and understand the hazards involved.
Children aged from 3 to 8 years are allowed to load and unload the appliance provided that they have been properly instructed. - This appliance may be used by persons with very extensive and complex disabilities provided that they have been properly instructed.
- Children of less than 3 years of age should be kept away from the appliance unless continuously supervised.
- Children should be supervised to ensure that they do not play with the appliance.
Children shall not carry out cleaning and user maintenance of the appliance without supervision. - Keep all packaging away from children and dispose of it appropriately.
1.2 General Safety
- This appliance is for storing wine only.
- This appliance is designed for single household domestic use in an indoor environment.
-
This appliance may be used in, offices, hotel guest rooms, bed & breakfast guest rooms, farm guest houses and other similar accommodation where such use does not exceed (average) domestic usage levels.
-
WARNING: Keep ventilation openings, in the appliance enclosure or in the built-in structure, clear of obstruction.
- WARNING: Do not use mechanical devices or other means to accelerate the defrosting process, other than those recommended by the manufacturer.
- WARNING: Do not damage the refrigerant circuit.
- WARNING: Do not use electrical appliances inside the food storage compartments of the appliance, unless they are of the type recommended by the manufacturer.
- Do not use water spray and steam to clean the appliance.
- Clean the appliance with a moist soft cloth. Only use neutral detergents. Do not use abrasive products, abrasive cleaning pads, solvents or metal objects.
- When the appliance is empty for long period, switch it off, defrost, clean, dry and leave the door open to prevent mould from developing within the appliance.
- Do not store explosive substances such as aerosol cans with a flammable propellant in this appliance.
- If the supply cord is damaged, it must be replaced by the manufacturer, its Authorised Service Centre or similarly qualified persons in order to avoid a hazard.
2. SAFETY INSTRUCTIONS
2.1 Installation

WARNING!
Only a qualified person must install this appliance.
- Remove all the packaging.
- Do not install or use a damaged appliance.
- Do not use the appliance before installing it in the built-in structure due to safety manner.
-
Follow the installation instructions supplied with the appliance.
Always take care when moving the appliance as it is heavy. Always use safety gloves and enclosed footwear. -
Make sure the air can circulate around the appliance.
- At first installation or after reversing the door wait at least 4 hours before connecting the appliance to the power supply. This is to allow the oil to flow back in the compressor.
- Before carrying out any operations on the appliance (e.g. reversing the door), remove the plug from the power socket.
- Do not install the appliance close to radiators or cookers, ovens or hobs.
- Do not expose the appliance to the rain.
-
Do not install the appliance where there is direct sunlight.
-
Do not install this appliance in areas that are too humid or too cold.
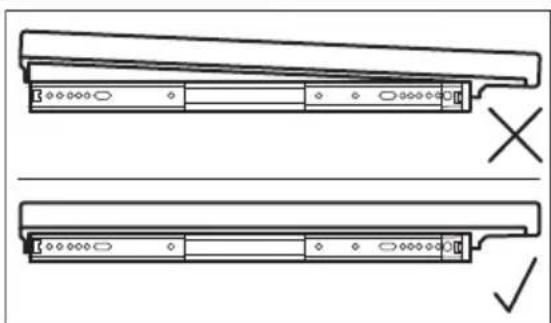
- When you move the appliance, lift it by the front edge to avoid scratching the floor.
2.2 Electrical connection

WARNING!
Risk of fire and electric shock.

WARNING!
When positioning the appliance, ensure the supply cord is not trapped or damaged.

WARNING!
Do not use multi-plug adapters and extension cables.
The appliance must be earthed.
- Make sure that the parameters on the rating plate are compatible with the electrical ratings of the mains power supply.
Always use a correctly installed shockproof socket.
Make sure not to cause damage to the electrical components (e.g. mains plug, mains cable, compressor). Contact the Authorised Service Centre or an electrician to change the electrical components.
- The mains cable must stay below the level of the mains plug.
- Connect the mains plug to the mains socket only at the end of the installation. Make sure that there is access to the mains plug after the installation.
- Do not pull the mains cable to disconnect the appliance. Always pull the mains plug.
2.3 Use

WARNING!
Risk of injury, burns, electric shock or fire.

The appliance contains flammable, isobutane (R600a), a natural gas
with a high level of environmental compatibility. Be careful not to cause damage to the refrigerant circuit containing isobutane.
- Do not change the specification of this appliance.
- Any use of the built-in product as freestanding is strictly prohibited.
- Do not put electrical appliances (e.g. ice cream makers) in the appliance unless they are stated applicable by the manufacturer.
- If damage occurs to the refrigerant circuit, make sure that there are no flames and sources of ignition in the room. Ventilate the room.
- Do not let hot items to touch the plastic parts of the appliance.
- Do not store flammable gas and liquid in the appliance.
- Do not put flammable products or items that are wet with flammable products in, near or on the appliance.
- Do not touch the compressor or the condenser. They are hot.
2.4 Internal lighting

WARNING!
Risk of electric shock.
- This product contains one or more light sources of energy efficiency class E.
- Concerning the lamp(s) inside this product and spare part lamps sold separately: These lamps are intended to withstand extreme physical conditions in household appliances, such as temperature, vibration, humidity, or are intended to signal information about the operational status of the appliance. They are not intended to be used in other applications and are not suitable for household room illumination.
2.5 Care and cleaning

WARNING!
Risk of injury or damage to the appliance.
-
Before maintenance, deactivate the appliance and disconnect the mains plug from the mains socket.
-
This appliance contains hydrocarbons in the cooling unit. Only a qualified person must do the maintenance and the recharging of the unit.
- Regularly examine the drain of the appliance and if necessary, clean it. If the drain is blocked, defrosted water collects in the bottom of the appliance.
2.6 Service
To repair the appliance contact the Authorised Service Centre. Use original spare parts only.
- Please note that self-repair or non-professional repair can have safety consequences and might void the guarantee.
The following spare parts will be available for 7 years after the model has been discontinued: thermostats, temperature sensors, printed circuit boards, light sources, door handles, door hinges, trays and baskets. Please note that some of these spare parts are only available to professional repairers, and that not all
pare parts are relevant for all models.
- Door gaskets will be available for 10 years after the model has been discontinued.
2.7 Disposal

WARNING!
Risk of injury or suffocation.
- Disconnect the appliance from the mains supply.
- Cut off the mains cable and discard it.
- Remove the door to prevent children and pets to be closed inside of the appliance.
- The refrigerant circuit and the insulation materials of this appliance are ozone-friendly.
- The insulation foam contains flammable gas. Contact your municipal authority for information on how to discard the appliance correctly.
- Do not cause damage to the part of the cooling unit that is near the heat exchanger.
3. INSTALLATION

WARNING!
Refer to Safety chapters.
3.1 Dimensions
| Overall dimensions1 |
| H1 mm 818 |
| W1 mm 595 |
| D1 mm 577 |
1 the height, width and depth of the appliance without the handle
| Space required in use2 |
| H2 mm 820 |
| W2 mm 600 |
| D2 mm 580 |
the height, width and depth of the appliance including the handle, plus the space necessary for free circulation of the cooling air
| Overall space required in use3 |
| H2 mm 820 |
| W3 mm 600 |
| D3 mm 1162 |
3 the height, width and depth of the appliance including the handle, plus the space necessary for free circulation of the cooling air, plus the space necessary to allow door opening to the minimum angle permitting removal of all internal equipment
3.2 Location
To ensure appliance's best functionality, you should not install the appliance in the nearby of the heat source (oven, stoves, radiators, cookers or hobs) or in a place with direct sunlight. Make sure that air can circulate freely around the back of the cabinet.
This appliance should be installed in a dry, well ventilated indoor position.
This appliance is intended to be used at ambient temperature ranging from 10^ to 38^ .
The correct operation of the appliance can only be guaranteed within the specified temperature range.
i If you have any doubts regarding where to install the appliance, please turn to the vendor, to our customer service or to the nearest Authorised Service Centre.
i It must be possible to disconnect the appliance from the mains power supply. The plug must therefore be easily accessible after installation.
3.3 Electrical connection
- Before plugging in, ensure that the voltage and frequency shown on the rating plate correspond to your domestic power supply.
- The appliance must be earthed. The power supply cable plug is provided with a contact for this purpose. If the domestic power supply socket is not earthed, connect the appliance to a separate earth in compliance with current regulations, consulting a qualified electrician.
The manufacturer declines all responsibility if the above safety precautions are not observed. - This appliance complies with the E.E.C. Directives.
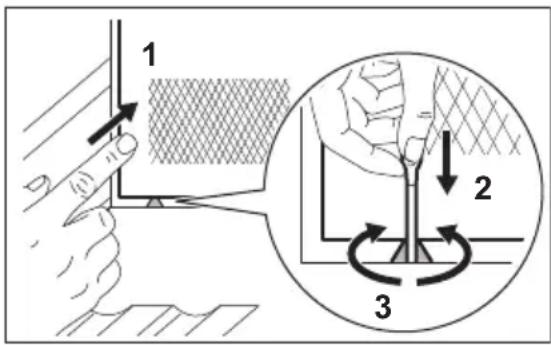
3.4 Levelling
When placing the appliance make sure that it stands level. This can be achieved by four adjustable feet at the bottom of the appliance.
4.PRODUCT DESCRIPTION
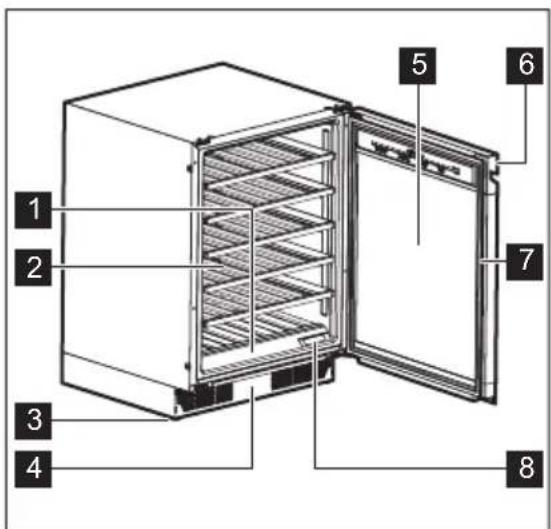
4.1 Product overview
1 Control panel
2 Shelf
3 Foot
4 Decorative frame
5 Tempered glass door
6 Handle
7 Gasket
8 Air filter
5. OPERATION

WARNING!
Do not spill any liquids on the control panel. This may damage the equipment and increase the risk of electric shock.
5.1 Control panel
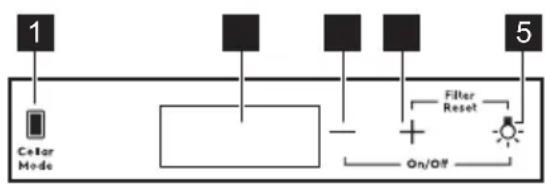
1 Cellar Mode key
2 Display
3 Temperature decrease key
5.2 Display
4 Temperature increase key
5 Light key
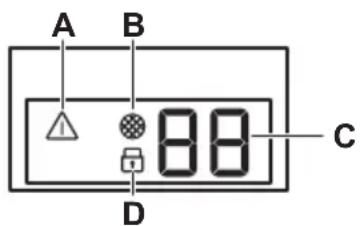
A. Alarm indicator
B. Filter reset indicator
C. Temperature indicator
D. Child lock indicator
5.3 Switching on and off
To switch on the appliance:
- Insert the plug into the wall socket.
- Go to the right side of the control panel.
- Tap and hold the Temperature decrease key and Light key for 3 seconds if the display is off.
- The display shows the default set temperature (12^)
To switch off the appliance, repeat the above procedure in reverse order.
To select a different temperature, refer to the "Temperature regulation" section.
5.4 Temperature regulation

The default set temperature for the wine cabinet is 12^ .

The temperature can be adjusted between +5 and +20^ .
To set the temperature, tap the temperature increase or decrease key for the compartment:
- Single tap shows the current set temperature.
- Second tap increases or decreases the temperature by one degree.
- To speed up the selection, tap and hold the temperature increase or decrease key until you reach the desired temperature.

By default, the temperature digits show the current temperature at half brightness. When you tap once or start selecting a new setting, the displayed digits blink. After 3 seconds without tapping the keys, the digits stop blinking and the current temperature is displayed.
To set the right temperature for each type of wine, refer to the "Daily use" chapter.
5.5 Light setup
Tap the Light key once to turn the light on or off. The default light setting is 1A for the light behaviour and 9L for the light brightness.

The light has no negative effect on the quality of wine.
You may adjust behaviour and brightness of the light.
Light behaviour (A):
- 1A door open - lights on at the highest dimming level, door closed - lights turn off
- 2A door open - lights on at the highest dimming level, door closed - lights on at the selected dimming level
- 3A door open and closed - lights on at the selected dimming level
- 4A door open - lights on at the selected dimming level, door closed - lights on at the highest dimming level Light brightness (L):
- 9L is the brightest setting while 1L is the dimmest one.
To set the light behaviour or brightness:
- Tap and hold the Light key for 3 seconds to enter the light setting menu.
- Light behaviour A appears. Tap the Light key again to go to the light brightness L.
- Tap the temperature regulators repeatedly to set the desired light behaviour or brightness.
5.6 Cellaring
In this mode, the appliance switches to the preset default temperature of 12^ .
To activate the Cellaring mode, tap the Cellar Mode key. CE on the display starts blinking. Wait 5 seconds. The mode is active when CE stops blinking and is lit at half brightness.
To deactivate the Cellaring mode, tap Cellar Mode once again.
5.7 Child Lock mode
Activate the Child Lock mode to lock the keys from an unintentional operation.
To activate the Child Lock, tap and hold the Cellar Mode key for 3 seconds. When the mode is on, the lock indicator lights up at full brightness. After 3 seconds, the lock indicator dims to half brightness.

If you press any key other than Cellar Mode, the lock indicator blinks three times.
To deactivate the Child Lock mode, tap the corresponding key again.

The Child Lock mode deactivates after electricity interruption or unplugging the appliance.
5.8 Reset air filter
To reset the air filter alarm:
- Change the carbon air filter. Refer to the "Replacing air filter" section.
- Tap and hold the Temperature increase and Light keys simultaneously for 5 seconds.
- The filter indicator turns off for the next 6 months.

After 6 months, the display shows the filter indicator to remind you to replace filter.
5.9 Mute or unmute sounds
The sounds are enabled by default.
To mute or unmute the sounds:
- Tap and hold the Cellar Mode and Temperature increase keys simultaneously for 5 seconds.
- The display shows Of for 2 seconds when the sounds are muted, or On for 2 seconds when the sounds are unmuted.
5.10 Changing temperature units
To switch the temperature units between ^ C and ^ F :
- Tap simultaneously the Cellar Mode and Temperature decrease keys.
- Once you set your preferable unit, ^ C or ^ blinks on the display for 5 seconds.
5.11 Demo mode
Activate the Demo mode to demonstrate the appliance's features.
To activate the Demo mode, tap and hold the Light and Cellar Mode keys simultaneously for 10 seconds.
Once the mode is on, the display shows dE and On blinking alternately for 5 seconds.
The above message is displayed every 5 minutes to remind you that the appliance is in the Demo mode.
To deactivate the Demo mode, repeat the above procedure.
Once you deactivate the mode, the display shows dE and Of blinking alternately for 5 seconds.
5.12 High and low temperature alarm
High temperature alarm
The alarm goes off when the compartment's temperature is 5^ higher than the set temperature for more than 60 minutes.
During the alarm:
- the display shows H^
the alarm indicator flashes
Low temperature alarm
The alarm goes off when the compartment's temperature is 2^ lower
6. DAILY USE
6.1 Wine storage

This appliance is intended to be used exclusively for the storage of wine.

Wine storage compartment is the one marked (on the rating plate) with
The storage time for wine depends on age, alcoholic content, type of grapes and level of fructose and tannin in it. At the time of purchase, check if the wine is
than the set temperature for more than 60 minutes.
During the alarm:
- the display shows L^
the alarm indicator flashes
Press any key on the control panel to turn off the alarm.
- If the appliance adjusted the temperature automatically, the normal display restores. Check if the wine inside is not spoiled.
- If the temperature is still too high or too low, the alarm goes off again after 60 minutes.

The alarm does not go off within the first 90 minutes after switching on the appliance.
5.13 Door open alarm
If the door is left open for approximately 5 minutes, the lights start to flash and display shows alternately dr and OP. After 2 more minutes the sound is on.
The alarm stops after closing the door or after pressing any key on the control panel.

The alarm goes off again after 5 minutes if the door is still open.
already aged or if it will improve over time.
Recommended storage temperatures:
- For champagne and sparkling wines, between +6^ and +8^ .
For white wines, between +10^ and +12^ .
For rose and light red wines, between +12^ and +16^ . - Aged red wines, between +14^ and +18^ .
The appliance is designed to store up to 40 bordeaux bottles (0.75 l) by placing:
-
5 bottles on level 1,
-
7 bottles on level 2,3,4,5,6
- Shelf levels
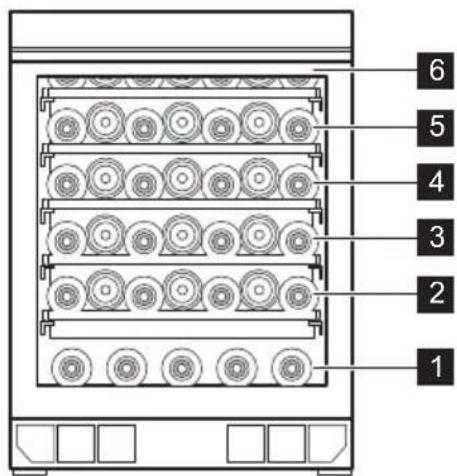
Full shelf levels 2,3,4,5,6
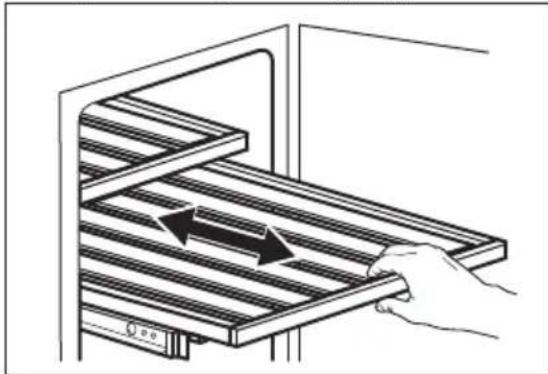
6.2 Removing and installing shelves
Removing shelves
To remove the shelf:
- Open the wine cabinet door completely.
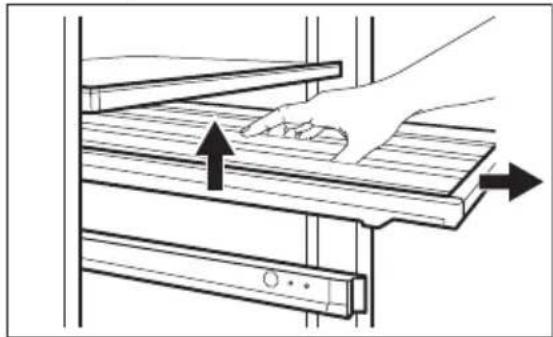
2.Pull the shelf out. - Grab the shelf in the middle, lift it up slightly and take it out of the wine cabinet.
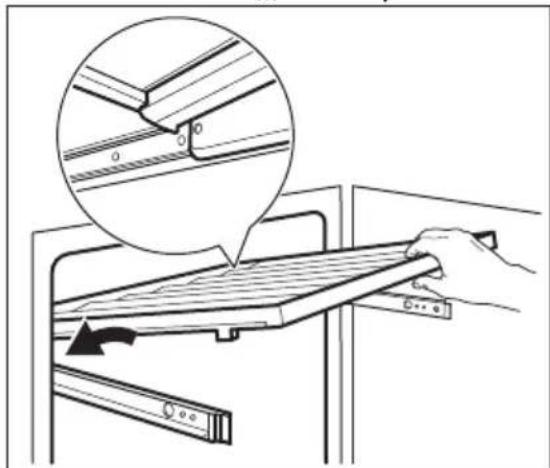
Installing shelves
To put the shelf back into its initial position:
- Pull out the shelf's rails completely.
- Position the shelf's rear mounts on the rails, so they are engaged on both sides.

- Align the guides in the front.
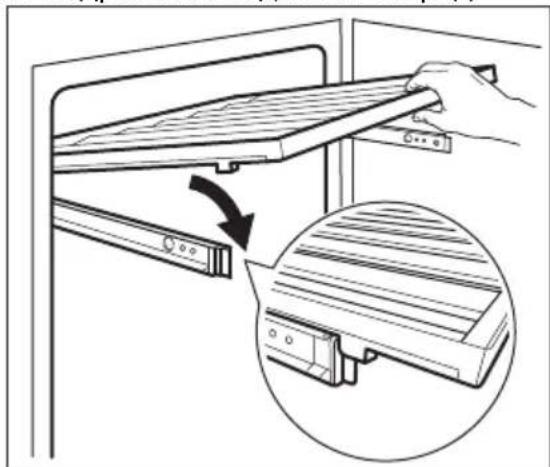
- Press the back of the shelf down firmly to check if it is placed and engaged correctly on the rails and push it back into the appliance.


CAUTION!
Before placing any wine bottles on the shelves, make sure they are properly engaged on the rails.
Check for the possible wrong shelf positioning:
7. HINTS AND TIPS
7.1 Hints for energy saving
- The internal configuration of the appliance is the one that ensures the most efficient use of energy.

Use the wooden shelves only to store bottles.
6.3 Replacing air filter
Your appliance is equipped with the air carbon filter located next to the control panel. Refer to the "Product description" chapter.
The filter purifies air from unwanted odours in the wine cabinet, improving the storage quality.
To replace the air filter:
- Locate the filter and detach it from the appliance. Remove its cover.
- Remove the old filter.
- Take out the new filter from the plastic bag.
- Insert the new filter ensuring the side with the text is facing upward.

- Put the filter cover back and install it back into the appliance.
- Go to the control panel and reset the filter to deactivate the alarm. Refer to the "Reset air filter" section.
To get the best performance, the filter should be changed every 6 months. New active filter can be purchased from your local dealer or through the website. The part number is printed on the plastic bag.
- Do not open the door frequently or leave it open longer than necessary.
- Ensure a good ventilation. Do not cover the ventilation grilles or holes.
8. CARE AND CLEANING

WARNING!
Refer to Safety chapters.
8.1 General warnings

CAUTION!
Unplug the appliance before carrying out any maintenance operation.

This appliance contains hydrocarbons in its cooling unit; maintenance and recharging must therefore only be carried out by authorized technicians.

The accessories and parts of the appliance are not suitable for washing in a dishwasher.
8.2 Cleaning the interior
Before using the appliance for the first time, the interior and all internal accessories should be washed with lukewarm water and some neutral soap to remove the typical smell of a brand-new product, then dried thoroughly.

CAUTION!
Do not use detergents, abrasive powders, chlorine or oil-based cleaners as they will damage the finish.
8.3 Periodic cleaning
The equipment has to be cleaned regularly:
- Clean the inside with lukewarm water and baking soda solution. The solution should be about 2 tablespoons of baking soda to a litre of water.
- Wring excess water out of sponge or cloth when cleaning the area of the controls, or any electrical parts.
-
Clean the outside of the appliance with warm water and some neutral soap.
-
Regularly check the door seals and wipe them clean to ensure they are clean and free from debris.
- Rinse and dry thoroughly.
8.4 Cleaning the drain
Periodically clean the drain hole to prevent water from overflowing and dripping onto the stored bottles. The drain hole is located on the rear wall in the lower left part of the appliance. To reach it more easily, slightly press the covering grid.
For this purpose, use a thin, plastic, nonsharp stick.
8.5 Periods of non-operation
When the appliance is not in use for long periods, take the following precautions:
- Disconnect the appliance from electricity supply.
- Remove all items.
- Clean the appliance and all accessories.
- Leave the door open to prevent unpleasant smells.
When the appliance is not in use due to power failure:
- Most power failures are corrected within a few hours and don't affect the temperature of your appliance if you minimize the door opening.
- If the power is going to be off for a longer time, you need to take the proper steps described above.
9. TROUBLESHOOTING

WARNING!
Refer to Safety chapters.
9.1 What to do if...
| Problem Possible cause Solution | ||
| The appliance does not operate. | The appliance is switched off. | Switch on the appliance. |
| The mains plug is not connected to the mains socket correctly. | Connect the mains plug to the mains socket correctly. | |
| There is no voltage in the mains socket. | Connect a different electrical appliance to the mains socket, to check if electricity is flowing. If not, contact a qualified electrician. | |
| The circuit breaker trip-ped or a blown fuse. | Turn on the circuit breaker or change the fuse. | |
| The compressor operates continually. | Temperature is set incorrectly. | Refer to the "Operation" chapter. |
| The room temperature is too high. | Refer to the "Installation" chapter. | |
| The door is opened too often. | Do not keep the door open longer than necessary. | |
| The door is not closed correctly. | Refer to the "Closing the door" section. | |
| The light does not work. The light is turned off. Turn on the light. Refer to the "Light setup" section. | ||
| The appliance is not plugged in. | Connect the appliance. | |
| The circuit breaker trip-ped or a blown fuse. | Turn on the circuit breaker or change the fuse. | |
| The lamp is defective. Contact the service. | ||
| The light button is not operat-ing. | Contact the service. | |
| Too much vibration. The appliance is not sup- ported properly. | Check if the appliance stands stable. | |
| The appliance is noisy. The appliance is not sup- ported properly. | Check if the appliance stands stable. | |
| Water flows on the rear plate of the appliance. | During the automatic de-frosting process, frost melts on the rear plate. | This is correct. |
| Water flows inside the wine cabinet. | The appliance drain is clogged. | Clean the appliance drain hole. Refer to the "Cleaning the drain" section. |
| Water flows inside the wine cabinet. | Products prevent that water flows into the water collector. | Make sure that products do not touch the rear plate. |
| The temperature in the wine cabinet is too low or too high. | The temperature regulator is not set correctly. | Set a higher or lower temperature. |
| The door is not closed | correctly. | Refer to the "Closing the door" section. |

If the advice does not lead to the desired result, call the nearest brand-mark service.
9.2 Replacing the lamp
The appliance is equipped with a longlife LED interior light.
Only service is allowed to replace the lighting device. Contact your Authorised Service Centre.
9.3 Closing the door
- Clean the door gaskets.
- If necessary, adjust the door. Refer to the "Installation" chapter.
- If necessary, replace the defective door gaskets. Contact the Authorised Service Centre.
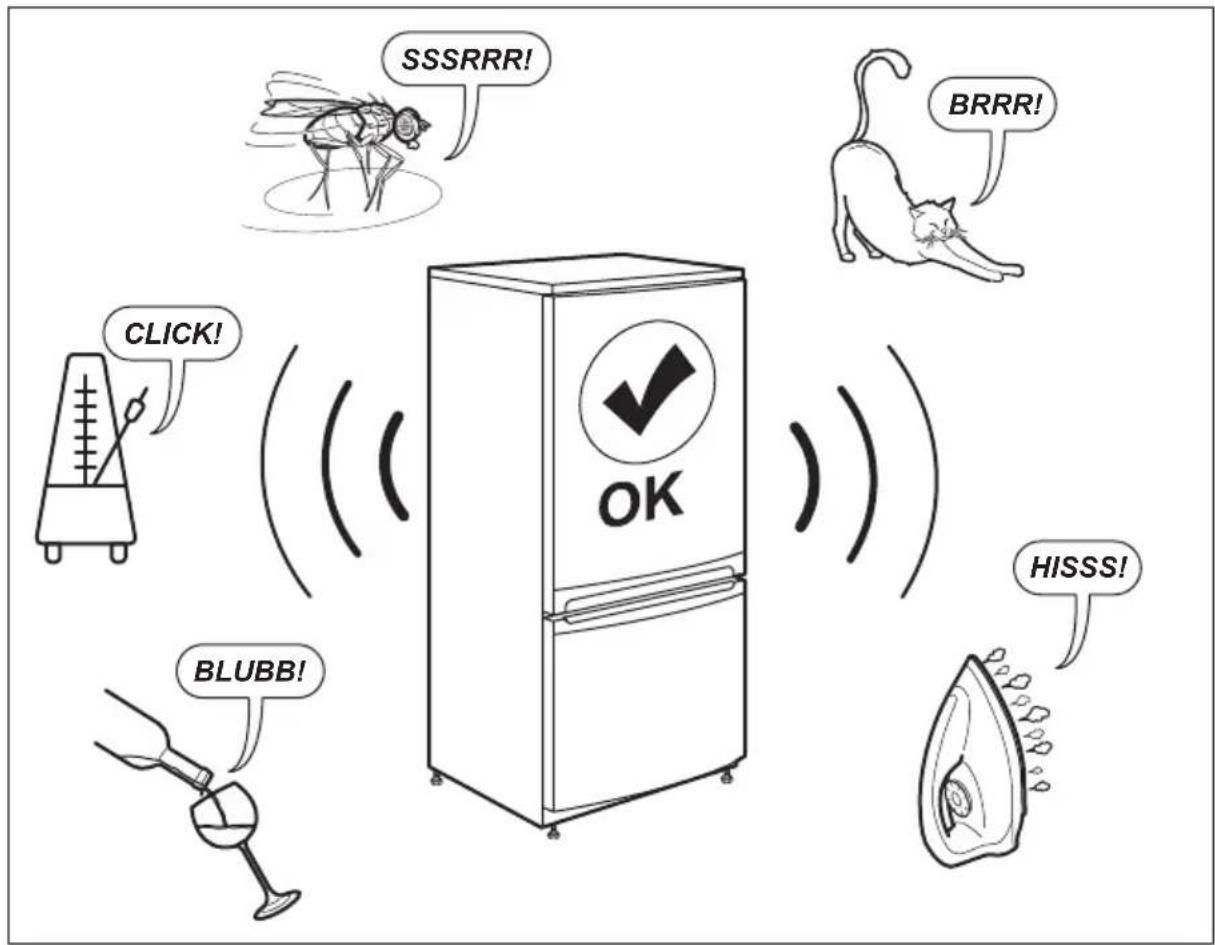
10. NOISES
11. TECHNICAL DATA
The technical information is situated in the rating plate on the internal side of the appliance and on the energy label.
The QR code on the energy label supplied with the appliance provides a web link to the information related to the performance of the appliance in the EU EPREL database.
Keep the energy label for reference together with the user manual and all other documents provided with this appliance.
It is also possible to find the same information in EPREL using the link https://eprel.ec.europa.eu and the model name and product number that you find on the rating plate of the appliance.
See the link www.theenergylabel.eu for detailed information about the energy label.
12. INFORMATION FOR TEST INSTITUTES
Installation and preparation of the appliance for any EcoDesign verification shall be compliant with EN 62552. Ventilation requirements, recess dimensions and minimum rear
clearances shall be as stated in this User Manual at Chapter 3. Please contact the manufacturer for any other further information, including loading plans.
13. ENVIRONMENTAL CONCERNS
Recycle materials with the symbol Put the packaging in relevant containers to recycle it. Help protect the environment and human health by recycling waste of electrical and electronic appliances. Do not dispose of
appliances marked with the symbol with the household waste. Return the product to your local recycling facility or contact your municipal office.
CONTENIDO
- INFORMACION SOBRE SEGURIDAD 94
- INSTRUCCIONES DE SEGURIDAD 96
- INSTALLACION 98
4.DESCRIPTION DEL PRODUCTO 100 - FUNCIONAMENTO 100
6.USO DIARIO 103 - CONSEJOS 106
8.CUIDADO Y LIMPIEZA. 106
9.SOLUCIOn DE PROBLEMAS 107 - RUIDOS 109
11.DATOS TECNICOS. 109 - INFORMACION PARA INSTITUTOS DE PRUEBAS 110
- ASPECTOS MEDIOAMBIENTALES 110
PENSAMOS EN USTED
4. PRODUKTA APRAKSTS
4.1 Produktaparskats
1 Vadibas panelis
2 Plaukts
3 Pamatne
4 Dekorativais ramis
5 Rudita stikla durvis
6 Rokturis
7 Blive
8 Gaisa filtrs
5. DARBIBA

BRIDINAJUMS!
Izvairieties no jebkadu skidrumu izslakstiisanas uz vadibas panela. Tas var sabojat aprikojumu un palielinat elektrosoka risku.
5.1 Vadības panelis
1 Vina pagraba režima taustiš
2 Displejs
3 Temperaturas samazināsanas taustins
5 Apgaismojuma taustiš
4 Temperaturas palielinaesanas taustins
5.2 Displejs
A. Bridinajuma indicators
B. Filtra atiestatisanas indicators
C. Temperatūras indicators
5.3 leslegsana un izslegsana
Lai ieslēgtu ieri ci:
- lespraudiet kontaktdaksu sienes elektrotikla kontaktligzdā.
- Parejiet uz vadibas panela labo pusi.
- Ja displejeis ir izslegts, pieskarieties un turiet nospiestus temperaturas pazeminasanas un apgaismojuma taustinus 3 sekundes.
- Displeja redzama noklusejuma iestatita temperatura (12^)
Lai izslęgtu icerici, atkartoti veiciet ieprieks noraditas daribas pretejā seciba.
Lai atlasitu citu temperaturu, skatiet sadalu "Temperaturas regulešana".
5.7 Rezims Child Lock
7.1 Tips for strømsparing
9. RIESENIE PROBLEMOV

VAROVANIE!
reparationsinformation:
www.electrolux.com/support
registrar din produit for bättre service:
www.registerelectrolux.com


1 Knapp for Cellaring-lage
5.13 Larm for oppen dorr


- OBCJNYKBAHE HA KJIneHTN
- HOPMALI 3A BE3OJACHOCT
- Be3oNaChOcT 3a Deca N Iuca B HepaBHOCTOHOIPOJXeHne
- O6ua 6e3oNaChocT
- INHCTPYKUN 3A BE3OJACHOCT
- 2.1Инстацnia
- BHIMAHNE!
- EneKtpnuecko Cbbp3BaHe
- 2.3ИЗползванe
- BHIMAHHE!
- Pa3noJaRaHe
- EneKtpnuecko Cbbp3BaHe
- HnBeJInpaHe
- Cellaring
- Pexim Child Lock
- HuyipaHe Ha Bb3dUshnna
- 3aIyUbaHe nII nYcKaHe Ha 3ByKOBn CnHaJIu
- CbXpaHHeHnE Ha BnHO
- IpenopbHTeHn Tempeatypn 3a cxbxpaHeHne:
- CbajHe n noCTaBHe Ha paTOBe
- CbaJHe Ha paTOBete
- NocTabrHe Ha paTObe
- PENEYNPEXKDEHNE!
- CmHa Ha Bb3dUshnnaΦnntbp
- NOJE3HN CbBETN
- CbBcTn 3a eHeprocncctraBaHe
- Глижам поочьбаHE
- O6u npdynpejdeHna
- PPEyynPEXKDEHNE!
- 8.2Поунствае на Вьтpeшноctta
- NPEyynPEXKDEHNE!
- OTCTPAHЯBAHE HA HEN3ПРABHOCTN
- KaK da nocTbNITE, aKO...
- 3aTbapnHe Ha BpaTaTa
- LjyMOBE
- TEXHnueCKn DAHHN
- INHΦOPMAÇIЯ 3A IN3ΠNTBAΙΝΙΑБOPATΟΝΙ
- 13.ОПАЗBAHEHAOKOLHATA CPEДA
- OBSAH
- MYSLIME NA VÁS
- Udskifting at luftfilter
- WE'RE THINKING OF YOU
- CUSTOMER CARE AND SERVICE
- SAFETY INFORMATION
- Children and vulnerable people safety
- General Safety
- SAFETY INSTRUCTIONS
- Installation
- WARNING!
- Electrical connection
- Use
- Internal lighting
- Care and cleaning
- Service
- Disposal
- INSTALLATION
- Dimensions
- Location
- Electrical connection
- Levelling
- 4.PRODUCT DESCRIPTION
- Product overview
- OPERATION
- Control panel
- Display
- Switching on and off
- Temperature regulation
- Light setup
- Child Lock mode
- Reset air filter
- Mute or unmute sounds
- Changing temperature units
- Demo mode
- High and low temperature alarm
- DAILY USE
- Wine storage
- Door open alarm
- Recommended storage temperatures:
- Removing and installing shelves
- Removing shelves
- Installing shelves
- CAUTION!
- HINTS AND TIPS
- Hints for energy saving
- Replacing air filter
- CARE AND CLEANING
- General warnings
- Cleaning the interior
- Periodic cleaning
- Cleaning the drain
- Periods of non-operation
- TROUBLESHOOTING
- What to do if...
- Replacing the lamp
- Closing the door
- NOISES
- TECHNICAL DATA
- INFORMATION FOR TEST INSTITUTES
- ENVIRONMENTAL CONCERNS
- CONTENIDO
- PENSAMOS EN USTED
- PRODUKTA APRAKSTS
- Produktaparskats
- DARBIBA
- BRIDINAJUMS!
- Vadības panelis
- Displejs
- leslegsana un izslegsana
- Rezims Child Lock
- Tips for strømsparing
- RIESENIE PROBLEMOV
- VAROVANIE!
- Larm for oppen dorr
Brand : ELECTROLUX
Model : EWUS040B8B
Category : Wine cellar