
TVL300 - Earphones SWITEL - Free user manual and instructions
Find the device manual for free TVL300 SWITEL in PDF.

| Product type | Wireless headphone |
| Brand | Switel |
| Model | TVL300 |
| Category | Headphone |
| Transmitter power supply | 5 V, 550 mA |
| Receiver power supply | Lithium polymer battery 3.7 V / 380 mAh |
| Charging time | Approximately 3 hours |
| Battery life | Up to 5 hours |
| Range | Up to 20 m (optimal conditions) |
| Frequency response | 20 Hz - 20 kHz |
| Distortion | <0.5% THD |
| Signal-to-noise ratio | 70 dB |
| Maximum volume | 120 dB |
| Transmitter weight | 65 g |
| Package contents | Receiver with ear cushions, transmitter, 1 extra pair of ear cushions, power adapter, RCA audio adapter, audio cable (2 x 3.5 mm jack) |
| Main functions | Wireless transmission, built-in microphone for ambient listening, volume and balance adjustment, automatic shut-off when no signal |
| LED indicators | Receiver: blue (power/signal), green (microphone active); Transmitter: green (operation), red (charging) |
| Care and cleaning | Clean surfaces with a soft, lint-free cloth. Do not use any cleaning agents or solvents. |
| Safety | Risk of hearing damage at high volume. Use only the supplied power adapter. Do not open the device. |
| Spare parts and repairability | Replaceable ear cushions (2 pairs included). For any repairs, contact the dealer or after-sales service. |
| General information | Compliant with Directive 2014/53/EU. CE marking. 24-month warranty from date of purchase. |
Frequently Asked Questions - TVL300 SWITEL
User questions about TVL300 SWITEL
0 question about this device. Answer the ones you know or ask your own.
Ask a new question about this device
Download the instructions for your Earphones in PDF format for free! Find your manual TVL300 - SWITEL and take your electronic device back in hand. On this page are published all the documents necessary for the use of your device. TVL300 by SWITEL.
USER MANUAL TVL300 SWITEL
Telgo AG, Route D'Agy 16, 1763 Granges-Paccot, Switzerland
Technische Daten
Übertragungsmodus
Trägerfrequenz
Stromversorgung
Frequenzbereich
Klirrfaktor
Signal/Rausch-Abstand
Reichweite
Max. Lautstärke
Betriebsdauer
Ladezeit
Gewicht
Digital Hopping System
2,4 GHz ISM Band I
Sender: 5 V, 550 mA
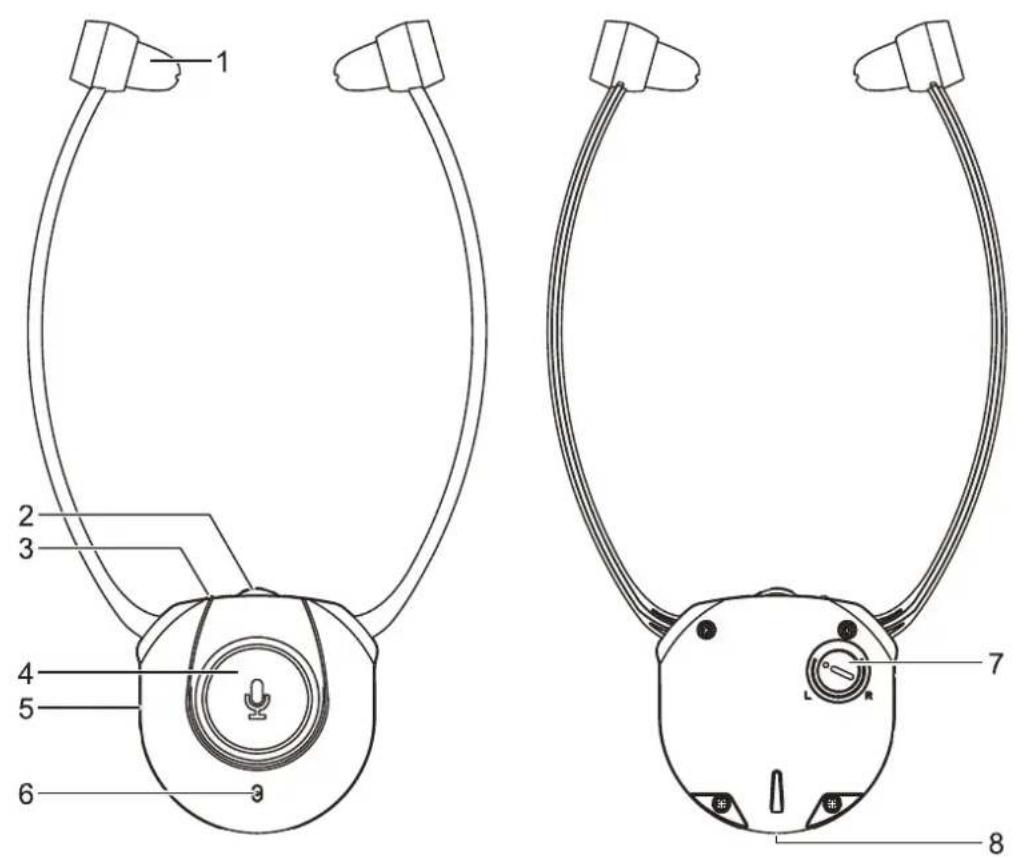
1 Adjustable Earbud
2 Volume Control
3 LED Indicator (Power / Signal = blue, Microphone = green)
4 Microphone button to hear sounds from the surroundings
5 Power ON/OFF
6 Microphone
7 Balance Control
8 Charging Contacts
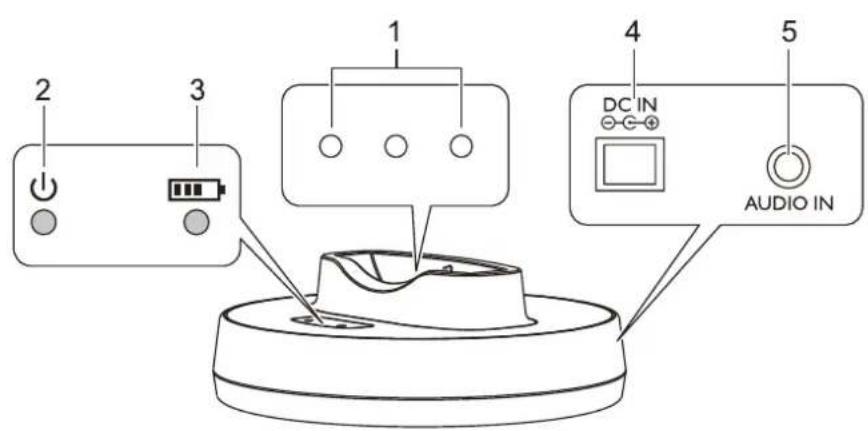
1 Charging Contacts
2 LED Indicator (Power / Signal = green)
3 Charge LED Indicator (charging = red / fully charged = green)
4 Socket for Power Adaptor
5 3.5 mm Audio Socket (Audio Line In)
Getting started
Box contents
GB
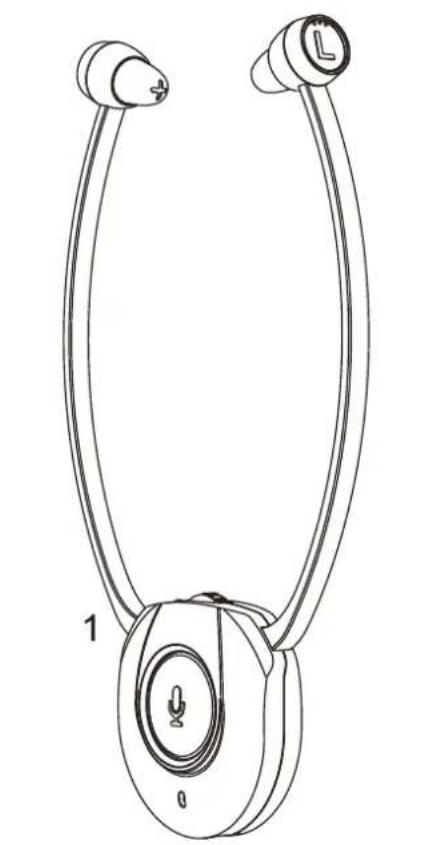
1 Receiver with rubber ear buds
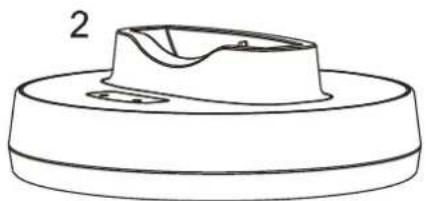
2 Transmitter
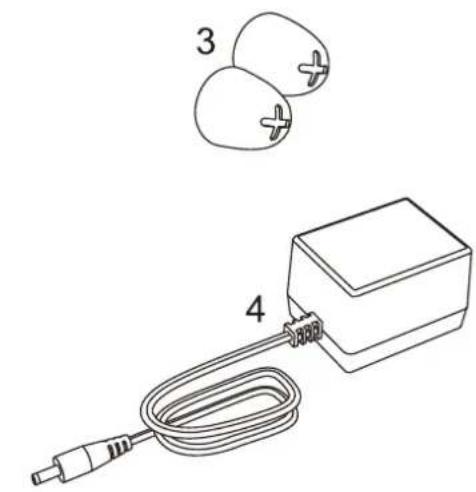
3 1 additional pair of rubber ear buds
4 AC/DC adapter
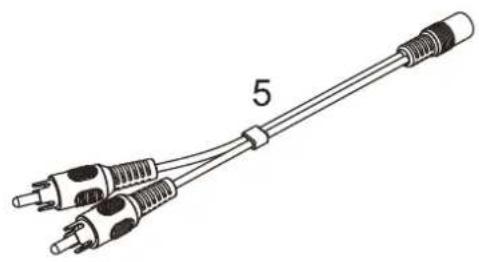
5 Adapter cable (RCA) for audio cable
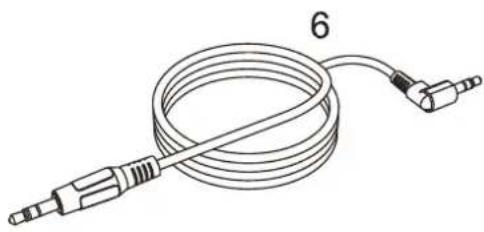
6 Audio cable (both ends with 3.5mm stereo plug) User guide
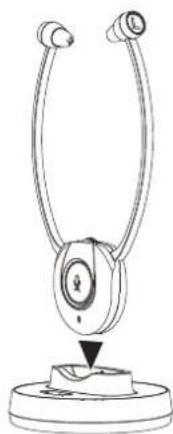
Charging the receiver battery
Charge the battery for about 3 hours before first use.
1 Switch off the receiver (position OFF).
2 Place the headset receiver on the transmitter.
3 The LED indicator on the transmitter will light up red when charging. It will light up green in about 2 hours after the battery is fully charged.
Connecting the transmitter
1 Connect the power adapter to the DC IN input socket located on the transmitter rear panel.
2 Connect the power adapter provided to an electrical outlet.
3 Connect the transmitter to your audio source. RCA adapter cable and audio cable are provided for various type of connection to your audio source (e.g. TV set, Hi-Fi system, MP3 or iPod).
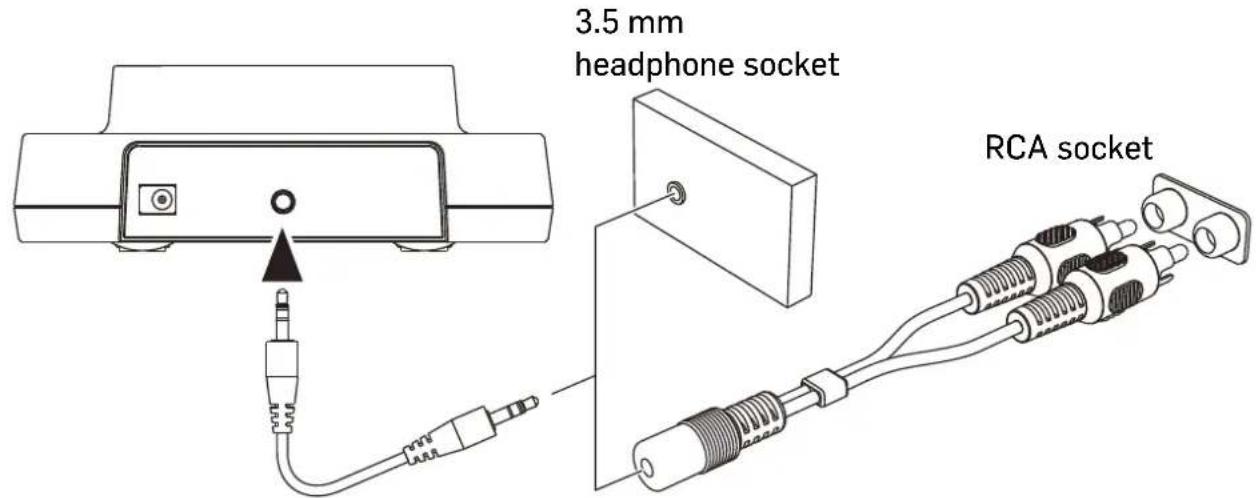
4 The green LED indicator will flash as soon as you have connected the power adapter to the electrical outlet. As soon as an audio signal is detected, the LED lights up constantly.
Operation
Hearing damage due to high volumes! This receiver allows you to set higher volumes than conventional headphones. This can cause hearing damage in persons with healthy hearing and especially in children.
- Before putting the receiver on, set the volume on the receiver to a low value.
- Do not continuously expose yourself to high volumes.
1 Switch on the audio source. The green indicator LED on the transmitter lights up constantly.
2 Switch the On/Off switch on the headset receiver to ON position, then the blue LED indicator lights up constantly. The transmitter and the headset receiver will then be connected automatically.
3 Flex the head set arms outwards until the ear buds can be inserted in the ear. Please note the ear buds can be angled through a movement up, down or sideways, so as to enter the ear a little deeper. This will improve the sound quality and volume. Gently press the ear buds further into the ear to find a comfortable position for the ear buds and an ideal position for the sound.
4 Adjust the desired volume.
5 Adjust the balance (left/right) if necessary.
Note: When the battery level is low, the indicator LED sparkles in blue. You will hear 3 beeps every minute and 1 double-beep in the forth minute. The receiver will switch off automatically in the fifth minute.
- A fully charged battery provides up to 5 hours of listening enjoyment.
- To conserve battery power, the receiver automatically shuts off if no signal is detected for a period of approx. 5 minutes or when the level is too low.
The microphone button
The microphone opening at the lower part of the receiver front picks up the sounds of your surroundings. When the microphone is switched on, you will hear your surroundings louder. You can hear for example your door bell, your telephone or your conversational partner even when you are wearing the receiver.
Press the microphone button to switch the microphone on. The power on indicator will turn to green and two short beeps are to be heard. Make sure that the microphone opening is not covered!
You can hear your surroundings and you use the receiver as an assistive listening device which helps you to better hear other people.
Press the microphone button again to switch off the microphone. The power on indicator will return to blue and two short beeps are to be heard.
Caution: When switching between the microphone and music source please be aware that the volume level can change substantially dependant upon signal input levels. As a precaution the volume level should be lowered prior to switching between the microphone and music.
Pairing / restore the connection
In a few cases, due to external influences, the connection between transmitter and receiver may be lost. To restore it, please follow the following instruction.
1 Unplug the main adaptor to turn off the transmitter,.
2 Switch the On/Off switch on the headset receiver to ON position.
3 Press and hold the headset receiver microphone button for about 5 seconds, the blue LED on the headset receiver flashes quickly.
4 Connect the transmitter to the power source (plug in the power adapter again). The connection is restored and the blue LED on the headset receiver lights up constantly.
Changing the rubber ear buds
Two pairs of ear buds are delivered with the device. One pair is already mounted on the headset.
1 For changing the ear buds pick the mounted ear buds at the end and tear them off simply.
2 Position the spare ear buds onto the "open ends" and let them snap into place.
Troubleshooting
No sound
- Ensure that the receiver power ON/OFF switch is switched to ON.
- The charge level of the battery inside receiver may be too low. Recharge the battery for approx. 3 hours.
- The receiver output level is set too low. Adjust the volume to a suitable level.
Distortion
- The charge level of the battery inside the receiver may be too low. Recharge the battery for approx. 3 hours.
- The receiver may be too far away from the transmitter. Move closer to it.
Appendix
Safety Information
- Please read this operating instruction manual thoroughly and keep it for further use.
- Prevent excessive exposure to smoke, dust, vibration, chemicals, moisture, heat and direct sunlight.
- Furniture polish, over time, may disintegrate the rubber feet of the transmitter which may stain your furniture. To avoid a potential stain, you may want to place the transmitter on a pad or mat.
- This listener allows you to amplify sounds to a loud volume, but listening to earphones at a high volume over an extended period of time may damage your hearing; especially in children. Thus, we suggest that you set the volume to a level that is comfortable to your hearing.
- Only use the power adapter plug contained in the material supplied since other power adapter plugs could damage the devices.
- Ensure access to the power adapter plug is not obstructed by furniture or such.
Intended use
This device was developed to transmit audio signals wireless from an audio source to a receiver. Any other use is considered unintended use.
Unauthorised modification or reconstruction is not permitted. Under no circumstances open the devices or complete any repair work yourself.
For users wearing a pacemaker
It is recommended that if you have a pacemaker fitted you check with a medical expert or your health adviser before using this product. Switch the device off immediately if you notice or suspect any adverse effects.
Power adapter plug
Attention: Only use the power adapter plug contained in the material supplied since other power adapter plugs could damage the devices. Ensure access to the power adapter plug is not obstructed by furniture or such.
Pay attention that the plug and cable are in perfect condition. Kinked or worn cable represents the risk of a fatal accident!
The power adapter plug supplied fulfils the ecodesign requirements of the European Union (Directive 2009/125/EC). This means that, both in an operating state and in an idling state, the power consumption is considerably lower compared to power adapter plugs with an older design.
Maintenance
Clean the housing surfaces with a soft, fluff-free cloth.
- Never use cleaning agents or solvents.
Disposal
In order to dispose of your device, take it to a collection point provided by your local public waste authorities (e.g. recycling centre).
According to laws on the disposal of electronic and electrical devices, owners are obliged to dispose of old electronic and electrical devices in a separate waste container. The adjacent symbol indicates that the device must not be disposed of in normal domestic waste!
Batteries represent a hazard to health and the environment!
Never open, damage or swallow batteries or allow them to pollute the environment. They may contain toxic, ecologically hazardous heavy metals. You are legally obliged to dispose of power packs and batteries at the point of sale or in the corresponding containers provided at collection points provided by local public waste authorities. Disposal is free of charge. The adjacent symbols indicate that the batteries must not be disposed of in normal domestic waste and must be brought to collection points provided by local public waste authorities. Packaging materials must be disposed of according to local regulations.

Declaration of conformity
This device fulfils the requirements stipulated in the EU directive: 2014/53/EU.
Conformity with the above mentioned directive is confirmed by the CE symbol on the device.
To view the complete Declaration of Conformity, please refer to the free download available on our website www.switel.com.
Telgo AG, Route D'Agy 16, 1763 Granges-Paccot, Switzerland

Technical data
Transmission mode
Carrier frequency
Operating voltage
Digital hopping system
2,4 GHz ISM Band I
Transmitter: 5 V, 550 mA
Receiver: Akku 3,7 V / 380 mA Lithium Polymer
Frequency response
Distortion
Signal-to-noise ratio
Range
Max volume
Operation time
Charging time
Weight receiver
20 Hz - 20 kHz
<0,5%THD
70dB
up to 20 meters (open area)
120 dB
with fully charged battery up to 5 hours
for empty battery approx. 3 hours
65g
Guarantee
SWITEL equipment is produced and tested according to the latest production methods. The implementation of carefully chosen materials and highly developed technologies ensure trouble free functioning and a long service life. The terms of guarantee do not apply where the cause of equipment malfunction is the fault of the telephone network operator or any interposed private branch extension system. The terms of the guarantee do not apply to the rechargeable batteries or power packs used in the products. The period of guarantee is 24 months from the date of purchase.
All deficiencies resulting from material of production faults which occur during the period of guarantee will be eliminated free of charge. Rights to claims under the terms of guarantee are annulled following intervention by the purchaser or third parties. Damage caused as a result of improper handling or operation, incorrect positioning or storing, improper connection or installation, Acts of God or other external influence are not covered by the terms of guarantee. In the case of complaints, we reserve the right to repair or replace defect parts or provide a replacement device. Replacement parts or devices become our property. Rights to compensation in the case of damage are excluded where there is no evidence or intent or gross negligence by the manufacturer. If your equipment shows signs of defect during the period of guarantee, please return to the sales outlet in which you purchased the SWITEL equipment together with the purchase receipt. All rights to claims under the terms of guarantee in accordance with this agreement must be asserted exclusively with regard to your sales outlet.
Two years after the purchase of our products, claims under the terms of guarantee can no longer be asserted.
Aperçu
Telgo AG, Route D'Agy 16, 1763 Granges-Paccot, Switzerland
\section*{Caracteristiques techniques}
Transmission
Bande de fréquence
Digital hopping system
2,4 GHz ISM Bande I
Telgo AG, Route D'Agy 16, 1763 Granges-Paccot, Switzerland
Dati tecnici
Telgo AG, Route D'Agy 16, 1763 Granges-Paccot, Switzerland
Telgo AG, Route D'Agy 16, 1763 Granges-Paccot, Switzerland
Technische specificaties
In the case of technical questions, please use the service form on our website: http://www.switel.com/en/product-information-technical-support/