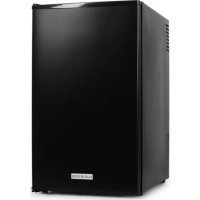
Steakhouse Pro - Fridge Klarstein - Free user manual and instructions
Find the device manual for free Steakhouse Pro Klarstein in PDF.
Download the instructions for your Fridge in PDF format for free! Find your manual Steakhouse Pro - Klarstein and take your electronic device back in hand. On this page are published all the documents necessary for the use of your device. Steakhouse Pro by Klarstein.
USER MANUAL Steakhouse Pro Klarstein
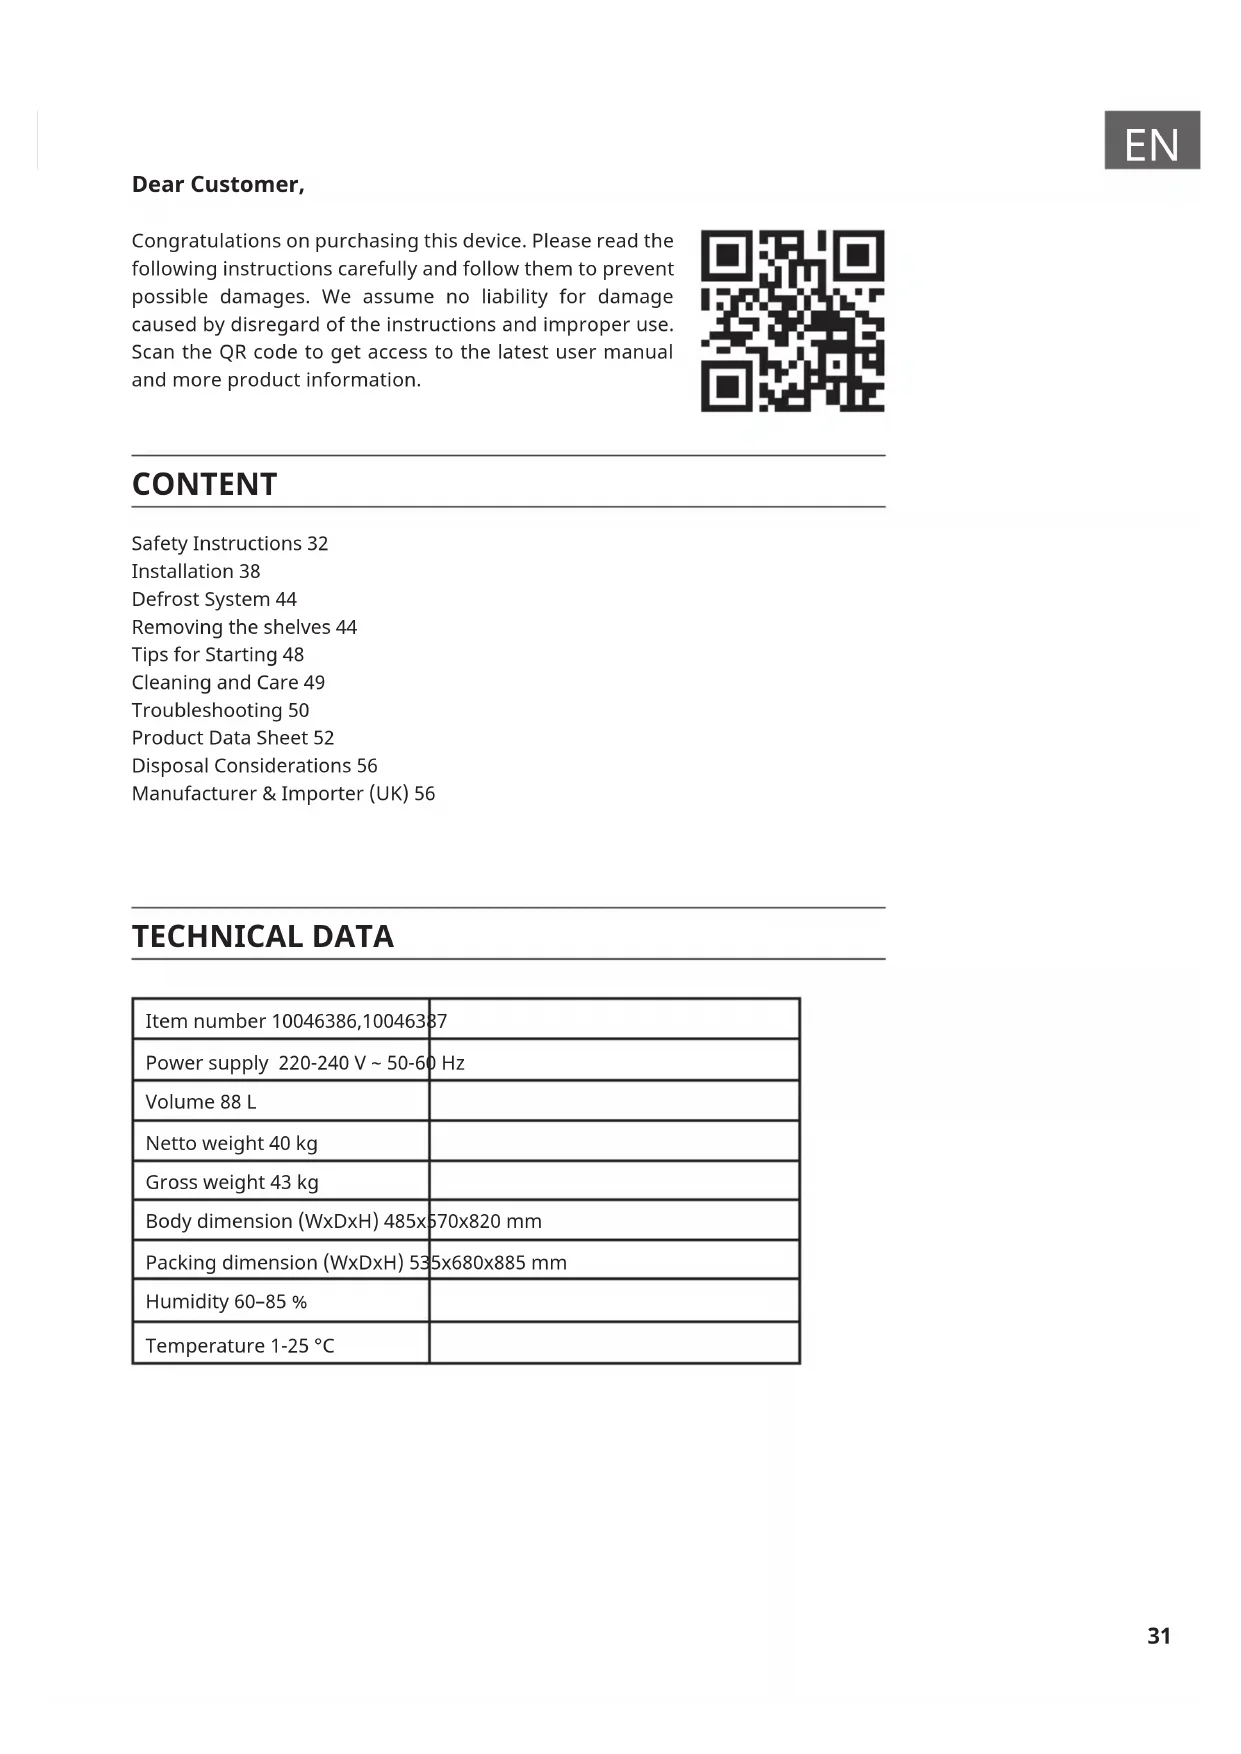
Dear Customer, Congratulations on purchasing this device. Please read the following instructions carefully and follow them to prevent possible damages. We assume no liability for damage caused by disregard of the instructions and improper use. Scan the QR code to get access to the latest user manual and more product information. CONTENT TECHNICAL DATA Item number 10046386,10046387 Power supply 220-240 V ~ 50-60 Hz Volume 88 L Netto weight 40 kg Gross weight 43 kg Body dimension (WxDxH) 485x570x820 mm Packing dimension (WxDxH) 535x680x885 mm Humidity 60–85 % Temperature 1-25 °C Safety Instructions 32 Installation 38 Defrost System 44 Removing the shelves 44 Tips for Starting 48 Cleaning and Care 49 Troubleshooting 50 Product Data Sheet 52 Disposal Considerations 56 Manufacturer & Importer (UK) 5632
- Read the operating instructions thoroughly before use and keep them for future reference.
- To avoid injury or damage to the Steak Ager, two or more people should unpack the appliance together.
- If the product is damaged during transportation, please contact the supplier immediately before use.
- All packaging must be removed before use to avoid poor grounding or increased noise. In order to ensure the stability of the aging machine, please adjust the product feet according to the placement on the ground.
- Check the voltage on the rating plate before use. Only connect the steak dry ager to sockets that correspond to the voltage of the device.
- Children over the age of 8 and persons with reduced physical, sensory or mental capabilities or those with a lack of experience and knowledge may only use the steak dry ager if they are instructed on how to do so by a person responsible for their safety, or if they are supervised and understand the associated risks.
- Children should be supervised to ensure that they do not play with the appliance.
- Cleaning and user maintenance shall not be made by children without supervision.
- Do not give the packaging and its parts to children. Folding cardboard and plastic lm may pose a choking hazard!
- Steak Ager with door lock: keep the key out of the reach of children as children could be trapped inside otherwise.
- This appliance is only suitable for the cooling of meat or food in commercial environment or similar. All other types of use are not permitted. Any misuse of the appliance may result in damage to the stored goods or spoilage. Furthermore, the appliance is not suitable for use in hazardous areas.
- Make sure that the ventilation openings are open and clean them regularly.
- Do not place any electrical devices in the steak dry ager.
- Be careful not to damage the coolant circuit.
- If the power cord or plug is damaged, it must be replaced by the manufacturer, an authorised specialist, or a similarly qualied person.
- Check the power cord regularly for damage. Do not use the steak dry ager with a damaged power cord or lamp.
- Do not handle the steak dry ager, the plug or the power cord with wet hands.
- If possible, do not use an extension cord. If you are using one, make sure that the ampere value of the connected device does not exceed the maximum ampere value of the power cord.
- The product is designed to stand upright and must have adequate ventilation at the rear of the Steak Ager when placed to facilitate heat dissipation.
- Close the door as quickly as possible after adding food so that the cold does not escape.
- The four cabinet feet of the product are adjustable. It is recommended that you adjust the height of the rear two cabinet feet to the maximum, and then33
adjust the front two cabinet feet to reach balance. When adjusting the height, the product must be empty.
- Place the steak dry ager on a rm, level surface. Do not place it on a soft surface such as a carpet.
- LED is for product interior lighting only, not for room lighting.
- If the Steak Ager is not to be used for a long time, it is essential that the contents are emptied and rinsed with water to keep the whole machine clean.
- In addition to the method recommended by the manufacturer, do not use mechanical devices or other methods to speed up the defrosting process (such as blowing, shoveling, etc.).
- Do not damage the refrigeration pipes
- Electrical appliances other than those recommended by the manufacturer must not be used in the food compartment of the appliance.
- Do not store explosives in the Steak Ager, such as fuel sprays.
- If the power cord is damaged, to avoid hazards, do not attempt to repair or replace the product by anyone other than an authorised technician or professional, contact the supplier immediately.
- Do not place any electrical appliances or heavy objects on the steak dry ager.
- Do not store any ammable or explosive substances in the device.
- Do not use the steak dry ager outdoors.
- Do not pull the plug out of the socket with the cable, but rather hold it by hand when pulling it out.
- Make sure that the power cord does not touch any hot surfaces.
- Only connect the steak dry ager to earthed sockets.
- Do not connect the steak dry ager to sockets with which other kitchen appliances are already connected.
- If the steak dry ager goes out, fails or is switched off, wait 5 minutes before switching it on again, otherwise the compressor could be damaged. Special instructions
- Opening the door for a long time may cause the temperature of the Steak Ager to rise signicantly
- When positioning the steak dry ager, make sure that the power cord is not pinched or damaged.
- Make sure that there are not multiple sockets or power supplies on the back of the device.
- The Steak Ager is not suitable for storing frozen food.
- If the Steak Ager is left empty for a long time, please close, defrost, clean, dry and keep the door open to prevent the refrigerant from mold inside the equipment
- If there are two or more different kinds of meat, wrap the food in a bag before putting the food in the Steak Ager to avoid contamination caused by contact between the two kinds of meat. This product is only suitable for pork and beef, other meats are not allowed.
- If there is liquid owing out of the meat, it needs to be packed in a bag to avoid the problem that the product design structure is not easy to clean.34
WARNING When using, servicing and disposing of the unit, pay attention to the left symbol on the rear of the unit or on the compressor. This symbol warns of possible res. There are ammable substances in the refrigerant lines and in the compressor. Keep the appliance away from sources of re during use, maintenance and disposal. To avoid food contamination, please follow the instructions below:
- Prolonged opening of the door can lead to a signicant rise in temperature in the compartments of the steak dry ager.
- Clean regularly to keep the water tank system clean and avoid food contamination
- Before the Steak Ager is powered on, clean the water tank; it is recommended to clean the water tank every 5 days. Grounding instructions When installing the product, must connect the grounding wire. Please use the grounding power socket correctly to prevent the leakage of the wire and reduce the risk of electric shock. The Steak Ager is equipped with a grounded power cord. Improper installation of grounding may cause electric shock. If you have any questions about the grounding installation information, please consult a professional electrician or maintenance personnel. Note: If there is frequent lightning in the area, it is recommended to use a power protector. R600a Warning This device contains the refrigerant isobutane (R600a), a natural gas which is high in environmental sustainability, but is ammable. Although it is ammable, it will not damage the ozone layer and will not increase the greenhouse effect. The use of this refrigerant leads to a somewhat higher noise level from the device. In addition to the compressor noise, you can hear the ow of the refrigerant. This is unavoidable and has no negative impact on the performance of the device. Be careful during transportation to ensure that the refrigerant circuit is not damaged. Leaking refrigerants can irritate the eyes. For your safety observe the following recommendations:
- During transportation and installation, do not damage the piping of the refrigerant system. The injected refrigerant may cause eye damage or spontaneous combustion .
- In the event of any accident, you should immediately cut off the power supply of the equipment and avoid contact with open ames and items that can35
- The space for placing the product must ensure that every 8g of refrigerant requires more than 1 m³ of space, and the refrigerant content of the equipment is listed on the label.
- If you have needs or suggestions, please inform customer service
- Warning: In order to avoid the danger caused by unstable appliances, repairs must be performed according to the instructions. The symbol is a warning that the refrigerant is ammable!
Warning: Risk of re or ammability!36
INSTALLATION Before rst use Let the device stand for 24 hours before the rst use so that the coolant can spread. During this time, leave the door open so that production-related odours can evaporate. Note: All models without front ventilation or ventilation slots on the front are not built-in devices and must be free-standing. Location The location where you place the device should:
- be sturdy and well ventilated.
- be far away from direct sunlight or other heat sources.
- not be too wet, such as a bathroom or washroom.
- have a standardised electrical connection.
- have a socket with surge protection.
- be far away from microwaves, as their interference could have a negative impact on the device. Furthermore, the ambient temperature in the room should not be very cold or very warm. Cold and warmth may have a negative effect on the function, so that the desired internal temperature will not be reached. Setup
- Remove all packaging material and adhesive strips from and around the steak dry ager.
- Set up the steak dry ager in a way that the plug is accessible at all times. Unplug the power cord and put the device in its nal location. Set it up so that the compressor is free and has no contact with other objects or walls.
- Compensate for any slight oor unevenness before lling the device. Use the adjustable feet for this. Your Steak Ager is equipped with 4 adjustable feet to facilitate easy leveling. To do this, turn the rear feet completely inwards and compensate for the incline with the two front feet. The Steak Ager must be leveled before loading.
- The Steak Ager requires a standard 240 volt/ 10 amp power supply. (Or according to different country specications).
- The power cord is 2.0 m long and is located on the right hand side at the back when viewed from the front of the appliance.
- Like most modern appliances, the Steak Ager contains sensitive electronic components which are susceptible to damage from lightning and power39
faults. It is therefore advisable to use a surge protector to avoid problems of this nature. WARNING 10046386 and 10046387 are free-standing models and must not be used for built-in installation. Never put a free-standing model into any cabinet! Cooling system Note: These series adopts transverse condensation cooling pattern.40
- The permissible voltage and frequency are indicated on the rating plate, the socket outlet must be properly earthed and protected by a fuse.
- The socket must not be located directly behind the Steak Ager and must be easily accessible.
- Do not use extension cables or extension sockets to connect the Steak Ager.
- Do not use stand-alone inverters or energy saving plugs as this may damage the electronic control system.
- Do not look directly at the light line at close range, it will damage your eyes.
- Plug in and switch on the cellar by pressing the power button for a few seconds.
- When you rst use the Steak Ager (or switch it on again after a long period of inactivity) there will be a few degrees difference between the temperature you have selected and the temperature displayed on the LED. This is normal and is due to the length of the activation time. Once the Steak Ager has been running for a few hours, everything will stabilise. Note: If the unit is unplugged, power is lost or switched off, wait 3 to 5 minutes before restarting. The Steak Ager will not start if you try to restart it before this time has elapsed. Operating noises In order to achieve the desired temperature settings, our Steak Ager, like all products that use compressors and fans, may produce the following types of noise. These noises are normal and can occur in the following ways: Gurgling Caused by the refrigerant owing through the unit‘s coils. Cracking/popping sounds Caused by the contraction and expansion of the refrigerant gas to produce cold. Fan operation sound To circulate air inside the Steak Ager. “Pa Pa“ sound Solenoid valve starting sound41
“Sizzling“ sound This is caused by the refrigerant owing in the pipe after the system‘s solenoid valve opens. An individual‘s perception of noise is directly related to the environment in which the Steak Ager is located, as well as the specic type of model. Our Steak Agers comply with international standards for such appliances. We will always do our utmost to satisfy our customers, but will not take back goods due to complaints based on normal operating noise.42
Temperature setting Note: The LED display is the actual temperature and humidity in the cabinet. The circuit board on all models has a memory function. In the event of a power interruption, all temperatures will automatically revert to the set temperature prior to the power interruption. It is important to understand that there is a difference between the temperature/ humidity inside the Steak Ager and the temperature/humidity shown on the display panel: You will need to wait approximately 12 hours before noticing the effects of the temperature/humidity setting when the Steak Ager is fully loaded. Once the temperature is set, don’t adjust it frequently. The thermostat will maintain the temperature inside the Steak Ager within a range of +/- 2 °C. However, the thermal inertia of the Steak Ager and the glass is such that within this temperature range the actual temperature of the Steak Ager will only vary by
Function keys ➀ Function Switch button Press once to toggle the temperature window ➃ and humidity function window ➄, and press ⑥ or ⑦ to increase or decrease the temperature and humidity. ② Power ON/OFF button: ①②③④⑤⑥⑦⑧ Press and hold for 3 seconds to turn off. Note: The other functions, except for the light, are switched off when the power is switched off. Press again (without delay) to switch on. ③ Light / UVC lamp switching: It is used to switch the lighting and UVC disinfection system. Press once for a short time to turn the light on or off, and press for 3 seconds for a long time to turn the UVC light on or off. Instructions for controlling the UV system
1. Automatic control: The machine is switched on. If the UV lamp is not turned on
by a person, the UV lamp will turn on automatically every 24 hours. The time is 1 hour. This means that the UV lamp will be on for 1 hour every 24 hours.43
2. Manual control: The Steak Ager is switched on. Press and hold this button for 3
seconds and you will hear “beep, beep“ twice. Please press the light button again for 3 seconds and you will hear “beep“ once, then the UV light will turn off.
3. When the UV light is turned on, the UV light will be closed when the door is
open, and it will be on when the door is closed.The window will display “UU“ for 2 seconds every 10 seconds. Note: The life of the UV lamp is 12 months. Exceeding the life will greatly reduce the anti-virus effect of the UV lamp. ④Display window: Displays the current temperature, ⑤Display window: Displays the current humidity ⑥Temperature / Humidity setting increase button: Press once, temperature/humidity will increase by 1 degree Celsius / 1%RH. ⑦Temperature/Humidity setting decrease button: Press once, temperature / humidity will decrease 1 degree Celsius / 1%RH. ⑧ °C/°F display conversion function keys: Set the conversion degrees Celsius / Fahrenheit display, each press this key, the display window will be in degrees Celsius or Fahrenheit.44
DEFROST SYSTEM The product is designed with an automatic circulation defrosting system. The steak ager can defrost automatically when the compressor is stopped and timed. Frost water is automatically drained from the storage area of the aging machine. The water condensed in the tank is converted into heat or evaporation by the compressor, the remaining water is used to maintain the humidity in the cabinet. All units are tted with a double-layered Low-E glass door with a third internal layer of acrylic to minimise condensation on the glass door. The Steak Ager is not completely sealed; fresh air is allowed in through the exhaust pipe. Notes: During the refrigeration cycle, heat is emitted and dissipated through the external surfaces of the Steak Ager. Avoid touching the surfaces during these cycles.
REMOVING THE SHELVES
Press one side of the shelf limit pin ①, pull and remove the shelf from the other side of the support bracket ①, then remove the shelf according to the arrow mark
Shelf assembly is the reverse of shelf removal. “A” is the shelf limit pin and “B” is the shelf.45
1. Depending on the model and type of handle of the Steak Ager, you may
need to rotate the door 180 degrees or change the direction of the door symmetrically (according to the product‘s own conguration).
2. The door may be irreversible depending on the type of handle on the Steak
Ager, or the door may need to be opened and replaced when ordering. WARNING Risk of injury! To avoid accidents when changing doors, we recommend that you get help. The glass door is heavy and can cause injury if it falls
1. To place the cabinet in the open position, open the door to the maximum
2. Use a small knife (②) to remove the decorative nail (①) on the opposite side
3. Use the internal hexagonal screwdriver (tool ⑤) to unscrew the screws (④) of
the anti-drop device (③), then remove the anti-drop device (Drawing 1).
4. Holding the door, use the Allen wrench (tool ⑤) to unscrew the door shaft
core (⑥) from both ends of the top of the door. Remove the door and put it aside. (Drawing 2)
5. Unscrew the upper and lower door hinges (⑦)(⑧) using the M5 hexagonal
screwdriver (tool ⑤), then assemble the door hinge on the opposite side. (Drawing 3 and 4)
6. Turn the door 180 degrees, then install the door on the opposite side of the
cabinet. (Drawing 5)
7. Finally, install the decorative nail and drop guard on the opposite side.
HANDLE INSTALLATION Note: Not all products require handles to be installed, please refer to the conguration of the actual product purchased.
1. Remove the handle from the cabinet, then remove the 2 screws from the
2. Pull open the door seal from the side of the door, then insert the screws
into the 2 handle holes on the side of the door, then put the screws aligning the hole of the handle, tighten the screws by Phillips screwdriver and then compress the door seal. If the screw holes of the handle do not perfectly match the holes of the door, please use the electric drill to drill the holes of the door a bit bigger (in the surface side) in order to install the handle perfectly.48
- Clean the inside of the Steak Ager with a non-aggressive disinfectant.
- If ordered, unpack the salt blocks and remove the foil. Place the salt blocks in the stainless steel tray and place the tray in the bottom of the cabinet. Check every 2-3 days to see if there is any water left on the salt blocks, if so, remove the water.
- The temperature and humidity are already set to 1°C and 85% humidity, which is perfect for dry curing beef and pork.
- The meat for dry aging must be fresh, perfect would be max.5 days after slaughtering. Even vacuum matured meat can be used, but for a maximum of 14 days (please remove the foil).
- Our recommendation for the best dry-aged beef: use meat from a young cow with a normal fat cover and good marbling.
- Hang the whole rump on the hangers of your Steak Ager or place the individual cuts on the shelves.
- Load capacity: max. 2x half striploin on the bone with a length of 0.5m, so you will need 2 hangers.
- Load capacity with shelves: max. 20kg of individual pieces or cuts will t on the shelves.
- When maturing individual cuts on the shelves, pay attention to a protective layer of fat to prevent too much waste and if possible let them mature on the bone. The ideal size is 2-4 kg per cut.
- Always wear protective gloves when handling the meat, DON‘T touch the meat without gloves!
- The perfect maturing time is between 25-28 days, but more than 4 weeks is possible. Quality requirements for meat
- The best meat recognised for dry aging is rib eye steak on the bone. It is always best to buy from a butcher who sources their meat from a good quality slaughterhouse.
- The younger the animal, the better the result. It is always recommended to buy a piece of meat that has a good fat content and a high proportion of internal marbling. It is advisable to let the meat ripen either by hanging or in large pieces on the bone. This is because the meat exposed to the air is minimised, which reduces loss of weight.
- The dry aging period is recommended to last at least 21 days, during which the taste will become more intense. Please note: an aging period of up to 6 weeks is possible. The hygienic handling of food should always be considered for best results.
- When the process is complete, the thin crust must be cut off to remove the bone or cut into steaks.49
- First switch off the steak dry ager and pull the mains plug out of the socket.
- Remove all contents.
- Wipe the inside with a damp cloth that has been dipped in lukewarm water with a little washing-up liquid.
- Make sure the rubber seal on the door is clean so that the steak dry ager remains ecient.
- The outside of the steak dry ager should be cleaned with a mild detergent.
- Dry the inside and outside with a soft cloth.
- Dust and everything else that is clogging the exhaust openings and reducing the cooling capacity of the steak dry ager. If necessary, vacuum the exhaust air opening. Decommissioning while absent
- Switch off the steak dry ager rst. Then pull out the mains plug.
- Remove all of the contents.
- Clean the steak dry ager.
- Open the lid slightly to prevent the formation of condensation, mould or odours. Relocation to another location
- Switch off the steak dry ager rst. Unplug the power cord.
- Remove all of the contents.
- Secure all loose objects with adhesive tape.
- Glue the doors shut. Energy saving tips The steak dry ager should be placed in the coolest place in the room, away from devices that generate heat, heating pipes or direct sunlight. Make sure that the door is closed properly when the steak dry ager is switched on.50
TROUBLESHOOTING Common problems may easily be solved, saving you the cost of a possible service call. Please read carefully the instruction manual and revert to troubleshooting guide chart. Problem Possible cause and solution approach The steak dry ager isn’t running. The steak dry ager is not plugged in. The steak dry ager is switched off. The fuse is out or broken. The steak dry ager is not cold enough. Check the temperature settings. The environment requires a lower setting. The door has been opened too often. The door is not closed properly. The door seal does not seal properly. The light is not working. The steak dry ager is not plugged in. The fuse is out or broken. The bulb is broken. The light switch is set to ‘off’. The steak dry ager often goes on and off. The room temperature is higher than usual. There is too much food in the device. The door has been opened too often. The door is not closed properly. The temperature is not set correctly. The door seal is not sealing properly. Vibrations Check whether the steak dry ager is level. The steak dry ager is very loud. The coolant is in circulation. Noises resulting from this are not a sign of malfunction, but are normal. You may hear a gurgle after each cooling cycle because there is still coolant in circulation. The contraction and expansion of the inner walls can lead to a crack. The steak dry ager is not level.51
The door isn’t closing properly. The steak dry ager is not level. The door has been turned over and not attached properly. The seal or the magnet are damaged. The shelves are protruding too far. Operation Anomalies
- Make sure that there is power to the mains plug by connecting another electrical appliance to it. Check the fuse, if there is one. Check that the door is properly closed.
- If your Steak Ager appears to be malfunctioning, unplug it and contact your service centre. Any work on the refrigeration circuit should be carried out by a refrigeration technician who will check the circuit sealing system. Similarly, any work on the electrical circuit should be carried out by a qualied electrician. Note: Any work carried out by an unauthorised technician will invalidate the warranty. Power failure
- In the event of a power failure, all previous temperature settings are automatically maintained and the unit will revert to a preset temperature setting. (See preset table)
- Most power failures are rectied within a short time. A power cut of one or two hours will not affect the temperatures of the Steak Ager. To avoid sudden temperature changes during a power cut, do not open the door. In the event of a prolonged power failure, take steps to protect your meat or food.
- Whatever the cause, if you notice abnormal temperature or humidity levels inside your Steak Ager, rest assured that only prolonged and frequent exposure to these abnormal conditions can have a detrimental effect on your meat or food.52
Product Information Sheet COMMISSION DELEGATED REGULATION (EU) 2019/2018 with regard to energy labelling of refrigerating appliances with a direct sales function Supplier's name or trade mark: Klarstein Supplier's address: Customer service , Wallstraße 16, 10179 berlin, DE Model identifier: 10046386 Use: Display and sale Type of refrigerating appliance with a direct sales function: supermarket cabinet Cabinet family code, accord- ing to the harmonised stan- dards or other reliable, accu- rate and reproducible meth- ods in accordance with Annex IV. VC1 Product specific parameters
4. Integral vertical (other than semi-vertical) supermarket cabinet, roll-in: No
Total display area (m²) Temperature class (according to Table 4(a)) 0,22 refrigerator: H2 General product parameters: Parameter Value Parameter Value Annual energy consumption (kWh/a) 470,85 Recommended tem- perature(s) for opti- mised food storage (°C) (These settings shall not contradict the tem- perature conditions set out in Annex IV, Table 4, 5 or 6, as applicable)
EEI 12,9 Energy efficiency class B Light source parameters: Type of light source - Energy efficiency class - Minimum duration of the guarantee offered by the supplier: 24 months Additional information: The weblink to the supplier’s website, where the information in point 3 of Annex II of Commission Regulation (EU) 2019/2024 is found: https://www.electronic-star.com/ Page 1 / 253
Product Information Sheet COMMISSION DELEGATED REGULATION (EU) 2019/2018 with regard to energy labelling of refrigerating appliances with a direct sales function Supplier's name or trade mark: Klarstein Supplier's address: Customer service , Wallstraße 16, 10179 berlin, DE Model identifier: 10046387 Use: Display and sale Type of refrigerating appliance with a direct sales function: supermarket cabinet Cabinet family code, accord- ing to the harmonised stan- dards or other reliable, accu- rate and reproducible meth- ods in accordance with Annex IV. VC1 Product specific parameters
4. Integral vertical (other than semi-vertical) supermarket cabinet, roll-in: No
Total display area (m²) Temperature class (according to Table 4(a)) 0,22 refrigerator: H2 General product parameters: Parameter Value Parameter Value Annual energy consumption (kWh/a) 470,85 Recommended tem- perature(s) for opti- mised food storage (°C) (These settings shall not contradict the tem- perature conditions set out in Annex IV, Table 4, 5 or 6, as applicable)
EEI 12,9 Energy efficiency class B Light source parameters: Type of light source - Energy efficiency class - Minimum duration of the guarantee offered by the supplier: 24 months Additional information: The weblink to the supplier’s website, where the information in point 3 of Annex II of Commission Regulation (EU) 2019/2024 is found: https://www.electronic-star.com/ Page 1 / 255
DISPOSAL CONSIDERATIONS If there is a legal regulation for the disposal of electrical and electronic devices in your country, this symbol on the product or on the packaging indicates that this product must not be disposed of with household waste. Instead, it must be taken to a collection point for the recycling of electrical and electronic equipment. By disposing of it in accordance with the rules, you are protecting the environment and the health of your fellow human beings from negative consequences. For information about the recycling and disposal of this product, please contact your local authority or your household waste disposal service. MANUFACTURER & IMPORTER (UK) Manufacturer: Chal-Tec GmbH, Wallstrasse 16, 10179 Berlin, Germany. Importer for Great Britain: Berlin Brands Group UK Limited PO Box 42 272 Kensington High Street London, W8 6ND United Kingdom57