TWM350S - Lamp NightStick - Free user manual and instructions
Find the device manual for free TWM350S NightStick in PDF.
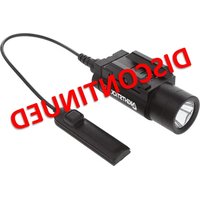
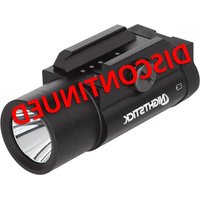
| Product Type | Weapon-mounted tactical light |
| Brand | NightStick |
| Model | TWM350S |
| Power Source | 2 CR-123 lithium batteries (included) |
| Lighting Modes | Momentary, constant, strobe (350S model) |
| Switches | Dual dependent lock-out switches (left and right) |
| Mounting | Tactical rail (Picatinny) with universal mounting inserts |
| Package Contents | Light, 2 CR-123 batteries, 2 mounting inserts (1 pre-installed, 1 spare), 4 hex head screws, 1 Allen key |
| Warranty | 1-year limited (materials and workmanship defects) |
| Body Material | Aerospace aluminum (approximate) |
| Dimensions (approximate) | Length: 115 mm, Width: 35 mm, Height: 40 mm |
| Weight (approximate) | 120 g (with batteries) |
| Safety | Do not use in explosive atmospheres, near flammable liquids, or in explosion-proof areas. Keep out of reach of children. Do not expose batteries to water. |
| Maintenance | Periodically check the tightness of mounting screws. Clean with a dry cloth. |
| Spare Parts and Repairability | Standard CR-123 batteries available. Spare screws included. Contact customer service for other parts. |
| Usage | Only with a firearm equipped with a tactical rail and at least one mounting slot. |
Frequently Asked Questions - TWM350S NightStick
User questions about TWM350S NightStick
0 question about this device. Answer the ones you know or ask your own.
Ask a new question about this device
Download the instructions for your Lamp in PDF format for free! Find your manual TWM350S - NightStick and take your electronic device back in hand. On this page are published all the documents necessary for the use of your device. TWM350S by NightStick.
USER MANUAL TWM350S NightStick
InstructionManual TWM-350/850
Please read these instructions before using your Nightstick TWM-350/850. They include important assembly and operating instructions.
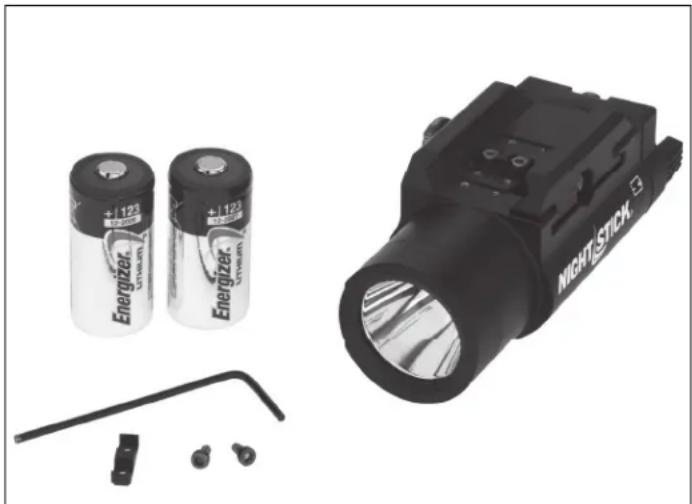
PACKAGE CONTENTS
- 1 - Weapon Mounted Light
- 2-CR-123 Lithium Batteries
2-Cross Rail Inserts (1 pre-installed & 1 spare) - 4 - Cross Rail Mounting Cap Head Screws (2 pre-installed & 2 spare)
1-Allen Wrench
WEAPON SAFETY
PLEASE BE SURE TO READ, UNDERSTAND AND FOLLOW THESE SAFETY AND OPERATING INSTRUCTIONS WHEN HANDLING A FIREARM OR THE NIGHTSTICK TWM WHEN MOUNTED ON A FIREARM. FAILURE TO DO SO CAN BE DANGEROUS AND COULD RESULT IN SERIOUS INJURY, DAMAGE TO PROPERTY, OR DEATH.
Use of a firearm under any circumstance is inherently dangerous. SERIOUS INJURY OR EVEN DEATH may result without proper training in the safe handling of fi rearms. Proper training should be obtained from an accredited fi rearms safety program conducted by a qualified instructor.
Read, understand and follow all of the safety instructions that came with your firearm before attaching your new TWM.
Always assume every firearm is loaded and treat that firearm as such.
- Never point a firearm at anything that you are not willing to destroy.
- Never service your firearm or your TWM when mounted on a firearm without first activating the weapon's safety (if applicable), removing the magazine, opening the action and physically and visually inspecting to make sure that no ammunition is installed in the firearm.
WEAPON MOUNTED LIGHT SAFETY
- Nightstick recommends that the TWM should only be activated with the non-trigger hand (support hand) while employing a two-hand grip on the firearm and with the trigger finger fully outside the trigger guard when applicable.
WARNING: FAILURE TO DO SO COULD RESULT IN AN ACCIDENTAL DISCHARGE AND SERIOUS INJURY, DAMAGE TO PROPERTY, OR DEATH.
- Thoroughly practice (employing safe training conditions) with the TWM and an unloaded firearm before using the weapon.
BEFORE ATTACHING, INSPECTING OR SERVICING THE TWM
- Engage the safety on the firearm (if applicable).
-
Remove the magazine from the fi rearm (if applicable).
-
Open the action and visually and physically inspect the chamber to be sure it is empty.
- Keep the barrel pointed in a safe direction at all times and never place your hand in front of the muzzle.
WARNING: IT IS IMPERATIVE THAT SAFETY MEASURES BE EMPLOYED AT ALL TIMES WHILE HANDLING A FIREARM.
GENERAL SAFETYWARNINGS
NOT FOR USE ABOVE HAZARDOUS LOCATIONS
- DO NOT use in explosive atmospheres, near flammable liquids, or where explosion proof lamps are required.
DO NOT use in the proximity of vehicles or equipment when there is a risk of flammable liquids coming into contact with the flashlight.
DO NOT expose the batteries to water or salt water, or allow the batteries to get wet. - DO NOT store the batteries with metallic objects that may cause a short circuit.
-
Immediately discontinue use of the batteries if they emit an unusual smell, feel hot, change color, change shape or appear abnormal in any way.
-
Keep out of the reach of children.
STEP 1. INSTALL THE BATTERIES
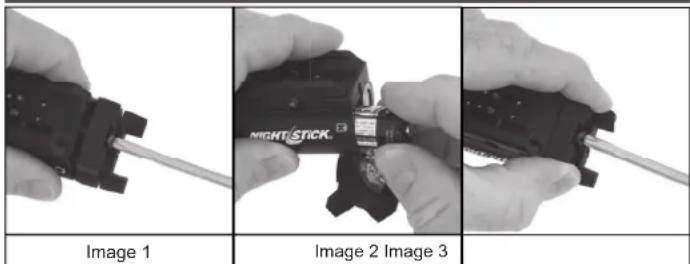
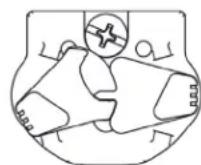
- To install the included CR-123 Lithium Batteries in the TWM, begin by unscrewing the screw on the battery compartment door. (Image 1) This screw is designed to remain in the battery compartment door once it has been unscrewed, do not attempt to remove it.
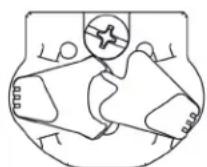
- Insert both batteries into the battery compartment paying attention to the battery orientation marking on the sides of the light near the battery compartment door. (Image 2)
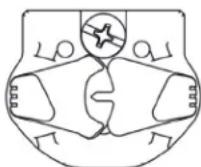
- Re-install the battery compartment screw by pressing the door fully closed and then tightening the screw until it is hand tight. Do not over tighten. (Image 3)
Test the operation of the light (see OPERATION below).
STEP 2. INSTALL THE LIGHT ONTO YOUR FIREARM
The TWM is designed to be easily attached and detached from the fi rearm's tactical rail. However, the fi rearm must have a tactical rail and it must have at least one cross rail slot. The TWM is not designed to be used on a fi rearm that does not have a cross rail slot. IMPORTANT: Your TWM comes with the Universal Insert pre-installed in the slot location that will allow the light to fi t on approximately 70% of the handguns on the market today. If the fi t is not correct for your specific handgun, use the included Allen Wrench to relocate the insert to the slot location that works best for your fi rearm.
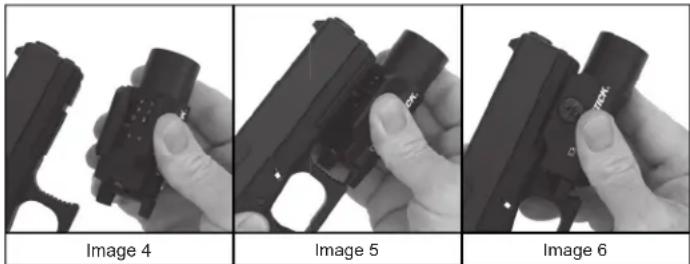
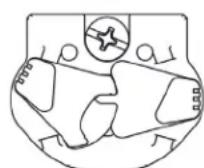
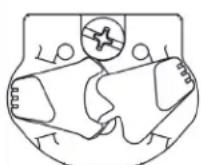
- Push inward on the head of the Rail Clamp Tension Thumbscrew to fully open the Adjustable Portion of the Rail Clamp. (Image 4)
- While making sure that your firearm is in a safe condition and that the barrel is pointed in a safe direction, place the fi xed portion of the Rail Clamp into the groove of the tactical rail on your fi rearm and align the Cross Rail Insert with the slot on your fi rearm.
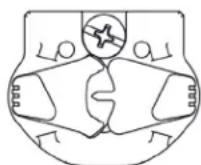
- Rotate the TWM onto the tactical rail (Image 5) and then release the pressure on the Tension Thumbscrew making sure that the TWM is gripping both sides of the tactical rail of your fi rearm and verify that the Cross Rail Insert is fully seated into the tactical rail slot of your fi rearm. (Image 6)
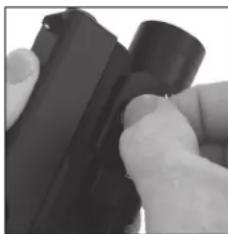
Image 7
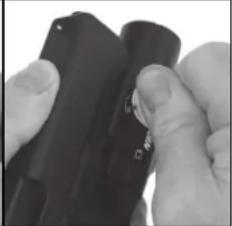
Image 8
- While holding the TWM tightly to the tactical rail of your firearm, fully tighten by hand the Rail Clamp Tension Thumbscrew. (Image 7)
- Then use a large coin (a quarter works well) and fully tighten the Rail Clamp Tension Thumbscrew. (Image 8)
WARNING: NIGHTSTICK STRONGLY RECOMMENDS PERIODICALLY CHECKING TO INSURE THAT THE CROSS RAIL INSERT SCREWS AND THE RAIL CLAMP TENSION THUMBSCREW REMAIN TIGHT. FAILURE TO KEEP THESE TIGHT CAN RESULT IN DAMAGE TO THE TWM AND/OR THE CROSS RAIL INSERTS UNDER CONTINUOUS RECOIL.
STEP 3: TEST FUNCTION OF THE SWITCHES
- Verify that both switches have a full range of movement and that the TWM is operating properly.
The TWM is now properly installed on your firearm.
OPERATION
Right Down-Momentary On
Neutral Off
Left Down-Momentary On
Left Up-Constant On
Right Up-Constant On Neutral Off
The TWM uses Dual Dependent Locking Switches.
Each switch has 3 positions of operation: Neutral - Off, Down - Momentary-on and/or Strobe (model dependent), Up - Constant-on
- In order to operate one of the switches, the switch on the opposite side must be in the Neutral Position (off).
MOMENTARY-ON MODE
Press down and hold either the left side switch or the right side switch to activate the momentary-on mode. Release the switch, back to the Neutral position and the light turns off.
NOTE: While in Momentary-on Mode on one side of the TWM, the Dual Dependent Locking Switch design of the TWM prevents the switch that is NOT in use from accidentally moving out of the Neutral position. This eliminates the possibility of an unintended activation of the light (i.e. while the left side switch is being held in the Momentary-on Mode, the right side switch is mechanically locked in the Neutral position).
CONSTANT-ON MODE
Press up, click and release either the left side switch or the right side switch to activate the constant-on mode. From the constant-on mode slightly press the switch downward into the Neutral position to turn the light off.
STROBE MODE (350S/850XLS Models Only)
To activate (using either switch), quickly press down twice and hold on the second press. This will activate the strobe. The strobe mode will continue until the switch is released back to the Neutral position.
STROBE WARNING
Exposure to strobing lights may cause dizziness, disorientation, and nausea. A very small percentage of people suffer from photosensitive epilepsy and may experience seizures or blackouts triggered by strobing lights. For more information from the EPILEPSY FOUNDATION about photosensitivity and seizures, please visit www.
epilepsy.com. Anyone who has had symptoms linked to this condition should consult a doctor before using this product.
WARRANTY
LIMITED LIFETIME WARRANTY
Bayco Products, Inc. warrants this product to be free from defects in workmanship and materials for the original purchaser's lifetime. The Limited Lifetime Warranty includes the LEDs, housing and lenses. Rechargeable batteries, chargers, switches, electronics and included accessories are warranted for a period of two years with proof of purchase. Normal wear and failures which are caused by accidents, misuse, abuse, faulty installation and lightning damage are excluded.
We will repair or replace this product should we determine it to be defective. This is the only warranty, expressed or implied, including any warranty of merchantability or fitness for a particular purpose.
For a complete copy of the warranty, go to www.nightstick.com/nightstick-product-support/warranties. Retain your receipt for proof of purchase.
- Loosen the battery door screw using a Phillips head screwdriver.
- Insert the included CR-123 batteries using the battery orientation markings on the side of the light.
- Re-install the battery door screw until tight. CAUTION: Do not over-tighten.
STEP 2 - INSTALL THE TWM ONTO YOUR HANDGUN
NOTICE: Your TWM has been pre-configured with the universal Cross Rail Insert which will fit approximately 70% of the handguns on the market. If the fit is not correct for your specific handgun, use the included Allen Wrench to relocate the Insert to the slot location that works best for your firearm.
- Push inward on the Rail Clamp Tension Thumbscrew fully spreading the moveable rail clamp.
- Align the Cross Rail Insert with the appropriate slot on the tactical rail of your handgun and then rotate the rail clamp sections of the TWM onto your handgun's rail so that the Insert is fully seated in the slot.
- While making sure that the insert remains fully seated in the slot, hand-tighten the Rail Clamp Tension Screw.
- Use a quarter to fully tighten the Rail Clamp Tension Screw.
CAUTION: PERIODICALLY CHECK THE CROSS RAIL INSERT SCREWS AND THE RAIL CLAMP TENSION THUMBSCREW FOR TIGHTNESS.
OPERATION
- The TWM uses Dual Dependent Locking Switches.
- To operate one of the switches, the switch on the opposite side must be in the off position.
Momentary-on Mode
- Press down and hold on either the left or right switch. Release the switch and the light will turn off.
Constant-on Mode
- Press up until the switch locks in the constant-on mode. Press down to release the lock and turn off the light.
Strobe Mode (350S/850XLS Models Only)
- Quickly press down twice and hold on the second press of either switch to activate the strobe. Release the switch and the strobe will turn off.
WEAPON SAFETY
PLEASE BE SURE TO READ, UNDERSTAND AND FOLLOW THESE SAFETY AND OPERATING INSTRUCTIONS WHEN HANDLING A FIREARM OR THE NIGHTSTICK TWM WHEN MOUNTED ON A FIREARM. FAILURE TO DO SO CAN BE DANGEROUS AND COULD RESULT IN SERIOUS INJURY, DAMAGE TO PROPERTY, OR DEATH.
- Use of a firearm under any circumstance is inherently dangerous. SERIOUS INJURY OR EVEN DEATH may result without proper training in the safe handling of firearms. Proper training should be obtained from an accredited firearms safety program conducted by a qualified instructor.
- Read, understand and follow all of the safety instructions that came with your firearm before attaching your new TWM.
- Always assume every firearm is loaded and treat that firearm as such.
- Never point a firearm at anything that you are not willing to destroy.
- Never service your firearm or your TWM when mounted on a firearm without first activating the weapon's safety (if applicable), removing the magazine, opening the action and physically and visually inspecting to make sure that no ammunition is installed in the firearm.
WEAPON MOUNTED LIGHT SAFETY
- Nightstick recommends that the TWM should only be activated with the non-trigger hand (support hand) while employing a two-hand grip on the handgun and with the trigger finger fully outside the trigger guard when applicable.
- Thoroughly practice (employing safe training conditions) with the TWM and an unloaded handgun before using the weapon.
WARNING: FAILURE TO DO SO COULD RESULT IN AN ACCIDENTAL DISCHARGE AND SERIOUS INJURY, DAMAGE TO PROPERTY, OR DEATH.
LIMITED LIFETIME WARRANTY
Bayco Products, Inc. warrants this product to be free from defects in workmanship and materials for the original purchaser's lifetime. The Limited Lifetime Warranty includes the LEDs, housing and lenses. Rechargeable batteries, chargers, switches, electronics and included accessories are warranted for a period of two years with proof of purchase. Normal wear and failures which are caused by accidents, misuse, abuse, faulty installation and lightning damage are excluded.
We will repair or replace this product should we determine it to be defective. This is the only warranty, expressed or implied, including any warranty of merchantability or fitness for a particular purpose.
For a complete copy of the warranty, go to www.nightstick.com/nightstick-product-support/warranties. Retain your receipt for proof of purchase.

WATCHVIDEO
SCAN TO WATCH INSTALLATION VIDEO
or visit: https://youtu.be/GNnRKa6QfVk