XPR-5572GA - Lamp NightStick - Free user manual and instructions
Find the device manual for free XPR-5572GA NightStick in PDF.


User questions about XPR-5572GA NightStick
0 question about this device. Answer the ones you know or ask your own.
Ask a new question about this device
Download the instructions for your Lamp in PDF format for free! Find your manual XPR-5572GA - NightStick and take your electronic device back in hand. On this page are published all the documents necessary for the use of your device. XPR-5572GA by NightStick.
USER MANUAL XPR-5572GA NightStick
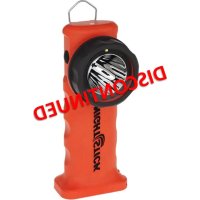
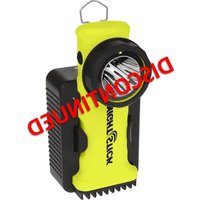
Please read these instructions before using your Nightstick XPR-5572 Intrinsically Safe Permissible Rechargeable Angle Light. They include important safety information and operating instructions.
THE XPR-5572 IS APPROVED FOR USE
Permissible Nightstick XPR-5572 Flashlight/Floodlight
MSHA
APPROVAL No. 20-A150005-0
TESTED FOR INTRINSIC SAFETY IN METHANE-AIR MIXTURES ONLY WARNINGS: Do not charge in hazardous location. MSHA approved for use with Bayco
Li-ion Battery Pack 5572-BATT or Primary 5570-BATT Battery Pack containing 6 AA Energizer Type EN91 or E91 batteries. Replace the Battery Pack in fresh air only. Do not mix batteries from different manufacturers or different types. Battery Pack to be replaced by a qualified technician only. The Model Nightstick 5572 must not be opened in areas where permissibility is required. Substitution of components may impair Intrinsic Safety.

Ex ia FLASHLIGHT FOR USE IN HAZARDOUS LOCATIONS
UL listed for use with Bayco Li-ion Battery Pack 5572-BATT or Primary 5570-BATT Battery Pack
containing 6 AA Energizer Type EN91 or E91 batteries.
E 467756 ID 4001184
CLASS I DIV 1 GRPS A-D T4
CLASS II & III DIV 1 GRPS E-G
CLASS I ZONE 1 AEx ia IIC T4 Gb
CLASS II ZONE 20 IIIC
Ex ia IIC T4 Gb
① II 2 G Ex ia IIC T4 Gb
Ex ia IIC T4 Gb
DEMKO 16ATEX1773
IECEx UL 16.0115
-20°C ≤ Tamb ≤ +40°C
3.7V/Cell
U_m=4.75V
This product complies with Standards IEC 60079-0, 6th edition, EN 60079-0:2012 + A11:2013, UL 60079-0 6th ed, CAN/CSA C22.2 No. 60079-0: 2015, IEC 60079-11, 6th edition EN 60079-11:2012, UL 60079-11 6th ed, CAN/CSA C22.2 No. 60079-11:2014, UL 913 5th edition, and CAN/CSA C22.2 No. 157-92.
WARNINGS - INTRINSICALLY SAFE
- WARNING: Use only the approved Nightstick 5572-BATT Lithium-ion rechargeable battery pack or the approved non-rechargeable batteries listed below.
- WARNING: To prevent ignition of a hazardous atmosphere, do not open the battery compartment or attempt to exchange any of the supplied battery packs while in the hazardous environment. This task must ONLY be performed in an area known to be non-hazardous.
- WARNING: To prevent ignition of a hazardous atmosphere, the approved Nightstick 5572-BATT Lithium-ion rechargeable battery pack must only be charged in an area known to be non-hazardous.
- WARNING: When using non-rechargeable batteries in the Nightstick 5570-BATT, use only Energizer EN91 or Energizer E91 batteries.
- WARNING: To prevent ignition of a hazardous atmosphere, non-rechargeable AA batteries must only be changed in an area known to be non-hazardous.
- WARNING: To reduce the risk of explosion, do not mix new non-rechargeable batteries with used non-rechargeable batteries, or mix non-rechargeable batteries from different manufacturers.
WARNING: Substitution of components may impair intrinsic safety.
SPECIAL INSTRUCTIONS FOR INTRINSIC SAFETY
For personal safety, always confirm the rating of any known hazardous or potentially hazardous location where the Angle Light is to be used.
STROBE WARNING
Exposure to strobing lights may cause dizziness, disorientation, and nausea. A very small percentage of people suffer from photosensitive epilepsy and may experience seizures or blackouts triggered by strobing lights. For more information from the EPILEPSY FOUNDATION about photosensitivity and seizures, please visit www.epilepsy.com. Anyone who has had symptoms linked to this condition should consult a doctor before using this product.
natural_image
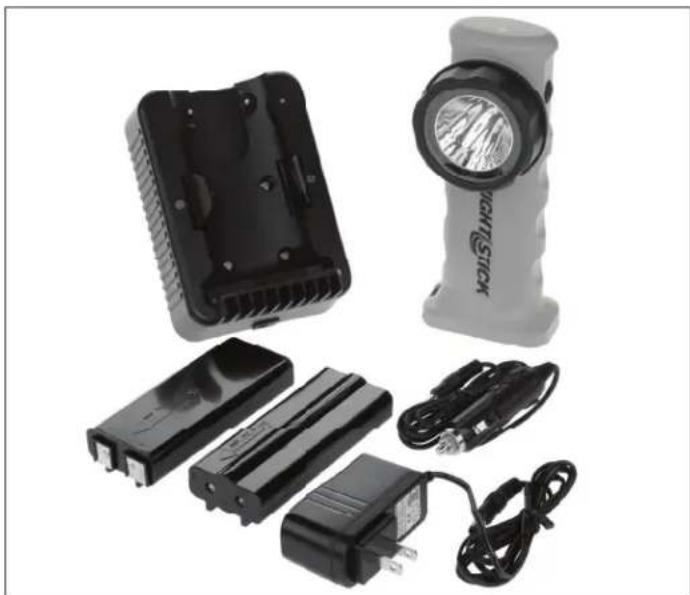
Product photo of a nightlight station flash unit with battery pack, charging case, and charging plug (no visible text or symbols)- Rechargeable Lithium-ion batteries must be used and charged properly. Improper use can result in serious injury, fi re, or death.
- Do not leave the battery in direct sunlight or use or store the battery inside cars in hot weather.
- Do not expose the battery to water or salt water, or allow the battery to get wet.
- Do not store the battery with metallic objects that may cause a short circuit.
- Immediately discontinue use of the battery if the battery emits an unusual smell, feels hot, changes color, changes shape or appears abnormal in any way.
- Keep out of the reach of children.
MOUNTING THE CHARGER
WARNING: While the XPR-5572 Angle Light is certified as an Intrinsically Safe Permissible product, the charger is NOT Intrinsically Safe. The charger MUST be installed in a location far enough outside of the hazardous environment to ensure that it can never come in contact with any potentially explosive materials.
Tools required for installation:
- A small level
- A hammer
• A small center punch or nail
An electric drill and drill bits to suit the wall material and anchoring method
• A #2 Phillips Head Screwdriver - Torx Wrench (included)
The Nightstick 5572-CHGR1 wall/vehicle charger is designed to mount to any flat, dry surface. The design of the charger will secure the Angle Light into the charger at virtually any angle. As such, the charger can be mounted at any angle. For purposes of these instructions, we will be mounting the charger vertically.
Included with the wall/vehicle charger are 4 - #8 x 32 x 1 12 " Pan Head Screws that can be used to install the charger to virtually any surface however special mounting requirements may require different hardware.
- To install the charger, use the full-size DRILLING DIAGRAM TEMPLATE located here in the instructions.
- Select a location to install the charger making sure to check what is on the other side of the mounting surface...no electrical wires, water lines, etc.
- The other consideration for determining the mounting location of the charger is the distance to the AC wall outlet or the 12v DC power outlet. Please check to make sure that the appropriate Nightstick AC or DC Power Supply will reach the charger when it is plugged in. Otherwise, relocate the charger's installation location as needed.
- Once the appropriate location has been selected, tape the template in place using blue painter's tape (or other non-marring tape) ensuring that the template is level.
- Use a hammer and a small center punch or nail to mark all 4 of the hole locations through the template and then remove the tape and template.
- If the charger is being installed onto drywall, you will need to install 4 - #8 Drywall Anchors (included). Using a 1/4" drill bit, drill 4 holes through the drywall in the locations of the nail marks. Using a #2 Phillips Head Screwdriver, install all 4 Drywall Anchors into the drywall until they are each fl ush with the surface.
NOTE: If the charger is being installed onto a metal surface, drill 4 appropriately sized holes. The diameter of the drill bit required will be determined by the type of metal and the thickness of the material.
NOTE: If the charger is being installed onto a wooden surface, drill a 3/32" pilot hole in all 4 locations.
- The mounting screw holes can be accessed from the front of the charger when the Angle Light is not installed in the charger.
- Looking through the mounting holes in the front face of the charger, line up the mounting holes for the charger with the pilot holes (or drywall anchors) and one at a time, carefully insert each of the supplied #8 x 32 x 1 12 " Pan Head Screws into the mounting holes from the front of the charger. Give each screw a small turn by hand to get each one started.
- Using a #2 Phillips Head Screwdriver, hand-tighten each screw until the charger is securely affixed to the mounting surface. CAUTION: Do not use an electric drill or drill driver to install the screws. Do not over-tighten. Doing so could damage the mounting holes in the charger.
- Plug either the Nightstick AC or DC Power Supply cord into the power port on the bottom of the 5572-CHGR1 charger and then into the appropriate power outlet.
- The LED Charge Indicator Light on the charger will momentarily light up GREEN and then turn RED and then go off. This is normal behavior when the Angle Light is NOT installed in the charger.
• The charger is now ready to use.
POWERING THE XPR-5572
The XPR-5572 Intrinsically Safe Permissible Rechargeable Angle Light can be powered in one of two ways:
• The Nightstick 5572-BATT Lithium-ion Rechargeable Battery Pack.
• The Nightstick 5570-BATT Non-Rechargeable Battery Carrier and 6 - AA Energizer
EN91 or Energizer E91 Batteries.
WARNING: Do not use any other type of non-rechargeable battery with this light.
WARNING: Do not use rechargeable AA batteries with this light.
5572-BATT LITHIUM-ION RECHARGEABLE BATTERY PACK
natural_image
Close-up of hands holding a small object with a circular arrow indicating rotation (no text or symbols visible)Image 1 Image 2 Image 3
natural_image
Close-up of a black mechanical component with a threaded end (no visible text or symbols)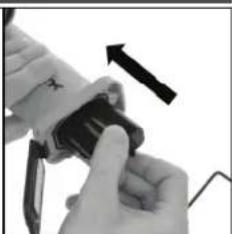
natural_image
Close-up of hands holding a small electronic device with an arrow indicating rotation (no visible text or symbols)WARNING: The Nightstick 5572-BATT Lithium-ion Rechargeable Battery Pack is a proprietary shape and design and will only fit in the XPP-5570R or XPR-5572R. Angle Lights. Do not attempt to use this battery pack in any other light. Do not attempt to use any other rechargeable battery pack in this light.
WARNING: The Nightstick 5572-BATT Lithium-ion Rechargeable Battery Pack is a sealed unit and is not designed to be opened up. Do not attempt to open the 5572-BATT Lithium-ion Rechargeable Battery Pack.
natural_image
Close-up of hands holding a small object with a curved arrow indicating rotation (no text or symbols visible)Image 4
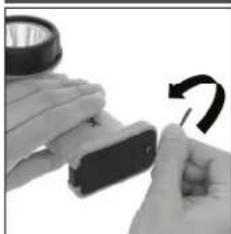
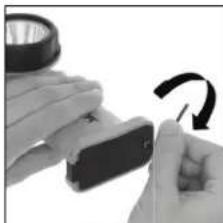
- To install the 5572-BATT Lithium-ion Rechargeable Battery Pack, unscrew the Torx Head Screw located on the Battery Compartment Door on the base of the light using the included Torx Wrench. (Image 1)
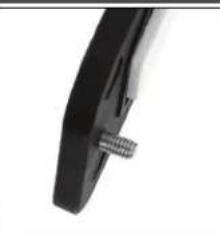
NOTE: The Battery Compartment Door Torx Screw utilizes a design that prevents the screw from falling out of the door. Do not attempt to remove the screw. (Image 2)
- With the Battery Compartment Door opened enough to provide clearance, insert the 5572-BATT Lithium-ion Rechargeable Battery Pack with the end having the metal contacts on it being inserted first and the rails on the bottom of the Battery Pack positioned toward the back of
the light. (Image 3)
- With the 5572-BATT Lithium-ion Rechargeable Battery Pack fully inserted into the handle of the light, close the Battery Compartment Door and secure it in place with the Battery Compartment Door Torx Head Screw and the included Torx Wrench. (Image 4) WARNING: Do not over-tighten the Battery Compartment Door Torx Head Screw.
The Angle Light is now ready to be powered using the Nightstick 5572-BATT Lithium-ion Rechargeable Battery Pack.
5570-BATT NON-RECHARGEABLE BATTERY CARRIER
WARNING: The Nightstick 5570-BATT Non-Rechargeable Battery Carrier is a proprietary shape and design and will only fit in the XPP-5570 or XPR-5572 Angle Lights. Do not attempt to use this battery pack in any other light. Do not attempt to use any other battery pack in this light.
The Nightstick 5570-BATT Non-Rechargeable Battery Carrier is designed to fit 6 AA batteries. In order to maintain the XPR-5572's Intrinsically Safe Permissible rating, the only AA batteries certified for use with this light are the Energizer EN91 or Energizer E91.
Do not attempt to use any other brand or model of AA batteries with this light.
Do not attempt to use any type of rechargeable AA batteries with this light.
Installing or replacing the batteries
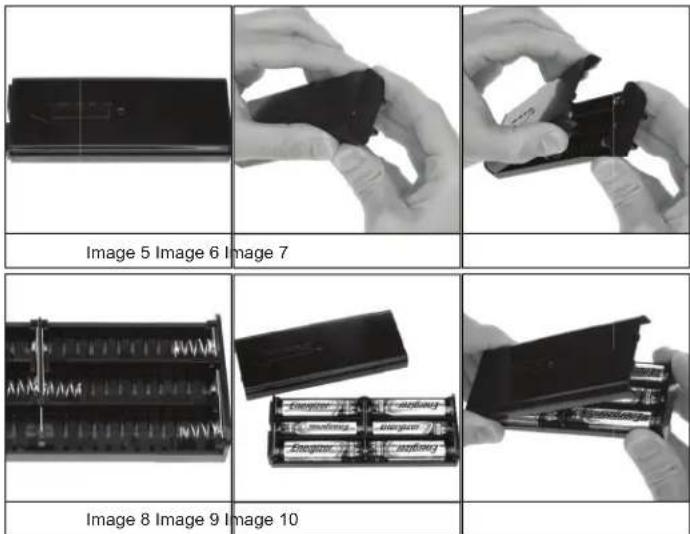
- Begin by positioning the 5570-BATT Non-Rechargeable Battery Carrier with the arrow pointing to the left. (Image 5)
- Using the thumb and index finger, squeeze in on the two sides of the carrier cover closest to the right end of the carrier. (Image 6)
- This action will cause the tabs on the right end of the cover to release from the base and allow the cover to simply lift away. (Image 7)
natural_image
Close-up of hands holding a black smartphone (no visible text or symbols)Image 11
- Using 6 – AA Energizer EN91 or Energizer E91 (make sure that all 6 batteries are of one or the other model...do not use a combination of the two), install the batteries per the diagram located on the inside base of the battery carrier. (Image 8)
• Take care not to bend any of the battery contact springs, and to make sure that all 6 batteries are properly seated before reinstalling the cover. (Image 9) - To reinstall the cover, insert the two tabs on the left-hand end of the cover into the two corresponding slots on the left end of base. (Image 10)
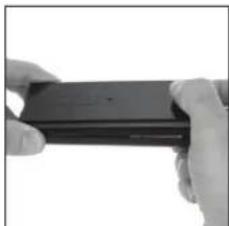
- While keeping the left-hand tabs in their slots, gently press down on the right side of the cover until the two right-pective slots. (Image 11)
NOTE: The battery carrier cover will only fit one way. It is not possible to install it in a reversed position.
The Nightstick 5570-BATT Non-Rechargeable Battery Carrier is ready to install into the Angle Light. Installation of the 5570-BATT Non-Rechargeable Battery Carrier into the Angle Light is the same as installing the 5572-BATT Lithium-ion Battery Pack. Please see the instructions listed above in the 5572-BATT LITHIUM-ION RECHARGEABLE
natural_image
Close-up of hands holding a handheld device with a curved black line on the wrist (no visible text or symbols)Image 12 Image 13 Image 14
natural_image
Close-up of a hand holding a handheld device with a wrist strap (no visible text or symbols)Image 14
natural_image
Close-up of a black and white object with a small circular mark and textured surface (no visible text or symbols)BATTERY PACK section.
PLACING THE ANGLE LIGHT INTO THE CHARGER
The Nightstick 5572-CHGR1 charger is designed to securely hold a properly installed XPR-5572 Angle Light in place under conditions up to and including 9g of lateral force meeting the requirements of NFPA 1901 (2009).
WARNING: Installing the Angle Light into the charger MUST be done using the following steps. Failure to do so could damage the charger or its ability to hold the Angle Light securely in place.
The spring-loaded grips located on the charger, are designed to snap around the body of the light one at a time...not simultaneously.
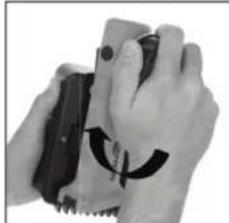
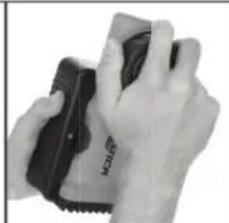
- While positioned in front of the charger, grasp the Angle Light around the bezel and place either the left or right side of the light into the charger at an approximate 45
degree angle being certain that the base of the light rests on the base contour of the charger. (Image 12)
- While holding the inserted side of the light against the back of the charger's contour, firmly press straight back on the opposite side of the light (allowing the edge to slide around the contour of the charger) until it slips past the Spring-loaded Gripper and snaps into the charger. (Image 13)
WARNING: Attempting to push the Angle Light straight into the charger or from an angle above or below, could result in damage to the charger and should not be attempted.
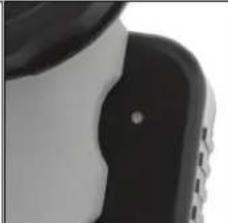
Confirmation of proper installation can be seen in the LED Charge Indicator Light. When the Angle Light is properly installed in the charger, and power is being supplied by the Nightstick AC or DC Power Supply, the LED Charge Indicator Light on the charger will light up constant RED indicating that the unit is being charged. (Image 14)
REMOVING THE ANGLE LIGHT FROM THE CHARGER
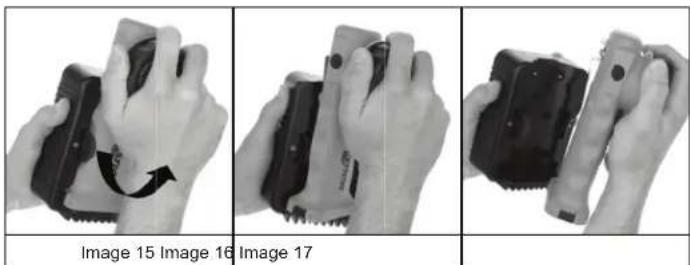
- While positioned in front of the charger, grasp the Angle Light around the bezel and twist it in either a clockwise or counter-clockwise direction. (Image 15)
- This action will cause the side of the light to disengage from the charger and slip past the Spring-loaded Gripper. (Image 16)
- While maintaining an approximate 45 degree angle to the light, pull the light straight away from the charger. (Image 17)
• The light has now been safely removed from the charger and is ready to use.
WARNING: Use only the supplied Charger, Lithium-ion Rechargeable Battery Pack and AC or DC Power Supply for charging. Do not attempt to charge this light with non-rechargeable or rechargeable AA batteries installed.
- The time required to charge the Angle Light is conditional on the remaining charge left in the Lithium-ion Rechargeable Battery Pack at the time of charging. The maximum charge time required is approximately 6 hours.
- Fully charge the Lithium-ion Rechargeable Battery Pack before the first use, or if the Lithium-ion Rechargeable Battery Pack has been unused for several months.
- Install the Angle Light into the charger using the exact method described in this Instruction Manual above ("PLACING THE ANGLE LIGHT INTO THE CHARGER"). WARNING: Failure to do so could damage the charger and/or the light.
- When the Angle Light is properly seated in the charger, the LED Charge Indicator light will turn solid RED indicating that the Lithium-ion Rechargeable Battery Pack is charging (Image 14). The Lithium-ion Rechargeable Battery Pack is fully charged when the LED Charge Indicator light turns GREEN.
- The Lithium-ion Rechargeable Battery Pack does not have any Recharge Memory Effect, therefore placing the Angle Light in the charger prior to full depletion of the battery does not adversely affect the battery life. The Angle Light can be kept in the charger indefinitely without any negative impact on the battery or the battery life.
OPERATION
THE XPR-5572 HAS EIGHT SEPARATE LIGHTING MODES:
• High-brightness Flashlight
• Medium-brightness Flashlight
• Survival-mode Flashlight
- Flashlight Strobe
• High-brightness Floodlight
• Medium-brightness Floodlight
• Survival-mode Floodlight
• Dual-Light (both the Flashlight and Floodlight on at the same time)
Flashlight Modes
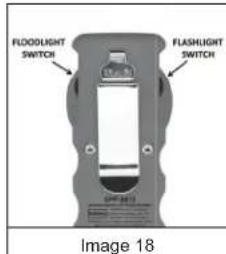
To activate the Flashlight, press and release the Flashlight Switch (Image 18). The default mode will be High-brightness. To select the brightness level for the Flashlight, press and hold the Flashlight Switch. The flashlight will cycle from high to medium to Survival and then back up again at a rate of approximately one mode per second. The light will continue to cycle up and down through the various modes as long as the switch is held down. When the desired brightness level is reached, simply release the Flashlight Switch, and the light will remain in that brightness mode. To turn the Flashlight off, press and release the Flashlight Switch one more time.
Strobe
To activate the Strobe, double click the Flashlight Switch (Image 18). To turn the Strobe off, press and release the Flashlight Switch one more time.
Floodlight Modes
To activate the Floodlight, press and release the Floodlight Switch (Image 18). The default mode will be High-brightness. To select the brightness level for the Floodlight, press and hold the Floodlight Switch. The floodlight will cycle from high to medium to Survival and then back up again at a rate of approximately one mode per second. The light will continue to cycle up and down through the various modes as long as the switch is held down. When the desired brightness level is reached, simply release the Floodlight
text_image
FLOODLIGHT SWITCH FLASHLIGHT SWITCH Image 18Switch, and the light will remain in that brightness mode. To turn the Floodlight off, press and release the Floodlight Switch one more time.
Dual-Light Mode
Dual-Light mode allows the user to turn on both the Flashlight and the Floodlight at the same time. Dual-Light mode can be activated by simply pressing the Flashlight Switch and then the Floodlight Switch or the Floodlight Switch and then the Flashlight Switch (Image 18). If the Angle Light already has the Flashlight or the Floodlight on (regardless of what brightness mode that light is in), pressing the switch for the light that is NOT on, will activate Dual-Light mode. The user can leave Dual-Light
mode and go back to either Flashlight or Floodlight mode simply by pressing the switch for the mode that they wish to turn off. To turn both lights off, simply press each of the switches independently.
WARRANTY
LIMITED LIFETIME WARRANTY
Bayco Products, Inc. warrants this product to be free from defects in workmanship and materials for the original purchaser's lifetime. The Limited Lifetime Warranty includes the LEDs, housing and lenses. Rechargeable batteries, chargers, switches, electronics and included accessories are warranted for a period of two years with proof of purchase. Normal wear and failures which are caused by accidents, misuse, abuse, faulty installation and lightning damage are excluded.
We will repair or replace this product should we determine it to be defective. This is the only warranty, expressed or implied, including any warranty of merchantability or fitness for a particular purpose.
For a complete copy of the warranty, go to www.nightslick.com/nightstick-product-support/warranties. Retain your receipt for proof of purchase.
APPROVAL No. 20-A150005-0
TESTED FOR INTRINSIC SAFETY IN METHANE-AIR MIXTURES ONLY WARNINGS: Do not charge in hazardous location. MSHA approved for use with Bayco Li-ion Battery Pack 5572-BATT or Primary 5570-BATT Battery Pack containing 6 AA Energizer Type EN91 or E91 batteries. Replace the Battery Pack in fresh air only. Do not mix batteries from different manufacturers or different types. Battery Pack to be replaced by a qualified technician only. The Model Nightstick 5572 must not be opened in areas where permissibility is required. Substitution of components may impair Intrinsic Safety.

Ex ia FLASHLIGHT FOR USE IN HAZARDOUS LOCATIONS
E 467756
ID 4001184
UL listed for use with Bayco Li-ion Battery Pack 5572-BATT or Primary 5570-BATT Battery Pack containing 6 AA Energizer Type EN91 or E91 batteries.
CLASS I DIV 1 GRPS A-D T4 CLASS II & III DIV 1 GRPS E-G CLASS I ZONE 1 AEx ia IIC T4 Gb CLASS II ZONE 20 IIIC
Ex ia IIC T4 Gb ④ II 2 G Ex ia IIC T4 Gb
Ex ia IIC T4 Gb DEMKO 16ATEX1773 IECEx UL 16.0115 -20°C ≤ Tamb ≤ +40°C
3.7V/Cell U_m=4.75V
Ce produit est conforme aux normes IEC 60079-0, 6th edition, EN 60079-0:2012 + A11:2013, UL 60079-0 6th ed, CAN/CSA C22.2 No. 60079-0: 2015, IEC 60079-11, 6th edition EN 60079-11:2012, UL 60079-11 6th ed, CAN/CSA C22.2 No. 60079-11:2014, UL 913 5th edition, and CAN/CSA C22.2 No. 157-92.
AVERTISSEMENTS - SÉCURITÉ INTRINSÈQUE
APPROVAL No. 20-A150005-0
TESTED FOR INTRINSIC SAFETY IN METHANE-AIR MIXTURES ONLY
WARNINGS: Do not charge in hazardous location. MSHA approved for use with Bayco
Li-ion Battery Pack 5572-BATT or Primary 5570-BATT Battery Pack containing 6 AA
Energizer Type EN91 or E91 batteries. Replace the Battery Pack in fresh air only. Do not mix batteries from different manufacturers or different types. Battery Pack to be replaced by a qualified technician only. The Model Nightstick 5572 must not be opened in areas where permissibility is required. Substitution of components may impair Intrinsic Safety.

E 467756
ID 4001184

Ex ia FLASHLIGHT FOR USE IN HAZARDOUS LOCATIONS
UL listed for use with Bayco Li-ion Battery Pack
5572-BATT or Primary 5570-BATT Battery Pack
containing 6 AA Energizer Type EN91 or E91 batteries.
CLASS I DIV 1 GRPS A-D T4
CLASS II & III DIV 1 GRPS E-G
CLASS I ZONE 1 AEx ia IIC T4 Gb
CLASS II ZONE 20 IIIC
Ex ia IIC T4 Gb
II 2 G Ex ia IIC T4 Gb
Ex ia IIC T4 Gb
DEMKO 16ATEX1773
IECEx UL 16.0115
-20°C ≤ Tamb ≤ +40°C
3.7V/Cell
U_m=4.75V
Este producto cumple con las normas IEC 60079-0, 6th edition, EN 60079-0:2012 + A11:2013, UL 60079-0 6th ed, CAN/CSA C22.2 No. 60079-0: 2015, IEC 60079-11, 6th edition EN 60079-11:2012, UL 60079-11 6th ed, CAN/CSA C22.2 No. 60079-11:2014, UL 913 5th edition, and CAN/CSA C22.2 No. 157-92.
ADVERTENCIAS - INTRÍNSECAMENTE SEGURA
APPROVAL No. 20-A150005-0
TESTED FOR INTRINSIC SAFETY IN METHANE-AIR MIXTURES ONLY
WARNINGS: Do not charge in hazardous location. MSHA approved for use with Bayco
Li-ion Battery Pack 5572-BATT or Primary 5570-BATT Battery Pack containing 6 AA Energizer Type EN91 or E91 batteries. Replace the Battery Pack in fresh air only. Do not fix batteries from different manufacturers or different types. Battery Pack to be replaced by a qualified technician only. The Model Nightstick 5572 must not be opened in areas where permissibility is required. Substitution of components may impair Intrinsic Safety.

Ex ia FLASHLIGHT FOR USE IN HAZARDOUS LOCATIONS
UL listed for use with Bayco Li-ion Battery Pack
5572-BATT or Primary 5570-BATT Battery Pack containing 6 AA Energizer Type EN91 or E91 batteries.
E 467756
ID 4001184
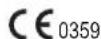
CLASS I DIV 1 GRPS A-D T4
CLASS II & III DIV 1 GRPS E-G
CLASS I ZONE 1 AEx ia IIC T4 Gb
CLASS II ZONE 20 IIIC
Ex ia IIC T4 Gb
II 2 G Ex ia IIC T4 Gb
Ex ia IIC T4 Gb
DEMKO 16ATEX1773
IECEx UL 16.0115
-20°C ≤ Tamb ≤ +40°C
3.7V/Cell
U_m=4.75V
Este produto está em conformidade com os Padrões IEC 60079-0, 6th edition, EN 60079-0:2012 + A11:2013, UL 60079-0 6th ed, CAN/CSA C22.2 No. 60079-0: 2015, IEC 60079-11, 6th edition EN 60079-11:2012, UL 60079-11 6th ed, CAN/CSA C22.2 No. 60079-11:2014, UL 913 5th edition, and CAN/CSA C22.2 No. 157-92.
AVISOS - INTRINSECAMENTE SEGURO
APPROVAL No. 20-A150005-0
TESTED FOR INTRINSIC SAFETY IN METHANE-AIR MIXTURES ONLY
WARNINGS: Do not charge in hazardous location. MSHA approved for use with Bayco Li-ion Battery Pack 5572-BATT or Primary 5570-BATT Battery Pack containing 6 AA Energizer Type EN91 or E91 batteries. Replace the Battery Pack in fresh air only. Do not fix batteries from different manufacturers or different types. Battery Pack to be replaced by a qualified technician only. The Model Nightstick 5572 must not be opened in areas where permissibility is required. Substitution of components may impair Intrinsic Safety.

Ex ia FLASHLIGHT FOR USE IN HAZARDOUS LOCATIONS
UL listed for use with Bayco Li-ion Battery Pack
5572-BATT or Primary 5570-BATT Battery Pack
containing 6 AA Energizer Type EN91 or E91 batteries.
E 467756
ID 4001184
CLASS I DIV 1 GRPS A-D T4
CLASS II & III DIV 1 GRPS E-G
CLASS I ZONE 1 AEx ia IIC T4 Gb
CLASS II ZONE 20 IIIC
Ex ia IIC T4 Gb
II 2 G Ex ia IIC T4 Gb
Ex ia IIC T4 Gb
DEMKO 16ATEX1773
IECEx UL 16.0115
-20^ ≤ Tamb ≤ +40^
3.7V/Cell
U_m = 4.75V
Dieses Produkt entspricht dem Standard IEC 60079-0, 6th edition, EN 60079-0:2012 + A11:2013, UL 60079-0 6th ed, CAN/CSA C22.2 No. 60079-0: 2015, IEC 60079-11, 6th edition EN 60079-11:2012, UL 60079-11 6th ed, CAN/CSA C22.2 No. 60079-11:2014, UL 913 5th edition, and CAN/CSA C22.2 No. 157-92.
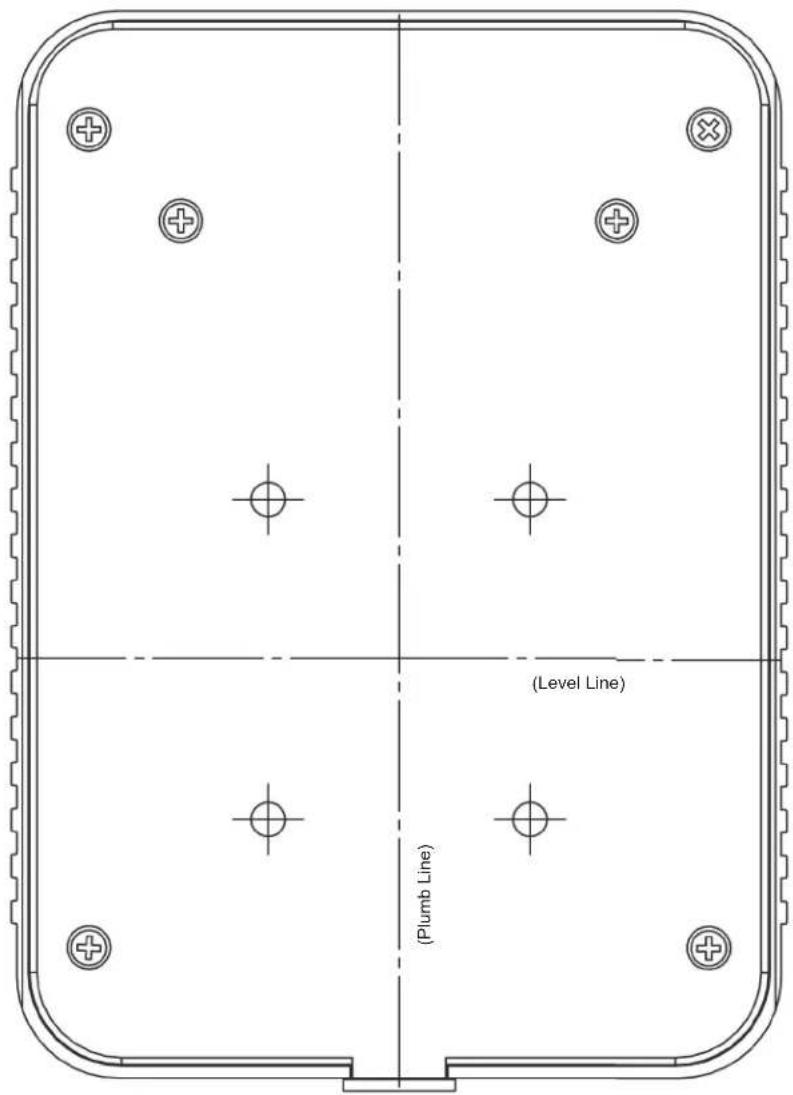
Please refer to the directions located in the Instruction Manual for assistance in mounting the charger.
text_image
(Level Line) (Plumb Line)WARNING: BEFORE MARKING OR DRILLING INTO ANY SURFACE, PLEASE BE CERTAIN OF WHAT IS LOCATED BEHIND THAT SURFACE. PLEASE BE CERTAIN TO LOCATE AND AVOID ALL ELECTRICAL WIRING, PLUMBING LINES, ETC. USE CAUTION WHEN CHOOSING THE LOCATION TO MOUNT THIS CHARGER.
CAUTION: WHEN SELECTING A LOCATION TO MOUNT THE CHARGER, PLEASE ENSURE THAT THE AC OR DC CORD WILL REACH THEIR RESPECTIVE OUTLET PRIOR TO INSTALLATION.
EU Declaration of Conformity (DoC)
XPP5570 / XPR-5572 / GA / RA
Company name Bayco Products
Postal address: 640 Sanden Blvd.
Postcode and City: 75098
Wylie, Texas USA
Declare that the DoC is issued under our sole responsibility and belongs to the following product:
Apparatus model/Product:
XPP-5570 / XPR-5572 / GA / RA
Type: Flashlight
ATEX Directive 2014/34/EU
The following harmonised standards and technical specifications have been applied:
Evaluated to the following safety standards by Underwriters Laboratories (U.L.):
EN 60079-0:2012/A11:2013 EN 60079-11:2012 (ia)
These Products are fully compliant and do not contain the restricted substances above levels noted in EU RoHS.
Certificate No. DEMKO 17 ATEX 1773 Rev. 0

II 2G
Ex ia IIC T4 Gb

0359
Name James Conner
Engineer
Date of issue:
04/30/2018
Form F-900-001 Rev-A