TWM-354 - Lamp NightStick - Free user manual and instructions
Find the device manual for free TWM-354 NightStick in PDF.


User questions about TWM-354 NightStick
0 question about this device. Answer the ones you know or ask your own.
Ask a new question about this device
Download the instructions for your Lamp in PDF format for free! Find your manual TWM-354 - NightStick and take your electronic device back in hand. On this page are published all the documents necessary for the use of your device. TWM-354 by NightStick.
USER MANUAL TWM-354 NightStick
Please read these instructions before using your Nightstick TWM-354. They include important assembly and operating instructions.
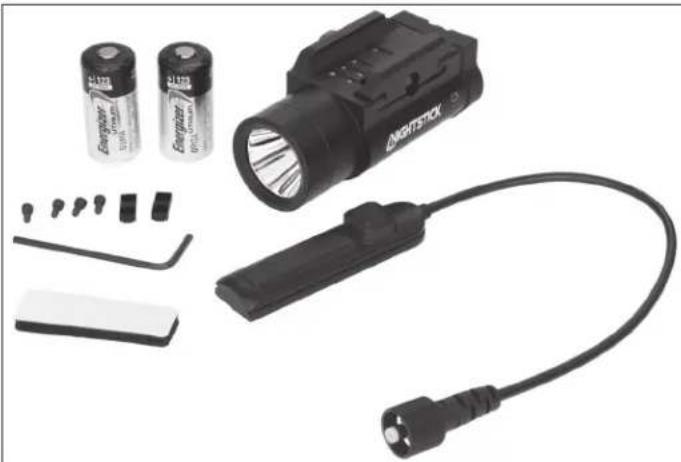
PACKAGE CONTENTS
natural_image
Product photo of a black-and-white flashlight with various accessories and a cable (no visible text or symbols)• 1 - TWM Weapon Mounted Light – Long Gun
• 1 – TWM-RPS Remote Pressure Switch Cable
• 1 – NS-PIC1 Picatinny Rail Mount for RPS Switch
• 1 – 2-Part Velcro Pads w/ Pressure Sensitive Adhesive Strips
• 1 – Alcohol Prep Pad
• 2 - CR123 Lithium Batteries
• 1 - Set of Cross Rail Inserts (pre-installed)
• 4 - Cross Rail Mounting Cap Head Screws (pre-installed)
• 1 - Allen Wrench
WEAPON SAFETY
PLEASE BE SURE TO READ, UNDERSTAND AND FOLLOW THESE SAFETY AND OPERATING INSTRUCTIONS WHEN HANDLING A FIREARM OR THE NIGHTSTICK TWM WHEN MOUNTED ON A FIREARM. FAILURE TO DO SO CAN BE DANGEROUS AND COULD RESULT IN SERIOUS INJURY, DAMAGE TO PROPERTY, OR DEATH.
Use of a fi rearm under any circumstance is inherently dangerous. SERIOUS INJURY OR EVEN DEATH may result without proper training in the safe handling of fi rearms. Proper training should be obtained from an accredited fi rearms safety program conducted by a qualified instructor.
Read, understand and follow all of the safety instructions that came with your fi rearm before attaching your new TWM.
• Always assume every firearm is loaded and treat that firearm as such.
- Never point a firearm at anything that you are not willing to destroy.
- Never service your firearm or your TWM when mounted on a firearm without first activating the weapon's safety (if applicable), removing the magazine, opening the action and physically and visually inspecting to make sure that no ammunition is installed in the fi rearm.
BEFORE ATTACHING, INSPECTING OR SERVICING THE TWM
- Engage the safety on the firearm (if applicable).
- Remove the magazine from the fi rearm (if applicable).
- Open the action and visually and physically inspect the chamber to be sure it is empty.
- Keep the barrel pointed in a safe direction at all times and never place your hand in front of the muzzle.
WARNING: IT IS IMPERATIVE THAT SAFETY MEASURES BE EMPLOYED AT ALL TIMES WHILE HANDLING A FIREARM.
WATCH COMPLETE INSTALLATION VIDEO AT: HTTPS://YOUTU.BE/JR8RP194DSG
INSTALL BATTERIES
text_image
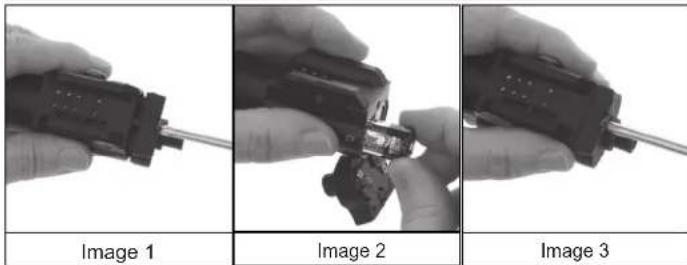
Image 1 Image 2 Image 3- Open the Battery Door Screw using a Phillips head screwdriver. (Image 1)
- Insert the included CR123 Batteries using the battery orientation markings on the side of the light. (Image 2)
• Re-install the Battery Door Screw until fully tightened. (Image 3)
INSTALLING RPS CABLE ONTO THE TWM
natural_image
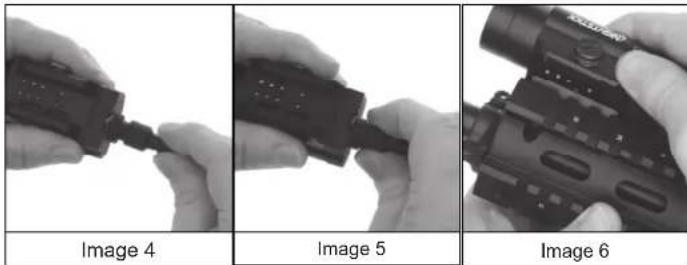
Three-panel image sequence showing hands holding a device, labeled Image 4, Image 5, and Image 6 (no text or symbols on devices)- Insert the connector of the RPS Cable into the mating connector on the Battery Door of the TWM until it is fully inserted. (Image 4)
- Screw the Threaded Coupling Ring on the end of the RPS Cable onto the external threads on the TWM Battery Door in a clockwise direction by hand until it is fully tightened. CAUTION: Do not cross-thread, do not use any tools to tighten (finger tight only) or strip the screw threads. (Image 5)
INSTALLING THE TWM ON TO YOUR FIREARM
Your TWM comes with both cross rail inserts pre-installed in cross rail slots 1 & 4.
- If the location of one or both of these is not correct for your specific installation, remove either or both of the inserts and then proceed to step 1.
- If the location of the pre-installed inserts is correct for your firearm, proceed to step 3.
WARNING: DO NOT INSTALL THE TWM ONTO A FIREARM WITHOUT USING THE CROSS RAIL INSERT. FAILURE TO USE A CROSS RAIL INSERT COULD RESULT IN THE TWM COMING LOOSE FROM THE FIREARM UNDER EVEN NORMAL RECOIL.
STEP 1: DETERMINE WHICH CROSS RAIL INSERT SLOT TO USE
text_image
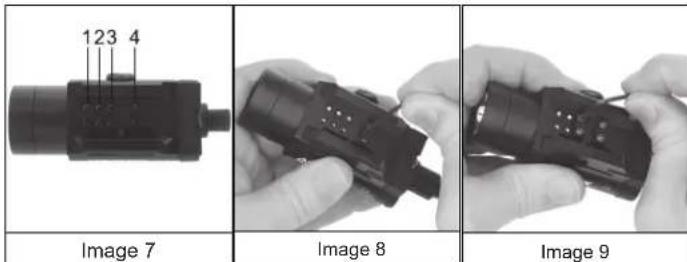
123 4 Image 7 Image 8 Image 9- Hold the TWM alongside the Picatinny rail on your firearm and determine which of the 4 Cross Rail Insert Slots milled into the top of the TWM is best suited for your firearm. (Image 6)
- A single Cross Rail Insert can be installed in any of the 4 Cross Rail Insert Slots milled into the top of the TWM.
- Slots 1, 3 & 4 (Image 7) are set up at a standard 1913 spacing, meaning that all 3 will line up with a Mil-STD-1913 Picatinny Rail. If the desired installation location on your fi rearm will allow it, both of the 2 included Cross Rail Inserts may be installed in any combination of slots 1, 3 or 4. Using both of the Cross Rail
Inserts will increase the retention of the TWM onto the Picatinny rail. STEP 2: INSTALL THE CROSS RAIL INSERT INTO THE TWM
- Line up the Insert into the correct slot and make sure it is fully seated into the slot.
- Using the 2 Cross Rail Insert Cap Head Screws and the supplied Allen Wrench, begin installing the Cap Head Screws. (Image 8)
- If installing a second insert, repeat the first two steps using the additional insert.
- Fully tighten all Cap Head Screws using the long side of the Allen Wrench. (Image 6)
NOTE: The Allen Wrench should fl ex a very small amount when the Cap Head Screws have been tightened correctly.
WARNING: NIGHTSTICK STRONGLY RECOMMENDS PERIODICALLY CHECKING TO INSURE THAT THE CROSS RAIL INSERT SCREWS REMAIN TIGHTENED. FAILURE TO KEEP THESE SCREWS TIGHT CAN RESULT IN DAMAGE TO THE TWM AND/OR THE CROSS RAIL INSERTS UNDER RECOIL.
STEP 3: INSTALL THE LIGHT ONTO YOUR FIREARM
natural_image
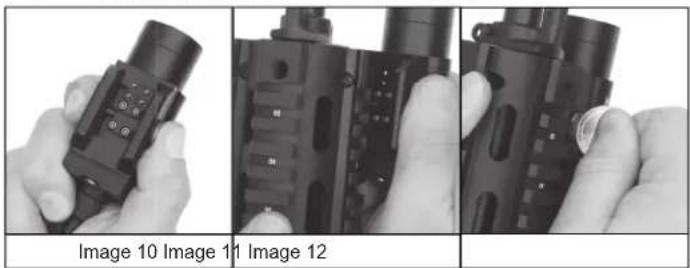
Three-panel photo showing a hand holding a device, with three views of the device's internal structure (no text or symbols visible)- Push inward on the head of the Rail Clamp Tension Thumbscrew to fully open the Adjustable Portion of the Rail Clamp. (Image 10)
- Place the adjustable portion of the Rail Clamp into the groove of the Picatinny rail and align the Cross Rail Insert(s) with the desired slot(s). (Image 11)
- Rotate the TWM onto the Picatinny rail and then release the pressure on the Tension Thumbscrew making sure that the TWM is gripping both sides of the rail and verify that the Cross Rail Insert(s) is fully seated into the desired slot(s).
- While holding the TWM tightly to the Picatinny rail, fully tighten by hand the Rail Clamp Tension Thumbscrew.
- Then use a large coin (a quarter works well) to fully tighten the light's rail clamp tension thumbscrew. (Image 12)
WARNING: NIGHTSTICK STRONGLY RECOMMENDS PERIODICALLY CHECKING TO INSURE THAT THE TWM IS STILL FULLY TIGHTENED ONTO THE PICATINNY RAIL OF THE FIREARM. FAILURE TO KEEP THE TWM TIGHTENED CAN RESULT IN DAMAGE TO THE TWM AND/OR THE CROSS RAIL INSERTS UNDER RECOIL.
ATTACHING RPS PRESSURE PAD SWITCH TO FIREARM
text_image
Image 13 Image 14 Image 15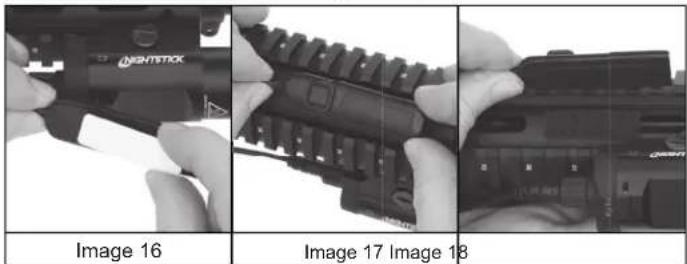
text_image
Image 16 Image 17 Image 18The RPS Pressure Pad Switch can be attached to the firearm using a variety
of methods:
OPTION 1: USING THE NS-PIC1
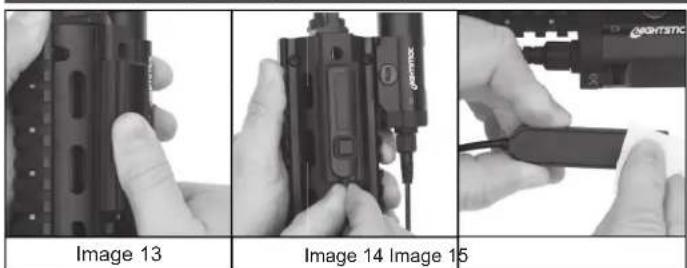
- The NS-PIC1 allows the user to mount the RPS Pressure Pad Switch to any section of Picatinny Rail. Begin by fi tting the NS-PIC1 over the section of Picatinny Rail.
- Begin by fitting the NS-PIC1 over the section of Picatinny Rail where you want the RPS Remote Pressure Pad Switch to be located. (Image 13)
- Once the NS-PIC1 is installed, insert the RPS Pressure Pad Switch into the upper molded profile of the NS-PIC1 until fully seated. (Image 14)
OPTION 2: USING THE 2-PART VELCRO PADS
- The Velcro Pads come with 2 strips of Pressure Sensitive Adhesive that when used together allow the RPS Pressure Pad Switch to be attached to any clean smooth surface of your firearm.
- Prior to installation, be sure to use the included Alcohol Prep Pad to completely clean the application surfaces of the fi ream and the back of the RPS Pressure Pad Switch. (Image 15)
- Once the residual alcohol has fully dried, remove the backing strips from one side of the PSA and attach it to the back of the RPS Pressure Pad Switch. (Image 16)
- Then repeat that same process to attach the RPS/Velcro Strip assembly to the firearm. (Image 17)
- Apply even pressure and allow the PSA tape to cure for approximately 24 hours for the best adhesion.
- The Hook and Loop portions of the Velcro may be separated in order to facilitate temporary removal of the RPS Pressure Pad Switch from the firearm. (Image 18)
OPTION 3: USING A VERDICAL FOREND GRIP

natural_image
Three-panel image showing a hand holding a rifle, labeled Image 19, Image 20, and Image 21 (no text or symbols on the images themselves)- Various aftermarket manufactures make Vertical Forend Grips that the Nightstick RPS Pressure Pad Switch will fit into.
- The Tango Down (models BGV-MK46 or BGV-QDSF) Vertical Fore Grips as an example, allows the RPS Pressure Pad Switch to slide perfectly into the molded slot of their specific grip. (Image 19)
- Any other Vertical Fore Grip that accommodates this same shape would work as well.
OPERATION
The RPS Remote Pressure Pad Switch provides for two different modes of operation.
MOMENTARY-ON MODE
Fully pressing down and holding the long tape switch will activate the momentary-on mode. Releasing the tape switch will turn the light off. (Image 20)
CONSTANT-ON MODE
Pressing the smaller square shielded switch near the end of the RPS until it clicks will activate the Constant-on mode. Pressing the switch until it clicks again will turn the light off. (Image 21)
WARRANTY
LIMITED LIFETIME WARRANTY
Bayco Products, Inc. warrants this product to be free from defects in workmanship and materials for the original purchaser's lifetime. The Limited Lifetime Warranty includes the LEDs, housing and lenses. Rechargeable batteries, chargers, switches, electronics and included accessories are warranted for a period of two years with proof of purchase. Normal wear and failures which are caused by accidents, misuse, abuse, faulty installation and lightning damage are excluded.
We will repair or replace this product should we determine it to be defective. This is the only warranty, expressed or implied, including any warranty of merchantability or fitness for a particular purpose.
For a complete copy of the warranty, go to www.nightstick.com/nightstick-product-support/warranties. Retain your receipt for proof of purchase.
natural_image
Close-up of a black tactical device with attached probe and cable, no visible text or symbolsSTEP 1 – INSTALL THE BATTERIES
- Open the Battery Door Screw using a Phillips head screwdriver.
- Insert the included CR123 Batteries using the battery orientation markings on the side of the light.
- Re-install the Battery Door Screw until fully tightened.
STEP 2 – INSTALL THE RPS CABLE ONTO THE TWM
- Insert the connector of the RPS Cable into the mating connector on the Battery Door of the TWM until it is fully seated.
- Screw the Threaded Coupling Ring on the end of the RPS Cable onto the external threads on the TWM Battery Door in a clockwise direction by hand until it is fully tightened.
CAUTION: Do not cross-thread. Do not use any tools to tighten (finger tight only). Be careful to not strip the threads.
STEP 3 – INSTALLING THE TWM ONTO YOUR FIREARM
Notice: Your TWM comes with both cross rail inserts pre-installed in cross rail slots 1 and 4. If the location of one or both of these is not correct for your specific installation, please go to our website for full instructions to set up the TWM onto your firearm.
If the location of the pre-installed inserts is correct for your firearm, proceed to the next step.
- Push inward on the Rail Clamp Tension Thumbscrew fully spreading the moveable Rail Clamp.
- Place the moveable portion of the Rail Clamp into the groove of the Picatinny rail and align the Cross Rail Inserts with the desired slots.
- Rotate the TWM onto the Picatinny rail and then release the pressure on the Rail Clamp Tension Thumbscrew making sure that the TWM is gripping both sides of the rail and verify that the Cross Rail Inserts are fully seated into the slots.
- While holding the TWM tightly to the rail, tighten the Rail Clamp Tension Thumbscrew by hand.
- Use a quarter to fully tighten the Rail Clamp Tension Thumbscrew.
CAUTION: Periodically check the Cross Rail Insert Screws and the Rail Clamp Tension Thumbscrew for tightness.
STEP 4 – ATTACHING THE RPS PRESSURE PAD SWITCH TO YOUR FIREARM
OPTION 1: USING THE NS-PIC1
The NS-PIC1 can be used to attach the RPS Pressure Pad Switch to any section of Picatinny Rail.
- Attach the NS-PIC1 over the section of Picatinny Rail where you want the RPS to be located.
- Insert the RPS into the upper molded profile of the NS-PIC1 until fully seated.
OPTION 2: USING THE 2-PART VELCRO® PADS
The Velcro® Pads come with 2 strips of Pressure Sensitive Adhesive already attached that allow the RPS Pressure Pad Switch to be adhered to any clean smooth surface of your firearm.
- Prior to installation, use the included Alcohol Prep Pad to clean the application surfaces of the firearm and the back of the RPS.
- Allow the residual alcohol to fully dry and then remove the backing strip from one side of the PSA and attach it to the back of the RPS.
- Then repeat that same process to attach the RPS/Velcro Strip assembly to the firearm.
- Apply even pressure and allow the PSA tape to cure for approximately 24 hours for the best adhesion.
- The Hook and Loop portions of the Velcro may be separated in order to facilitate temporary removal of the RPS Pressure Pad Switch from the firearm.
OPTION 3: USING A VERTICAL FORE GRIP
Various aftermarket manufactures make Vertical Fore Grips that the Nightstick RPS Pressure Pad Switch will fit into.
- For example, the TangoDow (models BGV-MK46 or BGV-QDSF) Vertical Fore Grips allows the RPS Pressure Pad Switch to slide perfectly into the molded slot of their grip.
- Any other Vertical Fore Grip that has this same profile would work with the RPS Pressure Pad Switch as well.
OPERATION
The TWM-354/854XL uses the switches on the Remote Pressure Pad for two different modes of operation.
MOMENTARY-ON MODE
Pressing down and holding the long tape switch will activate the momentary-on mode. Releasing the tape switch will turn the light off.
CONSTANT-ON MODE
Pressing the small square switch near the end of the RPS until it clicks will activate the Constant-on mode. NOTE: This switch intentionally requires a lot of force to activate so as to prevent accidental activation. Pressing the switch until it clicks again will turn the light off.
WEAPON SAFETY
PLEASE BE SURE TO READ, UNDERSTAND AND FOLLOW THESE SAFETY AND OPERATING INSTRUCTIONS WHEN HANDLING A FIREARM OR THE NIGHTSTICK TWM WHEN MOUNTED ON A FIREARM. FAILURE TO DO SO CAN BE DANGEROUS AND COULD RESULT IN SERIOUS INJURY, DAMAGE TO PROPERTY, OR DEATH.
- Use of a firearm under any circumstance is inherently dangerous. SERIOUS INJURY OR EVEN DEATH may result without proper training in the safe handling of firearms.
Proper training should be obtained from an accredited firearms safety program conducted by a qualified instructor.
- Read, understand and follow all of the safety instructions that came with your firearm before attaching your new TWM.
• Always assume every firearm is loaded and treat that firearm as such. - Never point a firearm at anything that you are not willing to destroy.
- Never service your firearm or your TWM when mounted on a firearm without first activating the weapon's safety (if applicable), removing the magazine, opening the action and physically and visually inspecting to make sure that no ammunition is installed in the firearm.
BEFORE ATTACHING, INSPECTING OR SERVICING THE TWM
- Engage the safety on the firearm (if applicable).
-
Remove the magazine from the firearm (if applicable).
-
Open the action and visually and physically inspect the chamber to be sure it is empty.
- Keep the barrel pointed in a safe direction at all times and never place your hand in front of the muzzle.
WARNING: IT IS IMPERATIVE THAT SAFETY MEASURES BE EMPLOYED AT ALL TIMES WHILE HANDLING A FIREARM.
WARRANTY
LIMITED LIFETIME WARRANTY
Bayco Products, Inc. warrants this product to be free from defects in workmanship and materials for the original purchaser's lifetime. The Limited Lifetime Warranty includes the LEDs, housing and lenses. Rechargeable batteries, chargers, switches, electronics and included accessories are warranted for a period of two years with proof of purchase. Normal wear and failures which are caused by accidents, misuse, abuse, faulty installation and lightning damage are excluded.
We will repair or replace this product should we determine it to be defective. This is the only warranty, expressed or implied, including any warranty of merchantability or fitness for a particular purpose.
For a complete copy of the warranty, go to www.nightstick.com/nightstick-product-support/warranties. Retain your receipt for proof of purchase.
WATCH VIDEO
SCAN TO WATCH INSTALLATION VIDEO

or visit: http://bit.ly/2FknmNy