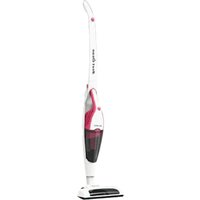
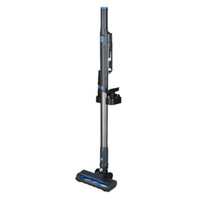
H20 - Vacuum Cleaner MEDION - Free user manual and instructions
Find the device manual for free H20 MEDION in PDF.

User questions about H20 MEDION
0 question about this device. Answer the ones you know or ask your own.
Ask a new question about this device
Download the instructions for your Vacuum Cleaner in PDF format for free! Find your manual H20 - MEDION and take your electronic device back in hand. On this page are published all the documents necessary for the use of your device. H20 by MEDION.
USER MANUAL H20 MEDION
natural_image
Exterior view of a modern vacuum cleaner with black and white body (no text or symbols visible)other
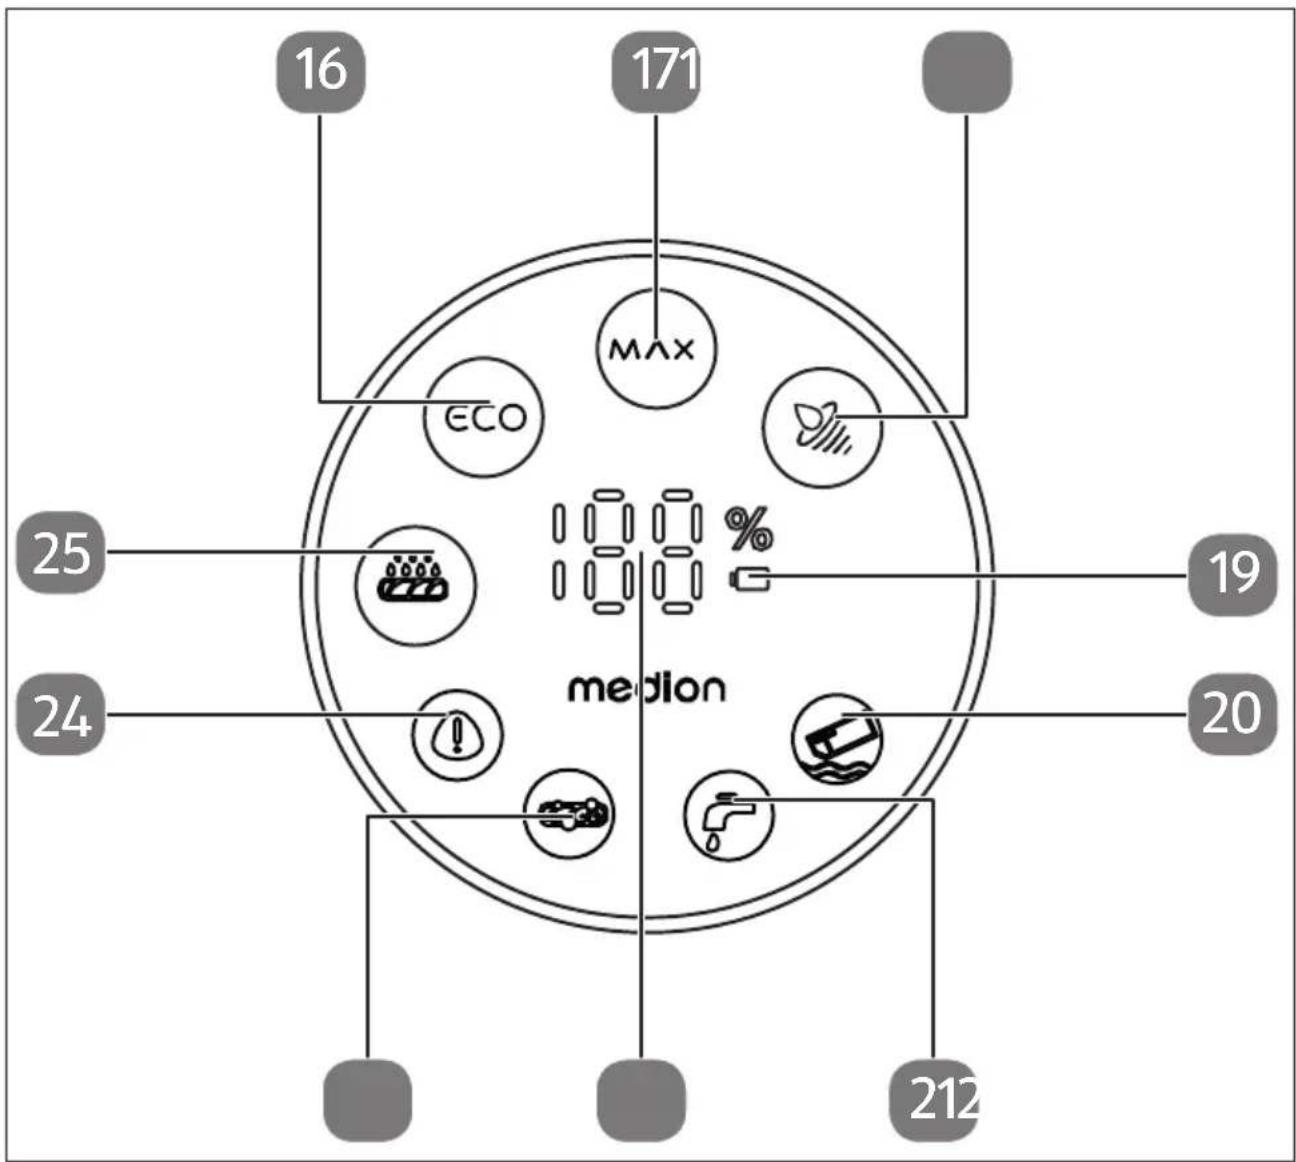
| Category | Value (%) | |---|---| | max | 100 | | 16 | Not labeled (implied by arrow) | | 171 | Not labeled (implied by arrow) | | 25 | Not labeled (implied by arrow) | | 24 | Not labeled (implied by arrow) | | 19 | Not labeled (implied by arrow) | | 20 | Not labeled (implied by arrow) | | 212 | Not labeled (implied by arrow) |Abb. 2 - Display
natural_image
Four technical illustrations of electronic components: a battery pack, coiled cable, a handheld device, and an integrated circuit block (no text or symbols visible)natural_image
Technical line drawing of a mechanical device with directional arrows indicating movement or force (no text or symbols)natural_image
Technical line drawing of a mechanical device with handle and mounting bracket (no text or symbols)natural_image
Technical line drawing of a mechanical device with a directional arrow indicating motion (no text or symbols)natural_image
Technical line drawing of a device with an open lid and a cylindrical base, showing internal components and an upward arrow (no text or symbols)natural_image
Simple line drawing of a cylindrical object emitting particles from a funnel (no text or symbols)Abb. 10 – Wasser-tank entleeren
natural_image
Technical line drawing of a mechanical device with a directional arrow indicating motion (no text or symbols)natural_image
Line drawing of a hand holding a rolled-up device (no text or symbols)natural_image
Technical line drawing of a mechanical device with no visible text or symbolsnatural_image
Illustration of a hand washing a water tap with a tool, no text or symbols presentAbb. 14 - Mikro-faserrolle reinigen
natural_image
Technical line drawing of a mechanical device with no visible text or symbolsnatural_image
Illustration of a medical or diagnostic device with an arrow indicating upward motion (no text or symbols present)natural_image
Technical line drawing of a handheld electronic device with a slide and lever mechanism (no text or symbols)natural_image
Line drawing of a faucet spraying water into a square basin (no text or symbols)Abb. 18 – Filter reinigen
natural_image
Technical line drawing of a mechanical device with no visible text or symbolsnatural_image
Diagram of a handheld device with a screwdriver inserted, showing internal components and an upward arrow indicating motion (no text or symbols present)text_image
QR code image containing encoded data, no visible human-readable textnatural_image
Four technical illustrations of electronic components: a battery pack, coiled cable, a handheld device, and a multi-pin electrical connector (no text or symbols)Fig. 3 - Support mural
▶ Retirez tous les emballages.
6.1. Installation de la station de charge
natural_image
Technical line drawing of a mechanical device with directional arrows indicating movement or force (no text or symbols)natural_image
Technical line drawing of a mechanical tool or device with a handle and mounting bracket (no text or symbols)natural_image
Technical line drawing of a mechanical device with a directional arrow indicating motion (no text or symbols)natural_image
Technical line drawing of a device with an open lid and a cylindrical base, showing a 3D view and an upward arrow (no text or symbols)Fig. 9 – Retirer le cache
natural_image
Simple line drawing of a spray can pouring liquid into a container (no text or symbols)natural_image
Technical line drawing of a mechanical device with a directional arrow indicating motion (no text or symbols)natural_image
Line drawing of a hand holding a rolled-up device (no text or symbols)Fig. 12 - Retirer le cache
natural_image
Technical line drawing of a mechanical component with no visible text or symbolsnatural_image
Line drawing of a faucet spraying water onto a cylindrical object (no text or symbols)natural_image
Technical line drawing of a mechanical component with no visible text or symbolsnatural_image
Diagram showing a device being processed with an upward arrow, no text or symbols presentFig. 16 – Retirer le filtre
natural_image
Technical line drawing of a mechanical device with motion indicators (no text or symbols)natural_image
Line drawing of a kitchen sink with water spraying out (no text or symbols)natural_image
Technical line drawing of a mechanical device with no visible text or symbolsnatural_image
Diagram of a handheld device with a scroll wheel and a pull-up arrow, showing internal components (no text or symbols)text_image
QR code image containing encoded data, no visible human-readable textWAARSCHUWING! Explosiegevaar!
other
| Category | Value (%) | |---|---| | max | 100 | | ECO | 85 | | emissions | 75 | | emissions (water) | 65 | | emissions (drain) | 60 | | emissions (drain, water) | 55 | | emissions (drain, water, exhaust) | 50 | | emissions (drain, exhaust, water, exhaust, etc.) | 45 | | emissions (drain, water, exhaust, etc.) | 40 | | emissions (drain, water, exhaust, etc.) | 35 | | emissions (drain, water, exhaust, etc.) | 30 | | emissions (drain, water, exhaust, etc.) | 25 | | emissions (drain, water, exhaust, etc.) | 20 | | emissions (drain, water, exhaust, etc.) | 15 | | emissions (drain, water, exhaust, etc.) | 10 | | emissions (drain, water, exhaust, etc.) | 5 | | emissions (drain, water, exhaust, etc.) | 0 | | emissions (drain, water, exhaust, etc.) | -5 | | emissions (drain, water, exhaust, etc.) | -10 | | emissions (drain, water, exhaust, etc.) | -15 | | emissions (drain, water, exhaust, etc.) | -20 | | emissions (drain, water, exhaust, etc.) | -25 | | emissions (drain, water, exhaust, etc.) | -30 | | emissions (drain, water, exhaust, etc.) | -35 | | emissions (drain, water, exhaust, etc.) | -40 | | emissions (drain, water, exhaust, etc.) | -45 | | emissions (drain, water, exhaust, etc.) | -50 | | emissions (drain, water, exhaust, etc.) | -55 | | emissions (drain, water, exhaust, etc.) | -60 | | emissions (drain, water, exhaust, etc.) | -65 | | emissions (drain, water, exhaust, etc.) | -70 | | emissions (drain, water, exhaust, etc.) | -75 | | emissions (drain, water, exhaust, etc.) | -80 | | emissions (drain, water, exhaust, etc.) | -85 | | emissions (drain, water, exhaust, etc.) | -90 | | emissions (drain, water, exhaust, etc.) | -95 | | emissions (drain, water, exhaust, etc.) | -100 | | emissions (drain, water, exhaust, etc.) | -105 | | emissions (drain, water, exhaust, etc.) | -110 | | emissions (drain, water, exhaust, etc.) | -115 | | emissions (drain, water, exhaust, etc.) | -120 | | emissions (drain, water, exhaust, etc.) | -125 | | emissions (drain, water, exhaust, etc.) | -130 | | emissions (drain, water, exhaust, etc.) | -135 | | emissions (drain, water, exhaust, etc.) | -140 | | emissions (drain, water, exhaust, etc.) | -145 | | emissions (drain, water, exhaust, etc.) | -150 | | emissions (drain, water, exhaust, etc.) | -155 | | emissions (drain, water, exhaust, etc.) | -160 | | emissions (drain, water, exhaust, etc.) | -165 | | emissions (drain, water, exhaust, etc.) | -170 | | emissions (drain, water, exhaust, etc.) | -175 | | emissions (drain, water, exhaust, etc.) | -180 | | emissions (drain, water, exhaust, etc.) | -185 | | emissions (drain, water, exhaust, etc.) | -190 | | emissions (drain, water, exhaust, etc.) | -195 | | emissions (drain, water, exhaust, etc.) | -200 | | emissions (drain, water, exhaust, etc.) | -205 | | emissions (drain, water, exhaust, etc.) | -210 | | emissions (drain, water, exhaust, etc.) | -215 | | emissions (drain, water, exhaust, etc.) | -220 | | emissions (drain, water, exhaust, etc.) | -225 | | emissions (drain, water, exhaust, etc.) | -230 | | emissions (drain, water, exhaust, etc.) | -235 | | emissions (drain, water, exhaust, etc.) | -240 | | emissions (drain, water, exhaust, etc.) | -245 | | emissions (drain, water, exhaust, etc.) | -250 | | emissions (drain, water, exhaust, etc.) | -255 | | emissions (drain, water, exhaust, etc.) | -260 | | emissions (drain, water, exhaust, etc.) | -265 | | emissions (drain, water, exhaust, etc.) | -270 | | emissions (drain, water, exhaust, etc.) | -275 | | emissions (drain, water, exhaust, etc.) | -280 | | emissions (drain, water, exhaust, etc.) | -285 | | emissions (drain, water, exhaust, etc.) | -290 | | emissions (drain, water, exhaust, etc.) | -295 | | emissions (drain, water, exhaust, etc.) | -300 | | emissions (drain, water, exhaust, etc.) | -305 | | emissions (drain, water, exhaust, etc.) | -310 | | emissions (drain, water, exhaust, etc.) | -315 | | emissions (drain, water, exhaust, etc.) | -320 | | emissions (drain, water, exhaust, etc.) | -325 | | emissions (drain, water, exhaust/other), 212-253-264-274-283-293-303-313-323-333-343-353-363-373-383-393-403-413-423-433-443-453-463-473-483-493-503-513-523-533-543-553-563-573-583-593-603-613-623-633-643-653-663-673-683-693-703-713-723-733-743-753-763-773-783-793-803-813-823-833-843-853-863-873-883-893-903-913-923-933-943-953-963-973-983-993-100Afb. 2 - Display
natural_image
Four technical illustrations of electronic components: a battery pack, coiled cable, a handheld device, and an integrated circuit block (no text or symbols visible)Afb. 3 - Wandhouder
- Opberg-/laadstation
-
Netadapter
-
Reinigingsborstel
- Reserve-EPA-10-filter
natural_image
Technical line drawing of a mechanical device with directional arrows indicating movement or force (no text or symbols)natural_image
Technical line drawing of a mechanical tool or device with a handle and mounting bracket (no text or symbols)Afb. 6 – Waterreservoir vullen
natural_image
Technical line drawing of a mechanical device with a directional arrow indicating motion (no text or symbols)natural_image
Technical line drawing of a device with an open lid and a downward arrow indicating rotation (no text or symbols)natural_image
Simple line drawing of a cylindrical object emitting particles from a pointed tip (no text or symbols)Afb. 10 - Waterreservoir legen
natural_image
Technical line drawing of a mechanical device with a directional arrow indicating motion (no text or symbols)natural_image
Line drawing of a hand holding a rolled-up device (no text or symbols)natural_image
Technical line drawing of a mechanical component with no visible text or symbolsnatural_image
Illustration of a faucet spraying water onto a rolled roller (no text or symbols)Afb. 14 - Microvezelrol reinigen
natural_image
Technical line drawing of a mechanical device with no visible text or symbolsnatural_image
Illustration of a handheld electronic device with an upward arrow indicating motion or change (no text or symbols present)natural_image
Technical line drawing of a handheld device with a slide and handle, showing motion or assembly (no text or symbols)Afb. 17 – Afsluitkap reinigen
natural_image
Line drawing of a faucet spraying water into a square basin (no text or symbols)Afb. 18 – Filter reinigen
natural_image
Technical line drawing of a mechanical device with a screwdriver and adjustment lever (no text or symbols)natural_image
Diagram of a handheld device with a screwdriver inserted, showing a downward arrow and a small screen (no text or symbols present)text_image
QR code image containing encoded data, no visible human-readable textnatural_image
Four technical illustrations of electronic components: a battery pack, coiled cable, a handheld device, and an integrated circuit block (no text or symbols visible)Fig. 3 - Soporte mural
natural_image
Technical line drawing of a mechanical device with directional arrows indicating movement or force (no text or symbols)natural_image
Technical line drawing of a mechanical tool or device with a handle and mounting bracket (no text or symbols)natural_image
Technical line drawing of a mechanical device with a directional arrow indicating motion (no text or symbols)natural_image
Technical line drawing of a device with an open lid and internal components, showing a 3D view with an upward arrow (no text or symbols)Fig. 9 - Retirada de la tapa
natural_image
Simple line drawing of a cylindrical object with liquid spilling out, no text or symbols presentnatural_image
Technical line drawing of a mechanical device with a directional arrow indicating motion (no text or symbols)natural_image
Line drawing of a hand holding a rolled-up device (no text or symbols)natural_image
Technical line drawing of a mechanical component with no visible text or symbolsFig. 13 – Retirada del rollo de micro-fibra

natural_image
Illustration of a faucet spraying water onto a rolled roller, with no text or symbols present.natural_image
Technical line drawing of a mechanical device with rollers and a handle (no text or symbols)natural_image
Illustration of a medical or diagnostic device with an arrow indicating upward movement (no text or symbols present)natural_image
Technical line drawing of a mechanical device with two views: top shows a circular component, bottom shows a handle-like structure (no text or symbols)natural_image
Line drawing of a kitchen sink with a faucet spraying water from the drain (no text or symbols)natural_image
Technical line drawing of a mechanical device with a screwdriver and adjustment lever (no text or symbols)natural_image
Diagram of a handheld device with a screwdriver inserted, showing a downward arrow and a small screen (no text or symbols)Fig. 20 - Retirada del asa
MEDION Service Center
ENAME, S.A
text_image
QR code image containing encoded data, no visible human-readable textother
| Category | Value (%) | |---|---| | max | 100 | | 16 | Not labeled (implied by arrow) | | 171 | Not labeled (implied by arrow) | | 25 | Not labeled (implied by arrow) | | 24 | Not labeled (implied by arrow) | | 19 | Not labeled (implied by arrow) | | 20 | Not labeled (implied by arrow) | | 212 | Not labeled (implied by arrow) |Fig. 2 - Display
natural_image
Four technical illustrations of electronic components: a battery pack, coiled cable, a handheld device, and an integrated circuit block (no text or symbols visible)Fig. 3 - Supporto a parete
natural_image
Technical line drawing of a mechanical device with directional arrows indicating movement or force (no text or symbols)natural_image
Technical line drawing of a mechanical tool or device with a handle and mounting bracket (no text or symbols)natural_image
Technical line drawing of a mechanical device with a directional arrow indicating motion (no text or symbols)natural_image
Technical line drawing of a device with an open lid and a cylindrical base, showing internal components and an upward arrow (no text or symbols)natural_image
Simple line drawing of a cylindrical container pouring liquid into a narrow neck (no text or symbols)natural_image
Technical line drawing of a mechanical device with a directional arrow indicating motion (no text or symbols)natural_image
Line drawing of a hand holding a rolled-up device (no text or symbols)natural_image
Technical line drawing of a mechanical device with a handle and scroll (no text or symbols)natural_image
Illustration of a hand washing a water tap with a tool, no text or symbols presentFig. 14 – Pulizia del rullo in micro-fibra
natural_image
Technical line drawing of a mechanical device with no visible text or symbolsFig. 15 – Inserimento del rullo in microfibra
natural_image
Illustration of a medical or diagnostic device with an arrow indicating upward movement, no text or symbols present.natural_image
Line drawing of a handheld electronic device with a slide and a separate lever mechanism (no text or symbols)natural_image
Line drawing of a faucet spraying water into a square basin (no text or symbols)Fig. 18 – Pulizia del filtro
natural_image
Technical line drawing of a mechanical device with no visible text or symbolsFig. 19 – Pulizia del tubo
natural_image
Diagram of a handheld device with a screwdriver inserted, showing internal components and an upward arrow indicating motion (no text or symbols present)https://www.medion.com/medionserviceshop
text_image
QR code image containing encoded data, no visible human-readable text- Information about this user manual .... 149
1.1. Explanation of symbols ......149 FR - Proper use 149
- Safety instructions N150
3.1. Power supply 150
3.2. Handling the rechargeable batteries 152 ES
3.3. Using the appliance safely....153
3.4. Using the appliance correctly 154 IT - Package contents 155
- Appliance overview 156
- Before using the appliance for the first time 159
6.1. Setting up the charging station....159
6.2. Assembling the hard floor cleaner....159
6.3. Charging the battery 159
6.4. Filling the fresh water tank....160 - Using the hard floor cleaner 161
7.1. Fault messages during operation 162 - Cleaning the appliance ....162
8.1. Self-cleaning 162
8.2. Emptying/cleaning the dirty water tank....163
8.3. Cleaning the surface of the appliance 164
8.4. Removing and cleaning the microfibre roller 165
8.5. Cleaning the dirty water tank filter....166
8.6. Cleaning the dirty water pipe 167 - Storing/transporting the appliance....167
- Spare parts ....168
- Troubleshooting ....168
- Disposal 170
- Technical specifications.... 171
- EU declaration of conformity ....172
- Service information....173
- Legal Notice....174
1. Information about this user manual

Thank you for choosing our product. We hope you enjoy using this appli-ance.
Please read the safety instructions and the user manual carefully before using the appliance for the first time. Note the warnings on the appliance and in the user manual.
Always keep the user manual close to hand. If you sell the appliance or give it away, please ensure that you also pass on this user manual. It is an essential component of the product.
1.1. Explanation of symbols
If a block of text is marked with one of the warning symbols listed below, the hazard described in that text must be avoided to prevent the potential consequences described there from occurring.
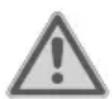
DANGER!
Warning: risk of fatal injury!
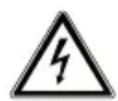
DANGER!
Warning: risk of electric shock!
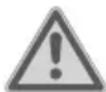
WARNING!
Warning: risk of possible fatal injury and/or serious irreversible injuries!

CAUTION!
Warning: risk of minor and/or moderate injuries!

NOTICE!
Follow these instructions to prevent damage to the appliance!

Notes regarding assembly or operation

Follow the instructions in the user manual!

Protection class II – protective insulation
IPX4
The appliance housing is protected according to DIN EN 60529:
Protection against splashing water on all sides
2. Proper use
The cordless hard floor cleaner is used to clean suitable sealed hard floors (e.g. laminate, tiles, parquet or plastic floors). The cordless hard floor cleaner is not suitable for absorbing large amounts of water and cleaning unsealed hardwood, parquet, cork or carpet floors.
The appliance is only intended for private use and not for industrial/commercial use.
Please note that we shall not be liable in cases of improper use:
▶ Do not modify the appliance without our consent and do not use any auxiliary equipment that we have not approved or supplied.
▶ Only use replacement parts or accessories that we have supplied or approved.
Comply with all the information in this user manual, especially the safety instructions. Any other use is considered improper and can cause personal injury or property damage.
3. Safety instructions
IMPORTANT SAFETY INSTRUCTIONS – READ CAREFULLY AND KEEP FOR FUTURE REFERENCE!
WARNING! Risk of injury!
Risk of injury due to improper use.
- Keep the appliance and its accessories out of the reach of children.
■ This appliance can be used by children of 8 years and older, and by people with reduced physical, sensory or mental capacity, or with a lack of experience and/or knowledge, but only with proper supervision, or if they have been told how to use the appliance safely, and have understood the risks involved if they use it improperly.
■ Children must not be allowed to play with the appliance.
■ Cleaning and user maintenance must not be carried out by children.
■ Children do not recognise the dangers that can arise when handling electrical
appliances. Please be par- ticularly careful while using the appliance if there are children nearby.
■ Children younger than 8 must be kept away from the appliance and the mains cable.
3.1. Power supply
WARNING! Risk of electric shock/ short circuit!
There is a risk of electric shock/short circuit from live parts.
■ Only use the mains adapter included in the scope of delivery to charge the appliance. ■ Only connect the appliance to a properly installed and easily accessible socket that is close to where you are using the appliance. The local mains voltage must correspond to the technical specifications for the appliance.
■ The power socket must be easily accessible so you can unplug the appliance from the mains quickly if necessary.
■ Remove the mains adapter from the socket:
– after each charging process
– before each cleaning
– during thunderstorms
- when the appliance is left unattended
- when you are no longer using the appliance.
■ Always pull on the mains adapter housing, not on the mains adapter cable.
■ Do not allow the mains adapter cable to come into contact with hot objects or surfaces (e.g. cooker hob).
■ Do not operate the appliance if there is visible damage to the appliance, the mains adapter or the mains adapter cable, or if the appliance has been dropped.
■ Before first use and after each use, check the appliance and the mains adapter cable for damage.
■ Unwind the mains adapter cable completely.
■ Do not kink or crush the mains adapter cable.
■ Contact our Service Centre without delay if the appliance has been damaged during transport.
■ Do not, under any circum- stances, make any unauthor- ised modifications to the appliance or try to open a component and/or repair it yourself. FR NL ES
If the mains adapter is damaged, contact our Service Centre to avoid hazards. The mains adapter must be replaced with a new mains adapter of the same type.
■ Do not let the appliance come into contact with water or other liquids. Keep the mains adapter cable away from washbasins, sinks or similar objects. Never expose the appliance to water drops or water spray.
■ Never touch the mains adapter cable with wet or damp hands.
■ Never immerse the appliance or the mains adapter in water or other liquids.
■ Do not place containers that are filled with liquid, e.g. vases, on or near the appliance or its mains adapter. Such containers may tip over and the liquid may impair the electrical safety of the appliance.
■ Operate the appliance and the mains adapter indoors only.
■ Do not expose the appliance to extreme conditions.
Avoid:
– high humidity or wet conditions
- extremely high or low temperatures
- direct sunlight
- naked flames.
3.2. Handling the rechargeable batteries
The hard floor cleaner is equipped with a rechargeable integrated lithium-ion battery that you can charge with the mains adapter that comes with it.
Rechargeable batteries may contain combustible materials. If handled incorrectly, rechargeable batteries can leak, become very hot, ignite or even explode, which could damage the appliance and your health. Observe the following safety instructions:
■ If electrolyte solution leaks from the battery, avoid contact with the skin, eyes or mucous membranes. If
necessary, rinse the affected areas with plenty of clean water and consult a doctor immediately.

WARNING! Risk of explosion!
There is a risk of explosion if the battery is used incorrectly.
■ Do not expose the battery to temperatures above 80°C:
- Never throw the appliance into a fire when its battery is still in it.
- Never expose the batteries to excessive heat such as direct sunlight, fire, strong artificial light or similar.
- Do not place naked flames such as lit candles on or near the appliance.

NOTICE! Possible damage to the appliance!
Risk of damage to the appli- ance if used incorrectly.
■ Avoid heavy impacts and vibrations.
■ Charge the battery regularly and as fully as possible. Re-charge discharged batteries immediately to avoid deep discharge and damage to the battery.
■ Prevent the appliance from toppling over or falling (e.g. when not in use or when cleaning stairs).
■ The battery is permanently installed and must not be replaced by the user.
■ To prevent malfunctions, keep the appliance dust-free, away from sources of heat, and out of direct sunlight.
■ Do not operate or store the appliance at temperatures below 0°C or above 40°C.
■ Do not operate or store the mains adapter at temperatures below 5°C or above 40°C.
3.3. Using the appliance safely
■ When the appliance is not in use, place it in the storage station.
■ Empty the fresh water tank before charging the battery.
■ Switch off the appliance immediately if the appliance emits excessive heat, noise or odour.
■ Be careful when using the appliance on stairs.
■ Do not pick up the following substances with the appliance: FR
- explosive or flammable substances, e.g. flour or coal dust, toner dust (laser printers, copiers)
– substances hazardous to health, e.g. acids and alkalis or asbestos dust - hot objects, e.g. matches or hot ashes.
- foamy or foaming liquids
- Never fill the fresh water tank with solvents, cleaners containing solvents, strongly acidic cleaners, petrol, paint thinner, acetone or other liquids such as aromatic, alcohol-based cleaning agents, as these substances attack the material of the appliance's components.
■ Do not run the appliance over floor grilles of convector heaters. The escaping water cannot be absorbed by the appliance if it is run over the floor grille.

CAUTION!
Risk of injury!
Touching moving parts can result in bruising.
■ Do not touch the moving parts.
- Keep hair, clothing, objects, hands and other body parts away from the microfibre roller during operation to avoid injury.
■ As a matter of principle only use the appliance if it is fully assembled.
3.4. Using the appliance correctly
■ Do not use the appliance on floors without a microfibre roller. The surfaces can be damaged.
■ Do not hold the microfibre roller in one place for too long. The floor surfaces can be damaged.
■ The appliance must not be lifted, carried or laid flat on the floor during operation.
■ Only ever move the appliance forwards and backwards across the floor, never sweep sideways.
■ Do not operate the appliance without water in the fresh water tank.
■ Only use the appliance with clean tap water or distilled water.
■ Do not use hot or boiling water to fill the fresh water tank. Do not heat the water in the fresh water tank in the microwave.
■ Do not use the appliance on unsealed hardwood or par-quet floors.
■ Use the appliance only on flat surfaces.
■ Do not use the appliance to clean carpets or rugs.
■ Before using the appliance, remove any rough, sharp or hot parts from the floor surface to avoid possible damage to the appliance.
■ Never lay the appliance flat on the floor during operation or shake the appliance if there is still water in the tanks.
■ Empty the fresh and dirty water tanks after each use.
■ Clean the dirty water tank after each use to avoid soil-ing the floors.
■ Do not place the storage station near sources of heat (e.g. heater, oven).
4. Package contents

DANGER!
Risk of choking and suffocation!
Packaging film can be swallowed or used improperly, creating a risk of choking and suffocation.
- Keep packaging material such as plastic film or plastic bags away from children.
■ Do not let children play with the packaging material.
▶ Please check your purchase to ensure that all items are included and in perfect condition. If anything is missing or damaged, contact us within 14 days of purchase.
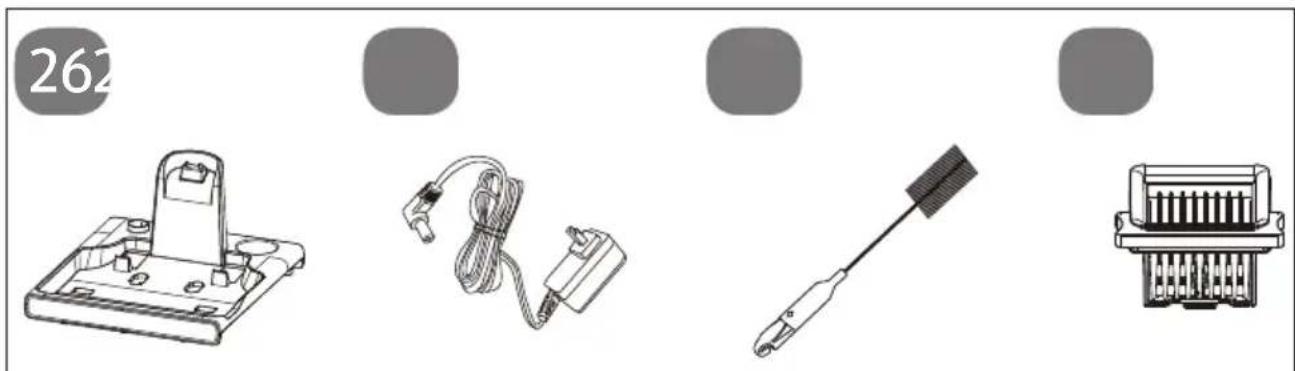
The following items are supplied with your product:
-
Cordless hard floor cleaner
• Accessories already fitted: -
Microfibre roller
- Fresh water tank
- Dirty water tank
-
EPA 10 filter
-
Charging/storage station
- Mains adapter
- Replacement EPA 10 filter
- Cleaning brush
- Short manual
5. Appliance overview
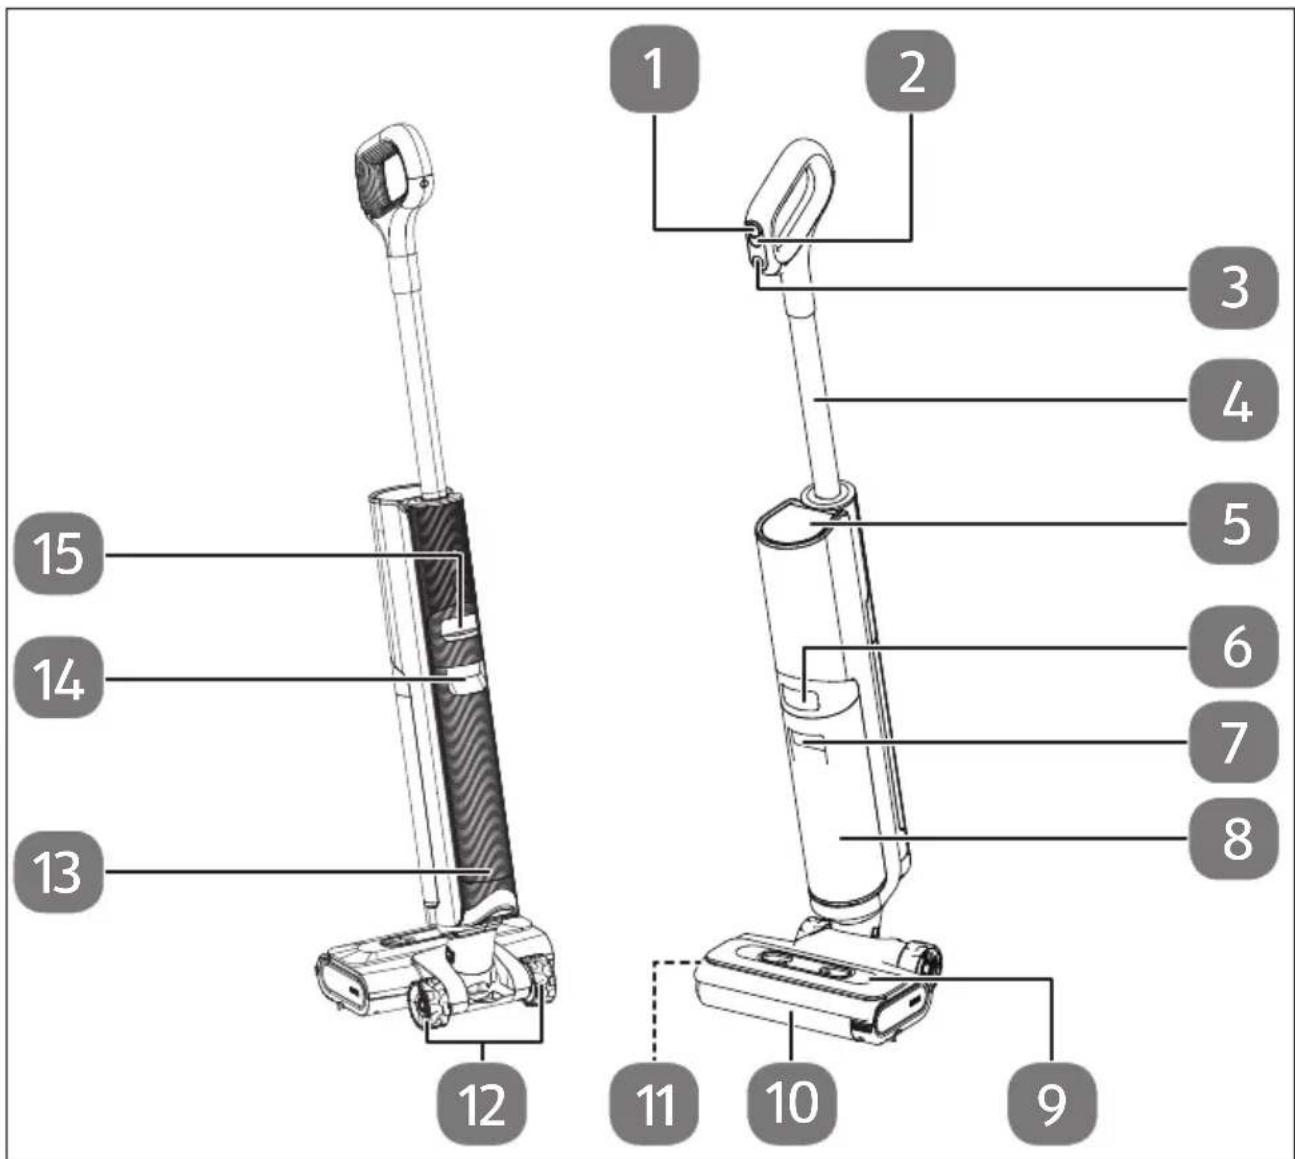
text_image
1 2 3 4 5 6 7 8 9 10 11 12 13 14 15Fig. 1 – Appliance overview
- ⏻ button: Switch the appliance on/off
- Ⓥ button: Operating mode selection
- 📍 button: Self-cleaning
- Handle
- Display
- Release button for dirty water tank
-
Recessed grip for dirty water tank
-
Dirty water tank
- Microfibre roller cover
- Microfibre roller
- Microfibre roller handle (on the left side)
- Rollers
- Fresh water tank
- Recessed grip for fresh water tank
- Release button for fresh water tank
other
| Category | Value (%) | |---|---| | max | 100 | | 16 | Not labeled (implied by arrow) | | 171 | Not labeled (implied by arrow) | | 25 | Not labeled (implied by arrow) | | 24 | Not labeled (implied by arrow) | | 19 | Not labeled (implied by arrow) | | 20 | Not labeled (implied by arrow) | | 212 | Not labeled (implied by arrow) |Fig. 2 - Display
- ECO mode
- MAX mode
- Vacuum mode
- Battery LED
-
Dirty water tank full
-
Fresh water tank empty
- Charge level indicator
- Fault on the microfibre roller
- Error message
- Self-cleaning active
natural_image
Four technical illustrations of electronic components: a battery pack, coiled cable, a handheld device, and an integrated circuit block (no text or symbols visible)Fig. 3 - Wall bracket
- Storage/charging station
-
Mains adapter
-
Cleaning brush
- Replacement EPA 10 filter
6. Before using the appliance for the first time
Remove all packaging materials.
6.1. Sett ing up the charging station
▶ Position the charging station on a wall with a level surface and avoid direct sunlight.
Insert the coaxial power connector of the mains adapter supplied into the connection socket on the back of the charging station.
Plug the mains adapter into a domestic power socket.
6.2. Assembling the hard floor cleaner

When assembling the individual parts, make sure that they fit together precisely to avoid bending the contacts inside.
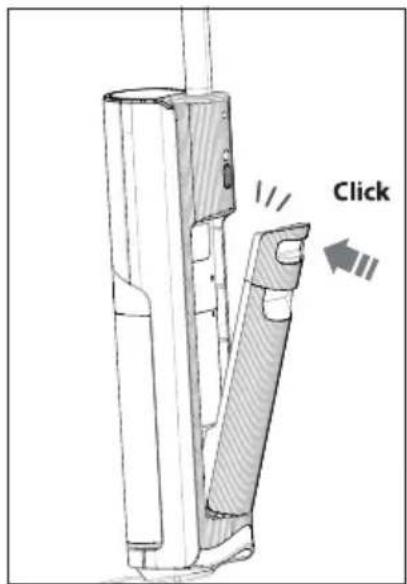
▶ Push the handle into the appliance body as far as it will go until you hear it click into place. The handle must sit firmly in the appliance (see Fig. 4).
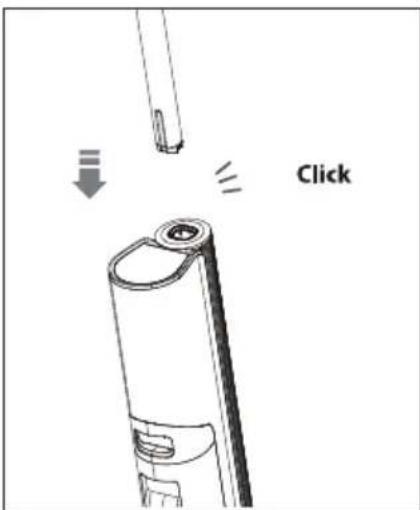
text_image
ClickFig. 4 - Handle assembly
6.3. Charging the battery

NOTICE!
Possible material damage!
Water overflowing from the fresh water tank (13) can damage the appliance and fixtures.
■ Always empty the fresh water tank before charging the battery.
Place the hard floor cleaner in the storage/charging station (26) near a domestic power socket.
▶ Ensure that the charging contacts engage in the charging socket of the hard floor cleaner.
When the hard floor cleaner is correctly positioned in the charging station, the outer ring of the display lights up and starts to rotate. The charging process has started and the charge level indicator in the centre of the display shows the current charge level.
When the battery is empty, it takes approx. 3 hours to charge it to 100%.
6.4. Filling the fresh water tank
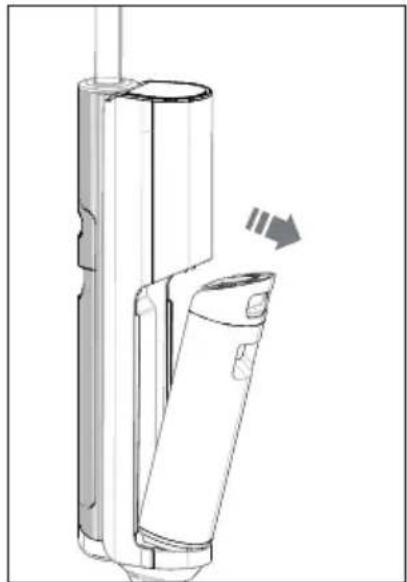
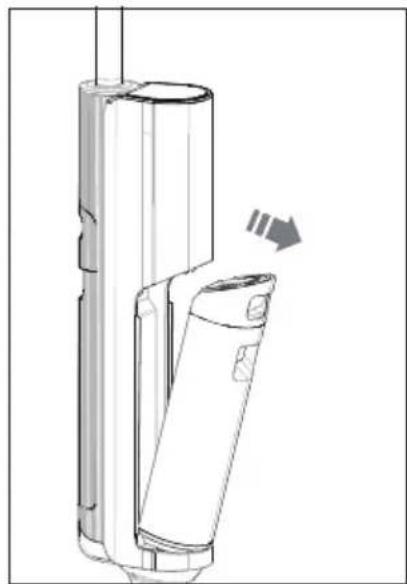
▶ Hold the recessed grip of the fresh water tank (14) and press the fresh water tank release button (15) downwards.
▶ Pull the fresh water tank out of the appliance body (see Fig. 5).

natural_image
Technical line drawing of a mechanical device with directional arrows indicating movement or force (no text or symbols)Fig. 5 - Removing the water tank
▶ Open the cap on the back of the fresh water tank.
▶ Fill the fresh water tank with clean tap water. Do not use hot or boiling water to fill the fresh water tank. (see Fig. 6)
You can add commercially available, non-foaming floor cleaning agent to the fresh water (in the ratio cleaner/water max. 1:20). Also follow the detergent manufacturer's dosing instructions and ensure that you do not exceed the 500-ml filling quantity.
▶ Close the filling opening of the fresh water tank with the cap.
natural_image
Technical line drawing of a mechanical tool or device with a handle and mounting bracket (no text or symbols)Fig. 6 - Filling the water tank
Insert the fresh water tank into the recess on the back of the appliance at a slight angle and press on the fresh water tank until you hear it click into place and it is seated securely (see Fig. 7).
text_image
ClickFig. 7 - Inserting the water tank
7. Using the hard floor cleaner

NOTICE!
Possible material damage!
The appliance is only suitable for cleaning sealed hard floors.
■ Do not use the appliance on unsealed hardwood, parquet, cork or carpet floors.
■ If necessary, check the floor for water resistance in an inconspicuous place before use.

To prevent the dirty water tank from overflowing, do not pick up any foaming substances (such as a cleaner residue from previous floor cleaning) from the floor with the hard floor cleaner.
▶ Fill the fresh water tank (13) with water and detergent as described above.
▶ Empty the dirty water container (8) after each cleaning and reinsert it (see "8.2. Emptying/cleaning the dirty water tank" on page 163).
▶ Tilt the appliance body backwards slightly to start cleaning.
▶ Press the button to switch on the appliance.
The charging status is displayed and the eco symbol lights up.
▶ Clean the floor by moving the hard floor cleaner back and forth, similar to vacuuming, until the floor is clean.
▶ Be careful not to wet the floor surface too much, especially when cleaning wood and other delicate floor surfaces.
▶ Press the ⏱ button to switch to maximum mode as required. The Ⓞ symbol lights up.
Press the button again to start the suction function; only liquid is picked up and suctioned off with the microfibre roller as part of this process.
The symbol lights up.
▶ Press the button to switch off the appliance.
The hard floor cleaner sucks the remaining liquid from the floor once more and then switches itself off.
7.1. Fault messages during operation
If the fresh water tank runs empty during cleaning, the display will show 📋.
▶ Fill the fresh water tank as described in section "6.4. Filling the fresh water tank" on page 160.
If lights up, the dirty water tank is full and must be emptied. The appliance then switches to standby mode.
▶ Empty the dirty water tank, only then can you start the appliance again.
It is possible that hair or lint may become wrapped around the microfibre roller (10) or the microfibre roller may become blocked for any other reason; lights up on the display.
Switch off the appliance and clean the microfibre roller as described in section "8.4. Removing and cleaning the microfibre roller" on page 165.
If any other error messages are displayed during operation, lights up on the display, switch off the appliance and contact our Service Centre.
8. Cleaning the appliance
8.1. Self-cleaning
For optimal cleaning performance, use the self-cleaning function when after each use, or at the latest when you notice that the floor is no longer optimally cleaned or is even soiled when using the hard floor cleaner.
▶ Empty the dirty water tank (8) if necessary.
▶ Make sure that there is enough water in the fresh water tank (13) for cleaning; you can recognise this by the marking on the fresh water tank.
Place the appliance in the storage/charging station (26).
▶ Press the button to start the self-cleaning.
The display will show.
The motor of the microfibre roller (10) and the water pump work for 2 minutes.
▶ Empty and clean the dirty water tank after the self-cleaning.
▶ Clean the cover of the microfibre roller (9) after each self-cleaning.
Remove any water residue from the storage/charging station.
The hard floor cleaner is ready for use again.
8.2. Emptying/cleaning the dirty water tank
The appears as soon as the dirty water tank is full and needs to be emptied.
Empty the dirty water tank after each use:
▶ Hold the recessed grip of the dirty water tank (7) and press the dirty water tank release button (6) downwards.
▶ Pull the fresh water tank out of the appliance body (see Fig. 8).
natural_image
Technical line drawing of a mechanical device with a directional arrow indicating motion (no text or symbols)Fig. 8 - Removing the water tank
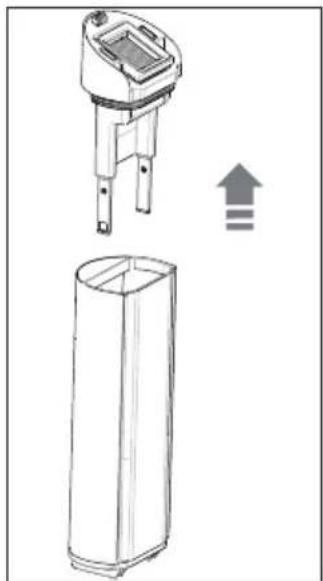
▶ Pull the cap of the recovery tank upwards and remove (see Fig. 9).
natural_image
Technical line drawing of a device with an open lid and a cylindrical base, showing internal components and an upward arrow (no text or symbols)Fig. 9 - Removing the cap
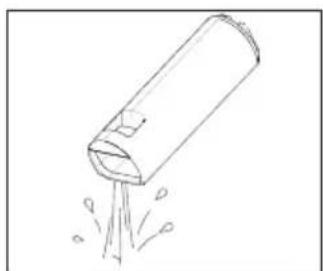
▶ Empty the dirty water tank over a sink and rinse it out with clean water (see Fig. 10).
▶ Push the cap straight back onto the dirty water tank.
natural_image
Simple line drawing of a cylindrical object emitting particles from a pointed tip (no text or symbols)Fig. 10 - Emptying the water tank
Insert the dirty water tank into the recess on the front of the appliance at a slight angle and press on the dirty water tank until you hear it click into place and it is seated securely (see Fig. 11).
natural_image
Technical line drawing of a mechanical device with a directional arrow indicating motion (no text or symbols)Fig. 11 - Inserting the water tank

Rinse out the dirty water tank and cap and clean both parts with a damp cloth, Do not immerse the dirty water tank in water.
8.3. Cleaning the surface of the appliance

WARNING!
Risk of electric shock!
The appliance and cleaning foot must not be immersed in water or other liquids or held under running water as this may result in an electric shock.
■ Before cleaning the appliance, always disconnect the mains adapter from the connection socket of the appliance.
■ Make sure that the appliance is switched off.

NOTICE!
Possible damage to the appliance!
Using the wrong cleaning agent can damage sensitive surfaces.
- Do not use any solvents or caustic/gaseous cleaning agents to clean the appliance's surfaces and accessories.
■ Do not clean the dirty water tank (8) in the dishwasher.
▶ Wipe the surfaces with a damp cloth.
8.4. Removing and cleaning the microfi bre roller
If the microfibre roller is excessively dirty or if you no longer use the appliance, remove the microfibre roller from the cleaning foot and clean it.
▶ Press the button to switch off the appliance.
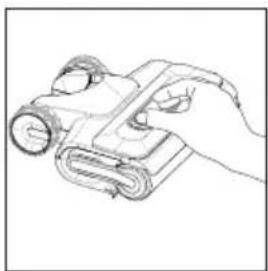
Remove the cover of the microfibre roller by pressing the two release buttons on the top together and pulling the cover upwards (see Fig. 12).
natural_image
Line drawing of a hand holding a rolled-up device (no text or symbols)Fig. 12 - Removing the cover
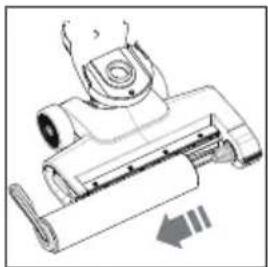
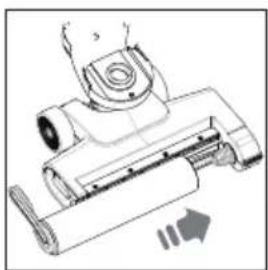
▶ Pull the locking tab on the microfibre roller to the left and remove the microfibre roller (see Fig. 13).
natural_image
Technical line drawing of a mechanical device with no visible text or symbolsFig. 13 – Removing the microfibre roller
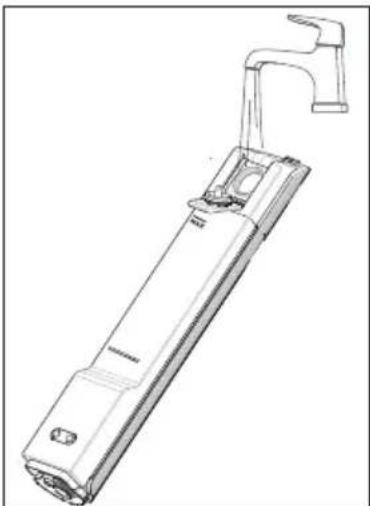
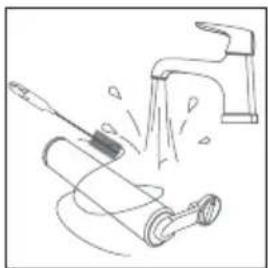
▶ Clean the microfibre roller under running water. If necessary, also use the cleaning brush supplied (28) (see Fig. 14).
Remove any dirt from the cover and the cleaning foot.
natural_image
Illustration of a faucet spraying water onto a rolled roller (no text or symbols)Fig. 14 - Cleaning the microfibre roller
Place the microfibre roller on the roller holder with the right-hand side first. Turn the locking tab so that you can engage the locking tab in the recess in the cleaning foot (see Fig. 15).
If you no longer wish to use the appliance, leave the microfibre roller to dry in the storage station and only insert it again when using the appliance for the next time.
▶ Replace the cover of the microfibre roller on the cleaning foot and carefully press the cover onto the cleaning foot until you hear it click into place.
natural_image
Technical line drawing of a mechanical device with no visible text or symbolsFig. 15 - Inserting the microfibre roller
8.5. Cleaning the dirty water tank fi Iter
The hard floor cleaner is equipped with an EPA 10 filter. If this filter is very dirty, it can be cleaned under lukewarm running water.

Depending on the degree of soiling, the filter is to be replaced every 3–6 months. You can obtain new filters from our Service shop, "10. Spare parts" on page 168.
Proceed as follows for cleaning:
▶ Press the ⏻ button to switch off the appliance.
Remove the dirty water tank as described in section "8.2. Emptying/cleaning the dirty water tank" on page 163.
▶ Pull out and remove the cap for the dirty water tank.
▶ Pull the EPA 10 filter upwards and remove from the dirty water tank cap (see Fig. 16).
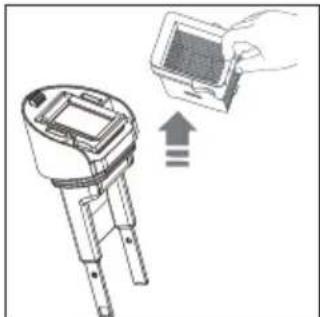
natural_image
Diagram showing a handheld device with an upward arrow and a hand holding a screen (no text or symbols present)Fig. 16 - Removing the filter
▶ Clean the cap under running water (see Fig. 17).
natural_image
Technical line drawing of a handheld device with a water drop symbol (no text or labels)Fig. 17 - Cleaning the cap
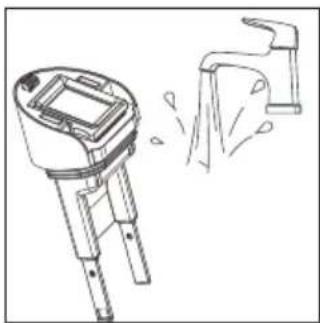
▶ Also clean the EPA 10 filter under lukewarm running water (see Fig. 18).
▶ Allow the EPA 10 filter to dry completely for at least 24 hours.
Place the dry filter back into the cap.
- Close the dirty water tank with the cap and reinsert the tank as described in section "8.2. Emptying/cleaning the dirty water tank" on page 163.

natural_image
Line drawing of a faucet spraying water into a square basin (no text or symbols)Fig. 18 - Cleaning the filter
8.6. Cleaning the dirty water pipe
▶ Press the button to switch off the appliance.
Remove the fresh water tank as described in section "6.4. Filling the fresh water tank" on page 160.
Remove the dirty water tank as described in section "8.2. Emptying/cleaning the dirty water tank" on page 163.
▶ Tilt the hard floor cleaner back fully to easily clean the pipe.

Never tilt the hard floor cleaner back fully with the tanks fitted to prevent water from flowing back into the motor block.
▶ Clean the dirty water pipe to the cleaning foot using the cleaning brush supplied (see Fig. 19).

natural_image
Technical line drawing of a mechanical device with no visible text or symbolsFig. 19 – Cleaning the lines
9. Storing/transporting the appliance
When you are not using the appliance, unplug the mains adapter.
▶ Empty the fresh water tank (13) and the dirty water tank (8).
▶ Clean the appliance and the microfibre roller (10) as previously described.
Place the appliance in the storage station to collect any residual liquid that may leak out.
Place the microfibre roller in the compartment of the storage station to allow it to dry properly and to prevent mould from forming.
- Store the appliance in a dry, frost-free place, away from direct sunlight.
▶ Observe the environmental conditions for storage specified in the technical specifications.
Do not store the appliance within the reach of children.
▶ Charge the battery before storage to avoid deep discharge of the battery.
If the appliance will not be used for a long period of time, charge the battery for approx. 3 hours every three months. The battery does not need to be fully charged; the charge level achieved in this way prevents the battery from becoming completely discharged.
You can dismantle the appliance for transport or space-saving storage.
Remove all tanks and accessories.
▶ Use a suitable tool (e.g. a screwdriver) to press into the small opening below the handle and pull the handle upwards to remove it (see Fig. 20).

natural_image
Diagram of a handheld device with a screwdriver inserted, showing internal components and an upward arrow indicating motion (no text or symbols present)Fig. 20 - Removing the handle
▶ Allow all parts to dry completely to prevent mould from forming during transport.
▶ To avoid damage during transport, we recommend that you use the original packaging.
10. Spareparts
Please visit our MEDIONserviceshop at https://www.medion.com/medionserviceshop to order any spare parts you need.
You will be able to find out all the details about your specific product while you're there.
11. Troubleshooting
If the appliance stops working properly, please refer to the troubleshooting table shown below to see if you can resolve the problem yourself.
Never attempt to repair the appliance yourself. If a repair is necessary, please contact our Service Centre or a suitable authorised repair workshop.
| Problem Possible cause Troubleshooting | ||
| The cleaning performance decreases. | The battery power is low. ▶ | Charge the battery. |
| The microfibre roller becomes dirty/blocked. | ▸ Remove the microfibre roller and clean the microfibre roller. | |
| Problem Possible cause Troubleshooting | ||
| The suction power decreases | The dirty water tank is full. | ▸ Remove the dirty water tank and empty it. |
| The microfibre roller, the cover of the microfibre roller and/or the dirty water tank are not inserted properly. | ▸ Check that all components have been inserted correctly. | |
| The filter is missing or not inserted correctly. | ▸ Check the filter. | |
| The filter is very dirty. ▶ Clean the filter. | ||
| The microfibre roller becomes dirty/blocked. | ▸ Remove the microfibre roller and clean the microfibre roller. | |
| The suction line or cleaning foot is dirty. | ▸ Clean the suction line and/or the cleaning foot. | |
| Unusual noises during operation | The cleaning foot and/or the suction line is blocked. | ▸ Clean the cleaning foot and/or the suction line. |
| The dirty water tank is full. | ▸ Remove the dirty water tank and empty it. | |
| The microfibre roller is not moistened with fresh water and the floor surface remains dry. | The fresh water tank is empty. | ▸ Switch off the appliance. Remove the fresh water tank and fill it. |
| The fresh water tank is not inserted correctly. | ▸ Insert the fresh water tank correctly. | |
| Water is leaking from the air outlet openings. | The dirty water tank is not inserted correctly. | ▸ Reinsert the dirty water tank. |
| The filter is not completely dry. | ▸ Allow the filter to dry out completely before use. | |
| The battery does not charge. | Mains adapter not correctly connected to the connection socket | ▸ Make sure that the coaxial power connector is correctly inserted in the connection socket. |
| The mains adapter plug is not inserted into the socket properly. | ▸ Make sure that the plug is properly inserted into the socket. | |
| Wrong mains adapter ▶ Use only the supplied mains adapter. | ||
| Problem Possible cause Troubleshooting | ||
| The dirty water tank indicator flashes. | The dirty water tank is full or the suction line is blocked. | ▸ Empty the dirty water tank and/or clean the suction line. |
| The fresh water tank indicator flashes. | The fresh water tank is empty. | ▸ Fill the fresh water tank before use. |
| The microfibre roller display flashes. | The microfibre roller becomes dirty/blocked. | ▸ Remove the microfibre roller and clean the microfibre roller. |
12. Disposal
PACKAGING
Your appliance has been packaged to protect it from damage in transit. The packaging is made of materials that can be recycled in an environmentally friendly manner.
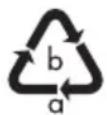
Observe the following labels on the packaging materials regarding waste separation with the abbreviations (a) and numbers (b):
1–7: plastics/20–22: paper and cardboard/80–98: composite materials

(France only)
The “Triman” symbol tells the consumer that the product can be recycled, is covered by an extended system of manufacturer’s responsibility and must be sorted by material type in France.
APPLIANCE
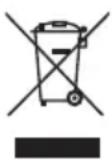
All old appliances marked with the symbol shown must not be disposed of in normal household waste.
In accordance with Directive 2012/19/EU, the appliance must be properly disposed of at the end of its service life.
This involves separating the materials in the appliance for the purpose of recycling as well as minimising the environmental impact and negative effects on human health.
Take old appliances to an electrical scrap collection point or a recycling centre.
Contact your local waste disposal company or your local authority for more information on this subject.
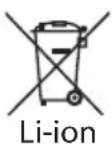
RECHARGEABLE BATTERY
The appliance is fitted with an integrated rechargeable battery. At the end of its service life, do not dispose of the appliance in the normal household rubbish. Instead, contact your local authority to find out how to dispose of it in an environmentally friendly manner at collection points for electrical and electronic scrap.
- Technical specifications
| Cordless hard floor cleaner | |
| Supplier's name or trademark: MEDION | |
| Supplier's address: MEDION AG | Am Zehnthof 7745307 EssenGERMANY |
| Model identifier: MD 11934 | |
| Input voltage when charging 27.0 V | - - - - 1.0 A |
| Output power Max. 125 watt | |
| Operating time (at 100% charge) Approx. 30 minutes | |
| Fresh water tankMax. filling quantity for operation Approx. 500 ml | |
| Dirty water tank Approx. 500 ml | |
| Appliance dimensions (W x H x D) 26 × 25.5 × 110.3 cm | |
| Appliance weight 3.9 kg | |
| Charging station dimensions (W x H x D) 29 × 31.7 × 16.1 cm | |
| Charging station weight | 0.5 kg |
| Rechargeable battery | |
| Manufacturer | BYD Company Ltd.Importer:MEDION AGAm Zehnthof 7745307 EssenGERMANY |
| Model | Z151-6S1P |
| Type | Lithium-ion battery block |
| Cells | 6 |
| Charging time (0–100%) | Approx. 3 hours |
| Output voltage/current type | 22.2 V —— |
| Output | 51.1 Wh |
| Battery capacity 2600 mAh (nominal) | |
| 2300 mAh (rated) | |
| Operating temperature 0°C to 40°C | |
| Storage temperature Max. 40°C | |
| Mains adapter | |
| Manufacturer E-TEK Electronics Manufactory | Co., Ltd.Importer:MEDION AGAm Zehnthof 7745307 EssenGERMANY |
| Model name ZD024M270100EU | |
| Input voltage / current / input AC frequency | 100–240 V~, 50/60 Hz, 0.8 A |
| Output voltage/current 27.0 V | — — — 1.0 A |
| Output power 27.0 W | |
| Average efficiency during operation 87.90% | |
| Efficiency with low load (10%) 85.05% | |
| Power consumption with zero load 0.071 W | |


14. EU declaration of conformity

MEDION AG hereby declares that the product conforms to the following European requirements:
• EMC Directive 2014/30/EU
• Low Voltage Directive 2014/35/EU
• Ecodesign Directive 2009/125/EC
• Ecodesign Regulation 2019/1782
• RoHS Directive 2011/65/EU.
15. Service information
Please contact our Customer Service team if your device ever stops working the way you want or expect it to. There are several ways for you to contact us:
- In our Service-Community, you can meet other users, as well as our staff, and you can exchange your experiences and pass on your knowledge there.
You will find our Service-Community at community.medion.com.
• Alternatively, use our contact form at www.medion.com/contact. - You can also contact our Service team via our hotline or by post.
| Opening times Hotline number UK | |
| Mon – Fri: 08.00 – 20.00Sat – Sun: 10.00 – 16.00 | 0333 3213106 |
| Service address | |
| MEDION Electronics Ltd.120 Faraday Park, Faraday Road, DorcanSwindon SN3 5JF, WiltshireUnited Kingdom | |

text_image
QR code image containing encoded data, no visible human-readable textYou can download this and many other sets of operating instructions from our service portal at www.medionservice.com.
We have stopped providing printed copies of our warranty terms and conditions as part of our commitment to sustainability, but you can access the warranty terms and conditions on our service portal.
You can also scan the QR code on the side of the screen, to download the operating instructions onto your mobile device from the service portal.
16. Legal Notice
Copyright 2024
Date: 12. June 2024
All rights reserved.
These operating instructions are protected by copyright.
Mechanical, electronic and any other forms of reproduction are prohibited without the written permission of the manufacturer.
Copyright is owned by the company:
MEDION AG
Am Zehnthof 77
45307 Essen
Germany
Please note that you cannot use the address above for returns. Please always contact our Customer Service team first.
DE
FR
NL
ES
IT
EN