59651 - Cooker Mirage - Free user manual and instructions
Find the device manual for free 59651 Mirage in PDF.

| Product type | Induction cooktop |
| Brand | Mirage |
| Model | 59651 |
| Intended use | Commercial foodservice (non-domestic) |
| Power supply | 230 V, dedicated circuit, Schuko plug |
| Maximum power | 1800 W (estimated) |
| Power range | 1 - 100 (levels) |
| Temperature range | Display in °F or °C |
| Timer | 1 to 180 minutes |
| Compatible cookware diameter | 12.1 cm to 30.5 cm (built-in) / 12.1 cm to 26.0 cm (countertop) |
| Compatible cookware materials | Ferritic stainless steel, iron, cast iron (flat bottom) |
| Incompatible materials | Earthenware, glass, aluminum, bronze, copper, metal disc bottom cookware |
| Minimum clearance (rear) | 10 cm |
| Minimum clearance (below) | 1.3 cm |
| Automatic safety shutoff | Yes (if no pan detected for 10 minutes) |
| Overheat protection | Yes (code F2) |
| Recommended cleaning | Damp cloth after cooling, no abrasive products |
| Repairability | Spare parts available on Vollrath.com, repairs by technical service |
| Warranty | Vollrath warranty (see terms) |
Frequently Asked Questions - 59651 Mirage
User questions about 59651 Mirage
0 question about this device. Answer the ones you know or ask your own.
Ask a new question about this device
Download the instructions for your Cooker in PDF format for free! Find your manual 59651 - Mirage and take your electronic device back in hand. On this page are published all the documents necessary for the use of your device. 59651 by Mirage.
USER MANUAL 59651 Mirage
Mirage® CountertopandDrop-inInductionRanges
ThankyouforpurchasingthisVollrathequipment.Beforeoperatingthe equipment,readandfamiliarizeyourselfwiththefollowingoperating andsafetyinstructions.SAVETHESEINSTRUCTIONSFORFUTURE REFERENCE.Savetheoriginalboxandpackaging.Usethispackaging toshiptheequipmentifrepairsareneeded.
SAFETYPRECAUTIONS
Toensuresafeoperation,readthefollowingstatementsandunderstand theirmeaning.Thismanualcontainssafetyprecautionswhichare explainedbelow.Pleasereadcarefully.

WARNING
Warningisusedtoindicatethepresenceofahazardthatwillorcan causeseverepersonalinjuryordeath.

CAUTION
Cautionisusedtoindicatethepresenceofahazardthatwillorcan causeminorormajorpersonalinjuryifthecautionisignored.
NOTICE: Notice is used to note information that is important but not hazard-related.
Toreduceriskofinjuryordamagetotheequipment:
- Plugonlyintogroundedelectricaloutletsthatmatchthevoltageon theratinglabel.
•Thisequipmentrequiresadedicatedcircuit. - Donotuseextensioncords, powerstripsorsurgeprotectors with this equipment.
- Unplugthisequipmentfromthewalloutletwhennotinuse.
• Use this equipment only in a flat, level position. - Toprotectagainstelectricalshockdonotimmersethecordorplug inwater.Keepthecordawayfromheatedsurface.Donotletthe cordhangovertheedgeoftableorcounter.
- Asaprecaution, persons using pacemakers should stand back 12 ^® (30cm) from an operating unit. Studies haveshown that the induction element will not disrupt pacemaker.
- Keepallcreditcards, driverlicenses and other items with amagnetic strip away from an operating unit. The unit's magnetic field will damage the information on these strips.
•Theheatingsurfaceismadeofastrong,non-porousmaterial. However,shoulditcrackorbreak,stopusingandimmediately unplugtheunit.Cleaningsolutionsandspillscouldpenetratethe brokencook-topandcreateariskofelectricalshock. - Donotoperatethisequipmentwithadamagedcordorplugorifitis notfunctioningproperly.
- Donotoperateunattended. Closelysuperviseunitsoperatingin publicareasand/oraroundchildren.
- Donotplaceanyobjectsinsidetheairintakeorexhaustpanels.
- Donotattachanyaccessoryobjectstothisequipment.

natural_image
Exterior view of a modern electric heating appliance with a circular top and control panel (no visible text or symbols)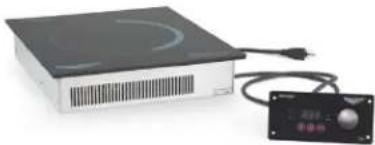
natural_image
Exterior view of a black electronic device with a power cord and control panel (no visible text or symbols)| ItemNo. | Description | Plug |
| 59500 | Mirage® CountertopInductionRange,US | NEMA5-15P |
| 59510 | Mirage® CountertopInductionRange, US,Canada | |
| 59650 | Mirage® CountertopInductionRange | Schuko |
| 59651UK | ||
| 59652China | ||
| 59655AU | ||
| 59501 | Mirage® Drop-inInductionRange | NEMA5-15P |
| 59601Schuko | ||
| 59602UK | ||
| 59603China | ||
| 59605AU |
FUNCTIONANDPURPOSE
This equipment is intended for use in commercial food service operations only. It is not intended for household, industrial or laboratory use. It is intended to be used within induction-ready cookware.
COOKWAREREQUIREMENTS
Compatible
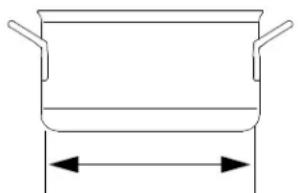
natural_image
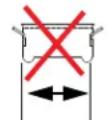
Simple line drawing of a cooking pot with two handles and a central height dimension (no text or symbols)- Drop-inRanges: Flatbase 4¾"to12"(12.1to30.5cm)in diameter
- CountertopRanges: Flatbase 4 34 "to 10 14 " (12.1 to 26.0 cm) indiameter
•Ferrousstainlesssteel, iron, castiron
Incompatible
lessthan4 ^3/4
- Baseisnotflat
- Baseislessthan4 ^3/4 " (12.1cm) indiameter
•Pottery, glass, aluminum, bronzeorcoppercookware
•Metaldiskonbottomofpan
Note: Cookwarewithininferiorconstructionormaterialmaynotperform well. Cookwarewithalargerbasediametercanbeused, howeveronly theareaofthecookwareabovetheinductioncoilwillheat. Themore cookwareextendspastthecoil, themoretheoverallperformancewill bereduced.
NOTICE: Equipment Damage Hazard
Notintendedforusewithaluminumpanswithametaldisk onthebottom.Underhighheat,themetaldiskwillseparate fromthepan.Thesepansmaydamageyourunitandvoid yourwarranty.
FCCSTATEMENT
This equipment has been tested and found to comply with Part 18 of FCC Rules. These limits are designed to provide reasonable protection against harmful interference in a residential installation. This equipment generates, uses and can radiater radiofrequency energy and, if not installed and used in accordance with the instructions, may cause harmful interference or radiocommunications. However, there is no guarantee that interference will not occur in particular installation. If this equipment does cause harmful interference or radioortelevision reception, which can be determined by turning the equipment off and on, the user is encouraged to try to correct the interference by one or more of the following measures:
•Reorientorrelocatethereceivingantenna
- Increase these separation between the equipment and receiver
- Connecttheequipmentintoanoutletonacircuitdifferentfromthat towhichthereceiverisconnected
- Consultthedealeroranexperiencedradio/TVtechnicianforhelp Toassurecontinuedcompliance,anychangesormodificationsnot expresslyapprovedbythepartyResponsibleforcompliancecouldvoid theuser'sauthoritytooperatethisequipment.
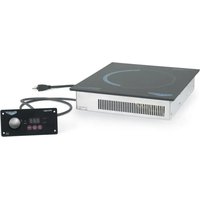
COUNTERTOPRANGEINSTALLATION
ClearanceandEnvironmentRequirements
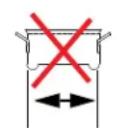
NOTICE: This unit is not designed to be enclosed or built into any area. Sufficient airflow must be allowed around the unit. Blocking the airflow could cause the unit to overheat.
•Rearoftherangetoanysurroundingsurface:4"(10cm)
- Bottomoftherangetoanysurroundingsurface: 12 " ( 2 c m )
- Indooruseonly.
- Donotplacetheequipmentonornearheat-producingequipment.
Installation
- Placetheinductionrange/warmeronaflatstablesurface.
- Plug the power cord into a grounded electrical outlet that match the voltage on the rating label.
NOTICE: This equipment requiresadedicated circuit.
NOTICE: Usingavoltageotherthanthenameplateratedvoltage willcausedamagetotheunit.Incorrectvoltage, modificationtothepowercordorelectricalcomponents candamageunitandwillvoidthewarranty.
DROP-INRANGEINSTALLATION

natural_image
Pure diagram of a rectangular electronic component with internal circuit-like structure and two side connectors (no text or symbols)Beforeyoubegin
- Downloadthespecificationsheetforyourdrop-infrom Vollrath.com.Youwillneedtorefertothisdocumentfor dimensions,clearance,ventingandpowerrequirements.
- Verify the properelectrical outlet is available at the installations site.
NOTICE: This equipment requiresadedicated circuit.
NOTICE: Do NOT modify the chordor plug on the drop-in. Modifying any component may damage the drop-in or cause injury, and will void the warranty. Seethespecificationsheet on Vollrath.com forelectrical specifications.
3.Knowthecountertopmanufacturer'srequirementsforpreparingand installingequipmentintothecountertopprioritostartinginstallation.
PreparetheCountertopandCabinet
NOTICE: Refertothedrop-inspecificationsheetforcutout dimensions, airflow and venting requirements, minimum clearance distances and environment requirements.
NOTICE: Countertopmaterials requires specific preparation. Referto the countertop manufacturer for instructions regarding proper installation of equipment into thematerial.
NOTICE: Exposedwoodorparticleboardedgesmustbesealedwith anappropriatewaterproofingmaterial.Sealtheedge betweentheglassandthecountertopwithsiliconeor similarmaterial.Failuretodosomayresultindamageto thecountertop.
- Cutrequiredopeningsinthecountertopandcabinet.
- Cleandebrisfromthecutoutarea(s).
- Reinforcethecountertopsupportasneededperthecountertop manufacturerguidelinesandtheweightoftheequipment.
MounttheDrop-in
- Choose a flat, level countertop for themountings surface.
- Measure the area for the cutout, including the countersink area. The unit is designed to be countersunk. The depth of the surface around the cutout must be reduced to allow for the countersink. Seethe specifications sheet.
MounttheControlBox
- Measure the area for the control box cut out.
- Apply sealant to the space between the control box and the mountingsurface to prevent moisture penetration.
- Secure the control box to them mountings surface.
- Plug the USB cable from the control box into the bottom of the range.
FEATURESANDCONTROLS
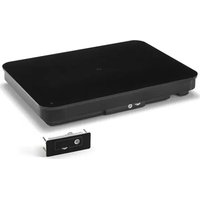
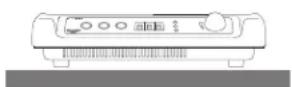
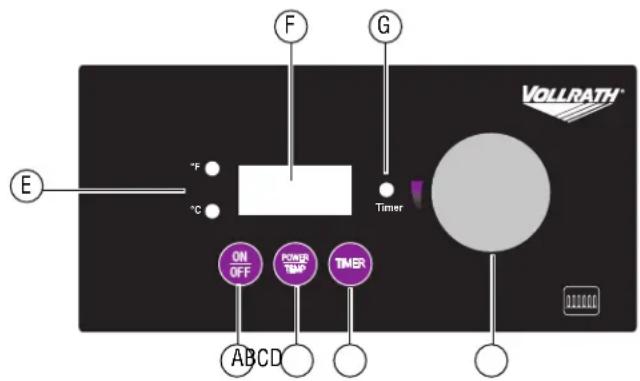
Drop-inRangeControlPanel
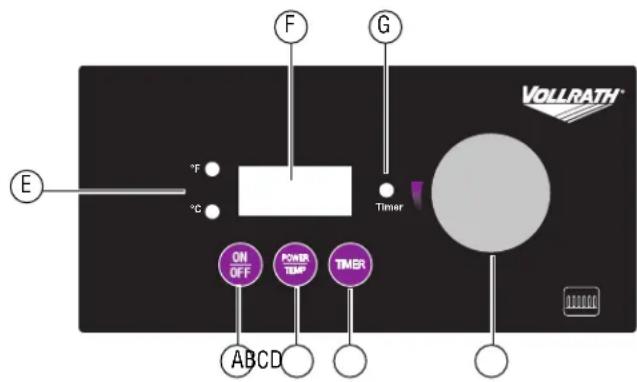
CountertopRangeControlPanel
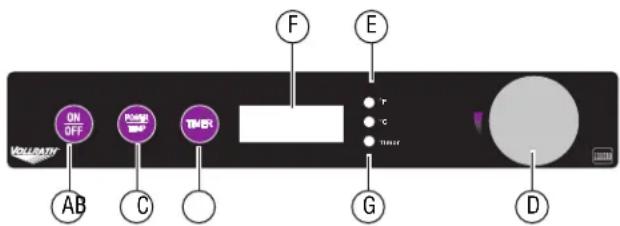
AOn/Offbutton.
BPower/Tempbutton. Presstotogglebetweenpowerlevel(1-100) andtemperaturecontrol, and Fahrenheit and Celsius.
CTimerbutton.Startsthetimer.
DControlknob. Selectsthetemperature, powerlevelortime, dependingonthemode.
E°Fand°CLEDs. Illuminatetoindicate which temperature is displaying.
FDisplaypanel.Displaysthepowerlevel,temperature,timertime oranerrorcode.
GTimerLED. Illuminateswhentimerfunctionisoperating.
OPERATION


WARNING
ElectricalShockHazard
Keepwaterandotherliquidsfromenteringtheinsideofthe equipment. Liquidinsidetheequipmentcouldcausean electricalshock.


CAUTION
BurnHazard
Donottouchhotfood, liquidorheatingsurfaceswhile equipmentisheatingoroperating.
NOTICE: Donotpreheatemptycookware. Because of the speed and efficiency of the induction range, cookware can very quickly overheat and bedamaged.
NOTICE: Donotdropcookingutensilsorotherobjectsontothe cookingsurface. Thestrong, non-porous surface will break. Thewarranty does not cover this type of a base.
NOTICE: Donotleaveanemptypanonoperatingunit.
NOTICE: Donotheatsealed cansor containers astheymay explode.
TurnonthelnductionRange
Pressandrelease.

AdjustthePowerLevelorTemperature Increaseordecrease
Rotatethecontrolknob.
- Clockwiseincreasesthenumbers.
- Counterclockwisedecreasesthenumbers.
Switchbetweenpowerandtemperaturemodes
Pressandrelease.

SwitchbetweenFahrenheitandCelsius
Pressandrelease.tv

CookFood
Thedisplayshouldremainconstantduringoperation.Ifthedisplayis flashing,seetheTroubleshootingsectioninthismanual.
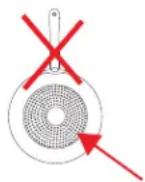
Removingcookwarefromthecookingsurfaceformorethanten minuteswillcausetheunittoautomaticallyturnoff. Removing cookwareforlessthantenminuteswillnotinterruptoperation.
UsetheTimer
- Pressandrelease. Thetimer LED will flash.
- Rotatethecontrolknobtosethetimeinfullminutes(1-180).
- Whenthetimercycleiscomplete,therangeturnoff.
- Tocancelthetimer, press. The angewillreturntopoweror temperaturemode.
CLEANING
Tomaintaintheappearanceandincreasetheservicelife,cleanyour inductionrangedaily.


WARNING
ElectricalShockHazard
Donotspraywaterorcleaningproducts.Liquidcouldcontact theelectricalcomponentsandcauseashortcircuitoran electricalshock.


CAUTION
BurnHazard
Allowequipmenttocoolbeforemovingorcleaning.
NOTICE: The cookingsurfaceremainshotevenwhenthisequipment isturnedoff.
NOTICE: Donotuse abrasivematerials, scratching cleanser scouring padstoclean the equipment. These can damage the finish.
- Pressandrelease.

-
Unplugthecordfromthewalloutlet.
-
Allow the equipment to cool.
-
Wipethe exterior with acle and amp cloth.
5.Thoroughlywipeoffanymildsoaporchemicalcleaners.
NOTICE: Residue could corrode the surface of the unit.
TROUBLESHOOTING
| ProblemMightbeCausedByCourseofAction | ||
| Theunitturnedoffafter10minute(s). | Thereisnotapot/panontheinductionrange orthepot/panisnotinduction-readycook-ware.Theinductionrangeturnedoff.Thisis normal. | Makesurethepot/panisinductionready.SeetheFunctionand Purposesectionofthismanual. |
| Theunitison,butnotheating. | Thecookwaremaybetoosmallormaynot beinduction-ready. | Makesurethepot/panisinductionready.SeetheFunctionand Purposesectionofthismanual. |
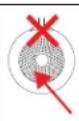
| ThedigitaldisplayisflashingF2. | Theoverheat-protectionfeaturemayhave activated. | Removecookware.Letcookingsurfacecool. |
| Theunitsuddenlystoppedworking. | Theunitmaybetooclosetoanexternalheat sourceortheairintakemayberestricted. | Relocatetheunitawayfromanyexternalheatsource.Clearany obstructionstotheairintake. |
SERVICEANDREPAIR
ServiceablepartsareavailableonVollrath.com.
To avoid serious injury or damage, never attempt to repair the unit or replace a damaged power cord yourself. Do not send units directly to TheVollrathCompanyLLC.PleasecontactVollrathTechnicalServicesforinstructions.
When contacting Vollrath Technical Services, please be ready with the item number, model number (if applicable), serial number, and proof of purchaseshowingthedatetheunitwaspurchased.
WARRANTYSTATEMENTFORTHEVOLLRATHCO.L.L.C.
This warranty does not apply to products purchased for personal, family or household use, and The Vollrath Company LLC does not offer a written warranty top purchasersforsuchuses.
The Vollrath Company LLC warrants the products it manufactures or distributes against defects in materials and workmanship as specifically described in our full warranty statement. In all cases, the warranty runs from the date of the end user's original purchase date found on the receipt. Any damages from improper use, abuse, modification or damage resulting from improper packaging during return shipment for warranty repair will not be recovered under warranty.
Forcompletewarrantyinformation,productregistrationandnewproductannouncement,visitwww.vollrath.com.
The VollrathCompany, L.L.C. Headquarters
1236North18thStreet
Sheboygan, Wisconsin
53081-3201USA
MainTel:800-624-2051or920-457-4851
MainFax:800-752-5620or920-459-6573
CanadaCustomerService:800-695-8560
TechServices:techservicereps@vollrathco.com
www.vollrath.com
Pujadas
Ctra.deCastanyet.
132P.O.Box121
17430SantaColomadeFarners
(Girona)-Spain
Tel.+34972843201
info@pujadas.es
VollrathofChina
VollrathShanghaiTrading
Limited
23A, TimeSquarePlaza|500
ZhangYangRoad
Pudong, Shanghai200122
Tel:86-21-50589580
natural_image
Simple line drawing of a cooking pot with two handles and a central height dimension (no text or symbols)natural_image
Pure diagram of a mechanical or electronic component with no visible text, numbers, or symbolsAvantdecommencer
FONCTIONSETCOMMANDES
Panneaudecommandedelaplaqueencastrable
ABoutonOn/Off.
The VollrathCompany, L.L.C. Headquarters
1236North18thStreet
Sheboygan, Wisconsin
53081-3201USA
MainTel:800-624-2051or920-457-4851
MainFax:800-752-5620or920-459-6573
Main: ax.600-752-362681926-459-6575 CanadaCustomerService:800-695-8560
CanadaCustomerService.800-695-8300 TechServices:techservicareng@vollrath
TechServices.techservicereps@volrathco.com
www.vollrath.com
Puiadas
Ctra.deCastanyet.
132P.O.Box121
17430SantaColomadeFarners
(Girona)-Spain
Tel.+34972843201
info@pujadas.es
VollrathofChina
VollrathShanghaiTrading
Limited
23A.TimeSquarePlaza|500
ZhangYangRoad
Pudong.Shanghai200122
Tel:86-21-50589580
natural_image
Exterior view of a standard electrical appliance with a curved top and control panel (no visible text or symbols)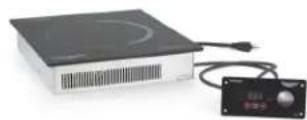
natural_image
Simple line drawing of a cooking pot with two handles and a central height dimension (no text or symbols)- Emoptrada: Baseplanade 12, 1a 30,5cm (4¾"to12") dediámetro
•Mostrador:Baseplanade12.1a 26.0cm(4 ^3/4 "to10 ^1/4 ")dediámetro - Aceroinoxidableferroso, hierro hierrofundido
Incompatible
menosde4 ^3/4 (12,1cm)
natural_image
Pure diagram of a rectangular electronic component with two side tabs and three wires, no text or symbols present.ABotóndeencendido/apagado(On/Off).
BBotóndepotencia/temperatura(Power/Temp).Púlselopara alternarentreelcontroldepotencia(1-100)ytemperatura,yentre Fahrenheitcentigrados.
The VollrathCompany, L.L.C. Headquarters
1236North18thStreet
Sheboygan, Wisconsin
53081-3201USA
MainTel:800-624-2051or920-457-4851
MainFax:800-752-5620or920-459-6573
CanadaCustomerService:800-695-8560
CanadaCustomerService.000 000 000 TechServices:techservicarens@vollrathc
TechServices.techservicereps@volmatnco.com
www.vollrath.com
Pujadas
Ctra.deCastanyet.
132P.O.Box121
17430SantaColomadeFarners
(Girona)-Spain
Tel.+34972843201
info@pujadas.es
VollrathofChina
VollrathShanghaiTrading
Limited
23A.TimeSquarePlaza|500
ZhangYangRoad
Pudong.Shanghai200122
Tel:86-21-50589580