
B156E0028KK - Video adapter Tripp Lite - Free user manual and instructions
Find the device manual for free B156E0028KK Tripp Lite in PDF.

User questions about B156E0028KK Tripp Lite
0 question about this device. Answer the ones you know or ask your own.
Ask a new question about this device
Download the instructions for your Video adapter in PDF format for free! Find your manual B156E0028KK - Tripp Lite and take your electronic device back in hand. On this page are published all the documents necessary for the use of your device. B156E0028KK by Tripp Lite.
USER MANUAL B156E0028KK Tripp Lite
DisplayPort v1.4 Multi-Stream Transport Hubs over Cat6 Extender Kits
Models:
(DisplayPort Out)
B156E-002-8K-K,
B156E-003-8K-K
(HDMI Out)
B156E-002-H8K-K,
B156E-003-H8K-K
Español 18
Français 34
Deutsch 50
Italiano 67

Powering Business Worldwide
Product Features
- Connect multiple monitors via the DisplayPort output on your computer to display the same image on each monitor, extend the desktop across monitors, or combine as one enlarged monitor in video wall mode.
- Extends up to 230 ft. (70 m) from the source to remote receiver via Cat6 UTP cable with zero latency.
- DisplayPort v1.4 and Multi-Stream Transfer (MST) compliant.
- DisplayPort and HDMI output models support UHD 4K resolutions up to 3840 x 2160 (60 Hz). See System Requirements for more information.
• Supports HDMI 2.0, HDCP 1.4 & 2.3, HDR, EDID and DDC.
• Supports DTS-HD, Dolby True HD and 7.1-channel surround sound audio. - Pigtail receiver features built-in equalization (EQ) control and auto EDID image adjustment.
- Power over Cable (PoC) technology means no external power is required for the receiver.
- 5V power adapter with screw-type connector allows attachment to MST hub.
- Rugged metal enclosure includes patented detachable surface-mounting brackets.
System Requirements
- A computer with a DisplayPort v1.4 compatible graphics card (e.g., AMD Radeon with AMD Eyefinity Technology). Backward compatible with most DisplayPort 1.1a equipment running current graphics drivers. The feature set is limited to that of the attached equipment (e.g., you may be limited to displaying in Clone/Mirror mode only). Compatibility with older graphics cards is not guaranteed.
- macOS X does not support MST for NVIDIA and Intel Graphics Processor Units, limiting video display on the connected monitors to mirror mode.
- DisplayPort 1.4 bandwidth is 32.4 Gbps. Higher-resolution monitors take up more bandwidth.
- Although DisplayPort and HDMI monitors support video resolutions up to 3840 x 2160 on individual monitors, the number of 4K monitors connected at the same time is limited. For example, when connecting 4 monitors simultaneously, you will be limited to connecting 1080p monitors. Higher resolutions are possible when displaying in video wall mode (e.g., 3840 x 6480 in a 1x3 video wall, 11520 x 2160 in a 3x1 video wall, etc.)
System Requirements
• Maximum Resolution: The following chart explains the maximum resolution of both models. Source equipment (PC) requires a DisplayPort 1.4 compatible video card.
| Mode (output for Display-Port or HDMI) | Display 1 Display 2 | |||
| Video Wall Mode | 1x2 | 3840 x 4320@ 60 Hz | ||
| 2x1 | 7680 x 2160@ 60 Hz | |||
| Extended Desktop Mode | 3840 x 2160 @ 60 Hz | 3840x2160 @ 60 Hz | ||
| Mirror Mode 38 | 40 x 2160 @ 60 Hz | 3840x2160 @ 60 Hz | ||
| Mode (output for Display-Port or HDMI) | Display 1 Display 2 Display 3 | |||
| Video Wall Mode | 1x3 | 3840 x 6480@ 60 Hz | ||
| 3x1 | 11520 x 2160@ 60 Hz | |||
| Extended Desktop Mode | 3840 x 2160 @ 60 Hz | 3840x2160 @ 60 Hz | 3840x2160 @ 60 Hz | |
| Mirror Mode 38 | 40x2160 @ 60 Hz | 3840x2160 @ 60 Hz | 3840x2160 @ 60 Hz | |
| Notes:When in Mirror Mode, the same content may only display on 2 screens.Under the circumstance of removing the graphics card driver software, it is possible to achieve the requirement of mirroring 3 screens. | ||||
- When utilizing an 8K source with 8K display(s) connected to the output ports, there may be bandwidth issues that limit the capability of individual output ports.
Package Contents
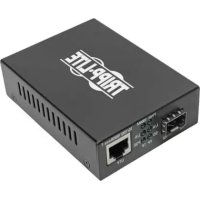
• DisplayPort MST Transmitter Hub
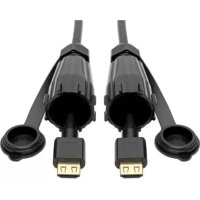
• DisplayPort or HDMI Pigtail Receiver
- External Power Supply (Input: 100–240V, 50/60 Hz, 0.6A; Output: 24V 1A)
- Quick Start Guide
Optional Accessories
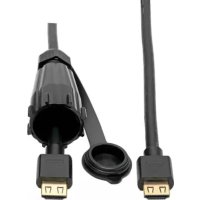
• P568-0XX-8K6 8K @ 60 Hz HDMI Cables
• P569-XXX-CERT or P568-XXX-2A Series HDMI 2.0 Cables
• P580-Series DisplayPort 1.4 Cables
• N202-Series Cat6 24 AWG Solid-Wire Cables
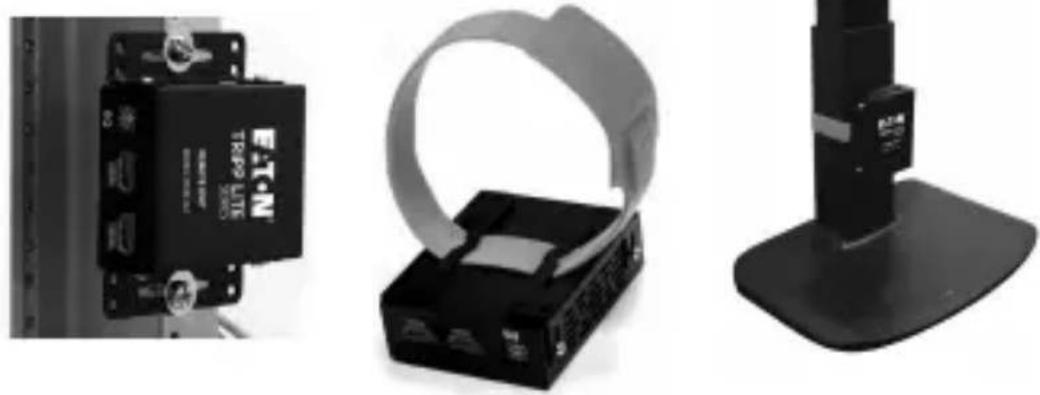
Mounting Instructions
The following images illustrate how the included mounting brackets can be attached for different installations.
Notes:
- The models shown below are for illustrative purposes only. Your product may vary by model number, size or port orientation.
- Only the DisplayPort MST Hub can be mounted. The receiver is a pigtail-type unit that connects directly to the display.
Wall-mount
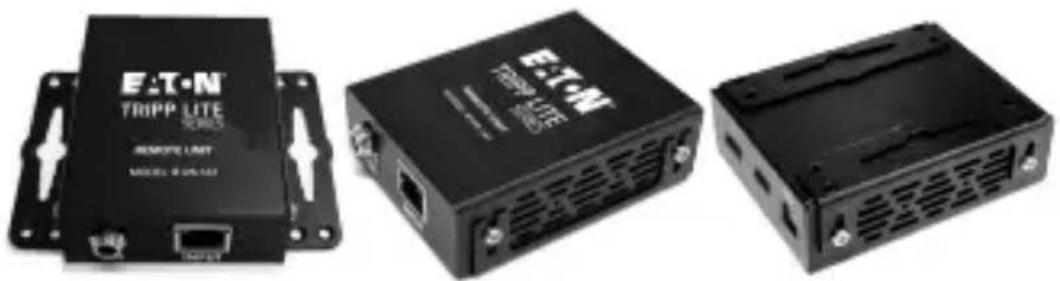
natural_image
Three black electronic devices with visible ports and ventilation slots, no text or symbols on the devices themselves.19" Rack-mount
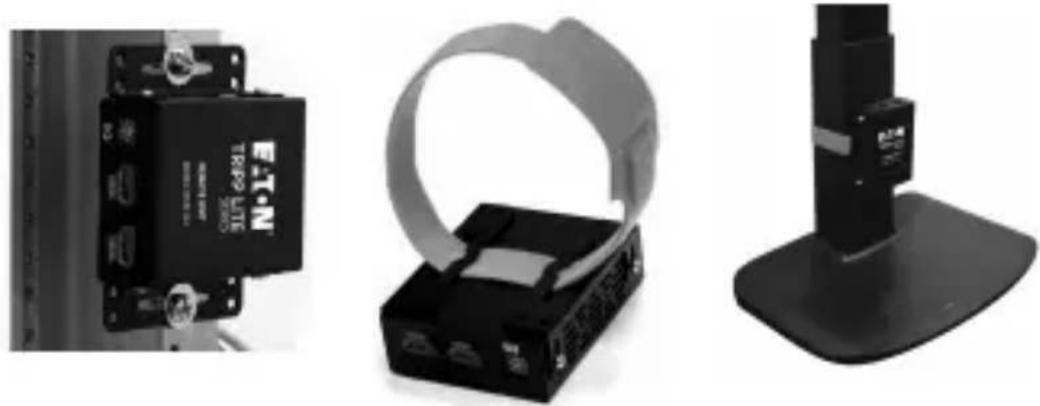
natural_image
Three black electronic devices: a battery pack, a USB cable strap, and a stand (no visible text or symbols)Before Installation
Before installation, please check the following settings of your source(s) and display(s):
- Set display to 60 Hz. Double-check factory settings, as default can be set to a lower frequency (Hz) than advertised.
- Ensure the input setting of your monitor is set at HDMI 2.0. Some displays may have default setting at HDMI 1.4.
- Verify your monitor has the HDR feature enabled. Some displays may have this feature disabled as a factory setting.
- Check if the Ultra HD (UHD) Deep Color setting is enabled on your display. Confirm with your display's manufacturer which HDMI ports support UHD Deep Color. Note: To connect a local monitor to your installation, the UHD Deep Color setting may need to be disabled on your local display to achieve 4K @ 60 Hz resolution.
Installation
Notes:
- Test to ensure the entire installation works properly before pulling cables through ceilings/walls.
- To achieve maximum distance and performance, use 24 AWG solid-wire Cat6 cable. Using stranded-wire Cat6 cable or cable with a gauge (AWG) size higher than 24 AWG will result in shorter extension distance. Higher-gauge cabling, such as 26 AWG, has a more limited transmission capability than lower-gauge cabling. N202-Series Cat6 cables are made with 24 AWG solid-wire cabling.
- External power is not required for pigtail receivers due to Power over Cable (PoC) technology incorporated in the transmitters.
- Before installation, ensure your graphics driver is up-to-date by installing the latest driver available. The MST hub is backward compatible with most DisplayPort 1.1a equipment running current graphics drivers. Feature set is limited to the attached equipment's capabilities (e.g., you may be limited to displaying in Clone/Mirror mode only). Compatibility with older graphics cards is not guaranteed.
Installation
- Make sure all equipment in the installation is powered OFF.
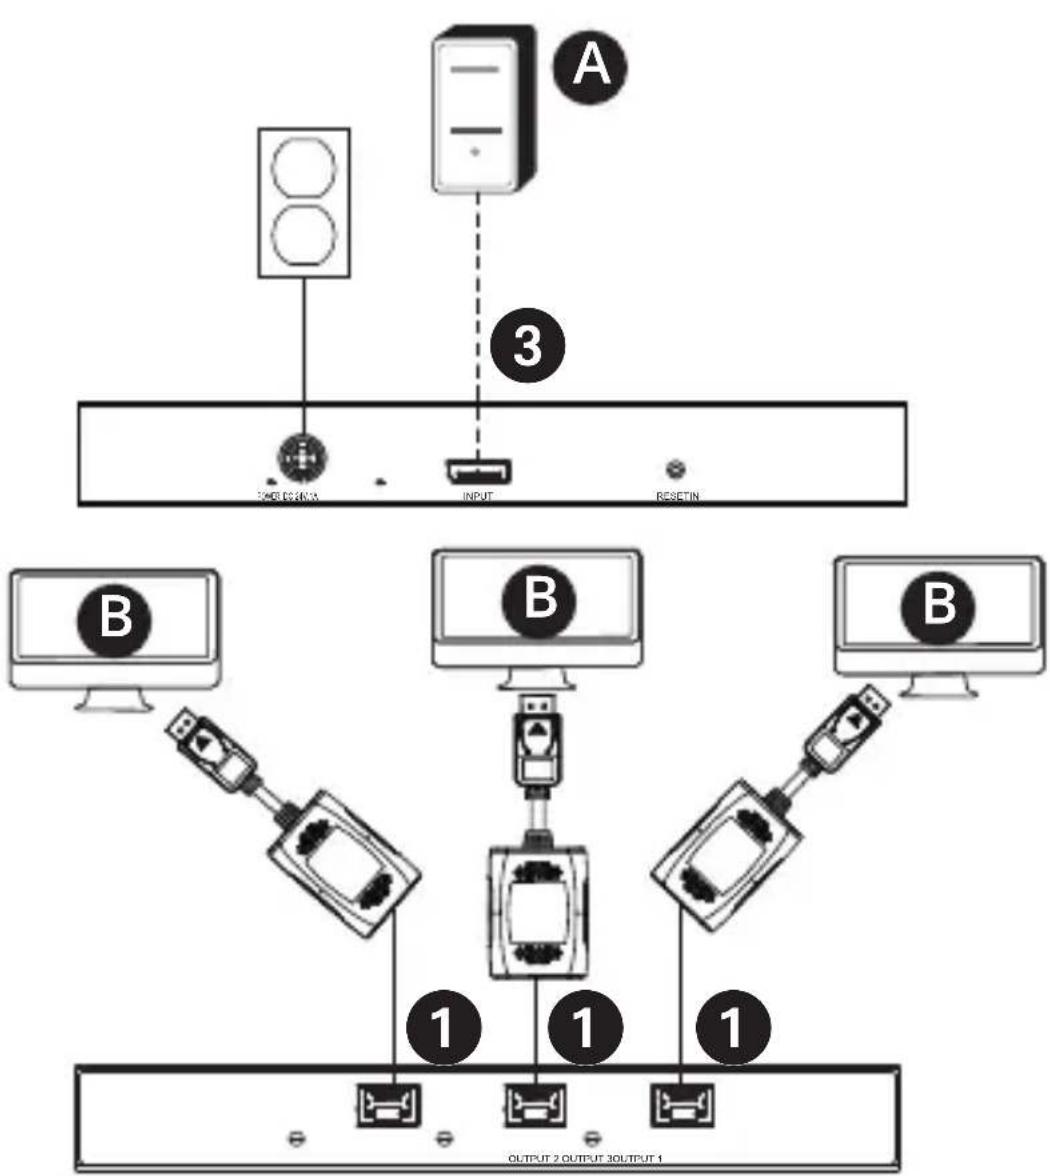
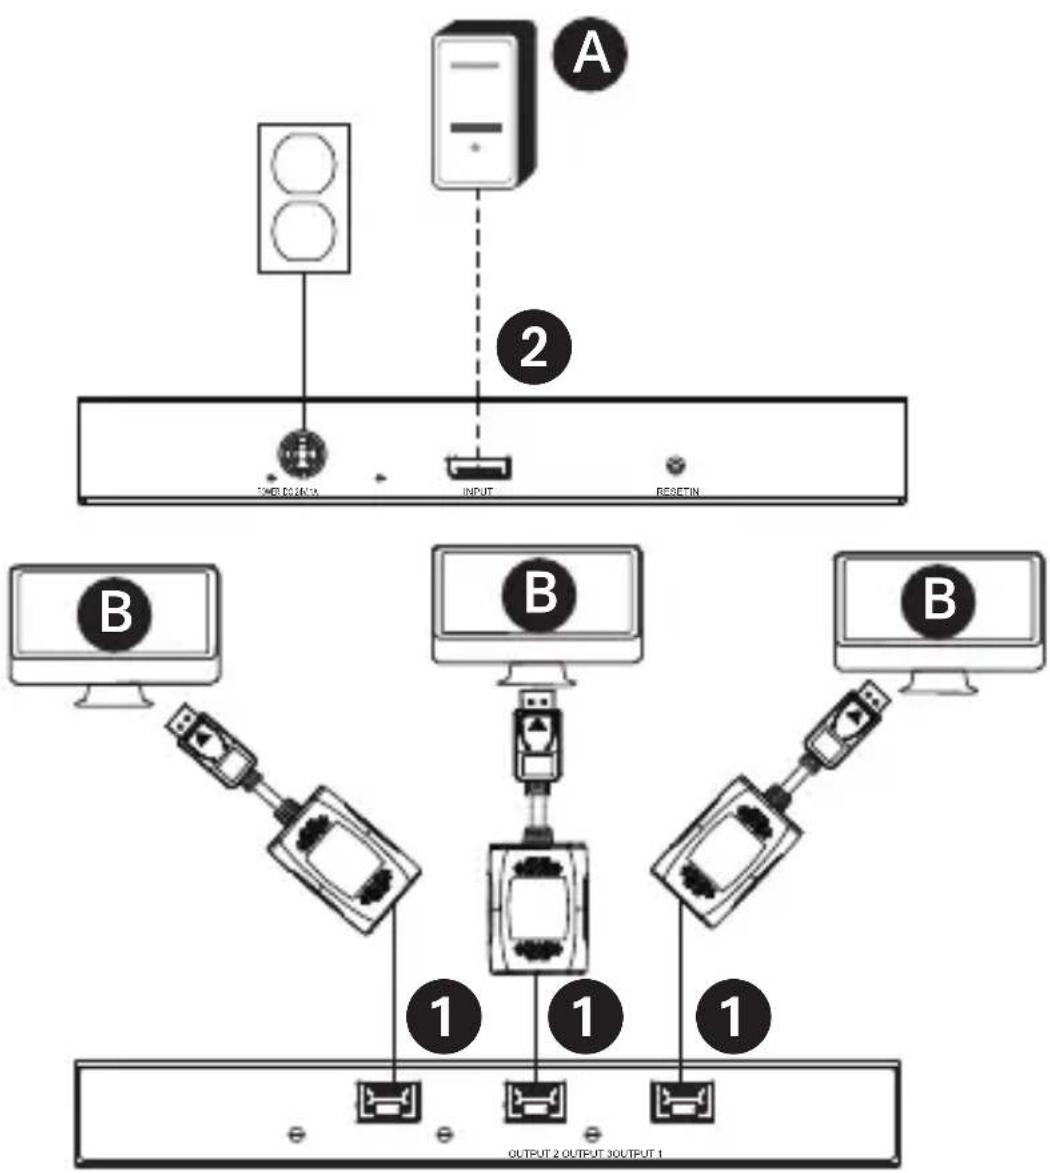
- Using a DisplayPort 1.4 cable, connect the DisplayPort source with the DisplayPort input on the MST transmitter OR using an HDMI cable, connect the HDMI source with the HDMI input on the MST transmitter.
- Using Cat6 cable, connect the RJ45 port on the MST transmitter to the RJ45 port on the pigtail receiver.
- Repeat Step 3 for each additional display you are connecting.
- Connect the pigtail receiver to the display.
- Turn on the power to your connected displays.
- Connect the external power supply to the MST transmitter. Plug it into an available wall outlet or a surge protector, power distribution unit (PDU) or uninterruptible power supply (UPS). The POWER (green) LED on the MST transmitter will illuminate to indicate the unit is receiving power from the external power supply. The POWER (green) LED on the pigtail receiver will illuminate to indicate the unit is receiving power from the local transmitter unit through PoC technology.
- Turn on the power to the DisplayPort source.
- The orange RJ45 LED will illuminate on both the MST transmitter and pigtail receiver to indicate a signal is being received from the source to the display. The screen should now appear on the connected display(s).
- Use your video card's display settings screen to adjust how video is displayed on the connected displays.
Installation Diagrams
B156E-003-8K-K
flowchart
graph TD
    A["Port A"] -->|3| B["LED Interface"]
    A -->|3| C["INPUT"]
    A -->|3| D["RESETIN"]
    B --> E["Computer 1"]
    C --> F["Computer 2"]
    D --> G["Computer 3"]
    E --> H["Device 1"]
    F --> I["Device 2"]
    G --> J["Device 3"]
    H --> K["Output 1"]
    I --> L["Output 2"]
    J --> M["Output 3"]
Note: B156E-002-8K-K is the same as B156E-003-8K-K except it has only two outputs.
Installation Diagrams
B156E-003-H8K-K
flowchart
graph TD
    A["Device A"] -->|2| B["LED Device"]
    A -->|2| C["Input"]
    A -->|2| D["RESET"]
    E["Device B"] --> F["Switch"]
    G["Device B"] --> H["Switch"]
    I["Device B"] --> J["Switch"]
    K["Device B"] --> L["Switch"]
    M["Device B"] --> N["Switch"]
    O["Device B"] --> P["Switch"]
    Q["Device B"] --> R["Switch"]
    S["Device B"] --> T["Switch"]
    U["Device B"] --> V["Switch"]
    W["Device B"] --> X["Switch"]
    Y["Device B"] --> Z["Switch"]
    AA["Device B"] --> AB["Switch"]
    AC["Device B"] --> AD["Switch"]
    AE["Device B"] --> AF["Switch"]
    AG["Device B"] --> AH["Switch"]
    AI["Device B"] --> AJ["Switch"]
    AK["Device B"] --> AL["Switch"]
    AM["Device B"] --> AN["Switch"]
    AO["Device B"] --> AP["Switch"]
    AQ["Device B"] --> AR["Switch"]
    AS["Device B"] --> AT["Switch"]
    AU["Device B"] --> AV["Switch"]
    AW["Device B"] --> AX["Switch"]
    AY["LED Device"] --> AZ["Input"]
    BA["Input"] --> BB["RESET"]
Note: B156E-002-H8K-K is the same as B156E-003-H8K-K except it has only two outputs.
Installation Diagrams
Cable connections
1 Up to 230 ft. (70 m) Cat6 solid cable at 4K / 60 Hz
2 Up to 15 ft. (4.5 m) HDMI 2.0 cable at 4K / 60 Hz
3 Up to 15 ft. (4.5 m) DisplayPort cable at 4K / 60 Hz
Connected components
A DisplayPort or HDMI Source
B 4K Display
Troubleshooting
If you are unable to get an acceptable image after following the installation instructions, try the troubleshooting tips below.
-
Is your equipment running the latest graphics
driver? If not, download the latest graphics drivers for your equipment. The MST hub is backward compatible with most DisplayPort 1.1a equipment running current graphics drivers. The feature set is limited to the attached equipment's capabilities (e.g., you may be limited to displaying in Clone/Mirror mode only). Compatibility with older graphics cards is not guaranteed. -
Press the hub's reset button to reset the signal being sent to the connected displays.
Troubleshooting
- Is the included external power supply connected and plugged into a working power source? For the product to function properly, it must be connected to and receiving power from the included external power supply.
- Was the power to the DisplayPort source and connected monitors turned off prior to installation? If not, restart your computer.
- What resolution are you trying to attain on each monitor? DisplayPort 1.4 has a bandwidth of 32.4 Gbps with higher-resolution monitors taking up more bandwidth. Although DisplayPort and HDMI monitors support video resolutions up to 3840 x 2160 on individual monitors, the number of 4K monitors connected at the same time is limited. For example, when connecting 4 monitors simultaneously, you will be limited to connecting 1080p monitors. Higher resolutions are possible when displaying in video wall mode (e.g., 3840 x 6480 in a 1x3 video wall, 11520 x 2160 in a 3x1 video wall, etc.)
- What cable lengths are you using? The maximum cable length between the hub and the connected monitors should not exceed 15 ft. (4.6 m).
- What type of cabling are you using? Inferior cabling can result in poor performance. It is important to use cables that support the video resolution you are trying to attain. It is recommended you use the cables listed in the Optional Accessories section, as they have been tested to work with these MST Hubs.
- Test your cables to ensure they are working properly. For example, connect your DisplayPort or HDMI cables between a source and display setup you know works to determine if the cable is functioning properly.
Specifications
| Maximum Distance to Display | 230 ft. (70 m) |
| Maximum Supported Color Depth | 12-bit Deep Color |
| HDR Support Yes | |
| HDMI Specification 2.0 | |
| DisplayPort Specification 1.4 | |
| Chroma Subsampling RGB, YCC444, YCC422, YCC420 | |
| HDCP 1.4 and 2.3 | |
| 3D Video Support Yes | |
| Audio 2-channel LPCM, AC3, DTS, Bit depth up to 24 bits, Sample rate up to 192 KHz | |
| Chipset Yes | |
| IR or RS-232 Extension Support | No |
| Consumer Electronic Control (CEC) Support | No |
| Drivers Required None | |
| Operating Temperature Range | 32° to 104°F / 0° to 40°C |
| Storage Temperature Range 5° | to 122°F / -15° to 50°C |
| Relative Humidity 0% to 85% | Non-Condensing |
| Construction Material ABS Plastic | |
| Connector/Contact Plating Nickel/Gold |
Warranty
1-YEAR LIMITED WARRANTY
We warrant our products to be free from defects in materials and workmanship for a period of one (1) year from the date of initial purchase. Our obligation under this warranty is limited to repairing or replacing (at its sole option) any such defective products. Visit Tripplite.Eaton.com/support/product-returns before sending any equipment back for repair. This warranty does not apply to equipment which has been damaged by accident, negligence or misapplication or has been altered or modified in any way.
EXCEPT AS PROVIDED HEREIN, WE MAKE NO WARRANTIES, EXPRESS OR IMPLIED, INCLUDING WARRANTIES OF MERCHANTABILITY AND FITNESS FOR A PARTICULAR PURPOSE. Some states do not permit limitation or exclusion of implied warranties; therefore, the aforesaid limitation(s) or exclusion(s) may not apply to the purchaser.
EXCEPT AS PROVIDED ABOVE, IN NO EVENT WILL WE BE LIABLE FOR DIRECT, INDIRECT, SPECIAL, INCIDENTAL OR CONSEQUENTIAL DAMAGES ARISING OUT OF THE USE OF THIS PRODUCT, EVEN IF ADVISED OF THE POSSIBILITY OF SUCH DAMAGE. Specifically, we are not liable for any costs, such as lost profits or revenue, loss of equipment, loss of use of equipment, loss of software, loss of data, costs of substitutes, claims by third parties, or otherwise.
Warranty
FCC Notice, Class B
This device complies with part 15 of the FCC Rules. Operation is subject to the following two conditions: (1) This device may not cause harmful interference, and (2) this device must accept any interference received, including interference that may cause undesired operation.
Note: This equipment has been tested and found to comply with the limits for a Class B digital device, pursuant to part 15 of the FCC Rules. These limits are designed to provide reasonable protection against harmful interference in a residential installation. This equipment generates, uses and can radiate radio frequency energy and, if not installed and used in accordance with the instructions, may cause harmful interference to radio communications. However, there is no guarantee that interference will not occur in a particular installation. If this equipment does cause harmful interference to radio or television reception, which can be determined by turning the equipment off and on, the user is encouraged to try to correct the interference by one or more of the following measures:
- Reorient or relocate the receiving antenna.
- Increase the separation between the equipment and receiver.
- Connect the equipment into an outlet on a circuit different from that to which the receiver is connected.
- Consult the dealer or an experienced radio/TV technician for help.
Any changes or modifications to this equipment not expressly approved by Eaton could void the user's authority to operate this equipment.
Eaton has a policy of continuous improvement. Specifications are subject to change without notice.

Powering Business Worldwide
Eaton
1000 Eaton Boulevard
Cleveland, OH 44122
United States
Eaton.com
© 2024 Eaton
All Rights Reserved
Publication No.
24-06-150 /
93-4938_RevA
May 2024

934938
Eaton is a registered trademark.
All trademarks are property of their
respective owners.
Hubs DisplayPort v1.4 Multi-Stream Transport sobre kits extensores Cat6
Modelos: (Salida
DisplayPort)
B156E-002-8K-K,
B156E-003-8K-K
(Salida HDMI)
B156E-002-H8K-K,
B156E-003-H8K-K
English 1
Français 34
Deutsch 50
Italiano 67

Powering Business Worldwide
natural_image
Three black electronic devices with visible ports and labels, no readable text or symbols on the devices themselves.natural_image
Three black electronic devices: a TRP9 LTE ADC module, a circular device with a strap, and a stand (no visible text or symbols)Powering Business Worldwide
Eaton
1000 Eaton Boulevard
Cleveland, OH 44122
Estados Unidos
Eaton.com
© 2024 Eaton
Todos los derechos
reservados
Publicación n.°
24-06-150 /
93-4938_RevA
Mayo de 2024

934938
Powering Business Worldwide
natural_image
Three black electronic devices with visible ports and ventilation grilles, no text or symbols on the devices themselves.natural_image
Three black electronic devices: a TRP20 LITE device, a USB cable connector, and a stand-mounted device (no visible text or symbols)GARANTIE LIMITÉE D'UN AN
Powering Business Worldwide
Eaton
1000 Eaton Boulevard
Cleveland, OH 44122
États-Unis
Eaton.com
© 2024 Eaton
Powering Business Worldwide
Produktmerkmale
natural_image
Three black electronic devices with visible ports and ventilation grilles, no text or symbols on the devices themselves.19"-Rack-Montage
natural_image
Three black electronic devices: a battery pack, a USB cable strap, and a stand (no visible text or symbols)Powering Business Worldwide
Eaton
1000 Eaton Boulevard
Cleveland, OH 44122
Vereinigte Staaten
Eaton.com
934938
© 2024 Eaton
Alle Rechte
vorbehalten.
Powering Business Worldwide
natural_image
Three black electronic devices with visible ports and labels, no readable text or symbols on the devices themselves.natural_image
Three black electronic devices: a device with a labeled control panel, a circular device with a strap, and a stand (no visible text or symbols)Powering Business Worldwide
Eaton
1000 Eaton Boulevard
Cleveland, OH 44122
Stati Uniti
Eaton.com
© 2024 Eaton

- DisplayPort v1.4 Multi-Stream Transport Hubs over Cat6 Extender Kits
- Product Features
- System Requirements
- Package Contents
- Optional Accessories
- Mounting Instructions
- Notes:
- Before Installation
- Installation
- Installation Diagrams
- Cable connections
- Connected components
- Troubleshooting
- Warranty
- 1-YEAR LIMITED WARRANTY
- FCC Notice, Class B
- Eaton
- Hubs DisplayPort v1.4 Multi-Stream Transport sobre kits extensores Cat6
- GARANTIE LIMITÉE D'UN AN
- Produktmerkmale
Brand : Tripp Lite
Model : B156E0028KK
Category : Video adapter