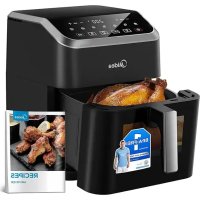
MAD70F9APK - Deep fryer MIDEA - Free user manual and instructions
Find the device manual for free MAD70F9APK MIDEA in PDF.



| Brand | Midea |
| Model | MAD70F9APK |
| Product type | Air fryer |
| Voltage | 220-240 V~ |
| Frequency | 50/60 Hz |
| Power | 1500-1800 W |
| Capacity | Approx. 3.5 L |
| Dimensions (approx.) | 30 x 30 x 30 cm |
| Weight (approx.) | 4 kg |
| Cooking functions | 7 presets: fries, fish, sausage, chicken, vegetables, cake, chicken wings |
| Settings | Adjustable temperature and time |
| Special modes | DIY (custom), keep warm, +1 min |
| Display | Digital LED screen |
| Interior light | Yes, button controlled |
| Standby consumption | 0.8 W |
| Power-off consumption | 0.5 W |
| Cleaning | Basket and pot dishwasher safe; main body wipe with damp cloth |
| Safety | Automatic shutdown in case of overheating, short circuit protection |
| Included accessories | Cooking plate, basket, pot |
| Warranty | 24 months from purchase date |
Frequently Asked Questions - MAD70F9APK MIDEA
User questions about MAD70F9APK MIDEA
0 question about this device. Answer the ones you know or ask your own.
Ask a new question about this device
Download the instructions for your Deep fryer in PDF format for free! Find your manual MAD70F9APK - MIDEA and take your electronic device back in hand. On this page are published all the documents necessary for the use of your device. MAD70F9APK by MIDEA.
USER MANUAL MAD70F9APK MIDEA
DE German
IT Italian
EN English
FR France
SP Spanish
PL Polish
VIELEN DANK
Email: customer_services@midea.com
Midea Electrics Netherlands B.V.
Johan Cruijff Boulevard 65,
1101 DL Amsterdam
LETTERA DI RINGRAZIAMENO
Email: customer_services@midea.com
Midea Electrics Netherlands B.V.
Johan Cruijff Boulevard 65,
1101 DL Amsterdam
THANK YOU LETTER
Thank you for choosing Midea! Before using your new Midea product, please read this manual thoroughly to ensure that you know how to operate the features and functions that your new appliance offers in a safe way.
CONTENTS
THANK YOU LETTER 01
SAFETYINSTRUCTIONS 02
SPECIFICATIONS 05
PRODUCT OVERVIEW 06
OPERATION INSTRUCTIONS 07
CLEANING AND MAINTENANCE 11
TROUBLESHOOTING 12
TRADEMARKS, COPYRIGHTS AND LEGAL STATEMENT 14
DISPOSAL AND RECYCLING 15
DATA PROTECTION NOTICE 16
SAFETY INSTRUCTIONS
Intended Use
The following safety guidelines are intended to prevent unforeseen risks or damage from unsafe or incorrect operation of the appliance. Please check the packaging and appliance on arrival to make sure everything is intact to ensure safe operation. If you find any damage, please contact the retailer or dealer. Please note modifications or alterations to the appliance are not allowed for your safety concern. Unintended use may cause hazards and loss of warranty claims.
Explanation of Symbols
| Danger This symbol indicates that there are dangers to the life and health of persons due to extremely flammable gas. | |
| Warning of electrical voltage This symbol indicates that there is a danger to life and health of persons due to voltage. | |
| Warning The signal word indicates a hazard with a medium level of risk which, if not avoided, may result in death or serious injury. | |
| Caution The signal word indicates a hazard with a low degree of risk which, if not avoided, may result in minor or moderate injury. | |
| Attention The signal word indicates important information (e.g. damage to property), but not danger. | |
| Observe instructions This symbol indicates that a service technician should only operate and maintain this appliance in accordance with the operating instructions. |
Read these operating instructions carefully and attentively before using/commissioning the unit and keep them in the immediate vicinity of the installation site or unit for later use!
SAFETY INSTRUCTIONS
- If the supply cord is damaged, it must be replaced by the manufacturer, its service agent or similarly qualified persons in order to avoid a hazard.
- Do not immerse any part of the appliance in water or other liquid.
- Warning: Avoid spillage on the connector.
- Do not use outdoors.
-
This appliance is intended to be used in household and similar applications such as:
-
Staff kitchen areas in shops, office and other working environments;
- Farm houses;
- By clients in hotels, motels and other residential type environments;
-
In bed and breakfast type environments.
-
This appliance can be used by children aged from 8 years and above and persons with reduced physical, sensory or mental capabilities or lack of experience and knowledge if they have been given supervision or instruction concerning use of the appliance in a safe way and understand the hazards involved.
Children shall not play with the appliance. Cleaning and user maintenance shall not be made by children unless they are older than 8 and supervised. Keep the appliance and its cord out of reach of children aged less than 8 years.
-
Children should be supervised to ensure that they do not play with the appliance. Keep the appliance and its cord out of reach of children.
-
Warning: Misuse may cause potential injury.
- Appliances are not intended to be operated by means of an external timer or separate remote-control system.
- WARNING: If the surface is cracked, switch off the appliance to avoid the possibility of electric shock.
- Always put the ingredients to be fried in the basket, to prevent it from coming into contact with the heating elements.
- Do not cover the air inlet and the air outlet openings while the appliance is operating.
- Do not fill the pan with oil as this may cause a fire hazard.
- Never touch the inside of the appliance while it is operating.
- During hot air frying, hot steam is released through the air outlet openings. Keep your hands and face at a safe distance from the steam and from the air outlet openings. Also be careful of hot steam and air when you remove the pan from the appliance.
- Immediately unplug the appliance if you see dark smoke coming out of the appliance. Wait for the smoke emission to stop before you remove the pan from the appliance.
- Keep the appliance and its cord out of reach of children less than 8 years.
The surface are liable to get hot during use.
SPECIFICATIONS
| MAD70F9APKProduct Model | |
| Voltage | 220-240V~ |
| Frequency | 50/60Hz |
| Power | 1500-1800W |
| Mode | power consumption | Time for the equipment to reach the applicable low power mode or condition |
| Off mode (plug in) | 0.5W | 20min |
| standby mode (after operation) | 0.8W | 20min |
PRODUCT OVERVIEW
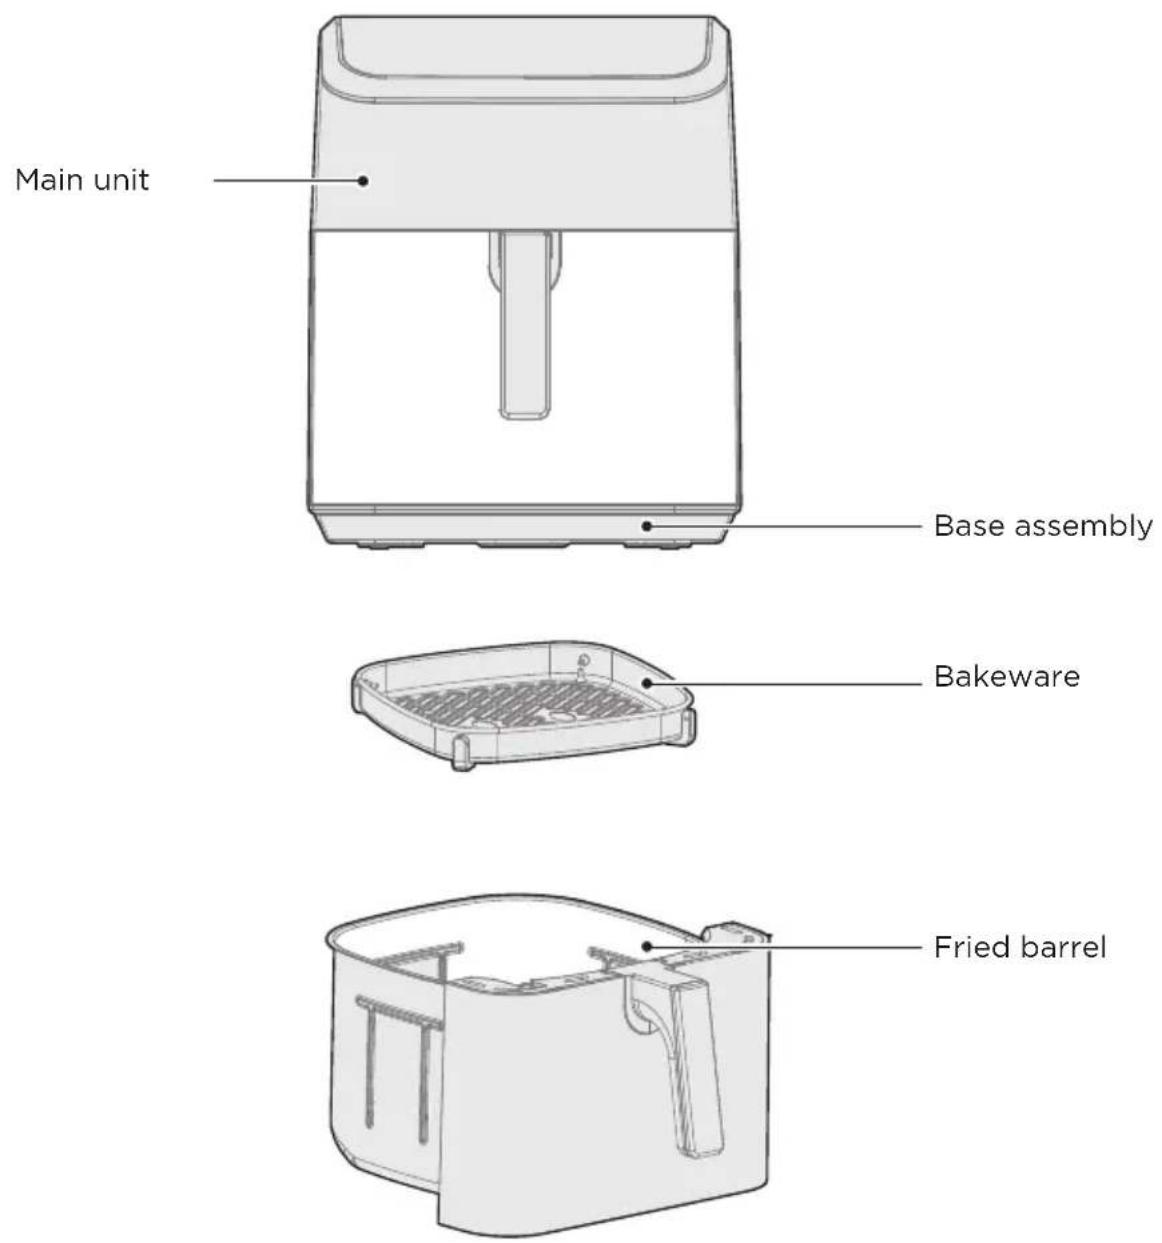
Part Name
The product is subject to the actual product and configuration.

NOTE
The figure below is for reference only, and the details are subject to the actual objects in the packaging box.
OPERATION INSTRUCTIONS
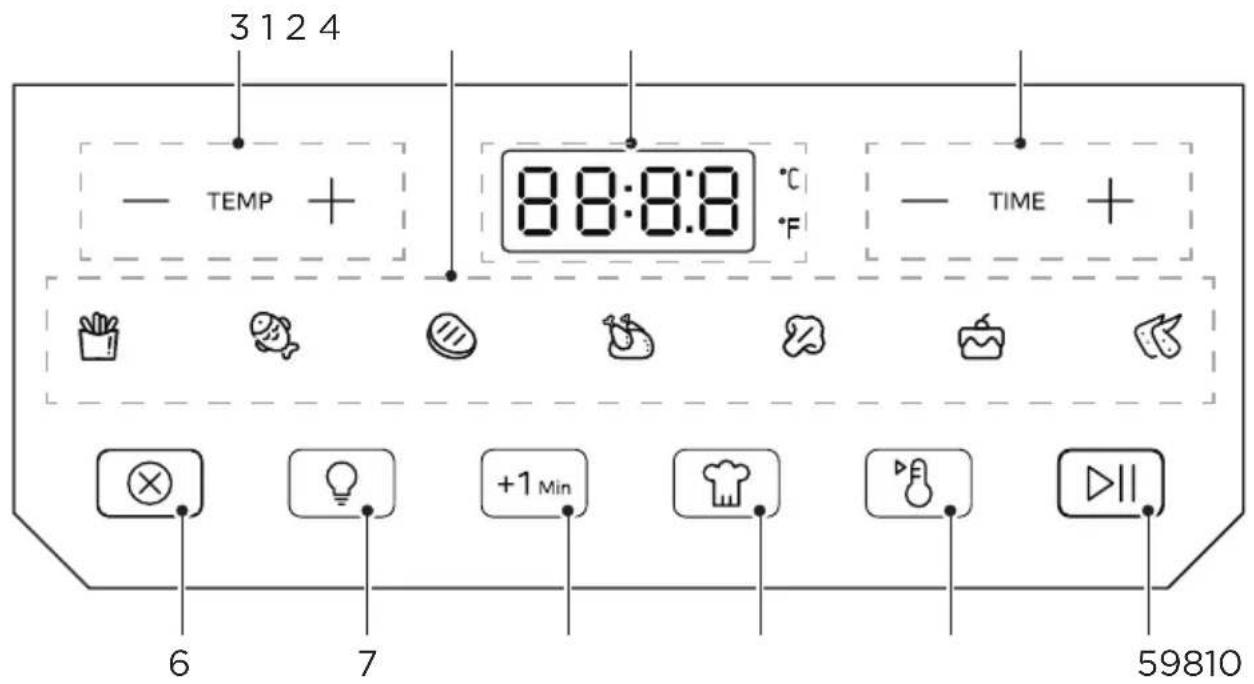
Instructions for Use
EN
| DescriptionName | ||
| 1 Menu functions | ·Any of the 7 functions can be used in the air fryer. The temperature and time can be adjusted for each function. | |
| 2 | Display | |
| 3 | TEMP | |
| 4 TIME | ·Touch — or + to adjust the temperature. | |
| 5 | Start/Pause | |
| Cancel6 | ||
| Light7 | ||
| 8 | DIY | |
| 9 | Keep warm | |
| 10+1 Min | ·In the standby state or the end of cooking state, touch +1Min to directly enter the working state of 200°C and 1 minute; In the state of cooking or pause, touch +1Min to increase the current cooking function time by 1 minute. | |
Operation
- The first use requires 10 minutes of dry burning. A small amount of white smoke or odor may appear during the dry burning process, which is normal. Do not panic.
- Place the baking sheet in the frying barrel, and then add the ingredients; Push the barrel into the main unit, make sure that the barrel is fully pushed into the main unit;
- In the off-screen state, only blinks. Press it to enter the standby state. Click the desired menu function, and you can click TEMP+, TEMP-, TIME+, and TIME- to adjust the time and temperature. Press to start the menu cooking, and the cooking countdown is displayed;
- During cooking, press to cancel the cooking state and return to standby; press to enter the cooking pause; Click TEMP+, TEMP-, TIME+, TIME- to enter the cooking menu parameter selection.
- The end of cooking state, the digital tube display "End" and the blinks ,other indicators are off; At this point, the food can be extracted after drawing out the frying barrel.
- is the key that controls the lighting.
- In the standby state or cooking finished state, press +1min to directly enter the working state of 200^ and 1 minute;
- In the state of cooking or pause, press +1_ to increase the current cooking function time by 1 minute.
- Press to enter DIY mode, and the set temperature and time will be saved. Press to run the DIY set time and temperature.
- Press to activate the keep warm function.

NOTE

- Please carefully take it out.
- Make sure it's flat on the table. (To avoid being scalded by steam or food being topped over the frying barrel, causing oil or hot food to burn the human body.)
- In addition, the auxiliary tools (such as chopsticks) are suggested to be used in the process of taking out food.
Preparation
- The product should be stably placed on a flat table, so that the power cord has a sufficient length to be plugged into the socket, and the air around the product should be kept in circulation, and should not be close to flammable items.
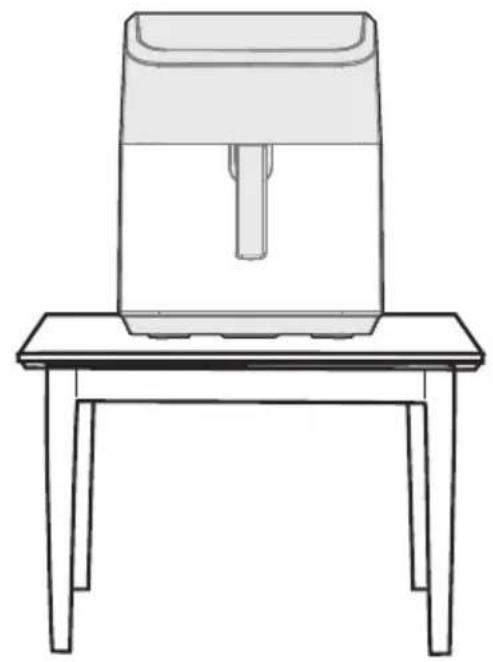
EN
Put the bakeware in the fried barrel, then push it into the Main unit. 2.
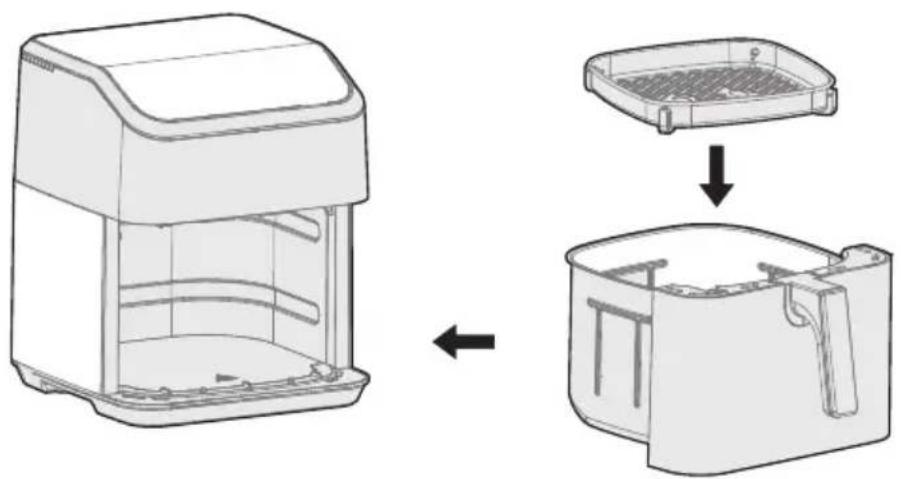
Cooking
- These cooking options give your meals all the rich and crispy flavor of deep frying with little to no oil.
- The default time and temps are a starting point that you can experiment with to get the results you like best.
- The function listed for each food is a recommendation for optimal cooking.
| Temperature(℃) | Time (min)Menu | ||
| 180French fries | 19 | ||
| 180Fish 12 | |||
| 200Meat 10 | |||
| 170Chicken 30 | |||
| 170Vegetable 8 | |||
| 170Cake 12 | |||
| 180Chicken wings | 16 |
EN
Menu Functions
Before the product works, please check whether the bakeware is in place to avoid malfunction.
If you find that the product is malfunctioning, please stop using it and contact our service department immediately.
- Please use the bakeware and fried barrel together in the whole machine, and avoid using them separately.
After using, unplug the power plug and allow the air fryer to cool completely before moving.
CLEANING AND MAINTENANCE
- Please clean the air fryer to prevent it from being burned.
- After using, please clean the bakeware and fried barrel in time to avoid the damage of the coating due to the erosion of food residue oil.
- Do not use strong abrasive cleaners to prevent damage to the machine and your health.
- Use a soft, clean cloth to wipe the air fryer. Please do not use an over-wet cloth to clean the air fryer, to prevent water from entering the air fryer, which may cause short circuit and fire.
- Please do not use other cleaning equipment such as a dishwasher to clean the air fryer, otherwise it may cause damage and affect the use.
- Use neutral detergent or clean water to clean the frying pans and drums.
- Please do not use hard and sharp items (such as wire balls, blades, etc.) to clean the bakeware and fried barrel to prevent scratching.
- Any other servicing should be performed by an authorized service representative.
TROUBLESHOOTING
Operation of your appliance can lead to errors and malfunctions. The following tables contain possible causes and notes for resolving an error message or malfunction. It is recommended to read the tables carefully below in order to save your time and money that may cost for calling to the service center.
| Cause SolutionProblem | ||
| The air fryer does not work | ·The appliance is not plugged in. | Put the mains plug in an earthed wall socket. |
| ·You have not set the timer. | Turn the timer knob to the required preparation time to switch on the appliance. | |
| ·The pan is not put into the appliance properly. | Slide the pan into the appliance properly. | |
| The ingredients fried with the air fryer are not done. | ·The amount of ingredients in the basket is too big. | Put smaller batches of ingredients in the basket.Smaller batches are fried more evenly. |
| ·The set temperature is too low. | Turn the temperature control key to the required temperature setting (see section 'settings' in chapter 'Using the appliance'). | |
| ·The preparation time is too short. | Turn the timer key to the required preparation time (see section 'Settings' in chapter 'Using the appliance'). | |
| The ingredients are fried unevenly in the air fryer. | ·Certain types of ingredients need to be shaken halfway through the preparation time. | Ingredients that lie on top of or across each other (e.g.fries) need to be shaken halfway through the preparation time. See section 'Settings' in chapter 'Using the appliance'. |
| Fried snacks are not crispy when they come out of the air fryer. | ·You used a type of snacks meant to be prepared in a traditional deep fryer. | Use oven snacks or lightly brush some oil onto the snacks for a crispier result. |
| I cannot slide the pan into the appliance properly. | ·There are too much ingredients in the basket. | DO NOT fill the basket beyond in full, refer to the "Setting" table above. |
| ·The basket is not placed, in the pan correctly. | Push the basket down into the pan until you hear a click. | |
| White smoke comes out of the appliance. | ·You are preparing greasy ingredients. | When you fry greasy ingredients in the air fryer, a large amount of oil will leak into the pan. The oil produces white smoke and the pan may heat up more than usual. This does not affect the appliance or the end result. |
| ·The pan still contains grease residues from previous use. | White smoke is caused by grease heating up in·the pan. Make sure you clean the pan properly after each use. | |
| Fresh fries are fried unevenly in the air fryer. | ·You did not use the right potato type. | Use fresh potatoes and make sure they stay firm, during frying. |
| ·You did not rinse the potato sticks properly before you fried them. | Rinse the potato sticks properly to remove starch from the outside of the sticks. | |
| EN | ·The crispiness of the fries depends on the amount of oil and water in the fries. | Make sure you dry the potato sticks properly before you add the oil. |
| Cut the potato sticks smaller for a crispier result. | ||
| Add slightly more oil for a crispier result. | ||
TRADEMARKS, COPYRIGHTS AND LEGAL STATEMENT
Midea logo, word marks, trade name, trade dress and all versions there of are valuable assets of Midea Group and/or its affiliates ("Midea"), to which Midea owns trademarks, copyrights and other intellectual property rights, and all goodwill derived from using any part of an Midea trademark. Use of Midea trademark for commercial purposes without the prior written consent of Midea may constitute trademark infringement or unfair competition in violation of relevant laws.
This manual is created by Midea and Midea reserves all copyrights thereof. No entity or individual may use, duplicate, modify, distribute in whole or in part this manual, or bundle or sell with other products without the prior written consent of Midea.
All the described functions and instructions were up to date at the time of printing this manual. However, the actual product may vary due to improved functions and designs.
EN
DISPOSAL AND RECYCLING
Important instructions for environment
Compliance with the WEEE Directive and Disposing of the Waster Product: This product complies with EU WEEE Directive (2012/19/EU). This product bears a classification symbol for waster electrical and electronic equipment (WEEE).
This symbol indicates that this product shall not be disposed with other household wastes at the end of its service life. Used device must be returned to official collection point for recycling of electrical electronic devices. To find these collection systems please contact to your local authorities or retailer where the product was purchased. Each household performs important role in recovering and recycling of old appliance. Appropriate disposal of used appliance helps prevent potential negative consequences for the environment and human health.
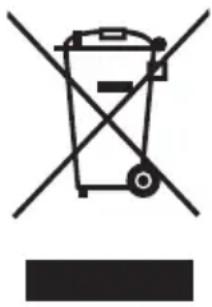
EN
Compliance with RoHS Directive
The product you have purchased complies with EU RoHS Directive (2011/65/EU). It does not contain harmful and prohibited materials specified in the Directive.
Package information
Packaging materials of the product are manufactured from recyclable materials in accordance with our National Environment Regulations. Do not dispose of the packaging materials together with the domestic or other wastes. Take them to the packaging material collection points designated by the local authorities.

DATA PROTECTION NOTICE
For the provision of the services agreed with the customer,
we agree to comply without restriction with all stipulations of applicable data protection law, in line with agreed countries within which services to the customer will be delivered, as well as, where applicable, the EU General Data Protection Regulation (GDPR).
Generally, our data processing is to fulfil our obligation under contract with you and for product safety reasons, to safeguard your rights in connection with warranty and product registration questions. In some cases, but only if appropriate data protection is ensured, personal data might be transferred to recipients located outside of the European Economic Area.
Further information are provided on request. You can contact our Data Protection Officer via MideaDPO@midea.com. To exercise your rights such as right to object your personal data being processed for direct marketing purposes, please contact us via MideaDPO@midea.com. To find further information, please follow the QR Code.
EN
WARRANTY / SERVICE
We congratulate you to your new device and are convinced that you will be satisfied and have your joy with this modern appliance.
If you have any question or concerns, please email us
Email: customer_services@midea.com
In case of a technical fault, enter your exact address, telephone number, sales contract number and Device type (from the type plate of the device).
A precise fault description saves you time and money. For special questions, please contact the customer service center.
Before calling for service:
Please check whether there is an operating error or a cause that has nothing to do with the function of your device.
Please observe the note in the user manual and check whether:
- The power plug is connected
- The power plug may be damaged
Electricity is available
Warranty terms
EN
This device has been manufactured and tested according to the most modern methods. The seller warrants for faultless material and proper manufacture for a period of 24 months from the date of sale to the end user. The unit is not suitable for commercial use.
The claim under guarantee lapses in the event of intervention by the Buyer or by a third party. Damage caused as a result of improper handling or operation, incorrect installation or storage, improper connection or installation as well as an act [...] of God or other external factors shall not be covered by this warranty.
When claims are submitted, the manufacturer reserves the right to make improvements to defective parts or to replace or exchange the device.
Only if it is not possible to achieve the intended use of the device by repairing or replacing the device, the buyer can demand a reduction of the purchase price or the cancellation of the purchase contract within 6 months from the date of purchase.
Claims for damages, including consequential damages, are excluded unless they are based on intent or gross negligence.
The guarantee claim exists only with submission of the product and the purchase receipt.
Midea Electrics Netherlands B.V.
Johan Cruijff Boulevard 65,
1101 DL Amsterdam
LETTRE DE REMERCIEMENTS
VUE D'ENSEMBLE DU PRODUIT 06
INSTRUCTIONS SUR LE FONCTIONNEMENT 07
NETTOYAGE ET ENTRETIEN 11
DÉPANNAGE 12
MARQUES, DROITS D'AUTEUR ET MENTIONS LEGALES 14
VUE D'ENSEMBLE DU PRODUIT
Noms des Pièces
Email: customer_services@midea.com
Midea Electronics Netherlands B.V.
Johan Cruijff Boulevard 65,
1101 DL Amsterdam
AGRADECIMIENTOS
Email: customer_services@midea.com
UTYLIZACJA I RECYKLING
Email: customer_services@midea.com
Midea Electrics Netherlands B.V.
Johan Cruijff Boulevard 65,
1101 DL Amsterdam

make yourself at home

www.midea.com
© Midea 2022 all rights reserved
| MIDEA | Midea Europe GmbH Ludwig-Erhard-Str.14, 65760 Eschborn, Germany | kundenservice@midea.com |
| MIDEA ITALIA S.R.L. Via Luigi Bodio 29/37 -Milano (MI) 20158 Italy | assistenza@midea.com | |
| Midea Electronics France 253 RUE SAINT-HONORE 75001 PARIS | service_france@midea.com | |
| MIDEA HOME APPLIANCES UK LTD Conavon Court Ground Floor, 12 Blackfriars Street, Salford,Manchester M3 5BQ UK | service_uk@midea.com |
Factory Name:
MIDEA CONSUMER ELECTRIC (VIETNAM) CO., LTD.
CONG TY TNHH MIDEA CONSUMER ELECTRIC (VIETNAM)
Factory address:
NO.40, 6TH STREET, VIETNAM-SINGAPORE INDUSTRIAL PARK, AN PHU WARD, THUAN AN CITY, BINH DUONG PROVINCE, VIET NAM.
SO 40, DUONG SO 6, KHU CONG NGHIEP VIET NAM - SINGAPORE, PHUONG AN PHU, THANH PHO THUAN AN, TINH BINH DUONG



- VIELEN DANK
- LETTERA DI RINGRAZIAMENO
- THANK YOU LETTER
- CONTENTS
- SAFETY INSTRUCTIONS
- Intended Use
- Explanation of Symbols
- SPECIFICATIONS
- PRODUCT OVERVIEW
- Part Name
- NOTE
- OPERATION INSTRUCTIONS
- Operation
- Preparation
- EN
- Cooking
- Menu Functions
- CLEANING AND MAINTENANCE
- TROUBLESHOOTING
- TRADEMARKS, COPYRIGHTS AND LEGAL STATEMENT
- DISPOSAL AND RECYCLING
- Important instructions for environment
- Compliance with RoHS Directive
- Package information
- DATA PROTECTION NOTICE
- WARRANTY / SERVICE
- Before calling for service:
- Warranty terms
- LETTRE DE REMERCIEMENTS
- VUE D'ENSEMBLE DU PRODUIT
- Noms des Pièces
- AGRADECIMIENTOS
- UTYLIZACJA I RECYKLING
Brand : MIDEA
Model : MAD70F9APK
Category : Deep fryer