MRU21C7BWW - Uncategorized MIDEA - Free user manual and instructions
Find the device manual for free MRU21C7BWW MIDEA in PDF.
Download the instructions for your Uncategorized in PDF format for free! Find your manual MRU21C7BWW - MIDEA and take your electronic device back in hand. On this page are published all the documents necessary for the use of your device. MRU21C7BWW by MIDEA.
USER MANUAL MRU21C7BWW MIDEA
Warning notices: Before using this product, please read this manual carefully and keep it for future reference. The design and specifications are subject to change without prior notice for product improvement. Consult with your dealer or manufacturer for details. The diagram above is just for reference. Please take the appearance of the actual product as the standard. Download the app & activate productTHANK YOU LETTER Thank you for choosing Midea! Before using your new Midea product, please read this manual thoroughly to ensure that you know how to operate the features and functions that your new appliance oers in a safe way. CONTENTS SPECIFICATIONS
PRODUCT INSTALLATION
CLEANING AND MAINTENANCE
DISPOSAL AND RECYCLING
LANGUAGES EN English FR French ES SpanishEN
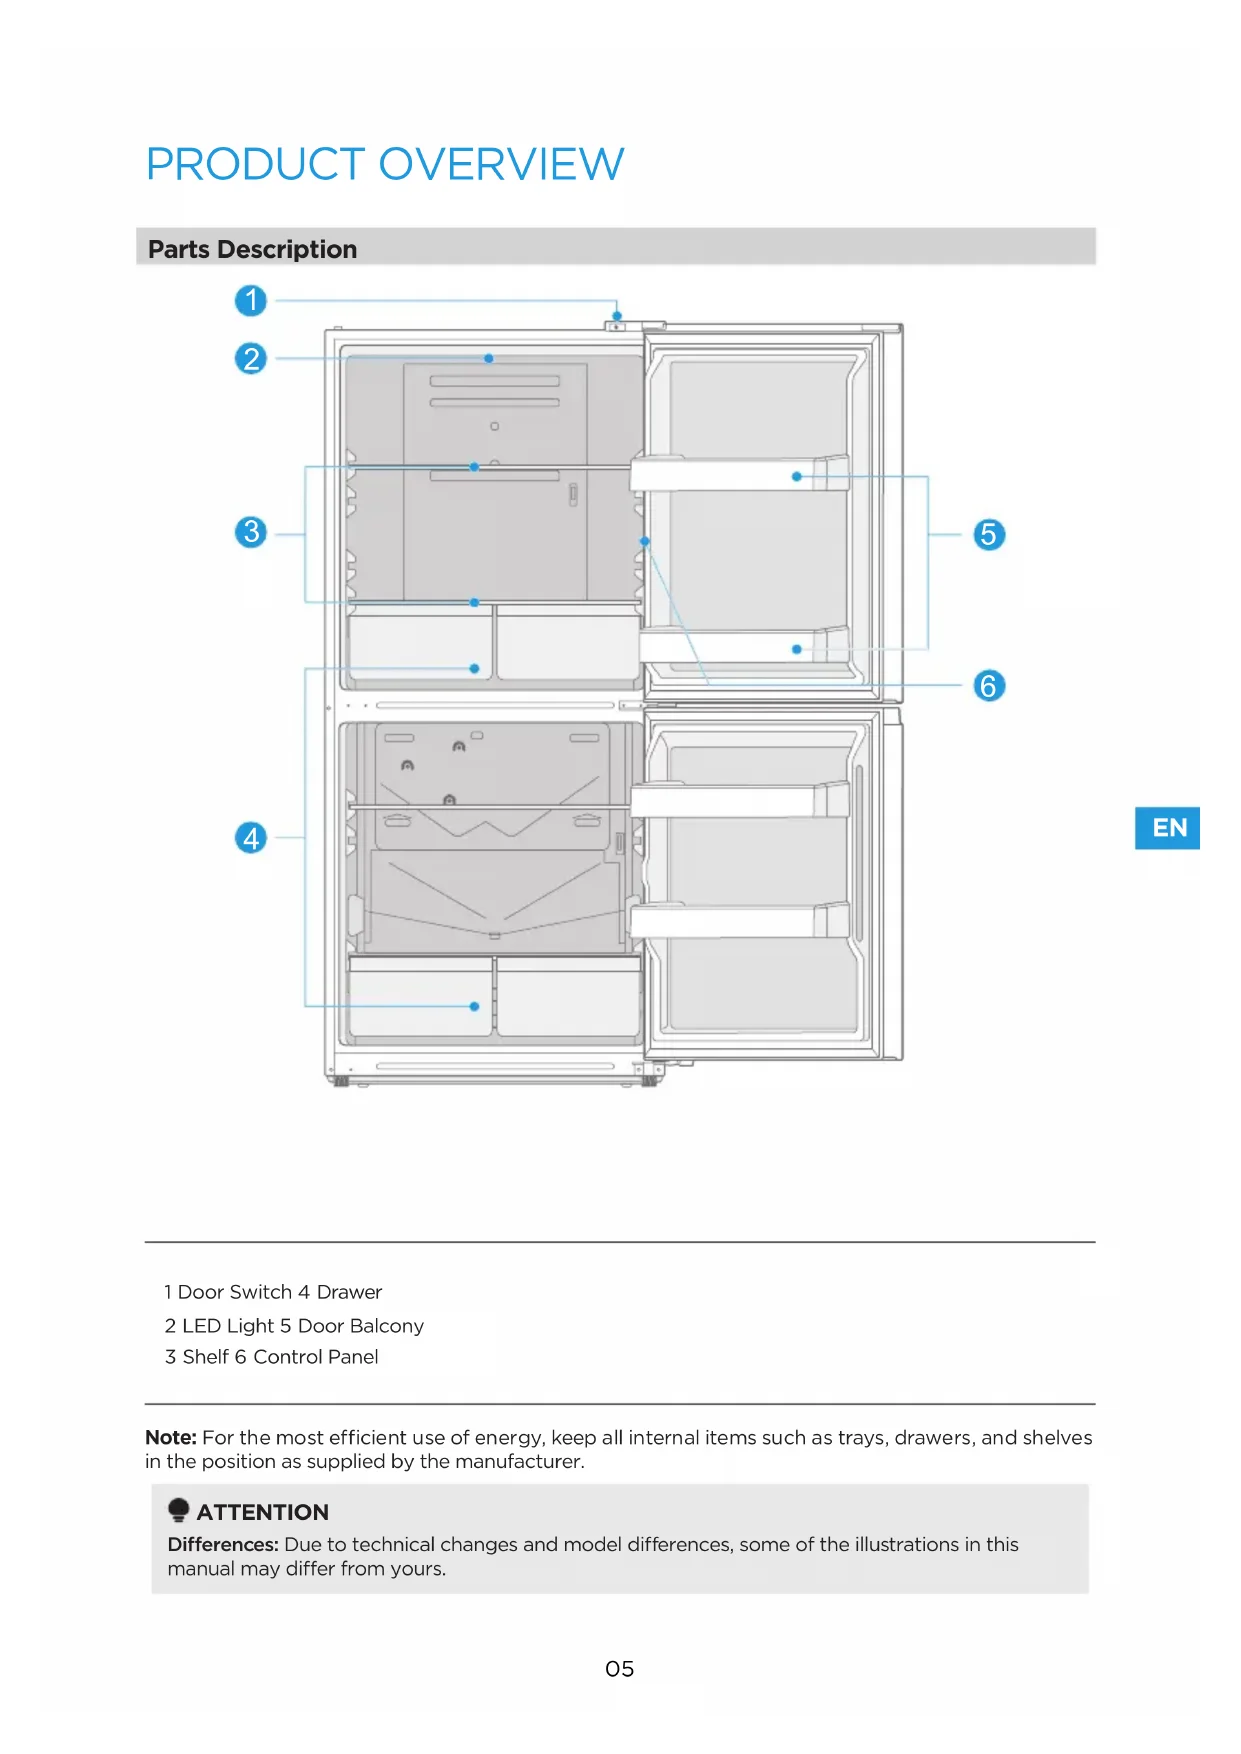
PRODUCT OVERVIEW Parts Description
1 Door Switch 4 Drawer 2 LED Light 5 Door Balcony 3 Shelf 6 Control Panel Note: For the most efficient use of energy, keep all internal items such as trays, drawers, and shelves in the position as supplied by the manufacturer. ATTENTION Dierences: Due to technical changes and model dierences, some of the illustrations in this manual may dier from yours.EN
PRODUCT INSTALLATION Installation Instructions Finding a suitable location
- This refrigerator is designed to be free standing only, and should not be recessed or built-in.
- The refrigerator should be placed in a well-ventilated indoor place; the ground shall be flat and sturdy.
- Keep away from heat and avoid direct sunlight. Do not place the refrigerator in moist or watery places to prevent rust or reduction of insulating effect. Dimensions and clearances
- Too small of a distance from adjacent items may result in the degradation of freezing capability and increased electricity costs. Allow over 100 mm of clearance at both sides and the top, and 50-75 mm at the back when installing the appliance. >100mm50~75mm>100mm TOP BACK SIDE Providing a proper power supply
- Check your local power source. This refrigerator requires an AC 115 V, 60 Hz power supply.
- Use a receptacle that accepts the grounding prong. The power cord is equipped with a 3-prong (grounding) plug which mates with a standard 3-prong (grounding) wall outlet to minimize the possibility of electric shock hazard from this refrigerator. CAUTION The refrigerator should always be plugged into its own individual electrical outlet which has a voltage rating that matches the rating plate. Never unplug your refrigerator by pulling on the power cord. Always grip the plug firmly and pull straight out from the outlet.
WARNING: When positioning the appliance, ensure the supply cord is not trapped or damaged.EN
Space requirement diagram (when the door is open and when the door is closed)
Door Reversal (Optional) Depending on where you plan to use your refrigerator, you may find it more convenient to reverse the door position. ATTENTION To avoid injury to yourself or your property, we recommend that someone assist you during the door reversal process. Preparing to reverse the door position You will need: A standard screwdriver, a Phillips screwdriver, and the included Allen wrench.
- Make sure that your refrigerator is unplugged and empty.
- Have someone to assist you in the process.
- Keep all the parts you remove. You may need them later. Parts included with the hinge kit: Left upper hinge Left upper hinge cover Left middle hinge Upper door left stop Upper door left self-lock Parts already mounted on the door (as shipped): Hole cap Upper hinge shaft sleave Middle hinge shaft sleeve Lower hinge shaft sleeve Lower hinge Lower door Stop Lower door self-lock Parts currently open on the right side: Right upper hinge Right upper hinge cover Right middle hinge Upper door right stop Upper door right self-lockEN
1. Unplug the refrigerator and remove all food items from the door shelves. Secure the door with
2. Remove the left hole cover and the right upper hinge cover using Phillips and flat-head
screwdrivers, and remove the upper hinge. Disconnect the signal wire ( ) at the top right of the refrigerator body from the hinge cover. Keep the screws for later use.
3. Remove the upper door body.
4. Remove the middle hinge with a Phillips screwdriver, and then remove the lower door body from
the body of the refrigerator. Retain the bolts for future use.
5. Remove the right lower hinge screws, and then remove the lower hinge.
6. Remove the lower hinge shaft and move it to the left of the lower hinge and tighten it, then install
the removed right lower hinge to the left lower end of the refrigerator and secure it with the screws that were kept aside.
7. Remove the shaft sleeves at the right end of the lower door body and the upper door body and
the shaft hole cover at the left end of the lower door, and install them on the opposite side.EN
8. Remove the door stop at the lower right end of the lower door body and install it on the
opposite side of the door body. Remove the door stop and self-locking device at the lower right end of the upper door body and save it, find the upper door left stop and self-locking device in the accessory package and install them on the door body.
9. Install the lower door onto the lower hinge, remove the left middle hinge from the accessory
package and install the middle hinge on the left side.
10. Remove the left upper hinge cover from the accessory package. Remove the switch from the
right hinge cover and fit it to the left upper hinge cover. Left door lock hookRight door lock hook Install the upper door body on the left middle hinge and install the left upper hinge. Connect the signal wire ( ) at the top left of the refrigerator body to the switch on the left hinge cover, then cover and fix the left hinge cover. Finally, install the decorative hinge cover to the right side of the refrigerator body.
ATTENTION Dierences: Due to technical changes and model dierences, some of the illustrations in this manual may dier from yours.EN
Leveling Feet To avoid vibration, the appliance must be leveled. If required, adjust the leveling feet (located on both sides of the bottom front) to compensate for the uneven floor. The front should be slightly higher than the rear to aid in door closing. Leveling feet can be turned easily by tipping the cabinet slightly. Turn the leveling feet clockwise to raise the unit, or counterclockwise to lower it. Moving the Appliance
1. Remove all items from the appliance.
2. Pull the power plug out, insert and fix it
into the power plug hook at the rear or on top of the appliance.
3. Tape parts such as shelves and the door to
prevent from falling off while moving the appliance.
4. Move the appliance with more than two
people carefully. When transporting the appliance over a long distance, keep the appliance upright. ATTENTION Before making changes, the refrigerator must be disconnected from power. Precautions should be taken to prevent any personal injury. Replacing the light Any replacement or maintenance of the LED lamps is intended to be made by the manufacturer, its service agent or similar qualified person. Tips for Energy Saving Do not place the appliance near cookers, radiators or other heat sources. If the ambient temperature is high, the compressor will run more frequently and for longer, resulting in increased energy consumption. Ensure that there is sufficient ventilation at the base of the appliance, on the sides of the appliance and at the back of the appliance. Please also observe the spacing dimensions in the chapter “Installation”. An evenly filled refrigerator/freezer compartment contributes to optimal energy use. Allow warm food to cool before placing it in the refrigerator/freezer compartment. Food that has already cooled down increases energy efficiency. Allow frozen food to defrost in the refrigeration compartment The coldness of the frozen food reduces the energy consumption in the refrigerator compartment and thus increases the energy efficiency. Open the door only as briefly as necessary to minimise cold loss. Opening the door briefly and closing it properly reduces energy consumption. Setting the temperature no colder than necessary contributes to optimal energy use. The door gaskets of your appliance must be perfectly intact so that the doors close properly and energy consumption is not increased unnecessarily.EN
OPERATION INSTRUCTIONS Control Panel The control panel is located on the right-hand inside wall of the refrigerating chamber.
Wi-Fi icon Lights up when connected to Wi-Fi.
REF-FRZ mode Indicates the appliance is in refrigerator-freezer mode.
REF-REF mode Indicates the appliance is in full refrigerating mode.
FRZ-FRZ mode Indicates the appliance is in full freezer mode.
COLDEST Indicates the temperature level selected.The snow icon at the top represents the coldest temperature inside the chambers, the bottom snow icon the warmest.
Mode button ( ) Press to switch the appliance between different operating modes.Press and hold for 3s to enter the network configuration mode.
Use and Functions Display When using for the first time, the appliance operates in refrigerator-freezer mode and temperatures are set as follows by default:
- Refrigerating chamber: 39°F (4°C)
- Freezer chamber: -4°F (-20°C) Note: If a fault occurs, the display will show the fault code by flashing the temperature level icons (see “Fault Indication”). MODE Selection
- In addition to working as a normal refrigerator-freezer, the appliance has the versatility to be converted into a full refrigerator or full freezer.
- Press the button to change the appliance’s operating mode: FRZ-FRZ mode (freezer-freezer) > REF-REF mode (refrigerator-refrigerator) > REF-FRZ mode (refrigerator-freezer).
- The corresponding mode icon will light up. Temperature Setting To adjust the temperature, press the button to select a temperature level: COLDEST > COLDER > COLDER > COLD (from top to bottom). The corresponding snow icon will light up. The four temperature levels are preset with different temperatures for different operating modes:
- In refrigerator-refrigerator mode: 2 °C, 4 °C, 6 °C, 8 °C respectively (both chambers).
- In freezer-freezer mode: -24 °C, -20 °C, -18 °C, -16 °C respectively (both chambers).
- In refrigerator-freezer mode: 2 °C, 4 °C, 6 °C, 8 °C respectively (refrigerating chamber). -24 °C, -20 °C, -18 °C, -16 °C respectively (freezer chamber). ATTENTION Recommended setting: refrigerating chamber 39°F (4°C), freezer chamber -4°F (-20°C). Power Failure Memory In the event of a power failure, the current working state will be memorized and maintained until power is restored. Fault Indication The following warnings appearing on the control panel indicate corresponding faults of the refrigerator. Though the refrigerator may still have refrigerator and freezing function with the following faults, the user shall contact a maintenance specialist for maintenance, so as to ensure normal use of the refrigerator. Fault code Fault Description Icon 7 and Icon 8 flashing The fridge’s temperature sensor fails Icon 6 and Icon 8 flashing The freezer’s defrosting sensor fails Icon 5 and Icon 8 flashing The ambient temperature sensor fails Icon 5 and Icon 7 flashing The freezer’s temperature sensor failsEN
Storing Food Freezer Compartment The freezer compartment is designated for the low-temperature freezing of food and long-term storage of frozen food. Do not put fresh and frozen food next to each other. The frozen food may thaw. When freezing large amounts of fresh food (such as meat, fish or chopped meat), please divide them into several small pieces before putting in, so that they can be quickly frozen and pick up easily. Abide by the storage times recommended by food manufacturers on the packages, there is no information on the packaging, food should not be stored frozen for longer than three months from the date of purchase. When purchasing frozen food, make sure that it was frozen at a suitable temperature and that the packaging is not damaged. Frozen food should be kept in suitable individual packages to ensure that adjacent food cannot be contaminated.Consume thawed and defrosted foods immediately, do not refreeze them. In case of prolonged power failure or malfunction of the appliance, remove the stored frozen food and check whether they are still edible, then store them in a sufficiently cool place or in another appliance. To defrost food, remove it from the freezer and let it defrost at room temperature or in the refrigerator. To defrost food quickly, you can use the defrost function on your microwave, for example. If you only want to defrost part of a pack, remove the portion you need and immediately close the rest of the pack. In this way, you will avoid “freezer burn” and will reduce ice formation on the remaining foods. Refrigerator Compartment To reduce moisture and subsequent ice build-up, never put liquid into the fridge compartment in unsealed containers. Frost tends to concentrate in the coolest parts of the evaporator. Storing uncovered liquids results in a more frequent need for defrosting. Never put warm foods in the fridge compartment. These should first cool down at room temperature and then be placed so as to ensure adequate air circulation in the fridge compartment. Foods or food containers should not touch the back wall of the fridge because they could freeze to the wall. Do not keep regularly opening the door of the refrigerator. Meat and clean fish (packed in a package or plastic foil) can be placed in the fridge compartment, which can be used in 1–2 days. Fruit and vegetables without packaging can be placed in the part designated for fresh fruit and vegetables ATTENTION Storage of too much food during operation after the initial connection to power may adversely aect the freezing eect of the refrigerator. Storage Times and Temperature Note: Overlong storage or storage at inappropriate freezing temperature may cause a quality loss or spoiled foods, which causes food waste, is inedible and may cause food poisoning. The minimum temperature in most cases should be -18°C or colder. Follow the maximum recommended storage times below: > Stew, ice cream, sausages, bread: 2-6 months. > Fish, shrimp, lamb, meat: 4-8 months. > Vegetables, fruits, poultry, beef: 6-12 months.EN
Download the SmartHome app On an app market (Google Play Store, Apple App Store), search for SmartHome* and find the SmartHome app. Download and install it on your phone. You can also download the app by scanning the QR code below. Download the app & activate product Register and log in Open the SmartHome app, and create a new account to start (you can also register through a third-party account). If you already have an existing account, use the account to log in. Connect your devices to SmartHome
1. Please make sure your mobile phone is connected to a
wireless network. If it is not, go to Settings and enable wireless networks and Bluetooth.
2. Please power on your devices.
3. Open SmartHome app on your phone.
4. If a message of “Smart devices discovered nearby”
appears, click to add. Washing machine
5. If no message appears, select “+” on the page and select
your device in the list of nearby devices available. If your device is not listed, please add your device manually by the device category and device model.
6. Connect your device to the wireless network according
to instructions on app. If the connection fails, please follow the instructions provided by the app to continue with the operation. Add device 8:88EN
Problem Possible Causes Solution Cannot connect SmartHome app to Refrigerator/ Freezer Weak home WiFi signal Ensure that “both your mobile device and the Refrigerator/Freezer” are within range of the wireless network. WLAN+ (Android) or WLAN Assistant (iOS) function Turn o the WLAN+ (Android) or WLAN Assistant (iOS) function of your mobile phone Wireless network requires authentication The app cannot connect the referigerator/ freezer to a wireless network which requires authentication. Networks requiring authentication are typically found in public places, such as hotels, restau- rants, etc. Please connect to a wireless network that does not require authentication. Wireless network device does not support 2.4 GHz This refrigerator/freezer will only connect to 2.4GHz wireless networks. 5GHz wireless net- works are not supported. OPEN API
2. Energy consumption report
4. Refrigerator self-inspection
- Set the Sabbath mode POST /v1/api/plugin/set Sabbath Mode. ATTENTION The application (SmartHome) interface (about the demand response interface) allows the user to operate according to the smart grid signal intervention mode.EN
CLEANING AND MAINTENANCE
CAUTION Disconnect the appliance from the electrical supply before ndertaking any routine maintenance. Allow at least 5 minutes before restarting the appliance, as frequent starting may damage the compressor. Hold the plug, not the cable, when unplugging the appliance. Do not scrape off frost and ice with sharp objects. Do not use sprays, electric heaters like heater, hair dryer, steam cleaners or other sources of heat in order to avoid damage to the plastic parts. Eliminate the dust on the back of the unit at least once in the year to avoid hazard by fire, as well as increased energy consumption. Check the door gasket regularly to make sure there are no debris. Clean the door gasket with a soft cloth dampened with soapy water or diluted detergent. The interior of the product should be cleaned regularly to avoid odor. Use a soft cloth or sponge to clean the inside of the product, with two tablespoons of baking soda and a quart of warm water. Then rinse with water and wipe clean. After cleaning, open the door and let it dry naturally before turning on the power. For areas that are difficult to clean in the product (such as narrow sandwiches, gaps or corners), it is recommended to wipe them regularly with a soft rag, soft brush, etc. and when necessary, combined with some auxiliary tools (such as thin sticks) to ensure no contaminants or bacterials accumulation in these areas. Do not use soap, detergent, scrub powder, spray cleaner, etc., as these may cause odors in the interior of the product or contaminated food. Wipe the outer surface of the product with a soft cloth dampened with soapy water, detergent, etc., and then wipe dry. Do not use hard brushes, clean steel balls, wire brushes, abrasives (such as toothpastes), organic solvents (such as alcohol, acetone, isoamyl acetate, etc.), boiling water, acid or alkaline items, which may damage the fridge surface and interior. Boiling water and organic solvents such as benzene may deform or damage plastic parts. Do not rinse directly with water or other liquids during cleaning to avoid short circuits or affect electrical insulation after immersion. ATTENTION The appliance shall run continuously once it is started. Generally, the operation of the appliance shall not be interrupted; otherwise the service life may be impaired Defrosting Although this appliance automatically defrosts, a layer of frost may occur on the freezer compartment’s interior walls if the freezer door is opened frequently or kept open too long. If the frost is too thick, choose a time when the supply of food stocks are low and proceed as follows: Remove existing food and accessories baskets, unplug the appliance from the mains power and leave the doors open. Ventilate the room thoroughly to accelerate the thawing process. When defrosting is completed, clean your freezer as described above. CAUTION! Don’t use sharp objects to remove frost from the freezer. Only after the interior completely dry should the appliance be switched back on and plugged back into the mains socket.EN
Cleaning the Door Trays According to the direction of the arrow in the figure below, use both hands to squeeze the tray, and push it upward to remove it. After cleaning the tray, you can adjust its installation height to suit your needs. Cleaning the Glass Shelves
- The innermost part of the refrigerator liner, where contacting the shelves, has a backstop, you shall raise the shelves upward, then you can take it out.
- Adjust or clean the shelves as needed. Cleaning the Drawers
1. Remove the contents of the drawer.
2. Lift the drawer up and remove it by pulling
TROUBLESHOOTING The following simple issues can be handled by the user. Please call the after-sales service department if the issues are not solved. Problem Possible Causes Solution Not working
- The power supply is not turned on and the plug is not firmly inserted.
- Insert the power cord plug firmly.
- Turn on the power supply.
- Low voltage, power failure or part of the circuit tripped.
- Check the power supply at home. Light not on
- The appliance is not powered on. • Unplug and re-plug the power cord.
- The light is broken. • Replace the light with a new one. Fruits or vegetables are frozen
- Has the food been placed at the back of the fridge? The area near the back wall is where the temperatures are coldest.
- Do not place food which may freeze easily at the back of the fridge compartment. Fridge/freezer is over-cooling
- The set temperature is too cold. • Set the temperature higher. Compressor working for a long time
- High ambient temperature causes long working time.
- Putting too much food in at one time.
- Do not put too much food at one time.
- Food is put in before it has cooled down.
- Wait until the food has cooled down before putting it in.
- Opening the door too often. • Do not open the door too often.
- The frost layer inside is too thick. • Need to defrost. Door does not close properly
- Door is stuck with objects. • Remove the objects.
- Too much food in. • Do not put in too much food.
- Door gasket deformed.
- Heat the door gasket, then cool to restore (use an electric dryer or hot water to heat it). Outer wall is hot
- When the appliance is operating, heat is dissipated to the outside through the metal tubes inside the cabinet.
- A higher temperature on the outer wall is normal.
- Higher ambient temperatures in the summer cause the temperature of the outer wall to rise.
- Increase the heat dissipation space, or put the appliance in a ventilated and cool place. Cross or vertical beams are hot
- There are metal tubes inside the beams, and the heat released from the tubes prevents condensation.
- This is normal. Odors
- Spoiled food • Clean and remove any spoiled food.
- Food with strong odors
- Make sure strong smelling food is wrapped airtight.
- The interior of the compartment is soiled.
- Clean the interior of the compartment.EN
Problem Possible Causes Solution The actual temperature differs from the set temperature
- When warm food is put in, the temperature will rise temporarily.
- This is normal. Wait for some time before checking the actual temperature.
- After setting a new temperature, it will take some time for the temperature in the compartment to reach the set temperature if the door is not opened.
- After the temperature has stabilized, the actual temperatures at different locations within the compartment are different, with a deviation of about ±3°C. Condensation forms on the outside
- Condensation may form when the humidity in the room is high.
- This is normal. Wipe off the condensation using a dry cloth. Condensation forms inside the fridge and drawers
- The fridge maintains a high humidity to keep vegetables and other food items fresh.
- Wipe off the condensation using a dry cloth.
- Humidity is too high in the room and doors have been opened frequently.
- Do not open the doors too often or leave them open for too long.
- The door gasket is not tight.
- Check the door gasket, clean it or adjust its position. Frost around the vents
- Door is not closed properly.
- Make sure food does not block the door.
- The door gasket is not tight.
- Check the door gasket, clean it or adjust its position. Hard to open the door
- The difference in air pressure between the inside and outside of the compartment may sometimes make it hard to open the freezer door.
- Wait a few moments, and then try to open the door slowly.EN
Do you hear these abnormal sounds as below? Usually these sounds are normal. SSSRRR!CRACK! HISSS! BRRR! BLUBB!CLICK! CLICK: Some electrical parts in the refrigerator, such as electric valve will make this noise when working. This is normal. HISSS: When the refrigerant flows into the evaporator, it will make this noise. This is normal. CLICK!CLICK!HISSS!HISSS! BRRR: The compressor will make this noise when working, and the buzzes are loud particularly upon start or stop. This is normal. SSSRRR: The fan motor in the No Frost refrigerator will make this noise when working. This is normal. BRRR!BRRR! SSSRRR! SSSRRR! SSSRRR! SSSRRR!SSSRRR!SSSRRR! BLUBB: Refrigerant flowing through the pipes in the refrigerator will make this noise. This is normal. CRACK: Cracking sound or broken ice sound: the overall structure of the refrigerator, air duct frost will be with the thermal expansion and contraction of the expansion sound, these are also normal physical phenomenon.
CERTIFICATIONS Federal Communications Commission (FCC) Compliance Statement for USA This device complies with part 15 of the FCC rules. Operation is subject to the following two conditions: (1) This device may not cause harmful interference, and (2) this device must accept any interference received, including interference that may cause undesired operation. Note: This equipment has been tested and found to comply with the limits for a Class B digital device, pursuant to part 15 of the FCC Rules. These limits are designed to provide reasonable protection against harmful interference in a residential installation. This equipment generates, uses and can radiate radio frequency energy and, if not installed and used in accordance with the instructions, may cause harmful interference to radio communications. However, there is no guarantee that interference will not occur in a particular installation. If this equipment does cause harmful interference to radio or television reception, which can be determined by turning the equipment off and on, the user is encouraged to try to correct the interference by one or more of the following measures:
- Reorient or relocate the receiving antenna.
- Increase the separation between the equipment and receiver.
- Connect the equipment into an outlet on a circuit different from that to which the receiver is connected.
- Consult the dealer or an experienced radio/TV technician for help. This equipment complies with FCC radiation exposure limits set forth for an uncontrolled environment. Industry Canada (IC) Compliance Statement for Canada This device complies with Industry Canada license-exempt RSS standard(s). Operation is subject to the following two conditions: (1) this device may not cause interference, and (2) this device must accept any interference, including interference that may cause undesired operation of the device. CAN ICES-003(B)/NMB-003(B) Midea is not responsible for any changes or modifications not expressly approved by Midea. Such modifications could void the user’s authority to operate the equipment. For model: MWB-S-WB01
STATEMENT logo, word marks, trade name, trade dress and all versions thereof are valuable assets of Midea Group and/or its affiliates (“Midea”), to which Midea owns trademarks, copyrights and other intellectual property rights, and all goodwill derived from using any part of an Midea trademark. Use of Midea trademark for commercial purposes without the prior written consent of Midea may constitute trademark infringement or unfair competition in violation of relevant laws. This manual is created by Midea and Midea reserves all copyrights thereof. No entity or individual may use, duplicate, modify, distribute in whole or in part this manual, or bundle or sell with other products without the prior written consent of Midea. All the described functions and instructions were up to date at the time of printing this manual. However, the actual product may vary due to improved functions and designs.
DISPOSAL AND RECYCLING
Important instructions for environment This symbol indicates that this product shall not be disposed with other household wastes at the end of its service life. Used device must be returned to official collection point for recycling of electrical electronic devices. To find these collection systems please contact to your local authorities or retailer where the product was purchased. Each household performs important role in recovering and recycling of old appliance. Appropriate disposal of used appliance helps prevent potential negative consequences for the environment and human health. Compliance with RoHS Directive The product you have purchased complies with EU RoHS Directive (2011/65/EU). It does not contain harmful and prohibited materials specified in the Directive. Package information Packaging materials of the product are manufactured from recyclable materials in accordance with our National Environment Regulations. Do not dispose of the packaging materials together with the domestic or other wastes. Take them to the packaging material collection points designated by the local authorities.
DATA PROTECTION NOTICE
For the provision of the services agreed with the customer, we agree to comply without restriction with all stipulations of applicable data protection law, in line with agreed countries within which services to the customer will be delivered, as well as, where applicable, the EU General Data Protection Regulation (GDPR). Generally, our data processing is to fulfil our obligation under contract with you and for product safety reasons, to safeguard your rights in connection with warranty and product registration questions. In some cases, but only if appropriate data protection is ensured, personal data might be transferred to recipients located outside of the European Economic Area. Further information are provided on request. You can contact our Data Protection Officer via MideaDPO@midea. com. To exercise your rights such as right to object your personal date being processed for direct marketing purposes, please contact us via MideaDPO@midea.com. To find further information, please follow the QR Code.Réfrigérateur