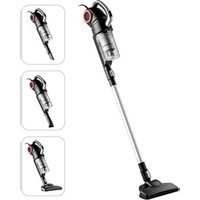
MCS2025GB - Vacuum Cleaner MIDEA - Free user manual and instructions
Find the device manual for free MCS2025GB MIDEA in PDF.



User questions about MCS2025GB MIDEA
0 question about this device. Answer the ones you know or ask your own.
Ask a new question about this device
Download the instructions for your Vacuum Cleaner in PDF format for free! Find your manual MCS2025GB - MIDEA and take your electronic device back in hand. On this page are published all the documents necessary for the use of your device. MCS2025GB by MIDEA.
USER MANUAL MCS2025GB MIDEA
PLEASE READ THE MANUAL CAREFULLY BEFORE USING AND KEEP IT PROPERLY FOR FUTURE USE
Warning notices: Before using this product, please read this manual carefully and keep it for future reference.
The design and specifications are subject to change without prior notice for product improvement. Consult with your dealer or manufacturer for details.
INSTRUCTION MANUAL
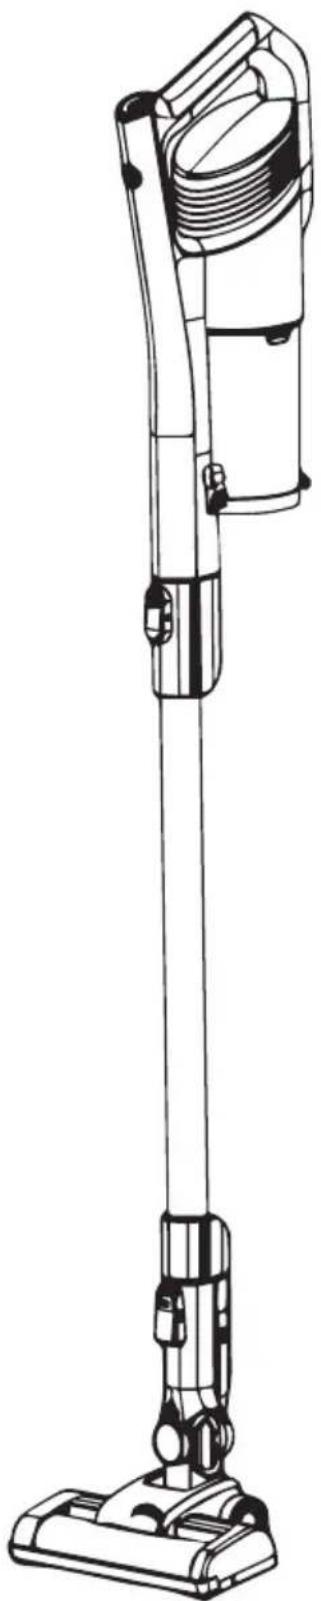
natural_image
Line drawing of a vacuum cleaner with handle and base mount (no text or symbols)EN, IT, DE, ES, FR, HR
ENGLISH.... 3-14
ITALIANO....15-27
DEUTSCH....28-42
ESPAÑOL.... 43-56
FRANÇAIS.... 57-69
Important Safety Instructions
- Read this manual thoroughly before first use, even if you are familiar with this type of product.
- The safety precautions enclosed reduce the risk of fire, electric shock and injury when correctly adhered to.
- Keep the manual in a safe place for future reference, along with the completed warranty card, purchase receipt and carton.
- Always follow basic safety precautions and accident prevention measures when using an electrical appliance, including the following:
- Before turning on, ensure the electrical voltage and frequency of the charging adaptor corresponds to those indicated on the rating label.
- Do not leave the vacuum cleaner when plugged in.
- Unplug from outlet when not in use and before cleaning or servicing.
- Do not use outdoors or on wet surfaces.
- Young children should be supervised to ensure they do not play with the appliance.
-
Do not insert any objects into the appliance.
-
Use only as described in this manual, use only manufacturers recommended attachments.
- Do not operate any appliance with a damaged charging adaptor or after the appliance malfunctions, or has been damaged in any manner.
- Keep the charging adaptor and cords away from heated surfaces.
- Do not unplug by pulling on cord. To unplug, grasp the charging adaptor, not the cord.
- To reduce the risk of electrocution never operate the product with wet hands, submerge in water or spill liquids into the product.
- Do not use with any opening blocked; keep free of dust, lint, hair, and anything that may reduce airflow.
- Turn off all controls before unplugging.
- Do not use to vacuum flammable or combustible liquids, such as gasoline, matches, or use in areas where they may be present.
-
Do not vacuum anything that is burning or smoking, such as cigarettes, matches, or hot ashes.
-
Do not use without the filter in place.
- This appliance is intended for normal household use only.
- If the charging adaptor is damaged, it must be replaced by the same type.
- This appliance is not intended for use by persons (including children) with reduced physical, sensory or mental capabilities, or lack of experience and knowledge, unless they have been given supervision or instruction concerning use of the appliance by a person responsible for their safety.
• Children should be supervised to ensure that they do not play with the appliance. - When charging the appliance, the power switch must be off.
- This Appliance should not be used by children or people who are physically challenged.
- This appliance is not a toy, and if not used in the correct manner, can lead to unnecessary damage or failure to perform.
- Do not use your appliance out doors or on any wet surface or for wet pick up. Never use the product to suck up water.
- Do not pick up hard or sharp objects, matches, hot ashes, cigarette ends or other similar items.
Caution
- Do not spray with or pick up flammable liquids, cleaning fluids, aerosols or their vapours.
- Do not run over the power charging cord when using your appliance or remove the plug by pulling on the power cord.
- Do not continue to use your appliance or charger if it appears faulty.
- Do not replace the batteries with non-rechargeable batteries.
- The battery must be removed from the appliance before it is scrapped
- The appliance must be disconnected from the supply mains when removing the battery
- The battery is to be disposed of safely
- Do not recharge non-rechargeable batteries, the battery is not replaceable
Motor Power: 350W Adaptor Model:MC2805B-V Input: 100-240V\~50-60Hz 0.5A Output: 25.0V---0.5A 12.5W 29.0V---0.5A 14.5W
Battery Type: 25.2V, 2000mAh, Li-ion Charging Time: 3-5 hours Dust Bin Volume: 0.45L Running Time: Max Power Mode: ≥12mins Mid Power Mode: ≥30mins Min Power Mode: ≥60mins
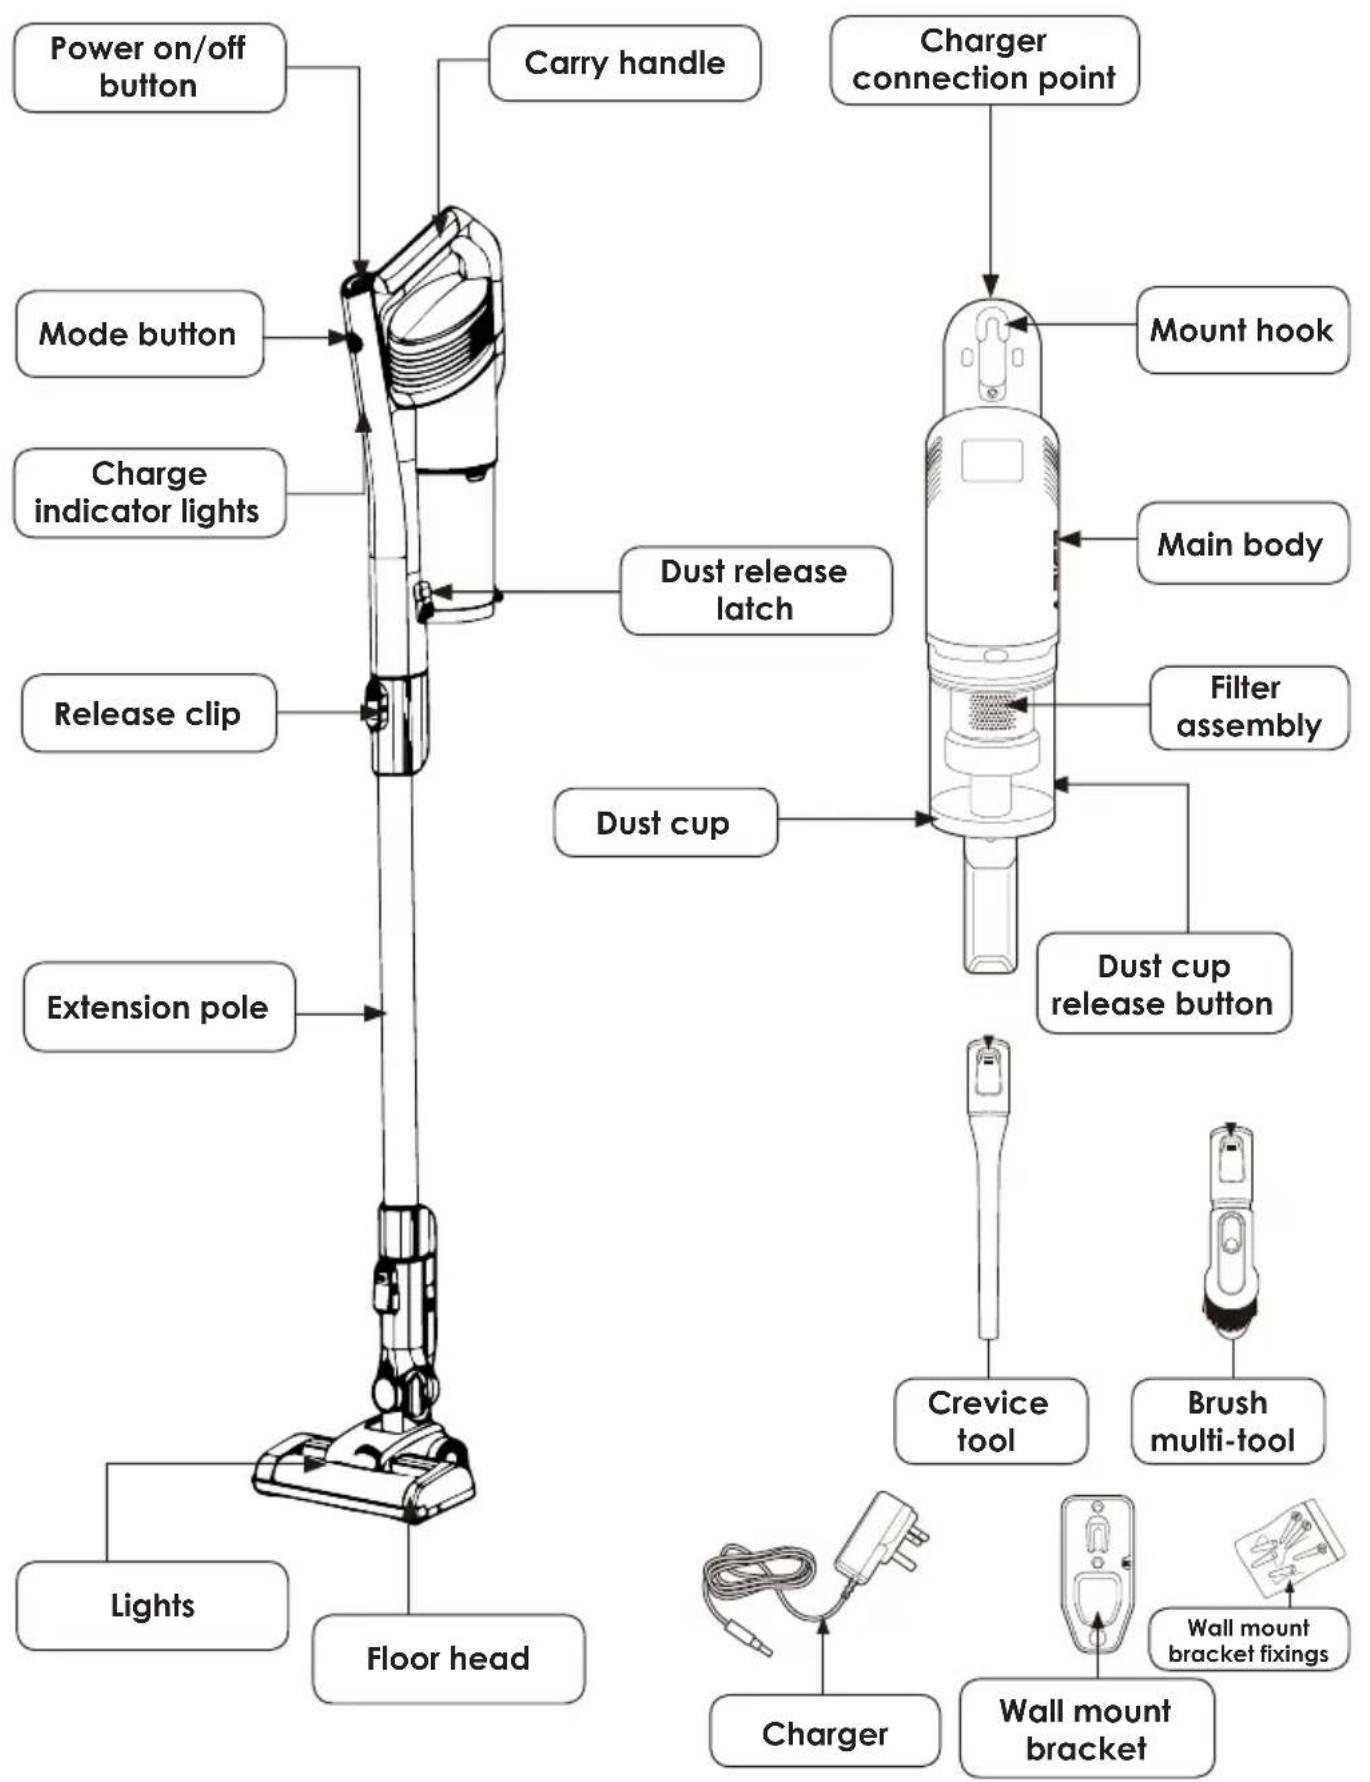
Names of Main Parts
text_image
Power on/off button Carry handle Charge indicator lights Mode button Release clip Extension pole Floor head Lights Dust release latch Dust cup Charger connection point Mount hook Main body Filter assembly Dust cup release button Crevice tool Brush multi-tool Wall mount bracket fixings Charter Wall mount bracket Floor headOperation instructions
How to use your vacuum cleaner
Ensure the vacuum cleaner is fully charged and assembled before using. Always take care when vacuuming stairs.
- There are two power settings on the stick vac: max mode (this has a higher suction power but a shorter running time, approx 15 mins) and
eco mode (lower suction power with a longer running time, approx 45 mins).
The stick vac will always start in max mode. The run time may vary depending on the surface being cleaned.
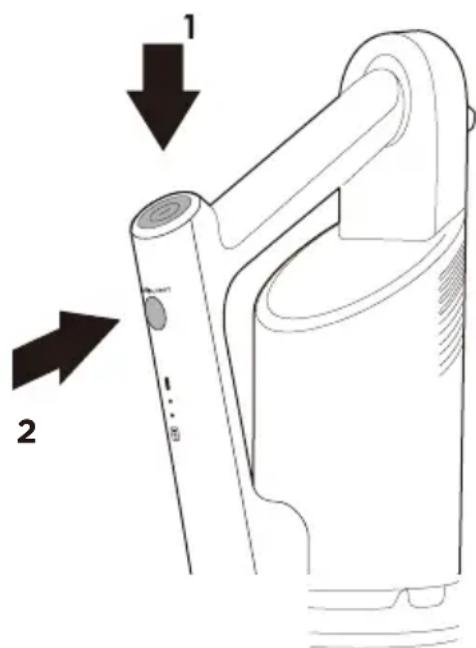
- For the 'max' mode simply press the power button (1), while for 'eco' mode press the power button (1) followed by the mode button (2). The max operation light will illuminate when in 'max' mode and go out when switched to 'eco' mode.
When required, press the power button again to turn off the stick vac.
text_image
Diagram of a handheld device with labeled parts and directional arrows indicating movement or assembly.-
Move the floor head back and forth over the surface. Use even strokes. Don't press hard; allow the stick vac to suck away the debris. There are lights on the floor head which will illuminate automatically when the stick vac is in operation to help with visibility in dark corners/areas.
-
The stick vac has charge indicator lights, these are the two small lights on the handle.
Whilst charging - the lower light will flash and the top light is off
Half charged - the lower light is on and the top light will flash
Fully charged - both lights are on, will turn off after 10mins
When in use and the battery is almost gone, the bottom light will be off and the top light will flash. After approximately 10 seconds the stick vac will automatically switch off.
- It is advisable to empty the dust cup after each use. For best performance, check the filters are clean (see the 'Removing and cleaning the dust cup and filters' section of this manual).
Operation instructions
Charging vacuum cleaner
Before use we recommend that the stick vac is charged fully for between 3 and 4 hours. When first purchased there will be some charge so it may not take the full amount of time to fully charge.
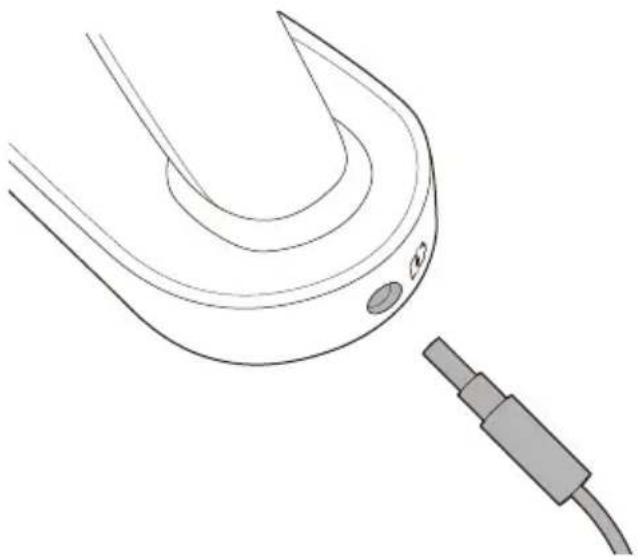
- Plug the end of the charger into the charger connection point located on the top of the stick vac main body. It is recommended that the stick vac is charged without any attachments connected and the appliance is laid on a flat surface.
- Plug the charger into the mains.
- The lower charge indicator light will flash on and off to show the appliance is charging. Leave to charge.
- Once fully charged, the charge indicator light will stop flashing and both lights will be lit.
- Turn off from the mains power and remove the charger.
Note: Do not leave the stick vac unattended or leave overnight when charging. The appliance will not work whilst charging.
natural_image
Line drawing of a medical or laboratory device with a curved top and attached rod (no text or symbols)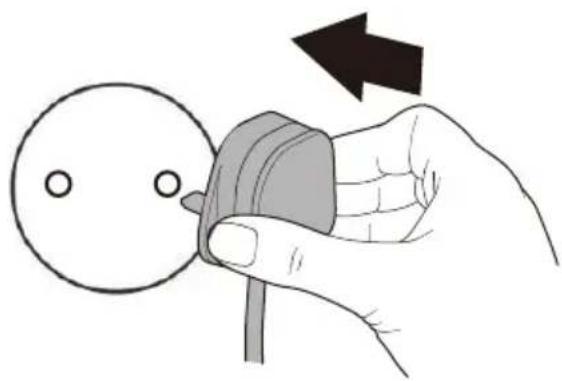
natural_image
Hand holding a small mechanical component with a circular head and arrow indicating rotation (no text or symbols)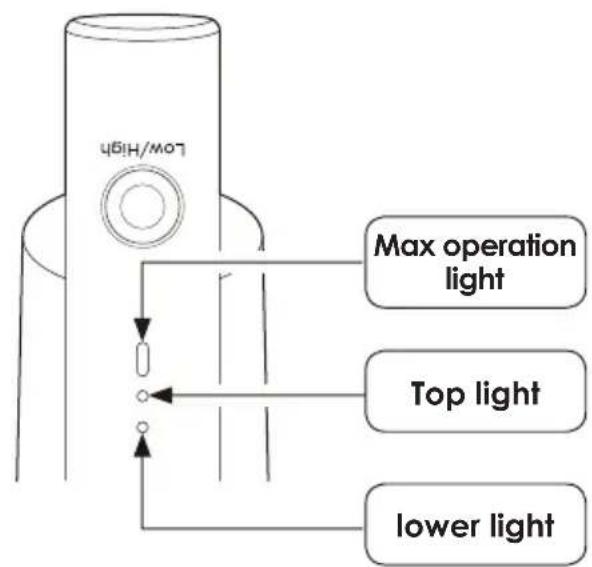
text_image
Low/High Max operation light Top light lower lightMaintenance guide
Emptying the dust cup
Ensure the stick vac is switched off and any attachments are removed before emptying the dust cup.
-
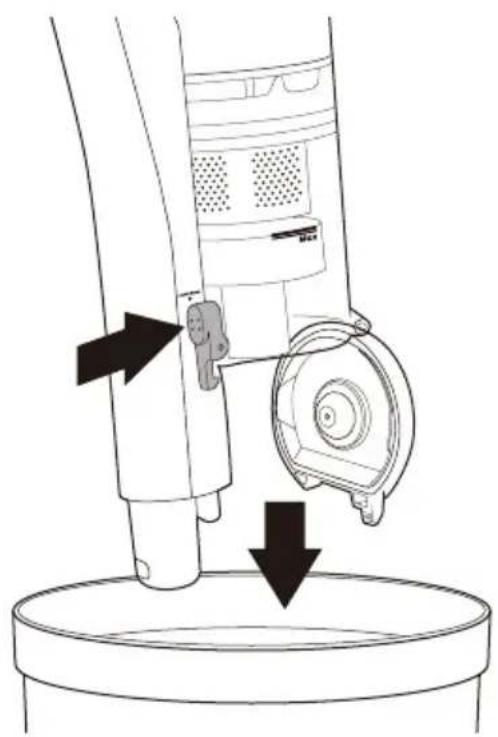
Hold the cup assembly over a household bin and push the dust release latch on the side of the dust cup. The debris will fall out into the bin. Please note: Do not allow the dust cup to overfill. Don't exceed the MAX level marker. Empty regularly. Every time you empty the dust cup, check the filter assembly and tap gently over the household bin to remove any excess dust.
-
Once empty close the lid until it clicks shut.
Removing and cleaning the dust cup and filters
Before starting any cleaning, ensure the stick vac is not charging and is switched off. It is easier to remove the dust cup without any attachments on the stick vac.
-
Empty the dust cup as shown in the 'Emptying the dust cup' section of this manual.
-
Press the dust cup release button located on the side of the main body near the bottom of the dust cup (1). Then pull the dust cup away from the main body, keeping the cup fairly upright (2).
natural_image
Diagram of a mechanical device with arrows indicating force or movement, no text or symbols present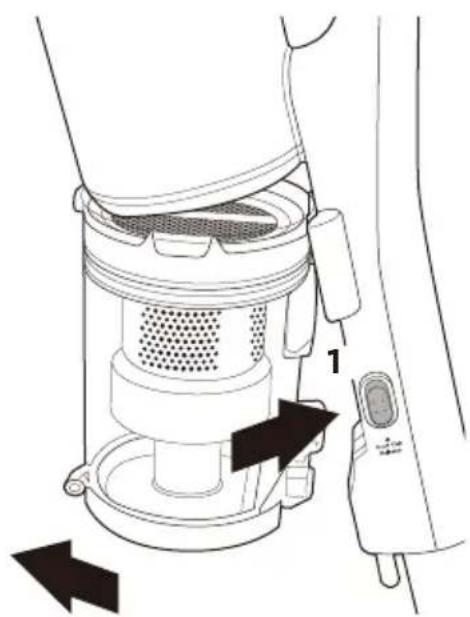
natural_image
Technical diagram of a vacuum cleaner with labeled component (no text or symbols present)2
Maintenance guide
-
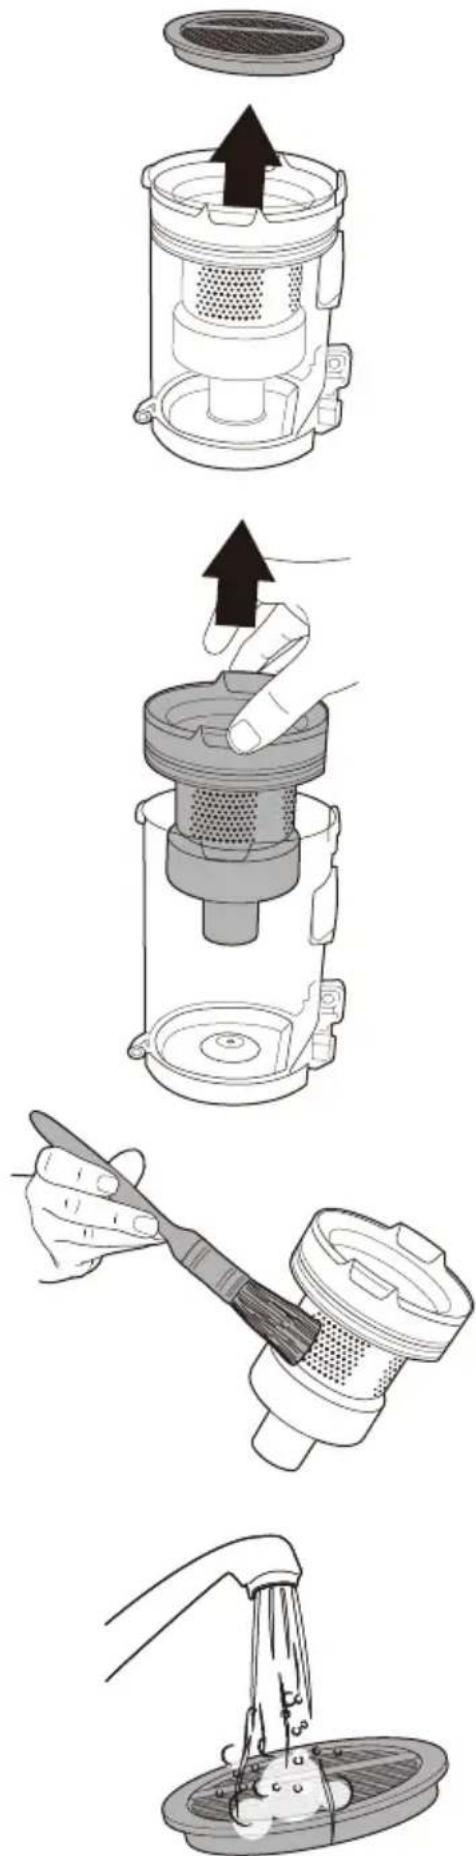
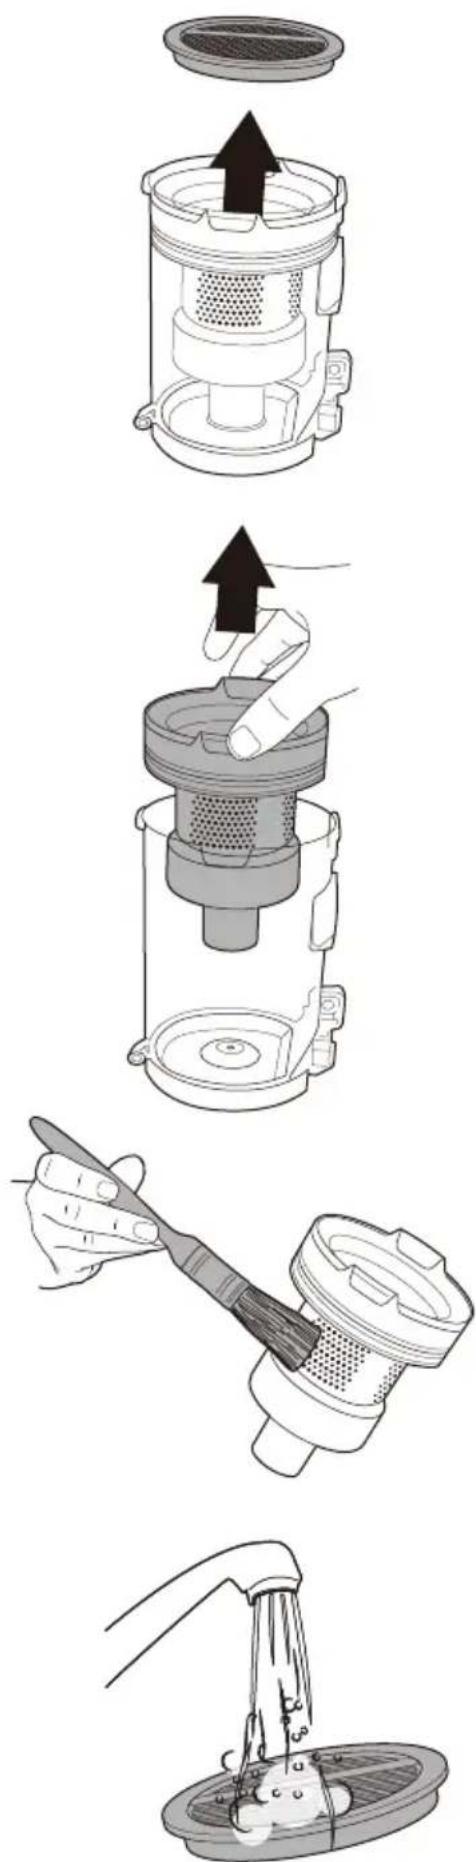
The dust cup houses the circular sponge filter and filter assembly. Firstly remove the circular sponge filter by pinching the ribbon material at the top of the filter and pulling upwards, then set aside.
-
Pinch either side of the filter assembly and pull upwards away from the dust cup. Tap the filter assembly gently over the household bin to remove any large amounts of dust.
Note: Do not allow the dust cup to overfill. Don't exceed the MAX level marker. Empty regularly.
-
Remove any more excess dust from the filter assembly using a soft brush or a clean paint brush. The filter can be broken down into three parts. Hold the top section and twist the lower section in the direction of the arrow and the unlock padlock icon.
-
Rinse the dust cup, filter assembly parts and circular sponge filter under warm water until the water runs clear and leave to dry for 24 hours.
text_image
Diagram illustrating the step-by-step installation of a cleaning device, showing steps from top view to drain discharge.Maintenance guide
-
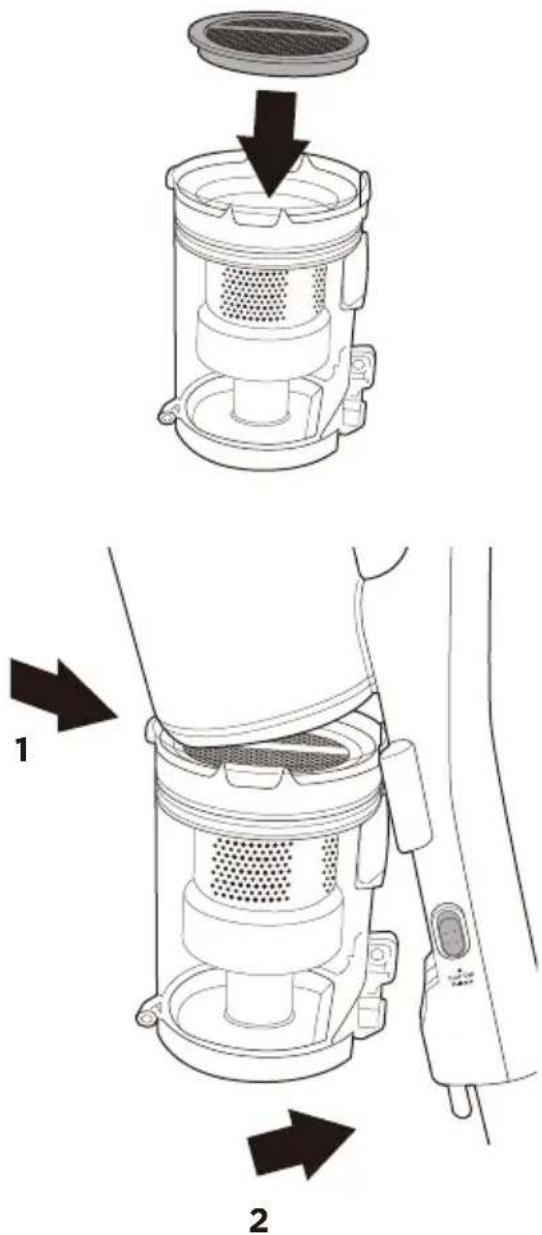
Once all the parts are thoroughly dry, reassemble the filter assembly parts following the arrow and the icon for the locked padlock and place it back into the dust cup. Don't forget to put the circular sponge filter back in the top of the filter assembly.
-
Replace the dust cup to the main body by hooking the channel on the top of the dust cup with the lug on the main body (1). Push the dust cup back towards the main body until you hear it click into place (2).
Note: It is important to regularly maintain and clean the filters. A clogged filter reduces suction power and can shorten the life of your stick vac.
text_image
Technical diagram showing two views of a device with labeled components and directional arrows indicating assembly or installation steps.Below is a recommended guide for how often you should clean the filters:
| Filter type Recommended cleaning times | |
| Filter assembly | Shake out debris when you empty the dust cup. Use the soft dusting brush to gently remove any dust build-up.Rinse under warm water once a month or more often if required. |
| Circular sponge filter | ccasionally remove any dust/debris as necessary. The filter can also be rinsed under warm water once a month. |
Maintenance guide
Removing and cleaning the floor head and roller brush
Before starting any cleaning, ensure the stick vac is not charging and is switched off and remove the floor nozzle from the rest of the stick vac.
If the roller brush becomes tangled during use, the self-protect system will shut off the stick vac. If that happens, please follow below steps.
-
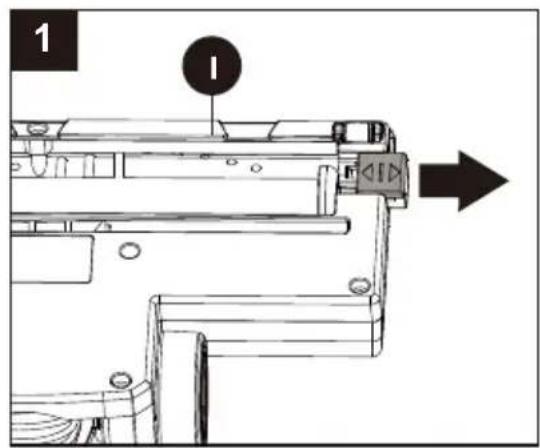
Turn the floor brush head (I) upside down. To access the roller brush, slide the tab, marked with arrows, to the right.
-
Pull the roller brush at a slight angle up and out of the floor brush head. Any build up of hair etc. can now be removed from the roller brush. Scissors can be used to cut any hair away from the roller if necessary, taking care not to cut any of the brush bristles.
-
Once the roller brush is cleaned, replace the roller brush by aligning the left, open side of the roller with the star cog shape on the floor brush head. You may need to twist the roller head a little to lock this in place.
-
Push the other end of the roller down as far as it will go. Slide the tab back to the left to lock in place.
text_image
1 1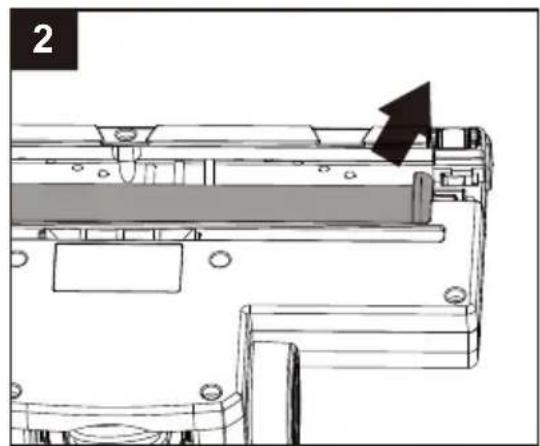
natural_image
Technical line drawing of a mechanical assembly with an arrow indicating direction (no text or symbols present)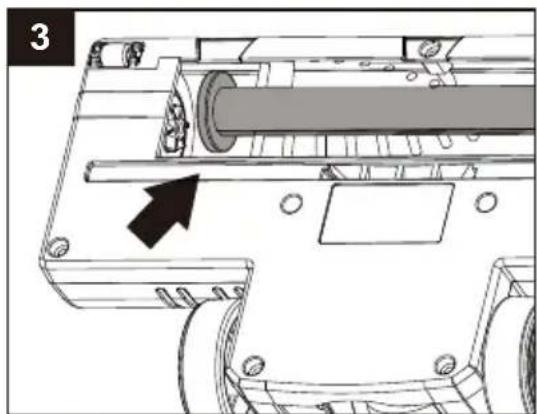
natural_image
Mechanical assembly diagram showing a cylindrical component with mounting holes and a directional arrow (no text or symbols)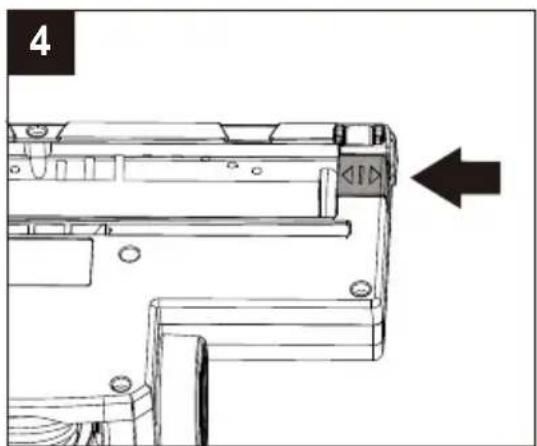
natural_image
Technical diagram of a mechanical assembly with an arrow indicating direction (no text or symbols present)Maintenance guide
Clearing a blockage
Ensure the stick vac is not plugged into the mains supply and is switched off before dismantling the vac.
The stick vac would only become blocked if the dust cup has exceeded the 'Max' level, the filters are clogged up or a large object has been sucked up.
- Check the dust cup and empty if necessary.
- Check the 2 filters in the unit, remove any debris/dust and wash if necessary.
- If the floor head, crevice or brush multi-tool were in use, detach them from the main body or extension pole and check for blockages. Remove any blockages.
- Detach the extension pole and look down it to see if there are any blockages. If there are, use the handle of a broom to clear the obstruction. Take care not to damage the pole in the process.
- Check the roller brush for any hair or thread which may have become wrapped around the roller. Cut away with a pair of scissors. To do this safely, remove as shown in the 'Removing and cleaning the floor head roller brush' section of this manual.
Storing the cordless stick vac
Your stick vac can be stored safely and securely by hanging from the wall mount supplied with your product or by removing all the attachments and stowing together in a cupboard. Either way will help avoid the product falling over and causing damage.
Always turn off and unplug from the mains supply before storing.
- Remove any attachments if the stick vac was last used with them on.
- Store the stick vac and accessories away safely in a dry place.
Storing the cordless stick vac with the wall mount
- Find a suitable spot in your household where you'd like to secure your stick vac.
- Mark the desired screw hole positions on the wall using a pencil. We recommend that the stick vac hangs slightly lifted off the floor.
- Use the wall mount bracket fixings supplied only if suitable for your wall type.
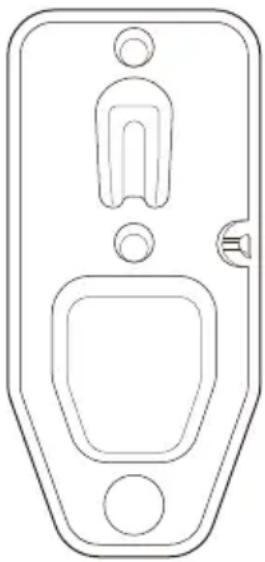
- Screw the wall mount bracket fixings and mount to the wall (see illustration for which way the mount should hang on the wall).
- The stick vac can then be mounted on the wall mount. The mount hook can be found on the back on the main body near the handle.
natural_image
Technical line drawing of a mechanical component with mounting holes and internal features (no text or symbols)| Troubleshooting | |
| Problem Solution | |
| The stick vac is not cleaning well. | Empty the dust cupRemove excess dust from the filtersWash the filtersCheck for blockages |
| The stick vac has stopped or won’t work. | Charge the vac (check the mains socket works and the switch is turned on)It might be blocked - check items 1 to 4 aboveProduct self-protection activated. Switch off the vac and leave the motor to cool for an hour then try using again. |
| The lights on the floor head turn off and/or the motor overheat light illuminates red. | The floor head is blocked, refer to the ‘Removing and cleaning the floor head and roller brush’ section of this manual.The roller brush motor has become overheated due to heavy loading. This might be due to extended use on a long pile carpet or loose rug. Leave the vac to cool for an hour then use the eco mode rather than the max mode. |

0 LGHD□,WDOLD□6□U□□□D□VRFLR□XQLFR□□
natural_image
Line drawing of a vacuum cleaner with handle and base mount (no text or symbols)text_image
Diagram of a handheld device with labeled parts and directional arrows indicating assembly or operation.natural_image
Line drawing of a medical or laboratory device with a curved top and attached cable (no text or symbols)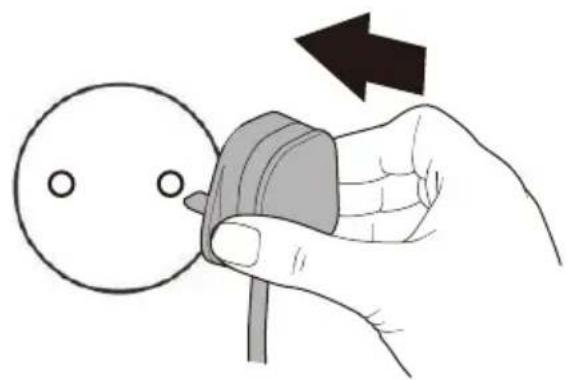
natural_image
Hand holding a small mechanical component with a circular head and arrow indicating rotation (no text or symbols)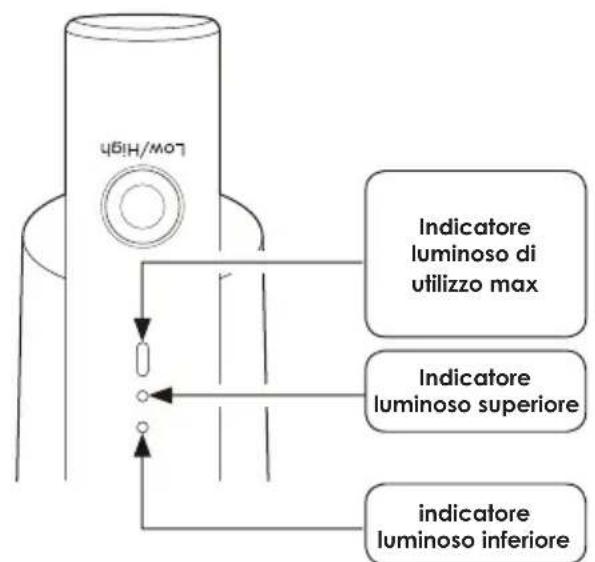
natural_image
Diagram of a mechanical device with arrows indicating force or movement, no text or symbols present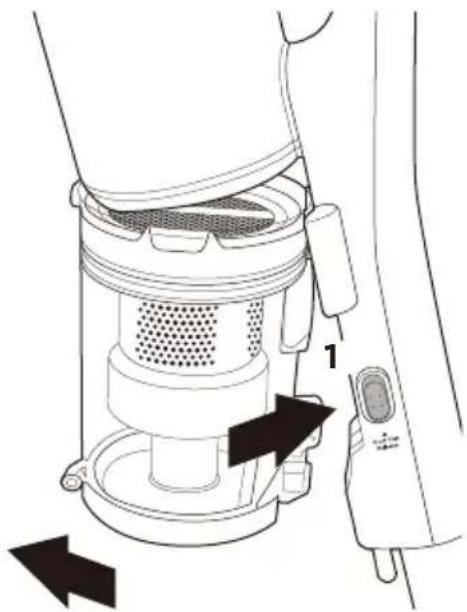
natural_image
Technical diagram of a vacuum cleaner assembly with labeled component (no text or symbols present)2
text_image
Diagram illustrating the step-by-step installation of a cleaning device, showing steps from top view to drain level.text_image
Technical diagram showing two steps of a device's internal structure, labeled 1 and 2, with arrows indicating process flow.natural_image
Technical line drawing of a mechanical assembly with no visible text or symbols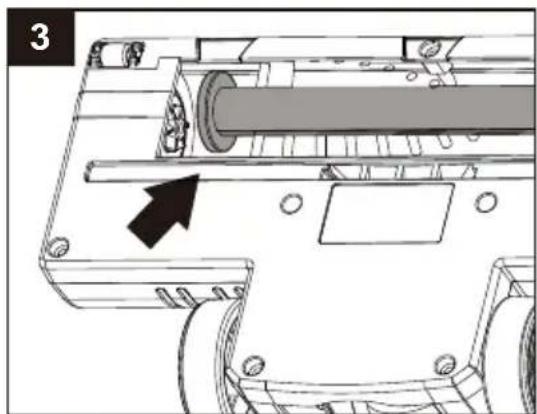
natural_image
Mechanical assembly diagram showing a cylindrical component with mounting holes and a black arrow indicating direction (no text or symbols)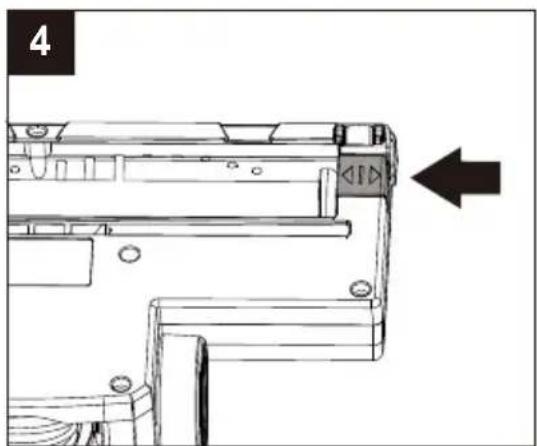
natural_image
Technical diagram of a mechanical assembly with an arrow indicating direction (no text or symbols present)natural_image
Line drawing of a mechanical component with mounting holes and internal features (no text or symbols)natural_image
Line drawing of a vacuum cleaner with handle and base mount (no text or symbols)text_image
Diagram of a handheld device with labeled parts and directional arrows indicating movement or assembly.natural_image
Line drawing of a medical or laboratory device with a curved top and attached cable (no text or symbols)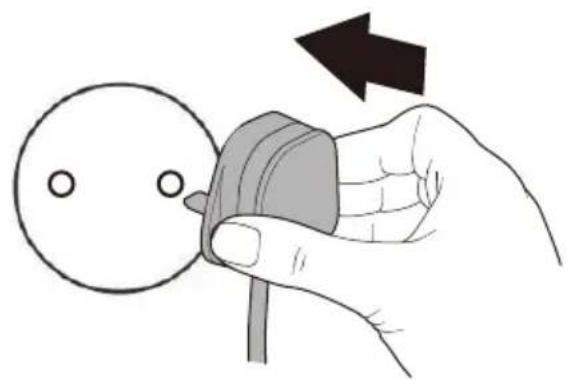
natural_image
Hand holding a small mechanical component with a circular head and arrow indicating rotation (no text or symbols)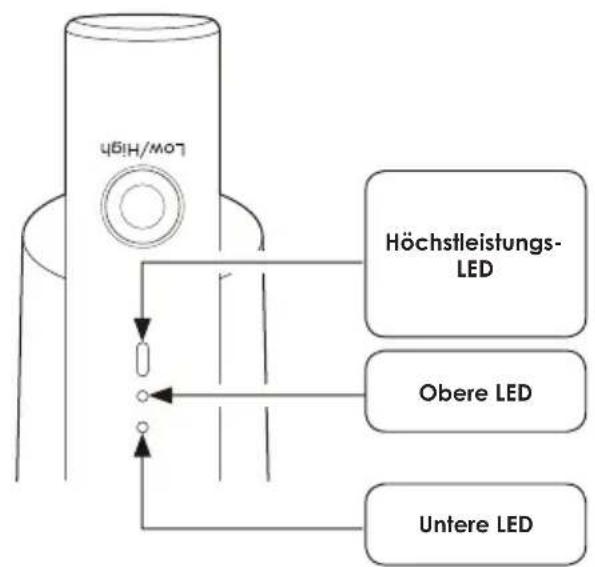
text_image
Low/High Höchtleistungs- LED Obere LED Untere LEDPflegehinweise
natural_image
Diagram of a mechanical device with arrows indicating motion or force direction (no text or symbols present)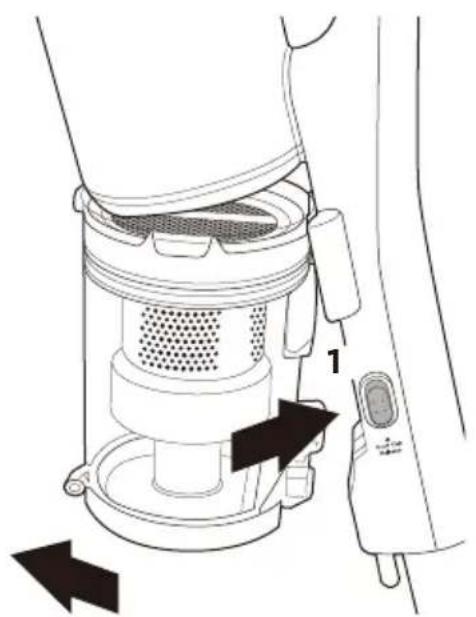
natural_image
Technical diagram of a vacuum cleaner with labeled component (no text or symbols present)2
natural_image
Diagram showing three steps of a cleaning or dust removal device, with arrows indicating process direction (no text or symbols present)natural_image
Illustration of a hand using a tool to clean or brush the cleaner of a mechanical component (no text or symbols visible)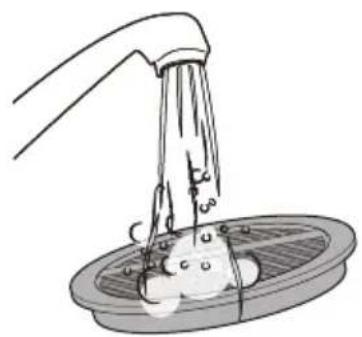
natural_image
Illustration of a showerhead spraying water into a circular container with bubbles (no text or symbols)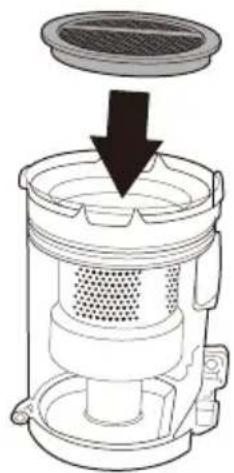
natural_image
Cross-sectional diagram of a mechanical device with a downward arrow indicating a component (no text or symbols present)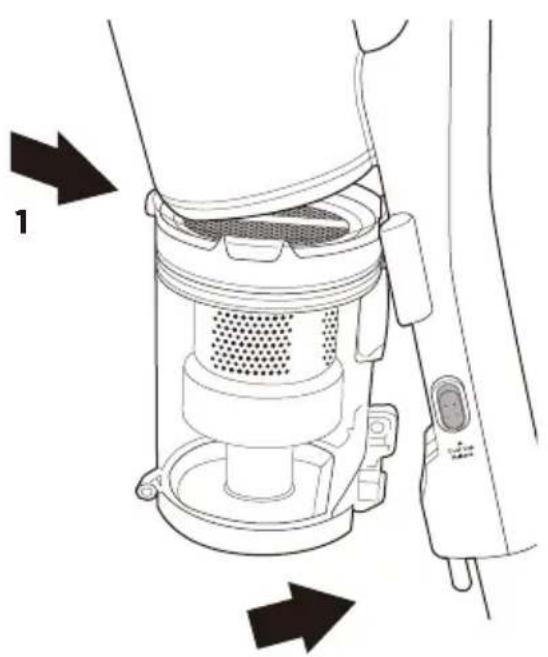
natural_image
Technical diagram of a vacuum cleaner internal structure with directional arrows indicating flow or movement (no text or symbols present)2
natural_image
Technical line drawing of a mechanical assembly with no visible text or symbols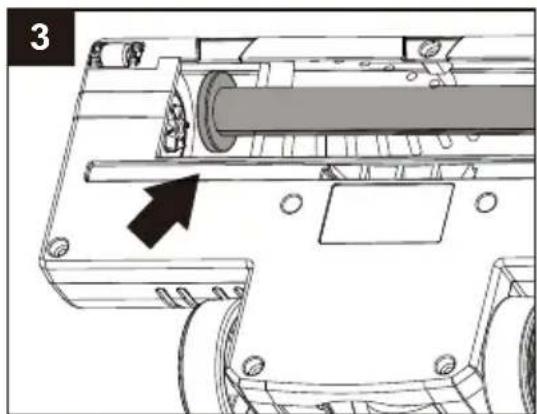
natural_image
Mechanical assembly diagram showing a shaft and housing with an arrow indicating direction (no text or symbols present)
natural_image
Technical diagram of a mechanical assembly with an arrow indicating direction (no text or symbols present)Pflegehinweise
natural_image
Line drawing of a mechanical or electrical component with no text or symbolsnatural_image
Line drawing of a vacuum cleaner with handle and base mount (no text or symbols)text_image
Diagram of a handheld device with labeled parts and directional arrows indicating movement or assembly.natural_image
Line drawing of a medical or laboratory device with a curved top and attached cable (no text or symbols)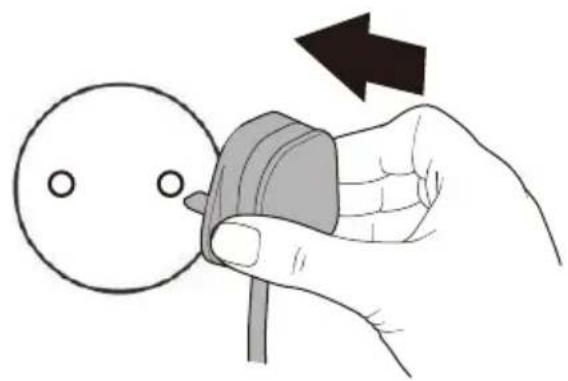
natural_image
Hand holding a small mechanical component with a circular head and arrow indicating rotation (no text or symbols)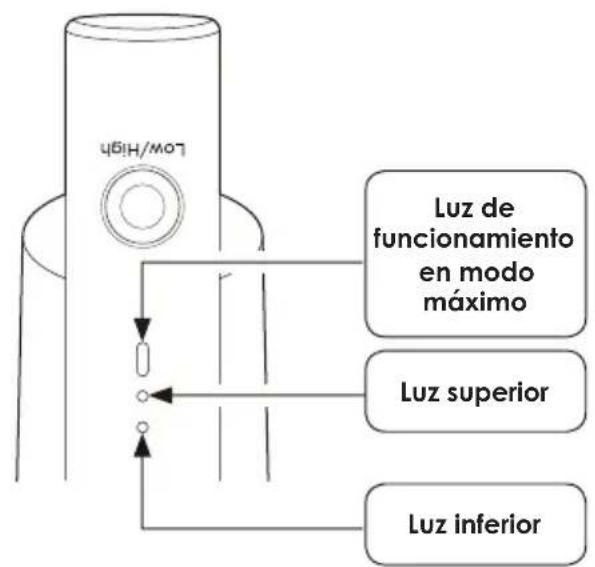
natural_image
Diagram of a mechanical device with directional arrows indicating movement or force (no text or symbols present)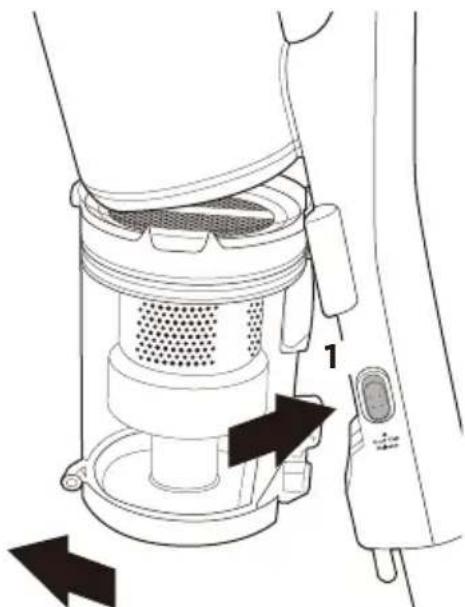
natural_image
Technical diagram of a vacuum cleaner with labeled component (no text or symbols present)2
text_image
Diagram illustrating the step-by-step installation of a cleaning device, showing steps from top view to drain discharge.text_image
Technical diagram showing two views of a vacuum cleaner with labeled components and directional arrows indicating assembly steps.natural_image
Technical line drawing of a mechanical assembly with no visible text or symbols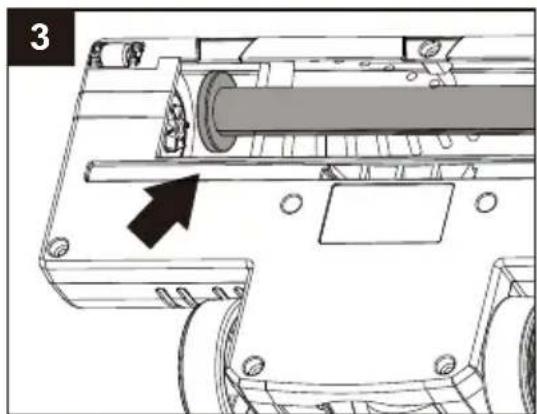
natural_image
Mechanical assembly diagram showing a cylindrical component with mounting holes and a black arrow indicating direction (no text or symbols)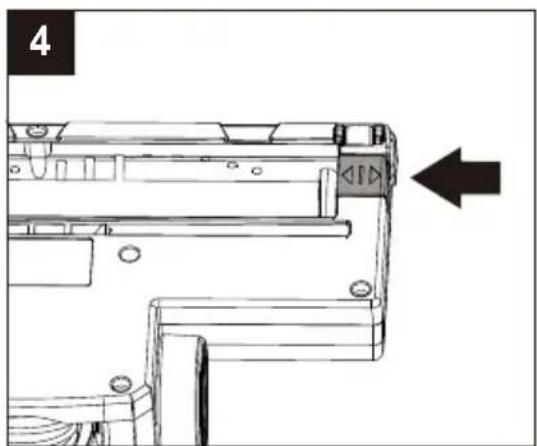
natural_image
Technical diagram of a mechanical assembly with an arrow indicating direction (no text or symbols present)natural_image
Line drawing of a mechanical component with mounting holes and internal features (no text or symbols)natural_image
Line drawing of a vacuum cleaner with handle and base mount (no text or symbols)Instructions Importantes De Securite
text_image
Diagram of a handheld device with labeled parts and directional arrows indicating process flownatural_image
Line drawing of a medical or laboratory device with a curved top and attached rod (no text or symbols)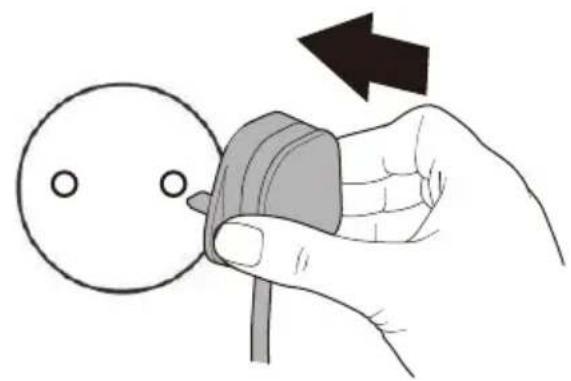
natural_image
Illustration of a hand holding a small mechanical component with a circular head and two holes, no text or symbols present.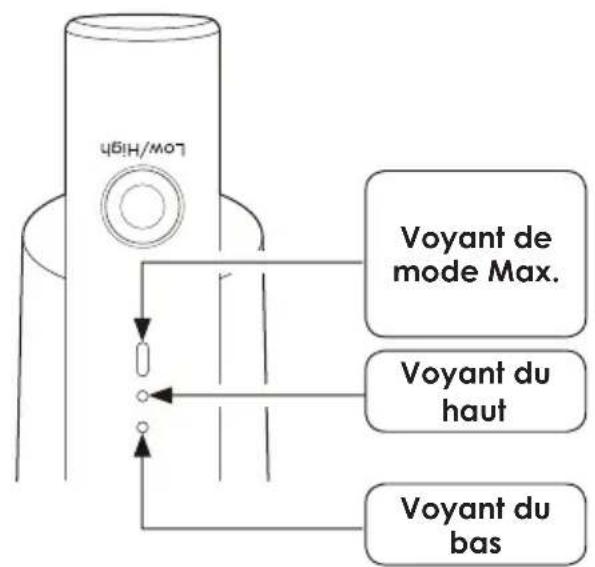
text_image
Low/High Voyant de mode Max. Voyant du haut Voyant du basGuide d'entretien
natural_image
Diagram of a mechanical device with arrows indicating motion or force direction (no text or symbols)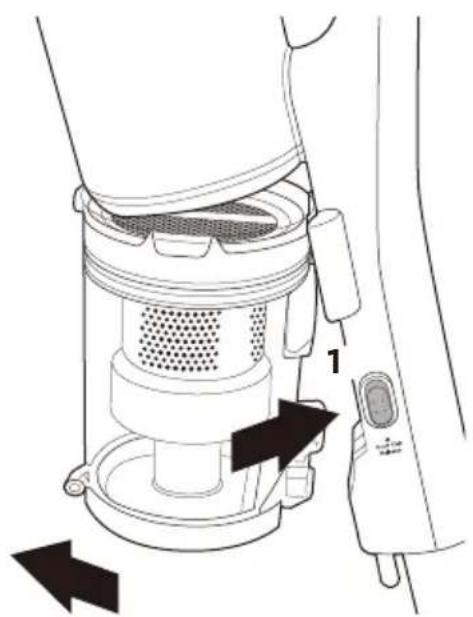
natural_image
Technical diagram of a vacuum cleaner with labeled component (no text or symbols present)2
Guide d'entretien
text_image
Diagram illustrating the step-by-step installation of a cleaning device, showing steps from top view to final discharge.Guide d'entretien
text_image
Technical diagram showing two steps of a device's internal structure, labeled 1 and 2, with arrows indicating process flow.natural_image
Technical line drawing of a mechanical assembly with no visible text or symbols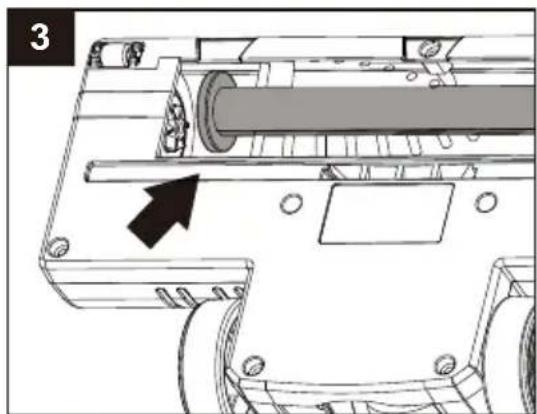
natural_image
Mechanical assembly diagram showing a cylindrical component with mounting holes and a black arrow indicating direction (no text or symbols)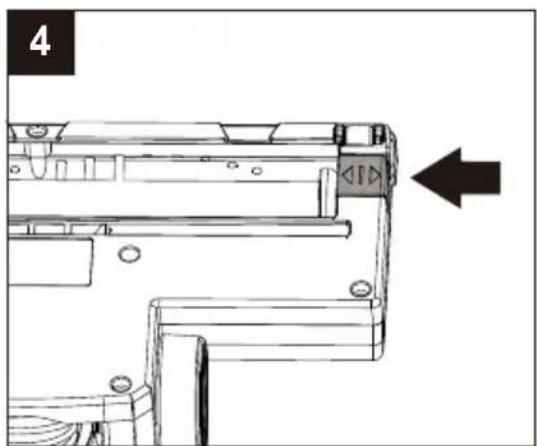
natural_image
Technical diagram of a mechanical assembly with an arrow indicating direction (no text or symbols present)Guide d'entretien
Nettoyer un blocage
natural_image
Technical line drawing of a mechanical component with mounting holes and internal features (no text or symbols)natural_image
Line drawing of a vacuum cleaner with handle and base mount (no text or symbols)Važne upute za sigurnost
text_image
Diagram of a handheld device with labeled parts and directional arrows indicating process stepsnatural_image
Line drawing of a medical or laboratory device with a curved top and attached cable (no text or symbols)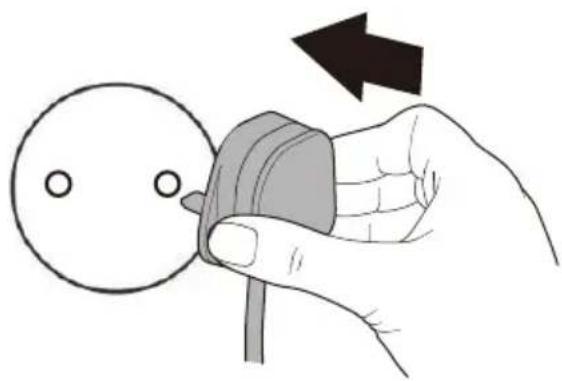
natural_image
Hand holding a small mechanical component with a circular head and arrow indicating rotation (no text or symbols)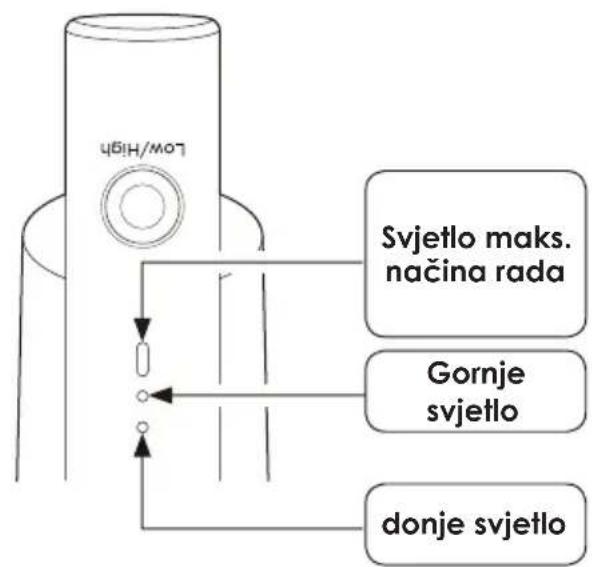
text_image
Low/High Svjetlo maks. načina rada Gornje svjetlo donje svjetloVodič za održavanje
Pražnjenje spremnika za prašinu
natural_image
Diagram of a mechanical device with arrows indicating movement or force, no text or symbols present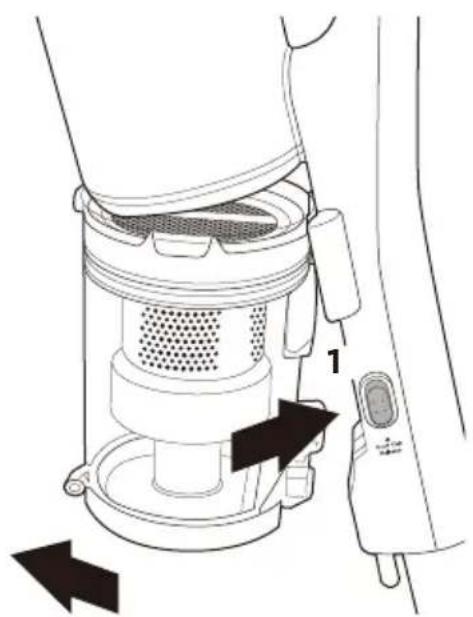
natural_image
Technical diagram of a vacuum cleaner with labeled component (no text or symbols present)2
Vodič za održavanje
- Spremnik za prašinu sadrži kružni spužvasti filtar i filtar. Prvo uklonite kružni spužvasti filtar tako što ćete primiti trake na vrhu filtera i povući prema gore, a zatim ga odložiti.
- Zakrenite obje strane sklopa filtra i povucite prema gore od spremnika za prašinu. Lagano protresite sklop filtra nad kantom kako biste uklonili velike količine prašine.
Napomena: Nemojte dopustiti da se spremnik za prašinu previše napuni. Ne prelazite oznaku razine MAX. Praznite redovito.
- Uklonite višak prašine sa sklopa filtra mekom četkom ili čistom soboslikarskom četkom. Filtar se može rastaviti na tri dijela. Držite gornji dio i uvijte donji dio u smjeru strelice i ikone za otključavanje katanca.
- Spremnik za prašinu, dijelove sklopa i kružni spužvasti filtar isperite pod toplom vodom dok voda ne bude čista i ostavite da se osuši 24 sata.
text_image
Diagram illustrating the step-by-step installation of a cleaning device, showing steps from top-down view to final discharge.Vodič za održavanje
text_image
Technical diagram showing two views of a vacuum cleaner with labeled components and directional arrows indicating assembly steps.| Tip filtra Preporučena vremena čišćenja | |
| Sklop filtra | Istresite ostatke kad ispraznite spremnik s prašinom.Koristite meku četkicu za prašinu kako biste nježnouklonili nakupine prašine.Isperite pod toplom vodom jednom mjesečno iličešće, ako je potrebno. |
| Kružnispužvasti filtar | Povremeno uklonite prašinu/nečistoće po potrebi.Filter se također može isprati pod toplom vodomjednom mjesečno. |
Vodič za održavanje
Uklanjanje i čišćenje podne glave i četke s valjkom
Prije početka bilo kakvog čišćenja, osigurajte da se štapni usisivač ne puni i da je isključen i uklonite podnu mlaznicu s ostatka usisivača.
natural_image
Technical line drawing of a mechanical assembly with an arrow indicating direction (no text or symbols present)
natural_image
Mechanical assembly diagram showing a cylindrical component with mounting holes and a directional arrow (no text or symbols)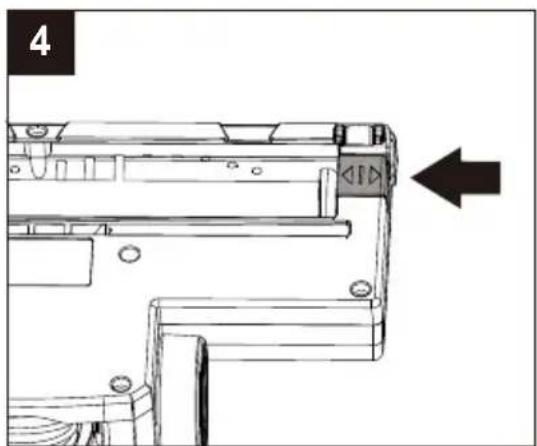
natural_image
Technical line drawing of a mechanical component with an arrow indicating direction (no text or symbols present)Vodič za održavanje
Uklanjanje blokade
natural_image
Line drawing of a mechanical component with mounting holes and internal features (no text or symbols)| Rješavanje Problema | |
| Problem Rješenje | |
| Štapni usisivač ne čisti dobro. | 1. Ispraznite spremnik za prašinu2. Uklonite višak prašine s filtera3. Operite filtre4. Provjerite ima li blokada |
| Štapni usisivač je zaustavljen ili neće raditi. | 1. Napunite usisivač (provjerite da li mrežna utičnica radi i da li je prekidač uključen)2. Može biti blokiran - provjerite stavke gore od 1 do 43. Aktivirana je automatska zaštita proizvoda. Isključite usisivač i ostavite motor da se ohladi sat vremena, a zatim pokušajte ponovo. |
| Svjetla na podnoj glavi se isključuju i/ili svjetlo pregrijavanja motora svijetli crveno. | 1. Podna glava je blokirana, pogledajte odjeljak "Uklanjanje i čišćenje podne glave i četke s valjkom" u ovom priručniku.2. Motor četke s valjkom se pregrijao zbog velikog opterećenja. To bi moglo biti posljedica duže upotrebe na dugom tepihu ili otiraču. Ostavite usisivač da se hladi sat vremena, a zatim upotrijebite eko, a ne maks. način rada. |

0 LGHD□,WDOLD□6□U□□□D□VRFLR□XQLFR□□