
MKE17H1ASS - Electric kettle MIDEA - Free user manual and instructions
Find the device manual for free MKE17H1ASS MIDEA in PDF.
| Brand | Midea |
| Model | MKE17H1ASS |
| Category | Electric kettle |
| Product type | Electric kettle with digital display and temperature control |
| Dimensions (approx.) | 22 x 24 x 25 cm (L x W x H) |
| Weight (approx.) | 1.2 kg |
| Power supply | 220-240 V ~ 50/60 Hz |
| Rated power | 1850-2200 W |
| Capacity | 1.7 L |
| Material | Plastic and stainless steel |
| Main functions | Rapid boiling, keep warm, temperature setting (40-100 °C), automatic shut-off, dry boil protection |
| Temperature control | Presets: 40 °C, 60 °C, 70 °C, 80 °C, 90 °C, 100 °C |
| Swivel base | 360° rotation |
| Limescale filter | Removable, washable |
| Care and cleaning | Descaling with white vinegar; clean with a damp cloth; do not immerse |
| Safety | Automatic shut-off, overheat protection, double insulation |
| Spare parts and repairability | Limescale filter available; in case of defect, contact after-sales service |
| General information | Household use only; suitable for children over 8 years under supervision |
Frequently Asked Questions - MKE17H1ASS MIDEA
User questions about MKE17H1ASS MIDEA
0 question about this device. Answer the ones you know or ask your own.
Ask a new question about this device
Download the instructions for your Electric kettle in PDF format for free! Find your manual MKE17H1ASS - MIDEA and take your electronic device back in hand. On this page are published all the documents necessary for the use of your device. MKE17H1ASS by MIDEA.
USER MANUAL MKE17H1ASS MIDEA
natural_image
Line drawing of a modern water heater with handle and side panel (no text or symbols)ELECTRIC KETTLE
USER MANUAL
MKE17H1ASS
Warning notices: Before using this product, please read this manual carefully and keep it for future reference. The design and specifications are subject to change without prior notice for product improvement. Consult with your dealer or manufacturer for details. The diagram above is just for reference. Please take the appearance of the actual product as the standard.
LANGUAGES
EN English
DE German
IT Italian
FR France
ES Spanish
THANK YOU LETTER
Thank you for choosing Midea! Before using your new Midea product, please read this manual thoroughly to ensure that you know how to operate the features and functions that your new appliance offers in a safe way.
CONTENTS
THANK YOU LETTER 01
SAFETY INSTRUCTIONS 02
SPECIFICATIONS 06
PRODUCT OVERVIEW 07
OPERATION INSTRUCTIONS 08
CLEANING AND MAINTENANCE 11
TROUBLESHOOTING 12
TRADEMARKS, COPYRIGHTS AND LEGAL STATEMENT 13
DISPOSAL AND RECYCLING 15
DATA PROTECTION NOTICE 16
SAFETY INSTRUCTIONS
Intended Use
The following safety guidelines are intended to prevent unforeseen risks or damage from unsafe or incorrect operation of the appliance. Please check the packaging and appliance on arrival to make sure everything is intact to ensure safe operation. If you find any damage, please contact the retailer or dealer. Please note modifications or alterations to the appliance are not allowed for your safety concern. Unintended use may cause hazards and loss of warranty claims.
Explanation of Symbols

Danger
This symbol indicates that there are dangers to the life and health of persons due to extremely flammable gas.

Warning of electrical voltage
This symbol indicates that there is a danger to life and health of persons due to voltage.

Warning
The signal word indicates a hazard with a medium level of risk which, if not avoided, may result in death or serious injury.

Caution
The signal word indicates a hazard with a low degree of risk which, if not avoided, may result in minor or moderate injury.

Attention
The signal word indicates important information (e.g. damage to property), but not danger.

Observe instructions
This symbol indicates that a service technician should only operate and maintain this appliance in accordance with the operating instructions.
Read these operating instructions carefully and attentively before using/commissioning the unit and keep them in the immediate vicinity of the installation site or unit for later use!
SAFETY PRECAUTIONS
When using electrical appliances, basic safety precautions should always be followed, including the following:
- Read all instructions.
- Do not touch hot surfaces. Use handles or knobs.
- To protect against fire, electric shock and injury to persons, do not immerse cord, plugs, base or kettle in water or other liquid.
- Never leave the appliance unattended when in use. Close supervision is necessary when any appliance is used by or near children.
- Unplug from outlet when not in use, no water in kettle, filling water, moving kettle and before cleaning. Allow to cool before putting on or taking off parts, and before cleaning the appliance.
- Do not operate any appliance with a damaged cord or plug or after the appliance malfunctions, or has been damaged in any manner. Call our toll-free Customer Assistance Number for examination, repair or adjustment.
- Do not use a base unit other than the one supplied. The use of accessory attachments not recommended by the appliance manufacturer may result in fire, electric shock or injury to persons.
- Do not use outdoors.
- Do not let cord hang over edge of table or counter, or touch hot surfaces. Always store excess portion of the power cord in the compartment of the base unit.
- Electric kettle must be operated on a flat surface. Do not place on or near a hot gas or electric burner, or in a heated oven, or on the top of other electric appliances.
- Always attach plug to appliance first, then plug cord into the wall outlet. To disconnect, turn control to off, then remove plug from wall outlet.
- Do not use appliance for other than intended use.
- To avoid circuit overload, do not operate another high wattage appliance on the same circuit.
- Do not fill kettle when positioned on base. Dry the water on the bottom of the body before placing it onto the power base.
- Be aware of steam being emitted from spout or lid espe-cially during refilling. Do not remove lid during boiling cycle.
- Do not use the kettle to heat anything other than water.
- Do not fill above the “max” indication marking. Do not operate kettle if water is below minimum marking. If the kettle is overfilled, boiling water may be ejected. The kettle is only to be used with the base unit provided.
- Do not insert any object into slots or holes of the kettle.
- Open the lid with the release button only. Push lid down to lock in place.
- Scalding may occur if the lid is removed during the brewing cycles.
- This appliance is for HOUSEHOLD USE ONLY. DO NOT OPERATE APPLIANCE IF THE LINE CORD SHOWS ANY DAMAGE OR IF APPLIANCE WORKS INTERMITTENTLY OR STOPS WORKING ENTIRELY.
- This appliance can be used by children aged from 8 years and above and persons with reduced physical, sensory or mental capabilities or lack of experience and knowledge if they have been given supervision or instruction concerning use of the appliance in a safe way and understand the hazards involved.
Children shall not play with the appliance. Cleaning and user maintenance shall not be made by children unless they are older than 8 and supervised. Keep the appliance and its cord out of reach of children aged less than 8 years.
- This appliance is intended to be used in household and similar applications such as:
- environments;
- farm houses;
- by clients in hotels, motels and other residential type envi-ronments;
-
In bed and breakfast type environments;
-
If the supply cord is damaged, it must be replaced by the manufacturer, its service agentor similarly qualified persons in order to avoid a hazard.
- Warning: Avoid spillage on the connector.
- The heating element surface is subject to residual heat after use.
| Mode | power consumption | Time for the equipment to reach the applicable low power mode or condition |
| Off mode (plug in) | 0.5W | 20min |
| standby mode (after operation) | 0.8W | 20min |
SAVE THESE INSTRUCTIONS.
Warning: Misuse may cause potential injury. The heating element surface is subject to residual heat after use.
SPECIFICATIONS
| MKE17H1ASSProduct Model | |
| Rated voltage | 220-240V~ 50/60Hz |
| Rated power | 1850-2200W |
| Capacity | 1.7L |
EN
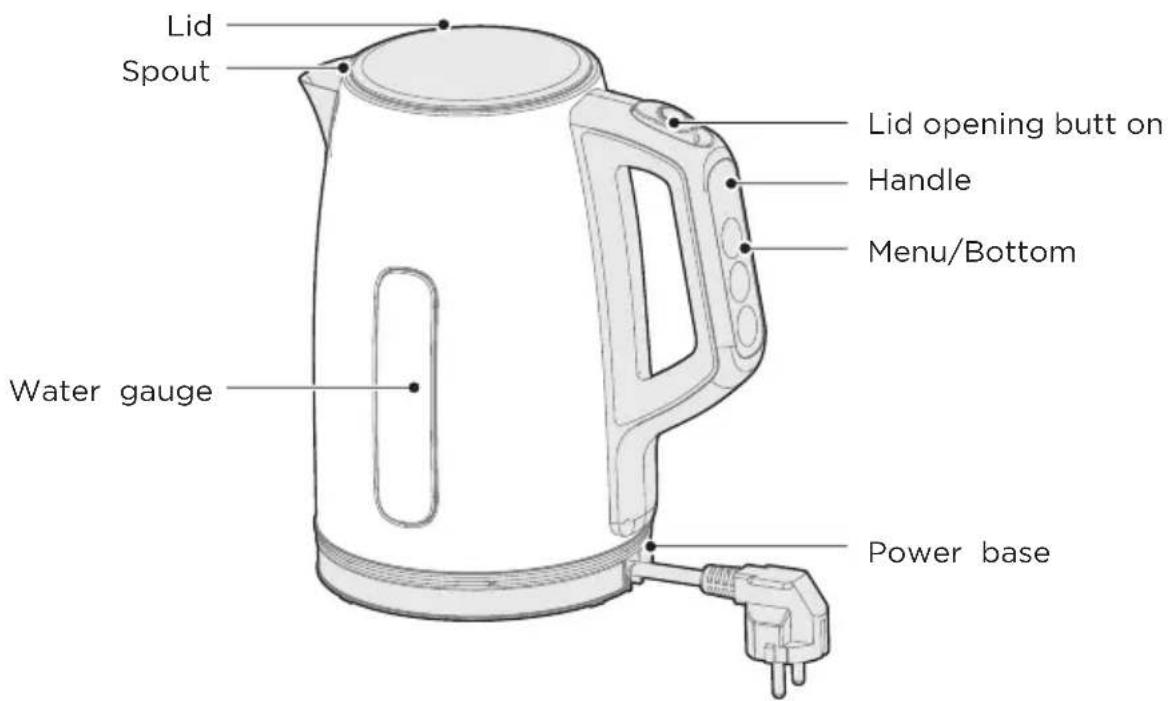
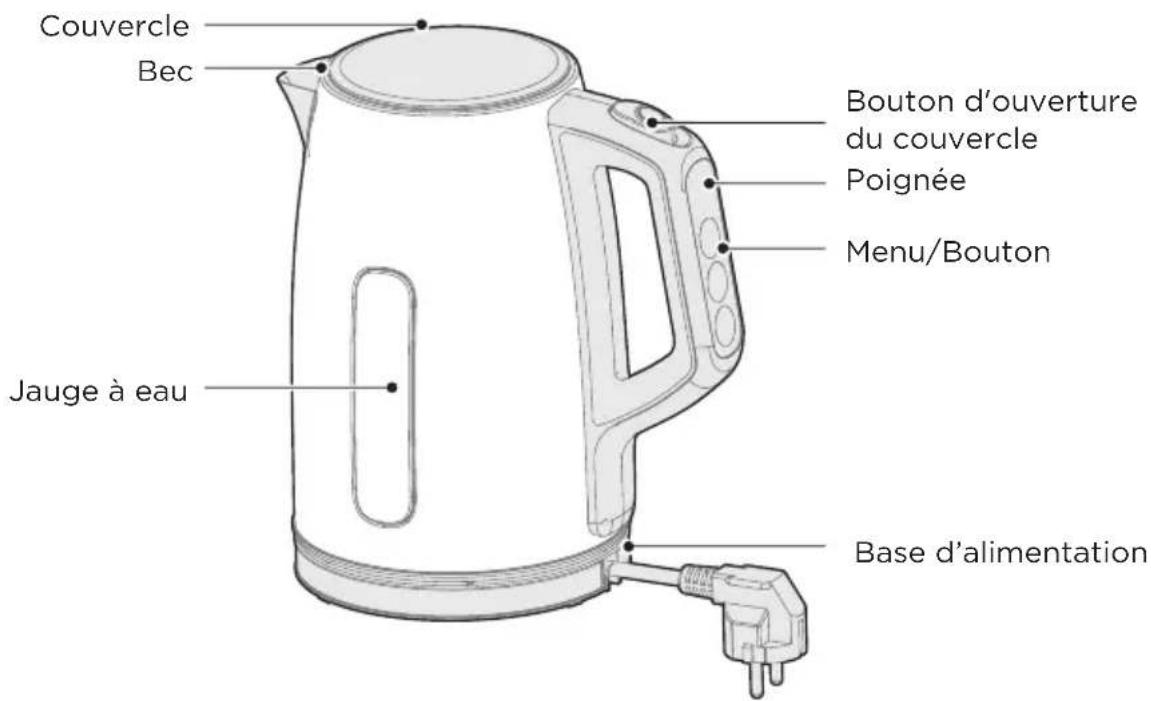
PRODUCT OVERVIEW
Part Name
EN

NOTE
Pictures in the manual are for reference only, and real objects within the packaging box will prevail in the end.
OPERATION INSTRUCTIONS
Brief Introduction
Rational design, bring convenience and enjoyment to your life.
- Rapid boiling, save time and energy for you.
- Removable filter to keep the water clean.
- Domestic temperature control to switch off after boiling.
- Automatically cuts out for boil-dry protection.
- 360 Rotational power base.
- Easy read water gauge.
- Thermostat of high quality.
How to Use
For the first time to use or no use for a long time, it is recommended that you fill to the maximum level mark with fresh tap water, boil and empty the kettle at least 2 times to clear kettle of any tiny particles. Do not drink such water.
- Press the lid lock on the handle, and you can open it.
- Remove the kettle from the base to the filling place. Fill the kettle with desired amount (no less than the minimum and no more than the maxi-mum.) Put back the lid; place the kettle back on the base unit.
- Connect the plug into a power outlet (220-240V, AC), switch the kettle on by pressing the switch. The light will illuminate to indicate the kettle is heating.
- The kettle will automatically switch off once the water has boiled and the neon light goes off.
- Lift the kettle from the base, and you can pour out the water into container.
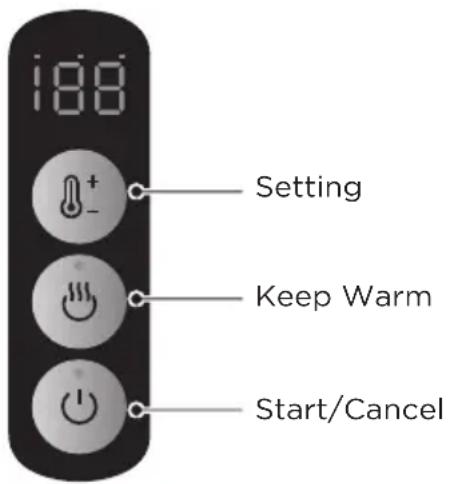
Product Menu
Product Function Description
- Power on: The kettle is placed on the base, the display screen is bright for 1 seconds, long noise for 1 seconds, then the water temperature is displayed, enter standby;
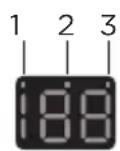
- One-button boiling: Standby and non-temperature setting state (i.e. display the actual water temperature), press the power button (Start), boil water to 100 degrees and then enter standby state. In the process of boiling water, the digital tube shows the real-time water temperature, lights up 1, and the power lamp is always on.
- Fixed temperature boiling water: set the temperature by setting key (70-80-90-100-40-60 in order), light 1. Stand by and the temperature setting state (that is, display the setting temperature), press the power button (Start) to boil water to the setting temperature and then enter the standby state. In the process of boiling water, the digital tube shows the real-time water temperature, lights up 1, and the power lamp is always on.
- Heat preservation mode 1: Setting the temperature (70-80-90-100-40-60 in sequence). (When the heat preservation mode is set first, the heat preservation mode is maintained while setting the temperature, and the dots above the digital tube are displayed accordingly.) Press the heat preservation mode to select the key, set the boiling water heat preservation mode (100 °C heat preservation key is invalid), light 1 + 2. Stand by and the temperature setting state (i.e. display the set temperature), press the power supply key (Start) to start boiling water, boiling water reaches the target temperature and enters the heat preservation state. At the same time, the buzzer calls three times. During the heat preservation process, the set temperature (1.0L-1.7L, +3/-3°C, +1.0L-0.5L (excluding 1.0), +5/-5 °C) is maintained, and then the boiling water enters the shutdown state after 60 +2/-2 minutes. (Temperature control and thermal insulation keys in no sequence)
- Heat preservation mode 2: Setting the temperature (70-80-90-100-40-60 in sequence). (When the heat preservation mode is set first, the heat preservation mode is maintained while setting the temperature, and the dots above the digital tube are displayed accordingly.) Press the heat preservation mode to select the key, set the boiling water heat preservation mode (100°C heat preservation key is invalid), light 1 + 2 + 3 .
Standby and temperature setting state (that is to say, display the set temperature), press the power button (Start) to start boiling water, boiling water to 100^ C, then enter the heat preservation state, and buzzer calls 3 times. In the process of heat preservation, the temperature should be maintained after cooling down to the set temperature, and the set temperature should be maintained (1.0L-1.7L, +3/-3°C, 1.0L-0.5L (exclud-ing 1.0), +5/-5°C) after 60 +2/-2 minutes, the machine will be shut down. (Temperature control and thermal insulation keys in no sequence)

NOTE
- In standby state, the operation of “temperature selection” or “heat preservation mode setting” key enters the temperature setting state (i.e. display the setting temperature). If the “Start” key is operated in 3S, the user-set boiling function will be activated. If the “Start” key is not operated in 3S, the machine will return to the non-temperature setting state (i.e. display the actual temperature). The “Start” key is operated in this state, and the boiling water can be directly activated to 100^ C.
- When the heat preservation mode is set to 1 or 2, then the setting temperature can be adjusted by setting key. The adjustment range can only be adjusted between 70-80-90-40-60.
Botton Function Description
- Temperature adjustment button: 70-80-90-100-40-60 cycle setting temperature;
- Press start directly after power-on. By default, 100 is turned on and off, light 1, and start key light is on.
- Press the heat preservation key once, heat preservation mode 1: heat preservation after boiling water setting temperature; light 1 + 2 , heat preservation key light (it is suggested to change into heat preservation before lighting).
- Press the heat preservation key twice, heat preservation mode 2: after boiling water to 100, wait for cooling to set temperature for heat preservation; light 1 + 2 + 3 , heat preservation key light (suggested to be changed into heat preservation and then light up).
- Press the heat preservation key three times, cancel the heat preservation, turn on the lamp 1, turn off the heat preservation key lamp;
- After pressing the start, the light flashes twice (two sounds at the same time), and then remains on, after canceling, the power lamp goes out. Press once again to cancel, stop heating/insulation, real-time display of water temperature, enter standby.
- Default key prompt sound, setting key and keep ware key combination press, long sound, switch to button silent sound; Repeat combination key, short sound, restore key prompt sound.
Note: Every triggering function button needs "drop" sound feedback, which is not functional in the following cases.
- Setting up 100^ C, pressing the heat preservation key has no function.
EN
CLEANING AND MAINTENANCE

NOTE
To prolong the kettle's life, please clean the mineral deposits in the kettle regularly.
Always unplug from the plug socket and allow to cool down before cleaning. Do not use chemical, steel wool, or abrasive cleaners to clean the outside of the kettle, as these will scratch the surface and fade the outside color.
- Fill the kettle with 0.5L white vinegar and the remainder with water and allow to stand for over 1 hours;
• Empty the solution from the kettle. Wipe off the deposits remained with damp cloth - Fill the kettle with clean water, bring to boil and then discard the water. Repeat and the kettle will be ready to use;
- If necessary, repeat the operations above for several times;
- Do not immerse into water. The surface of the kettle may be wiped over with a damp cloth and polished with a soft dry cloth.
- Grasp the top of the scale filter and pull upwards to remove. Wash with clean water and dry thoroughly before replacing in the kettle.
EN
TROUBLESHOOTING
Operation of your appliance can lead to errors and malfunctions. The following tables contain possible causes and notes for resolving an error message or malfunction. It is recommended to read the tables carefully below in order to save your time and money that may cost for calling to the service center.
| Problem Cause | Solution | |
| Indicator light does not work | • The plug is not inserted properly | Check plug |
| • Loose connecting wire | Send to the after-sales service point for maintenance | |
| • The lamp is broken | Send to the after-sales service point for maintenance | |
| Other problems | • Other faults of the product | Send to the after-sales service point for maintenance |
EN
TRADEMARKS, COPYRIGHTS AND LEGAL STATEMENT
Midea logo, word marks, trade name, trade dress and all versions there of are valuable assets of Midea Group and/or its affiliates (“Midea”), to which Midea owns trademarks, copyrights and other intellectual property rights, and all goodwill derived from using any part of an Midea trademark. Use of Midea trademark for commercial purposes without the prior written consent of Midea may constitute trademark infringement or unfair competition in violation of relevant laws.
This manual is created by Midea and Midea reserves all copyrights thereof. No entity or individual may use, duplicate, modify, distribute in whole or in part this manual, or bundle or sell with other products without the prior written consent of Midea.

All the described functions and instructions were up to date at the time of printing this manual. However, the actual product may vary due to improved functions and designs.
Warranty policy / service
We congratulate you to your new device and are convinced that you will be satisfied and have your joy with this modern appliance.
However, if you recognize a reason for a complaint, please contact us:
Email: customer_services@midea.com
Homepage: www.midea.com
In case of a technical fault, enter your exact address, telephone number, sales contract number and Device type (from the type plate of the device).
A precise fault description saves you time and money. For special questions, please contact the customer service center.
Before calling for service:
Please check whether there is an operating error or a cause that has nothing to do with the function of your device.
Please observe the note in the user manual and check whether:
- The power plug is connected
- The power plug may be damaged
- Electricity is available
Warranty terms
This device has been manufactured and tested according to the most modern methods. The seller warrants for faultless material and proper manufacture for a period of 24 months from the date of sale to the end user. The unit is not suitable for commercial use.
The claim under guarantee lapses in the event of intervention by the Buyer or by a third party. Damage caused as a result of improper handling or operation, incorrect installation or storage, improper connection or installation as well as an act [...] of God or other external factors shall not be covered by this warranty.
When claims are submitted, the manufacturer reserves the right to make improvements to defective parts or to replace or exchange the device.
Only if it is not possible to achieve the intended use of the device by repairing or replacing the device, the buyer can demand a reduction of the purchase price or the cancellation of the purchase contract within 6 months from the date of purchase.
Claims for damages, including consequential damages, are excluded unless they are based on intent or gross negligence.
The guarantee claim exists only with submission of the product and the purchase receipt. This warranty is valid within Germany.
Midea Electrics Netherlands B.V. Johan Cruijff Boulevard 65, 1101 DL Amsterdam
DISPOSAL AND RECYCLING
Important Instructions For Environment
Compliance with the WEEE Directive and Disposing of the Waster Product: This product complies with EU WEEE Directive (2012/19/EU). This product bears a classification symbol for waster electrical and electronic equipment (WEEE).
This symbol indicates that this product shall not be disposed with other household wastes at the end of its service life. Used device must be returned to official collection point for recycling of electrical electronic devices. To find these collection systems please contact to your local authorities or retailer where the product was purchased. Each household performs important role in recovering and recycling of old appliance. Appropriate disposal of used appliance helps prevent potential negative consequences for the environment and human health.
natural_image
Symbol of a trash bin crossed with a diagonal line and a horizontal bar below (no text or labels)Compliance With Rohs Directive
The product you have purchased complies with EU RoHS Directive (2011/65/EU). It does not contain harmful and prohibited materials specified in the Directive.
Package Information
Packaging materials of the product are manufactured from recyclable materials in accordance with our National Environment Regulations. Do not dispose of the packaging materials together with the domestic or other wastes. Take them to the packaging material collection points designated by the local authorities.
natural_image
Recycling symbol with three chasing arrows forming a triangle (no text or labels)DATA PROTECTION NOTICE
For the provision of the services agreed with the customer,
we agree to comply without restriction with all stipulations of applicable data protection law, in line with agreed countries within which services to the customer will be delivered, as well as, where applicable, the EU General Data Protection Regulation (GDPR).
Generally, our data processing is to fulfil our obligation under contract with you and for product safety reasons, to safeguard your rights in connection with warranty and product registration questions. In some cases, but only if appropriate data protection is ensured, personal data might be transferred to recipients located outside of the European Economic Area.
Further information are provided on request. You can contact our Data Protection Officer via MideaDPO@midea.com. To exercise your rights such as right to object your personal date being processed for direct marketing purposes, please contact us via MideaDPO@midea.com. To find further information, please follow the QR Code.
EN
VIELEN DANK
E-mail: customer_services@midea.com
Web: www.midea.com
Midea Electrics Netherlands B.V.
Johan Cruijff Boulevard 65, 1101 DL Amsterdam
natural_image
Symbol of a trash bin crossed with a diagonal line and a horizontal bar below (no text or labels)DE
natural_image
Recycling symbol with three chasing arrows forming a triangle (no text or labels)DATENSCHUTZHINWEISE
E-mail: customer_services@midea.com
Sito web: www.midea.com
Midea Electrics Netherlands B.V.
Johan Cruijff Boulevard 65, 1101 DL Amsterdam
natural_image
Symbol of a trash bin crossed with no visible text or labelsnatural_image
Recycling symbol with three chasing arrows forming a triangle (no text or labels)VUE D'ENSEMBLE DU PRODUIT 07
INSTRUCTIONS SUR LE FONCTIONNEMENT 08
NETTOYAGE ET ENTRETIEN 11
DÉPANNAGE 12
MARQUES, DROITS D'AUTEUR ET MENTIONS LEGALES 13
VUE D'ENSEMBLE DU PRODUIT
Nom Des Pièces
Email: customer_services@midea.com
Midea Electrics Netherlands B.V.
Johan Cruijff Boulevard 65, 1101 DL Amsterdam
ELIMINATION ET RECYCLAGE
natural_image
Symbol of a trash bin crossed with a diagonal line and a horizontal bar below (no text or labels)natural_image
Recycling symbol with three chasing arrows forming a triangle (no text or labels)AVIS SUR LA PROTECTION DES DONNEES
natural_image
Symbol of a trash bin crossed with no text or numbers, representing environmental restriction (no text present)natural_image
Recycling symbol with three chasing arrows forming a triangle (no text or labels)make yourself at home


- USER MANUAL
- LANGUAGES
- THANK YOU LETTER
- CONTENTS
- SAFETY INSTRUCTIONS
- Intended Use
- Explanation of Symbols
- Danger
- Warning of electrical voltage
- Warning
- Caution
- Attention
- Observe instructions
- SAFETY PRECAUTIONS
- SAVE THESE INSTRUCTIONS.
- SPECIFICATIONS
- PRODUCT OVERVIEW
- Part Name
- NOTE
- OPERATION INSTRUCTIONS
- Brief Introduction
- How to Use
- Product Menu
- Product Function Description
- Botton Function Description
- CLEANING AND MAINTENANCE
- TROUBLESHOOTING
- TRADEMARKS, COPYRIGHTS AND LEGAL STATEMENT
- Warranty policy / service
- Before calling for service:
- Warranty terms
- DISPOSAL AND RECYCLING
- Important Instructions For Environment
- Compliance With Rohs Directive
- Package Information
- DATA PROTECTION NOTICE
- VIELEN DANK
- DE
- DATENSCHUTZHINWEISE
- VUE D'ENSEMBLE DU PRODUIT
- Nom Des Pièces
- ELIMINATION ET RECYCLAGE
- AVIS SUR LA PROTECTION DES DONNEES
Brand : MIDEA
Model : MKE17H1ASS
Category : Electric kettle