
1000 - Electric breast pump BabyOno - Free user manual and instructions
Find the device manual for free 1000 BabyOno in PDF.
| Product type | Hands-free electric breast pump |
| Brand | BabyOno |
| Model | 1000 (internal reference 501) |
| Power supply | Mains plug 100-240V, 50/60Hz; output 5V/1A; lithium battery 1100 mAh |
| Battery life | Approximately 120 minutes of continuous operation |
| Charging time | Approximately 150 minutes |
| Suction power | ≤0.038 MPa (adjustable from L1 to L7) |
| Rated power | 5 W |
| Pumping modes | Expression, Two-in-one (stimulation + expression), Dual-frequency (high and low frequencies) |
| Suction levels | 7 levels (L1-L7) for each mode |
| Timer | 30-minute cycle with automatic shut-off |
| Display | Digital screen with timer, suction level, and battery indicator |
| Materials in contact with milk | Silicone (funnel, membrane, valve, inserts) and polypropylene (collection cup) |
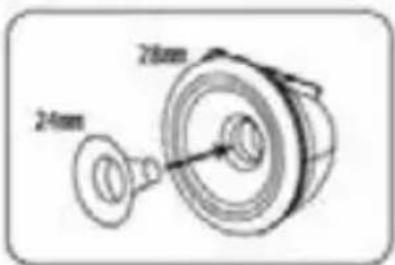
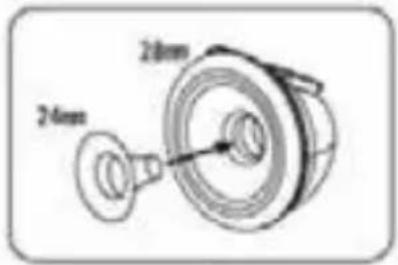
| Funnel size (flange) | 28 mm (standard); 24 mm and 21 mm adapters included |
| Cleaning and sterilization | Clean with hot water; sterilize by boiling for 30 seconds or using a dedicated sterilizer; do not microwave or put in dishwasher |
| Main unit maintenance | Wipe with a damp cloth; do not immerse |
| Box contents | Pump unit, silicone membrane, collection cup, 28 mm funnel, silicone valve, USB cable, 24 mm and 21 mm inserts |
| Warranty | Not specified in the manual; contact the seller |
| Approximate weight | Approximately 200 g (main unit) |
| Dimensions | Not specified; compact format |
Frequently Asked Questions - 1000 BabyOno
User questions about 1000 BabyOno
0 question about this device. Answer the ones you know or ask your own.
Ask a new question about this device
Download the instructions for your Electric breast pump in PDF format for free! Find your manual 1000 - BabyOno and take your electronic device back in hand. On this page are published all the documents necessary for the use of your device. 1000 by BabyOno.
USER MANUAL 1000 BabyOno
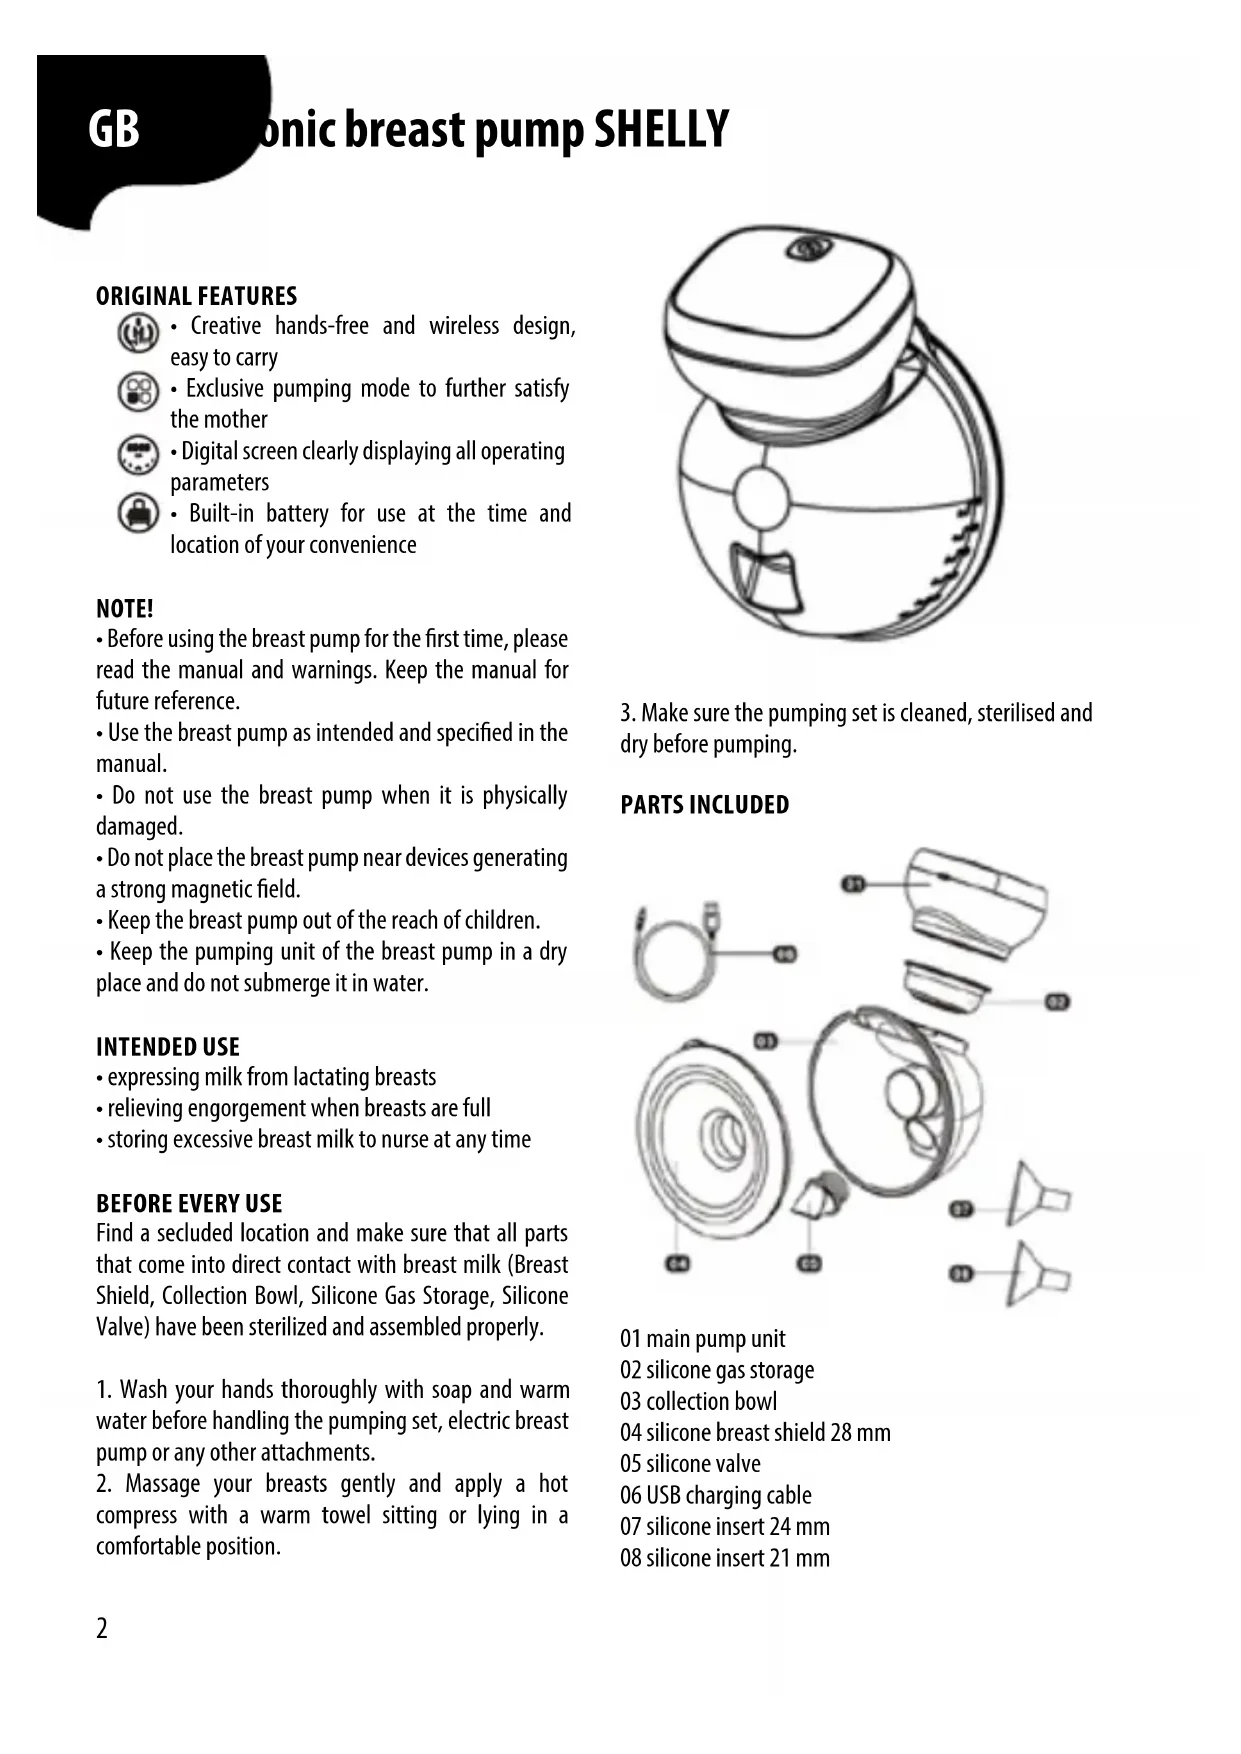
GB SHELLY electronic breast pump. 2
- Creative hands-free and wireless design, easy to carry

- Exclusive pumping mode to further satisfy the mother

• Digital screen clearly displaying all operating parameters

• Built-in battery for use at the time and location of your convenience
NOTE!
- Before using the breast pump for the first time, please read the manual and warnings. Keep the manual for future reference.
- Use the breast pump as intended and specified in the manual.
- Do not use the breast pump when it is physically damaged.
- Do not place the breast pump near devices generating a strong magnetic field.
- Keep the breast pump out of the reach of children.
- Keep the pumping unit of the breast pump in a dry place and do not submerge it in water.
INTENDED USE
• expressing milk from lactating breasts
• relieving engorgement when breasts are full
• storing excessive breast milk to nurse at any time
BEFORE EVERY USE
Find a secluded location and make sure that all parts that come into direct contact with breast milk (Breast Shield, Collection Bowl, Silicone Gas Storage, Silicone Valve) have been sterilized and assembled properly.
- Wash your hands thoroughly with soap and warm water before handling the pumping set, electric breast pump or any other attachments.
- Massage your breasts gently and apply a hot compress with a warm towel sitting or lying in a comfortable position.

natural_image
Line drawing of a coffee maker with a lid and spout, no text or symbols present- Make sure the pumping set is cleaned, sterilised and dry before pumping.
PARTS INCLUDED
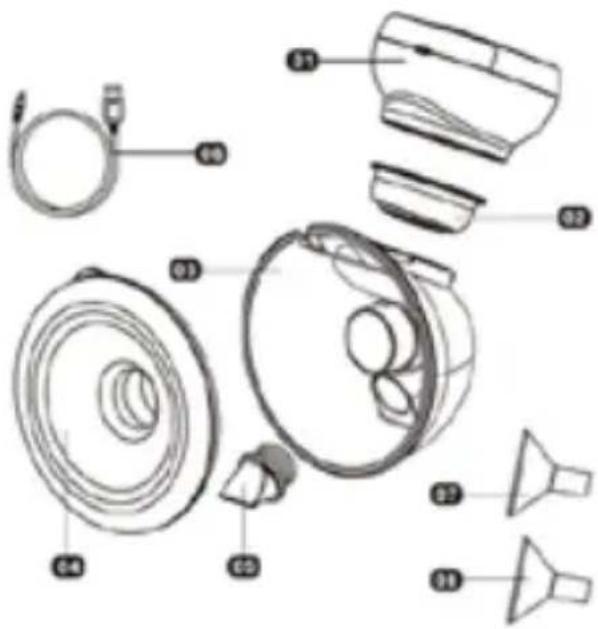
01 main pump unit
02 silicone gas storage
03 collection bowl
04 silicone breast shield 28 mm
05 silicone valve
06 USB charging cable
07 silicone insert 24 mm
08 silicone insert 21 mm
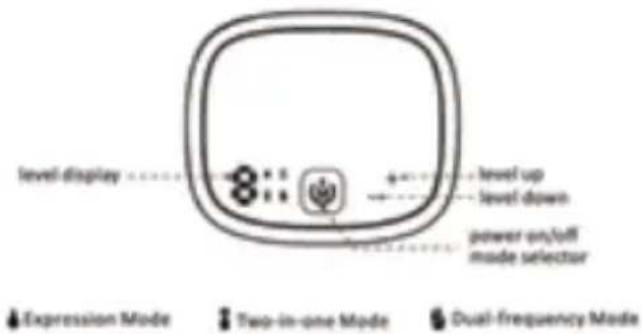
CONTROL PANEL INSTRUCTIONS
PRODUCT PARAMETER INFORMATION
| Model | 501 |
| Input Power | 100-240V, 50/60Hz |
| Suction Strength | =<0.038MPa |
| Charging Time | —150 mins |
| Rated Power | 5W |
| Output Power | 5V/1A |
| Battery Capacity | 1100 mAh |
| Running Time | —120 mins |
| MODE | LEVEL RANGE |
| Expression | 1-7 |
| Two-in-one | 1-7 |
| Dual-frequency | 1-7 |
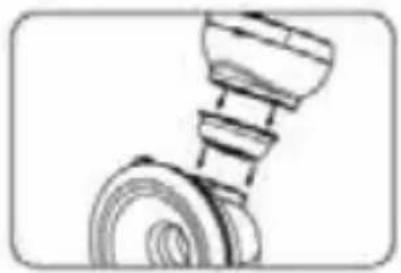
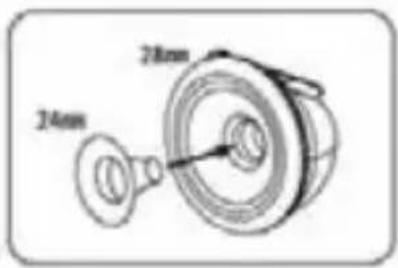
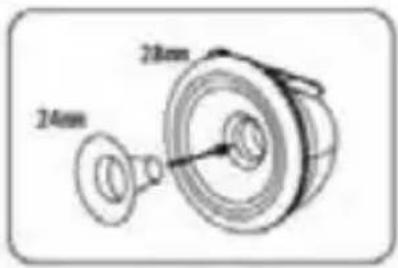
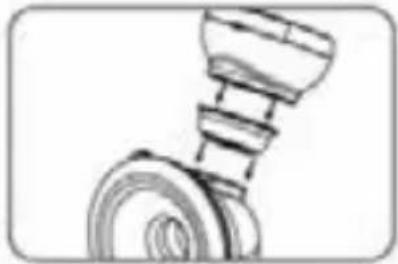
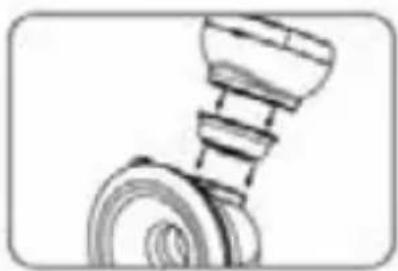
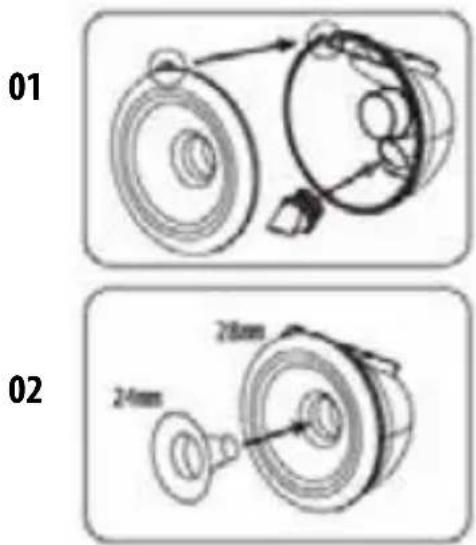
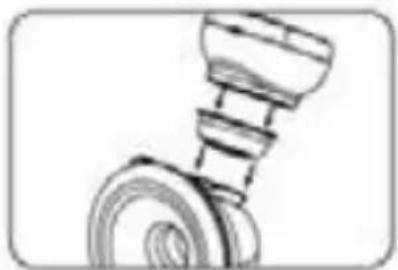
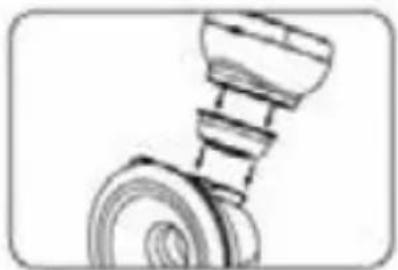
ASSEMBLY INSTRUCTIONS
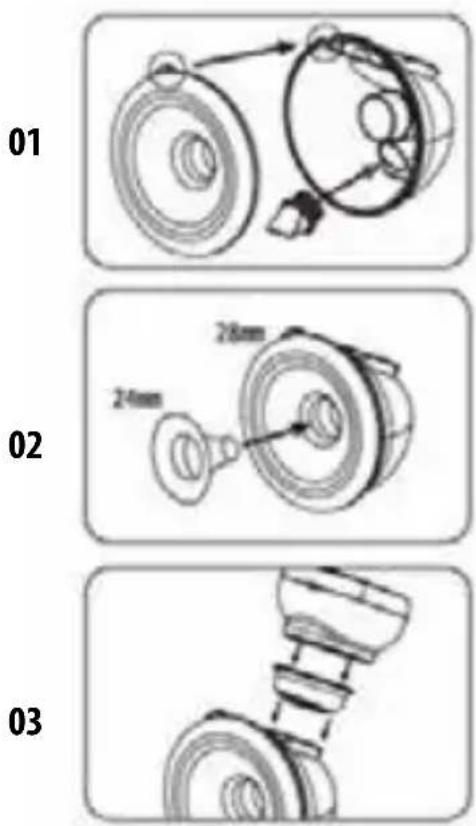
- Insert the duckbill valve into the interface of the bowl and install the breast shield to the bowl. Please note that it is installed place when the milk outlet of the bowl fits the protrusion of the breast shield.
- Choose 28 mm breast shield or 24 mm or 21 mm insert, depending on your needs.
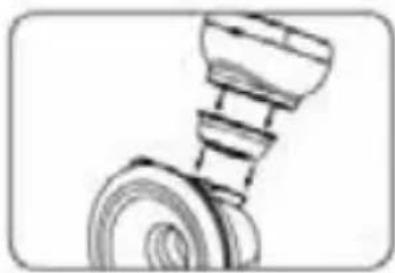
- Install the pump unit-silicone gas storage-storage bowl as shown in the above picture.
OPERATING INSTRUCTIONS
Maintain proper posture and relax. Place the breast shield on your breast with the nipple in the centre.
Press and hold 🙏 on top of main pump unit to turn on the power. The digital display screen will turn on and the 1 minute timer will start once the main pump unit is being turned on. If the main pump unit is idle for 1 minute, it will turn off automatically.
Press 🔊 to select desired mode.
Select ♦ to enter EXPRESSION MODE. Touch + to increase suction strength, - to reduce suction strength. Suction strength can be set between L1 and L7. Each setting offers a different pumping strength, from weak to strong.
Select 📤 to enter TWO-IN-ONE MODE. The breast pump will provide a pumping cycle of massaging eight (8) times and pumping once (1). This is a good way to relieve pain in full breasts and to produce plenty of breast milk in little time. Touch + to increase suction strength, - to reduce suction strength. Suction strength can be set between L1 and L7. Each setting offers a gentle massage and different pumping strength, from weak to strong.
Select 🔍 to enter DUAL-FREQUENCY MODE. This is a creative new pumping experience on both high and low suction strength settings. The pumping circle of weak4stop4strong is an effective way to correct inverted nipples. Touch + to increase suction strength, - to reduce suction strength. Suction strength can be set between L1 and L7.
Sleep Mode: The default operating cycle of the main pump unit is 30 minutes. After 30 minutes, the pump
will turn off automatically.
Screen Lock: When the touch screen is idle for 1 minute, it will be locked automatically. Press 🔊 to activate the touch screen.
When finishing pumping, pour the breast milk from collection bowl into the nursing bottle and start nursing or put the breast milk in the a fridge or freezer. Recommended method: remove the pump unit and slowly rotate the shell upside down above the bottle – the milk should flow through the hole.
BATTERY INSTRUCTION
- When the battery is charging, the battery indicator flashes blue and white.
- When the battery is fully charged, it will turn blue. A red light indicates low battery, which should be recharged immediately.
- Take good care of the built-in battery to extend its lifespan. It is recommended to NOT use the Main Pump Unit when charging the battery.
- Do NOT remove or change the built-in battery without professional assistance.
SAFETY GUIDELINES
Do not use the Electric Breast Pump without consulting your doctor if you have mastitis or inverted or flat nipples.
- The breast pump is personal device. Use by more than one person may produce a health risk.
- Keep the Electric Breast Pump out of the reach of children.
- Do not use Electric Breast Pump when sleepy or overly drowsy.
- Do not use the Electric Breast Pump when it is physically damaged.
- For best results, do not use the Electric Breast Pump with components of other manufacturers.
- Do not leave the Electric Breast Pump unattended when it is connected to a source of power supply.
- Do not touch the Electric Breast Pump if it falls in water and unplug it immediately.
- Do not expose the Electric Breast Pump directly to sunlight.
- Do not perform any repairs without authorised professional assistance.
CLEANING AND STERILISATION
- Before using the electric breast pump, disassemble, wash, and sterilise all parts of the Pumping Kit.
- Partially dry components may have adverse effects on the operation of your electric breast pump. Please make sure that all parts are completely dry before use.
GENERAL CLEANING INSTRUCTIONS
Do not wash or sterilise the Main Pump Unit, Power Adapter, or Charging Cable.
- Clean and sterilize all parts that come into direct contact with breast milk: Breast Shield, Silicone Insert, Silicone Gas Storage, Silicone Valve, Collection Bowl.
- Wash the parts in warm water to avoiding milk contamination and bacteria.
- Do not use solvents or abrasives.
- To clean the electric pump base, wipe the base with a damp cloth dipped in water or a water and mild soap solution.
- Suggested sterilisation methods: hot water boiling for 30 sec, dedicated sterilisers. Do not use microwaves and washers.
NOTE: Before each use, visually check individual components for cracks, chips, tears, stains, discoloration, or deterioration as they may produce adverse effects in operation. If any damage to the device is notices, please stop using the device until the appropriate parts are replaced.
STORING/THAWING BREAST MILK
- Breast milk should be stored and thawed your correctly. This is the only way to make sure that all important nutrients are preserved and bacterial contamination is minimised.
NBREAST MILK FREEZING/THAWING GUIDELINES
When filling bottles/bags, consider room for possible expansion.
- Label the bottles/bags with the date, on which the milk was expressed.
- Do not store breast milk on the door of the refrigerator. Keep it in the bottom back area of the refrigerator where the temperature is the coolest.
-
Thaw frozen breast milk in the refrigerator overnight or hold the bottle or bag under warm running water (max. 37°C).
-
Shake the bottle or bag gently to combine any separated fat.
- Do not thaw frozen breast milk in a microwave oven or in a pan of boiling water (risk of burning).
TROUBLESHOOTING
1. FOR LOW SUCTION STRENGTH OR NO SUCTION
- Check the components for correct assembly.
- Make sure that the collection bowl, silicone gas storage, and main pump unit all fit.
- Make sure that the breast shield seals the breast.
2. IF THE PUMP GETS WET
- Turn off the pump. Unplug the power adapter from the electrical outlet.
- Do not turn the pump upside down. The control panel must be upwards.
- Keep the pump in a dry and warm place for 24 hours.
- Do not expose the pump to direct sunlight.
- Do not accelerate the drying process with a source of heat.
3. IF THE PUMP DOES NOT TURN ON
- Check if the power cord is properly connected to the pump.
- Check the electrical outlet for power.
- Contact the store, which sold you the pump.
natural_image
Line drawing of a mechanical device with a circular base and central hub (no text or symbols)03
natural_image
Mechanical component diagram showing a shaft and bearing assembly (no text or symbols)natural_image
Line drawing of a mechanical device with a circular base and central hub (no text or symbols)natural_image
Mechanical diagram showing two rotating components with arrows indicating motion (no text or symbols)02
03

natural_image
Mechanical component diagram showing a shaft and bearing assembly (no text or symbols)natural_image
Line drawing of a mechanical device with a circular base and central hub (no text or symbols)natural_image
Line drawing of a mechanical device with a circular base and central hub (no text or symbols)INFORMATION ZU DEN PRODUKTPARAMETERN
natural_image
Mechanical assembly diagram showing two components with rotating parts and a connecting rod (no text or symbols)02
03
natural_image
Mechanical component diagram showing a shaft and housing assembly (no text or symbols)natural_image
Line drawing of a mechanical device with a circular base and a square top (no text or symbols)KUIDAS RINNAPUMPA KÄITADA?
natural_image
Line drawing of a mechanical device with a circular base and a square top (no text or symbols)natural_image
Mechanical assembly diagram showing two components with arrows indicating motion (no text or labels)02

03
natural_image
Mechanical component diagram showing a shaft and housing assembly (no text or symbols)natural_image
Line drawing of a mechanical device with a circular base and central hub (no text or symbols)natural_image
Mechanical component diagram showing a shaft and bearing assembly (no text or symbols)natural_image
Line drawing of a mechanical device with a circular base and central hub (no text or symbols)03

natural_image
Mechanical component diagram showing a cylindrical assembly with a flanged base and housing (no text or symbols)natural_image
Line drawing of a mechanical device with a square top and circular base (no text or symbols)01 glavna jedinica pumpice
02 skladište silikonskog plina
03 zdjela za prikupljanje
04 silikonski štitnik za grudi 28 mm
05 silikonski ventil
06 USB kabel za punjenje
07 silikonski umetak 24 mm
08 silikonski umetak 21 mm
UPUTE ZA UPRAVLJAČKU PLOČU

PODACI O PARAMETRIMA PROIZVODA
| Model | 501 |
| Ulazna snaga | 100-240V, 50/60Hz |
| Snaga usisavanja | =<0.038MPa |
| Vrijeme punjenja | —150 mins |
| Nazivna snaga | 5W |
| Izlazna snaga | 5V/1A |
| Kapacitet baterije | 1100 mAh |
| Vrijeme izvođenja | —120 mins |
| NAČIN RADA | RASPON RAZINA |
| Izražaj | 1-7 |
| Dva u jednom | 1-7 |
| Dvofrekventni | 1-7 |
KAKO SASTAVITI
03

natural_image
Mechanical component diagram showing a bearing and spring assembly (no text or symbols)natural_image
Line drawing of a mechanical device with a circular base and central hub (no text or symbols)03

natural_image
Mechanical component diagram showing a shaft and bearing assembly (no text or symbols)natural_image
Line drawing of a mechanical device with a circular base and central hub (no text or symbols)03

natural_image
Mechanical component diagram showing a cylindrical shaft and flanged base (no text or symbols)his pientraukis SHELLY
BÜDINGOS SAVYBÉS

natural_image
Line drawing of a mechanical device with a circular base and central hub (no text or symbols)natural_image
Line drawing of a mechanical device with a circular base and central knob (no text or symbols)natural_image
Line drawing of a mechanical device with a circular base and central hub (no text or symbols)01 kolfpomp
02 siliconen membraan
03 opvangbeker
04 siliconen borstschild 28 mm
05 siliconen ventiel
06 USB oplaadkabel
07 siliconen inzetschild 24 mm
08 siliconen inzetschild 21 mm
03
natural_image
Mechanical component diagram showing a bolt and threaded shaft assembly (no text or symbols)natural_image
Line drawing of a mechanical device with a circular base and central hub (no text or symbols)01 conjunto principal da bomba
02 membrana de silicone
03 cúpula de recolha
04 funil de silicone dimensão 28 mm
05 válvula de silicone
03
natural_image
Mechanical component diagram showing a bolt and washer assembly (no text or symbols)natural_image
Line drawing of a mechanical device with a circular base and central hub (no text or symbols)natural_image
Mechanical component diagram showing a bolt and shaft assembly (no text or symbols)1. DACĂ PRESIUNEA ESTE SCĂZUTĂ SAU ABSENTĂ
natural_image
Line drawing of a mechanical device with a circular base and central hub (no text or symbols)правильно собраны.
natural_image
Mechanical component diagram showing a bolt and spring assembly (no text or symbols)natural_image
Line drawing of a mechanical device with a circular base and central hub (no text or symbols)natural_image
Mechanical component diagram showing a helical spring and cylindrical shaft (no text or symbols)ANVISNINGAR FÖR ATT FRYSA/TINA BRÖSTMJÖLK
natural_image
Line drawing of a mechanical device with a circular base and central hub (no text or symbols)umyte ruky mydlom a teplou vodou.
natural_image
Mechanical assembly diagram showing two components with arrows indicating motion (no text or symbols)02
03
natural_image
Mechanical component diagram showing a spring and roller assembly (no text or symbols)natural_image
Line drawing of a mechanical device with a circular base and central knob (no text or symbols)равильно зібрані.
natural_image
Mechanical diagram showing a gong and rotor assembly with directional arrows (no text or labels)02
03

natural_image
Mechanical component diagram showing a spring and bearing assembly (no text or symbols)

- NOTE!
- INTENDED USE
- BEFORE EVERY USE
- OPERATING INSTRUCTIONS
- BATTERY INSTRUCTION
- SAFETY GUIDELINES
- CLEANING AND STERILISATION
- GENERAL CLEANING INSTRUCTIONS
- STORING/THAWING BREAST MILK
- NBREAST MILK FREEZING/THAWING GUIDELINES
- TROUBLESHOOTING
- FOR LOW SUCTION STRENGTH OR NO SUCTION
- IF THE PUMP GETS WET
- IF THE PUMP DOES NOT TURN ON
- KUIDAS RINNAPUMPA KÄITADA?
- his pientraukis SHELLY
- BÜDINGOS SAVYBÉS
- DACĂ PRESIUNEA ESTE SCĂZUTĂ SAU ABSENTĂ
- ANVISNINGAR FÖR ATT FRYSA/TINA BRÖSTMJÖLK
Brand : BabyOno
Model : 1000
Category : Electric breast pump