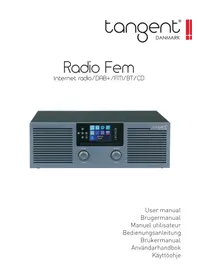
Elio Mono - Radio TANGENT - Free user manual and instructions
Find the device manual for free Elio Mono TANGENT in PDF.

| Product type | Radio |
| Brand | Tangent |
| Model | Elio Mono |
| Dimensions (W x H x D) | 280 mm x 140 mm x 180 mm |
| Power supply | DC 15 V, 2 A input (power adapter included) |
| Audio output power | 15 W |
| Radio bands | FM / DAB / DAB+ / Internet / Bluetooth |
| Display | TFT 3.2" |
| Connectivity | USB, AUX 3.5 mm, Line out 3.5 mm, Wi-Fi (for Internet radio) |
| Remote control | Included (AAA batteries not included) |
| Antenna | Telescopic DAB/FM |
| Available languages | 17 languages including French, English, German, etc. |
| Main functions | DAB/DAB+ radio, FM, Internet radio, Bluetooth, AUX, Media Center (USB, UPNP), Spotify Connect, alarm, timer, equalizer |
| Care and cleaning | Clean only with a dry cloth |
| Safety | Do not expose to rain or moisture; use only the supplied adapter; repair by qualified technician |
| Repairability | Do not attempt to repair yourself; contact a qualified technician |
| General information | Mono radio with built-in speaker; compatible with Spotify Connect |
Frequently Asked Questions - Elio Mono TANGENT
User questions about Elio Mono TANGENT
0 question about this device. Answer the ones you know or ask your own.
Ask a new question about this device
Download the instructions for your Radio in PDF format for free! Find your manual Elio Mono - TANGENT and take your electronic device back in hand. On this page are published all the documents necessary for the use of your device. Elio Mono by TANGENT.
USER MANUAL Elio Mono TANGENT
Important Safety Instructions
- Read these instructions.
- Keep these Instructions.
- Heed all Warnings.
- Follow all instructions.
- Do not use the speaker near water.
- Clean only with dry cloth.
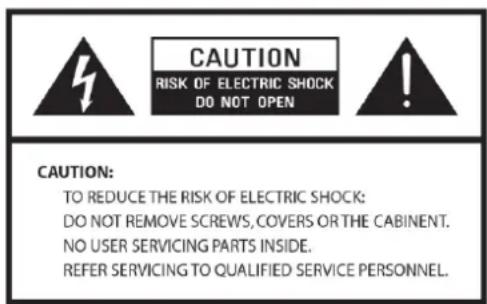
WARNING: TO REDUCE THE RISK OF FIRE OR ELECTRIC SHOCK, DO NOT EXPOSE THIS SPEAKER TO RAIN OR MOISTURE.
To reduce the risk of electrical shock, fire, etc.:
- Do not place unit near any heat source such as radiators, heat registers, stoves, or other apparatus (including amplifiers) that produce heat.
- Do not block any ventilation openings of unit.
- The unit shall not be exposed to dripping or splashing and no objects filled with liquids, such as vases, shall be placed on the unit.
- Do not place any heavy loads onto the unit, and do not step on it, the load may fall and cause serious injury to the unit.
- Please read Rating Labels at the back of unit for power input and other safety information.
- This unit is intended to be used only with the power supply provided.
- Protect the power cord from being walked on or pinched particularly at the plugs, convenience receptacles, and at any point where they exit from the unit.
- Never unplug your unit by pulling on the power cord. Always grasp the plug firmly and pull straight out from the outlet.
- Repair or replace all electric service cords that have become frayed or otherwise damaged immediately. Do not use a cord that shows cracks or abrasion damage along its length, the plug, or the connector end.
- To prevent fire or shock hazard, do not use this plug with an extension cord or other outlet unless the blades can be fully inserted to prevent blade exposure.
- To prevent fire or shock hazard, do not expose unit to rain or moisture.
- During lightning or raining days, unplug the unit for additional protection during thunderstorms or when the unit is not used for prolonged periods. This will prevent damage to the unit from lightning and power surges.
- Do not attempt to carry out any service work yourself. By opening or removing the cabinet, you may be exposed to dangerous voltage or other hazards. Any service work should be carried out by qualified technicians.
- The battery of remote control shall not be exposed to excessive heat such as sunshine, fire or the like.
- Danger of explosion if battery is incorrectly replaced. Replace only with the same or equivalent type.
- In the interests of safety and to avoid unnecessary energy consumption, never leave the unit switched on while unattended for long periods of time, e.g. overnight, while on holiday or while out of the house. Switch it off and disconnect the mains plug from the mains socket.
Contents
User Manual 1
Important Safety Instructions 2
Contents 3
Getting Started. 4
Unit Back View - Elio Mono 6
Unit Back View - Elio Stereo 8
Remote Control View 9
DAB/DAB+ Mode 10
Scan 10
Station Information 10
FM Mode 11
Selecting FM Mode 11
Internet Radio 12
Bluetooth Mode 13
Aux in Mode. 13
CD Mode (Elio Stereo Only) 14
Playing CD Program 14
Playback Setup. 14
Ejecting CD from CD Tray 14
Spotify Connect 15
Media Center 16
General Operations 17
Setting Alarm 17
Setting Sleep timer. 17
Setting Date/Time 17
Setting Languages 18
Setting Equalizer 18
Reset to default. 18
Specifications 19
Getting Started
Carefully unpack your radio from the box. You may wish to store the packaging for future use.
What you can find inside of your package
- Main unit
Power adapter
Remote control - Instruction manual
Positioning your Radio
Place your radio on a flat / stable surface that is not subject to vibrations.
Avoid the following locations:
Where the radio will be exposed to direct sunlight.
- Where the radio will be close to heat radiating sources.
Where the humidity is high and ventilation is poor.
- Where it is dusty.
- Where it is damp or there is a possibility of water dripping or splashing onto unit.
Adjusting the Antenna
Extend the antenna to ensure you receive the best reception possible in both DAB and FM radio modes. It may be necessary to adjust the position of the radio and /or antenna to achieve the best signal.
Turning the Unit On/Off
Connect the plug at the end of power adapter cable to the DC IN jack on the back of the unit. Then insert the power adapter into the mains socket. Press POWER button to turn the unit on or standby. To switch the unit off completely, unplug the power adapter from the mains socket.
Volume Control
Adjust the radio volume by turning the VOLUME knob.
Note: The Elio will power off after 15min, this can be handled in the setting power management
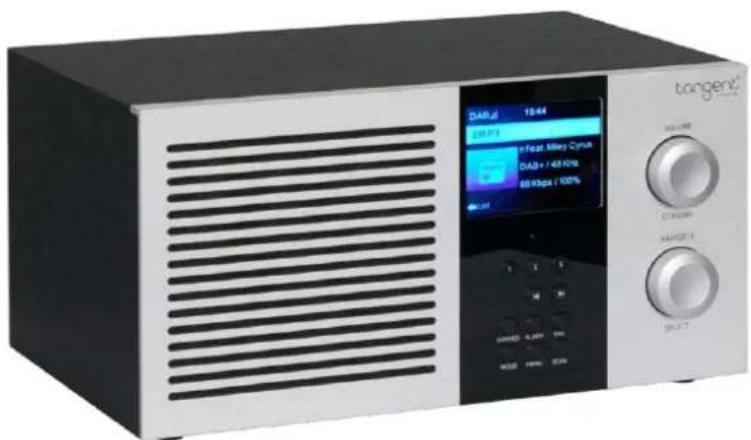
Unit Front View - Elio Mono
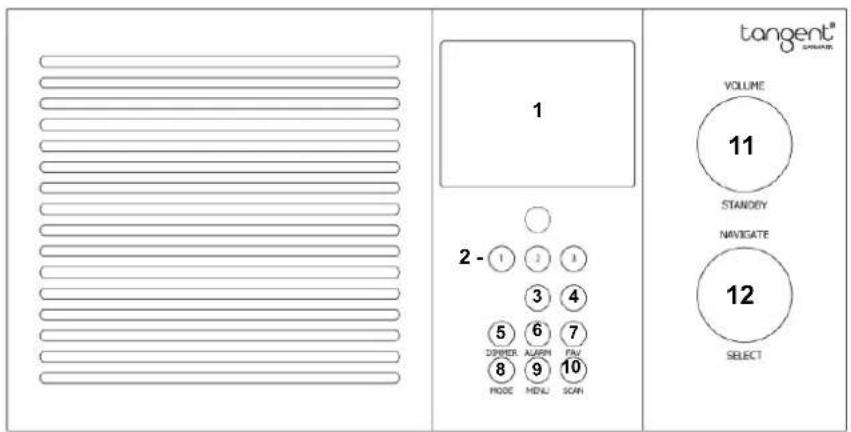
- Display: TFT Display 3.2"
- Preset buttons: 1-3
- Previous track & Turn left/back
- Next track & Turn right/forward
- Dimmer: To dim the light in the disp
- Alarm: For access Alarm
- FAV: To select (short press) and save (long press) favorite radio stations
- Mode: To change input mode
- Menu: Enter menu of the unit
- Scan: Scanning for radio channels in DAB & FM modes
- Volume/Standby: Rotate rotary knob to adjust the volume when in working mode Press knob to switch between standby and working mode
- Navigate/Select: Rotate rotary knob to navigate Press rotary knob to confirm when in menu mode
Unit Back View - Elio Mono
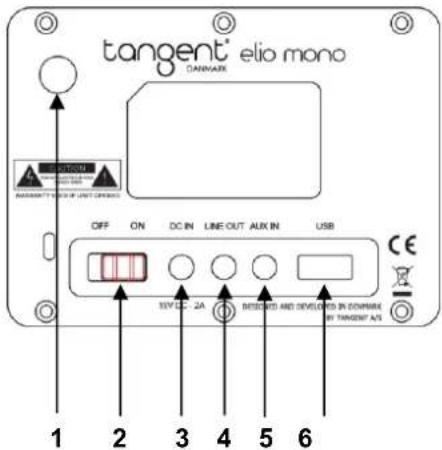
- DAB/FM Telescopic antenna
- ON/OFF Power switch
- DC INPUT Power inlet
- LINE OUTPUT Line out 3.5mm
- AUX INPUT Aux in 3.5mm
- USB INPUT Playback and update (Update service center only)
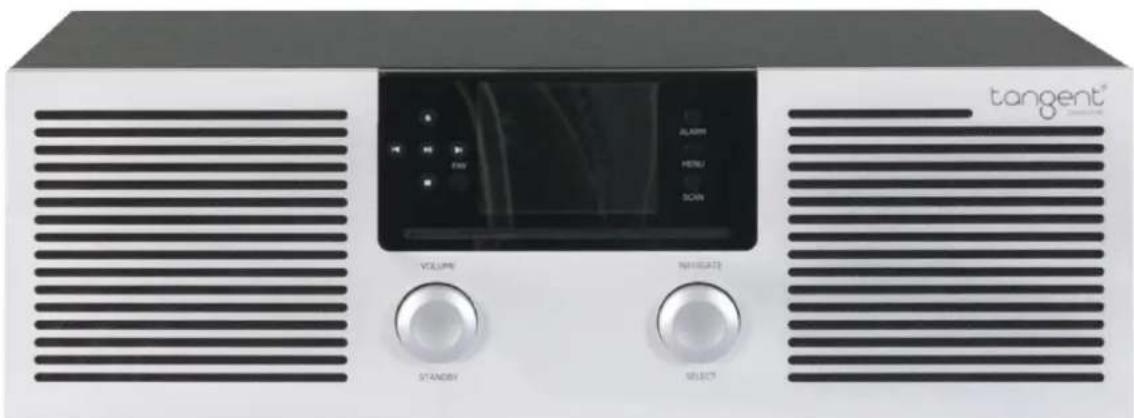
Unit Front View - Elio Stereo
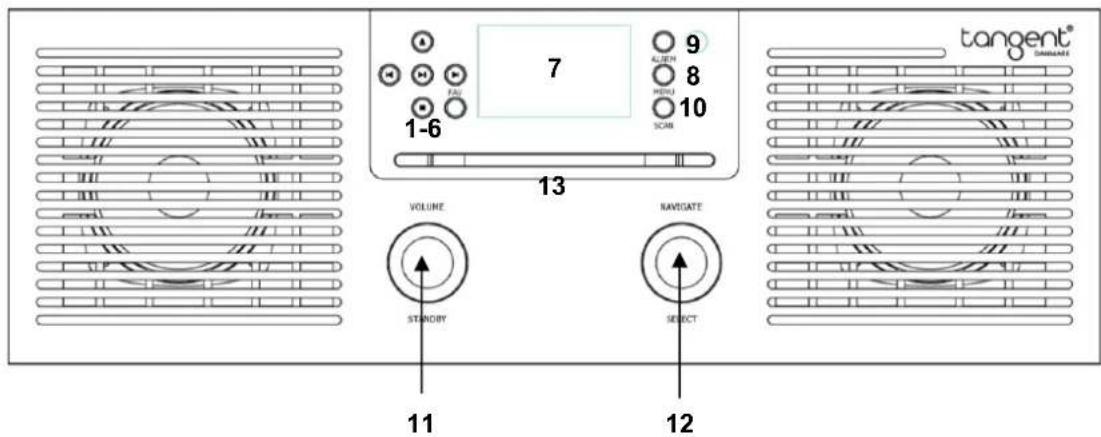
- Previous track & Turn left/back
-
Press to stop CD playing in CD mode
-
: CD Eject
- Play/Pause
- Next track & Turn right/forward
- FAV: To select & save favorite radio stations
- Display: TFT Display 3.2"
- Menu: Enter the menu
- Alarm: For access Alarm
- Scan: Scanning radio stations in DAB & FM mode.
- Volume/Standby: Rotate rotary knob to adjust the volume when in working mode Press knob to switch between standby and working mode
- Navigate/Select: Rotate rotary knob to navigate Press rotary knob to confirm when in menu mode Switch program menu when in working mode
- CD tray: Slot-in CD tray
Unit Back View - Elio Stereo

- DAB/FM Telescopic antenna
- ON/OFF Power switch
- DC INPUT Power inlet
- LINE OUTPUT Line out 3.5mm
- AUX INPUT Aux in 3.5mm
- USB INPUT Playback and update (Update service center only)
Remote Control View
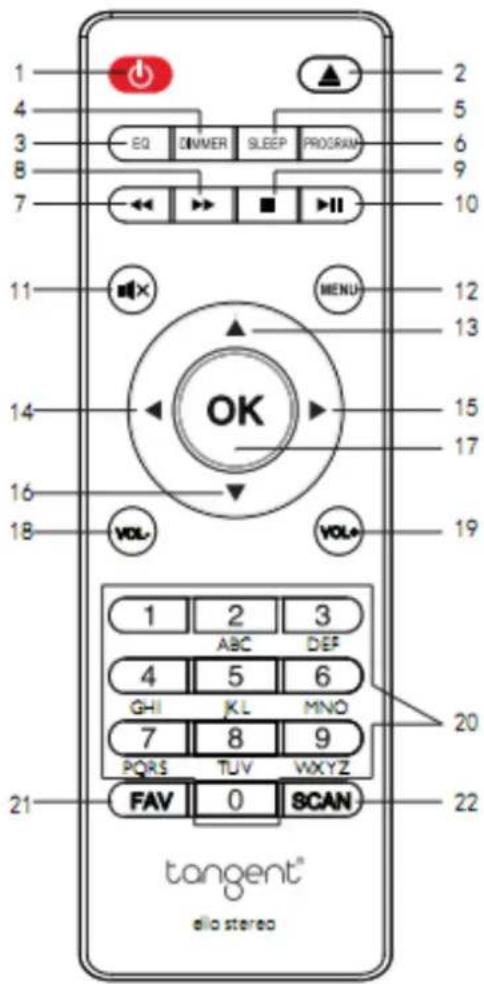
- Button Press to switch unit on or standby.
- button Press to eject CD from CD tray.
- EQ button
- DIM button Press to set the dim level.
- SLEEP button Press activate sleep function.
6.PROGRAM button - Reverse button
- Forward button
- STOP button
- PLAY/PAUSE button
- MUTE Press to set 'MUTE ON' or 'MUTE OFF'.
- MENU enter menu for change between DAB, FM, BT, Internet radio, Spotify connect & AUX Navigation buttons
- ▲ up
- backward
- forward
- down
- OK (Select)
- Volume-Down
- Volume+ UP
- Number buttons
- FAV
- SCAN
The way of replacing batteries:
- Open the battery compartment cover by using your thumb downward push the projection on the back of your remote control.
- Install two AAA new batteries referring to the markings direction inside the battery compartment. Note: do not reverse any battery and do not mix battery types, also do not mix old and new batteries. When discard your old battery, please considering eco-friendly.
- Cover the battery compartment door.
DAB/DAB+ Mode
Digital DAB radio
Fully extend the antenna.
Push Menu Rotate Navigate button to switch to DAB/DAB+ Press Select button to enter.
On first use it will automatically scan all stations and save them.
Station list: In DAB/DAB+ mode, press the NAVIGATE/SELECT button to enter the channel list.
When entering the channel list, turn the NAVIGATE/SELECT to the desired station and push the button for selecting.
Pre-setting your favorite DAB stations
Press and hold the Fav button, when display showing "saving station icon" and "saving position number", Turn the NAVIGATE/SELECT button to change the number you want, and press to store the station.
Recalling preset DAB stations
Press the "Fav" button, and it will show the saved presets if any saved. Select the station you want to hear, by turning the NAVIGATE button, then press the "NAVIGATE" button to confirm your selection.
Scan
This feature enables your radio to scan for all available stations.
Press SCAN button, and then select if you want to delete the current station list, choose YES or NO by turning the NAVIGATE/SELECT button, and push for select.
Station Information
DAB/DAB+ stations broadcast additional information. Press button and the display will show the information through Scrolling text, Program Type, Ensemble, Date, Frequency, Bitrate and Codec and Signal strength.
FM Mode
Selecting FM Mode
Press MENU button and turn the NAVIGATE/SELECT button until to select FM mode.
For initial use, it will start at the beginning of the FM frequency range (87.50MHz). Or it will play the last FM station you were listening to.
To manually change the FM frequency, make sure no other order/system setting is going on, turn TUNE knob to change the frequency by 0.05MHz per step.
To automatically scan, press SCAN or Previous track button, to scanning up or down frequency band. Once a station has been found the scanning will stop automatically.
Pre-setting your favorite FM stations
Press and hold the Fav button, when display showing "saving station icon" and "saving position number", Turn the NAVIGATE/SELECT button to change the number you want, and press to store the station.
Recalling preset FM stations
Press the "Fav" button, and it will show the saved presets if any saved. Select the station you want to hear, by turning the NAVIGATE button, then press the "NAVIGATE" button to confirm your selection.
Additional settings
Additional FM settings can be found in the configuration menu under FM setup
To set the FM sound quality: Press Menu Configuration FM setup.
There are two options: Mode: Set mono or Set stereo
Threshold: Seek Threshold or Stereo Threshold
There are three sub-option for seek threshold or stereo threshold: Strong, Default, Weak
Internet Radio
Internet radio how to get started.
Press MENU Rotate Navigate button to choose Internet radio Press Select button to enter the interface, and rotate Navigate to scroll through the main menu.
Press SELECT (to enter sub menus or confirm settings).
Press return to the previous menu.
After connection of any station successful, station information will be shown and information content can be changed with Kor button.
My Favorites
List of my favorite preset stations. It supports 250 favorite entries including stations and folder. During the station playing screen, press and hold Fav on the device to save the station as my favorite. You may replace the previous saved station to the new one.
If the Selected station has been saved, you cannot save it again. The saved stations are showed under this menu. You may also press Fav to enter the saved station list. You may enter the number key on the remote control to recall the saved station.
Under the preset station list, move to your station; press Select from unit or OK from remote control to listen.
Enter its submenu with button, Delete, Shift Up/Down along the list, Rename, Play, or Use as Alarm (if you chose internet as alarm sound in alarm configuration).
Radio Station/Music
Stations are categorized into Global Top 20, Genre, Country/Location (Africa, Asia, Europe, Middle East, North America, Oceania/Pacific and South America) and Highlight. Enter to continue the subcategories and choose the station to listen.
For each station, press OK from unit or remote control to play directly.
Press to enter its submenu. When you choose Auto Scan, it becomes the playback of marquee of each station in the subcategory. Each station plays 30 seconds until all have played or you press "OK" to stop the marquee listening. Press button to view the display information of the playing station.
Local Radio:
Stations are categorized to the country/location which the unit is operated.
Sleep Radio:
You can choose Birds, Piano, Rain, Spa, Space, and Wave as sleep radio.
History:
List of the ten recently listened stations.
Service:
Search radio station-Enter your keyword to search radio station from the list.
Add new radio by adding IP address, the added stations will be stored in My Favorite.
Note that the maximum character of the station name is 250.
Bluetooth Mode
Pair the unit with a Bluetooth device to listen to music:
Press MENU rotate Navigate button to Bluetooth mode Press Select button to enter Bluetooth MODE
The display will show 'Bluetooth disconnected', and Pairing mode will be activated.
You can also activate pairing mode with a long press at Play/Pause button.
Activate your Bluetooth device and select the search mode.
"Tangent Elio Stereo" will appear on your Bluetooth device. Select "Tangent Elio Stereo".
'BT connected: Your Bluetooth Device' will show on the display when connection is successful.
While a track is playing, you can:
a. Press button to skip to previous track.
b. Press button to pause or play current playing track.
c. Press button to skip to next track.
To disconnect current Bluetooth connection, press and hold PLAY/PAUSE button for 3 seconds.
Note: The operational range between the unit and a Bluetooth device is approximately 10 meters, without any objects in the way.
Aux in Mode
AUX IN allows for quick and easy connection to a Phone, MP3 player or other external audio sources. Push Menu Rotate Navigate button to switch to AUX Press Select button to enter.
In Aux in mode, you may operate your audio device directly for playback features.
Plug an AUX cable into your device and connect cable via AUX-in port at the rear of the radio. Begin playing audio from your device and this should play on the radio when in AUX mode.
Control the functions of the audio via your device.
To gain optimal volume levels, adjusting the output volume level on the Tangent Elio Stereo as well as on your device.
CD Mode (Elio Stereo Only)
CD MODE
Push Menu Rotate Navigate button to switch to CD Press Select button to enter.
Inserting CD to CD Tray
In order to play CD, please insert the Audio CD. Some CDs may be incompatible.
Insert an Audio CD into the CD tray when unit in CD mode
Playing CD Program
-
During Audio CD playback, the display shows the track number and the elapsed time.
-
When a track is playing, you can:
a. Press button to pause or play current playing track.
b. Press button to skip to previous track.
c. Press button to skip to next track.
d. Press and hold button to fast reverse current playing track.
e. Press and hold button to fast forward current playing track.
f. Press button to stop music.
- In CD STOP mode, if the disc is a normal audio CD, the display shows the total number of tracks and the total track time.
Playback Setup
If you want to setup the playback rule, pls enter the "configuration", then select Playback setup, you can choose "Off", "Repeat all", "Repeat one", "Shuffle".
Off: Play the CD from first song until last song in order.
Repeat all: Play the CD from first song to last song with loop playback.
Repeat one: Play the current song with loop playback.
Shuffle: Play the CD songs randomly.
Ejecting CD from CD Tray
Press button, And the CD will be ejected. This can be done in any MODE.
(If you don't remove the CD with-in 25 sec. it will be loaded into the unit again.)
Inserting the CD can only be done in CD mode.
Tips: CD Program (using on Remote). When CD is in "Stop", press the "Program" on the remote, then step into the state of programming, display will show P001 001(the first song on the CD), P001 means the first program location, 001 means the song location on CD. You can press / button to select the songs, then press "Program" button to go next programming P002 008 (the eighth song on the CD).
After Program finished, press "Play" button to play the songs which already programmed.
Press "Stop" button to exit the "Program" when programming.
When the Program playback is activated, press "Eject" or "Stop" button twice, then it will exit the program playback mode.
Programming number: CD: 20 songs, MP3 disc: 99 songs
Spotify Connect
Listen out loud with Spotify Connect.
Push Menu Rotate Navigate button to choose Spotify Connect Press Select button to enter.
Download the Spotify App on your device smartphone, computer etc.
Connect your internet radio and your device to the same WiFi connection in order to allow for Spotify
Connect the two devices. Check the WiFi connection the radio is connected to in Configuration Setting > Network
Go to the Spotify App on your device or computer and play any song.
If you are using the App on a phone, tap the song image in the bottom left of the screen. Tap the
connection to be taken to the 'Connect to a device' screen.
If you are using a computer, select the 'Devices available' option on the control bar at the bottom of the page.
Select the Tangent Elio Stereo as your connected device. Once connected, ensure the volume is switched up. The song or playlist should display on the radio.
Please ensure there are no other users connecting to the device.
The Spotify software is subject to third party licenses found here :
www.spotify.com/connect/third-party-licenses.
Use your phone, tablet or computer as a remote control for Spotify. Go to Spotify.com/connect to learn how
Media Center
USB
Play the audio files by USB, the USB input is compatible with file formats:
WMA/MP3/AAC/AAC+/FLAC/WAV.
To begin playing insert the USB stick with the music files.
Push Menu Rotate Navigate button to choose Media Center Press Select to enter the interface Choose USB by rotate Navigate button Select by press the Select button.
For the setup of play, please refer to the Playback setup in Configuration
Compatible with USB3.0 and lower versions.
UPNP
Play the media files from your computer.
Press Menu Rotate Navigate button to choose Media Center press Select button to enter the interface Choose UPNP by rotate Navigate button Enter it by press Select button.
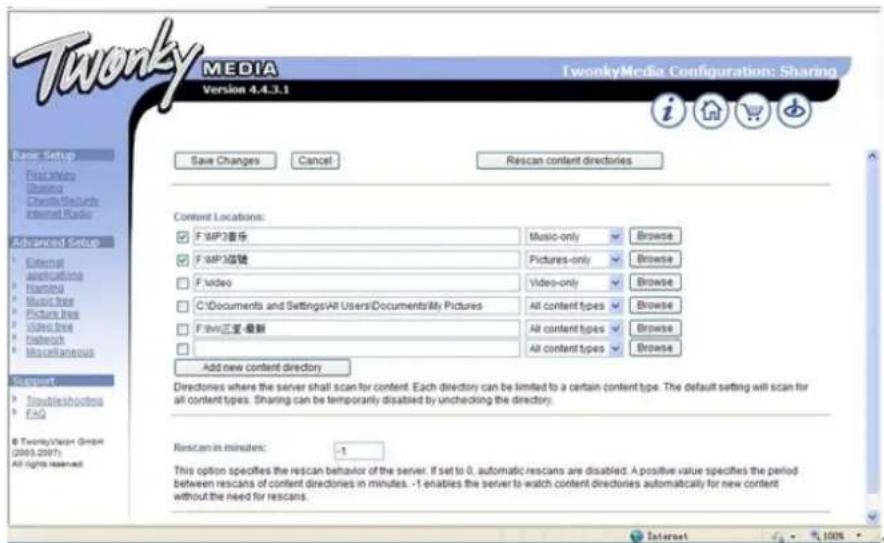
Note: You must install Windows Media Player 11 (or newer version) or Twonky Media in your computer, which is necessary for the UPNP operation.
In Windows Media Player you should get the media to share in your playlist.
Your computer must be available to the internet. The media must be put in your playlist.
Your computer must be allowed to be linked with others.(You can set up it in "Windows Media Player")
My Playlist
Press Menu Rotate Navigate button to choose Media Center Press Select button to enter the interface Choose My playlist by rotate Navigate Button Enter it by Select button.
Note: In the UPNP model, when playing you can long press Select button to put the chosen file into My playlist.
Clear My Playlist
Press Menu Rotate Navigate button to choose Media Center Press Select button to enter the interface Choose Clear My playlist by rotate Navigate Button Enter it by Select button.
Note: By cutting off the power, the files of your "My playlist" will be cleared automatically.
MY MEDIA U
Function: Fastly play the program of internet radio per the personal playlist.
Steps: Configuration My media U Press Select to confirm
Note: For the first time you need register in http://www.mediayou.net and set up related data before you use it, otherwise the display will show info to reminder you not to connect the internet.
Note: This option default disable. User need select Enable in Manage My Media U of Configuration, then can see My media U in Media Center.
General Operations
Setting Alarm
Your radio includes dual alarms, and a NAP ALARM. Set Alarm, making sure set time at first. Press ALARM button on the unit to set alarm.
Turn NAVIGATE knob to select 'Alarm 1', 'Alarm 2' or 'NAP Alarm' and then press SELECT button to confirm.
- Turn TUNE knob to select options, and then press ENTER button to confirm the setting.
| Set Alarm: | On or Off |
| Set Repetition: | Every day, Once, Mon, Tue, Wed, Thu, Fri, Sat, Sun |
| Set Time: | Set the desired time for the alarm |
| Set Source: | Beep, Melody, Internet radio, FM, DAB or USB |
| Set volume: | Volume must be set in the separate Volume menu |
- The alarm setting is successful. ① will show on the display.
- To temporarily switch off alarm, press any button except the standby button on the unit to activate snooze time. The set snooze time will show on the display.
- To turn off alarm, press Standby button when the alarm sounds
- To cancel Alarm, refer to steps1.
- NAP alarm can be set from 5min to 120min
Setting Sleep timer
To power off the unit automatically by setting the sleep timer.
Press Menu Configuration Sleep Timer press OK to confirm.
The time range is from Turn OFF, 15,30,60,90,120,150,180 minutes
Setting Date/Time
Press MENU button, and then turn TUNE knob to select Date & Time, press SELECT button to confirm.
Turn TUNE knob to select options, and then press ENTER button to confirm the setting.
Set Date and Time
Manual Setup: You can manual set the date and time.
Auto Detect: (UTC+00:00) 00:00 means the time difference between server and local time.
Set Time Format
The format of 24 hour is default
12 Hour
24 Hour
Set Date Format
The format of DD/MM/YYYY is default
YYYY/MM/DD
DD/MM/YYYY
MM/DD/YYYY
Setting Languages
Press Menu Configuration Language Press Select to enter.
The Tangent Elio supports 17 languages: English, Deutsch, Espanol, Frangois (France), Portugues, Netherlands, Italiano, Pyccknn, Svenska, Norske, Dansk, Magyar, Cesky, Slovensky, Polski, Turkce, Suomi.
Setting Equalizer
This feature enables you to choose a sound equalization profile. Each of the equalization setting will change the tone of the sound from your radio when selected.
Press Menu Configuration Equaliser Press Select to enter.
Turn TUNE knob to select through Normal, Flat, Jazz, Rock, Soundtracks, Classical, POP, News, my EQ and then press ENTER button to confirm.
- To set up My EQ, select My EQ and then press button to access. Turn Navigate knob to select through Treble, Bass and Loudness, use next and previous buttons to adjust settings, and then press ENTER button to confirm, when done.
Reset to default
Doing a factory reset resets all user settings to default values, so time/date and presets are lost.
- Press MENU button, and then turn Navigate knob to select Reset to default in the configuration menu, press ENTER button to confirm.
- Turn TUNE knob to select YES or NO, and then press Select button to confirm.
- If YES is selected, the unit will reset and restart.
Specifications
| Items | Specifications |
| Description: | DAB/DAB+/FM/BT/Internet radio with CD player (Elio Stereo only) and Spotify connect |
| Tuner Band: | FM / DAB / DAB+ |
| Power Requirements: | AC Input: 110-240VAC, 50-60Hz Elio Stereo = DC Output: 15V, 3A Elio Mono = DC Output: 15V, 2A |
| Elio Stereo CD Decoding: | Regular Audio CD and MP3 |
| Audio Output Power: | Elio Stereo 2x20Watt Elio Mono 15Watt |
| Dimension (W x H x D): | Elio Stereo 430mm x 140mm x 285mm Elio Mono 280mm x 140mm x 180mm |
CE
This symbol on the product or in the instructions means that your electrical and electronic equipment should be disposed at the end of its life separately from your household waste. There are separate collection systems for recycling in the EU.
For more information, please contact the local authority or your retailer where you purchased the product.
Tangent reserves the right to make changes without notice!
Tangent Elio Mono & Stereo
Internet radio/DAB+/FM/BT/CD(Kun Elio Stereo)


Remote Control View 9
DAB/DAB+ Mode 10
Scan 10
Stations Information 10
FM Mode 11
FM Mode 11
Internet Radio 12
Bluetooth Mode 13
Aux in Mode. 13
CD Mode (Elio Stereo Only) 14
Playing CD Program 14
Ejecting CD fra CD shuffen 14
Spotify Connect 15
Media Center 16
Drej knappen for at navigere
Press to set 'MUTE ON' or 'MUTE OFF'.
-
MENU menu for skift mellem DAB, FM, BT, Internet radio, Spotify connect & AUX Navigations knapper
-
▲ op
-
△bagud
-
fremad
-
ned
-
OK (vælg)
-
Volume-Ned
-
Volume+ OP
-
Numeriske knapper
-
FAV Favoritter
-
SCAN Scanning af kanaler i FM og DAB mode.
Stations Information
DAB / DAB + stationer sender yderligere oplysninger. Displayet kan vise informationen gennem Scrolling text, Programtype, Ensemble, Dato, Frekvens, Bitrate og Codec og Signalstyrke.
FM Mode
FM Mode
CD Mode (Elio Stereo Only)
CD MODE
Tryk Menu Drej Navigate knappen for at skiffe til CD mode Tryk Select knap for at vaelge.
Spotify-softwareer underlagt tredjepartslicensor, derfindes her: www.spotify.com/connect/third-party-licenses.
| Set Alarm: | On or Off |
| Set Repetition: | Every day, Once, Mon, Tue, Wed, Thu, Fri, Sat, Sun |
| Set Time: | Set the desired time for the alarm |
| Set Source: | Beep, Melody, Internet radio, FM, DAB or USB |
| Set volume: | Volume must be set in the separate Volume menu |
Aux in Mode. 13
CD Mode (Elio Stereo Only) 14
CD Mode (Elio Stereo Only)
CD MODE
www.spotify.com/connect/third-party-licenses.
Function: Fastly play the program of internet radio per the personal playlist.
Steps: Configuration My media U Press Select to confirm
Note: For the first time you need register in http://www.mediayou.net and set up related data before you use it, otherwise the display will show info to reminder you not to connect the internet.
Note: This option default disable. User need select Enable in Manage My Media U of Configuration, then can see My media U in Media Center.
Remote Control View 9
DAB/DAB+ Mode 10
Scan 10
Stationsinformationen 10
FM Mode 11
CD Modus (Elio Stereo Only) 14
CD Modus (Elio Stereo Only)
CD MODUS
Remote Control View. 9
DAB/DAB+ Mode. 10
Scan. 10
General Operations 16
Spotify Connect 15
Media Center 16
CD Mode (Elio Stereo Only)
CD-TILA
Paina Menu Kierra Navigoi-painike siirtyaksesi CD-levylle Paina Select-painiketta siirtyaksesi.
| Set Alarm: | On or Off |
| Set Repetition: | Every day, Once, Mon, Tue, Wed, Thu, Fri, Sat, Sun |
| Set Time: | Set the desired time for the alarm |
| Set Source: | Beep, Melody, Internet radio, FM, DAB or USB |
| Set volume: | Volume must be set in the separate Volume menu |