NS4FX - Controller NUMARK - Free user manual and instructions
Find the device manual for free NS4FX NUMARK in PDF.
| Product Type | DJ Controller |
| Brand and Model | Numark NS4FX |
| Number of Channels | 4 channels (2 physical decks, 2 layers) |
| Dimensions (approx.) | 43 x 32 x 7 cm |
| Weight (approx.) | 3 kg |
| Power Supply | 12V DC power adapter, 2A, center positive |
| Computer Connection | USB-B for MIDI and audio data |
| Main Audio Outputs | 2 x XLR (balanced) |
| Booth Output | 2 x RCA |
| Microphone/Line Input | 1 x combo XLR/6.35 mm jack (Mic 1/Line) + 1 x 6.35 mm jack (Mic 2) |
| Auxiliary Input | 2 x RCA |
| Headphone Output | 2 x jack (6.35 mm and 3.5 mm) |
| Jog Wheels | 2 touch-sensitive jog wheels, scratch and pitch bend modes |
| Performance Pads | 8 backlit pads per deck (multimode: Cue, Pitch Play, Auto Loop, Roll, Fader Cuts, Slicer, Sampler, Scratch Banks) |
| Built-in Effects | HPF, LPF, Echo, Reverb, Flanger, Phaser with Wet/Dry control and tap BPM |
| Display | Shows BPM, track position, pitch, key lock |
| Equalizer | Hi, Mid, Low per channel |
| Filter | High-pass/low-pass per channel |
| Crossfader | Assignable A or B per channel |
| Compatible Software | Serato DJ Lite (included) and Serato DJ Pro (optional) |
| Care and Cleaning | Use a dry, soft cloth. Do not use liquids. |
| Safety | Turn off and unplug before cleaning. Use only the supplied adapter. |
| Support | Visit numark.com/support |
Frequently Asked Questions - NS4FX NUMARK
User questions about NS4FX NUMARK
0 question about this device. Answer the ones you know or ask your own.
Ask a new question about this device
Download the instructions for your Controller in PDF format for free! Find your manual NS4FX - NUMARK and take your electronic device back in hand. On this page are published all the documents necessary for the use of your device. NS4FX by NUMARK.
USER MANUAL NS4FX NUMARK
User Guide (English)
Introduction
Thank you for purchasing the NS4 FX. At Numark, we know how serious music is to you. That's why we design our equipment with only one thing in mind—to make your performance the best it can be. We're honored and excited to play a part in your musical & creative DJ journey!
Box Contents
NS4 FX
Power Adapter
USB Cable
Software Download Card
User Guide
Safety & Warranty Manual
Support
For the latest information about this product (system requirements, compatibility information, etc.) and product registration, visit numark.com.
For additional product support, visit numark.com/support.
Product Registration
Your product may include exclusive software and/or promotions which can only be accessed by registering your new product on the Numark website.
To check eligibility and access the available content, please register your product by following the instructions below.
- Visit numark.com.
- Click "My Account" to access your existing account or to create a new account.
- Once signed in, click "Register A Product".
- Complete the form and click "Submit Registration".
- Upon successful registration, any applicable software downloads, exclusive content, and promotional offers will be shown in your account.
Setup
-
Place NS4 FX on a flat, stable surface.
-
Make sure all devices are turned off and all faders and gain knobs are set to "zero".
-
Connect any input devices (microphones, CD players, etc.) to NS4 FX's Mic or Aux Inputs.
-
Connect NS4 FX's Main Outputs and Booth Outputs (if using) to power amplifiers or loudspeakers, and connect headphones to the Headphone Outputs.
-
Plug all devices into power and connect NS4 FX's USB port to a computer's USB port using the included USB cable.
-
When powering everything on, power on your devices in the following order:
• (1) Any input sources, (2) your computer and NS4 FX, (3) any amplifiers, speakers, or output devices.
-
Locate the Serato DJ Lite installation card in the box to download and install the software.
-
Open your software program and load music to the decks.
-
Start DJ'ing!
-
When powering everything off, power off your devices in the following order:
• (1) Any amplifiers, speakers, or output devices, (2) your computer and NS4 FX, (3) any input sources.
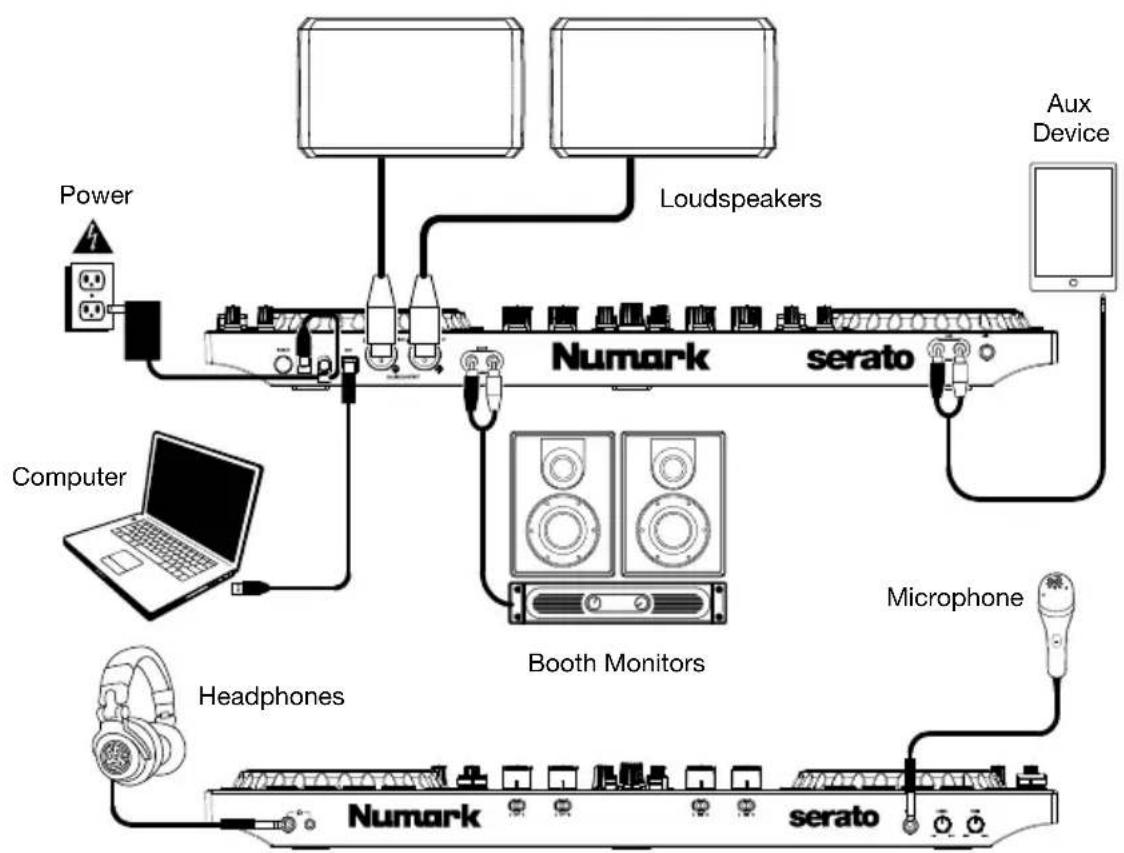
Connection Diagram
Items not listed under Introduction > Box Contents are sold separately.
flowchart
graph TD
    A["Power"] --> B["Switch"]
    C["Computer"] --> D["Laptop"]
    E["Headphones"] --> F["Microphone"]
    G["Aux Device"] --> H["Loudspeakers"]
    I["Booth Monitors"] --> J["Numark"]
    K["serato"] --> L["Numark"]
    M["Microphone"] --> N["serato"]
Features
Top Panel
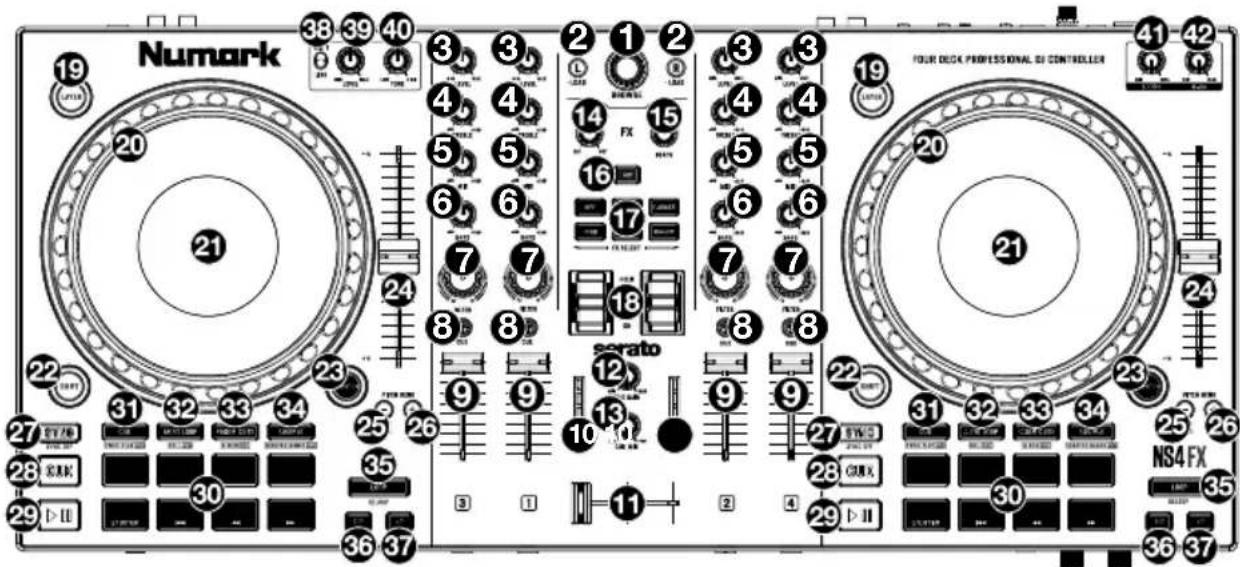
- Browse Knob: Rotate this knob to cycle through folders and tracks. Press the knob to cycle between the Crates and Library.
Hold Shift and rotate the knob to quickly scroll through tracks and folders.
-
Load: Press one of these buttons while a track is selected to assign it to the active Left or Right deck. Quickly double-press a Load button to assign the same track on both active decks.
-
Level: Adjusts the pre-fader, pre-EQ audio level of the corresponding channel.
-
Treble EQ: Controls the treble frequencies for the individual channels.
-
Mid EQ: Controls the mid-range frequencies for the individual channels.
-
Bass EQ: Controls the bass frequencies for the individual channels.
-
Filter: Adjusts the amount of the filter effect. Turning the knob left and right will produce a low-pass filter and high-pass filter, respectively.
-
Headphone Cue: Sends pre-fader audio to the cue channel for headphone monitoring.
-
Channel Fader: Adjusts the volume of the individual channels in the software.
-
Main Output LEDs: Displays the audio level going to the Main Output.
-
Crossfader: Controls the blend between the two decks.
-
Cue Gain: Adjusts the volume for headphone cueing.
-
Cue Mix: Adjusts the audio output to the headphones, mixing between the cue output and the master mix output.
-
FX Wet/Dry Knob: Turn this knob to adjust the wet/dry mix of the effects.
-
Beats Multiplier: Increases and decreases the rate of the effects to the beat. When using a time-based effect, this knob adjusts its time division.
-
Tap BPM: Press this button 4 or more times to manually enter a new BPM. The software will ignore the track's BPM and follow your manually entered tempo.
Press Shift and this button to reset the tempo to the track's default BPM.
- Software FX: Press one of these buttons to select a software effect.
- HPF (High pass filter)
- Echo
- LPF (Low pass filter)
- Reverb
- Flanger
- Phaser
-
FX On / Off / Hold: Push up on the toggle switch to latch (lock) the FX in the on position. Push down on the toggle switch to turn the FX on momentarily. When the toggle switch is in the middle position, the FX will be off.
-
Layer: Press this button to select which Layer in the software is controlled by that hardware Deck. Deck A can control Layer 1 or 3; Deck B can control Layer 2 or 4.
-
Platter/Jog Wheel: This capacitive, touch-sensitive jog wheel controls the audio when the wheel is touched and moved. When the Scratch button is not active, use the jog wheel to bend the pitch of the track. When the Scratch button is active, use the jog wheel to grab and move the audio, "scratching" the track as you would with a vinyl record. You can also grab the non-touch-sensitive outer wheel to bend the pitch of the track.
Press Shift and move the wheel to quickly search through the track audio.
-
Display: Use this screen to view information about the current track. See Features > Display for more information.
-
Shift: Allows multiple control commands to be triggered when pressed first along with other buttons.
-
Scratch: Press this button to turn on the scratch feature for the jog wheel.
-
Pitch Fader: This controls the speed of the music. Moving towards the "+" will speed the music up, while moving towards the "-" will slow it down.
-
Pitch Bend Down: Press and hold to momentarily reduce the speed of the track.
Hold Shift and this button to adjust the pitch fader range.
- Pitch Bend Up: Press and hold to momentarily increase the speed of the track.
Hold Shift and this button to activate or deactivate Keylock.
- Sync: Press this button to automatically match the corresponding Deck's tempo with the opposite Deck's tempo.
Press Shift and press this button to deactivate Sync.
- Cue (Transport Control): Sets and recalls the main Cue point in the current track. Hold down the Cue button for temporary play of the cue point. The track will play for as long as the button is held down and return to the cue point once it is released.
Press Shift + Cue to return the playhead to the start of the track.
-
Play/Pause: Starts and suspends playback.
-
Performance Pads: These pads have different functions on each deck depending on the current pad mode. See Operation > Performance Pad Modes to learn how to use the pads in each mode, described below.
With Serato DJ Lite, the bottom row of pads is used to trigger Stutter, Previous Track, Search Backward, and Search Forward:
- Stutter: Repeats or "stutters" the sample when the pad is repeatedly tapped.
• Previous Track: Goes to the previous track. - Search Backward: Searches backward through the current track.
• Search Forward: Searches forward through the current track.
With Serato DJ Pro, the bottom four pads can also be used for the selected pad mode.
- Cue / Pitch Play: Press this button to enter Cue mode. Press the button a second time to enter Pitch Play mode.
Note: The Serato Pitch N Time plugin (not included) is required to use Pitch Play mode.
-
Auto Loop / Roll: Press this button to enter Auto Loop mode. Press the button a second time to enter Roll mode (Serato DJ Pro only).
-
Fader Cuts / Slicer: Press this button to enter Fader Cuts mode. Press the button a second time to enter Slicer mode (Serato DJ Pro only).
-
Sampler / Scratch Banks: Press this button to enter Sampler mode. Press the button a second time to enter Scratch Banks mode (Serato DJ Pro only).
Numark
- Loop On/Off: Press this button to activate auto loop on/off. Hold Shift and press this button to trigger a reloop.
- Loop 1/2: Press this button when a loop is active to decrease the loop size by half. Hold Shift and press this button to set the Loop In point.
- Loop x2: Press this button when a loop is active to double the loop size. Hold Shift and press this button to set the Loop Out point.
- Mic 1/Line Switch: Flip this switch to the appropriate position, depending on the device connected to the Mic 1 Input. If you are using a microphone connected to the Mic 1 Input, set the switch to Mic 1. If you are using a device such as a CD player or sampler connected to the Aux Input, set the switch to Line.
- Mic 1/Line Level: Turn this knob to adjust the level for the Mic 1 Input or Aux Input.
- Mic 1/Line Tone: Turn this knob to adjust the tone of the Mic 1 Input or Aux Input. Turn left to increase the Low frequency tone, or turn right to increase the High frequency tone.
- Booth Volume: Turn this knob to adjust the output volume of the Booth Output mix.
- Main Volume: Turn this knob to adjust the output volume of the Main Output mix.
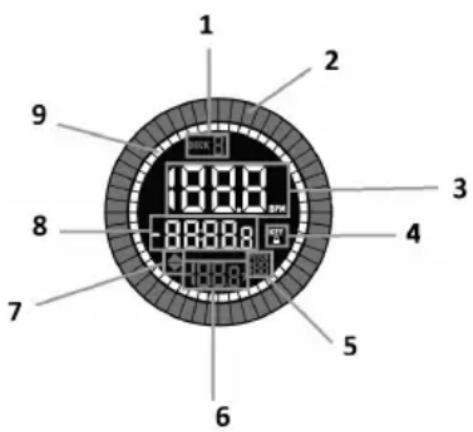
Display
- Active Deck: Indicates the currently active deck.
- Platter Position: Displays the current track position.
- BPM: Displays the current BPM for the selected track.
- Keylock: This icon illuminates when Keylock is active for the current deck.
- Pitch Range: Shows the current pitch range.
- Pitch: Shows current pitch of the track.
- Pitch Adjust: Indicates the direction to move the Pitch Fader to match the current track's BPM with the track on the opposite deck.
- Time Remaining: Displays the time elapsed or time remaining for the current track.
- Time Bars: Provides visual reference to time remaining on the selected song. When the song is almost over these segments will flash to give a warning.
Front Panel

- Headphone Outputs: Connect headphones to these 1/4" (6.35 mm) and 1/8" (3.5 mm) jacks for monitoring the signal. The headphone volume is controlled using the Cue Gain knob.
- Crossfader Assign: Use these switches to route the audio playing on the corresponding channel to either side of the crossfader (A or B), or bypasses the crossfader and sends the audio directly to the Program Mix (center, Off).
- Mic 2 Input: Connect a standard dynamic microphone to this 1/4" (6.35 mm) jack.
- Mic 2 Level: Adjusts the volume level of the Mic 2 Input.
- Mic 2 Tone: Turn this knob to adjust the tone of the Mic 2 Input. Turn left to increase the Low frequency tone, or turn right to increase the High frequency tone.
Rear Panel

- Power Button: Press this button to turn NS4 FX on and off. Turn on NS4 FX after all input devices have been connected and before you turn on amplifiers. Turn off amplifiers before you turn off NS4 FX.
- Power Input: Use the included power adapter (12 V DC, 2 A, center-positive) to connect NS4 FX to a power outlet. While the power is switched off, plug the cable into NS4 FX first, and then plug the cable into a power outlet.
- Cable Restraint: You can secure cables to this restraint to help avoid disconnecting them accidentally.
- USB: Use a standard USB cable (included) to connect each USB port to an available USB port on a computer. This port sends USB MIDI data to control various software parameters.
- Main Output (XLR): Use standard XLR cables to connect this output to a PA system or powered monitors. The level of this output is controlled with the Main knob on the top panel.
- Booth Output (RCA): Use standard RCA cables to connect this output to a booth monitoring system. The level of this output is controlled by the Booth knob on the top panel.
- Aux Input: Connect a line-level device to these RCA inputs. Use the Mic 1/Line controls on the top panel to select this input and adjust its level and tone.
- Mic 1 Input: Connect a standard dynamic microphone to this 1/4" (6.35 mm) input. Use the Mic 1/Line controls on the top panel to select this input and adjust its level and tone.
Operation
Performance Pad Modes
With the included Serato DJ Lite, the upper row of pads can be used to perform the functions of the four main pad modes described below: Cue, Auto Loop, Fader Cuts, and Sample. The bottom four pads are used for Stutter, Previous Track, Search Backward, and Search Forward functions.
If you would like to use Serato DJ Pro and/or the Serato Pitch 'n Time DJ Expansion Pack (sold separately), up to four additional pad modes are available: Pitch Play, Roll, Slicer, and Scratch Bank. You can also use all eight performance pads for any of the pad mode functions listed below.
Cue
In Cue mode, each pad assigns a hot cue point or returns the track to that hot cue point.
To enter Cue mode, press Cue.
To assign a hot cue point, press a pad at the desired point in your track. The pad will light up when it is assigned (with the corresponding color, if available).
To jump to a hot cue point, press a lit Pad.
To delete an assigned hot cue point, press Shift and the corresponding pad.
Pitch Play
In Pitch Play mode, each pad plays the track from a hot cue point at a different transposition (adjustable by semitones). The Serato Pitch 'n Time DJ Expansion Pack (sold separately) must be installed to use this mode. See Cue mode to learn how to assign hot cue points.
To enter Pitch Play Mode, press Cue a second time.
To select which hot cue point to use, press Shift and a dimly lit Pad.
To play the track from the hot cue point, press a lit Pad. Each pad corresponds to a specific transposition (by semitones), depending on the current range of transposition (see the diagrams here). The pad with no transposition (the original pitch) will be lit white. The bottom four pads are only available with Serato DJ Pro.
Up
| +4 semitones | +5 semitones | +6 semitones | +7 semitones |
| 0 (original pitch) | +1 semitone | +2 semitones | +3 semitones |
Middle
| 0(original pitch) | +1semitone | +2semitones | +3semitones |
| -4semitones | -3semitones | -2semitones | -1semitone |
Down
| -3 semitones | -2 semitones | -1 semitone | 0 (original pitch) |
| -7 semitones | -6 semitones | -5 semitones | -4 semitones |
Auto Loop
In Auto Loop mode, each pad triggers or releases an auto-loop of a different length. The software's loop grid determines the size of the loop.
To enter Auto Loop mode, press Auto Loop.
To set an auto loop, press a pad for the desired loop length.
Roll
In Roll mode (Serato DJ Pro only), each pad triggers a momentary loop roll. Releasing the pad stops the loop roll and resumes normal playback where the playhead would be if you had not triggered the loop roll (i.e., as if the track had been playing forward the whole time).
To enter Roll Mode, press Auto Loop a second time.
To trigger a loop roll, press and hold a pad.
Fader Cuts
In Fader Cuts mode, the pads will mute and unmute the deck's audio signal in a way that emulates crossfader movements toward that deck.
To enter Fader Cuts mode, press Fader Cuts.
To perform a fader cut, press a pad. The bottom four pads are only available with Serato DJ Pro.
Slicer
Important: Your track must have a set beatgrid for this mode to work.
In Slicer mode (Serato DJ Pro only), the eight pads represent eight sequential beats—“slices”—in the beatgrid. The currently playing slice is represented by the currently lit pad; the light will “move through the pads” as it progresses through each eight-slice phrase. You can press a pad to play that slice. When you release the pad, the track will resume normal playback from where it would have been if you had never pressed it (i.e., as if the track had been playing forward the whole time).
To enter Slicer mode, press Fader Cuts a second time. The deck will exit Slicer mode if you load another track to the deck or enable Grid Edit mode.
To play a slice, press the corresponding Pad.
Sampler
In Sampler mode, each pad triggers a sample, which you can assign in the software.
To enter Sample mode, press Sample.
To play a sample, press a pad.
To stop playback, or to load a sample if the slot is empty, press Shift and a pad.
Scratch Banks
In Scratch Banks mode (Serato DJ Pro only), each pad loads a song to the selected deck. You can assign the song and set the starting point in the software. This is useful for preparing and performing with song samples for scratching.
To enter Scratch Banks Mode, press Sampler a second time.
Pannello anteriore

Technical Specifications
| Outputs | 2 XLR balanced outputs1 RCA stereo output1 1/4” (6.35 mm) TRS headphone output1 1/8” (3.5 mm) TRS headphone output |
| Inputs | 1 RCA stereo input2 1/4” (6.35 mm) TS microphone inputs |
| Power | Via power adapter, DC 12 V, 2.0 A |
| Audio | 44.1 kHz, 24-bit |
| Dimensions(width x depth x height) | 23.5” x 10.8” x 2.4”59.7 x 27.4 x 6.1 cm |
| Weight | 6.6 lbs.3.0 kg |
Specifications are subject to change without notice.
Trademarks & Licenses
Numark is a trademark of inMusic Brands, Inc., registered in the U.S. and other countries.
Serato, Serato DJ, and the Serato logo are registered trademarks of Serato Audio Research.
All other product or company names are trademarks or registered trademarks of their respective owners.