
IAN 322310 - Furniture transport set POWERFIX - Free user manual and instructions
Find the device manual for free IAN 322310 POWERFIX in PDF.
| Product type | Furniture transport set / Mechanics creeper and workshop stool 2 in 1 |
| Brand | Powerfix |
| Model | IAN 322310 |
| Dimensions (creeper) | approx. 91 × 41 × 12 cm |
| Dimensions (stool) | approx. 46 × 41 × 36 cm |
| Net weight | approx. 5.4 kg |
| Maximum load (creeper) | 150 kg |
| Maximum load (stool) | 120 kg |
| Frame material | Steel |
| Casters | 6 swivel casters |
| Padding | Top, middle and bottom frame padded |
| Main functions | Use as a creeper for working lying down or as a seated stool |
| Assembly required | Yes, screwing of frames and casters |
| Conversion creeper ↔ stool | Yes, via pin and safety hook |
| Safety | Do not use as a step stool, check before each use, do not overload, do not use on stairs or sloped surfaces |
| Maintenance | Check and tighten screws regularly |
| Cleaning | Slightly damp cloth and mild household cleaner |
| Customer service | France: 0800 919270, email: kompernass@lidl.fr |
| Repairability | Contact customer service for spare parts or repair |
| Recycling | Product and packaging recyclable via local schemes |
Frequently Asked Questions - IAN 322310 POWERFIX
User questions about IAN 322310 POWERFIX
0 question about this device. Answer the ones you know or ask your own.
Ask a new question about this device
Download the instructions for your Furniture transport set in PDF format for free! Find your manual IAN 322310 - POWERFIX and take your electronic device back in hand. On this page are published all the documents necessary for the use of your device. IAN 322310 by POWERFIX.
USER MANUAL IAN 322310 POWERFIX
MONTAGE-ROLLBRETTE & WERKSTATTHOCKER 2IN1 / 2-IN-1 CAR CREEPER & STOOL / CHARIOT DE MÉCANICIEN & TABOURET D'ATELIER 2 EN 1 PRW 2 A1
DE AT CH
MONTAGE-ROLLBRETTC & WERKSTATTHOCKER 2IN1
Bedienungsanleitung
FR BE
CHARIOT DE MÉCANICIEN & TABOURET D'ATELIER 2 EN 1
Mode d'emploi
PL
MONTAZOWA LEZANKA NA KÓŁKACH I STOLEK WARSZTATOWY 2W1
Instrukcja obstugi
SK
MONTAZNA DOSKA NA KOLIESKACH A STOLČEK DO DIELINE 2 V 1
Návod na obsluhu
GB IE
2-IN-1 CAR CREEPER & STOOL
Operating instructions
NL BE
MONTAGE-ROLPLANK & WERKPLAATSKRUK 2-IN-1
Gebruiksaanwijzing
CZ
MONTAZNI POJIZDNÉ LEHÁTKO & STOLICKA DO DILNY 2 V 1
Návod k obsluze
IAN 322310_1901
DE BE NL
PL CZ SK
DE AT CH
Before reading, unfold the page containing the illustrations and familiarise yourself with all functions of the device.
FR BE
KOMPERNASS HANDELS GMBH
BURGSTRASSE 21
DE-44867 BOCHUM
DEUTSCHLAND
www.kompernass.com
Contents
Introduction 10
Information about these operating instructions 10
Proper use 10
Technical data 10
Safety. 11
Contents of package/parts description 12
Use 12
Assembly 12
Converting from the dolly to a stool 14
Storage 15
Maintenance. 15
Cleaning 15
Disposal 15
Disposal of the product 15
Disposal of packaging 15
Service 16
Importer. 16
Introduction
Information about these operating instructions
Congratulations!
You have purchased a high-quality product. Familiarise yourself with the product before using it for the first time. To do this, read the following operating instructions thoroughly. Use the product only as described and for the range of applications specified. Keep these operating instructions in a safe place. Please also pass these operating instructions on to any future owner(s).
Proper use
The product is designed as a useful aid for occasional work at low working heights that can only be carried out in a lying or crouching position. For use in private households only. The product is not designed for use on stairways or steep slopes. Commercial or industrial use is not permitted. No liability will be assumed in cases of improper use.
No liability will be assumed for damage caused by misuse or improper handling, the use of force or unauthorised modification. The risk is borne solely by the user.
Technical data
| Date of manufacture | 2019-07 |
| Dimensions | |
| Dolly | approx. 91 × 41 × 12 cm |
| Stool | approx. 46 × 41 × 36 cm |
| Weight | |
| Maximum load (as dolly) 150 kg | |
| Maximum load (as stool) 120 kg | |
| Unladen weight approx. 5.4 kg | |
Safety
RISK OF INJURY!
- Check the product before every use to make sure it is in perfect condition. Do not use the product if it is damaged in any way.
If it does not work properly or has been damaged, have the product be checked immediately and repaired by customer service.
This product is not intended for use by individuals (including children) with reduced physical, sensory, or mental capabilities. It may also not be used by individuals who lack experience and/or knowledge unless they are supervised by a person responsible for their safety or have received instructions on how to use the product from such a person. Children should be supervised to ensure they do not play with the product.
When using the product as a dolly, never apply a load of more than 150 kg.
When using the product as a stool, never apply a load of more than 120 kg.
Do not continue to use the product if it is overloaded.
This could lead to damage that is not immediately visible.
Do not use the product as a step or to transport passengers, neither in dolly mode nor in stool mode.
Only use the product to work underneath areas that have been secured against falling!
- Use the product only on hard, even surfaces, not on stairways or steep slopes. Do not roll over objects.
Never adjust the sitting or lying position while someone is on the product.
- Never hold onto the lateral steel waling while you are sitting on the product. This will prevent the risk of crushing injury in the event that your fingers are in the shear area when a fault occurs.
- Never reach into the shear area if the product is not fully unfolded in the lying position.
- Never reach under the product if you are lying on it. There is risk of crushing injury if you touch the middle wheels while rolling.
The product is flammable. Keep the product away from open flames (e.g. candles or smouldering cigarettes).
Take care when folding or unfolding the product.
Avoid getting your fingers or hands caught.
Check each screw connection at regular intervals.
Never use the product for purposes other than those described in these instructions.
Contents of package/parts description
- 2-in-1 car creeper & stool
-Upper frame with padding 1
- Middle frame with padding
- Lower frame with padding
-6×swivelling castors4
-Locking hole 5
- Locking pin
-Locking hook
These operating instructions
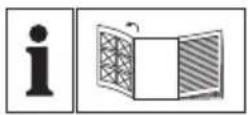
Assembly material:
4
NOTE
Check the package for completeness and signs of visible damage.
Use
Assembly
CAUTION
- Place all the parts of the product and the assembly material on a blanket to protect the floor and the product from scratches. Carry out the assembly also on a blanket or similar.
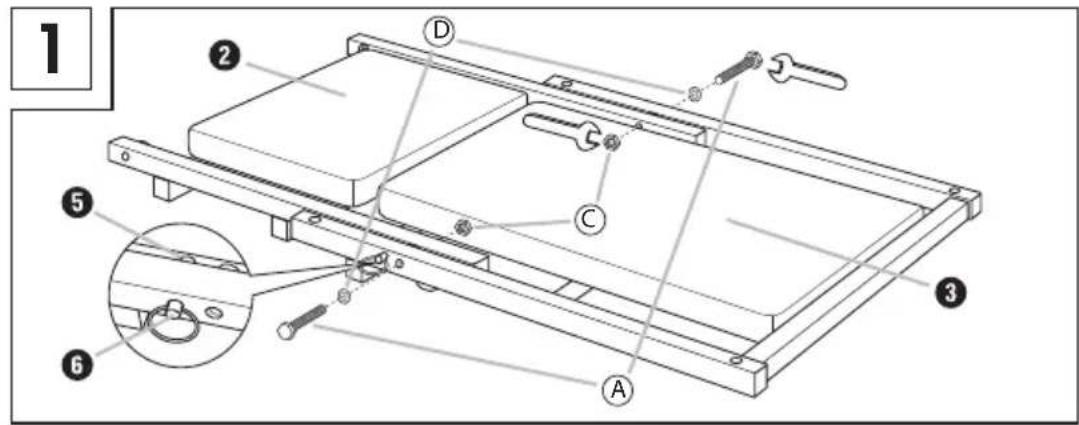
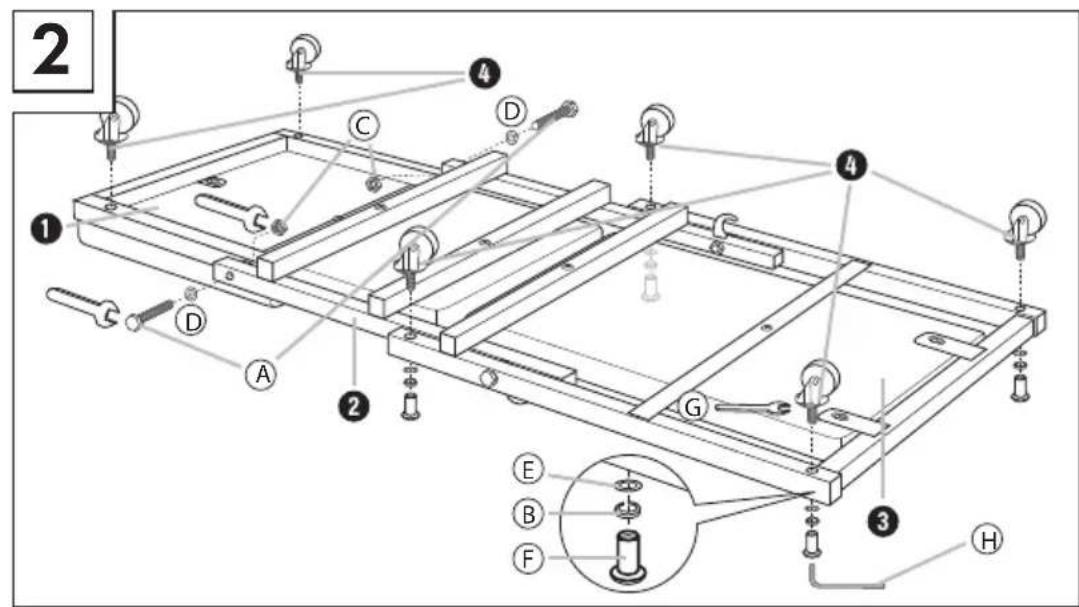
Place the lower frame 3 and the middle frame 2 n the floor with the bottom side facing down.
Push the middle frame between the steel walings of the lower frame 3
Pull out the locking pin on the lower frame 3 as far as it will go and slowly let go of it until it clicks into the locking hole 5 in the middle frame 3e fig.1).
Connect the lower frame 3 and the middle frame 2 using the screws A, washers D and lock nuts C (see fig. 1).
Turn the now-assembled frame so that the top side is on the floor.
Push the upper frame ① between the steel walings of the middle frame ②.
Connect the middle frame2 and the upper frame 1 sing the screws A, washers D and lock nuts C (see fig. 2).
Push the four castors 4 into the four holes on the lower frame 3. Use the hex key H to screw the sleeve nuts F with the spring washers B and washers E onto the threads of the castors. Counter the castors 4 with the screw wrench G. Screw the two remaining castors directly into the upper frame 1 (see fig.2).
Turn the now fully assembled product over so that it is standing on its castors. The product is ready for use as a dolly.
Converting from the dolly to a stool
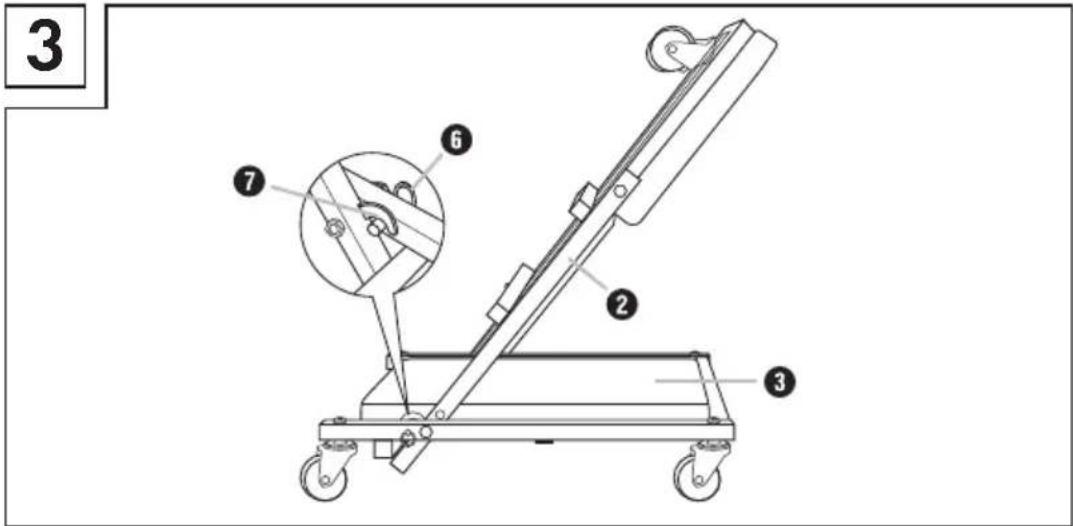
Pull the locking pin 6 on the lower frame 3 fully out and keep it held out.
Fold the middle frame upwards (see fig. 3).
Let the locking pin 6 slowly go until it clicks into the locking hook 7 (see fig. 3).
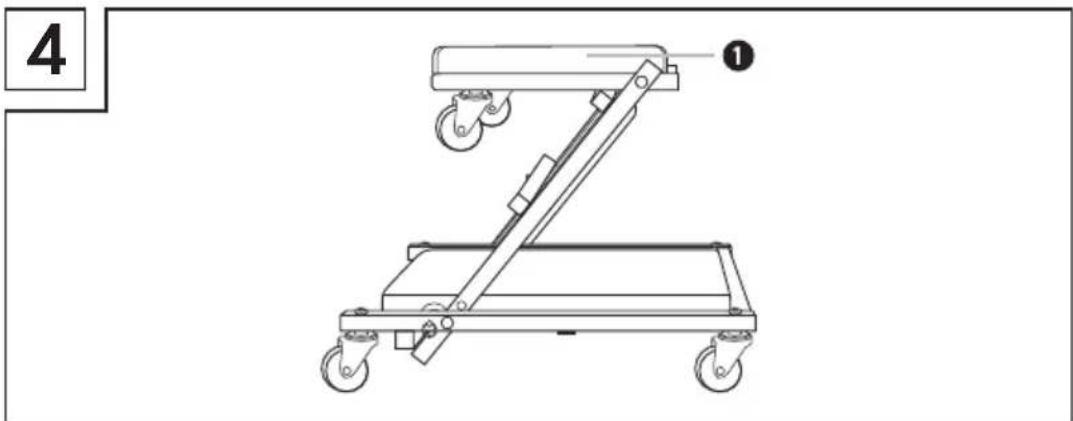
Fold the upper frame downwards until reaches a horizontal position (see fig. 4). The product is ready for use as a stool.
Storage
Store the product as a stool. Lay the product on its side on the frame so it cannot tip over or roll away. Select a clean, dry place away from direct sunlight.
Maintenance
Check that all the screw connections are sufficiently tightened at regular intervals.
Tighten the product's screw connections if necessary.
Any damaged screw joints should be replaced by a specialist.
Cleaning
CAUTION
- Do not use aggressive or abrasive cleaning agents, as these can damage the outer surfaces of the product.
Clean the product using a moistened cloth and a standard commercial household detergent.
Disposal
Disposal of the product

Dispose of the product via an approved waste disposal company or your municipal waste disposal facility. Observe the currently applicable regulations. Please contact your waste disposal facility if you are in any doubt.

Your local community or municipal authorities can provide information on how to dispose of the worn-out product.
Disposal of packaging

Dispose of the packaging in an environmentally friendly manner.
Note the labelling on the packaging and separate the packaging material components for disposal if necessary. The packaging material is labelled with abbreviations (a) and numbers (b) with the following meanings:
1-7:plastics,
20-22: paper and cardboard,
80-98: composites.
Service
GB Service Great Britain
Tel.: 0800 404 7657
E-Mail: kompernass@lidl.co.uk
IE Service Ireland
Tel.: 1890 930 034
(0,08 EUR/Min., (peak))
(0,06 EUR/Min., (off peak))
E-Mail: kompernass@lidl.ie
IAN322310_1901
Importer
Please note that the following address is not the service address. Please use the service address provided in the operating instructions.
KOMPERNASS HANDELS GMBH
BURGSTRASSE 21
DE-44867 BOCHUM
GERMANY
www.kompernass.com
Table des matieres
Introduction 18
KOMPERNASS HANDELS GMBH
BURGSTRASSE 21
DE-44867 BOCHUM
ALLEMAGNE
www.kompernass.com
Inhoud
Inleiding 26
KOMPERNASS HANDELS GMBH
BURGSTRASSE 21
DE-44867 BOCHUM
DUITSLAND
www.kompernass.com
Spis tresci
Wstep 34
KOMPERNASS HANDELS GMBH
BURGSTRASSE 21
DE-44867 BOCHUM
NIEMCY
www.kompernass.com
Obsah
Uvod. 42
Informace k tomuto navodu k obsluze 42
Pouziti v souladu s urcenim 42
Technické udaje 42
Bezpečnost 43
Rozsa h dodavky / popis dilu 44
Použití 44
Montaz 44
Prestavba pojizdne desky na podnozku 46
Skladovani 47
Udrzba. 47
Cisteni 47
Likvidace 47
Likvidace vrobku 47
Likvidace obalu 47
Servis 48
Dovozce 48
Uvod
KOMPERNASS HANDELS GMBH
BURGSTRASSE 21
DE-44867 BOCHUM
NEMECKO
www.kompernass.com
Obsah
Uvod. 50
KOMPERNASS HANDELS GMBH
BURGSTRASSE 21
DE-44867 BOCHUM
NEMECKO
www.kompernass.com
KOMPERNASS HANDELS GMBH
BURGSTRASSE 21
DE-44867 BOCHUM
GERMANY
www.kompernass.com
- MONTAGE-ROLLBRETTE & WERKSTATTHOCKER 2IN1 / 2-IN-1 CAR CREEPER & STOOL / CHARIOT DE MÉCANICIEN & TABOURET D'ATELIER 2 EN 1 PRW 2 A1
- MONTAGE-ROLLBRETTC & WERKSTATTHOCKER 2IN1
- CHARIOT DE MÉCANICIEN & TABOURET D'ATELIER 2 EN 1
- MONTAZOWA LEZANKA NA KÓŁKACH I STOLEK WARSZTATOWY 2W1
- MONTAZNA DOSKA NA KOLIESKACH A STOLČEK DO DIELINE 2 V 1
- 2-IN-1 CAR CREEPER & STOOL
- MONTAGE-ROLPLANK & WERKPLAATSKRUK 2-IN-1
- MONTAZNI POJIZDNÉ LEHÁTKO & STOLICKA DO DILNY 2 V 1
- DE AT CH
- FR BE
- Contents
- Introduction 10
- Technical data 10
- Safety. 11
- Contents of package/parts description 12
- Use 12
- Storage 15
- Maintenance. 15
- Cleaning 15
- Disposal 15
- Service 16
- Importer. 16
- Introduction
- Information about these operating instructions
- Proper use
- Technical data
- Safety
- RISK OF INJURY!
- Contents of package/parts description
- NOTE
- Use
- Assembly
- CAUTION
- Converting from the dolly to a stool
- Storage
- Maintenance
- Cleaning
- Disposal
- Disposal of the product
- Disposal of packaging
- Service
- Importer
- Table des matieres
- Introduction 18
- Inhoud
- Inleiding 26
- Spis tresci
- Wstep 34
- Obsah
- Uvod. 42
- Technické udaje 42
- Bezpečnost 43
- Rozsa h dodavky / popis dilu 44
- Použití 44
- Skladovani 47
- Udrzba. 47
- Cisteni 47
- Likvidace 47
- Servis 48
- Dovozce 48
- Uvod
- Uvod. 50
Brand : POWERFIX
Model : IAN 322310
Category : Furniture transport set