IAN 275317 - Embossing machine Crelando - Free user manual and instructions
Find the device manual for free IAN 275317 Crelando in PDF.

| Brand | Crelando |
| Model | IAN 275317 |
| Product type | Embossing tool (hot air gun) |
| Rated voltage | 230 V ~ 50 Hz |
| Power consumption | 350 W |
| Air flow (Level I) | approx. 70 l/min |
| Air flow (Level II) | approx. 120 l/min |
| Outlet temperature (Level I) | approx. 220 °C |
| Outlet temperature (Level II) | approx. 330 °C |
| Protection class | II (double insulation) |
| Included equipment | 1 hot air gun, 1 embossing pen (transparent), 9 ink pads, 6 Christmas-themed wooden stamps, 3 embossing powders (gold, silver, transparent), 2 embossing stencils (ABC, numbers), 1 stamp cleaner, 1 instruction manual |
| Intended use | Heat embossing powder for creative hobbies |
| Care and cleaning | Clean after use with a soft cloth; do not use solvents or sharp objects; keep the air intake and nozzle clean |
| Safety | Do not use as a hair dryer; do not direct at people/animals; do not touch hot nozzle; avoid flammable materials; unplug after use; let cool before storage |
| Warranty | 3 years from purchase date (conditions according to manual) |
Frequently Asked Questions - IAN 275317 Crelando
User questions about IAN 275317 Crelando
0 question about this device. Answer the ones you know or ask your own.
Ask a new question about this device
Download the instructions for your Embossing machine in PDF format for free! Find your manual IAN 275317 - Crelando and take your electronic device back in hand. On this page are published all the documents necessary for the use of your device. IAN 275317 by Crelando.
USER MANUAL IAN 275317 Crelando
SET D'EMBOSSAGE CHES 9 A1
FR BE
SET D'EMBOSSAGE
Translation of the original instructions
DE AT CH
EMBOSSING-SET
Before reading, unfold the page containing the illustrations and familiarise yourself with all functions of the device.
GB Translation of the original instructions Page 21
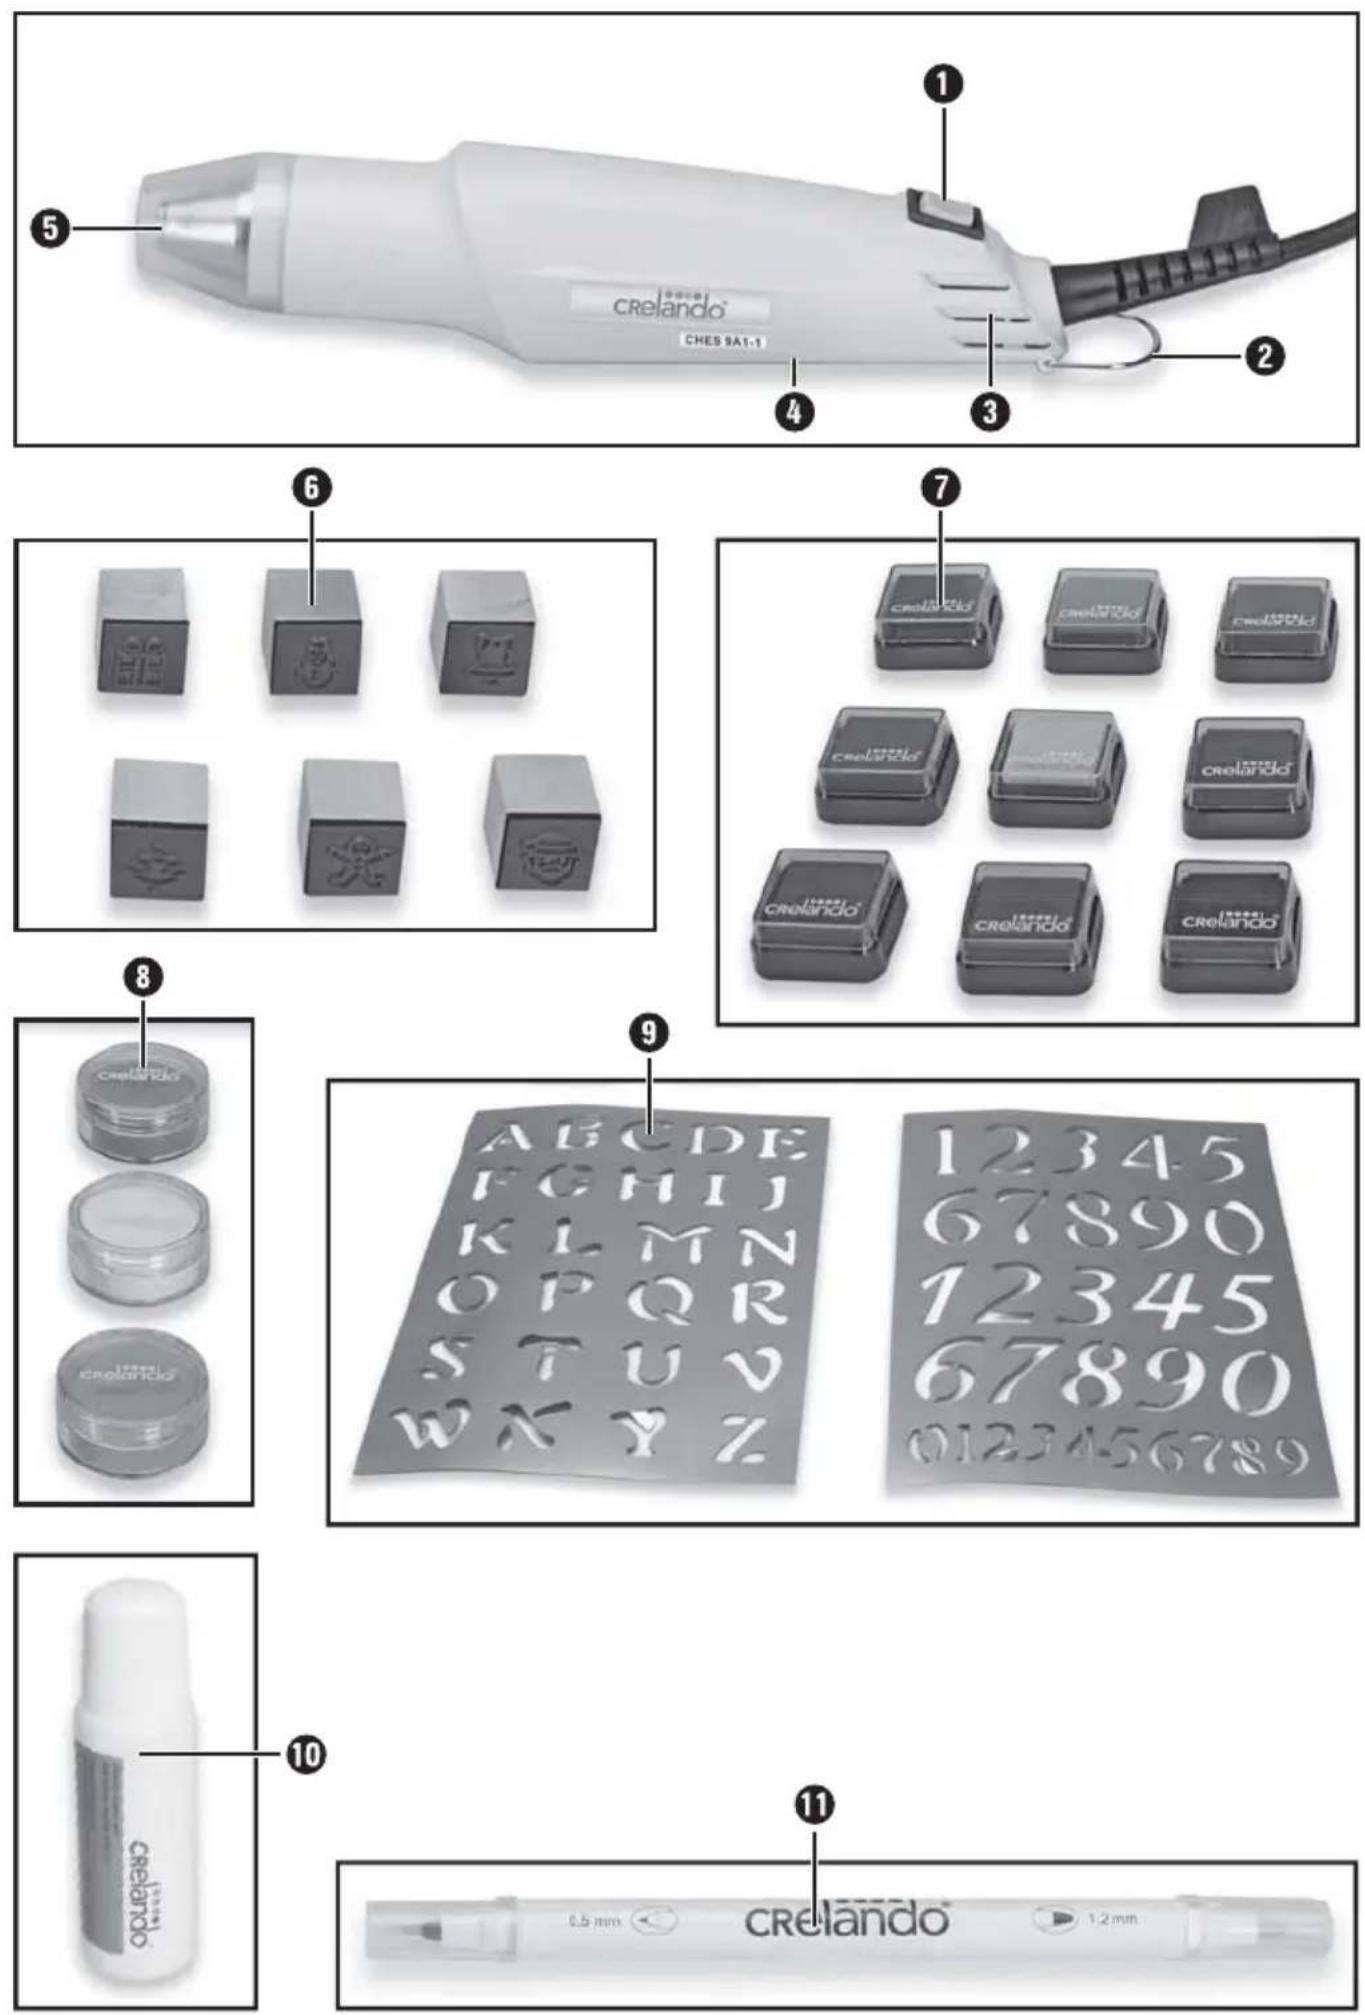
Table des matières
Introduction 2
SET D'EMBOSSAGE CHES 9 A1
Introduction
text_image
Transparency ABCDEFGHIJKLMNOPQRSTUVWXYZ W X Y Z S T U V O P Q R K L M N F G H I J A B C D EFig. A
REMARQUE
text_image
HOLDING HOLDINGFig. B
natural_image
Illustration of a droplet labeled 'LIVER/GOLD' with a feather-like structure emerging from it, no text or symbols present.Fig. D
text_image
Image showing six different types of containers and tools: a box, cube, container, brush, and bottle.natural_image
Line drawing of two hands holding blocks on a flat surface, one with a small object below (no text or symbols)Fig. F
REMARQUE
natural_image
Line drawing of a hand holding a small object over a sheet of paper, with a small container nearby (no text or symbols)Fig. G
natural_image
Simple line drawing of a small object on a flat surface with a dark base (no text or symbols)Fig. H

natural_image
Illustration of a transparent inkwell with a feather quill being inserted, no text or symbols presentFig. I
natural_image
Line drawing of two hands exchanging a small object, no text or symbols presentFig. K
REMARQUE
KOMPERNASS HANDELS GMBH
BURGSTRASSE 21
44867 BOCHUM
GERMANY
www.kompernass.com
Directive RoHS (2011/65/EU)
EMBOSSING-SET CHES 9 A1
Einleitung
text_image
HAPPY A B C D E F G H I J K L M N O P Q R S T U V S W Y Z W X Y ZAbb. A
HINWEIS
text_image
MERRY-CHRISTAbb. C
natural_image
Illustration of a droplet labeled 'SILVER/COLD' being poured into a jar, with no text or symbols on the diagram itself.Abb. D
text_image
Image showing six different types of products: battery, cube, container, pen, and bottle, each represented by a distinct line art.natural_image
Line drawing of two hands holding blocks on a flat surface, one with a small object at the end (no text or symbols)Abb. F
HINWEIS
natural_image
Line drawing of a hand holding a small object over a flat surface, with a small container nearby (no text or symbols)Abb. G
natural_image
Simple line drawing of a person standing at the bottom of a rectangular frame (no text or symbols)Abb. H

natural_image
Illustration of a transparent container with a feather-like object emerging from it, no text or symbols present.Abb. I
natural_image
Line drawing of two hands exchanging a small object, no text or symbols presentAbb. K
HINWEIS
KOMPERNASS HANDELS GMBH
BURGSTRASSE 21
44867 BOCHUM
GERMANY
www.kompernass.com
text_image
J. S. T. F. G. H.CE
Semi Uguzlu
Technical details 22
General safety instructions 23
Safety instructions for the hot air blower 24
Additional safety instructions 24
Use 25
Operation 25
Maintenance and cleaning 28
Disposal 28
Disposal of the device 28
Kompernass Handels GmbH warranty 28
Service 29
Importer 29
Translation of the original Conformity Declaration 30
EMBOSSING SET CHES 9 A1
Introduction
Congratulations on the purchase of your new appliance. You have selected a high-quality product. The operating instructions are part of this product. They contain important information about safety, usage and disposal. Before using the product, please familiarise yourself with all operating and safety instructions. Use the product only as described and for the range of applications specified. Please also pass these operating instructions on to any future owner.
Proper use of the hot air blower CHES 9 A1-1
The appliance is intended for heating embossing powder for leisure purposes. Any other usage of or modification to the appliance is deemed to be improper and carries a significant risk of accidents. The manufacturer accepts no responsibility for damage(s) attributable to misuse. The appliance is not intended for commercial use.
Features
① ON/OFF switch
② Hanger
3 Air inlet
4 Flattened side
5 Nozzle
6 Wooden Christmas motif stamp
⑦ Stamp pad
8 Embossing powder
9 Embossing stencil
10 Stamp cleaner
⑪ Embossing pen (with 2 tips for writing, painting or drawing)
Package contents
1 Heat gun CHES 9 A1-1
1 embossing pen (transparent)
9 stamp pads in various colours (red, orange, yellow, dark green, black, dark blue, light blue, purple, copper)
6 wooden Christmas motif stamps
1 embossing powder (gold)
1 embossing powder (silver)
1 embossing powder (transparent)
1 embossing stencil (ABC)
1 embossing stencil (numbers)
1 stamp cleaner
1 set of operating instructions
Technical details
Rated voltage: 230 V \~ 50 Hz (alternating current)
Rated power
consumption: 350 W
Air flow: Level I: approx. 70 l/min.
Level II: approx. 120 l/min.
Temperature
(nozzle outlet): Level I: approx. 220°C
Level II: approx. 330°C
Protection class: II / ☐ (double insulation)
The A-rated sound pressure level of the appliance is typically less than 70 dBA.

General safety instructions
WARNING!
▶ Read all safety warnings and all instructions. Failure to follow the warnings and instructions may result in electric shock, fire and/or serious injury.
■ This appliance may be used by children aged 8 years and above and by persons with limited physical, sensory or mental capabilities or lack of experience and knowledge, provided that they are under supervision or have been told how to use the appliance safely and are aware of the potential risks. Do not allow children to use the appliance as a plaything. Cleaning and user maintenance tasks may not be carried out by children unless they are supervised.
■ To avoid potential risks, damaged mains cables should be replaced by the manufacturer, their customer service department or a similarly qualified person.
Save all warnings and instructions for future reference.
The term "power tool" in the warnings refers to your mains-operated (corded) power tool or battery-operated (cordless) power tool.
■ Do not expose power tools to rain or wet conditions. Water entering a power tool will increase the risk of electric shock.
■ Do not abuse the cord. Never use the cord for carrying, pulling or unplugging the power tool. Keep cord away from heat, oil, sharp edges or moving parts. Damaged or entangled cords increase the risk of electric shock.
■ If operating a power tool in a damp location is unavoidable, use a residual current device (RCD) protected supply. Use of an RCD reduces the risk of electric shock.
■ Do not use the power tool if the switch does not turn it on and off. Any power tool that cannot be controlled with the switch is dangerous and must be repaired.
Safety instructions for the hot air blower
■ Careless use of the appliance can cause a fire.
■ Take care when using the appliance in the vicinity of inflammable materials.
■ Do not aim at the same place for a prolonged period of time.
■ Do not use in the presence of an explosive atmosphere.
■ Heat can be transferred to combustible materials which are hidden from view.
■ Allow the appliance to cool down after use before packing it away.
■ Do not leave the appliance unattended while it is in operation.
Additional safety instructions
CAUTION!
- Avoid the risk of injury or fire as well as health risks.
■ In case of danger, remove the plug from the socket immediately.
CAUTION! RISK OF INJURY!
▶ Never use the appliance as a hairdryer.
■ Never aim the hot air stream at people or animals.
■ Never look directly into the nozzle ^5 .
CAUTION! RISK OF BURNS!
▶ Do not touch the hot nozzle ^5 .
CAUTION! RISK OF FIRE AND EXPLOSION!
The appliance generates a lot of heat. Careless use can lead to an increased risk of fire and explosions.
■ Do not work in the presence of flammable gases or materials, or in an explosive environment. When working on plastics, paints, lacquers, etc., hazardous gasses can be released. Always ensure sufficient ventilation.
■ Always remove the plug from the power socket during work breaks, when adjusting the appliance and when it is no longer in use.
- Keep the nozzle at a distance from the workpiece or the area being processed. A build-up of hot air can result in damage to the appliance.
■ Pay close attention to the area being worked and also the surrounding area. The heat can reach combustible parts outside your field of vision.
■ The appliance must always be kept clean, dry and free from oil or grease.
■ Never use the appliance for purposes other than the ones for which it was designed.
Use
Operation

CAUTION!
▶ Do not cover the air inle3 during use.

CAUTION! RISK OF BURNS!
▶ Do not touch the hot nozzle ^5 .
Switching the appliance on:
■ Move the ON/OFF switch1 into the position level "I" or "II".
Switching the appliance off:
■ Move the ON/OFF switch① to position "0".
Setting airflow and temperature:
You can use the ON/OFF switch ① to select between two airflow levels. Depending on the application, you can select the most suitable airflow and temperature:
| Level I: * approx. 70 l/min. | approx.220°C |
| Level II: ** approx. 120l/min. | approx.330°C |
* For smaller applications, such as stamp motifs.
** For large-area applications, such as lettering.
For freehand and stencil work

text_image
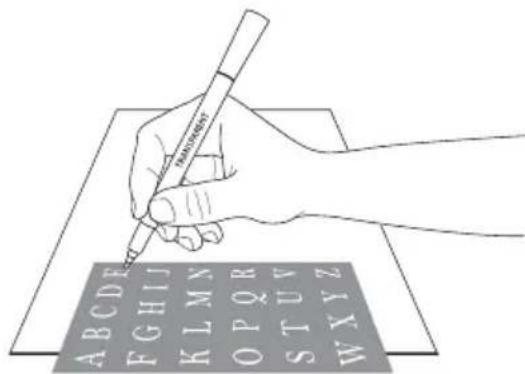
+ / +◆ 1.) Lay the embossing stencil! on the paper (see fig. A).
◆ 2.) Guide the embossing per1 along the contours (see fig. A).
text_image
Transparency ABCDEFGHIJKLMNOPQRSTUVWXYZ A B C D E F G H I J K L M N O P Q R S T U V W X Y ZFig. A
NOTE
▶ Please note that the pen color is quick drying. For example, after painting of two symbols, the powder should be sprinkled.
3.) Add a generous amount of embossing powder ⑧ (gold or silver) to the still wet pen ink. (the embossing powder ⑧ nly sticks to where you have previously drawn with the pen) (see fig. B).
text_image
MERRY CABBAGEFig. B
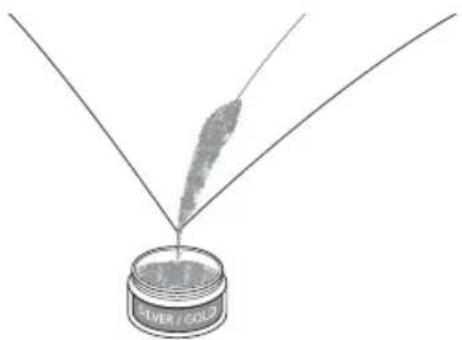
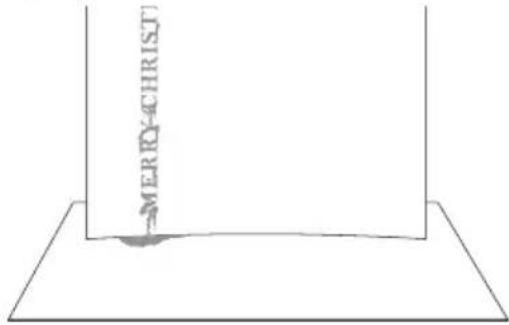
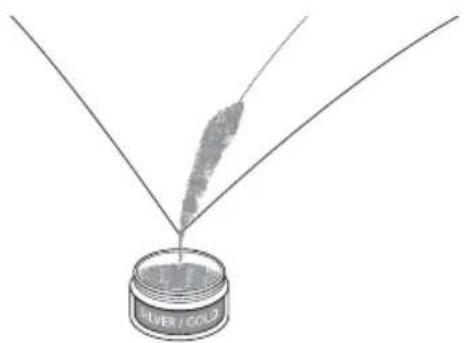
4.) Shake off the surplus embossing powder onto a piece of paper (preferably already folded down the middle). Now pour the powder back into the container (see figs. C+D).
text_image
MERIO-4CHRISTFig. C
text_image
LIVER / COLDFig. D
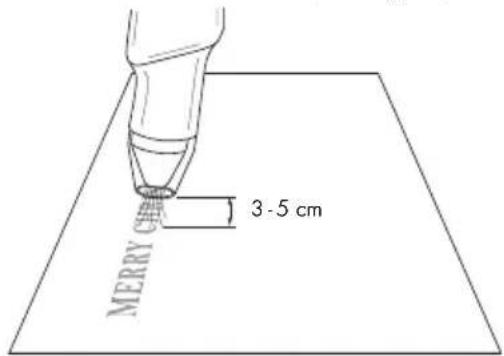
5.) Now heat up the powder-covered drawing. Aim the hot air blower at the drawing from a distance of 3 to 5 cm (see fig. E).
text_image
MERRY 3 - 5 cmFig. E
NOTE
▶ Heat the powder only until it has completely melted. The powder is then smooth and shiny.
Working with stamp pads

text_image
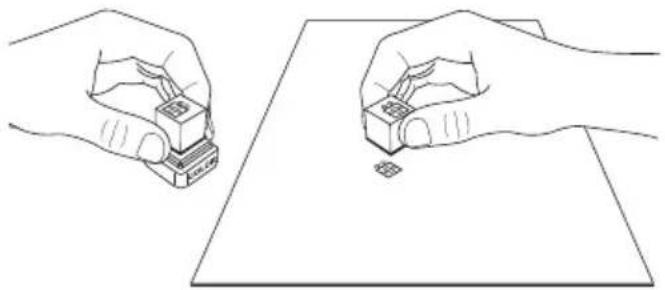
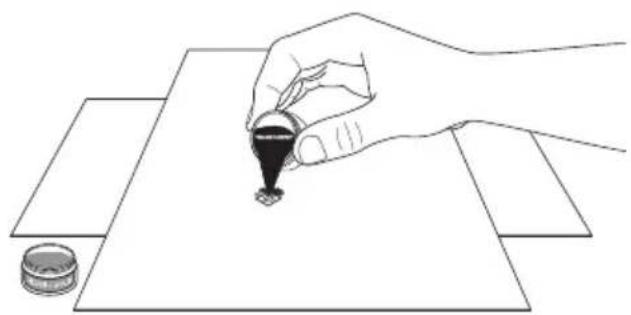
Image showing six different types of household appliances: battery, cube, container, brush, and bottle.1.) Moisten the wooden Christmas motif stamp on the stamp pad with the colour you want to use (see fig. F).
◆ 2.) Press the moistened wooden Christmas motif stamp ⑥ onto the paper (see fig. F).
natural_image
Line drawing of two hands holding blocks on a flat surface, one with a small object at the bottom (no text or symbols)Fig. F
NOTE
▶ Please note that the stamp ink is quick-drying. For example, after the impression of two motives, the powder should be sprinkled.
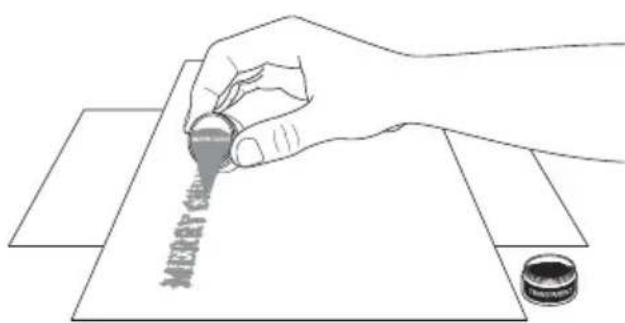
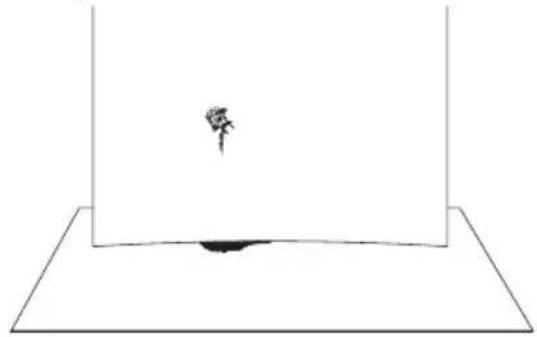
3.) Add a generous amount of embossing powder ⑧ (transparent) to the still-wet stamp (the embossing powder ⑧ only sticks to where you have stamped) (see fig. G).
natural_image
Line drawing of a hand holding a small object over a sheet of paper, with a small inset showing a coin (no text or symbols)Fig. G
4.) Shake off the surplus embossing powder onto a piece of paper (preferably already folded down the middle). Now pour the powder back into the container (see figs. H+1).
natural_image
Simple line drawing of a small flower emerging from a surface, no text or symbols presentFig. H

natural_image
Illustration of a transparent container with a feather-like structure emerging from it, no text or symbols present.Fig. I
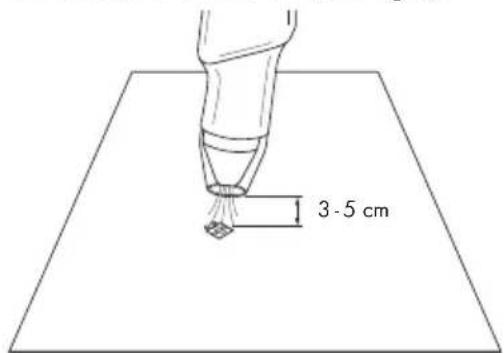
5.) Now heat up the powder-covered stamp. Aim the hot air blower at the stamp from a distance of 3 to 5 cm (see fig. J).
text_image
3 - 5 cmFig. J
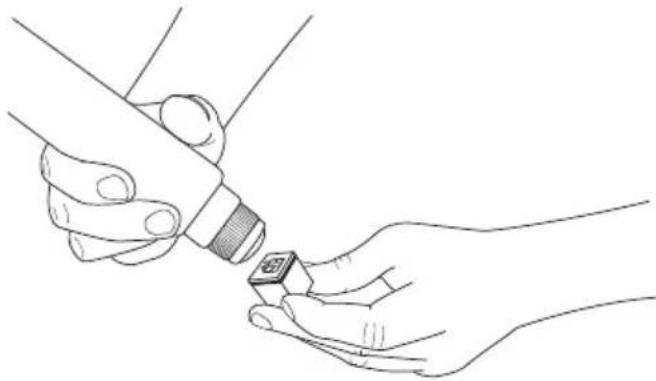
6.) Clean the wooden Christmas motif stamps using the supplied stamp cleaner 10 (see fig. K).
NOTE
▶ Pull cap of the stamp cleaner 10, do not turn!
natural_image
Line drawing of two hands exchanging a small object, possibly a device or tool, with no visible text or symbols.Fig. K
NOTE
▶ Heat the powder only until it has completely melted. The powder is then smooth and shiny.
Cooling down
■ Lay the appliance on its flattened sid ^4 on a flat surface,
■ or hang the appliance using the hange ^2
-to have both hands free to work.
-or to allow the appliance to cool down.
Maintenance and cleaning
WARNING! RISK OF INJURY! Always pull the plug out of the socket and let the appliance cool down before you carry out any work on the appliance.
■ Always clean the appliance after completion of work.
- Keep the air inlet and the nozzle clean.
■ To clean the housing, use a cloth and a mild detergent if necessary.
■ Never use sharp objects, petrol, solvents or cleaning agents that can damage plastic.
■ Do not allow any liquids to get into the interior of the appliance.
NOTE
▶ Replacement parts not listed (such as switches) can be ordered via our service hotline.
Disposal
Disposal of the device

The packaging is made from environmentally friendly material and can be disposed of at your local recycling plant.

ot dispose of power tools in your normal household waste!
European Directive 2012/19/EU requires that worn-out power tools be collected separately and recycled in an environmentally compatible manner. Your local community or municipal authorities can provide information on how to dispose of the worn-out appliance.
This appliance has a 3-year warranty valid from the date of purchase. If this product has any faults, you, the buyer, have certain statutory rights. Your statutory rights are not restricted in any way by the warranty described below.
Warranty conditions
The validity period of the warranty starts from the date of purchase. Please keep your original receipt in a safe place. This document will be required as proof of purchase.
If any material or production fault occurs within three years of the date of purchase of the product, we will either repair or replace the product for you at our discretion. This warranty service is dependent on you presenting the defective appliance and the proof of purchase (receipt) and a short written description of the fault and its time of occurrence.
If the defect is covered by the warranty, your product will either be repaired or replaced by us. The repair or replacement of a product does not signify the beginning of a new warranty period.
Warranty period and statutory claims for defects
The warranty period is not prolonged by repairs effected under the warranty. This also applies to replaced and repaired components. Any damage and defects present at the time of purchase must be reported immediately after unpacking. Repairs carried out after expiry of the warranty period shall be subject to a fee.
Scope of the warranty
This appliance has been manufactured in accordance with strict quality guidelines and inspected meticulously prior to delivery.
The warranty covers material faults or production faults. The warranty does not extend to product parts subject to normal wear and tear or fragile parts such as switches, batteries, baking moulds or parts made of glass.
The warranty does not apply if the product has been damaged, improperly used or improperly maintained. The directions in the operating instructions for the product regarding proper use of the product are to be strictly followed. Uses and actions that are discouraged in the operating instructions or which are warned against must be avoided.
This product is intended solely for private use and not for commercial purposes. The warranty shall be deemed void in cases of misuse or improper handling, use of force and modifications/repairs which have not been carried out by one of our authorised Service centres.
Warranty claim procedure
To ensure quick processing of your case, please observe the following instructions:
- Please have the till receipt and the item number (e.g. IAN 12345) available as proof of purchase.
- You will find the item number on the type plate, an engraving on the front page of the instructions (bottom left), or as a sticker on the rear or bottom of the appliance.
- If functional or other defects occur, please contact the service department listed either by telephone or by e-mail.
- You can return a defective product to us free of charge to the service address that will be provided to you. Ensure that you enclose the proof of purchase (till receipt) and information about what the defect is and when it occurred.

You can download these instructions
along with many other manuals, product videos and software on www.lidl-service.com.
Service

Service Great Britain
Tel.: 0871 5000 720 (£ 0.10/Min.)
E-Mail: kompernass@lidl.co.uk
IAN 275317
Importer
Please note that the following address is not the service address. Please use the service address provided in the operating instructions.
KOMPERNASS HANDELS GMBH
BURGSTRASSE 21
44867 BOCHUM
GERMANY
www.kompernass.com
Translation of the original Conformity Declaration
We, KOMPERNASS HANDELS GMBH, documents officer: Mr. Semi Uguzlu, BURGSTR. 21, 44867 BOCHUM, GERMANY, hereby declare that this product complies with the following standards, normative documents and EC directives:
EC Low Voltage Directive (2014/35/EU)
EMC (Electromagnetic Compatibility) (2014/30/EU)
RoHS Directive (2011/65/EU)
Applied harmonised standards:
EN 60335-1: 2012 / A11: 2014
EN 60335-2-45: 2002 / A2: 2012
EN 62233: 2008
EN 55014-1: 2006 / A2: 2011
EN 55014-2: 1997 / A2: 2008
EN 61000-3-2: 2014
EN 61000-3-3: 2013
Type/appliance designation:
Heat gun CHES 9 A1-1
Year of manufacture: 06 - 2016
Serial number: IAN 275317
Bochum, 11/05/2016

text_image
Sudan ###CE
Semi Uguzlu
- Quality Manager -
The right to effect technical changes in the context of further development is reserved.

KOMPERNASS HANDELS GMBH
BURGSTRASSE 21
44867 BOCHUM
DEUTSCHLAND / GERMANY
www.kompernass.com