
LE221R - Electric mower HUSQVARNA - Free user manual and instructions
Find the device manual for free LE221R HUSQVARNA in PDF.

| Product type | Battery-powered electric rotary mower, walk-behind |
| Brand | Husqvarna |
| Model | LE221R |
| Power source | 36 V lithium-ion battery (BLi20, BLi150, BLi200) |
| Cutting width | 51 cm |
| Cutting height | 20–75 mm (7 adjustable positions) |
| Grass collection bag capacity | 65 L |
| Motor type | BLDC (brushless) 36 V |
| Motor speed (nominal) | 3000 rpm |
| Motor speed (SavE) | 2600 rpm |
| Motor speed (high load) | 3500 rpm |
| Rated output power | 0.75 kW |
| Maximum output power | 1.2 kW |
| Weight (without battery) | 30.6 kg |
| Wheel drive | Yes, 4 speeds (3.0–4.5 km/h) |
| SavE function (eco mode) | Yes, extends runtime |
| Sound level (power) | 89 dB(A) measured, 91 dB(A) guaranteed |
| Vibration level (handle) | 0.45–0.52 m/s² |
| Compatible batteries | BLi20 (4.0 Ah), BLi150 (4.2 Ah), BLi200 (5.2 Ah) |
| Compatible chargers | QC80 (100–240 V), QC330 (100–240 V) |
| Runtime (with BLi200, SavE) | 43 min |
| Runtime (standard) | 30 min |
| Safety | Engine brake handle, safety key, anti-restart control |
| Maintenance | Dry cleaning, sharp blade, regular inspection |
| Mobile app | Husqvarna Connect (free) |
Frequently Asked Questions - LE221R HUSQVARNA
User questions about LE221R HUSQVARNA
0 question about this device. Answer the ones you know or ask your own.
Ask a new question about this device
Download the instructions for your Electric mower in PDF format for free! Find your manual LE221R - HUSQVARNA and take your electronic device back in hand. On this page are published all the documents necessary for the use of your device. LE221R by HUSQVARNA.
USER MANUAL LE221R HUSQVARNA
EN Operator's manual 2-21
Transportation, storage and disposal. 19
Operation 12
Technical data 20
Introduction
Product description
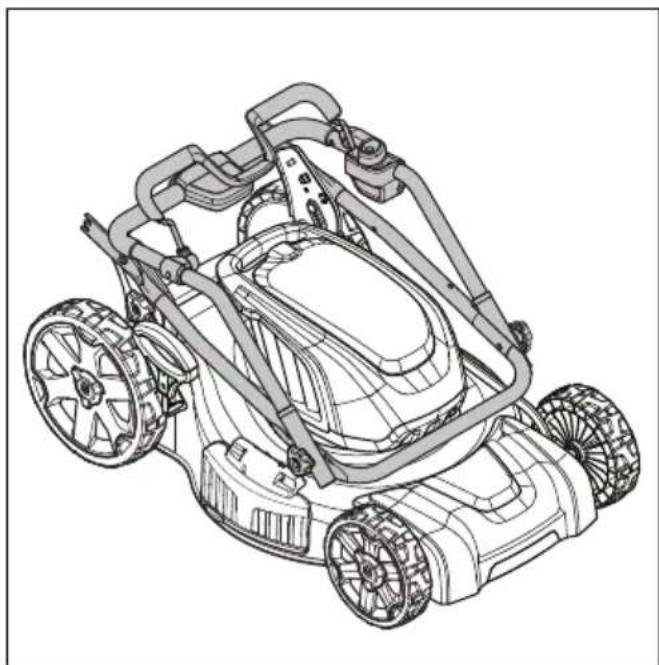
The product is a pedestrian-controlled rotary lawn mower. The grass is collected in a grass catcher.
Remove the grass catcher to get rear discharge of the grass. Attach a mulch kit (accessory) to cut the grass into fertilizer.
Intended use
Use the product to cut grass in private gardens. Do not use the product for other tasks.
Product overview

- Control panel
- Motor brake handle
- Start inhibitor
- Grass catcher
- Rear cover
- Safety key
-
Handle knob
-
Battery cover
- Cutting height control
- ON/OFF button
- SavE button
- Battery charge indicator and battery button
- Decrease speed button(only LE 221R)
-
Speed level indicator (only LE 221R)
-
Increase speed button (only LE 221R)
- Operator's manual
- Drive bail (onlyLE 221R)
- Battery charger (Accessory)
- Battery (Accessory)
- Discharge chute cover
- Discharge chute
- Mulch plug
Symbols on the product

Careless or incorrect use can result in injury or death to the operator or others.

Warning: Please read the operator's manual carefully and make sure that you understand the instructions before use.
Keep persons and animals at a safe distance from the work area.

Look out for thrown objects and ricochets.
Keep hands and feet away from the rotating blade.

Keep hands and feet away from rotating parts.
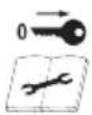
Remove the safety key before you do repair work or maintenance. (model LE 121P/LE 221R)

IPX1 - Drip protected (model LE 121P/LE 221R)

Do not expose to rain (model LE 121P/LE 221R)

Start procedure for model LE 121P/LE 221R: push ON/OFF button, loosen start inhibitor, push motor brake handle down.

Release motor brake handle to stop.

Slow

Fast

Scannable code.
Note: Other symbols/decals on the product refer to certification requirements for some markets.
Warning labels


WARNING
This product contains or emits a chemical known to the State of California to cause cancer or birth defects or other reproductive harm.
AVOID SERIOUS INJURY OR DEATH
- Read the operator's manual. Go across slopes, not up and down. Do not mow when children or others are around.
- Look down and behind before and while moving. Remove objects that could be thrown by the blade.
- Keep safety devices (guards, shields, switches, etc.) in place and working.
To reduce risk of electric shock, do not expose unit to water or operate unit on wet ground. - Disconnect from supply circuit before opening, cleaning or changing accessories.
To reduce the risk of injury, do not operate without guards in place.
To reduce the risk of injury, inspect catcher assembly frequently and replace with recommended replacement if there are signs of wear or deterioration. Keep hands and feet away - rotating blade hazard. Keep bystanders and children away. - Remove battery pack when not in use.
- For use only with BLi20/BLi150/BLi200 battery.
DANGER DE BLESSURES GRAVES OU MORTELLES
As referred to in the product liability laws, we are not liable for damages that our product causes if:
- the product is incorrectly repaired.
- the product is repaired with parts that are not from the manufacturer or not approved by the manufacturer.
- the product has an accessory that is not from the manufacturer or not approved by the manufacturer.
- the product is not repaired at an approved service center or by an approved authority.
Safety
Safety definitions
Warnings, cautions and notes are used to point out specially important parts of the manual.

WARNING: Used if there is a risk of injury or death for the operator or bystanders if the instructions in the manual are not obeyed.

CAUTION: Used if there is a risk of damage to the product, other materials or the adjacent area if the instructions in the manual are not obeyed.
Note: Used to give more information that is necessary in a given situation.
Safety instructions

WARNING: When using electric lawn mowers, basic safety precautions should always be followed to prevent electrical shock and personal injury, including the following:
- Read all instructions.
- Avoid dangerous environment. Do not operate the product in damp or wet locations.
- Do not operate the product in the rain.
- Keep children away. All visitors should be kept at a safe distance from the work area.
- Dress properly. Do not wear loose clothing or jewelry than can be caught in moving parts. Use rubber gloves and footwear when working outdoors.
- Use safety glasses. Always use a face mask or dust mask if operation is dusty.
- Do not use the product for any job except that for which it is intended.
- Do not force the product. It will do the job better and safer at the rate for which it was designed.
- Do not overreach. Keep proper footing and balance at all times.
- Stay alert. Watch what you are doing. Use common sense. Do not operate the product when you are tired.
- When not in use, the product should be stored in an indoor dry and locked-up place out of reach of children.
- Maintain the product with care. Keep the cutting edges sharp and clean for best and safest performance. Follow instructions for lubricating and changing accessories. Keep handles dry, clean, and free from oil and grease.
-
Keep guards in place and in working order.
-
Keep blades sharp.
- Keep hands and feet away from cutting area.
- Objects struck by the lawn mower blade can cause severe injuries to persons. The lawn should always be carefully examined and cleared of all objects prior to each mowing.
- If any foreign object is hit or if vibrations occur, obey these instructions: Switch off the motor, turn the safety key to "0" and remove the battery. Inspect the product for damage. Repair any damage or contact an authorised service agent.
- Use identical replacement blades only.
- The product can be a dangerous tool if used incorrectly or carelessly, which can cause serious or fatal injury to the operator or others.
- Keep in mind that the operator is responsible for accidents or hazards occurring to other people or their property.
- The product must be kept clean. Signs and stickers must be fully legible.
- It is not possible to cover every conceivable situation you can face. Always exercise care and use your common sense. If you get into a situation where you feel unsafe, stop and seek expert advice. Contact your dealer, service agent or an experienced user. Do not attempt any task that you feel unsure of!
- Do not let a child operate the product.
- Do not let a person, without knowledge of the instructions, operate the product.
- Always monitor a person, with decreased physical capacity or mental capacity, that uses the product. A responsible adult must always be there.
- Never use the product if you are fatigued, while under the influence of alcohol or drugs, medication or anything that could affect your vision, alertness, coordination or judgement.
- Unauthorized modifications and/or accessories may lead to serious injury or death to the user or others. Under no circumstances may the design of the product be modified without the permission of the manufacturer.
- Do not modify this product or use it if it appears to have been modified by others.
- Never use a product that is faulty. Carry out the safety checks, maintenance and service instructions described in this manual. Some maintenance and service measures must be carried out by trained and qualified specialists. See instructions in the section Maintenance on page 16.
- Always use original accessories.
Work area safety
-
Remove branches, twigs, stones and other objects from the lawn before you start to cut.
-
Keep persons, including children, and animals at a safe distance from the work area.
- Objects that hit against the cutting equipment can be ejected and cause damage to persons and objects.
- Do not use the product in bad weather, including fog, rain, moist or wet locations, strong winds, intense cold and risk of lightning. Doing work in bad weather can cause fatigue and dangerous conditions, such as slippery surfaces.
- Examine your work area to make sure that your control of the product cannot be prevented.
- Be careful of roots, stones, twigs, pits and ditches. High grass can conceal obstacles.
- Do not operate the product on slopes that are more than 15 degrees.
- Operate the product along slopes. Do not move up and down the slope.
- Be careful when you go near hidden corners and objects that can prevent your view.
Work safety

WARNING: Read the warning instructions that follow before you use the product.
- Use this product to cut grass lawns only. It is not permitted to use it for other tasks.
- Use personal protective equipment. See Personal protective equipment on page 7.
- Do not operate the product in rain or wet conditions. The risk of electrical shock increases if water enters the product.
- Do not operate the product unless the blade and all covers are attached correctly. An incorrectly attached blade can come loose and cause personal injury.
- Make sure that the blade does not hit objects such as stones and roots. This can do damage to the blade and bend the motor shaft. A bent axle causes heavy vibration and a very high risk that the blade becomes loose.
- If the blade hits an object or if vibrations occur, stop the product immediately. Stop the motor, turn the safety key to 0 and remove the battery. Examine the product for damages. Repair damages or let an authorised service agent do the repair.
- Never attach the motor brake handle permanently to the handle when the motor is started.
- Put the product on a stable, flat surface and start it. Make sure that the blade does not hit the ground or other objects.
- Always stay behind the product when you operate it.
- Let all the wheels stay on the ground and keep 2 hands on the handle when you operate the product. Keep your hands and feet away from the rotating blades.
- Do not tilt the product when the motor is started.
-
Be careful when you pull the product rearward.
-
Never lift up the product when the motor is started. If you must lift the product, first stop the motor, turn the safety key to 0 and remove the battery.
- Do not walk rearward when you operate the product.
- Stop the motor when you move across areas without grass, for example paths made of gravel, stone and asphalt.
- Do not run with the product when the motor is started. Always walk when you operate the product.
- Stop the motor before you change the cutting height. Never make adjustments with the motor started.
- Never let the product stay out of view with the motor started. Stop the motor and make sure that the cutting equipment does not rotate.
Safety instructions for operation
Personal protective equipment

WARNING: Read the warning instructions that follow before you use the product.
- Personal protective equipment cannot fully prevent injury but it decreases the degree of injury if an accident does occur. Let your dealer help you select the right equipment.
- Use hearing protection if the noise level is higher than 85 dB.
- Use heavy-duty slip-resistant boots or shoes. Do not use open shoes or go with bare feet.
- Use heavy, long pants.
- Use protective gloves when necessary, for example when you attach, examine or clean the cutting equipment.
Safety devices on the product

WARNING: Read the warning instructions that follow before you use the product.
- Do not use a product with defective safety devices.
- Do a check of the safety devices regularly. If the safety devices are defective, speak to your Husqvarna service agent.
To do a check of the cutting cover
The cutting cover decreases vibrations in the product and decreases the risk of injury from the blade.
- Examine the cutting cover to make sure that there are no damages such as cracks.
Grass catcher
The grass catcher prevents injury to the operator from the rotating blade. The grass catcher wears during operation of the product. Regularly examine the grass
catcher and replace it if it has damages. Replace only with a grass catcher approved by the manufacturer.
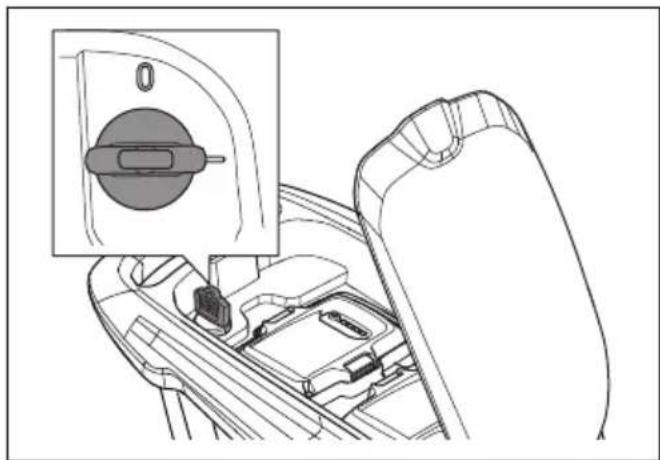
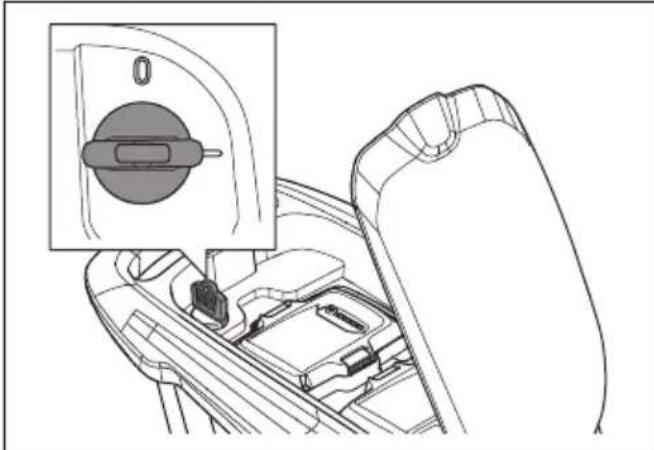
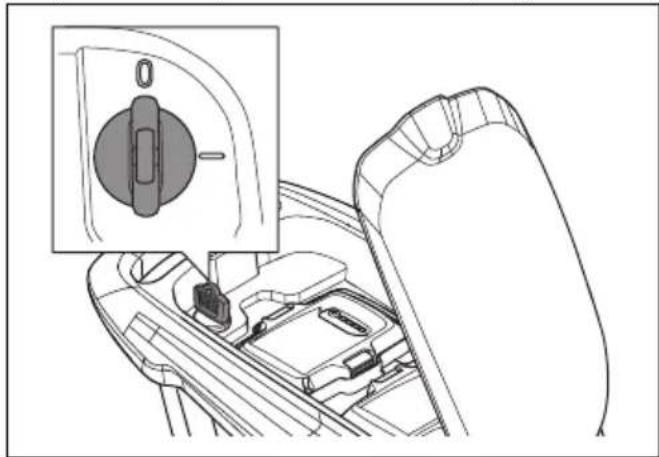
Safety key
The safety key is below the battery lid. The safety key connects the battery that supplies the motor with power.
- Start and stop the motor to do a check of the safety key.
- If the safety key operates correctly, the motor can only start when the safety key is in position 1.
Motor brake handle
The motor brake handle stops the motor. When the motor brake handle is released, the motor stops.
To do a check of the motor brake, start the motor and then release the motor brake handle. If the motor does not stop in 3 seconds, let an approved Husqvarna service agent adjust the motor brake.
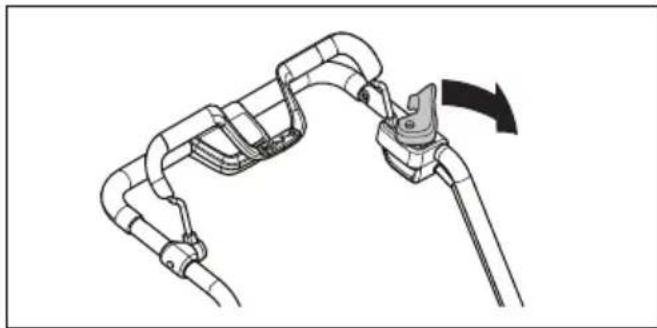
To examine the start inhibitor
Do a check of the start inhibitor to make sure that it prevents operation of the motor.
-
Push the motor brake handle in the direction of the handlebar. The start inhibitor stops the movement.
-
Push the start inhibitor out.
- Release the start inhibitor and make sure that it goes back to its initial position.
Battery and battery charger safety
Read the operator's manual for the battery and the battery charger and make sure that you understand the instructions before you use the product.
Battery safety

WARNING: Read the warning instructions that follow before you use the product.
- Use Husqvarna rechargeable batteries as a power supply for related Husqvarna products only. To prevent injury, do not use the battery as a power supply for other devices.
- Do not use non-rechargeable batteries.
- Risk of electrical shock. Do not connect the battery terminals to keys, coins, screws or other metal. This can cause a short circuit of the battery.
- Handle batteries carefully in order not to cause a short circuit with conducting materials such as rings, bracelets, and keys. The battery or conductor can overheat and cause burn injuries.
- Do not put objects into the air slots of the battery.
- Keep the battery away from sunlight, heat or open flame. The battery can explode and cause burns and/or chemical burns.
- Keep the battery away from rain and wet conditions.
- Keep the battery away from microwaves and high pressure.
- Do not try to disassemble or break the battery.
- Do not open or mutilate the battery. Released electrolyte is corrosive and can cause damage to the eyes or skin. It is poisonous if swallowed.
- If the battery leaks, do not let the liquid touch your body or eyes. If you have touched the liquid, clean the area with a large quantity of water and get medical aid.
- Use the battery in temperatures between -10^ and 40^ .
- Do not clean the battery or the battery charger with water. See To clean the battery and the battery charger on page 16.
-
Do not use a defective or damaged battery.
-
Keep batteries in storage away from metal objects such as nails, coins, jewellery.
Battery charger
The battery chargers, QC, are only used for charging of Husqvarna replacement batteries.
- Minimise the risk of electric shock or short circuit as follows: Never insert any object into the charger's cooling slots. Do not try to dismantle the battery charger. Never connect the charger terminals to metal objects. Use approved and intact wall sockets.
- This machine produces an electromagnetic field during operation. This field may under some circumstances interfere with active or passive medical implants. To reduce the risk of serious or fatal injury, we recommend persons with medical implants to consult their physician and the medical implant manufacturer before operating this machine.
- Regularly check that the battery charger connection wire is intact and that there are no cracks in it.
- Never carry the battery charger using the cord and never pull out the plug by pulling the cord.
- Keep all cables and extension leads away from water, oil and sharp edges. Make sure the cable is not jammed in doors, fences or the like. Otherwise it can cause the charger to become live.
- Never clean the battery or the battery charger with water.
- The battery charger can be used by children aged from 8 years and above and persons with reduced physical, sensory, or mental capabilities or lack of experience and knowledge if they have been given supervision or instruction concerning use of the appliance in a safe way and understand the hazards involved. Children shall not play with the appliance. Cleaning and user maintenance shall not be made by children without supervision.
- Do not charge non-rechargeable batteries in the battery charger.
-
Do not use the battery charger close to corrosive or flammable materials. Do not cover the battery charger. Pull out the plug to the battery charger in the event of smoke or fire.
-
Do not use a faulty or damaged battery charger or battery.
- Only charge the battery indoors and protected from direct sunlight and do not charge the battery in any wet conditions.
Safety instructions for maintenance

WARNING: Read the warning instructions that follow before you use the product.
- To prevent accidental start during maintenance, turn the safety key to 0 and remove the battery. Wait at minimum 5 seconds before you start the maintenance.
- Do the maintenance work correctly to increase the lifetime of the product and decrease the risk of accidents. Let an approved service agent do the professional repairs. Speak to your nearest service agent for more information.
- Only do the maintenance work written in this operator's manual. More extensive work must be done by an approved service agent.
- Put on heavy duty gloves when you use the cutting equipment. The blade is very sharp and cuts can easily occur.
- Keep the cutting edges sharp and clean for the best and safest performance.
- Let your service agent regularly examine the product and make necessary adjustments and repairs.
- Replace damaged, worn or broken parts.
- Obey the instructions for how to change accessories. Only use accessories from the manufacturer.
- When not in operation, keep the product, battery and battery charger apart in a dry, indoor and locked area. Make sure that children and persons that are not approved cannot get access to the product, battery or battery charger.
SAVE THESE INSTRUCTIONS
Assembly
Introduction

WARNING: Before you assemble the product, read the safety chapter.

WARNING: To prevent accidental start during assembly, turn the safety key to 0, remove the battery and wait at minimum 5 seconds.
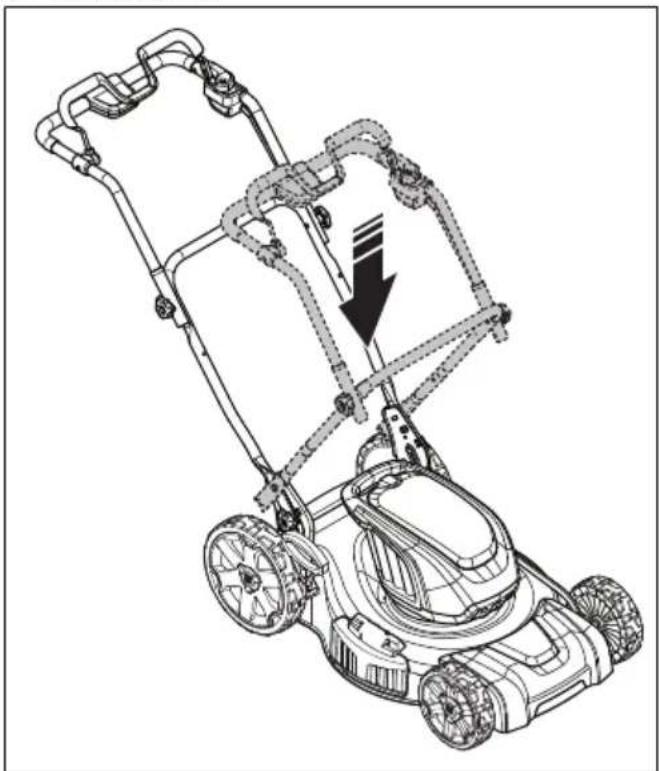
To assemble the handle

CAUTION: Make sure that the cable run along the inner part of the handlebar. Make sure that the cable do not get pinched when you assemble the handlebar.
- Raise the lower handlebar.
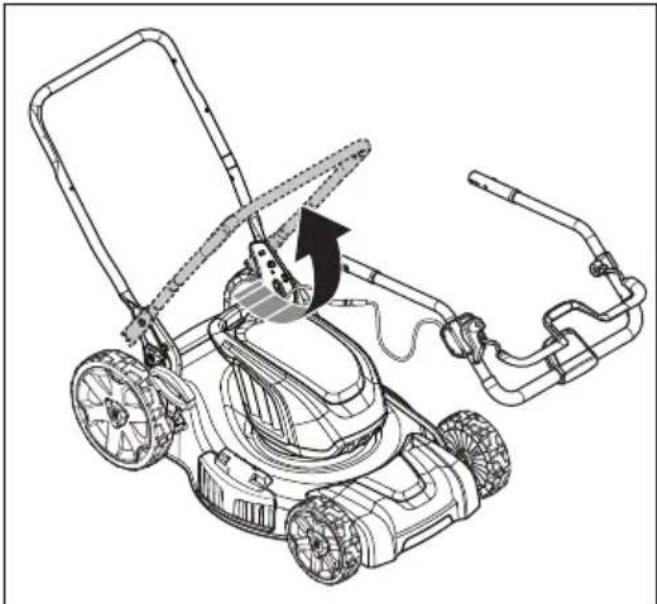
- Assemble the upper handlebar with the lower handlebar. Tighten the knobs.
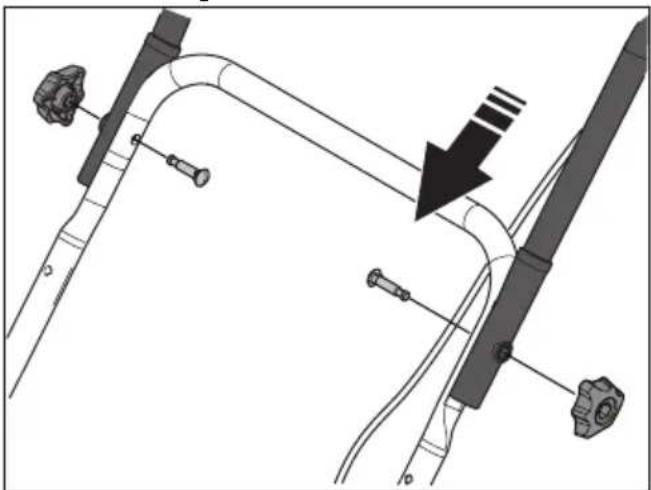
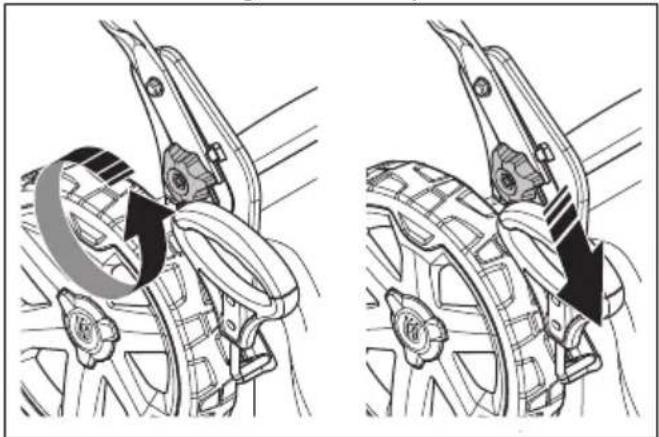
- Move the knobs to the lower end of the grooves on the two sides of the product.
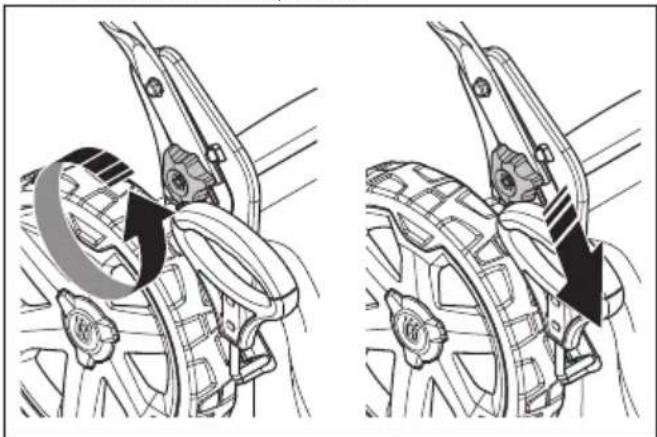
-
Set the handle height in one of the 2 available positions.
-
Move the knobs up in the direction of the handle until they stop and you hear a click.
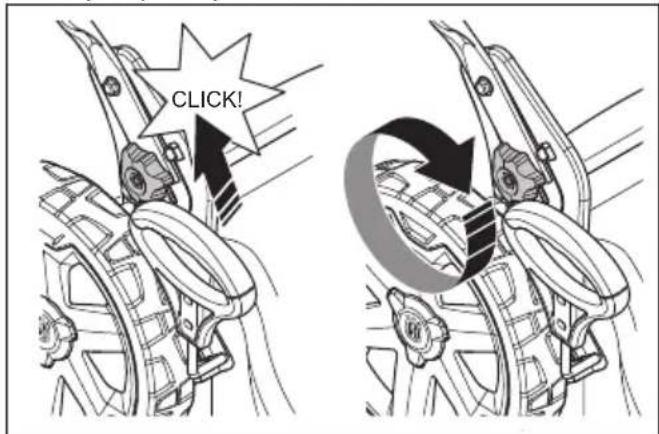
-
Tighten the knobs fully on the two sides of the product.
-
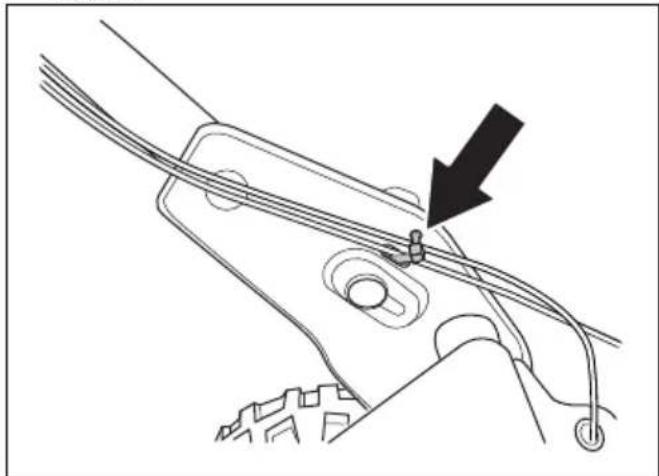
Put the wires in the cable brackets. Make sure the wires are not twisted. Attach the cable brackets to the handlebar.

- Use a cable tie to attach the cables to the handlebar bracket.
To assemble the grass catcher
- Attach the grass catcher frame to the grass bag with the rigid part of the bag on the bottom. Keep the handle of the frame on top of the grass bag.
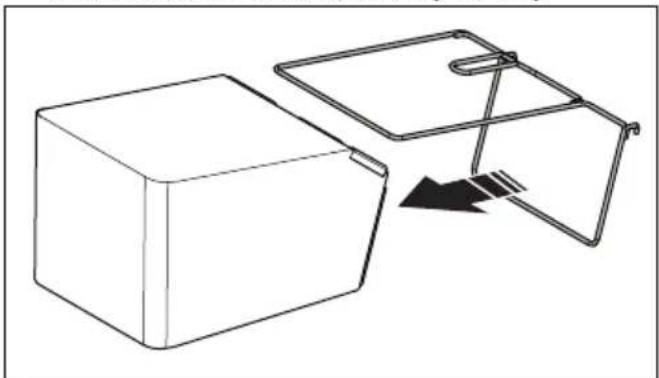
- Attach the grass bag to the grass catcher frame with the clips.
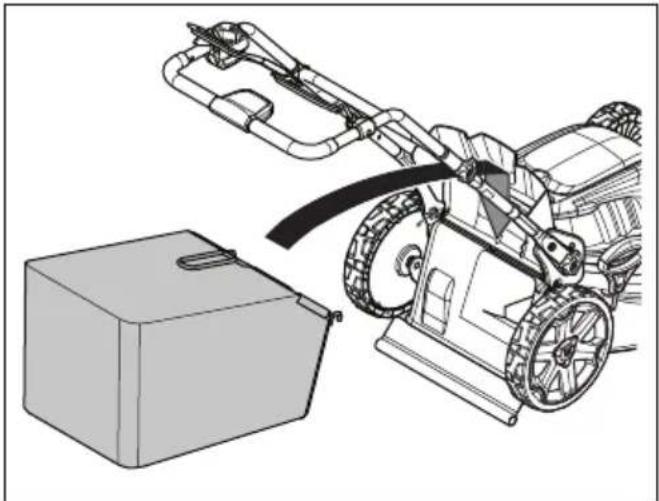
- Lift the rear cover and attach the grass catcher to the rod of the rear cover.
To assemble the mulch plug
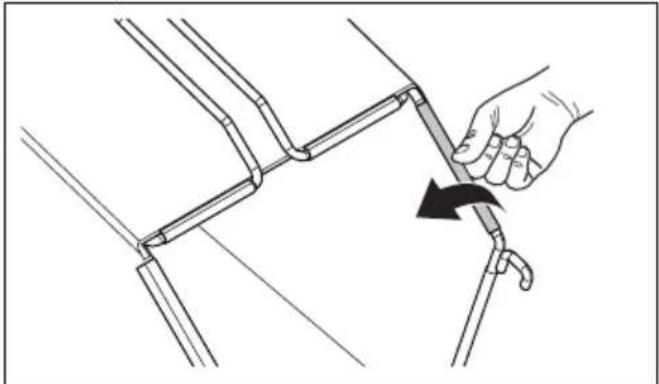
- Lift up the rear cover and remove the grass catcher.
-
Remove the side discharge chute (if installed) and close the side discharge cover.
-
Put the mulch plug into the discharge channel.
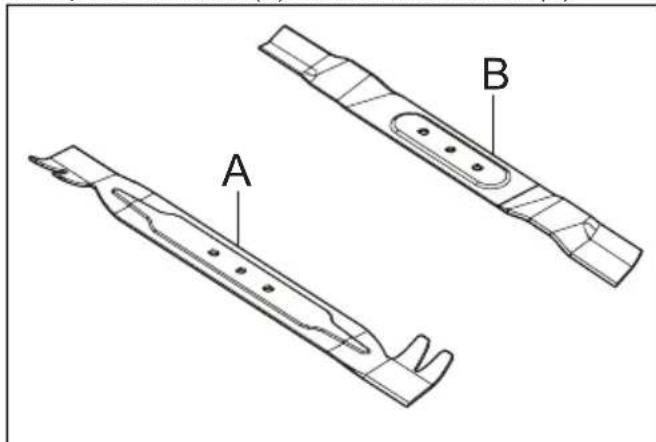
- Replace the blade (A) with the mulch blade (B).
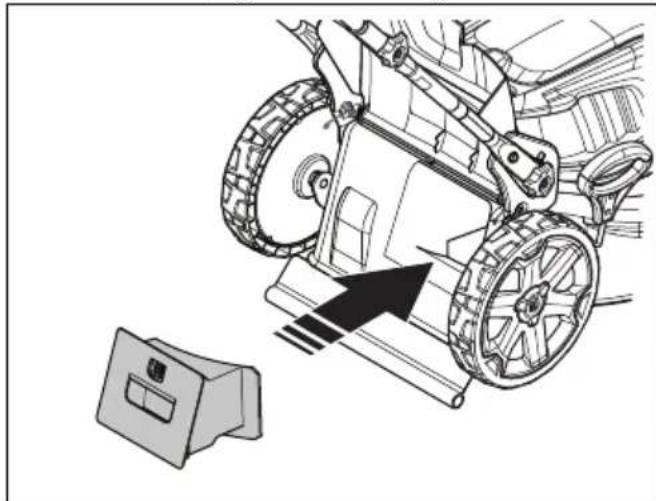
To assemble the discharge chute
- Remove the grass catcher.
- Install the mulch plug and close the rear cover.
- Lift the discharge chute cover and install the discharge chute.

- Make sure that the discharge chute cover rests on the discharge chute.
Operation
Introduction

WARNING: Before you operate the product, you must read and understand the safety chapter.
Husqvarna Connect
Husqvarna Connect is a free app for your mobile device. The Husqvarna Connect app gives extended functions for your Husqvarna product:
- Extended product information.
Information about, and help with, product parts and servicing.
To start to use Husqvarna Connect
- Download the Husqvarna Connect app on your mobile device.
- Register in the Husqvarna Connect app.
- Do the instruction steps in the Husqvarna Connect app to connect and register the product.
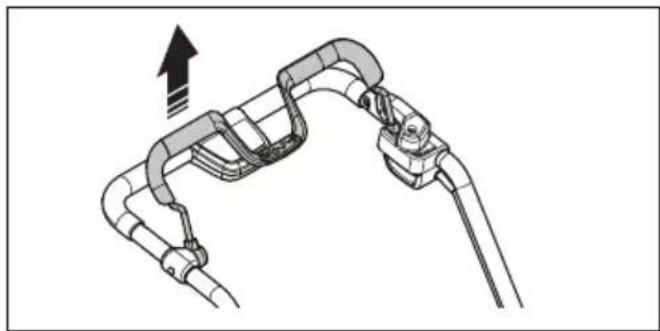
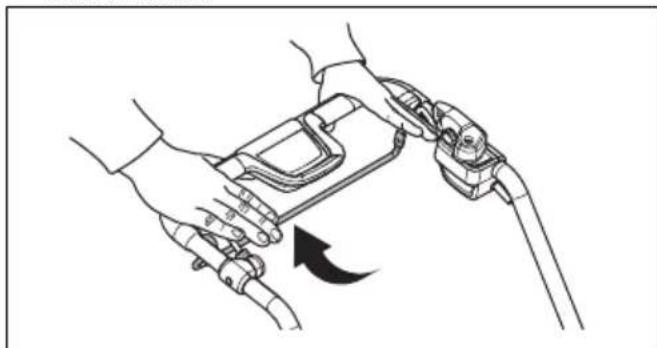
To set the product in operation position
If the handle is folded to its transport position (see To set the product in transport position on page 19), follow this procedure to make sure the handle goes back its operation position.
1. Lift the handlebar.
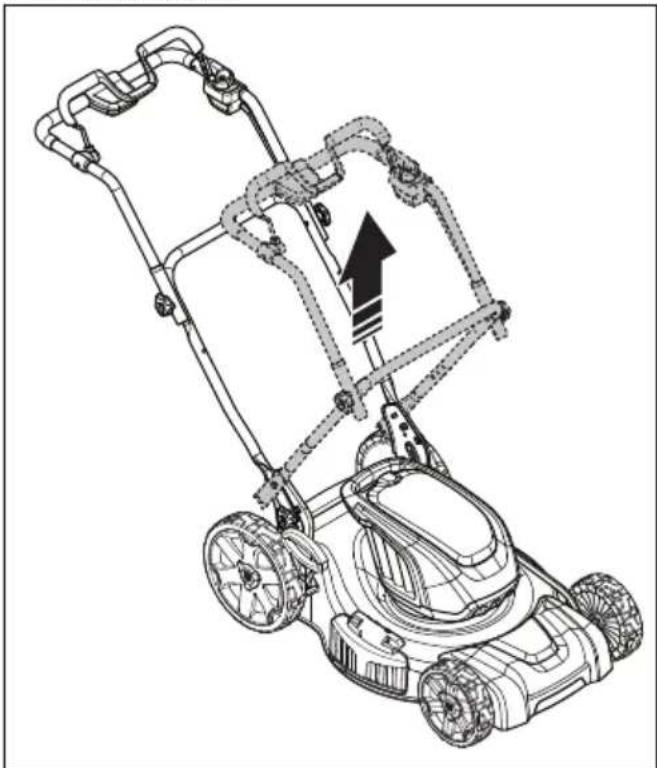
- Tighten the upper knobs.

- Move the knobs up in the direction of the handle until they stop and you hear a click.

- Tighten the knobs fully.
To set the cutting height
The cutting height can be adjusted in 7 levels.
- Move the cutting height lever out and reward to increase the cutting height.
- Move the cutting height lever out and forward to decrease the cutting height.

CAUTION: Do not set the cutting height too low. The blades can hit the ground if the surface of the lawn is not flat.
Battery

WARNING: Before you use the battery, you must read and understand the safety chapter. You must also read and understand the operator's manual for the battery and the battery charger.
Battery status
The display shows the remaining battery capacity and if there are problems with the battery. The battery capacity is shown for 5 seconds after the product is switched off or the battery indicator button is pressed. The warning symbol on the battery is on when an error has occurred. See Battery on page 17.
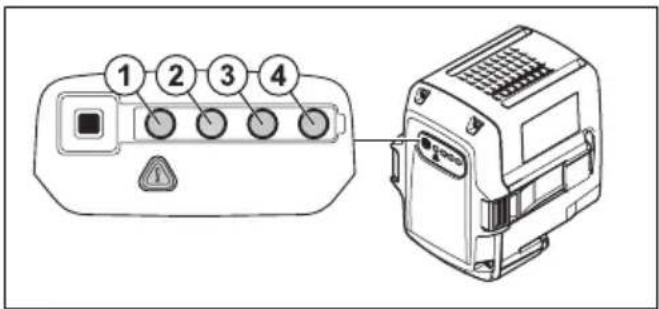
| LED lights | Battery status |
| All LEDs are lit Fully charged | (75-100%) |
| LED 1, LED 2, LED 3 are lit | The battery is 50%-75% charged |
| LED lights Battery status | |
| LED 1, LED 2 are lit The battery is 25%-50% charged | %-25% charged. |
| LED 1 is lit The battery is 25% charged. | |
| LED 1 flashes The battery is empty. Charge the battery. |
To charge the battery
Charge the battery before the first use. The battery is only 30% charged when supplied to the customer.
Note: The battery charger must be connected to the voltage and frequency specified on the rating plate.
The battery does not charge if the battery temperature is above 50^ . The battery charger decreases the temperature of the battery before it starts to charge.
- Connect one end of the power cord for the battery charger into the socket of the battery charger.
- Connect the other end of the power cord for the battery charger in an grounded mains socket. The LED on the battery charger flashes green one time.

- Put the battery in the battery charger. The green light on the charger comes on when the battery is correctly connected to the battery charger.
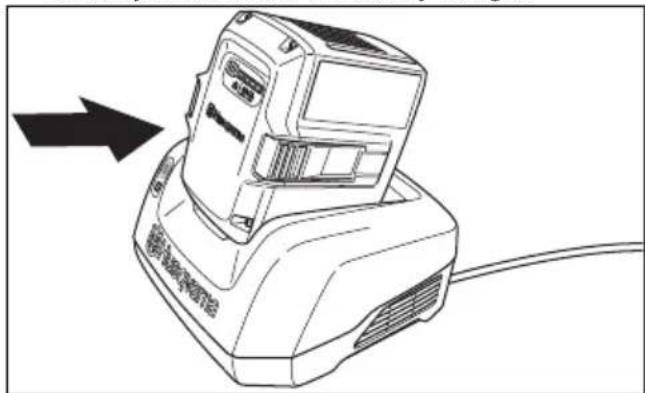
- When all LEDs on the battery have come on the battery is fully charged. Charge the battery for maximum 24 hours.
- To disconnect the battery charger from the mains socket, pull the plug, not the power cord.
- Remove the battery from the battery charger.
Battery charging status
A Husqvarna Li-ion battery can be charged or used at all charging levels. The battery is not damaged. A fully charged battery will not decrease its charge when the battery is left in the charger.
| LED display Charging status | |
| LED 1 flashes 0%-25% | |
| LED 1 is lit, LED 2 flashes | 25%-50% |
| LED 1, LED 2 are lit, LED 3 flashes | 50%-75% |
| LED 1, LED 2, LED 3 are lit, LED 4 flashes | 75%-100% |
| LED 1, LED 2, LED 3, LED 4 are lit | Fully charged |
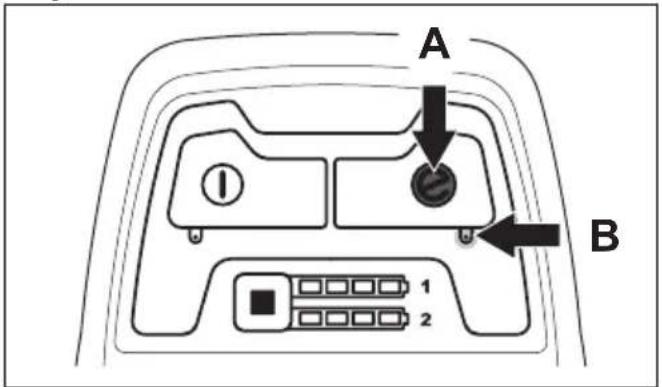
To start the product
-
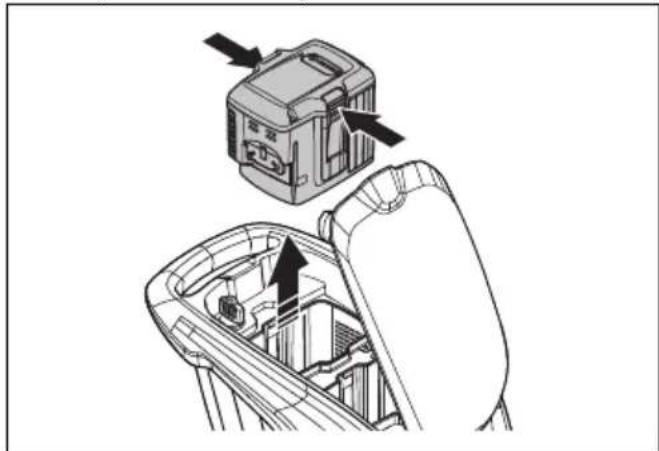
Put a charged battery in battery compartment number 1 below the battery lid. For longer operation time, put a second charged battery in battery compartment number 2.
-
Turn the safety key to 1.
-
Stay behind the product.
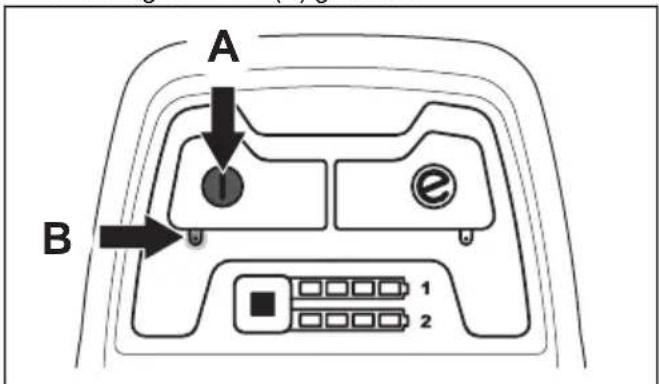
-
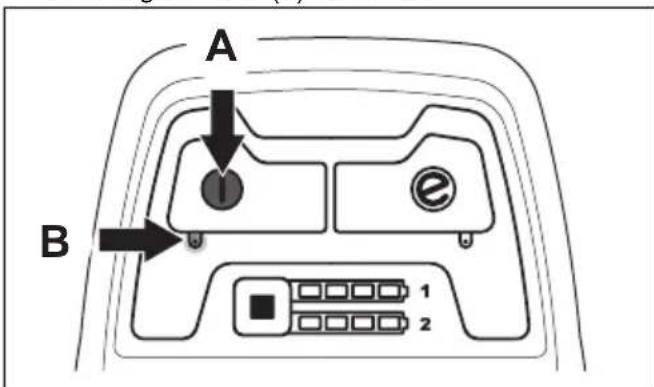
Press the ON/OFF button (A) on the control panel and the green LED (B) comes on.
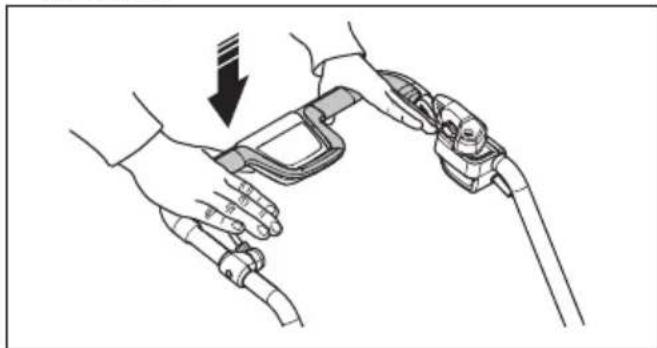
- Loosen the start inhibitor.
- Push the motor brake handle in the direction of the handlebar.
To use the drive on the wheels (LE 221R)
- Pull the drive bail in the direction of the handlebar to start the drive.
- Press + and - on the control panel to set the drive speed in 4 steps.
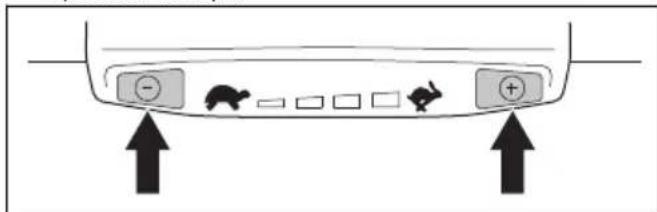
- Release the drive bail to disengage the drive, for example when you go near an obstacle.
To use the SavE function
The product has a battery saving function (SavE) that gives longer operation time.
- Press the SavE button (A) to start the function. The green LED comes on.
- Press the SavE button again to stop the function. The green LED (B) goes out.
The SavE function stops automatically if the ground conditions make it necessary to have a higher output. The SavE function starts automatically when the ground conditions let it.
High load function
When the product cuts long or wet grass, the motor automatically increases rpm. The motor goes back to standard mode when high load is not necessary.
To stop the product
The product stops automatically if you do not operate it for 10 minutes. Always turn the safety key to 0 before you let the product out of view.
- Release the motor brake handle to stop the motor.
- Press the ON/OFF button (A) on the control panel and the green LED (B) goes out.
- Open the battery lid and turn the safety key to 0.
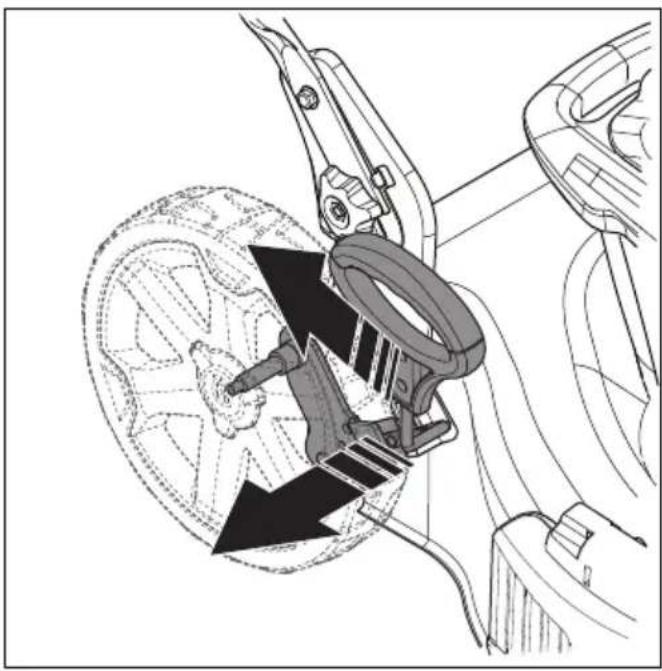
- To remove the battery, press the two release buttons and pull out the battery.
- Charge the battery if it is weak. For more information, see To charge the battery on page 13.
To get a good result
Always use a sharp blade. A blunt blade gives an irregular result and the cut surface of the grass becomes yellow. A sharp blade also uses less energy than a blunt blade.
- Do not cut more than 13 of the length of the grass. Cut first with the cutting height set high. Examine the result and lower the cutting height to an applicable level. If the grass is very long, drive slowly and cut 2 times if necessary.
- Cut in different directions each time to prevent stripes in the lawn.
To cut grass without a grass catcher or mulch plug attached
- Lift up the rear cover and remove the grass catcher.
- If a mulch plug and a mulch blade are attached, remove them.
- Close the rear cover before you operate the product.
When you operate the product, the cut grass discharges below the rear cover.
Maintenance
Introduction

WARNING: Before you do maintenance, you must read and understand the safety chapter.
For all servicing and repair work on the product, special training is necessary. We guarantee the availability of professional repairs and servicing. If your dealer is not a service agent, speak to them for information about the nearest service agent.
Maintenance schedule
The maintenance intervals are calculated from daily use of the product. The intervals change if the product is not used daily.
For maintenance identified with * see instructions in Safety devices on the product on page 7.
| Each use | Monthly | Each season | |
| Do a general inspection X | |||
| Clean the product X | |||
| Do a check of the start inhibitor * X | |||
| Make sure that the safety devices on the product are not defective * X | |||
| Examine the cutting equipment X | |||
| Examine the cutting cover * X | |||
| Do a check of the motor brake handle * X | |||
| Make sure that the ON/OFF button operates correctly and is not defective X | |||
| Examine the battery for damage X | |||
| Do a check of the battery charge X | |||
| Make sure that the release buttons on the battery operates correctly and that the battery locks into the product | X | ||
| Examine the battery charger for damage and make sure that it operates correctly. | X | ||
| Examine the connections between the battery and the product. Also examine the connection between the battery and the battery charger. | X |
To do a general inspection
- Make sure that the nuts and screws on the product are tightened.
- Make sure that the cables on the product are not in a position where they can get damaged.
To clean the product
- Clean plastic parts with a clean and dry cloth.
- Do not use water to clean the product. Water can enter the battery or the motor and cause short circuit or damage to the product.
- Do not use a high pressure washer to clean the product.
-
Do not flush water directly on the motor.
-
Use a brush to remove leaves, grass and dirt.
To clean the battery and the battery charger

CAUTION: Do not clean the battery or the battery charger with water.
- Make sure that the battery and the battery charger are clean and dry before you put the battery into the battery charger.
-
Clean the battery terminals with compressed air or use a soft and dry cloth.
-
Clean the surfaces of the battery and the battery charger with a soft and dry cloth.
To examine the cutting equipment

WARNING: To prevent accidental start, turn the safety key to 0, remove the battery and wait a minimum 5 seconds.

WARNING: Use protective gloves when you do maintenance on the cutting equipment. The blade is very sharp and cuts can easily occur.
- Examine the cutting equipment for damage or cracks. Always replace a damaged cutting equipment.
- Look at the blade to see if it is damaged or blunt.
Note: It is necessary to balance the blade after it is sharpened. Let a service center sharpen, replace and balance the blade. If you hit an obstacle that causes the product to stop, replace the damaged blade. Let the service center estimate if the blade can be sharpened or must be replaced.
To remove and replace the blade
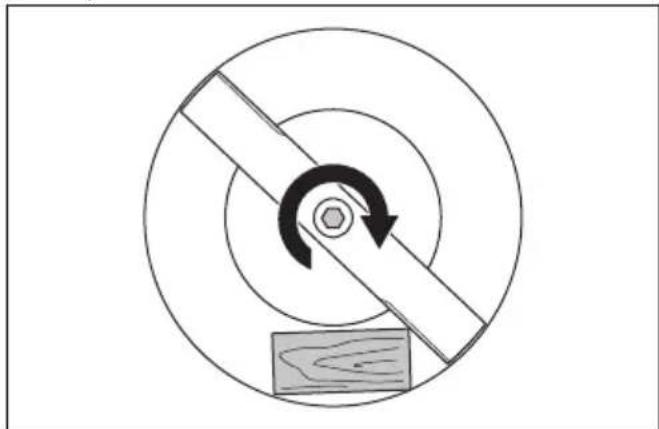
- Lock the blade with a block of wood.
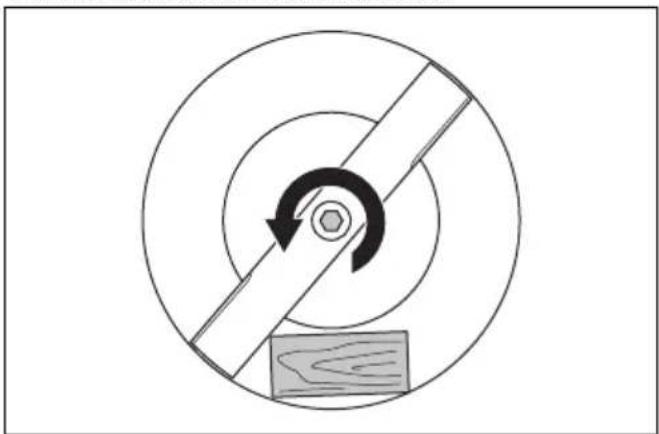
- Remove the blade bolt.
- Remove the blade.
-
Examine the blade support and blade bolt to see if there are damages.
-
Examine the motor shaft to make sure that it is not bent.
- When you attach the new blade, point the angled ends of the blade in the direction of the cutting cover.
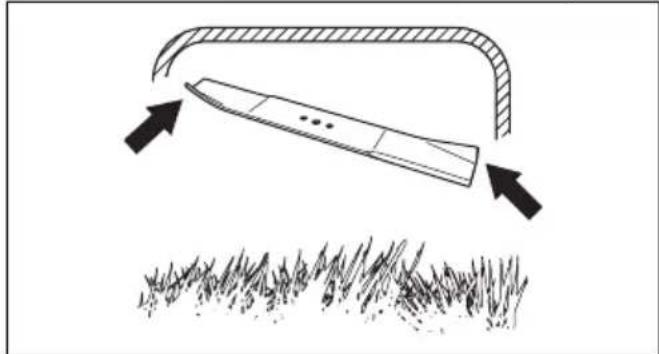
- Make sure that the blade is aligned with the center of the motor shaft.
- Lock the blade with a block of wood. Attach the spring washer and tighten the bolt and washer with a torque of 23-28 Nm.
- Pull the blade around by hand and make sure that it turns freely.

WARNING: Use heavy duty gloves. The blade is very sharp and cuts can easily occur.
- Start the product to do a test of the blade. If the blade is not correctly attached, there is vibration in the product or the cutting result is unsatisfactory.
| Troubleshooting | ||
| Battery | ||
| LED on the battery Possible faults Possible procedure | ||
| The green LED is flash- ing | The battery voltage is low Charge the battery. See page 13. | To charge the battery on |
| LED on the battery Possible faults Possible procedure | ||
| The error LED flashes The battery is weak Charge the battery. SeeTo charge the battery on page 13. | ||
| The temperature in the work environ-ment is too high or too low | Use the battery in temperatures between -10°C and 40°C. | |
| Overvoltage Check that the mains voltageis the same as onthe rating plate on the product. | ||
| Remove the battery from the battery charger. Wait 5 seconds and try again to charge the battery. If the problem continues, speak to an authorised service agent. | ||
| The error LED is on Celldifference too much (1V) Speak to an approved service agent. | ||
Battery charger
| LED on the battery charger | Possible faults Possible procedure | |
| The error LED flash- es | The temperature in the work en- vvironment is too high or too low speak to an approved service agent | Use the battery charger in temperatures between 5°C and 40°C. |
| The error LED is on Sp |
Control panel
For problems, other than those in this section, speak to your service agent.
| Keypad Error code (Number of flashes) | Possible faults Possible action | |
| Error LED flashes 3 | The motor is overloaded | Increase the cutting height. See To set the cutting height on page 12. |
| 5 The motor speed drops too much, and the motor stops | ||
| 10 The motor contro is too hot Stop the motor and wait until it has become cool | ||
| 2 The blade is blocked | To prevent accidents start turn the safety key to 0, remove the battery and wait a minimum 5 seconds. Make sure that the blade can rotate freely. If the problem continues, speak to an authorised service agent | |
| 9 Battery error or no signal from battery | Put the battery in the product correctly and examine the battery connector. If the error LED on the battery flashes, see Battery on page 13. | |
| The product stops | 8 The battery is weak | Charge the battery. See To charge the battery on page 13. |
| 0 Battery connector failure | Examine the battery connector |
Transportation, storage and disposal
Introduction

WARNING: To prevent unintentional start during transport turn the safety key to "0", remove the battery and wait at least 5 seconds.
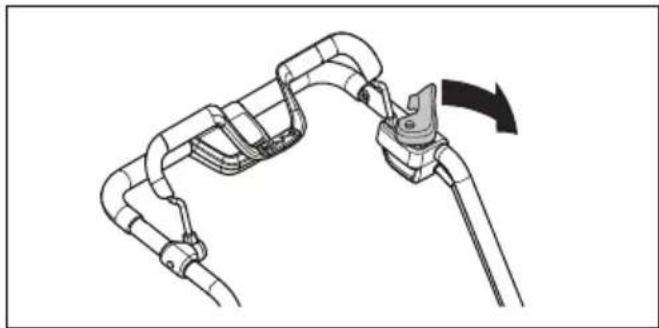
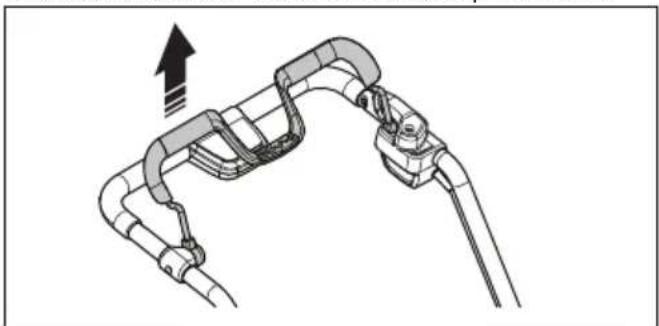
To set the product in transport position
- Remove the grass catcher (if installed).
- Loosen the lower knobs.
- Move the knobs to the lower end of the grooves on the left and the right side of the product.
- Loosen the upper knobs.
- Fold the handle.
Transportation
- The Dangerous Goods Legislation requirements apply to the contained Li-ion batteries.
- For commercial transports special requirements on package and labels must be obeyed.
- Make sure that you obey the regulations for dangerous material when you prepare the product for transport. Local regulations can apply.
- Always remove the battery for transport.
- Put tape on the battery connectors and make sure that the battery cannot move around during transport.
- Attach the product during transport.
Storage
- Always remove the battery for storage.
- To prevent accidents, make sure that the battery is not connected to the product during storage.
- Keep the battery charger in a closed and dry space.
- Keep the battery and the battery charger in a dry space where there is no moisture or frost.
- Disconnect the battery from the battery charger during storage.
- Do not keep the battery where static electricity can occur. Do not keep the battery in a metal box.
- Keep the battery where the temperature is between 5^ and 25^ and out of sunlight.
-
Keep the battery charger where the temperature is between 5^ and 45^ and out of sunlight.
Make sure that the battery is charged to 30% - 50% before you put it in storage for long periods. -
Keep the product, battery and battery charger in a locked area out of reach for children and not approved persons.
- Clean the product and do a complete servicing before you put the product in storage for a long time.
Disposal
The product must be submitted to an appropriate recycling station for the recovery of electrical and electronic equipment.
By ensuring that this product is taken care of correctly, you can help to counteract the potential negative impact on the environment and people that can otherwise result through the incorrect waste management of this product. For more detailed information about recycling this product, contact your municipality, your domestic waste service or the shop from where you purchased the product.
Technical data
| Technical data , LE 121PLE 221R | ||
| LE 121P LE 221R | ||
| Cutting motor | ||
| Motor type BLDC (brushless) 36V BLDC (brushless) 36V | ||
| Motor speed - SavE, rpm 2600 2600 | ||
| Motor speed - Nominal, rpm 3000 3000 | ||
| Motor speed - High load, rpm 3500 3500 | ||
| Motor output - max. kW 1.2 1.2 | ||
| Motor output - Nominal, kW 0.75 0.75 | ||
| Overcurrent limit (Current limit: 900W-35A) 35 (+/-) 1A 35 | (+/-) 1A | |
| Drive motor | ||
| Motor output - Nominal, kW N/A 0.25 | ||
| Self walk speed, km/h N/A 3.0-4.5 | ||
| Speed adjustment levels | N/A 4 | |
| Weight | ||
| Weight without battery, kg | 23,5 30.6 | |
| \( Battery^{1} \) | ||
| Type of battery | Husqvarna Battery Series | Husqvarna Battery Series |
| Battery runtime | ||
| Battery runtime, min, (free run) with SavE activated, with one Husqvarna 5.2 Ah battery (BLi200). | 43 | 43 |
| Battery runtime, min, (free run) with standard mode activated, with one Husqvarna 5.2 Ah battery (BLi200). | 30 | 30 |
| Noise emissions2 | ||
| Sound power level, measured dB (A) | 89 | 89 |
| Sound power level, guaranteed LWA dB (A) | 91 | 91 |
| LE 121P LE 221R | ||
| Sound levels3 | ||
| Sound pressure level at the operators ear, dB (A) 77 77 | ||
| Vibration levels4 | ||
| Handle, m/s2 | 0.45 - 0.52 0.45 - 0.52 | |
| Cutting | ||
| Cutting height, mm 20-75 mm 20-75 mm | ||
| Cutting width, cm 51 51 | ||
| Blade Collect 592 87 04-01 | Mulch 592 87 06-01 | Collect 592 87 04-01Mulch 592 87 06-01 |
| Bagger capacity, litre 65 65 | ||
| Approved batteries Type Battery capacity, | Ah | Voltage, V Weight | lb/kg |
| BLi20 Lithium-ion 4.0 36 2.6/1.2 | |||
| BLi150 | Lithium-ion 4.2 36 | 2.8/1.3 | |
| BLi200 | Lithium-ion 5.2 36 | 2.8/1.3 |
| Approved chargers for the specified batteries, BLi | Input voltage, V | Frequency, Hz | Power, W |
| QC80 | 100–240 | 50–60 | 100 |
| QC330 | 100-240 | 50–60 | 330 |
Distributor
Husqvarna Professional Products, Inc.
Charlotte, NC 28269
Support / Help
If you require assistance or have questions concerning the application, operation, maintenance or parts for your product:
Visit our website: www.husqvarna.com
Call Us Toll Free: 1-800-487-5951
Contidente
Introduccion. 22
Mantenimiento 36
Seguridad 26
- Read the operator's manual. Go across slopes, not up and down. Do not mow when children or others are around.
- Look down and behind before and while moving. Remove objects that could be thrown by the blade.
- Keep safety devices (guards, shields, switches, etc.) in place and working.
To reduce risk of electric shock, do not expose unit to water or operate unit on wet ground. - Disconnect from supply circuit before opening, cleaning or changing accessories.
To reduce the risk of injury, do not operate without guards in place.
To reduce the risk of injury, inspect catcher assembly frequently and replace with recommended replacement if there are signs of wear or deterioration. Keep hands and feet away - rotating blade hazard. Keep bystanders and children away. - Remove battery pack when not in use.
- For use only with BLi20/BLi150/BLi200 battery.
DANGER DE BLESSURES GRAVES OU MORTELLES
Para guitar y reemplazar la cucilla
Husqvarna Professional Products, Inc.
Charlotte, NC 28269
Soporte/ayuda
- Read the operator's manual. Go across slopes, not up and down. Do not mow when children or others are around.
- Look down and behind before and while moving. Remove objects that could be thrown by the blade.
- Keep safety devices (guards, shields, switches, etc.) in place and working.
To reduce risk of electric shock, do not expose unit to water or operate unit on wet ground. - Disconnect from supply circuit before opening, cleaning or changing accessories.
To reduce the risk of injury, do not operate without guards in place.
To reduce the risk of injury, inspect catcher assembly frequently and replace with recommended replacement if there are signs of wear or deterioration. Keep hands and feet away - rotating blade hazard. Keep bystanders and children away. - Remove battery pack when not in use.
- For use only with BLi20/BLi150/BLi200 battery.
DANGER DE BLESSURES GRAVES OU MORTELLES
Husqvarna Professional Products, Inc.
Charlotte, NC 28269 ETATS-UNIS
Soutien/aide


- Introduction
- Product description
- Intended use
- Product overview
- Symbols on the product
- Warning labels
- WARNING
- AVOID SERIOUS INJURY OR DEATH
- DANGER DE BLESSURES GRAVES OU MORTELLES
- Safety
- Safety definitions
- Safety instructions
- Work area safety
- Work safety
- Safety instructions for operation
- Personal protective equipment
- Safety devices on the product
- To do a check of the cutting cover
- Grass catcher
- Safety key
- Motor brake handle
- To examine the start inhibitor
- Battery and battery charger safety
- Battery safety
- Battery charger
- Safety instructions for maintenance
- SAVE THESE INSTRUCTIONS
- Assembly
- To assemble the handle
- To assemble the grass catcher
- To assemble the mulch plug
- To assemble the discharge chute
- Operation
- Husqvarna Connect
- To start to use Husqvarna Connect
- To set the product in operation position
- To set the cutting height
- Battery
- Battery status
- To charge the battery
- Battery charging status
- To start the product
- To use the drive on the wheels (LE 221R)
- To use the SavE function
- High load function
- To stop the product
- To get a good result
- To cut grass without a grass catcher or mulch plug attached
- Maintenance
- Maintenance schedule
- To do a general inspection
- To clean the product
- To clean the battery and the battery charger
- To examine the cutting equipment
- To remove and replace the blade
- Control panel
- Transportation, storage and disposal
- To set the product in transport position
- Transportation
- Storage
- Disposal
- Distributor
- Support / Help
- Contidente
- Para guitar y reemplazar la cucilla
- Soporte/ayuda
- Soutien/aide
Brand : HUSQVARNA
Model : LE221R
Category : Electric mower