
BP 2.2 FHD - VCR BLAUPUNKT - Free user manual and instructions
Find the device manual for free BP 2.2 FHD BLAUPUNKT in PDF.
| Product type | Dashcam |
| Brand | Blaupunkt |
| Model | BP 2.2 FHD |
| Screen size | IPS HD 2.0-inch screen |
| Viewing angle | 120° diagonal wide angle |
| Video resolution | 1080FHD (1920x1080), 720P (1280x720), WVGA (864x480), VGA (640x480) |
| Video format | AVI |
| Photo resolution | 10M, 8M, 5M, 3M, 2M, 1M, VGA |
| Photo format | JPG |
| Memory card | Micro SD up to 32 GB, class 10 or higher |
| Power supply | USB 5V / 1A via included 12V car charger |
| Built-in battery | 300 mAh, for emergency backup |
| Frequency | 50 Hz / 60 Hz |
| Languages | English, French, German, Italian, Spanish, Polish |
| Main functions | Loop recording, accelerometer (G-sensor), motion detection, parking surveillance, audio recording, date stamp, license plate display |
| Dimensions (L×H×W) | 61.5 × 66 × 33 mm |
| Net weight | 52 g |
| Maintenance and cleaning | Regularly clean the windshield and lens with a soft cloth; avoid moisture and dust |
| Safety | Do not expose to excessive heat (operating temperature -10°C to 60°C); avoid shocks; use only the provided charger |
| Spare parts and repairability | Mount and car charger included; micro SD card not included; reset possible via Reset button |
Frequently Asked Questions - BP 2.2 FHD BLAUPUNKT
User questions about BP 2.2 FHD BLAUPUNKT
0 question about this device. Answer the ones you know or ask your own.
Ask a new question about this device
Download the instructions for your VCR in PDF format for free! Find your manual BP 2.2 FHD - BLAUPUNKT and take your electronic device back in hand. On this page are published all the documents necessary for the use of your device. BP 2.2 FHD by BLAUPUNKT.
USER MANUAL BP 2.2 FHD BLAUPUNKT
natural_image
Color palette bar with grayscale shades and a central crosshair symbol (no text or labels)
BLAUPUNKT
natural_image
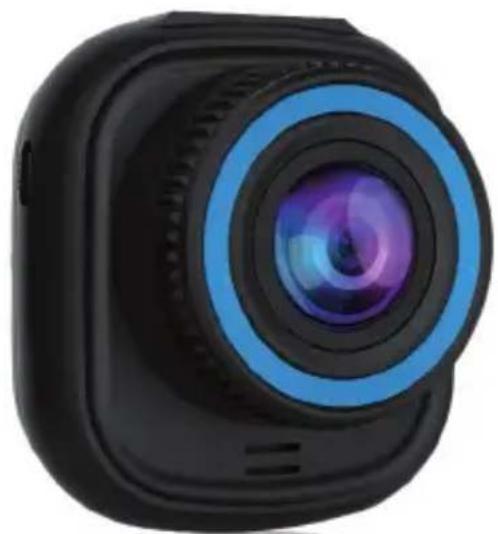
Close-up of a black and blue camera lens with lens and frame (no text or symbols visible)DE Bedienungs- und Montageanleitung
EN Operating and installation instructions
PL Instrukcja obsługi i montażu
ES Manual de uso e instalación
FR Notice d'emploi et d'installation
HU Használati és beszerelési útmutató
IT Manuale di installazione e d'uso
NL Bedienings- en installatiehandleiding
PT Instruções de utilização e montagem
SV SE Bruks- och monteringsanvisning
Enjoy it.


natural_image
Color palette bar with grayscale gradient and a central crosshair symbol (no text or labels)


WARNHINWEISE
DE
natural_image
Color palette bar with grayscale shades and a central crosshair symbol (no text or labels)AUFBAU

natural_image
Color palette bar with grayscale shades and a central crosshair symbol (no text or labels)FUNKTION

B. Akku laden
natural_image
Line drawing of a handheld electric drill bit with attached cable (no text or symbols)
natural_image
Technical line drawing of a mechanical device with a handle and internal gear (no text or symbols)
natural_image
Technical line drawing of a device with a labeled component (no readable text or symbols)FUNKTION
natural_image
Close-up of a smart glucose meter device with a digital display and control buttons, showing a close-up inset (no text or symbols visible)natural_image
Color palette bar with grayscale shades and a central crosshair symbol (no text or labels)VERDRAHTUNGSPLAN

natural_image
Line drawing of a car interior showing dashboard, steering wheel, and rearview camera (no text or symbols)PRODUKTSPEZIFIKATION

natural_image
Color palette bar with grayscale shades and a central crosshair symbol (no text or labels)PRODUKTSPEZIFIKATION
- Set correct time in System Menu before first use.
- Please insert a micro SD card in the right direction to avoid damage to the card slot in the DVR. If DVR shows error message, please format the micro SD card from DVR menu. Please reset DVR or change micro SD card if similar error occurs.
NOTE: All files will be deleted when formatting micro SD card, please backup important files before formatting the micro SD card. When reset function is selected, the settings will return to default setting.
- It is recommended to use micro SD card CLASS 10 or above. Not all micro SD cards behave the same as their specifications may vary. Please test micro SD card compatibility before purchasing micro SD card.
- Micro SD card should be formatted with DVR before first use. Backup important recording files once a week to avoid files from being overwritten. Please format micro SD card once every month for recording stability.
- The last file will be lost if micro SD card is removed from DVR while in ON condition or if the power to the DVR is interrupted.
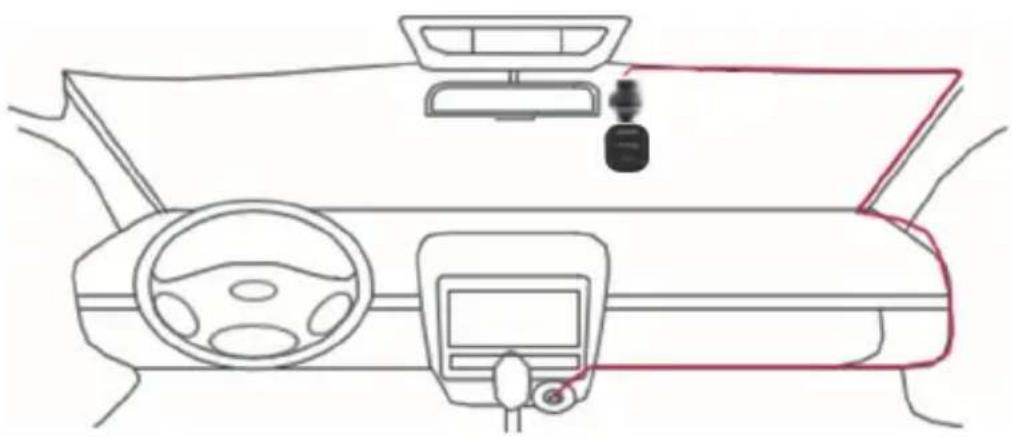
- Please ensure the provided holder (mounting bracket) is installed correctly and firmly on windscreen to avoid damage to DVR and for better recording angle.
- Battery life-span will continuously decrease with usage. Please charge battery once every month to preserve battery in the event the device is not used for long period.
- Please do not use DVR in wet or damp environment as this DVR is not waterproof/water resistant.
- Please do not record or take picture directly facing sunlight.
- To obtain clear image, please clean windscreen and DVR lens regularly. Avoid using DVR in a dusty environment.
- Please handle DVR with care and avoid direct impact on DVR. Also, this DVR may malfunction when used in a high electromagnetic environment.
- Operating temperature of DVR is -10^ to 60^ , storage temperature is -20^ to 70^ . Continuous exposure to sunlight, especially when locked in cabin temperature can exceed 70^ . This may cause the DVR to malfunction, change color, case housing & image distortion.
DISCLAIMER
- In no event shall Blaupunkt be liable for any direct, indirect, punitive, incidental, special consequential damages, to property or life, improper storage, whatsoever arising out of or connected with the use or misuse of our products.
- This device is NOT intended to be used for illegal purpose, surveillance and shall not be used in any form as evidence for claim purpose.
- Some countries prohibit drivers from mounting anything on the windshield, or restrict mounting to specific areas of the windshield. It is the owner's responsibility to mount the DVR in compliance with local laws.
- Error messages may appear depending on the environment it is used in and in when there's low battery voltage in the vehicle.
- Blaupunkt is not liable/responsible for non-recording of events, missing files, ect.


natural_image
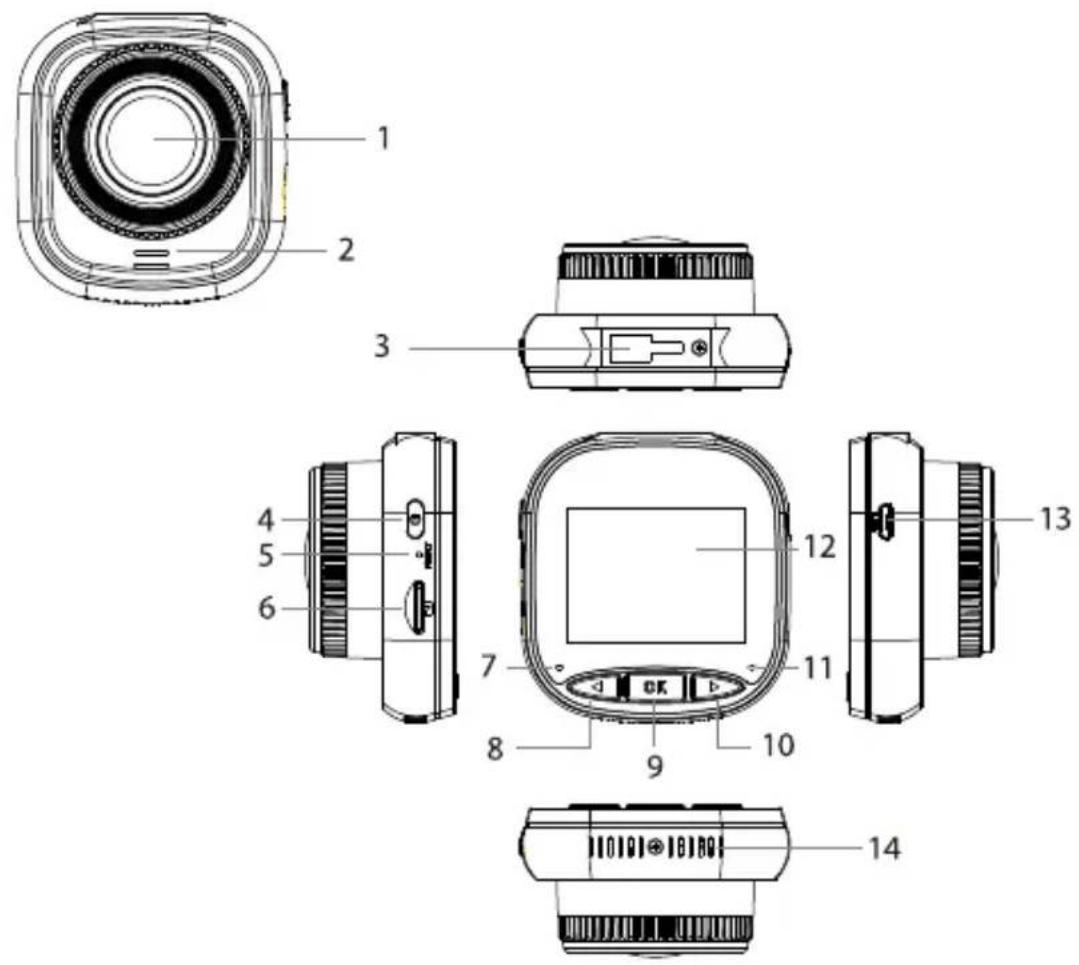
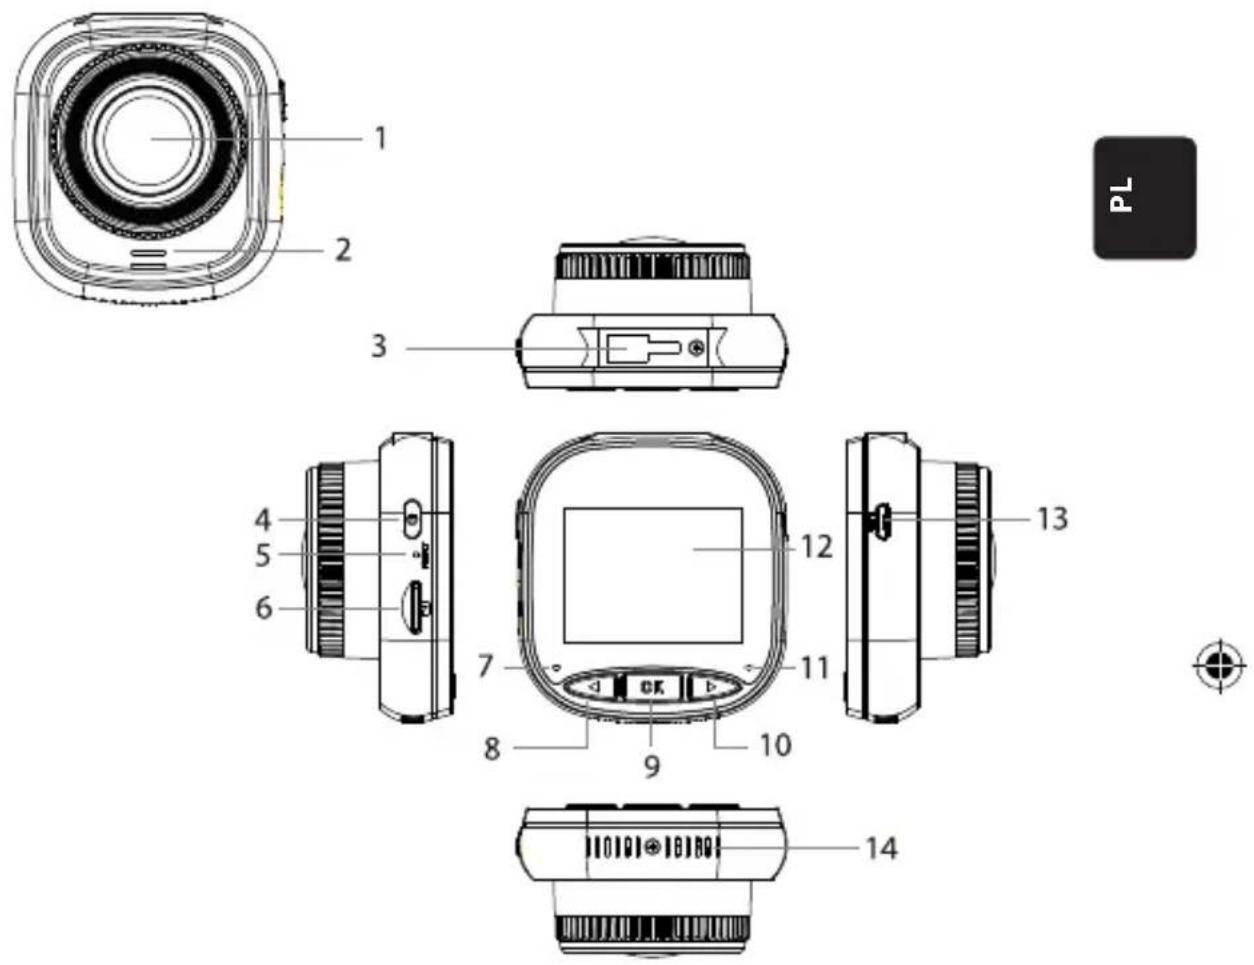
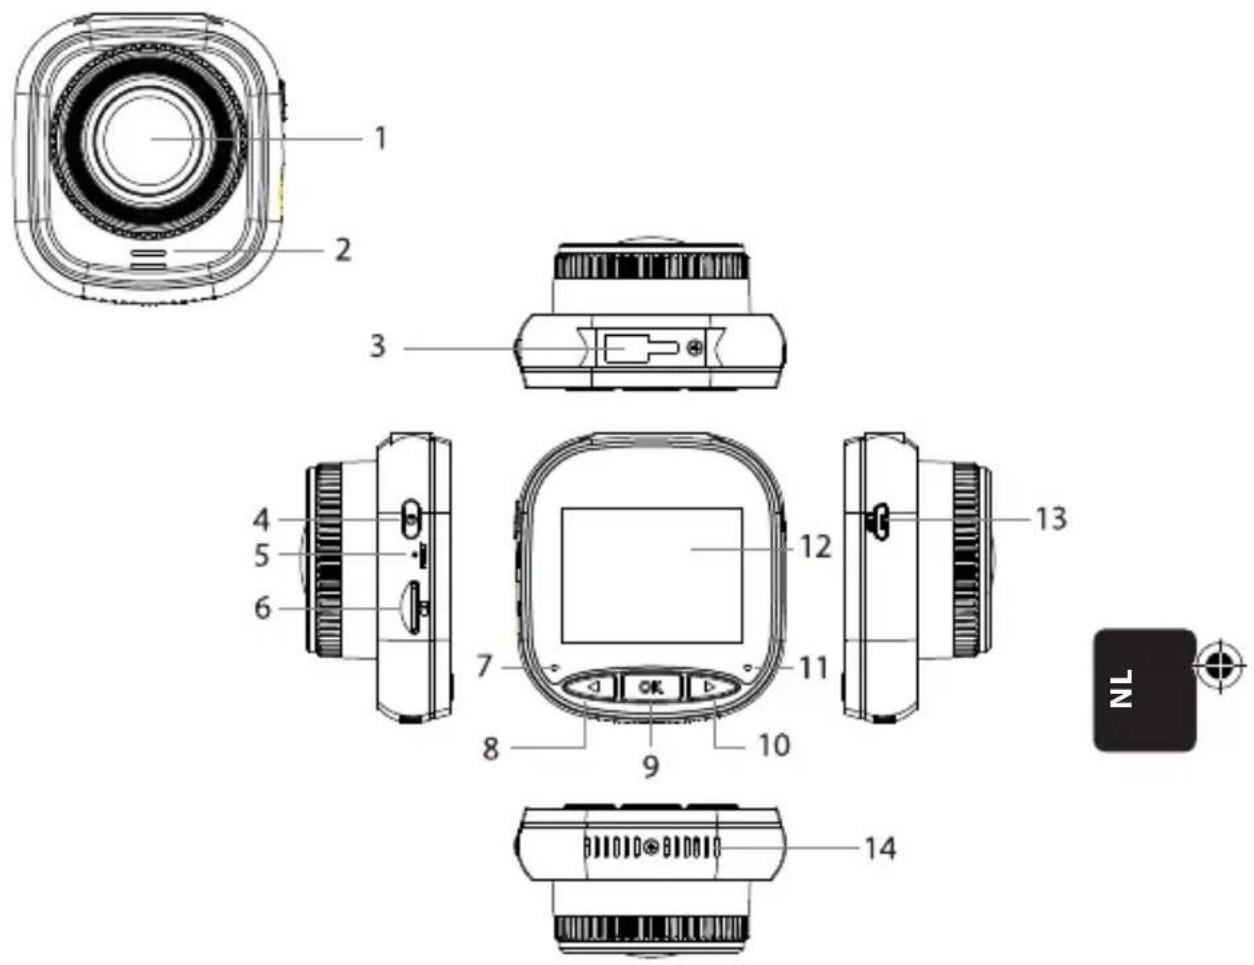
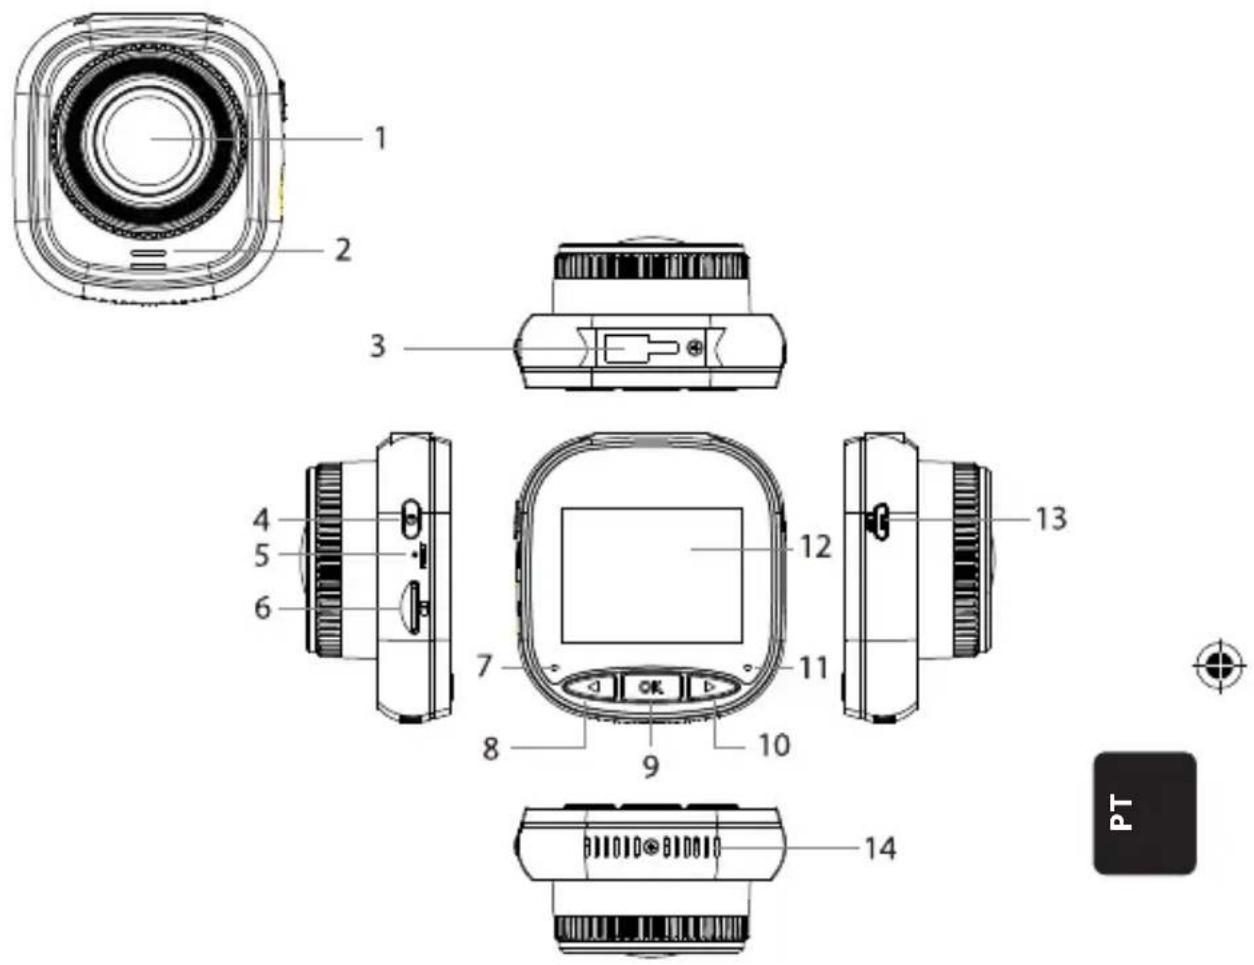
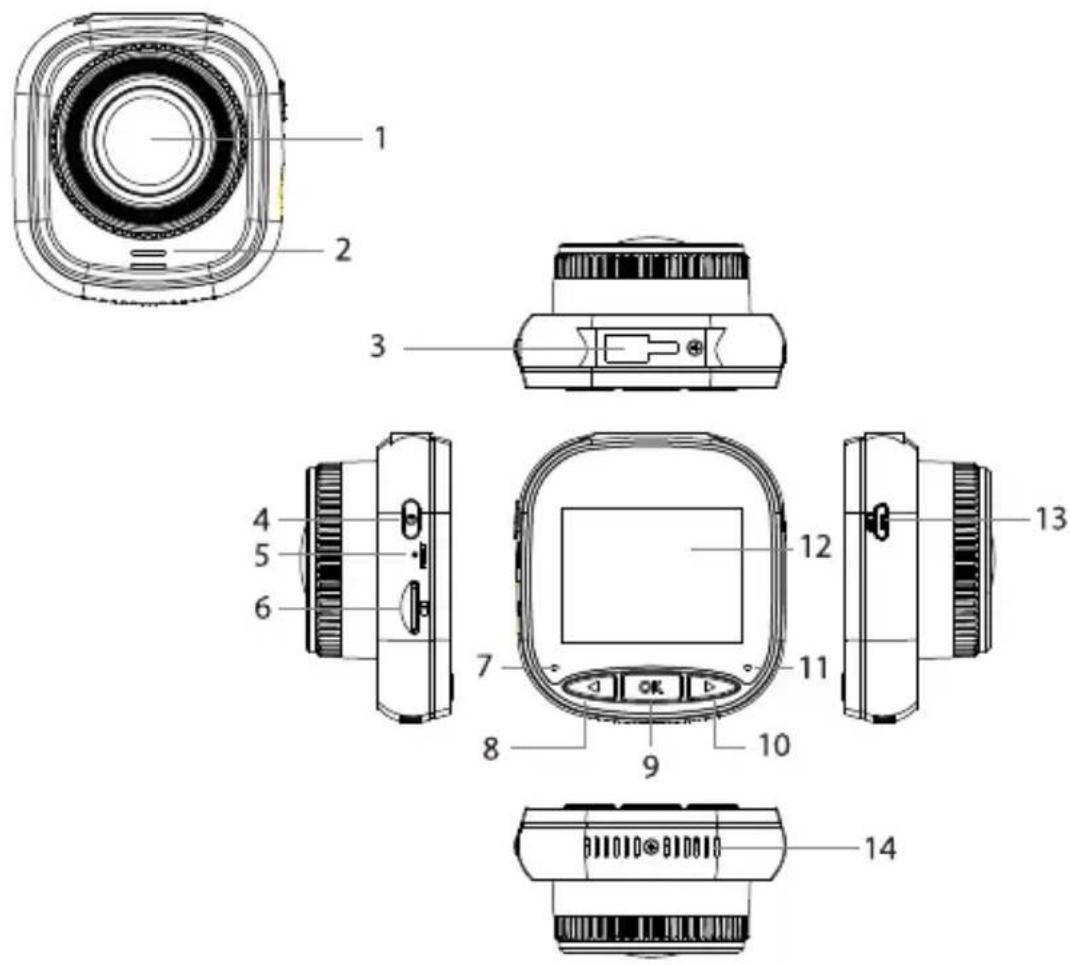
Color palette bar with grayscale shades and a central crosshair symbol (no text or labels)STRUCTURE

- Lens
- Speaker
- Holder Socket
- Power Key
- Reset
- Micro SD Card Slot
-
Charging Indicator Light
-
UP/MENU Key
- OK Key
- DOWN/MODE Key
- Recording Indicator Light
- IPS Screen
- USB Power Port
- Internal Heat Dissipation Provision
OPERATION
| MODE NUMBER ICON KEY ACTION | ||||
| VIDEO MODE | 4 Power Key | Long press to power ON/OFF;Short press to make screen ON/OFF | ||
| 8 | UP / MENU Key | Long press to enter /exist video menu settings;Short press to turn ON/OFF audio recording | ||
| 9 OK Key Shot press to start/pause recording | ||||
| 10 | DOWN / MODE Key | Long press to switch among Video Mode/Photo Mode /Playback Mode | ||
| PHOTO MODE | 4 Power Key | Long press to power ON/OFF;Short press to make screen ON/OFF | ||
| 8 | UP / MENU Key | Long press to enter /exist photo menu settings | ||
| 9 OK Key Short press to take a photo | ||||
| 10 | DOWN / MODE Key | Long press to switch among Video Mode/Photo Mode /Playback Mode | ||


OPERATION
| MODE NUMBER ICON KEY ACTION | ||||
| PLAY-BACK MODE | 4 Power Key | Long press to power ON/OFF;Short press to make screen ON/OFF | ||
| 8 | UP / MENU Key | Long press to enter /exist playback menu settings;Short press to go to the previous file | ||
| 9 OK Key OK | Short press to start/pause to play;Long press to switch from between DCIM file and LOCKED file | |||
| 10 | DOWN / MODE Key | Long press to switch among Video Mode/Photo Mode /Playback Mode;Short press to go to the next file | ||
| MENU SETTINGS | 4 Power Key | Long press to power ON/OFF;Short press to make screen ON/OFF | ||
| 8 | UP / MENU Key | Long press twice to enter menu settings;Short press to go to the previous item | ||
| 9 OK Key Short press to select/confirm | ||||
| 10 | DOWN / MODE Key | Long press to exit menu settings;Short press to go to the next item | ||
EN


FUNCTION
Key Features
- 2.0" IPS screen with better display quality
- Voice/Mute shortcut key
- Screen ON/OFF shortcut key
- Lock/unlock file manually shortcut key
- Built-in microphone&speaker
- Car number display in the video
- Support parking monitoring
- Support G-sensor, motion detection, loop recording
- Support Photo taking, Playback, Automatic Recording upon ignition
- CE & ROHS certificated
A. On/Off
Power On
Long press ⏻ Power key to switch ON DVR and enter video mode. Short press ⏻ OK key to start recording. When the DVR is connected to the 12V charger in the vehicle, it will AUTO commence recording when the ignition is turned ON. Once the ignition is turned OFF, the DVR will automatically save the last file and shut down after 10 seconds.
Note: Upon turn ON, the display screen will show 'PLEASE INSERT SD CARD' in case a Micro SD card is not inserted. Please insert Micro SD card ONLY after the DVR is in OFF condition.
Power Off
Long press Power key to switch OFF DVR while it is in either STANDBY or ON mode.
Note: When the built-in battery is closed to being drained out, the DVR display will show a 'Low Battery' warning and switch OFF. It automatically saves the last file before it shuts down.
FUNCTION
B. Battery Charging
With 12V car charger (provided)
Note: While the DVR is plugged in to the 12V charger, the charging indicator will be steady RED. Once it is fully charged, the charging indicator will switch OFF.


natural_image
Line drawing of a handheld electric drill bit with attached cable (no text or symbols)
natural_image
Technical line drawing of a mechanical device with a cylindrical component and a side panel (no text or symbols)C. Inserting Micro SD Card
It is recommended that while inserting the micro SD card into the provided slot, no force is to be applied. Once it is determined that the micro SD card has been inserted the correct side, we suggest that the card be pushed down till it locks into position in the slot.
Removing micro SD card: Briefly push down on the top of the micro SD card until it is released from it's locked position and then pull it out (It is suggested to remove the micro SD card when the DVR is in OFF mode).

natural_image
Technical line drawing of a mechanical device with ventilation grilles and a labeled 'RESET' button (no text or symbols beyond basic labels)FUNCTION
D. Holder Push in and Take out
Please push the holder into holder socket of DVR in the direction of the arrow. When taking out the holder, please take it from the windshield first and then take out from the DVR in the opposite direction of the arrow.
E. Video
Power on DVR to enter into video mode and it starts to record automatically. The blue indicator blinks when connected to the 12V car charger. Press OK key to stop recording and save the last file. The DVR goes into standby mode with the recording indicator light glowing a steady blue.

natural_image
Close-up of a black handheld device with a circular inset showing a close-up of its internal components (no visible text or symbols)In standby mode, short press OK OK key to restart recording.
When recording, long press ➤ DOWN/MODE key to lock or unlock the videos manually. The locked video will not be overwritten while the DVR is in loop recording.
In video mode, short press UP/MENU key to turn ON/OFF sound recording. Check
icons and displayed on the screen. Long press UP/MENU key to go to video settings.
F. Photo
In video Standby mode, long press DOWN/MODE key to enter into photo mode. Short press OK key to take photos with shutter sound.
In photo mode, long press UP/MENU key to go to photo settings.
FUNCTION
G. Playback and Delete
In video Standby mode, long press DOWN/MODE key twice to enter into playback mode. Short press UP/MENU key and DOWN/MODE key to select the file and then press OK OK key to start or pause. Long press OK OK key to switch between DCIM and LOCKED folders to view videos and photos. If you want to delete the file, long press UP/MENU key to enter into the menu. Select from File delete and Protection options. Long press UP/MENU key to go back to previous menu.
Note: Protection will lock/unlock a file manually. Once the file is locked, it won't be overwritten while the DVR is in loop recording and can only be deleted manually.
H. G-Sensor
In case of emergency braking or a collision, the G-sensor will be activated to save and protect the current video clip from being overwritten automatically and will be shown with a ☐ key and ⚫ G-sensor icon that appears at the top middle of the screen. Three setting options are available (High, Medium & Low). Medium is most recommended.
I. Motion Detection
In video standby mode, long press UP/MENU key to go to the video menu and turn on motion detection. When DVR detects a moving object, it starts to record automatically. If there is no movement in front of the lens for 20 seconds, DVR will stop recording automatically and go into Standby mode until movement is detected.
When motion detection ON, the icon 📁 is displayed on the screen. Short press OK key while in recording mode to turn OFF motion detection.
Note: Once motion detection is turned ON, it will take around 20 seconds to be activated to work.
FUNCTION
J. Parking Monitoring
Parking monitoring is for security monitoring while the vehicle is parked.
Once Parking Monitoring ON is selected in the video menu, the screen will display the icon. Once the vehicle ignition is turned OFF, the DVR will power OFF. In case the DVR detects any vibration, it will power ON to record for 20 seconds automatically with a key icon displayed at the top middle of the screen and then power OFF. If there is continuous vibration, DVR will turn ON again to record for 20 seconds until the built-in battery is drained completely. All videos created in Parking Monitoring mode without external power supply will be available in the LOCKED folder in the Micro SD card and not overwritten while the DVR is in loop recording.
If Parking Monitoring option is kept ON while the vehicle ignition is ON and the car charger provides power, only the first video will be locked.
Three setting options are available (High, Medium & Low). Medium is most recommended.

K. Car Number Display
Long press UP/MENU key to set Car Number Display ON in the video menu. There are total of 10 digits that can be entered. Select ▶ DOWN/MODE key to enter numeric information '0\~9' and 'A\~Z' for every digit. Once the correct information is entered, press OK OK key to go to next digit and long press ◀ UP/MENU key to exist settings.
Note: If Date Stamp is set to OFF, car number will not display on the screen and video even if Car Number is set to ON.

SYSTEM MENU
In video Standby mode, long press UP/MENU key twice to enter into system menu. Press UP/MENU key and DOWN/MODE key to select the item and press OK OK key to confirm. Long press UP/MENU key again to exit.

| MENU | MODE CATEGORY SUB-CATEGORY DEFAULT | |||
| VIDEO MODE | Video Resolution | 1080FHD 1920×1080,720P 1280 × 720,WVGA 864 × 480,VGA 640 × 480 | 720P 1280×720 | |
| Loop Recording | Off / 30 seconds /1 minute / 2 minutes | 1 minute | ||
| Exposure +3 - -3 0 | ||||
| Audio Record Off / On On | ||||
| Motion Detection Off / On Off | ||||
| Date Stamp Off / On On | ||||
| G-sensor | Off / Low / Medium /High | Medium | ||
| Parking Moni-toring | Off / Low / Medium /High | Off | ||
| Car Number A - Z, 0 - 9 | ||||
| Car Number Display | Off / On Off | |||

natural_image
Color palette bar with grayscale shades and a central crosshair symbol (no text or labels)SYSTEM MENU
| MENU | MODE CATEGORY SUB-CATEGORY DEFAULT | |||
| PHOTO MODE | Capture Mode | Single Shot / 2s timer / 5s timer / 10s timer | Single Shot | |
| Photo Resolution | 10M / 8M / 5M / 3M / 2M / 1M / VGA | 8M | ||
| Burst Off / On Off | ||||
| Quality Fine / Normal / Economy Fine | ||||
| Sharpness Strong / Normal / Soft Normal | ||||
| White Balance | Auto / Daylight / Cloudy / Tungsten / Fluorescent | Auto | ||
| Color | Color / Black & White / Sepia | Color | ||
| ISO Auto / 100 / 200 / 400 Auto | ||||
| Exposure +3 - -3 0 | ||||
| Steady Shot Off / On Off | ||||
| Quick Preview Off / 2sec / 5sec Off | ||||
| Date Stamp | Off / On On | |||


SYSTEM MENU
| MENU | MODE CATEGORY SUB-CATEGORIES DEFAULT | |||
| PLAY-BACK | Delete | Delete Current? / Delete All? | ||
| Protection | Lock Current / Unlock Current / Lock All / Unlock All | |||
| SYSTEM MENU | LCD OFF | Off / 30sec / 1min / 2mins | Off | |
| Auto Power Off | Off / 3mins / 5mins / 10mins | Off | ||
| Beep Sound Off / On On | ||||
| Language | English / Francais / Deutsch / Italiano / Espanol / Polski | English | ||
| Frequency 50HZ / 60HZ 50HZ | ||||
| Date / Time | DD/MM/YYYY, MM/DD/YYYY, YYYY/MM/DD | DD/MM/YYYY | ||
| Format cancel / ok | ||||
| Default Setting cance | / ok | |||
| Version | Current Software Version | |||
EN


MASS STORAGE
Video & Photo Download
The Red power indicator and Blue recording indicator will light up when the device is connected to the computer via USB cable. Once the device is connected to the computer, device's screen will prompt three options for usage selection, Mass Storage, PC Camera and REC Mode.
Mass Storage
- The screen will turn black with U DISK icon when Mass Storage is selected. Device will allow computer to access files in micro SD storage.
• There are two folders in the micro SD card-DCIM and LOCKED - DCIM is the file folder for normal videos and pictures from the device
- LOCKED is the file folder for locked videos created by G-sensor and Parking Monitoring. All file names in this fold start with 'LOCK'.

PC Camera
- Device will turn to black screen with CAMERA icon when PC Camera is selected. Device is now connected as an external PC camera.
- Please ensure the computer is installed with PC camera software before use.
REC Mode
- Device will work normally when REC Mode is selected. Video recording and photo capture are available in this mode.


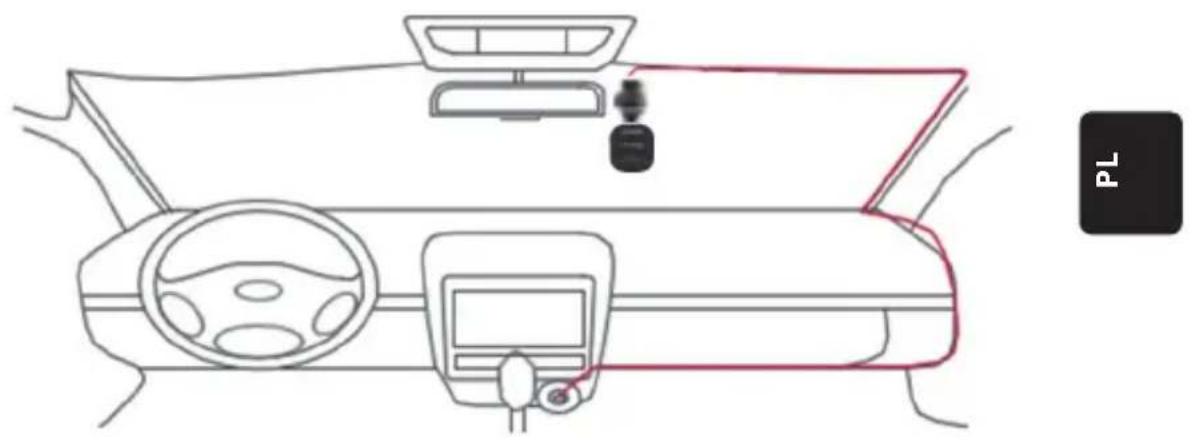
CABLING DIAGRAM
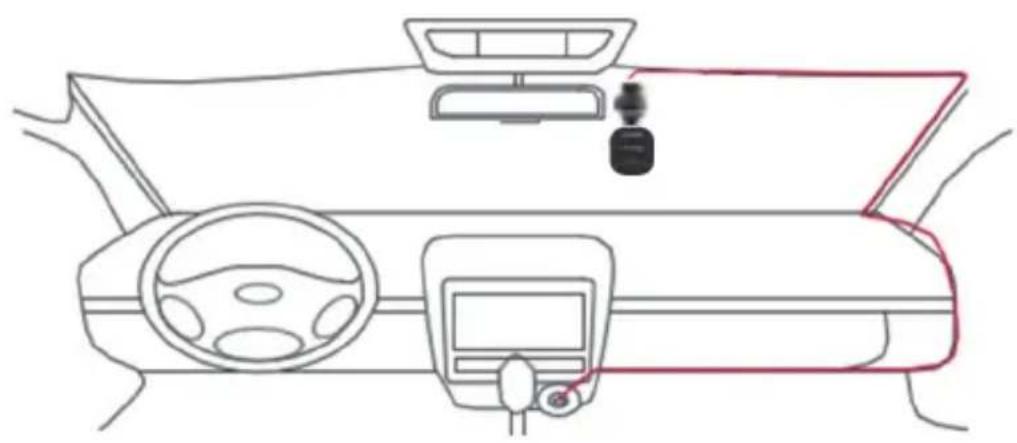
natural_image
Top-down line drawing of a car dashboard and steering wheel (no text or symbols)Z
PRODUCT SPECIFICATION
Specification are subject to change due to continuous improvement without prior notice will be given.
| CATAGORY DEFAULT | |
| Screen Size 2.0" HD IPS screen | |
| Viewing Angle 120° diagonal wide viewing angle | |
| Video Resolution | 1080FHD 1920X1080 / 720P 1280x720 / WVGA 864X480 / VGA 640x480 |
| Photo Resolution 10M/8M/5M/3M/2M/1M/VGA | |
| Video Format AVI | |
| Image Format JPG | |
| Memory Card Max. 32GB | Micro SD Card (Class 10 or above) |

natural_image
Color palette bar with grayscale shades and a central crosshair symbol (no text or labels)PRODUCT SPECIFICATION
| CATAGORY DEFAULT | |
| Frequency 50HZ/60HZ | |
| Power Port USB 5V / 1A | |
| Battery Capacity 300 mAH | |
| Microphone/Speaker Built-in | |
| Loop Recording Off / 30 seconds / 1 minute / 2 minutes | |
| LCD Off Support | |
| Audio Record Support | |
| Date Stamp Support | |
| G-Sensor Support | |
| Motion Detection Support | |
| Parking Monitoring Support | |
| Car Number Display Support | |
| Language English / Francais / Deutsch / Italiano / Espanol / Polski | |
| DVR N.W. | 52g |
| DVR Dimension | 61.5(W) × 66(H) × 33(D)mm |
PACKAGE CONTENT
- 1 × DVR
- 1 × holder
- 1 × user manual
- 1 × car charger
TROUBLE SHOOTING
01. DVR can't power on
a. Please make sure if DVR is properly connected to the car charger. Since the built-in battery is only to save the last file in case of emergency, powering ON with the 12V car charger is suggested. It is recommended to ONLY use the 12V car charger that comes with the device, do NOT use a standard vehicle USB port.
b. Reset DVR to default settings.
02. Stop recording or „Card Full“ Error Massage
a. CLASS 10 or above micro SD card is recommended. Micro SD card specification varies from one brand to another, which may not function as expected when using with this DVR. Please test for micro SD compatibility before purchasing.
b. Usually caused by too many „locked“ files
c. Go to settings, select Format, delete all data. If road conditions are too bumpy, this may also cause too many locked files on the micro SD card, in this case lower the G-Sensor sensitivity to Low.
d. Rest the device by sticking in a sharp object(paper clip) into the reset hole.
03. „No Card“Error Massage
a. Please confirm that the micro SD Card is inserted correctly and „clicks“ to lock. If not, the SD Card is most likely inserted wrong.
b. Format SD card using the device(located in settings).
04. Date&Time are incorrect
a. Reset the date and time in the System Menu. If the internal battery runs completely flat, then the device needs to be fully charged and the date/time will need to be re entered.
TROUBLE SHOOTING
05. Blurry video or picture or horizontal stripe interference on image
a. Make sure all protective adhesive is off the lens and screen.
b. Please clean the lens with soft cotton cloth and don't touch the lens. No dirt and fingerprints on the lens.
c. Set the correct Frequency in System Menu.
d. The quality of video and pictures will be affected in case front lighting and/or back lighting environment.
06. Battery only last 10 minutes or less
a. This is normal, the built-in battery is designed to save footage when the unit loses power.
07. The LCD shuts off when I'm driving
a. This is normal and please go to System Menu to check if LCD OFF set On. If yes, please set it OFF.
08. The device has frozen after quick-operating press
a. Please reset device
b. To avoid the same issue, please wait at least 1 or 2 seconds to finish your last press before you start the next one, do NOT press buttons thick and fast.
09. The device has frozen/stopped working after recording for a while
a. Check if the micro SD card was formatted using the device (located in settings) before first use.
b. Rest the device by sticking in a sharp object (paper clip) into the reset hole.
c. Check the speed of the micro SD card. Class 10 or higher is recommended for the highest data transfer, especially if the file sizes are large.
d. We always recommend that you make your purchase from a reputable vendor and steer from generic brands.
TROUBLE SHOOTING
10. I get an error massage „Picture error“ while attempting to play back a file
a. There may be some corrupt data sectors on the micro SD card, please format the SD card using the Format option in System Menu.
11. Q11. Can't play back files (.mov and .jpg)
a. The computer does not have the proper codec to play this file. Upgrade your Windows Media Player, QuickTime Player, etc.
12. My video/pictures of an incident are NOT there
a. Check if the capacity of micro SD card is filled with many „locked" files and hence there is not enough memory to record. Go to settings, Format, delete all data.
b. The files may have been overwritten in a record cycle (loop recording).

13. The device is not turning ON
a. Let the device remain plugged in to the 12V charging connector for about 10 minutes, sometimes due to storage and delivery, the battery may be completely drained, this is normal.
14. No voice in the video, no keypad tone, no G-Sensor, and no date & time
a. There may be abnormal use to cause loss of function and please set "Factory Default" in the System Menu.


TROUBLE SHOOTING
15. The DVR keeps auto ON & OFF continuously
a. Please turn OFF Parking Monitoring in MENU settings and then try again.
b. Normally if Parking Monitor is ON, DVR will go to Parking Monitoring mode and automatically power ON for 20 seconds' recording once detecting vibration or shake. If there is no vibration any more, it will power OFF automatically too.
16. The DVR keeps auto start and stop recording continuously
a. Please turn OFF Motion Detection in MENU settings and then try again.
b. If it is ON, it will auto go to record for 20 seconds once detecting movement in front of the lens. If there is no movement any more, it will automatically stop recording.


OSTRZEŻENIA
natural_image
Color palette bar with grayscale shades and a central crosshair symbol (no text or labels)BUDOWA
natural_image
Line drawing of a handheld electric drill bit with attached cable (no text or symbols)
natural_image
Technical line drawing of a mechanical device with a cylindrical component and a side panel (no text or symbols)P
natural_image
Technical line drawing of a device with a button labeled 'RESET' and a side panel (no readable text or symbols)FUNKCJA
natural_image
Close-up of a black handheld device with a circular inset showing a close-up of its top component (no visible text or symbols)natural_image
Color palette bar with grayscale shades and a central crosshair symbol (no text or labels)SCHEMAT OKABLOWANIA
natural_image
Top-down line drawing of a car dashboard and steering wheel (no text or symbols)SPECYFIKACJA PRODUKTU
natural_image
Color palette bar with grayscale shades and a central crosshair symbol (no text or labels)ESTRUCTURA

natural_image
Line drawing of a handheld electric drill bit with attached cable (no text or symbols)
natural_image
Technical line drawing of a mechanical device with a handle and internal components (no text or symbols)E
natural_image
Technical line drawing of a device with a button labeled 'RESET' and a side panel (no readable text or symbols)FUNCIÓN
natural_image
Close-up of a black glucose meter device with a close-up inset showing the lever mechanism (no text or symbols visible)natural_image
Top-down line drawing of a car dashboard and steering wheel (no text or symbols)ES
natural_image
Color palette bar with grayscale shades and a central crosshair symbol (no text or labels)CONCEPTION

natural_image
Line drawing of a handheld electric drill bit with attached cable (no text or symbols)
natural_image
Technical line drawing of a mechanical device with a lock and housing (no text or symbols)FR
natural_image
Technical line drawing of a device with a button labeled 'RESET' and a scroll wheel (no text or symbols beyond the label)FONCTION
natural_image
Close-up of a black handheld device with a circular inset showing a close-up of its top component (no visible text or symbols)natural_image
Top-down line drawing of a car dashboard and steering wheel (no text or symbols)CARACTÉRISTIQUE DU PRODUIT
natural_image
Color palette bar with grayscale shades and a central crosshair symbol (no text or labels)FELÉPÍTÉS

natural_image
Line drawing of a handheld electric drill bit with attached cable (no text or symbols)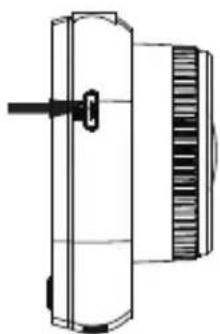
natural_image
Technical line drawing of a mechanical device with a cylindrical component and a side-mounted housing (no text or symbols)DH
natural_image
Technical line drawing of a device with a button labeled 'RESET' and a side panel showing textured surfaces (no readable text or symbols)FUNKCIÓ
natural_image
Close-up of a smart glucose meter device with a digital display and control buttons, showing a close-up inset (no text or symbols visible)natural_image
Line drawing of a car dashboard and steering wheel (no text or symbols)TERMÉK MÜSZAKI JELLEMZÖI
H
natural_image
Color palette bar with grayscale shades and a central crosshair symbol (no text or labels)STRUTTURA

natural_image
Line drawing of a handheld electric drill bit with attached cable (no text or symbols)
natural_image
Technical line drawing of a mechanical device with a cylindrical component and a side-mounted housing (no text or symbols)T
natural_image
Technical line drawing of a device with a button labeled 'RESET' and a side panel (no readable text or symbols)FUNZIONE
natural_image
Close-up of a black handheld device with a circular inset showing a close-up of its top component (no visible text or symbols)Telecamera del computer
natural_image
Top-down line drawing of a car dashboard and steering wheel (no text or symbols)SPECIFICHE DEL PRODOTTO
T
natural_image
Color palette bar with grayscale shades and a central crosshair symbol (no text or labels)BEHUIZING
natural_image
Line drawing of a handheld electric drill bit with attached cable (no text or symbols)
natural_image
Technical line drawing of a mechanical device with a cylindrical component and a side-mounted housing (no text or symbols)
natural_image
Technical line drawing of a mechanical device with ventilation grilles and a labeled 'RESET' button (no text or symbols beyond basic labels)

FUNCTIE
natural_image
Close-up of a black handheld device with a circular inset showing a close-up of its internal components (no visible text or symbols)Opnames/foto's downloaden
natural_image
Line drawing of a car dashboard and steering wheel (no text or symbols)PRODUCTSPECIFICATIE
natural_image
Color palette bar with grayscale shades and a central crosshair symbol (no text or labels)ESTRUTURA
natural_image
Line drawing of a handheld electric drill bit with attached cable (no text or symbols)
natural_image
Technical line drawing of a mechanical device with a cylindrical component and a side-mounted housing (no text or symbols)
natural_image
Technical line drawing of a device with a button labeled 'RESET' and a scroll wheel (no text or symbols beyond the label)PT

FUNÇÃO
D. Colocar e retirar o suporte
natural_image
Close-up of a black handheld device with a circular head and a close-up inset showing a vertical adjustment (no text or symbols visible)natural_image
Top-down line drawing of a car dashboard and steering wheel (no text or symbols)natural_image
Color palette bar with grayscale shades and a central crosshair symbol (no text or labels)UPPBYGGNAD

natural_image
Line drawing of a handheld electric drill bit with attached cable (no text or symbols)
natural_image
Technical line drawing of a mechanical device with a cylindrical component and a side-mounted housing (no text or symbols)
natural_image
Technical line drawing of a device with ventilation slots and a button labeled 'RESET' (no text or symbols beyond basic diagram)SV

FUNKTION
natural_image
Close-up of a black digital device with a sensor and control panel, showing a close-up inset (no text or symbols visible)natural_image
Line drawing of a car dashboard and steering wheel (no text or symbols)PRODUKTSPECIFIKATION


natural_image
Color palette bar with grayscale shades and a central crosshair symbol (no text or labels)Operating and installation instructions
DE, EN, PL, ES, FR, HU, IT, NL, PT, SV

This material may be reproduced, copied or distributed for personal use only.
Subject to technical alterations, errors and misprints.


- BLAUPUNKT
- WARNHINWEISE
- FUNKTION
- Akku laden
- DISCLAIMER
- OPERATION
- FUNCTION
- Key Features
- On/Off
- Power On
- Power Off
- Battery Charging
- Inserting Micro SD Card
- Holder Push in and Take out
- Video
- Photo
- Playback and Delete
- G-Sensor
- Motion Detection
- Parking Monitoring
- Car Number Display
- SYSTEM MENU
- MASS STORAGE
- Video & Photo Download
- PC Camera
- REC Mode
- PRODUCT SPECIFICATION
- PACKAGE CONTENT
- TROUBLE SHOOTING
- DVR can't power on
- Stop recording or „Card Full“ Error Massage
- „No Card“Error Massage
- Date&Time are incorrect
- Blurry video or picture or horizontal stripe interference on image
- Battery only last 10 minutes or less
- The LCD shuts off when I'm driving
- The device has frozen after quick-operating press
- The device has frozen/stopped working after recording for a while
- I get an error massage „Picture error“ while attempting to play back a file
- Q11. Can't play back files (.mov and .jpg)
- My video/pictures of an incident are NOT there
- The device is not turning ON
- No voice in the video, no keypad tone, no G-Sensor, and no date & time
- The DVR keeps auto ON & OFF continuously
- The DVR keeps auto start and stop recording continuously
- OSTRZEŻENIA
- FUNKCJA
- FUNCIÓN
- FONCTION
- CARACTÉRISTIQUE DU PRODUIT
- FUNKCIÓ
- TERMÉK MÜSZAKI JELLEMZÖI
- FUNZIONE
- Telecamera del computer
- SPECIFICHE DEL PRODOTTO
- FUNCTIE
- Opnames/foto's downloaden
- PRODUCTSPECIFICATIE
- FUNÇÃO
- Colocar e retirar o suporte
- PRODUKTSPECIFIKATION
Brand : BLAUPUNKT
Model : BP 2.2 FHD
Category : VCR