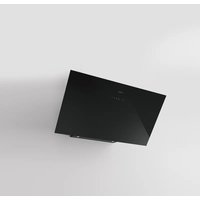
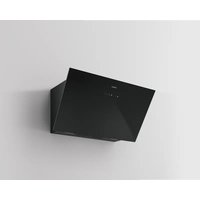
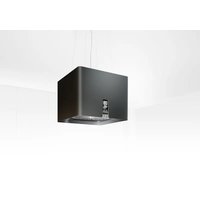
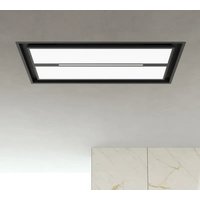
Raffaello - Basket Airforce - Free user manual and instructions
Find the device manual for free Raffaello Airforce in PDF.

User questions about Raffaello Airforce
0 question about this device. Answer the ones you know or ask your own.
Ask a new question about this device
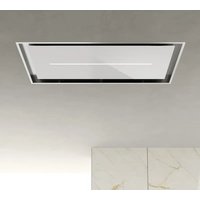
Download the instructions for your Basket in PDF format for free! Find your manual Raffaello - Airforce and take your electronic device back in hand. On this page are published all the documents necessary for the use of your device. Raffaello by Airforce.
USER MANUAL Raffaello Airforce
Checking the ceiling for first installation:
- The ceiling must be flat, horizontal and sufficiently solid and strong.
- The hood is designed to be installed in a false ceiling. The false ceiling must be solid and have an adequate load capacity for a product weighing max. 30kg .
Do not install the hood directly in the false ceiling panels, but use a suitable frame or support.
Installation of plasterboard panels:
Attention! installation must be performed by qualified installers.
For any painting of the perimeter panel and/or the hood frame, it is recommended to rely on a professional in the sector.
The details can be painted both with powder and liquid.
Wall paints and temperas are not indicated as they do not adhere to surfaces and are absorbent, inevitably the cooking vapors sucked in by the product would ruin the finish.

Notes: this remote control is universal but not all features are available on all models.
ON FIRST USE OR IN THE EVENT OF NEEDING TO CHANGE THE REMOTE CONTROL OR THE PRODUCT'S ELECTRONIC COMPONENTS, THE PAIRING PROCEDURE BETWEEN REMOTE CONTROL AND HOOD MUST BE PERFORMED (Valid for all models):
- Power off the hood for at least 10 seconds
- Power on the hood again
- Within the first 5 sec press the lights button T4 and release after the lights have turned on
- Within the next 5 sec press the motor button T2 and release it when the lights turn off
Now you need to wait approximately 10 seconds, after which you may use the hood normally.
Note: Anything that is not a part of the text is considered to be part of the text.
AL PRIMO UTILIZZO O NEL CASO SI DEBBA CAMIARE IL TELECOMANDO O L'ELETTRONICA A BORDO DEL PRODOTTO, BISOGNA EFFETTUARE LA PROCEDURA DI AFFILIAZIONE TRA TELECOMANDO E CAPPA (Valida per tutti i modelli):
The appliance should not be used by children under 8 years of age and by persons with reduced physical, sensory and mental capabilities, or lack of experience and knowledge, unless they are supervised or have received instructions regarding the safe use of the appliance and are aware of the possible risks. Children must not play with the appliance. Any intended cleaning and maintenance by the user should not be carried out by children unless supervised. The hood should never be used without without the grid properly fitted! Never use the hood without the grill properly fitted!
The accessible components can overheat when the cooktop is in use.
The hood must not be connected to the flues of other appliances that run on gas or other fuels. When the hood is used at the same time as other appliances that run on gas or other fuels, provision must be made for an adequate supply of air. No food must be cooked flambe underneath the hood. The use of an unprotected flame could cause damage to the filters and could cause fires, so should be avoided. When frying food, never leave the pan unattended because the cooking oil could flare up. Please comply with the technical and safety provisions set forth by your local competent authorities regarding the ventilation of hoods.
This appliance conforms to European Directive 2002/96/EC, Waste Electrical and Electronic Equipment (WEEE). Please dispose of this product correctly in the interest of health and the environment.
The symbol on the product, or on the documents accompanying the product, indicates that this appliance may not be treated as household waste. Instead it shall be handed over to the applicable collection point for the recycling of electrical and electronic equipment. Disposal must be carried out in accordance with local environmental regulations for waste disposal. For more detailed information about treatment, recovery and recycling of this product, please contact your local city office, your household waste disposal service or the shop where you purchased the product. If the power cable is damaged you should, in the interest of safety, contact the manufacturer or the manufacturer's technical assistance service to request a replacement, or ask someone who is similarly qualified.
Check also the drawings on the initial pages with the alphabetical and numerical references in the explanatory text. Closely follow the instructions in this manual. We cannot accept liability for any faults, detriment or fire damage to the appliance due to non-compliance with the manual's instructions.
You should affix the hood to a wall of sufficient weight-bearing capacity, so not to one made of plasterboard.
The cooker hood must be placed at a minimum distance of 65cm from the cooking plane for electric cookers and 65cm for gas or mixed cookers. If the instructions for installation for the gas hob specify a greater distance, this has to be taken into account. Do not tile, grout or silicone this appliance to the wall. Surface mounting only. Do not fix chimney flue to furniture or fly over shelves unless the chimney flue can be easily removed, in case maintenance is ever required.
The cooker hood is provided with an upper air exit B for discharging fumes externally for models including chimney flue C (Suction Version A- exhaust pipe not supplied). If cooking fumes and vapours cannot be externally discharged, the cooker hood can be used in the recirculating version F: the installation of 1 active charcoal filter F allows the recirculation of fumes and vapours through the upper grid G.
Make sure that there is a power socket near the hood and that the system has a 30mA differential. The mains voltage must be the same as that on the label inside the hood. The hood has a 1250mm power cable with or without plug: if it does have a plug, connect the hood to an accessible approved socket; or if it does not (connection direct to the mains), fit an approved bipolar switch with a minimum contact opening of no less than 3mm (accessible). This installation and electrical connection must be executed by a qualified technician.
Product performance test carried out in accordance with standard (EU) No 65/2014-Ref: IEC 61591
Maximum performance is achieved by placing the mobile panels, if any, in the open position.
TLC
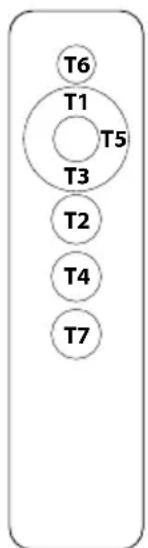
T1: +
T2:On/Off motor
T3:-
T4: On/Off light
Notes: this remote control is universal but not all features are available on all models.
ON FIRST USE OR IN THE EVENT OF NEEDING TO CHANGE THE REMOTE CONTROL OR THE PRODUCT'S ELECTRONIC COMPONENTS, THE PAIRING PROCEDURE BETWEEN REMOTE CONTROL AND HOOD MUST BE PERFORMED (Valid for all models):
- Power off the hood for at least 10 seconds
- Power on the hood again
- Within the first 5 sec press the lights button T4 and release after the lights have turned on
- Within the next 5 sec press the motor button T2 and release it when the lights turn off
Now you need to wait approximately 10 seconds, after which you may use the hood normally.
SHOULD THERE BE ANY MALFUNCTIONS DUE TO INTERFERENCES WITH OTHER REMOTE CONTROLS NEARBY, PERFORM THE PROCEDURE TO CHANGE THE REMOTE CONTROL'S TRANSMISSION CODE (Valid for all models)
The remote control is supplied with default codes. Should you wish to generate new random codes, the following procedure must be performed: press simultaneously the two buttons plus T1 and minus T3 for at least 10 seconds. After the remote control's code has been changed, the pairing procedure must be performed.
Button T2 (On/Off motor): pressing the T2 button turns the motor on or off, acting on the T1(+) or T3 (-) buttons increases or decreases the speed
1^ Speed:Green LED
2^ Speed: Flashing green LED
3^ Speed: Orange LED
4^ Speed: Flashing orange LED
5^ Speed: Red LED
6^ Speed: flashing red LED (intensive timed for 8 minutes, after which it returns to 5 speed)
Button T4:On/Off light (LED bar).
Note: the Raffaello model is not equipped with light
Maintenance
Prior to any maintenance operation ensure that the cooker hood is disconnected from the electrical outlet.
Cleaning
The hood must be cleaned frequently both inside (apart from the area behind the grease filter) and outside. Use a cloth moistened with denatured alcohol or neutral liquid detergents. Never use products containing abrasives.
Warning
Failure to carry out the basic standards of the cleaning of the cooker hood and replacement of the filters may cause fire risks. Therefore we recommend observing these instructions.
Anti-grease Filter
must be cleaned once a month, with non-abrasive detergents, by hand or in dishwasher on low temperature and short cycle. When washed in a dishwasher, the grease filter may discolour slightly, but this does not affect its filtering capacity.
Charcoal Filter - (only for filter version)
The active charcoal filters F are not washable nor regenerative. It should be changed every 6 months in normal use. The active charcoal filters capture unpleasant cooking odours.
Led Light
If the lighting group LED does not work, please contact the technical service center in order to replace the whole group.
Reducing environmental impact:
To reduce energy consumption, we recommend you always use the lowest suction speed among those suitable for the cooking mode currently active, avoid leaving the appliance running for more than 15 minutes after burner shutdown and switch off the lights if you leave the cooking area.
Warning
Toets T4:On/Off licht (LED-balk).
Installation with remote motor