Hawser - Fitness Equipment Capital Sports - Free user manual and instructions
Find the device manual for free Hawser Capital Sports in PDF.

User questions about Hawser Capital Sports
0 question about this device. Answer the ones you know or ask your own.
Ask a new question about this device
Download the instructions for your Fitness Equipment in PDF format for free! Find your manual Hawser - Capital Sports and take your electronic device back in hand. On this page are published all the documents necessary for the use of your device. Hawser by Capital Sports.
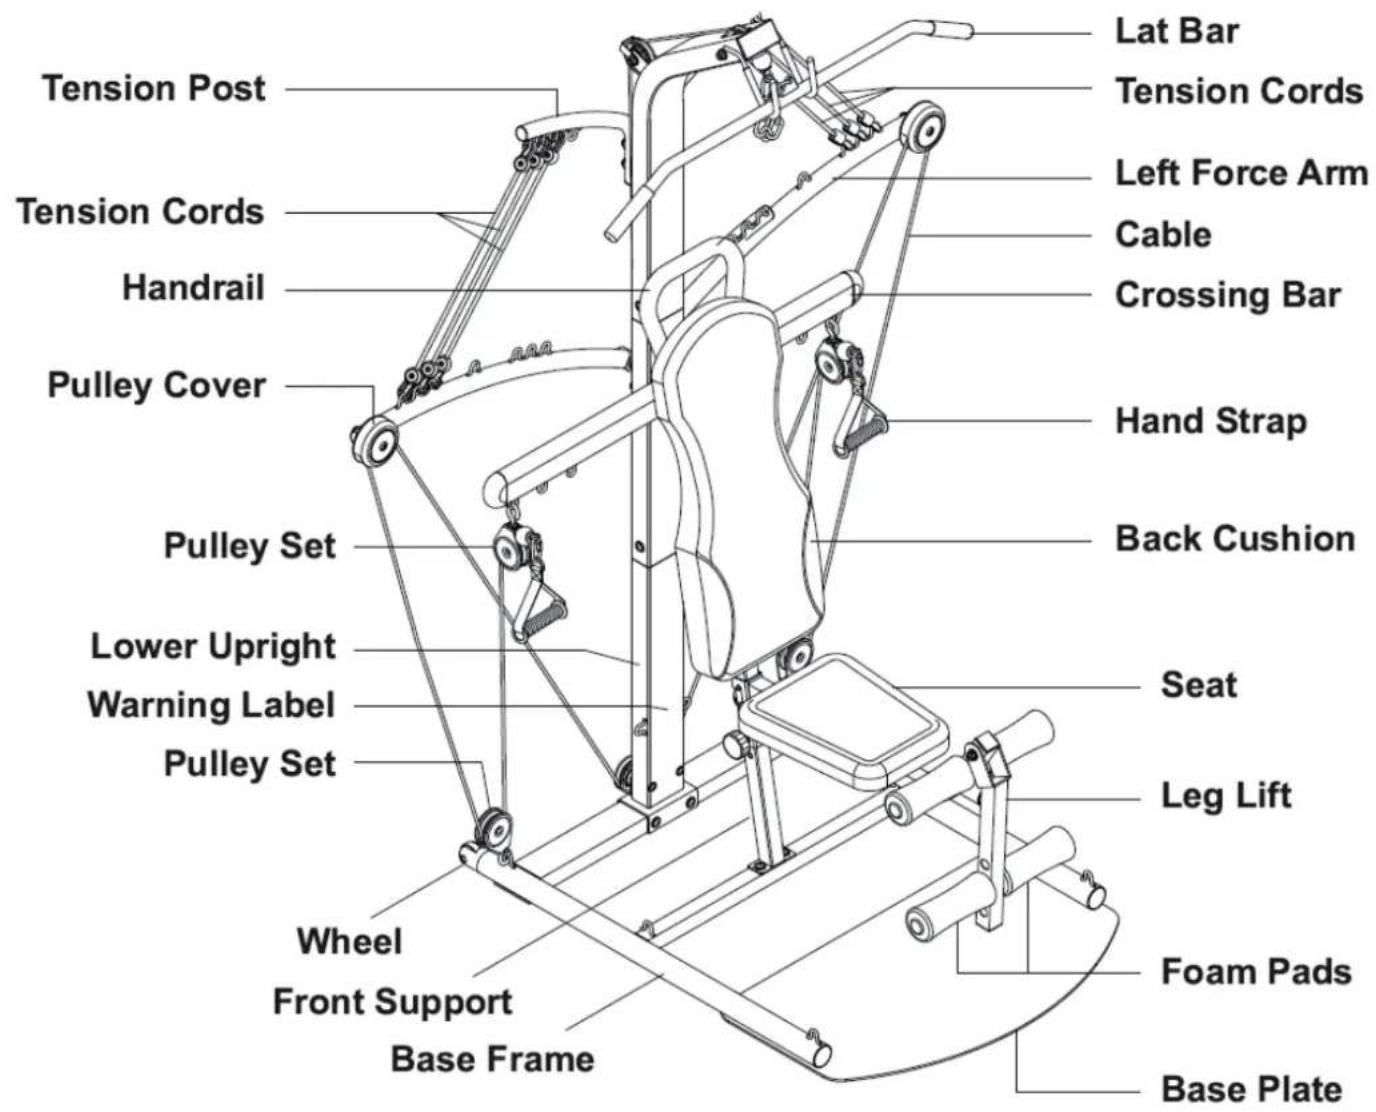
USER MANUAL Hawser Capital Sports
Congratulations on purchasing this product. Please read and follow these instructions, in order to avoid damaging the item. We do not cover any damages that may arise from improper use of the item or the disregard of the safety instructions.
General Safety Notice
- Read all instructions before using.
- Do not place on or near a hot gas or electric burner or in a heated oven.
- The appliance is not a toy. Do not let the children play with it. Never let children insert foreign objects into the appliance.
- Do not use the appliance for other than intended use. This appliance has been designed solely for domestic use; the manufacturer's liability shall not be engaged in the event of any professional use, by any misuse or by any use not complying with the operating instructions.
- Save these instructions.
Special safety advice for the use of sports equipment
- Check all the bolts, nuts and other connections before using the machine for the first time to ensure the machine is in the safe condition.
- Place a suitable base (e.g. rubber mat, wooden board etc.) beneath the machine in the area of assembly to avoid dirt.
- Before beginning the training, remove all objects within a radius of 2 meters from the machine.
- Your health can be affected by incorrect or excessive training. Consult a doctor before beginning the training program. He can define the maximum setting (Pulse. Watts. Duration of training etc) to which you may train yourself and can get precise information during training. This machine is not suitable for therapeutic purpose.
Only train on the machine when it is in correct working way. Use only original spare parts for any necessary repairs. - This machine can be used for only one person's training at a time.
- Wear training clothes and shoes that are suitable for fitness training with the machine. Your training shoes should be appropriate for the trainer.
If you have a feeling of dizziness, sickness or other abnormal symptoms, please stop training and consult a doctor immediately. - People such as children and handicapped persons should only use the machine in the presence of another person who can give aid and advice.
- The power of the machine increases with increasing the speed, and the reverse. The machine is equipped with adjustable knob that can adjust the resistance.
Max. User weight: 150kgs.
| # Description Qty | |||
| 52 Bolt, Round Head M6 x 1 x 15mm 8 | |||
| 53 bolt, Flat Head M8 x 1,25 x 20mm 5 | |||
| 54 bolt, Flat Head M8 x 1,25 x 50mm 2 | |||
| 55 60 | Bolt, Button Head | M8 x 1,25 x 15mm M10 x 1,5 x 15mm | |
| 56 61 62 63 | Bolt, Button Head | M8 x 1,25 x 45mm M10 x 1,5 x 50mm M10 x 1,5 x 60mm M10 x 1,5 x 65mm | |
| 57 58 | Bolt, Button Head | M8 x 1,25 x 80mm M8 x 1,25 x 90mm | |
| 59 64 65 | Bolt, Button Head | M8 x 1,25 x 115mm M10 x 1,5 x 105mm M10 x 1,5 x 110mm | |
| 67 68 | Nylock Nut | M8 x 1,25 M10 x 1,5 | |
| 69 70 | Washer | M8 M10 | |
| 71 Lock Washer M10 6 | |||
Assembly
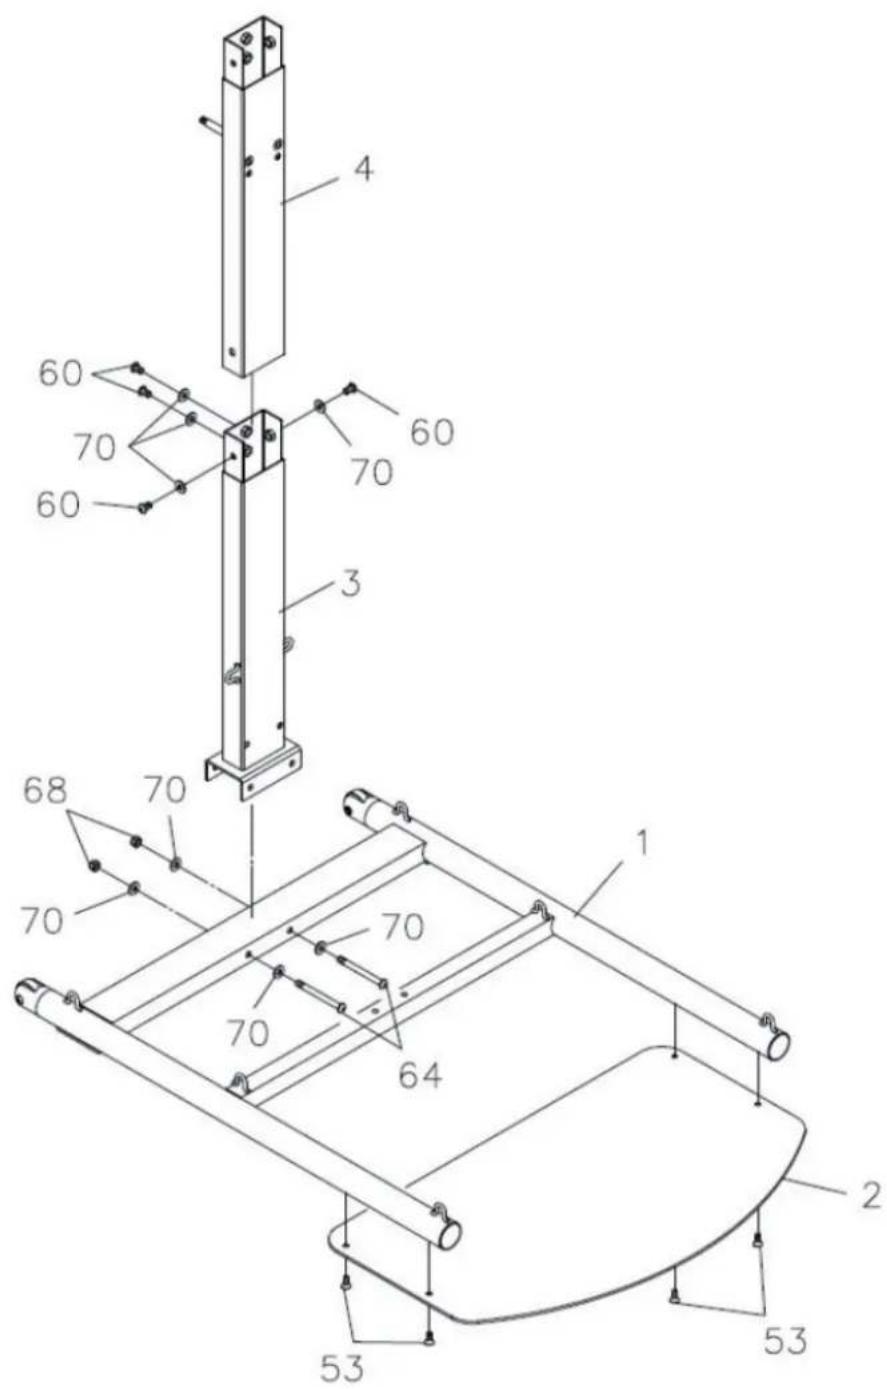
Step 1: Attach the base plate (2) to the base frame (1) with flat head bolts M8 × 1,25 × 20 (53)
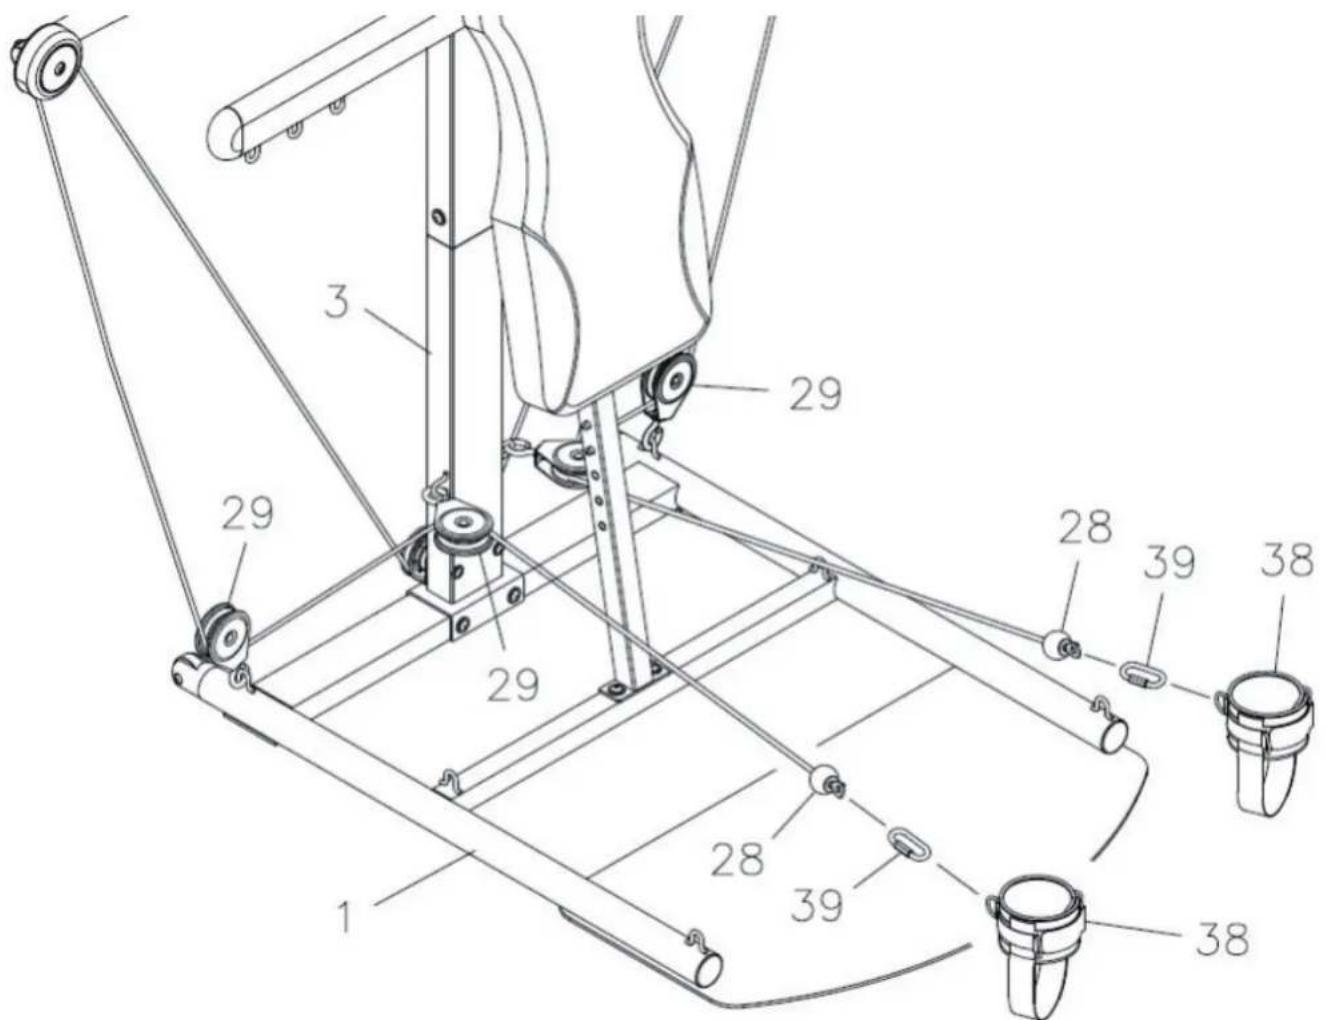
Step 2: Attach the lower upright (3) to the base frame (1) with button head bolts M10 x 1,5 x 105mm (64), washers M10 (70) and nylock nuts M10 x 1,5 (68).
Step 3: Attach the upright (4) to the lower upright (3) with button head bolts M10 x 1,5 x 15mm (60) and washers M10 (70).
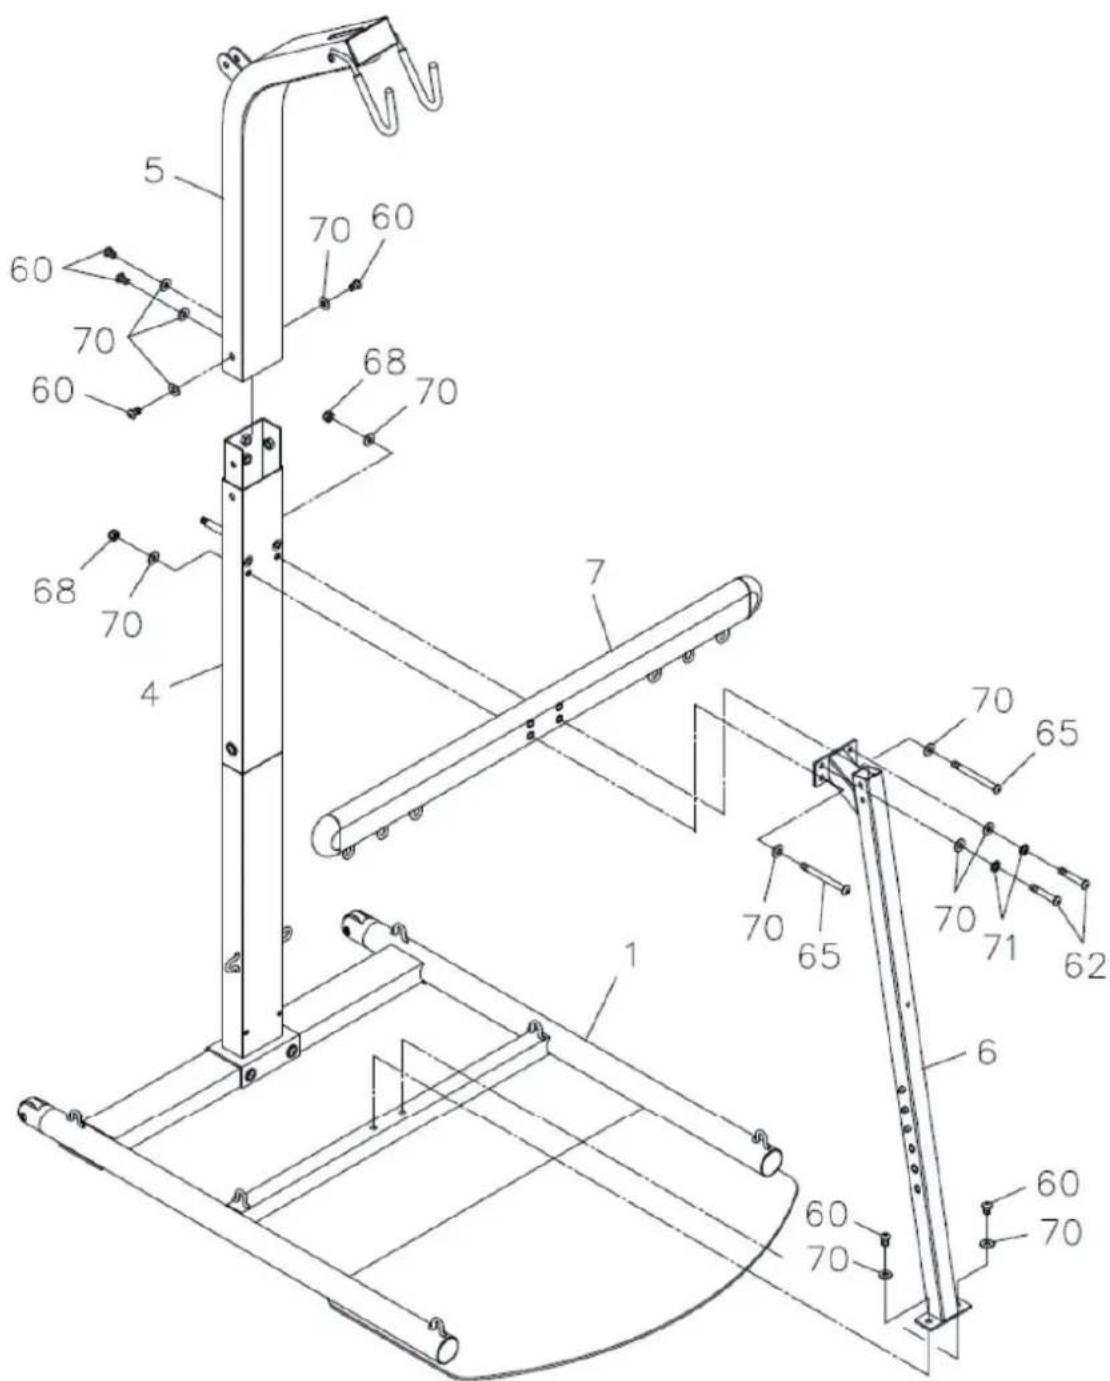
Step 4: Attach the top beam (5) to the upright with button head boltsM10 x 1,5 x 15mm (60) and washers M10 (70).
Step 5: Attach the crossing bar (7) and front support (6) to the upright (4) with button head bolts M10 x 1,5 x 110mm (65), washers M10 (70), nylock nuts M10 (71) and button head bolts M10 x 1,5 x 60mm (62). Do not tighten the bolts.
Step 6: Attach the front support (6) to the base frame (1) with button head bolts M10 x 1,5 x 15mm (60) and washers M10 (70). Tighten all bolts now.
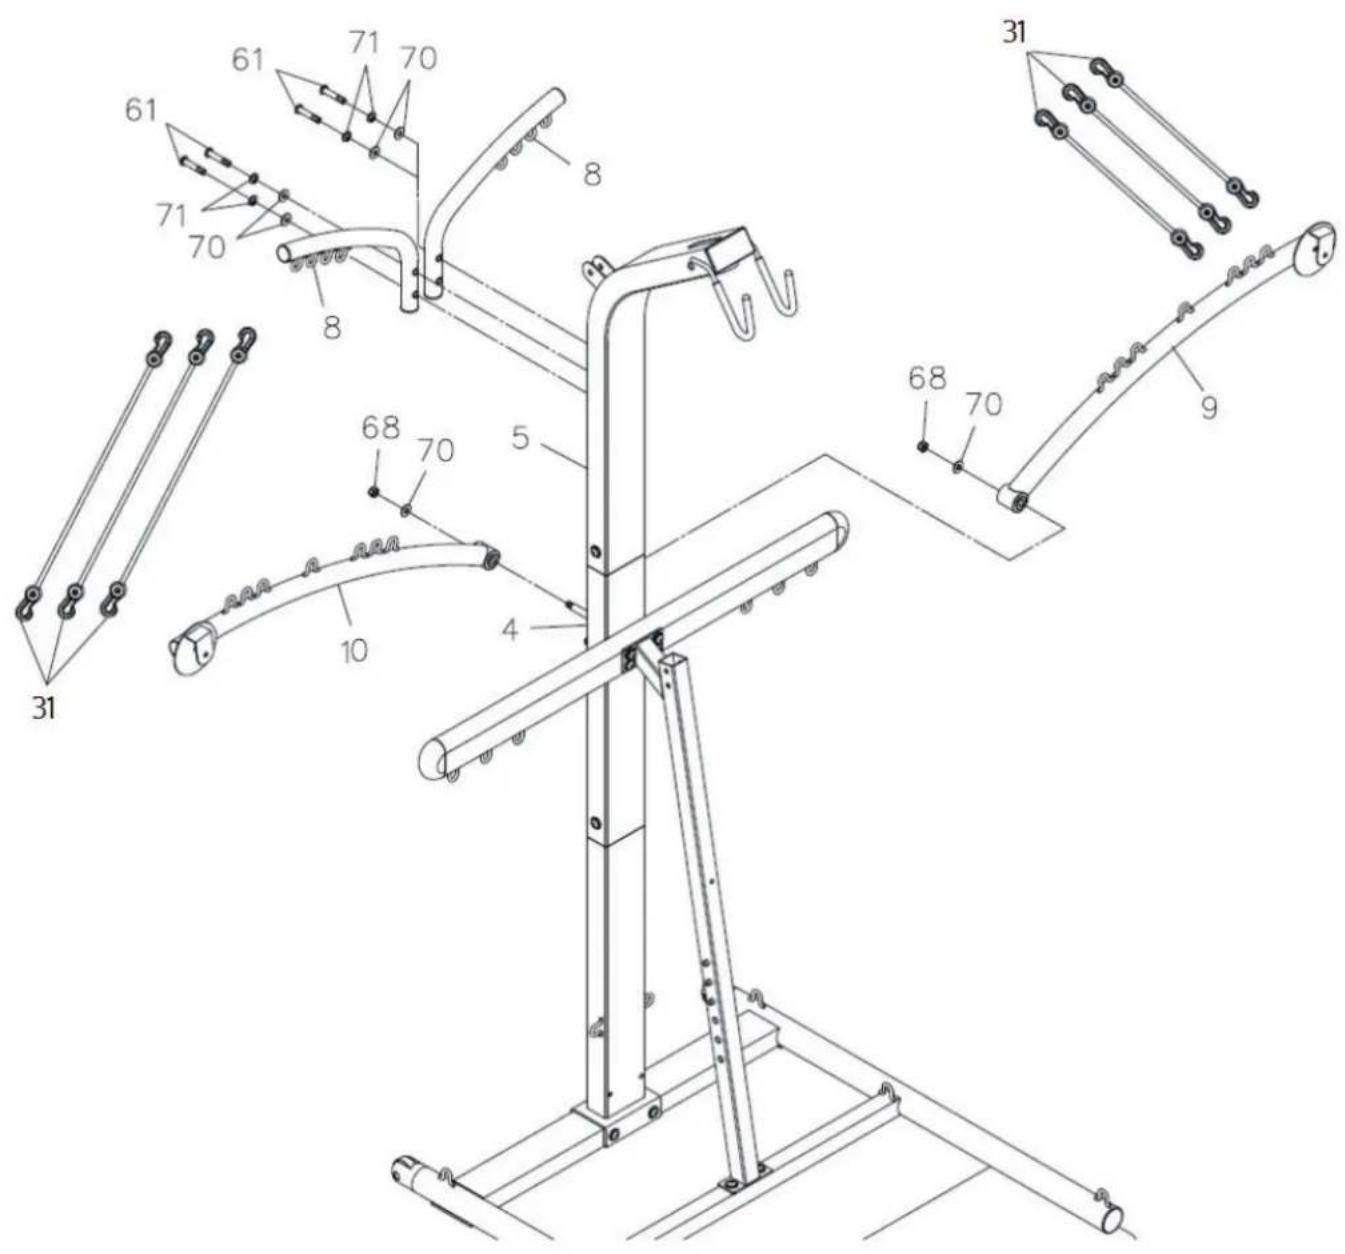
Step 7: Attach the tension posts (8) to the back of the top beam (5) with button head bolts M10 x 1,5 x 50mm (61), nylock nuts M10 (71) and washers M10 (70).
Step 8: Slide the force arms (right & left) (9, 10) onto the shafts on upright (4) and secure with washers M10 (70) and nylock nuts M10x1,5 (68). Do not overtighten the nuts, as the left and right force arms must be able to pivot smoothly.
Step 9: hook three tension cords (31) to the three hooks at the top of the tension posts (8) on both sides. Hook the lower ends of the cords to the hooks on the outer ends of the force arms (left/right) (9, 10).
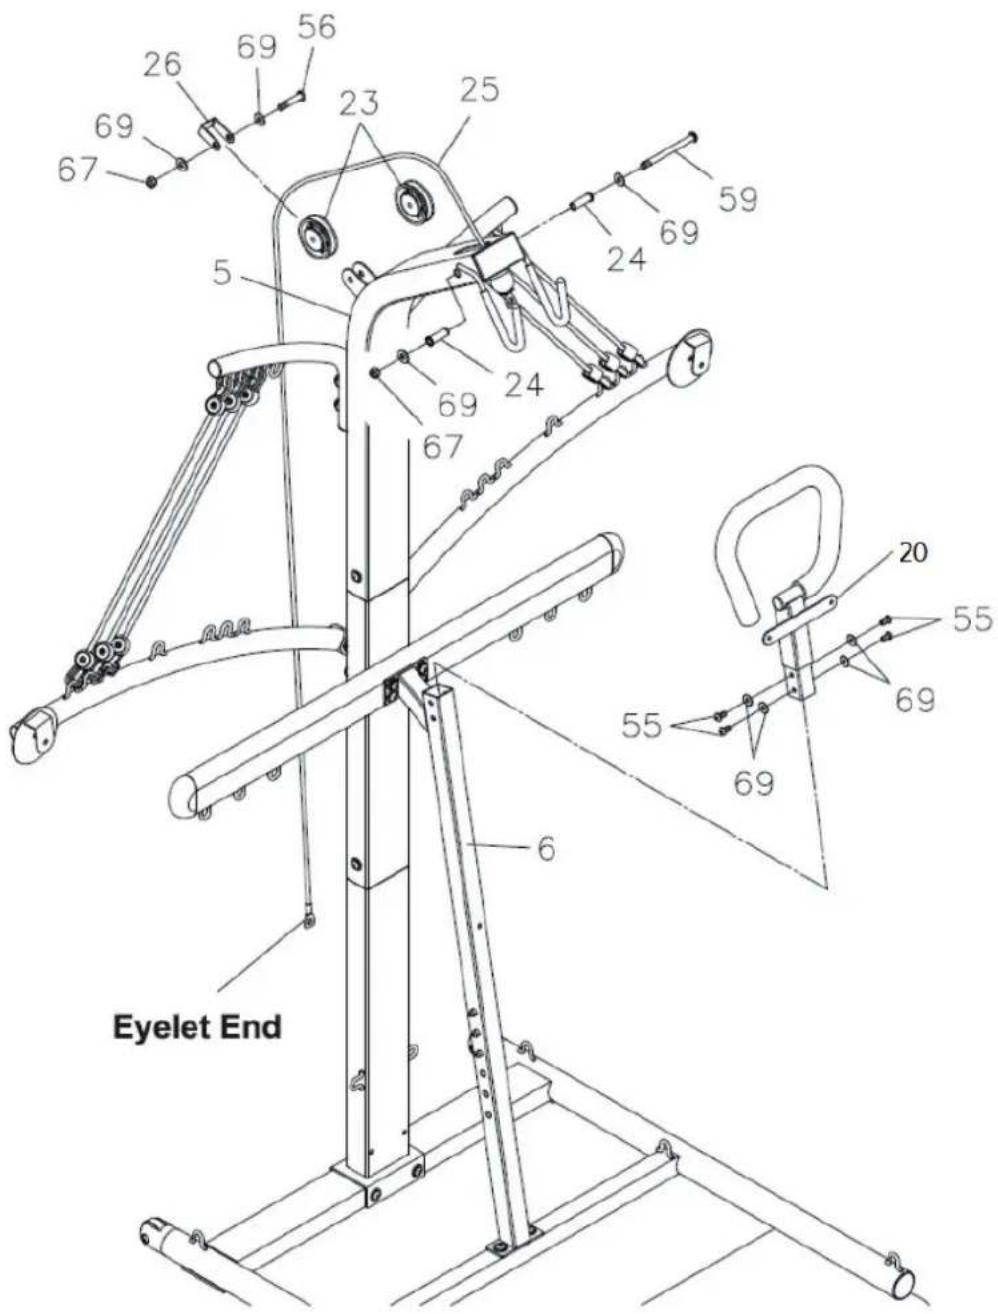
Step 10: Attach the handrail (20) to the front support (6) with button head bolts M8 x 1,25 x 15mm (55) and washers M8 (69).
Step 11:
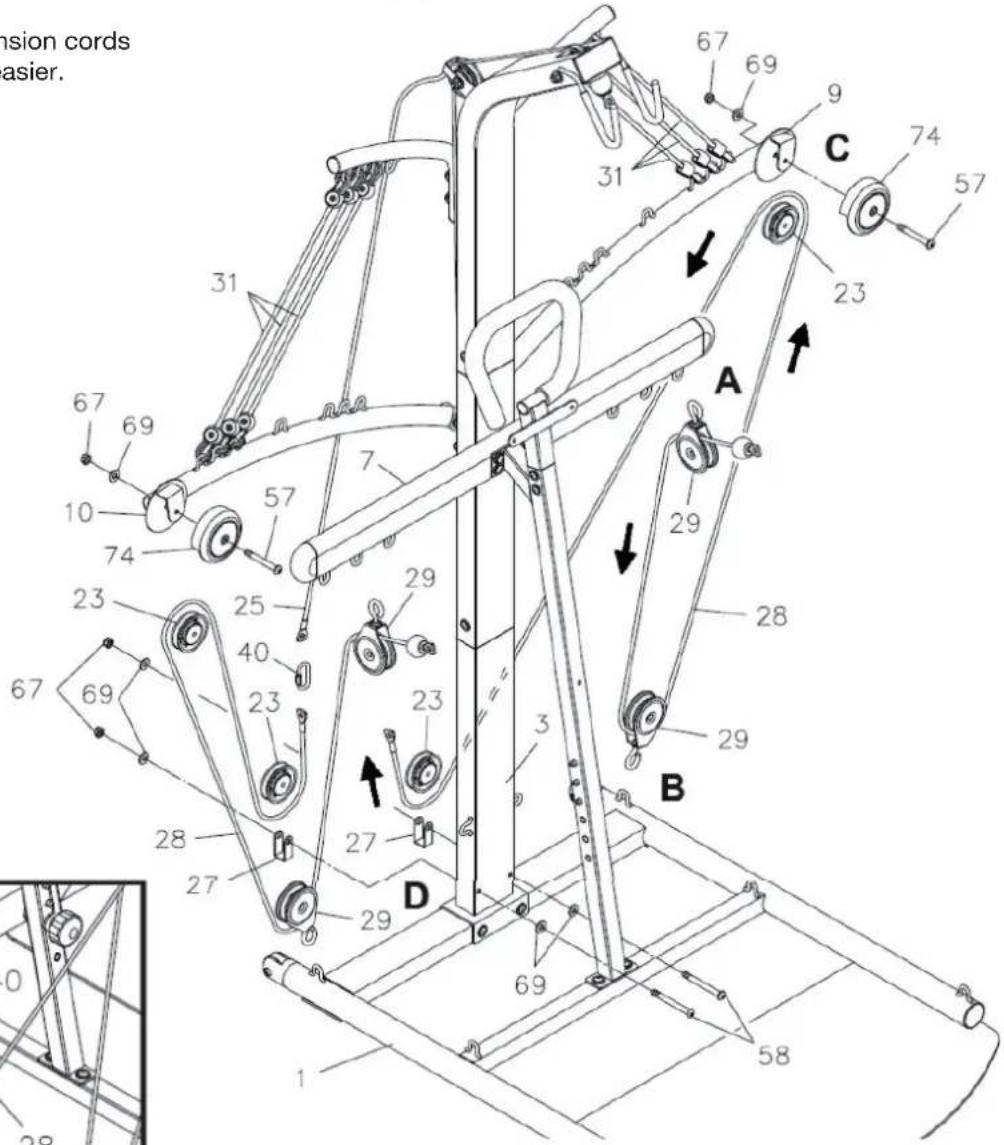
(NOTE: Do not overtighten bolts (56, 59), as pulleys must rotate freely.)
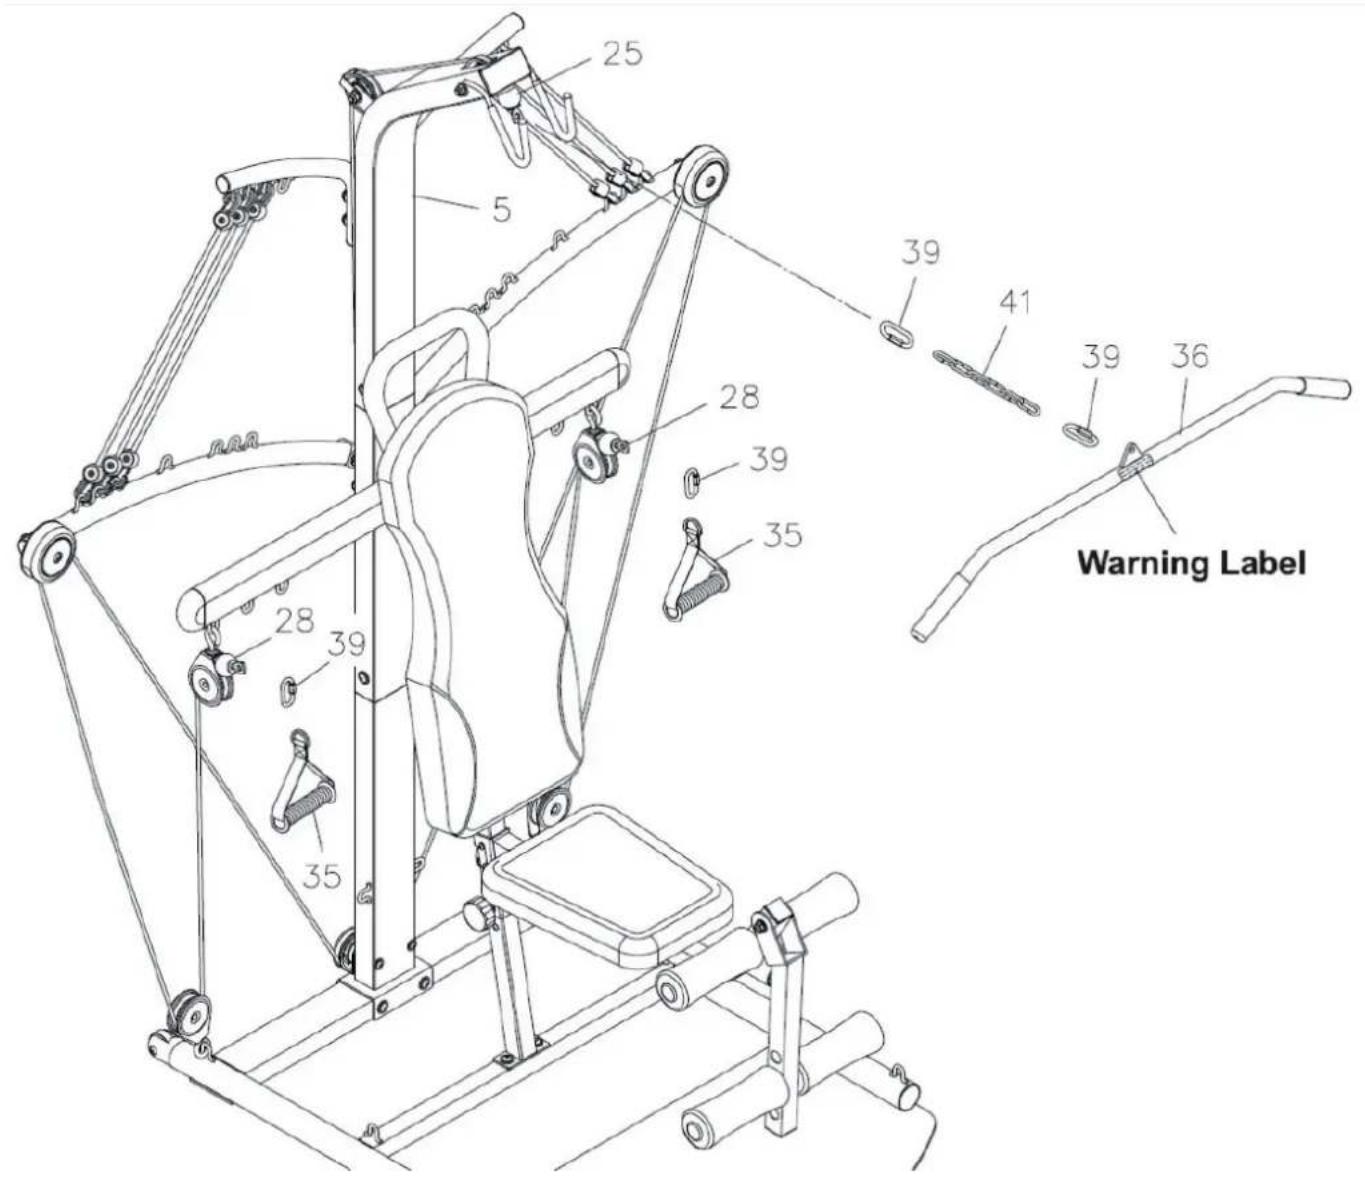
- Run the eyelet end of the LAT bar cable (25) (2050mm long) through the slot at the top end of the top beam (5) and attach the ball end of the LAT bar cable to the top beam (5) with a pulley (23), a button head bolt M8 x 1,25 x 115mm (59), nylock nut M8 x 1,25 (67), two washers M8 (69) and two pulley spacers (24).
- Attach the LAT bar cable (25) to the bracket on the top beam (5) with a pulley (23), button head bolt M8 x 1,25 x 45mm (56), nylock nut M8 x 1,25 (67), two washers M8 (69) and the wide cable guide (26).
Step 12:
- Hook a pulley set (29) to one of the hooks on the end of the crossing bar (7). Run the eyelet end of the cable (28) (3980mm long) through the pulley set (29).
- Run the eyelet end of the cable (28) through another pulley set (29). Hook the pulley set to the hook on the base frame (1).
- Attach the cable (28) to the bracket on the left force arm (9) with a pulley (23), a pulley cover (74), a button head bolt M8 x 1,25 x 80 (57), a washer M8 (69) and a nylock nut M8x1.25 (67).
- Attach the cable (28) to the lower upright (3) with a pulley (23), a cable guide (27), a button head bolt M8x1.25x90 (58), two wahsers M8 (69) and a nylock nut M8 (67).
Connect the cable (28) to the LAT bar cable (25) with the small wick link (40). Repeat the whole procedure for the other side. Both cables (28) are to be connected to the LAT bar cable (25).
Note: Unhooking two of the tension cords will make the cable assembly easier.
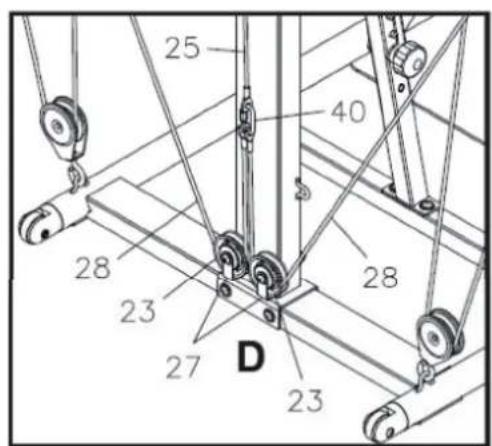
Step 13: Hook the seat frame (11) onto one of the lugs on the fron support (6) and secure with the locking knob (16) and a washer M10 (70).
Step 14: Attach the mounting plates (17) to the seat frame (11) with flat head bolts M8 x 1,25 x 50mm (54), washers M8 (69) and nylock nuts M8 (67). Attach the seat (18) to the mounting plates (17) with flat head bolts M6 x 1 x 15mm (52).
Step 15: Attach the mounting plate (17) to the front support (6) with flat head bolts M8 x 1,25 x 20mm (53) and attach the back cushion to the mounting plate (19) and the mounting plate to the handrail (20) with flat head bolts M6 x 1 x 15mm (52).
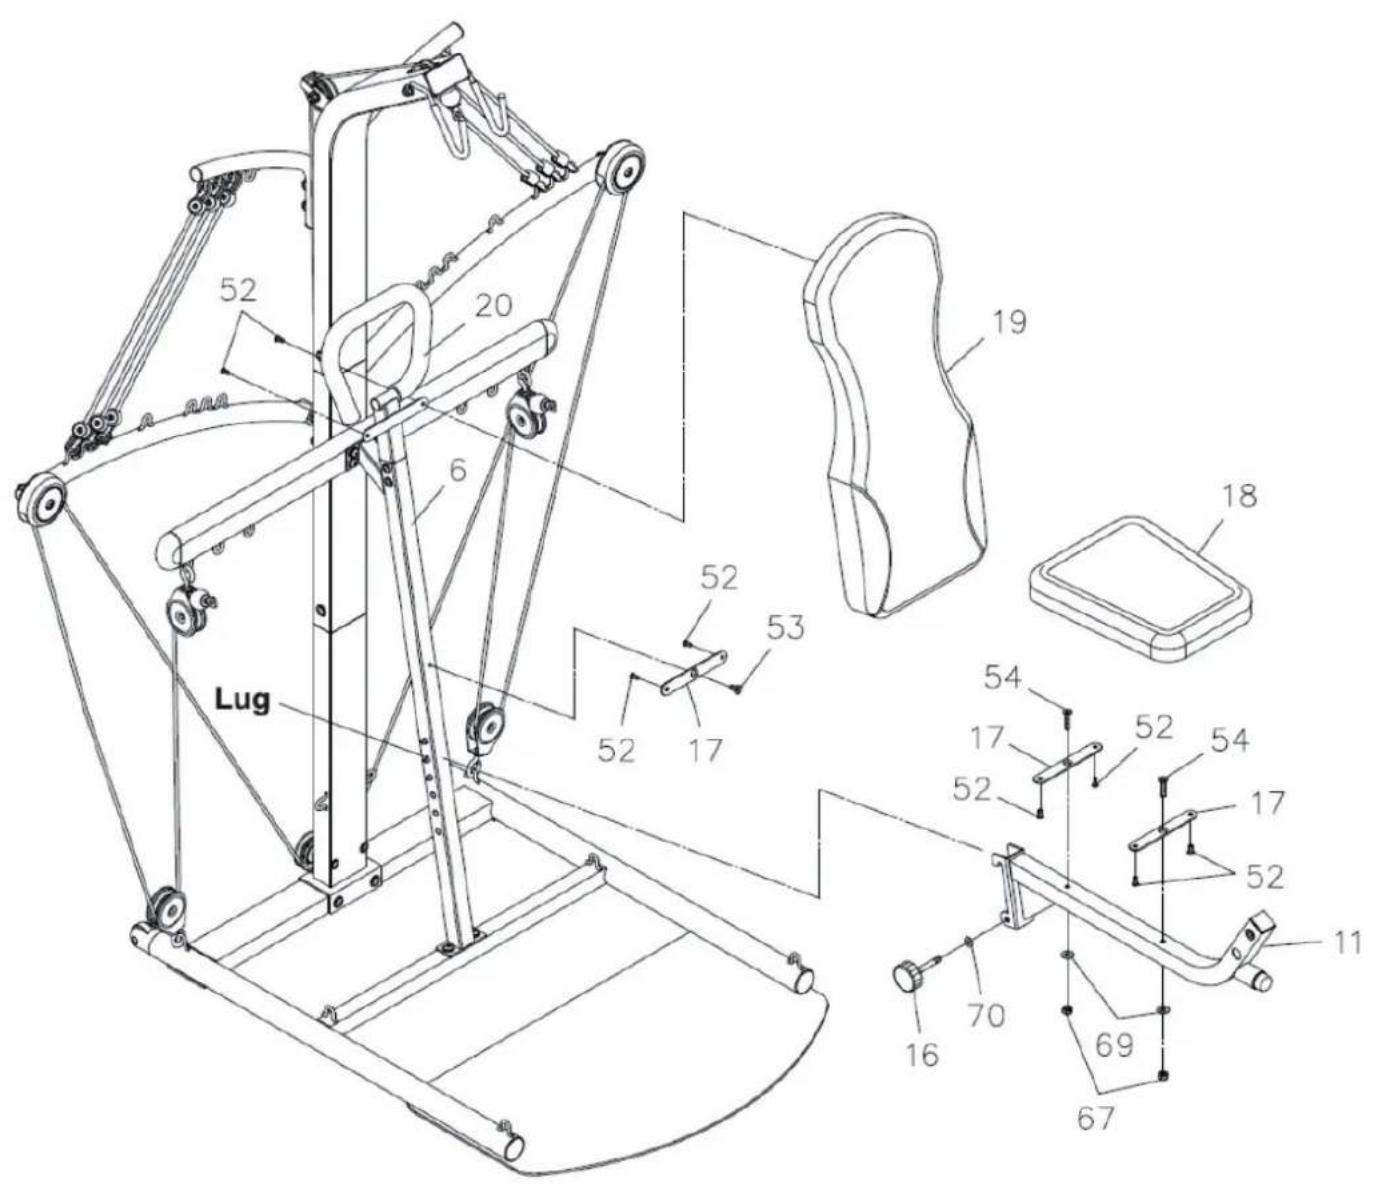
Step 16: Attach the leg lift (12) to the seat frame (11) with button head bolts M10 x 1,5 x 65mm (63), washers M10 (70) and nylock nut M10 (68). Do not overtighten! Leg lift must pivot smoothly.
Step 17: Slide the foam pads (15) over the pad tubes (14) and insert the pad tubes though the holes in the seat frame. Press the round plugs into the ends.(44).
Step 18: Attach the LAT bar (36) to the LAT bar cable with two quick links and the chain (39, 41). Adjust the length of the chain.
Step 19: Attach the hand straps (35) to the ball ends of the cable (28) with quick links (39).
Step 20: When the pulley sets (29) are hooked on the bottom of the lower upright (3), and the base frame (1), the ankle cuff (38) can be attached to the ball end of the cable (28) with a quick link (39):
Chere cliente, cher client,