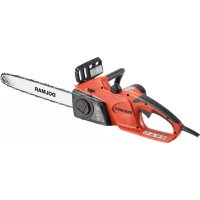
ES2141TLC - Saw DOLMAR - Free user manual and instructions
Find the device manual for free ES2141TLC DOLMAR in PDF.


User questions about ES2141TLC DOLMAR
0 question about this device. Answer the ones you know or ask your own.
Ask a new question about this device
Download the instructions for your Saw in PDF format for free! Find your manual ES2141TLC - DOLMAR and take your electronic device back in hand. On this page are published all the documents necessary for the use of your device. ES2141TLC by DOLMAR.
USER MANUAL ES2141TLC DOLMAR
GB Electric Chain Saw Instruction manual
natural_image
Line drawing of a chain-linking tool (no text or symbols)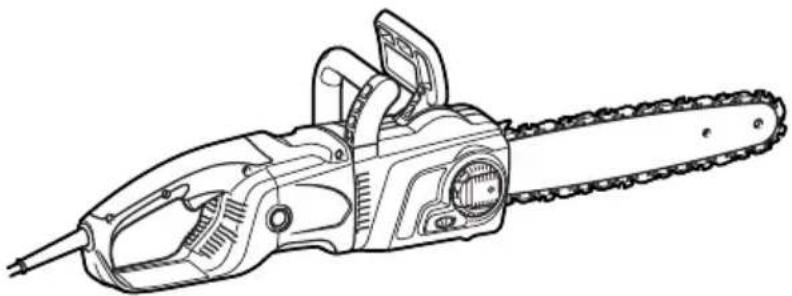
natural_image
Line drawing of a chain-linking power tool (no text or symbols)014371


natural_image
Line drawing of hands using a chainsaw to cut a metal strip (no text or symbols)1 014316 2 006909
natural_image
Line drawing of a person using a power saw to cut a wooden block (no text or symbols)
text_image
Diagram illustrating a mechanical or electrical setup with labeled components and directional arrows indicating movement or flow.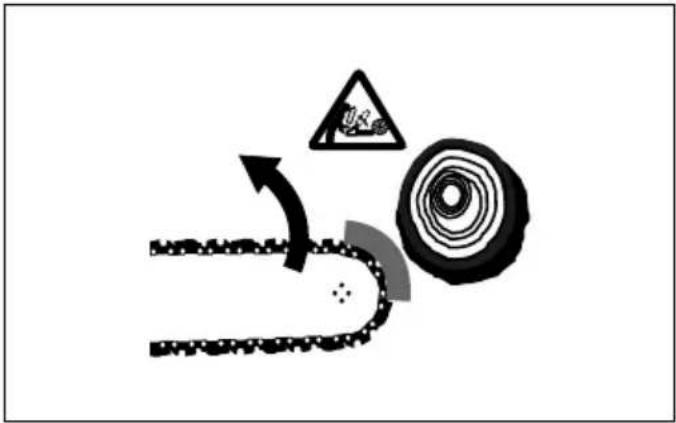
natural_image
Diagram illustrating a mechanical or environmental process with a gear-like structure, a circular gear, and a warning sign (no text or symbols present)3 006919 4 014317
text_image
Technical diagram of a chain-linking device with numbered parts for identification5 014372
text_image
Technical diagram of a chain saw with numbered parts for identification6 014373
text_image
Technical diagram of a chain saw with numbered parts for identification and assembly reference.7 014514
natural_image
Line drawing of a car interior panel with two circular buttons and mechanical components (no text or symbols)8 014453 9 014393
text_image
11 9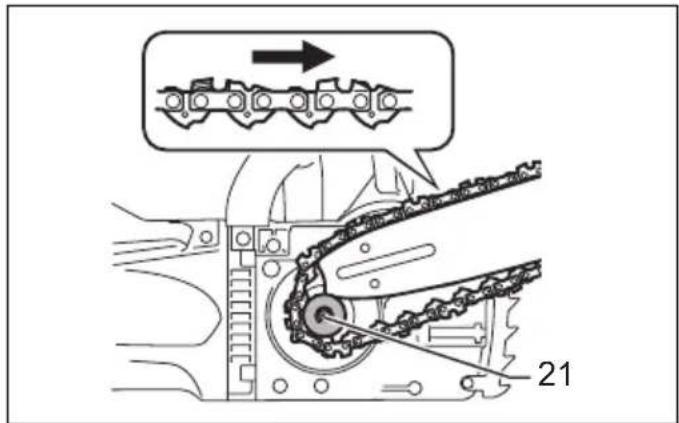
text_image
Technical diagram showing mechanical assembly with labeled components and directional arrow10 014457 11 014448
text_image
7 22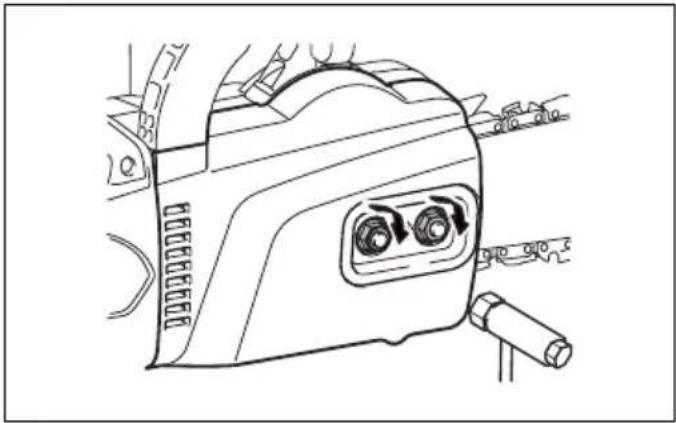
natural_image
Line drawing of a car interior with two circular vent slots and attached pipes (no text or symbols)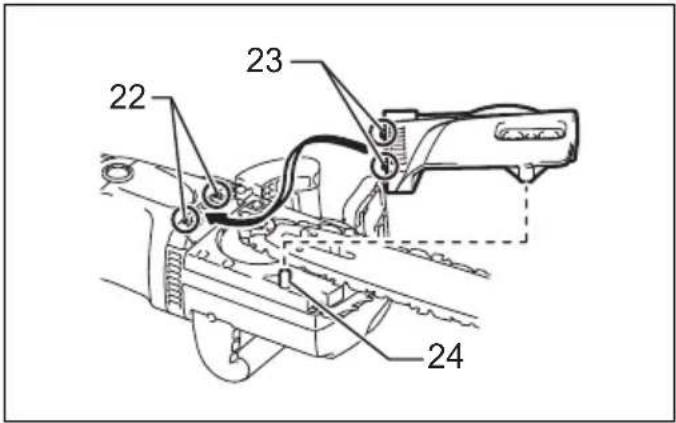
text_image
22 23 2412 014380 13 014454
text_image
25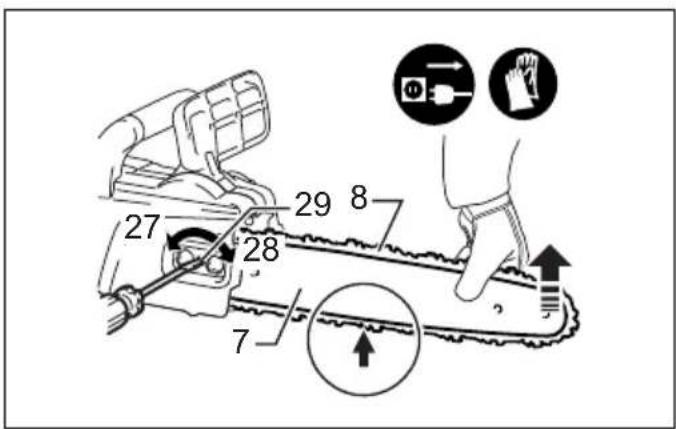
text_image
27 28 29 8 7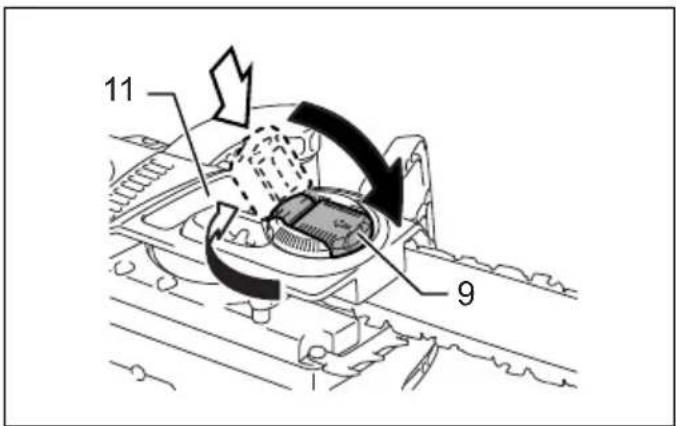
text_image
11 914 014394 15 014515
text_image
2616 014516 17 014680
text_image
22 8 27 28 718 014682 19 014359
text_image
31 19 30 32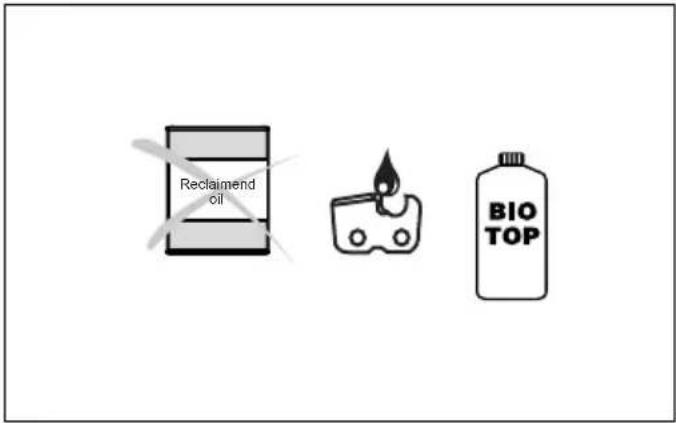
text_image
Reclaimend oil BIO TOP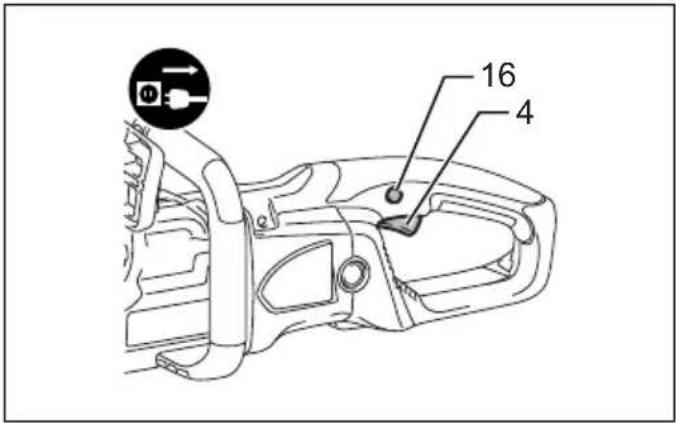
text_image
16 420 014376 21 006921
text_image
35← 34→ 6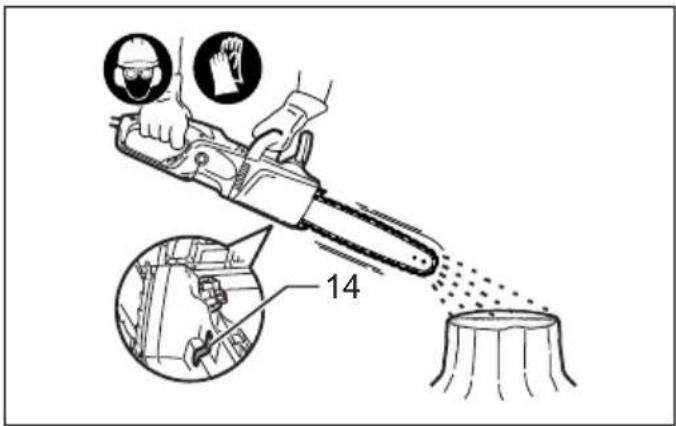
text_image
Diagram illustrating a manual tool emitting wood, with safety icons and a numbered annotation '14' indicating a step.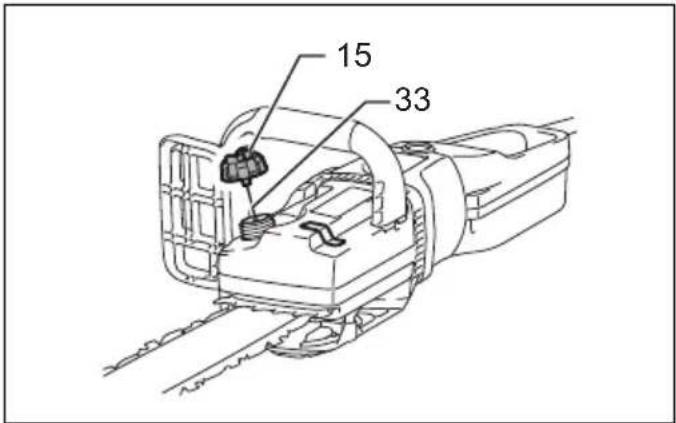
text_image
15 3322 014386 23 014387
text_image
35 34 624 014439 25 014517
text_image
Diagram showing car interior with a speech bubble indicating traffic flow and water drop icons26 014392 27 014389
text_image
13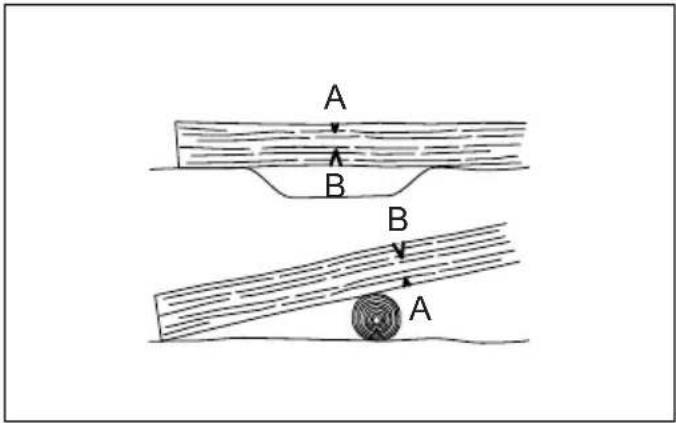
text_image
A B B A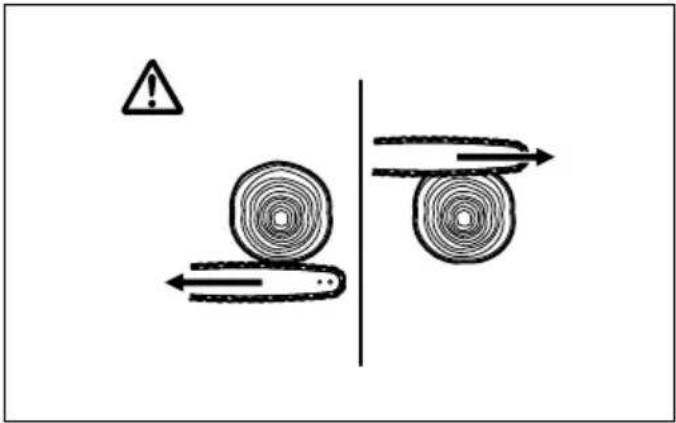
natural_image
Diagram showing two circular objects with directional arrows, one marked with a warning triangle (no text or symbols)28 006914 29 006915
text_image
2 1/2 45° 45° = 36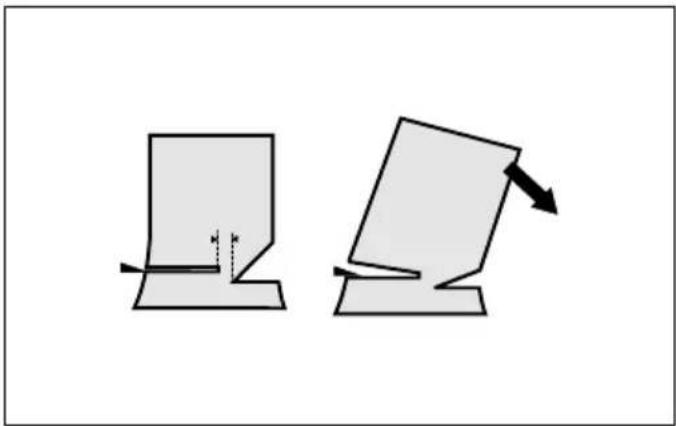
natural_image
Two abstract geometric shapes with arrows indicating movement or transformation (no text or symbols)
natural_image
Line drawing of a person using a chainsaw on a wooden surface (no text or symbols)30 014390 31 006917
natural_image
Two abstract geometric shapes with arrows indicating movement or transformation (no text or symbols)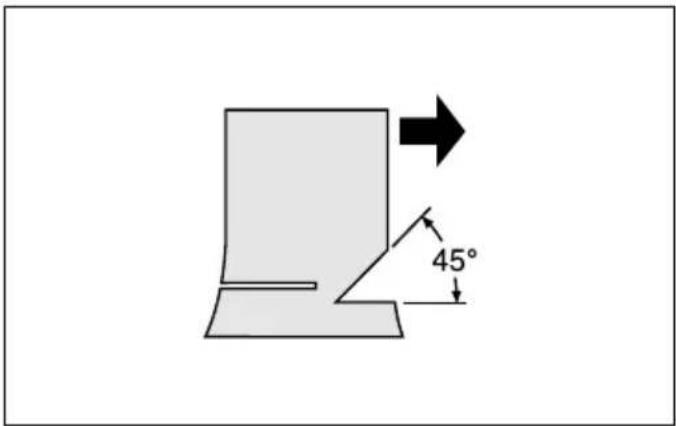
text_image
45°32 006918 33 006923
text_image
37 38 39 39 3834 009202 35 006924
text_image
Diagram illustrating safety symbols and correct/incorrect actions for cleaning or inspection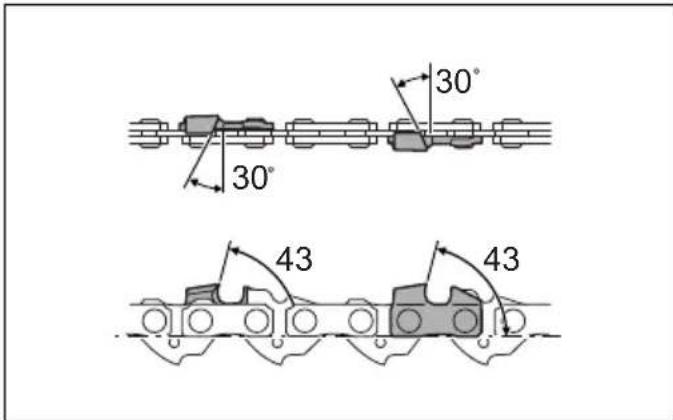
text_image
30° 30° 43 43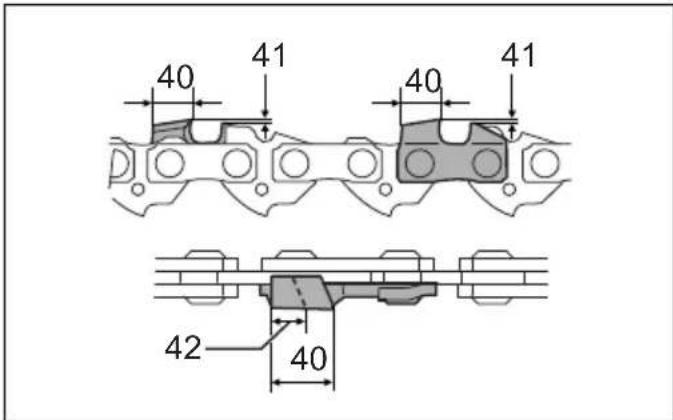
text_image
40 41 40 41 42 4036 014456 37 014455
text_image
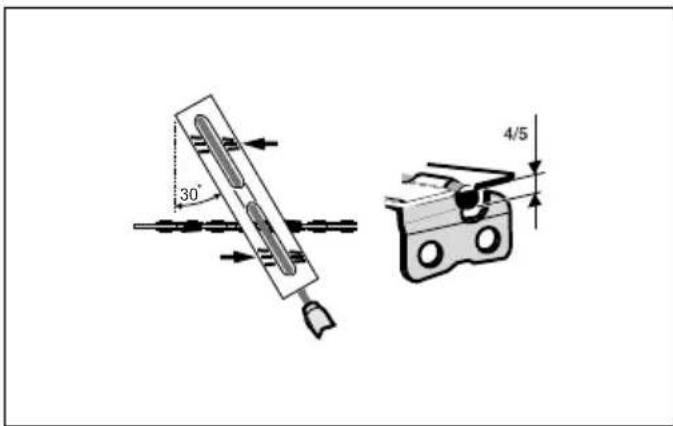
30° 4/5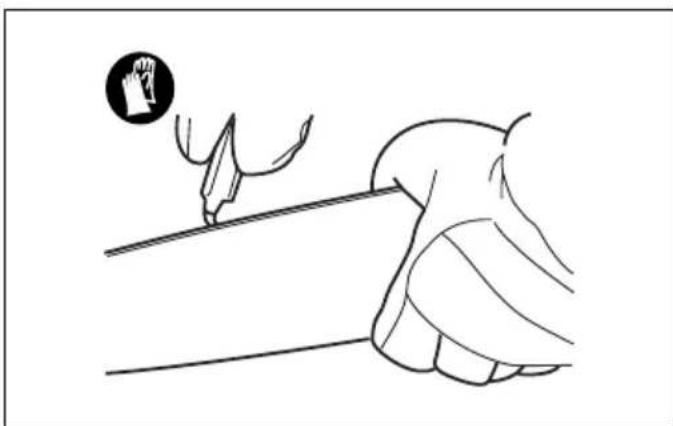
natural_image
Illustration of a hand holding a pen on a line, with a circular icon showing a pointing hand (no text or symbols)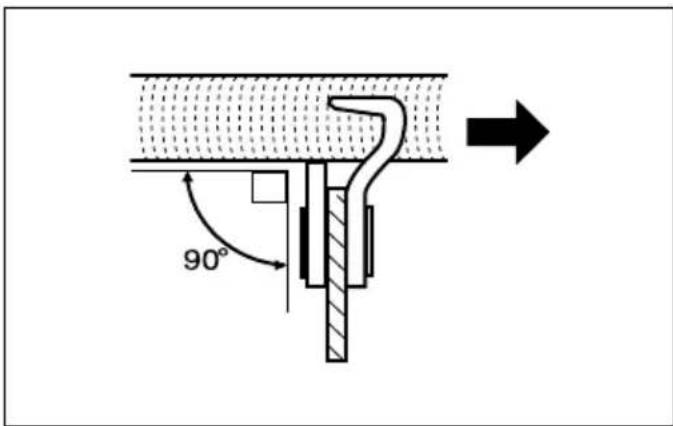
text_image
90°38 006927 39 006928
text_image
30° 4/5
natural_image
Illustration of a hand holding a pen on a line, with a circular icon showing a pointing hand (no text or symbols)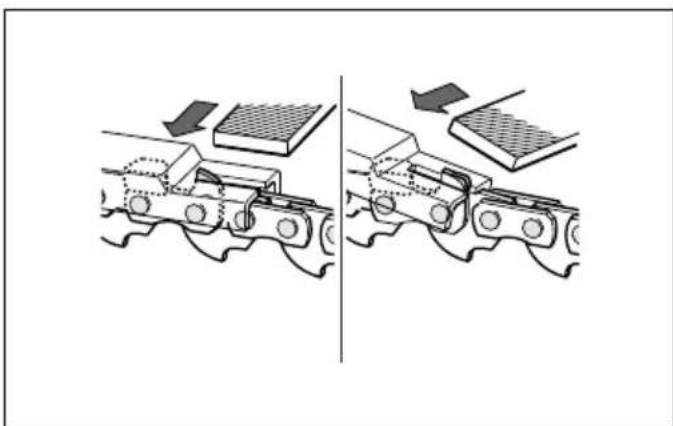
natural_image
Diagram showing two mechanical components with arrows indicating motion, no text or symbols present40 014344 41 006930
text_image
44 45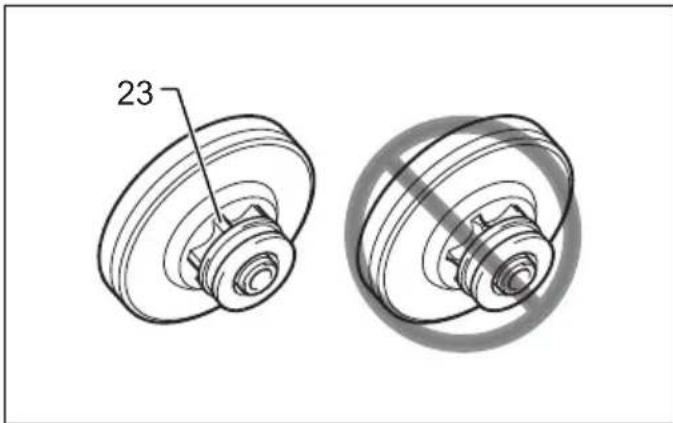
text_image
2342 014391 43 014513
text_image
46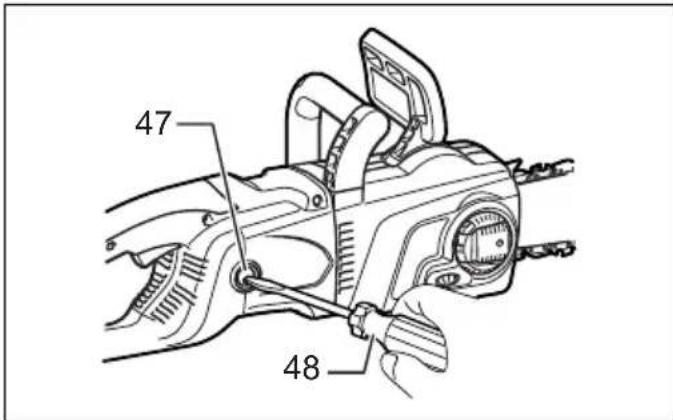
text_image
47 4844 001145 45 014395
ENGLISH (Original instructions)
Explanation of general view
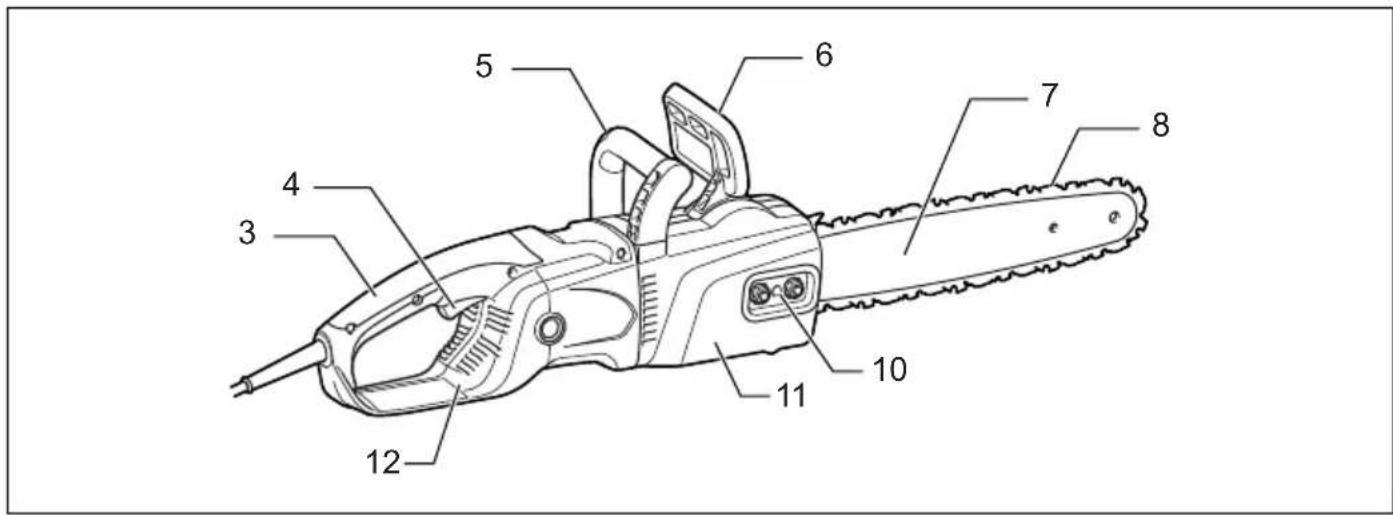
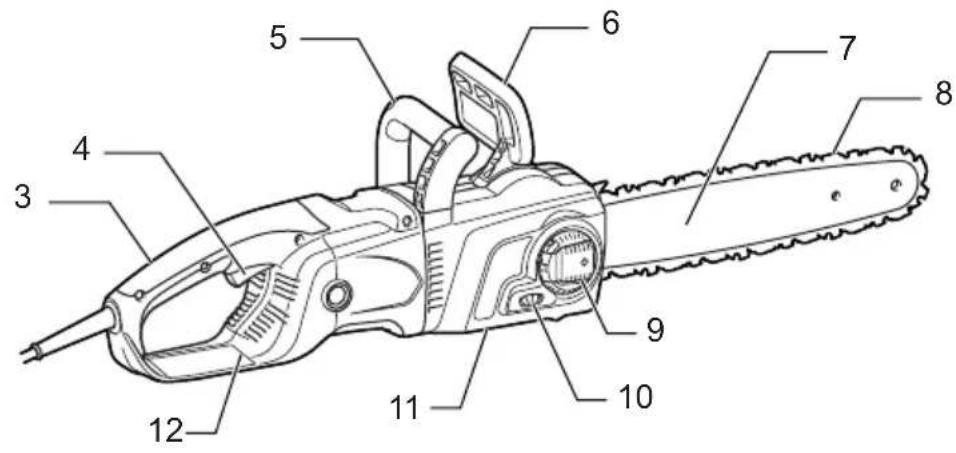
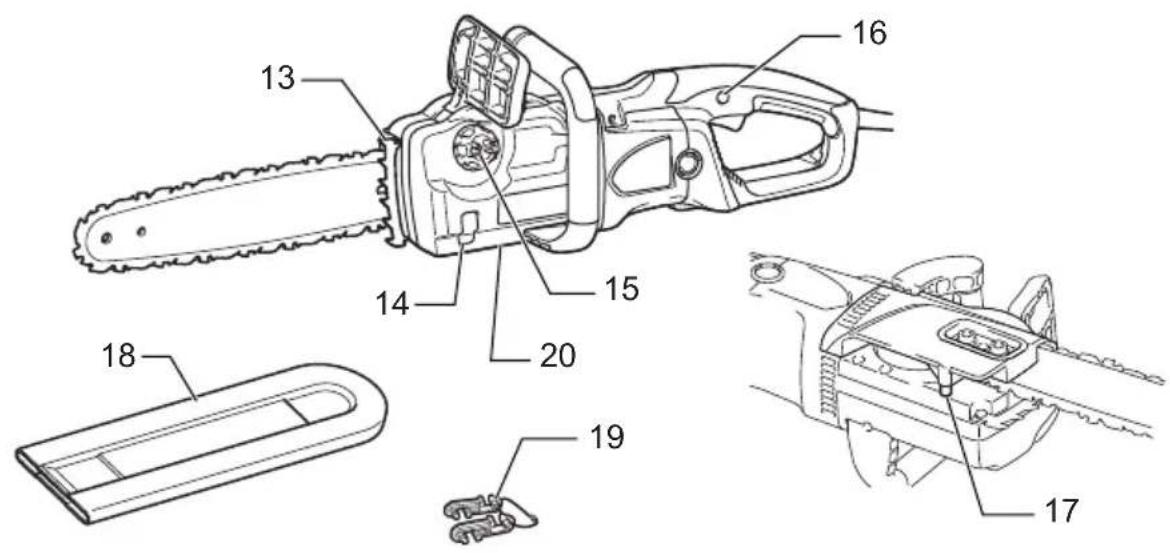
| 1. Chain brake applied | 18. Guide bar cover | 33. Strap |
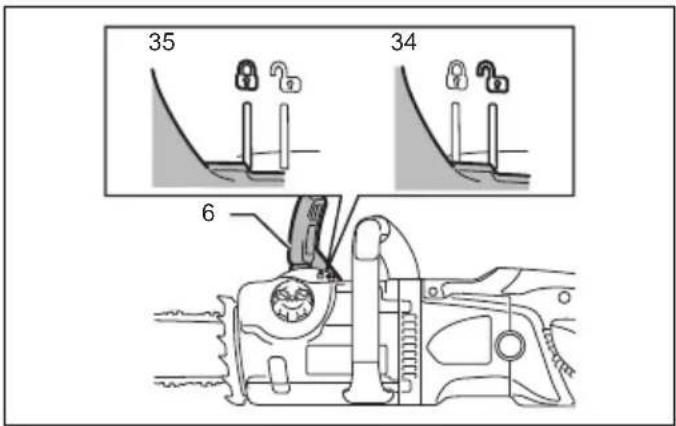
| 2. Chain brake released | 19. Cord hook | 34. Lock |
| 3. Rear handle | 20. Adjusting screw for oil pump (at the bottom) | 35. Unlock |
| 4. Switch trigger | 36. Felling area | |
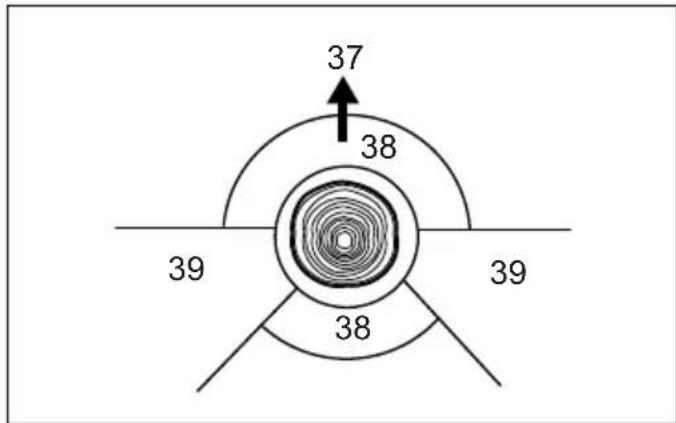
| 5. Front handle | 21. Sprocket | 37. Felling direction |
| 6. Front hand guard | 22. Hole | 38. Danger zone |
| 7. Guide bar | 23. Hook | 39. Escape route |
| 8. Saw chain | 24. Pin | 40. Cutting length |
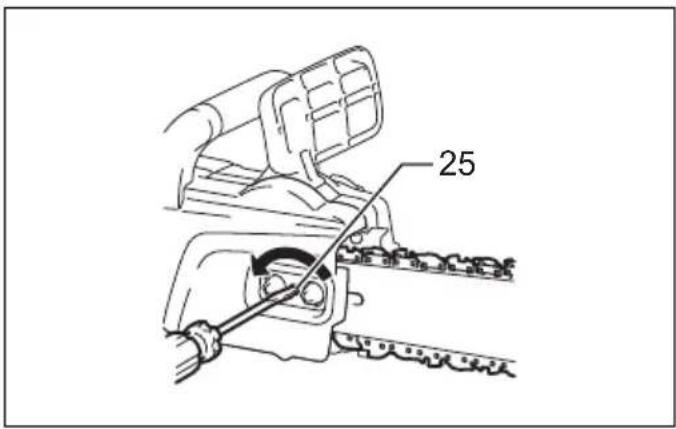
| 9. Lever | 25. Adjusting screw | 41. Distance between cutting edge and depth gauge |
| 10. Adjusting screw/dial | 26. Adjusting dial | |
| 11. Sprocket cover | 27. Loosen | 42. Minimum 3 mm |
| 12. Rear hand guard | 28. Tighten | 43. Side plate angle |
| 13. Spike bumper | 29. Chain adjusting screw | 44. Oil guide groove |
| 14. Oil level sight | 30. Tool's cord | 45. Oil feed hole |
| 15. Oil filler cap | 31. Extension cord | 46. Limit mark |
| 16. Lock-off button | 32. Plug and socket (the shape may differ from country to country) | 47. Brush holder cap |
| 17. Chain catcher | 48. Screwdriver |
SPECIFICATIONS
| Model | ES-154 | ES-154 TLC | ES-164 | ES-164 TLC | ES-174 | ES-174 TLC | ES-184 | ES-184 TLC | |
| ES-2131 | ES-2131 TLC | ES-2136 | ES-2136 TLC | ES-2141 | ES-2141 TLC | ES-2146 | ES-2146 TLC | ||
| Max. chain speed 14.5 | m/s (870 m/min) | ||||||||
| Standard guide bar | Bar length 3 | 300 mm 350 mm 400 mm | 450 mm | ||||||
| Cutting length | 260 mm 320 mm | 355 mm 415 mm | |||||||
| Guide bar type | Sprocket nose bar | ||||||||
| Standard saw chain | Type 492 (91PX) | ||||||||
| Pitch 3/8" | |||||||||
| No. of drive links | 46 52 56 62 | ||||||||
| Recommended guide bar length | 300 - 450 mm | ||||||||
| Overall length (without guide bar) | 505 mm | ||||||||
| Net weight | *1 | 4.7 kg | |||||||
| *2 | 5.4 - 5.7 kg | ||||||||
| Extension cable (optional) | DIN 57282/H07RN-F L = 30 m max., 3 x 1.5 mm2 | ||||||||
- Due to our continuing program of research and development, the specifications herein are subject to change without notice.
- Specifications may differ from country to country.
*1 Weight, without the saw chain, guide bar, guide bar cover and oil.
*2 The lightest and heaviest combination of weight, according to EPTA-Procedure 01/2014. The weight may differ depending on the attachment(s).
Symbol
END218-8
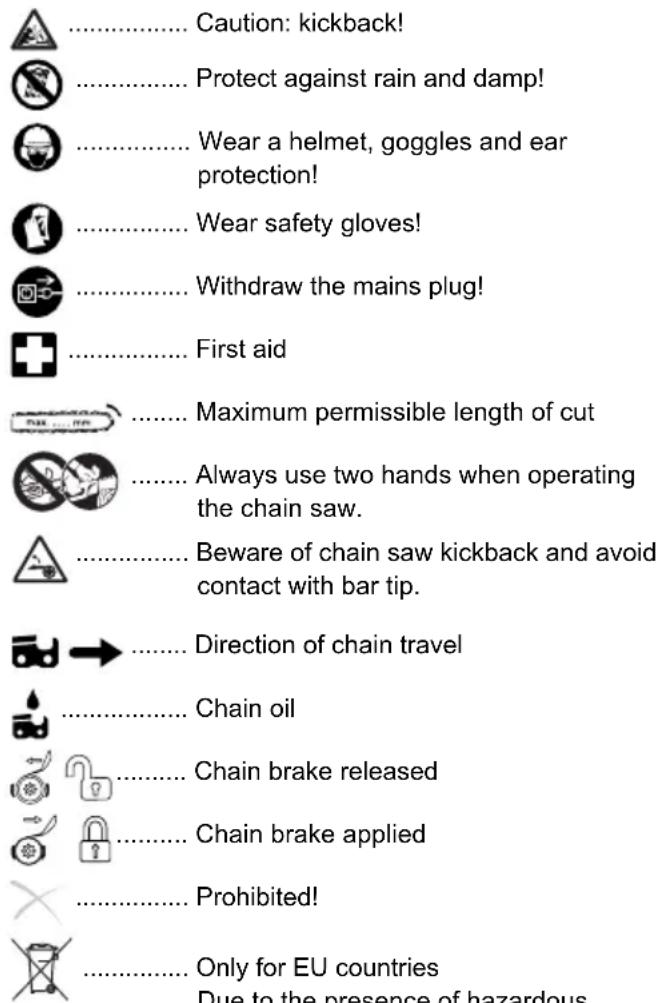
The followings show the symbols which may be used for the equipment. Be sure that you understand their meaning before use.


..... Read instruction manual and follow the warnings and safety instructions.


..... Wear eye protection.


...... Wear ear protection.

DOUBLE INSULATION

...... Caution: particular care and attention required!

...... Caution: withdraw the mains plug immediately if the cable is damaged!
text_image
Caution: kickback! Protect against rain and damp! Wear a helmet, goggles and ear protection! Wear safety gloves! Withdraw the mains plug! First aid Maximum permissible length of cut Always use two hands when operating the chain saw. Beware of chain saw kickback and avoid contact with bar tip. Direction of chain travel Chain oil Chain brake released Chain brake applied Prohibited! Only for EU countries Due to the presence of hazardous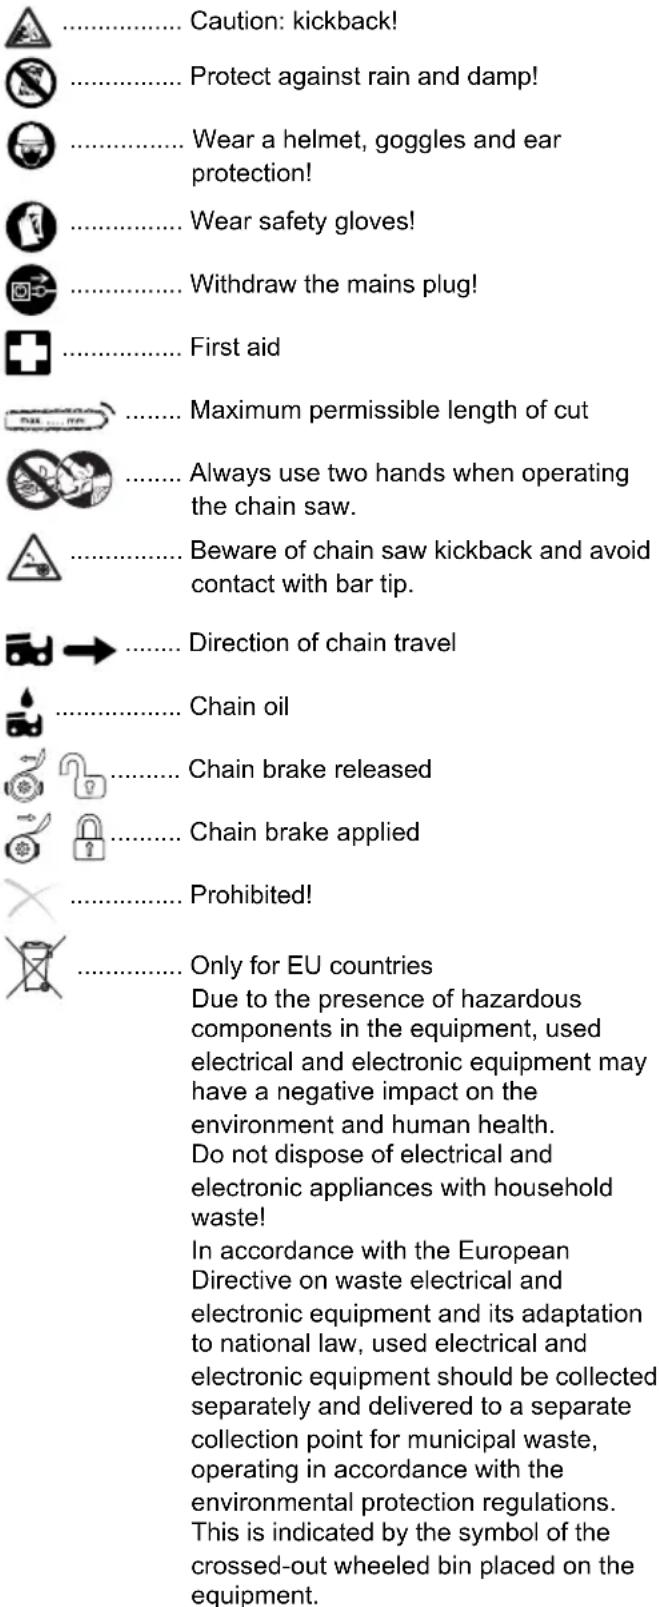
text_image
Caution: kickback! Protect against rain and damp! Wear a helmet, goggles and ear protection! Wear safety gloves! Withdraw the mains plug! First aid Maximum permissible length of cut Always use two hands when operating the chain saw. Beware of chain saw kickback and avoid contact with bar tip. Direction of chain travel Chain oil Chain brake released Chain brake applied Prohibited! Only for EU countries Due to the presence of hazardous components in the equipment, used electrical and electronic equipment may have a negative impact on the environment and human health. Do not dispose of electrical and electronic appliances with household waste! In accordance with the European Directive on waste electrical and electronic equipment and its adaptation to national law, used electrical and electronic equipment should be collected separately and delivered to a separate collection point for municipal waste, operating in accordance with the environmental protection regulations. This is indicated by the symbol of the crossed-out wheeled bin placed on the equipment.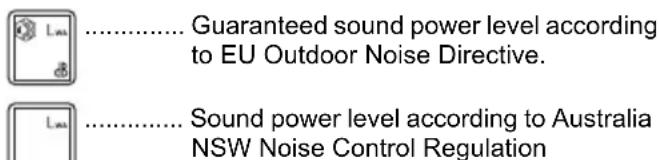
text_image
Guaranteed sound power level according to EU Outdoor Noise Directive. Sound power level according to Australia NSW Noise Control RegulationIntended use ENE085-1 The tool is intended for cutting lumbers and logs.
Power supply ENF002-2 The tool should be connected only to a power supply of the same voltage as indicated on the nameplate, and can only be operated on single-phase AC supply. They are
double-insulated and can, therefore, also be used from sockets without earth wire.
General power tool safety warnings
GEA010-2
WARNING: Read all safety warnings, instructions, illustrations and specifications provided with this power tool. Failure to follow all instructions listed below may result in electric shock, fire and/or serious injury.
Save all warnings and instructions for future reference.
The term “power tool” in the warnings refers to your mains-operated (corded) power tool or battery-operated (cordless) power tool.
Chain saw safety warnings GEB037-9
- Keep all parts of the body away from the saw chain when the chain saw is operating. Before you start the chain saw, make sure the saw chain is not contacting anything. A moment of inattention while operating chain saws may cause entanglement of your clothing or body with the saw chain.
- Always hold the chain saw with your right hand on the rear handle and your left hand on the front handle. Holding the chain saw with a reversed hand configuration increases the risk of personal injury and should never be done.
- Hold the chain saw by insulated gripping surfaces only, because the saw chain may contact hidden wiring or its own cord. Saw chains contacting a "live" wire may make exposed metal parts of the chain saw "live" and could give the operator an electric shock.
- Wear eye protection. Further protective equipment for hearing, head, hands, legs and feet is recommended. Adequate protective equipment will reduce personal injury from flying debris or accidental contact with the saw chain.
- Do not operate a chain saw in a tree, on a ladder, from a rooftop, or any unstable support. Operation of a chain saw in this manner could result in serious personal injury.
- Always keep proper footing and operate the chain saw only when standing on fixed, secure and level surface. Slippery or unstable surfaces may cause a loss of balance or control of the chain saw.
- When cutting a limb that is under tension, be alert for spring back. When the tension in the wood fibres is released, the spring loaded limb may strike the operator and/or throw the chain saw out of control.
- Use extreme caution when cutting brush and saplings. The slender material may catch the saw chain and be whipped toward you or pull you off balance.
-
Carry the chain saw by the front handle with the chain saw switched off and away from your body. When transporting or storing the chain saw, always fit the guide bar cover. Proper handling of the chain saw will reduce the likelihood of accidental contact with the moving saw chain.
-
Follow instructions for lubricating, chain tensioning and changing the bar and chain. Improperly tensioned or lubricated chain may either break or increase the chance for kickback.
- Cut wood only. Do not use chain saw for purposes not intended. For example: do not use chain saw for cutting metal, plastic, masonry or non-wood building materials. Use of the chain saw for operations different than intended could result in a hazardous situation.
- Do not attempt to fell a tree until you have an understanding of the risks and how to avoid them. Serious injury could occur to the operator or bystanders while felling a tree.
- Causes and operator prevention of kickback: Kickback may occur when the nose or tip of the guide bar touches an object, or when the wood closes in and pinches the saw chain in the cut.
Tip contact in some cases may cause a sudden reverse reaction, kicking the guide bar up and back towards the operator.
Pinching the saw chain along the top of the guide bar may push the guide bar rapidly back towards the operator.
Either of these reactions may cause you to lose control of the saw which could result in serious personal injury. Do not rely exclusively upon the safety devices built into your saw. As a chain saw user, you should take several steps to keep your cutting jobs free from accident or injury.
Kickback is the result of chain saw misuse and/or incorrect operating procedures or conditions and can be avoided by taking proper precautions as given below:
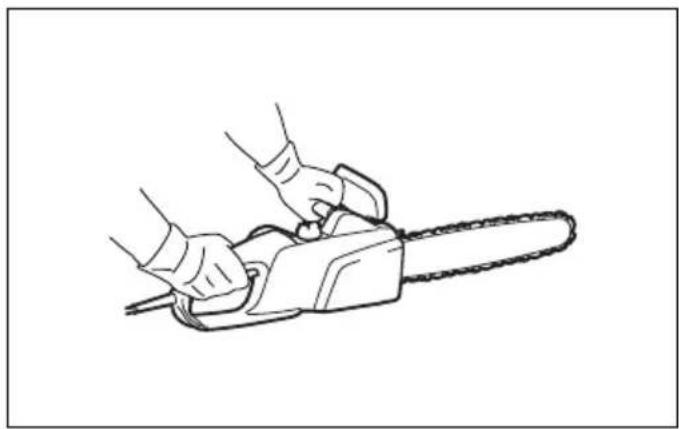
- Maintain a firm grip, with thumbs and fingers encircling the chain saw handles, with both hands on the saw and position your body and arm to allow you to resist kickback forces. Kickback forces can be controlled by the operator, if proper precautions are taken. Do not let go of the chain saw. (Fig. 1)
- Do not overreach and do not cut above shoulder height. This helps prevent unintended tip contact and enables better control of the chain saw in unexpected situations.
- Only use replacement guide bars and saw chains specified by the manufacturer. Incorrect replacement guide bars and saw chains may cause chain breakage and/or kickback.
- Follow the manufacturer's sharpening and maintenance instructions for the saw chain. Decreasing the depth gauge height can lead to increased kickback.
ADDITIONAL SAFETY RULES
- Read the instruction manual in order to familiarize yourself with operation of the chain saw.
- Before using the chain saw for the first time, arrange to have instruction in its operation. If this is not possible, at least practice cutting round timber on a trestle before beginning work.
- The chain saw must not be used by children or young persons under 18 years of age. Young persons over
16 years of age may be exempted from this restriction if they are undergoing training under the supervision of an expert.
- Working with the chain saw requires a high level of concentration. Do not work with the saw if you are not feeling fit and well. Carry out all work calmly and carefully.
- Never work under the influence of alcohol, drugs or medication.
Proper use
- The chain saw is intended solely for cutting wood. Do not use it for example to cut plastic or porous concrete.
- Only use the chain saw for operations described in this instruction manual. Do not, for example, use it to trim hedges or for similar purposes.
- The chain saw must not be used for forestry work, i.e. for felling and limbing standing timber. The chain saw cable does not provide the operator with the mobility and safety required for such work.
- The chain saw is not intended for commercial use.
- Do not overload the chain saw.
Personal protective equipment
- Clothing must be close-fitting, but must not obstruct mobility.
-
Wear the following protective clothing during work:
-
A tested safety helmet, if a hazard is presented by falling branches or similar;
• A face mask or goggles; - Suitable ear protection (ear muffs, custom or mouldable ear plugs). Octave brand analysis upon request.
• Firm leather safety gloves; - Long trousers manufactured from strong fabric;
- Protective dungarees of cut-resistant fabric;
- Safety shoes or boots with non-slip soles, steel toes, and cut-resistant fabric lining;
- A breathing mask, when carrying out work which produces dust (e.g. sawing dry wood).
Protection against electric shock

The chain saw must not be used in wet weather or damp environments, as the electric motor is not waterproof.
- Only plug the saw into sockets in tested electrical circuits. Check that the system voltage matches that on the rating plate. Ensure that a 16 A line fuse is fitted. Saws used in the open air must be connected to a residual current-operated circuit-breaker with an operating current no higher than 30 mA.

Should the connecting cable be damaged, withdraw the mains plug immediately.
Safe working practices
- Before starting work, check that the chain saw is in proper working order and that its condition complies with the safety regulations. Check in particular that:
• The chain brake is working properly;
• The run-down brake is working properly;
- The bar and the sprocket cover are fitted correctly;
- The chain has been sharpened and tensioned in accordance with the regulations;
- The mains cable and mains plug are undamaged; Refer to the "CHECKS" section.
- Always ensure in particular that the extension cable used is of adequate cross-section (see "SPECIFICATIONS"). When using a cable reel, wind the cable completely off the reel. When using the saw in the open air, ensure that the cable employed is intended for open-air use and is rated accordingly.
- Keep the cord away from the cutting area and to position cord so that it will not be caught on branches, and the like, during cutting.
- Do not operate the chain saw in the vicinity of flammable dust or gases, as the motor generates sparks and presents a risk of explosion.
- Work only on firm ground and with a good footing. Pay particular attention to obstacles (e.g. the cable) in the working area. Take particular care where moisture, ice, snow, freshly cut wood or bark may make surfaces slippery. Do not stand on ladders or trees when using the saw.
- Take particular care when working on sloping ground; rolling trunks and branches pose a potential hazard.
- Never cut above shoulder height.
- Hold the chain saw with both hands when switching it on and using it. Hold the rear handle with your right hand and the front handle with your left. Hold the handles firmly with your thumbs. The bar and the chain must not be in contact with any objects when the saw is switched on. (Fig. 1)
- Clean the area to be cut of foreign objects such as sand, stones, nails, wire, etc. Foreign objects damage the bar and chain, and can lead to dangerous kickback.
- Take particular care when cutting in the vicinity of wire fences. Do nut cut into the fence, as the saw may kick back.
- Do not cut into the ground.
- Cut pieces of wood singly, not in bunches or stacks.
- Avoid using the saw to cut thin branches and roots, as these can become entangled in the chain saw. Loss of balance presents a hazard.
- Use a secure support (trestle) when cutting sawn timber.
- Do not use the chain saw to prise off or brush away pieces of wood and other objects.
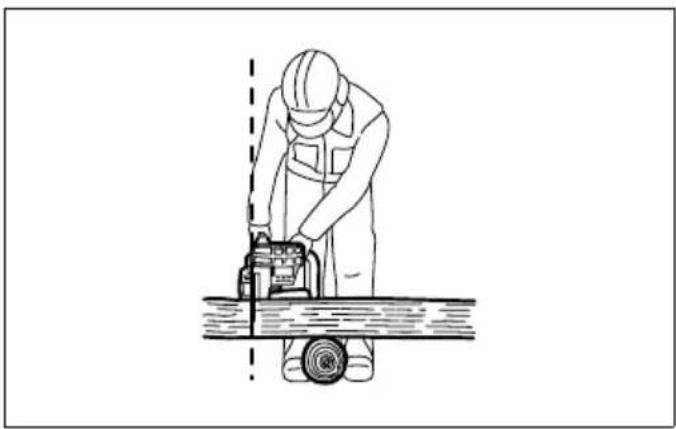
- Guide the chain saw such that no part of your body is within the extended path of the saw chain (see figure). (Fig. 2)
- When moving around between sawing operations, apply the chain brake in order to prevent the chain from being operated unintentionally. Hold the chain saw by the front handle when carrying it, and do not keep your finger on the switch.
- Withdraw the mains plug when taking breaks or leaving the chain saw unattended. Leave the chain saw where it cannot present a hazard.
Kickback
- Hazardous kickback may arise during work with the chain saw. Kickback arises when the tip of the bar (in particular the upper quarter) comes into contact with wood or another solid object. This causes the
chainsaw to be deflected in the direction of the operator. (Fig. 3)
-
In order to avoid kickback, observe the following:
-
Never begin the cut with the tip of the bar.
- Never use the tip of the bar for cutting. Take particular care when resuming cuts which have already been started.
- Start the cut with the chain running.
- Always sharpen the chain correctly. In particular, set the depth gauge to the correct height.
- Never saw through several branches at a time.
- When limbing, take care to prevent the bar from coming into contact with other branches.
- When bucking, keep clear of adjacent trunks. Always observe the bar tip.
- Use a trestle.
Safety features
- Always check that the safety features are in working order before starting work. Do not use the chain saw if the safety features are not working properly.
- Chain brake:
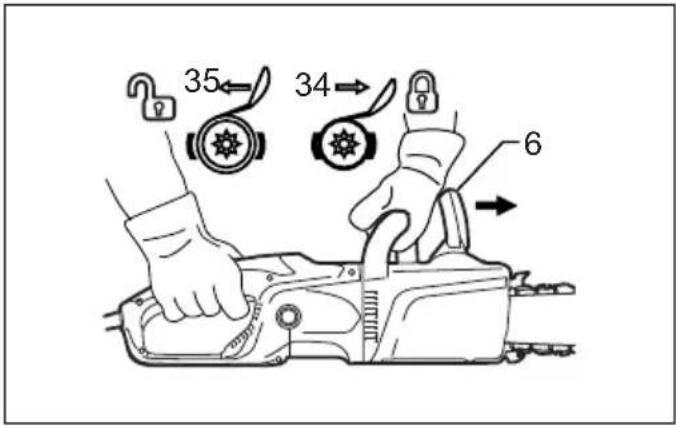
The chain saw is fitted with a chain brake which brings the saw chain to a standstill within a fraction of a second. It is activated when the hand guard is pushed forwards. The saw chain then stops within 0.15 s, and the power supply to the motor is interrupted. (Fig. 4)
- Run-down brake:
The chain saw is equipped with an run down brake which brings the saw chain to an immediate stop when the ON/OFF switch is released. This prevents the saw chain from running on when switched off, and thus presenting a hazard.
- The front and rear hand guards protect the user against injury from pieces of wood which may be thrown backwards, or a broken saw chain.
- The trigger lockout prevents the chain saw from being switched on accidentally.
- The chain catcher protects the user against injury should the chain jump or break.
Transport and storage

When the chain saw is not in use or is being transported, withdraw the mains plug and fit the guide bar cover supplied with the saw. Never carry or transport the saw with the saw chain running.
- Carry the chain saw by the front handle only, with the bar pointing backwards.
- Keep the chain saw in a secure, dry and locked room out of the reach of children. Do not store the chain saw outdoors.
Maintenance
- Withdraw the plug from the socket before carrying out any adjustments or maintenance.
- Check the power cable regularly for damage to the insulation.
- Clean the chain saw regularly.
- Have any damage to the plastic housing repaired properly and immediately.
- Do not use the saw if the switch trigger is not working properly. Have it properly repaired.
-
Under no circumstances should any modifications be made to the chain saw. Your safety is at risk.
-
Do not carry out maintenance or repair work other than that described in this instruction manual. Any other work must be carried out by authorized service centers.
- Only use genuine replacement parts and accessories intended for your model of saw. The use of other parts increases the risk of accident.
- We accept no responsibility for accidents or damage should non-approved bars, saw chains or other replacement parts or accessories be used.
First aid

Do not work alone. Always work within shouting distance of a second person.
- Always keep a first-aid box to hand. Replace any items taken from it immediately.
- Should you request assistance in the event of an accident, state the following:
• Where did the accident happen?
• What happened?
• How many persons are injured?
• What injuries do they have?
• Who is reporting the accident?
NOTE:
Individuals with poor circulation who are exposed to excessive vibration may experience injury to blood vessels or the nervous system.
Vibration may cause the following symptoms to occur in the fingers, hands or wrists: "Falling asleep" (numbness), tingling, pain, stabbing sensation, alteration of skin colour or of the skin.
If any of these symptoms occur, see a physician!
SAVE THESE INSTRUCTIONS.

WARNING:
DO NOT let comfort or familiarity with product (gained from repeated use) replace strict adherence to safety rules for the subject product. MISUSE or failure to follow the safety rules stated in this instruction manual may cause serious personal injury.
DESIGNATION OF PARTS
(Nut model: the sprocket cover is tightened by nuts.) For Model ES-154, ES-164, ES-174, ES-184, ES-2131, ES-2136, ES-2141, ES-2146 (Fig. 5)
(Lever model: the sprocket cover is tightened by lever.) For Model ES-154 TLC, ES-164 TLC, ES-174 TLC, ES-184 TLC, ES-2131 TLC, ES-2136 TLC, ES-2141 TLC, ES-2146 TLC (Fig. 6)
(For all models) (Fig. 7)
ASSEMBLY

CAUTION:
• Always be sure that the tool is switched off and unplugged before carrying out any work on the tool.
Removing or installing sprocket cover
To remove the sprocket cover, perform the following steps:
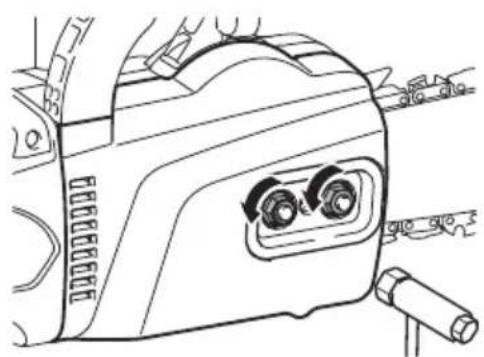
(For nut models) (Fig. 8)
Loosen the nut.
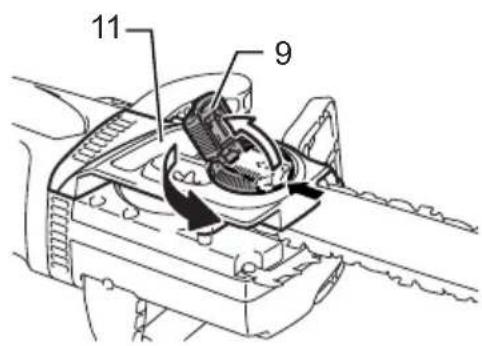
(For lever models) (Fig. 9)
Press and fully open the lever until it stops. Turn the lever counterclockwise.
To install the sprocket cover, perform the above steps in reverse.
Removing or installing saw chain
CAUTION:
• Always wear gloves when installing or removing the saw chain.
To install the saw chain, perform the following steps:
1. Make sure the direction of the chain. The arrow mark on the chain shows the direction of the chain. (Fig. 10)
2. Fit in one end of the saw chain on the top of the guide bar and the other end of it around the sprocket.
3. Place the guide bar on the chain saw.
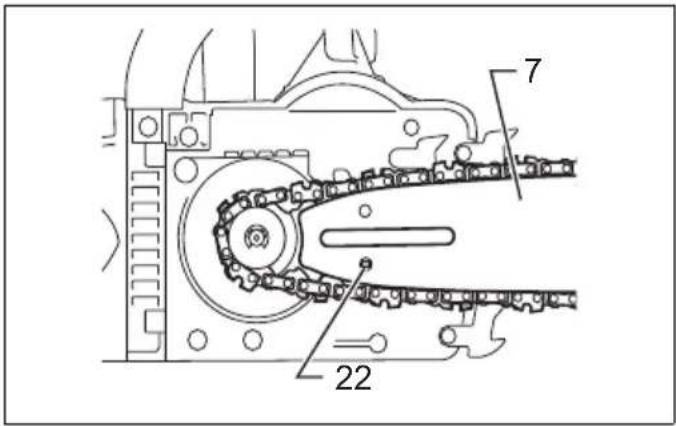
4. Align the tension slide with the hole of the guide bar.
(Fig. 11)
5. Place the sprocket cover so that the hooks fit alongside the holes and the pin fits its counterpart on the sprocket cover. (Fig. 12)
6. Tighten the nuts or turn the lever clockwise fully to secure the sprocket cover, then loosen it a bit for tension adjustment. (Fig. 13 & 14)
7. Turn the chain adjusting screw / dial to adjust the saw chain tension.
(See the chapter on “Adjusting saw chain tension” for procedure.)
8. Tighten the nuts or turn the lever clockwise to secure the sprocket cover.
To remove the saw chain, perform the following steps:
-
Loosen the sprocket cover.
-
(For nut models) Turn the chain adjusting screw counterclockwise to release the saw chain tension. (For lever models) Turn the adjusting dial to “-” direction to loosen the saw chain tension. (Fig. 15 & 16)
-
Remove the sprocket cover.
-
Remove the saw chain and guide bar from the chain saw.
Adjusting saw chain tension
The saw chain may become loose after many hours of use. From time to time check the saw chain tension before use.
- Loosen the sprocket cover lightly.
- Lift up the guide bar tip slightly.
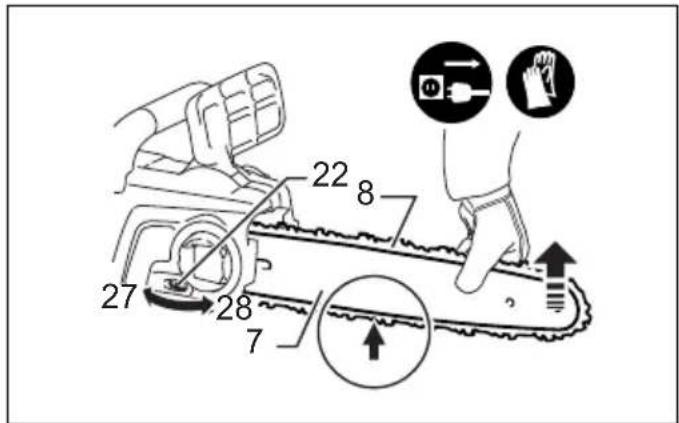
- Turn the adjusting screw/dial to adjust saw chain tension. (Fig. 17 & 18)
- Tighten the saw chain until the lower side of the saw chain fits in the guide bar rail (see circle).
- Keep holding the guide bar lightly, tighten the sprocket cover after adjusting the chain tension. Make sure that the saw chain does not lose at lower side.
Make sure the saw chain fits snugly against the lower side of the bar.
CAUTION:
- Do not tighten the saw chain too much. Excessively high tension of saw chain may cause breakage of saw
chain, wear of the guide bar and breakage of the adjusting dial.
- A chain which is too loose can jump off the bar, and therefore presents an accident risk.
- Carry out the procedure of installing or removing saw chain in a clean place free from sawdust and the like.
Engaging extension cord

CAUTION:
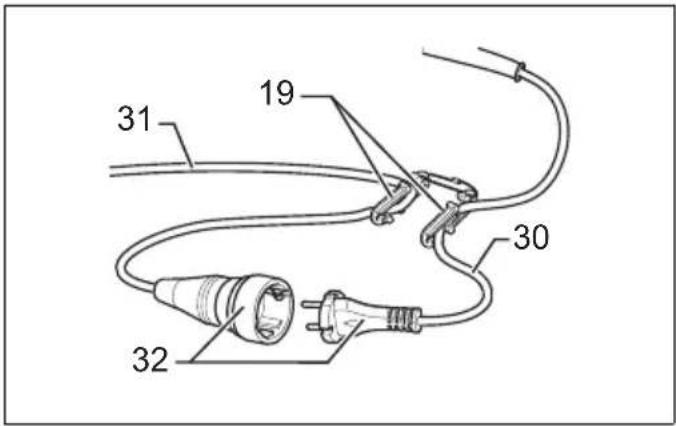
- Make sure that the extension cord is unplugged to the mains outlet. (Fig. 19)
When engaging the extension cord, secure it to the chain saw's cord with the cord hook.
Attach the cord hook about 100 - 200 mm from the extension cord connector. This helps prevent unintentional disconnection.
OPERATION

CAUTION:
- Hold the tool firmly with right hand on the rear handle and left hand on the front handle when performing the tool.
Switch action (Fig. 20)

CAUTION:
- Always be sure that the tool is switched off and unplugged before checking function on the switch trigger.
- Before plugging in the tool, always check to see that the switch trigger actuates properly and returns to the "OFF" position when released.
To prevent the switch trigger from being accidentally pulled, a lock-off button is provided.
To start the tool, depress the lock-off button and pull the switch trigger. Release the switch trigger to stop.
Lubrication

CAUTION:
• Always be sure that the tool is switched off and unplugged before lubricating the saw chain.
Lubricate the saw chain and bar using biologically degradable saw chain oil with an adhesion agent. The adhesion agent in the saw chain oil prevents the oil from being thrown off the saw excessively quickly. Mineral oils must not be used, as they are harmful to the environment.
(Fig. 21)

CAUTION:
- Do not operate the chain saw when the tank is empty. Replenish the oil in due time before the tank is empty.
- Prevent the oil from coming into contact with the skin and eyes. Contact with the eyes causes irritation. In the event of eye contact, flush the affected eye immediately with clear water, then consult a doctor at once.
- Never use waste oil. Waste oil contains carcinogenic substances. The contaminants in waste oil cause accelerated wear of the oil pump, the bar and the chain. Waste oil is harmful to the environment.
To fill the oil, perform the following steps: (Fig. 22)
-
Clean the area around the oil filler cap thoroughly to prevent any dirt from entering the oil tank.
-
Unscrew the oil filler cap and add oil up to the lower edge of the filler neck.
- Screw the oil filler cap firmly back in place.
- Wipe away any spilt chain oil carefully.
NOTE:
- When the chain saw is used for the first time, it may take up to two minutes for the saw chain oil to begin its lubricating effect upon the saw mechanism. Run the saw without load until it does so (see “CHECKS”).
- When filling the chain oil for the first time, or refilling the tank after it has been completely emptied, add oil up to the bottom edge of the filler neck. The oil delivery may otherwise be impaired.
- Use the saw chain oil exclusively for Makita/Dolmar chain saws or equivalent oil available in the market.
- Never use oil including dust and particles or volatile oil.
- When pruning trees, use botanical oil. Mineral oil may harm trees.
- Before the cutting operation, make sure that the provided oil tank cap is screwed in place.
CHECKS
Before starting work, carry out the following checks:
Checking the chain tension
WARNING:
• Always withdraw the mains plug before checking the chain tension, and wear safety gloves.
(For nut models) (Fig. 17)
(For lever models) (Fig. 18)
Make sure the saw chain fits snugly against the lower side of the bar (see circle).
Check the chain tension frequently, as new chains are subject to elongation.
Excessively high tension of saw chain may cause breakage of saw chain, wear of the guide bar and breakage of the adjusting dial.
A chain which is too loose can jump off the bar, and therefore presents an accident risk.
If the chain is too loose: Refer to the section titled "Adjusting saw chain tension" and adjust the saw chain tension again.
Checking the switch action
CAUTION:
Before plugging in the tool, always check to see that the switch trigger actuates properly and returns to the "OFF" position when released.
To prevent the switch trigger from being accidentally pulled, a lock-off button is provided.
To start the tool, depress the lock-off button and pull the switch trigger. Release the switch trigger to stop.
Do not pull the switch trigger hard without depressing the lock-off button. This may cause switch breakage.
Checking the chain brake
NOTE:
- If the chain saw fails to start, check whether the chain brake is released. To release the chain brake, pull the hand guard backwards firmly until you feel it engage.
(Fig. 23 & 24)
Check the chain brake as follows:
- Hold the chain saw with both hands when switching it on. Hold the rear handle with your right hand, the front handle with your left. Make sure that the bar and the chain do not contact with any object.
- First press the lock-off button, then the switch trigger. The saw chain starts immediately.
- Press the front hand guard forwards using the back of your hand. Make sure that the saw chain comes to an immediate standstill.

CAUTION:
- If the saw chain does not stop immediately, do not use the saw under any circumstances. Consult DOLMAR authorized service centers.
Checking the run-down brake
Switch on the chain saw.
Release the switch trigger completely. Make sure the saw chain comes to a standstill within a second.

CAUTION:
- If the saw chain does not stop immediately, do not use the saw under any circumstances. Consult DOLMAR authorized service centers.
Checking the chain oiler
Before starting work, check the oil level in the tank, and the oil delivery.
The oil level can be seen in the oil level sight shown in the figure. (Fig. 25)
Check the oil delivery as follows:
Start the chain saw.
With the saw running, hold the saw chain approximately 15 cm above a tree trunk or the ground. If lubrication is adequate, the oil spray will produce a light oil trace.
Observe the wind direction, and do not expose yourself to the oil spray unnecessarily.

CAUTION:
- If an oil trace is not formed, do not use the saw. The lifespan of the chain will otherwise be reduced. Check the oil level. Clean the oil feed groove and the oil feed hole in the bar (refer to "MAINTENANCE").
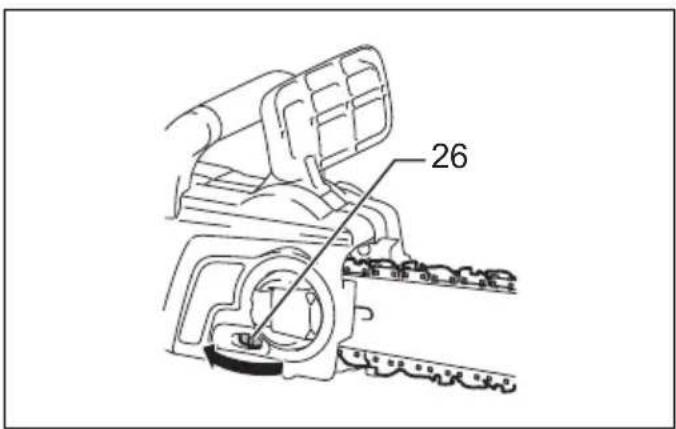
Adjusting the chain lubrication (Fig. 26)
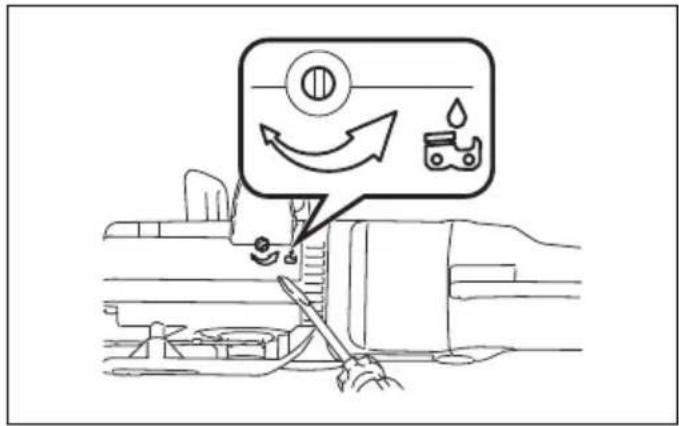
You can adjust the oil pump feed rate with the adjusting screw.
WORKING WITH THE CHAIN SAW

CAUTION:
- The first time user should, as a minimum practice, do cutting logs on a saw-horse or cradle.
- When sawing precut timber, use a safe support (saw horse or cradle). Do not steady the workpiece with your foot, and do not allow anyone else to hold or steady it.
- Secure round pieces against rotation.
- Keep all parts of the body away from the saw chain when the motor is operating.
- Hold the chain saw firmly with both hands when the motor is running.
- Do not overreach. Keep proper footing and balance at all times.
Bucking (Fig. 27)
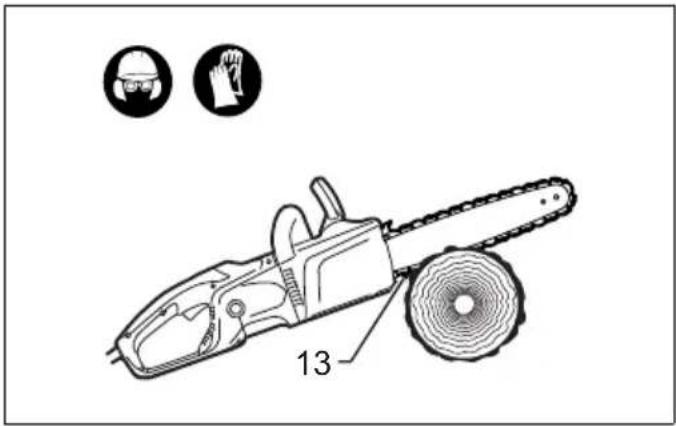
For bucking cuts, rest the spike bumper shown in the figure on the wood to be cut.
With the saw chain running, saw into the wood, using the rear handle to raise the saw and the front one to guide it. Use the spike bumper as a pivot.
Continue the cut by applying slight pressure to the front handle, easing the saw back slightly. Move the spike bumper further down the timber and raise the front handle again.
When making several cuts, switch the chain saw off between cuts.

CAUTION:
- If the upper edge of the bar is used for cutting, the chain saw may be deflected in your direction if the chain becomes trapped. For this reason, cut with the lower edge, so that the saw will be deflected away from your body. (Fig. 28)
Cut wood under tension on the pressure side (A) first. Then make the final cut on the tension side (B). This prevents the bar from becoming trapped. (Fig. 29)
Limbing

CAUTION:
- Limbing may only be performed by trained persons. A hazard is presented by the risk of kick-back.
When limbing, support the chain saw on the trunk if possible. Do not cut with the tip of the bar, as this presents a risk of kickback.
Pay particular attention to branches under tension. Do not cut unsupported branches from below.
Do not stand on the felled trunk when limbing.
Burrowing and parallel-to-grain cuts

CAUTION:
- Burrowing and parallel-to-grain cuts may only be carried out by persons with special training. The possibility of kickback presents a risk of injury.
Perform parallel-to-grain cuts at as shallow an angle as possible. Carry out the cut as carefully as possible, as the spike bumper cannot be used. (Fig. 30)
Felling

CAUTION:
- Felling work may only be performed by trained persons. The work is hazardous.
Observe local regulations if you wish to fell a tree.
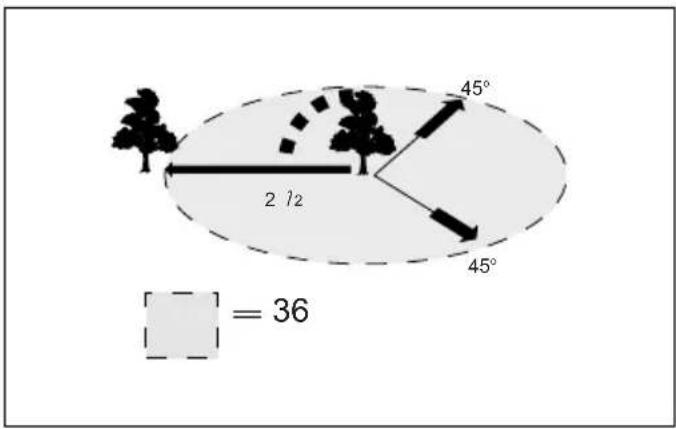
(Fig. 31)
– Before starting felling work, ensure that:
(1) Only persons involved in the felling operation are in the vicinity;
(2) Any person involved has an unhindered path of retreat through a range of approximately 45^ either side of the felling axis. Consider the additional risk of tripping over electrical cables;
(3) The base of the trunk is free of foreign objects, roots and ranches;
(4) No persons or objects are present over a distance of 2 1/2 tree lengths in the direction in which the tree will fall.
- Consider the following with respect to each tree:
- Direction of lean;
- Loose or dry branches;
- Height of the tree;
- Natural overhang;
-
Whether or not the tree is rotten.
-
Consider the wind speed and direction. Do not carry out felling work if the wind is gusting strongly.
- Trimming of root swellings: Begin with the largest swellings. Make the vertical cut first, then the horizontal cut.
- Cut a scarf: The scarf determines the direction in which the tree will fall, and guides it. It is made on the side towards which the tree is to fall. Cut the scarf as close to the ground as possible. First make the horizontal cut to a depth of 1/5 - 1/3 of the trunk diameter. Do not make the scarf too large. Then make the diagonal cut. (Fig. 32)
- Cut any corrections to the scarf across its entire width.
- Make the back cut a little higher than the base cut of the scarf. The back cut must be exactly horizontal. Leave approximately 1/10 of the trunk diameter between the back cut and the scarf.
The wood fibers in the uncut trunk portion act as a hinge. Do not cut right through the fibers under any circumstances, as the tree will otherwise fall unchecked. Insert wedges into the back cut in time. (Fig. 33)
- Only plastic or aluminum wedges may be used to keep the back cut open. The use of iron wedges is prohibited.
- Stand to the side of the falling tree. Keep an area clear to the rear of the falling tree up to an angle of 45^ either side of the tree axis (refer to the "felling area" figure). Pay attention to falling branches.
- An escape path should be planned and cleared as necessary before cuts are started. The escape path should extend back and diagonally to the rear of the expected line of fall as illustrated in figure. (Fig. 34)
MAINTENANCE

CAUTION:
- Always be sure that the tool is switched off and unplugged before attempting to perform inspection or maintenance.
- Always wear gloves when performing any inspection or maintenance.
- Never use gasoline, benzine, thinner, alcohol or the like. Discoloration, deformation or cracks may result. Carry out the maintenance work described below at regular intervals. Warranty claims will be accepted only if these operations have been performed regularly and properly.
Only maintenance work described in this instruction manual may be performed by the user. Any other work must be carried out by DOLMAR authorized service centers.
Cleaning the chain saw
Clean the saw regularly with a clean rag. The handles, in particular, must be kept free of oil.
Checking the plastic housing
Carry out regular visual inspections of all parts of the housing. If any parts are damaged, have them repaired immediately and properly in DOLMAR authorized service centers.
Sharpening the saw chain
CAUTION:
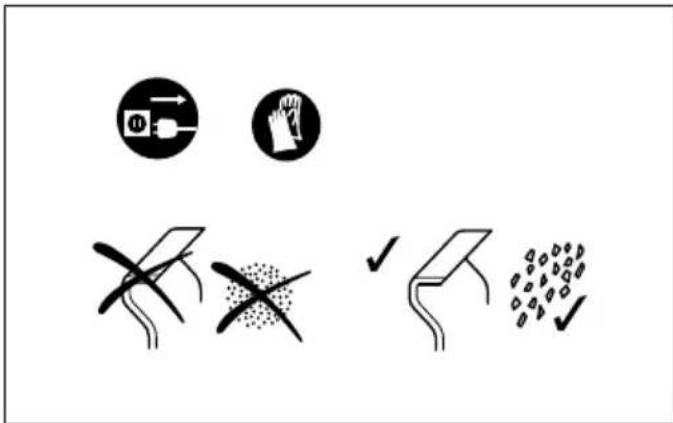
• Always withdraw the mains plug and wear safety gloves when performing work on the saw chain.
Sharpen the saw chain when: (Fig. 35)
– Mealy sawdust is produced when damp wood is cut;
– The chain penetrates the wood with difficulty, even when heavy pressure is applied;
– The cutting edge is obviously damaged;
- The saw pulls to the left or right in the wood. The reason for this behavior is uneven sharpening of the saw chain, or damage to one side only.
Sharpen the saw chain frequently, but remove only a little material each time.
Two or three strokes with a file are usually sufficient for routine resharpening. When the saw chain has been resharpened several times, have it sharpened in DOLMAR authorized service center.
Sharpening criteria:
- All cutter length must be equal. Cutters of differing length prevent the chain from running smoothly, and may cause the chain to break.
- Do not sharpen the chain once a minimum cutter length of 3mm has been reached. A new chain must then be fitted.
- The chip thickness is determined by the distance between the depth gauge (round nose) and the cutting edge.
- The best cutting results are obtained with following distance between cutting edge and depth gauge. Chain blade 492 (91PX): 0.65mm (Fig. 36)
WARNING:
- An excessive distance increases the risk of kick-back.
- The sharpening angle of 30^ must be the same on all cutters. Differences in angle cause the chain to run roughly and unevenly, accelerate wear, and lead to chain breaks.
- The side plate angle of the cutter is determined by the depth of penetration of the round file. If the specified file is used properly, the correct side plate angle is produced automatically.
– Side plate angle for each saw chain are as follows: Chain blade 492 (91PX): 80° (Fig. 37)
File and file guiding
- Use a special round file (optional accessory) for saw chains to sharpen the chain. Normal round files are not suitable.
– Diameter of the round file for each saw chain is as follows: Chain blade 492 (91PX): 4.0 mm - The file should only engage the cutter on the forward stroke. Lift the file off the cutter on the return stroke.
- Sharpen the shortest cutter first. Then the length of this shortest cutter becomes the standard for all other cutters on the saw chain.
– Guide the file as shown in the figure. (Fig. 38)
- The file can be guided more easily if a file holder (optional accessory) is employed. The file holder has markings for the correct sharpening angle of 30^ (align the markings parallel to the saw chain) and limits the depth of penetration (to 4/5 of the file diameter). (Fig. 39)
- After sharpening the chain, check the height of the depth gauge using the chain gauge tool (optional accessory). (Fig. 40)
- Remove any projecting material, however small, with a special flat file (optional accessory).
– Round off the front of the depth gauge again.
Cleaning the guide bar and lubricating the return sprocket

CAUTION:
- Always wear safety gloves for this task. Burrs present a risk of injury.
Check the running surfaces of the bar regularly for damage. Clean using a suitable tool, and remove burrs if necessary. (Fig. 41)
If the chain saw receives frequent use, lubricate the return sprocket bearing at least once a week. Before adding new fresh grease, carefully clean the 2 mm hole on the tip of the guide bar, then force a small quantity of multi-purpose grease (optional accessory) into the hole.
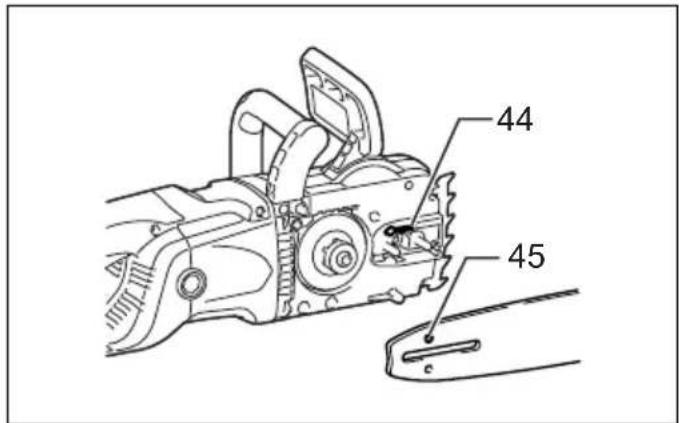
Cleaning the oil guide (Fig. 42)
– Clean the oil guide groove and the oil feed hole in the bar at regular intervals.
New saw chains
Use two or three saw chains alternately, so that the saw chain, sprocket and running surfaces of the bar wear evenly.
Turn the bar over when changing the chain so that the bar groove wears evenly.

CAUTION:
- Only use chains and bars which are approved for this model of saw (refer to "SPECIFICATIONS").
Before fitting a new saw chain, check the condition of the sprocket. (Fig. 43)

CAUTION:
- A worn sprocket damages a new saw chain. Have the sprocket replaced in this case.
Always fit a new locking ring when replacing the sprocket.
Maintaining the chain and run-down brakes
The braking systems are very important safety features. Like any other component of the chain saw, they are subject to a certain degree of wear. They must be inspected regularly by DOLMAR authorized service centers. This measure is for your own safety.
Replacing carbon brushes
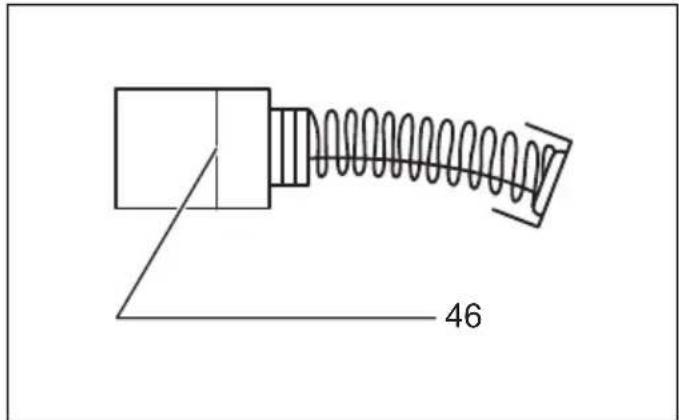
Remove and check the carbon brushes regularly. Replace when they wear down to the limit mark. Keep the carbon brushes clean and free to slip in the holders. Both carbon brushes should be replaced at the same time. Use only identical carbon brushes. (Fig. 44)
Use a screwdriver to remove the brush holder caps. Take out the worn carbon brushes, insert the new ones and secure the brush holder caps.
After replacing brushes, plug in the tool and break in brushes by running tool with no load for about 10 minutes.
(Fig. 45)
Storing tool
Biologically degradable saw chain oil can only be kept for a limited period. Beyond two years after manufacture, biological oils begin to acquire an adhesive quality, and cause damage to the oil pump and components in the lubricating system.
– Before taking the chain saw out of service for a longer period, empty the oil tank and fill it with a small quantity of engine oil (SAE 30).
- Run the chain saw briefly to flush all residue of the biological oil out of the tank, lubricating system and saw mechanism.
NOTE:
- When the chain saw is taken out of service, small quantities of chain oil leaks from it for some time afterwards. This is normal, and is not a sign of a fault. Store the chain saw on a suitable surface.
Before returning the chain saw to service, fill up with fresh BIOTOP saw chain oil.
To maintain product SAFETY and RELIABILITY, repairs, any other maintenance or adjustment should be performed by DOLMAR Authorized Service Centers, always using DOLMAR replacement parts.
TROUBLE SHOOTING
Before asking for repairs, conduct your own inspection first. If you find a problem that is not explained in the manual, do not attempt to dismantle the tool. Instead, ask Dolmar Authorized Service Centers.
| Malfunction status Possible cause Remedy | ||
| The chain saw does not start. | No power supply. | Connect to the power supply.Check the power supply. |
| Cable defective. | Stop using the tool immediately, and ask your local authorized service center. | |
| Tool malfunction. | Stop using the tool immediately, and ask your local authorized service center. | |
| Chain does not run. Chain brake | is engaged. Release chain brake. | |
| Insufficient performance. Carbon | brush worn down. Ask your local authorized service center for repair. | |
| No oil on the chain. | Oil tank is empty. Fill the oil tank. | |
| Oil guide groove is dirty. Clean the groove. | ||
| Oil pump adjusting screw incorrectly adjusted. | Adjust the oil pump feed rate. | |
| Chain does not stop even the chain brake is engaged. | Brake band worn down. | Stop using the tool immediately, and ask your local authorized service center. |
| The tool vibrates abnormally. | Loose guide bar or saw chain. | Adjust the guide bar and saw chain tension. |
| Tool malfunction. | Stop using the tool immediately, and ask your local authorized service center. | |
014314
OPTIONAL ACCESSORIES

CAUTION:
• These accessories or attachments are recommended for use with your Dolmar tool specified in this manual. The use of any other accessories or attachments might present a risk of injury to persons. Only use accessory or attachment for its stated purpose.
If you need any assistance for more details regarding these accessories, ask your local Dolmar Service Center.
- Saw chain
- Guide bar cover
- Guide bar
- Saw chain oil
NOTE:
- Some items in the list may be included in the tool package as standard accessories. They may differ from country to country.
Noise
The typical A-weighted noise level determined according to EN62841-4-1:
Sound pressure level ( L_pA ): 89 dB (A)
Sound power level ( L_WA ): 100 dB (A)
Uncertainty (K): 3 dB (A)
ENG907-1
- The declared noise emission value(s) has been measured in accordance with a standard test method and may be used for comparing one tool with another.
- The declared noise emission value(s) may also be used in a preliminary assessment of exposure.

WARNING:
- Wear ear protection.
- The noise emission during actual use of the power tool can differ from the declared value(s) depending on the ways in which the tool is used especially what kind of workpiece is processed.
- Be sure to identify safety measures to protect the operator that are based on an estimation of exposure in the actual conditions of use (taking
account of all parts of the operating cycle such as the times when the tool is switched off and when it is running idle in addition to the trigger time).
Vibration
The vibration total value (tri-axial vector sum) determined according to EN62841-4-1:
Work mode: cutting wood
Vibration emission ( a_h ): 6.7 m/s ^2
Uncertainty (K): 1.5 m/s ^4
ENG901-2
- The declared vibration total value(s) has been measured in accordance with a standard test method and may be used for comparing one tool with another.
- The declared vibration total value(s) may also be used in a preliminary assessment of exposure.
WARNING:
- The vibration emission during actual use of the power tool can differ from the declared value(s) depending on the ways in which the tool is used especially what kind of workpiece is processed.
- Be sure to identify safety measures to protect the operator that are based on an estimation of exposure in the actual conditions of use (taking account of all parts of the operating cycle such as the times when the tool is switched off and when it is running idle in addition to the trigger time).
EC Declaration of Conformity
For European countries only
The EC declaration of conformity is included as Annex A to this instruction manual.