ProGuard 16 MD - Vacuum Cleaner ProTeam - Free user manual and instructions
Find the device manual for free ProGuard 16 MD ProTeam in PDF.
| Type of vacuum | Wet/dry vacuum for commercial use |
| Tank capacity | 16 gallons (approx. 60.6 liters) |
| Motor type | Two-stage motor |
| Rated voltage | 120 V ~ |
| Power cord length | 11.5 ft (3.5 m) |
| Filtration system | Qwik Lock® cartridge filter for fine dust + wet filter screen |
| Drain system | Drain plug for liquids |
| Float mechanism | Yes, automatic suction shut-off when liquid level is high |
| Wheels | 2 x 8 in. wheels and 2 x 2 in. swivel casters |
| Warranty | 3 years on components, 3 years or 1,400 hours on motor |
| Included accessories | 1-1/2 in. flexible hose, 2 metal extension wands, brush, crevice tool, squeegee, tool holder, carry-all |
| Weight | Approx. 11 kg (empty, estimated) |
| Tank material | Durable plastic |
| Usage | Dry dust and liquid vacuuming |
| Features | Quick-change Qwik Lock® filter, retractable handle, integrated accessory storage |
| Maintenance | Regular filter cleaning, tank draining, wheel lubrication if needed |
Frequently Asked Questions - ProGuard 16 MD ProTeam
User questions about ProGuard 16 MD ProTeam
0 question about this device. Answer the ones you know or ask your own.
Ask a new question about this device
Download the instructions for your Vacuum Cleaner in PDF format for free! Find your manual ProGuard 16 MD - ProTeam and take your electronic device back in hand. On this page are published all the documents necessary for the use of your device. ProGuard 16 MD by ProTeam.
USER MANUAL ProGuard 16 MD ProTeam
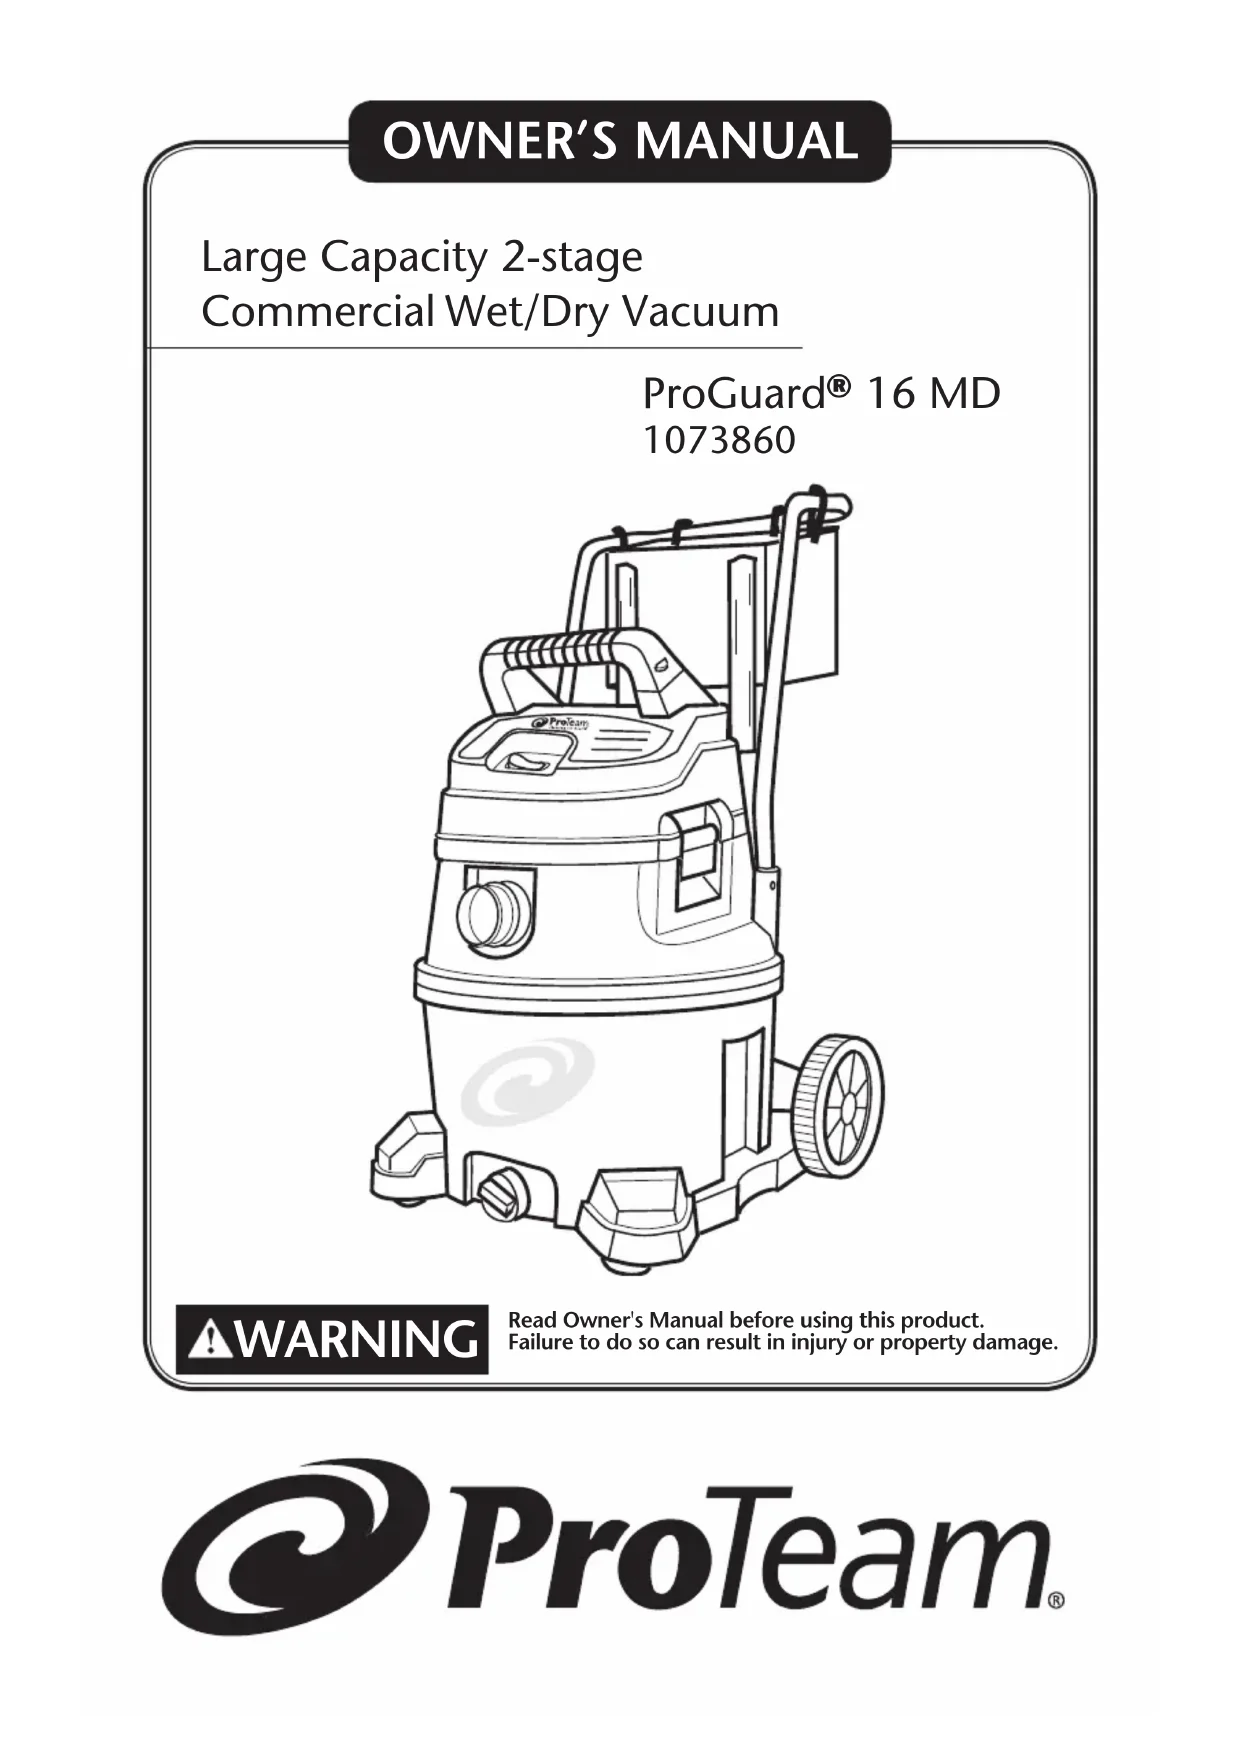
Large Capacity 2-stage
Commercial Wet/Dry Vacuum
ProGuard® 16 MD
1073860
WARNING
Read Owner's Manual before using this product. Failure to do so can result in injury or property damage.
TABLE OF CONTENTS
ProGuard® 16 MD, 16 Gallon Wet/Dry Vacuum
| Important Safety Instructions 1-2 | |
| Introduction | 3 |
| Grounding Instructions 4 | |
| Assembly | 5-7 |
| Filters | 8 |
| Operation | 9-10 |
| Accessories | 11 |
| Preventive Maintenance 11-13 | |
| Parts List 14-17 | |
| Limited Warranty 18-20 | |
| Spanish | 21-42 |
| French | 43-65 |
Go to www.pro-team.com to register your new Vacuum.
INSPECTION
Carefully unpack and inspect your new ProTeam Vacuum for shipping damage. Each unit is tested and thoroughly inspected before shipping. All returns must have a Return Authorization Number (RAN). To request an RAN or to ask questions regarding any shipping damage, contact ProTeam at 866.888.2168 or customerservice.proteam@emerson.com This Owner's Manual has important information for the use and safe operation of this machine. Read this manual carefully before starting the machine. Keep this manual available at all times and instruct all owners to read this manual. If instructions are not followed, an injury may occur or equipment, furniture or buildings may become damaged.
For new manuals please contact
ProTeam, Inc. at: customerservice.proteam@emerson.com
8100 W. Florissant Avenue, Building T, St. Louis, MO 63136
866.888.2168 or visit www.pro-team.com for a downloadable version.
The contents of this manual are based on the latest product information available at the time of publication. ProTeam reserves the right to make changes or improvements to its machines without notice.
IMPORTANT SAFETY INSTRUCTIONS
Safety is a combination of common sense, staying alert, and knowing how your Wet/Dry Vacuum cleaner ("Vacuum") works.
Safety Signal Words
DANGER: Indicates a hazardous situation which, if not avoided, will result in death or serious injury.
WARNING: Indicates a hazardous situation which, if not avoided, could result in death or serious injury.
CAUTION: Indicates a hazardous situation which, if not avoided, could result in minor or moderate injury. When using your Vacuum, always follow basic safety precautions including the following:
WARNING: Read Owner's Manual before using this product. To reduce the risk of fire, electric shock, or injury:
- Read and understand this manual and all labels on the Wet/Dry Vacuum before operating.
- Use only as described in this manual.
- DO NOT leave Vacuum running while unattended - you may fail to notice important signs indicating abnormal operation such as loss of suction, debris/liquid exiting the exhaust, or abnormal motor noises. Immediately stop using Vacuum if you notice these signs.
- DO NOT leave Vacuum when plugged in. Unplug from outlet when not in use and before servicing.
- Sparks inside the motor can ignite flammable vapors or dust. To reduce the risk of fire or explosion, DO NOT use near combustible liquids, gases, or dusts, such as gasoline or other fuels, lighter fluid, cleaners, oil-based paints, natural gas, coal dust, magnesium dust, grain dust, aluminum dust, or gun powder.
- DO NOT vacuum anything that is burning or smoking, such as cigarettes, matches, or hot ashes.
- DO NOT vacuum drywall dust, cold fireplace ash, or other fine dusts with standard filter. These may pass through the filter and be exhausted back into the air. Use a fine dust filter instead.
- To reduce the risk of inhaling toxic vapors, DO NOT vacuum or use near toxic or hazardous materials.
- To reduce the risk of electric shock, DO NOT expose to rain or allow liquid to enter motor compartment. Store indoors.
- DO NOT allow to be used as a toy. Close attention is necessary when used by or near children.
- DO NOT use with a torn filter or without the filter installed except when vacuuming liquids as described in this manual. Dry debris ingested by the impeller may damage the motor or be exhausted back into the air.
- Turn off Vacuum before unplugging.
- To reduce the risk of injury from accidental starting, unplug power cord before changing or cleaning filter.
- DO NOT unplug by pulling on cord. To unplug, grasp the plug, not the cord.
- DO NOT use with damaged cord, plug, or other parts. If your Vacuum is not working as it should, has missing parts, has been dropped, damaged, left outdoors, or dropped into water, call ProTeam Customer Service.
IMPORTANT SAFETY INSTRUCTIONS
(Continued)
- DO NOT pull or carry by cord, use cord as handle, close a door on cord, or pull cord around sharp edges or corners. Keep cord away from heated surfaces.
- DO NOT handle plug, switch, or the Vacuum with wet hands.
- Use only extension cords that are rated for outdoor use. Extension cords in poor condition or too small in wire size can pose fire and shock hazards. To reduce the risk of these hazards, be sure the cord is in good condition and that liquid does not contact the connection. DO NOT use an extension cord with conductors smaller than 16 gauge (AWG) in size. To reduce power loss, use a 14 gauge extension cord if 25 to 50 ft long and 12 gauge for 50 ft or longer.
- DO NOT put any object into ventilation openings. DO NOT vacuum with any ventilation openings blocked; keep free of dust, lint, hair, or anything that may reduce air flow.
20 Keep hair, loose clothing, fingers, and all parts of body away from openings and moving parts. - To reduce the risk of falls, use extra care when cleaning on stairs.
22 To reduce the risk of back injury or falls, do not lift a Vacuum that is heavy with liquid or debris. Partially empty the Vacuum by scooping debris or draining liquid to make it comfortable to lift.
23 To reduce the risk of personal injury or damage to Vacuum, use only ProTeam recommended accessories.
24 To reduce the risk of eye injury, wear safety eyewear. The operation of any utility Vacuum or blower can result in foreign objects being blown into the eyes, which can result in severe eye damage. - To reduce the risk of being struck by, or pulled down by, a rolling Vac, block the wheels when using on any uneven or sloped surface.
- Connect to a properly grounded outlet only. See Grounding Instructions.
CAUTION:
- To reduce the risk of hearing damage, wear ear protectors when using for extended time or in a noisy area.
- For dusty operations, wear dust mask, such as an N95 or P100 mask.
- Static shocks are common when the relative humidity of the air is low. vacuuming fine debris with your Vacuum can deposit static charge on the hose or Vacuum.
To reduce the frequency of static shocks when using this Vacuum, add moisture to the air with a humidifier.
Observe the following warnings that appear on the motor housing of your Vacuum:
WARNING - For your own safety, read and understand Owner's Manual.
Do not run unattended. Do not pick up hot ashes, coals, toxic, flammable or other hazardous materials. Don not use around explosive liquids or vapors.
WARNING - To reduce the risk of electric shock - Do not expose to rain - store indoors.
SAVE THESE INSTRUCTIONS
Violation of any of these instructions may void warranty
INTRODUCTION
TOOLS REQUIRED
Phillips Screwdriver
Hammer
Mallet
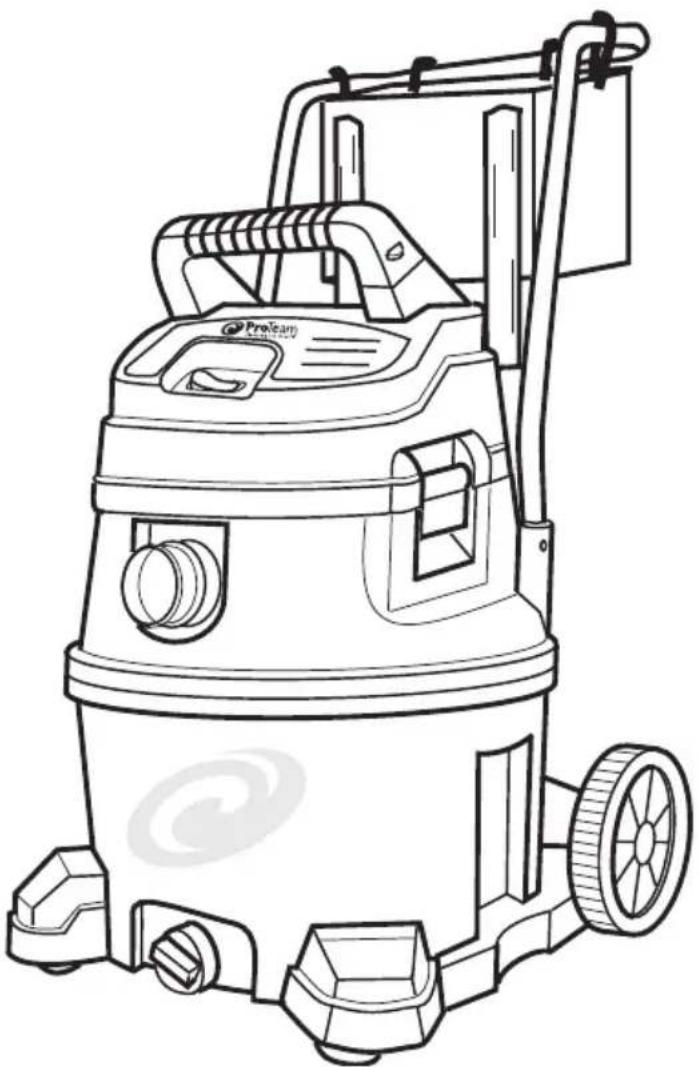
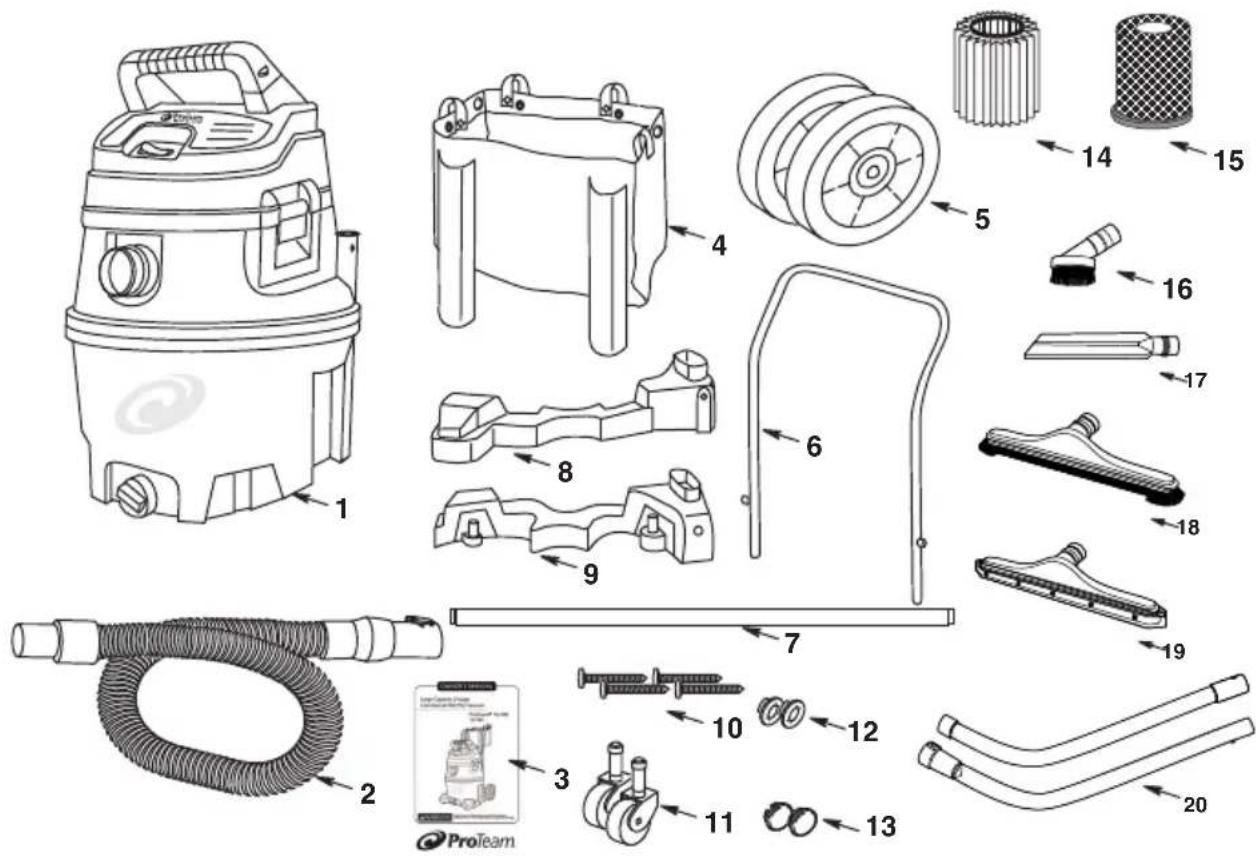
OVERVIEW
- 16 Gallon Wet/Dry Vacuum (1)
- Hose (1)
- Owner's Manual (1)
- Storage Bag (1)
- 8" Wheel (2)
- Metal Handle (1)
- Axle (1)
- Caddy, Right (1)
- Caddy, Left (1)
-
Screw, Type AB #10 x 1-3/4 (4)
-
2" Caster (2)
- 1/2" Cap Nut (2)
13.Wheel Caps (2) - Dry Filter (1)
- Wet Filter (1)
- Dust Brush 100110 (1)
- Crevice Tool 100107PT (1)
- Nylon Brush Floor Tool 100623 (1)
- Squeegee Tool 107199 (1)
- Two-Piece Wand 1 1/2" 101338 (1)
GROUNDING INSTRUCTIONS
THIS VACUUM MUST BE GROUNDED. If a Vacuum should malfunction or stop working, grounding provides a path of least resistance for electrical current, thereby reducing the risk of electrical shock. This unit is equipped with a cord that has an equipment-grounding conductor and grounding plug. The plug must be inserted in an appropriate outlet that is properly installed and grounded in accordance with all local codes and ordinances. Cutting off the ground wire or using a cord that is not equipped with a ground plug will void the warranty on the unit, and ProTeam will accept NO liability associated with the unit.
WARNING
Improper connection of the equipment grounding conductor can result in a risk of electric shock. Check with a qualified electrician or service person if you are in doubt as to whether the outlet is properly grounded. DO NOT modify the plug provided with the appliance - if it will not fit the outlet, have a proper outlet installed by a qualified electrician.
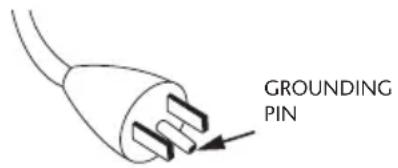
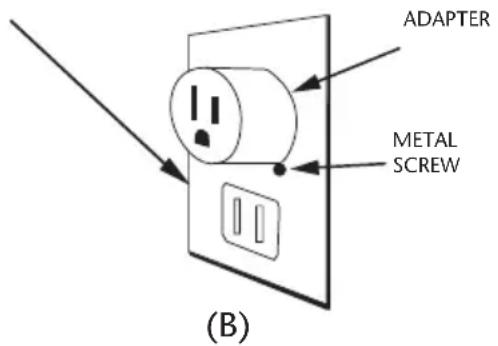
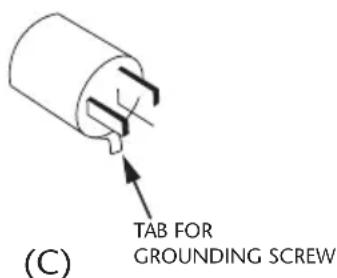
The Vacuum cleaners in this manual are for use on a nominal 120-volt circuit, and have a grounded plug that looks like the plug illustrated in Figure A. A temporary adaptor that looks like the adaptor illustrated in Figure C may be used to connect this plug to a 2-pole receptacle as shown in Figure B if a properly grounded outlet is not available. The temporary adaptor should be used only until a properly grounded outlet in Figure A can be installed by a qualified electrician. The green colored rigid ear,lug, or the like extending from the adaptor must be connected to a permanent ground such as a properly
grounded outlet box cover. Whenever the adaptor is used, it must be held in place by a metal screw. Note: In Canada, the use of a temporary adaptor is not permitted by the Canadian Electrical Code. For Canada - This appliance is for use on a nominal 120 - volt circuit and has a grounded attachment plug that looks like the plug illustrated in Figure A. Make sure that the Vacuums are connected to an outlet having the same configuration as the plug. No adaptor should be used with the Vacuums detailed in this manual.

ASSEMBLY
DRUM/CADDY
If any parts are missing or damaged contact ProTeam Customer Service.
DO NOT assemble until you have all the parts.
- Remove left and right caddies from drum.
- Install cap nut on one side of shaft rod. Tap gently with rubber mallet or hammer until fully seated. Slide open end of shaft through the wheel (smooth side of wheel facing outward).
- Place wheel/shaft assembly through caddy left and on through the caddy right, as shown.
- Then place the remaining wheel onto the caddy assembly (smooth side of wheel facing outward), and install second cap nut.
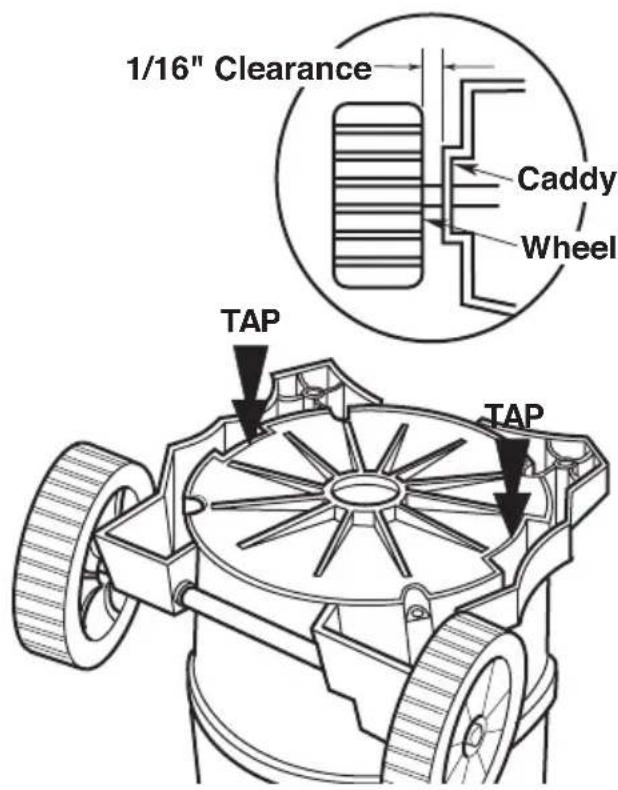
- Invert drum to install caddy. Place the caddy assembly onto the drum, as shown. Be sure that wheels spin freely, and DO NOT contact the caddies.
- Once the caddies are aligned on the drum, gently tap each end of each caddy until firmly seated. It is recommended to tap the center portion of the front caddies, as shown.
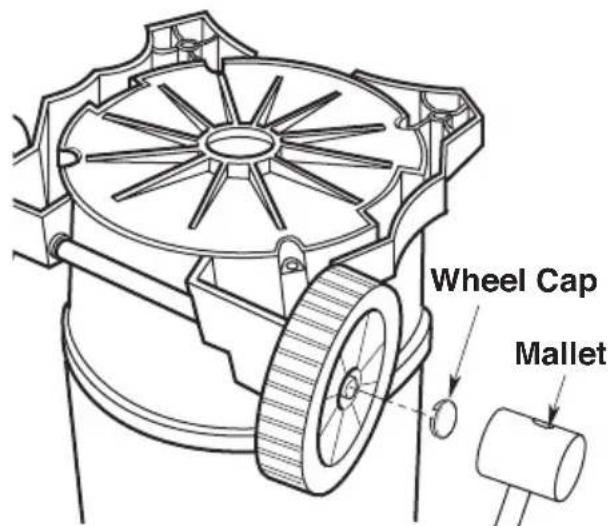
- Using a rubber mallet or hammer, gently tap the wheel caps onto each wheel until the wheel caps are firmly seated onto each wheel. This is required on both sides.

ASSEMBLY (Continued)
DRUM/CADDY (Continued)
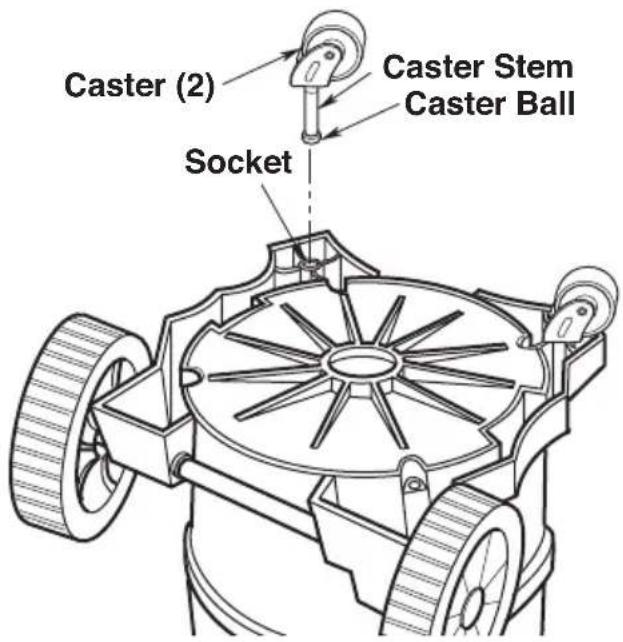
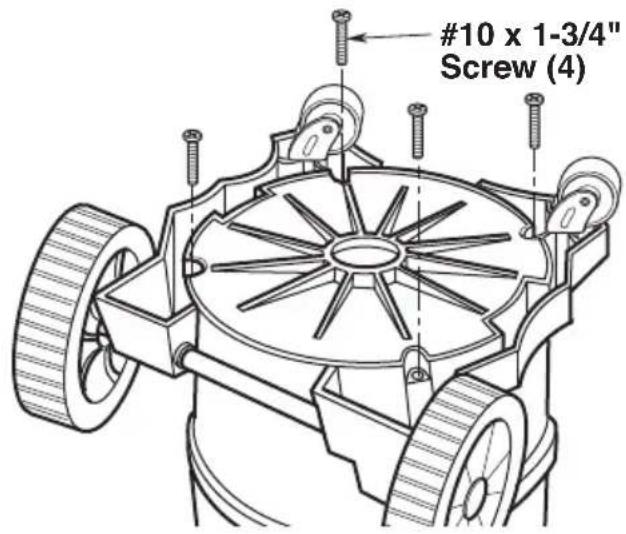
- Insert the caster stem into the socket of the caster foot as shown. (Front casters only).
- Push on the caster until the ball on the caster stem is inserted all the way into the socket. You will be able to hear the ball snap into the socket and the caster will swivel easily when positioning is correct.
- Install (4) #10 x 1-3/4" screws into matching holes on both right and left side of caddy, securing the caddies to the bottom of the drum. Tighten screws until just snug. DO NOT over tighten the screws, as this may deform the caddies.
INSTALLING HANDLE
Press and hold release buttons while installing handle into handle receptacles in drum (See illustration).
NOTE: An audible snap of release buttons indicates successful engagement of handle.
REMOVING HANDLE
Press and hold release buttons as shown. While firmly pushing in release buttons, pull handle upwards to remove (see illustration).

ASSEMBLY (Continued)
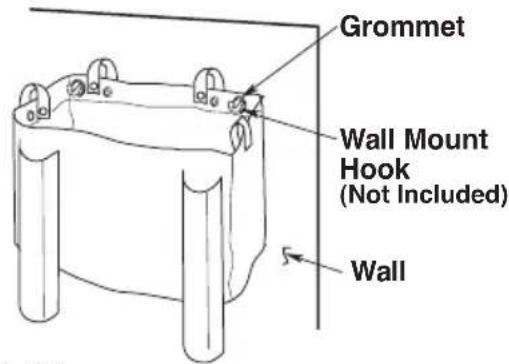
INSTALLING TOOL HOLDER
- Install tool holder as shown with extension wand holders (not included on all models) facing unit.
- As an alternative storage solution, the tool holder may hang on a wall. Two wall mounting hooks (not included) must be secured to the wall as shown (sold separately).
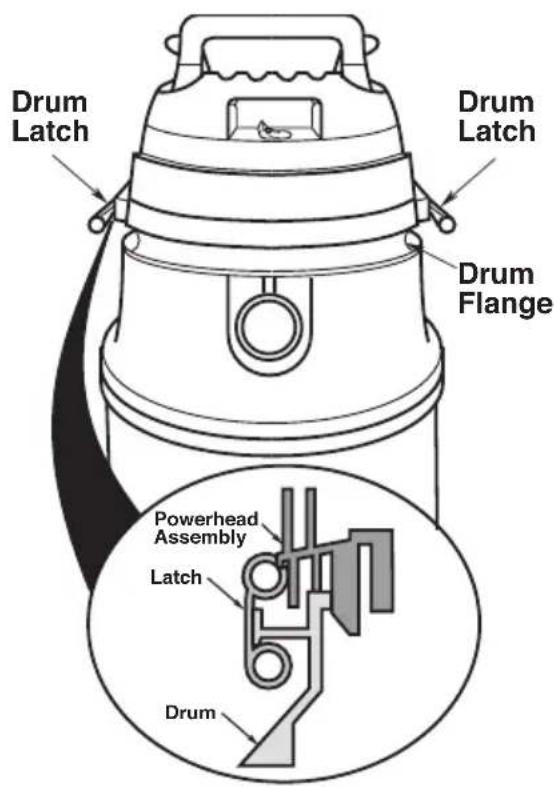
WET/DRY VACUUM ASSEMBLY
- Position the powerhead assembly on the drum/caddy assembly as shown (assembled earlier).
- Rotate both latches down and press until you hear them snap over the flanges on the drum.
ProTeam
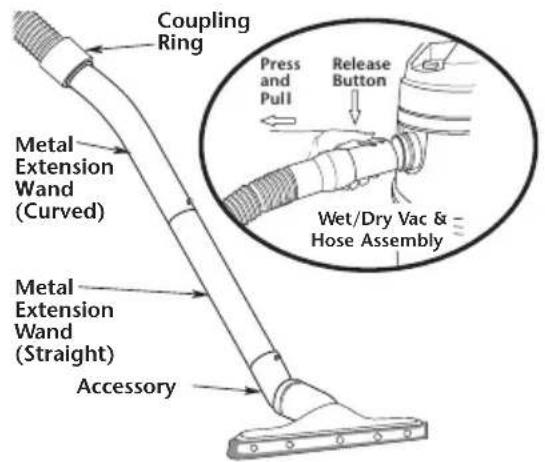
Insert Hose
Insert the push button end of the hose into the inlet of the Vacuum. The hose should snap into place.
To remove the hose from the Vacuum, press the release button in the hose assembly and pull the hose out of the Vacuum inlet, as shown.
Press the curved metal extension wand into the coupling ring of the hose end. Join the two metal extension wands, aligning the button and hole so they snap together.
Attach the accessories, aligning the button and hole so they snap together.
FILTERS
FILTER REMOVAL AND INSTALLATION
Removal and Installation of the Qwik LockTM Filter
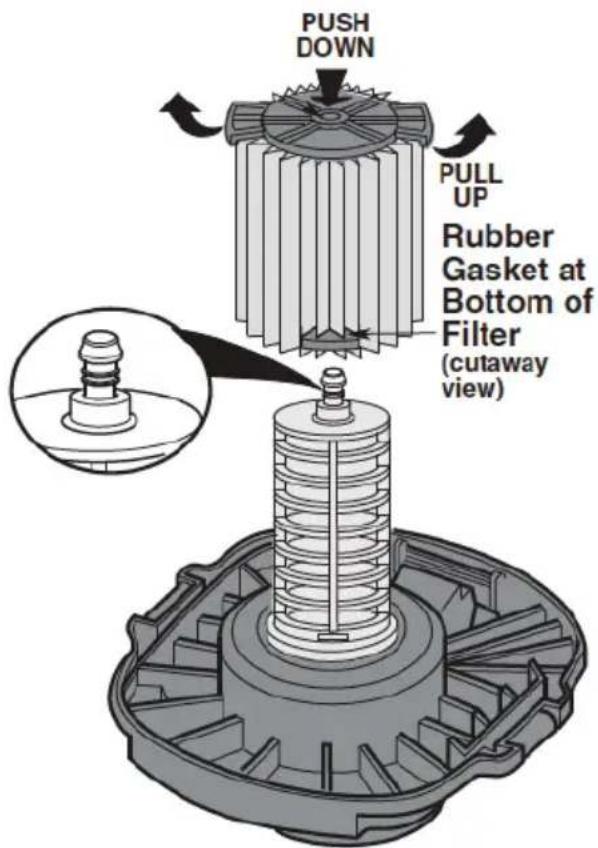
Filter Removal:
- Hold the filter tabs of the Qwik Lock Wet Filter, or fine Dust Filter in each hand.
- With one thumb on the Qwik Lock stud, which protrudes through the integrated filter plate, lift up on the filter tabs while pushing down on the stud.
- This action will cause the filter to release from the filter cage. Slide filter off cage.
Filter Installation:
- Carefully slide the Qwik Lock filter over the filter cage and press down on the outside edge of the filter until the rubber gasket on the bottom of the filter seats securely around the base of the filter cage and against the lid.
- Align the small center hole in the top of the filter over the Qwik Lock stud on the filter cage. Press firmly on top of the filter near the stud to allow the filter to snap over the ball on the end of the stud. The filter is now attached.
NOTE: Failure to properly seat the bottom gasket could result in debris bypassing the filter.

WARNING: DO NOT operate without filter cage and float, as they prevent liquid from entering the impeller and damaging the motor.
To Reorder Filters: Go to www.pro-team.com or contact ProTeam's Customer Service Department at 866.888.2168
Quick Lock Wet Fine Dust Cartridge Filter - 107175 Quick Lock HEPA Media Filter - 107176 Quick Lock Wet Filter - 107177
OPERATION
WARNING - To reduce the risk of fire, explosion, or damage to Vacuum:
- DO NOT leave Vacuum running while unattended - you may fail to notice important signs indicating abnormal operation such as loss of suction, debris/ liquid exiting the exhaust, or abnormal motor noises. Immediately stop using Vacuum if you notice these signs.
DO NOT leave Vacuum plugged in when not in use.
DO NOT continue running when float has cut off suction. - Sparks inside the motor can ignite airborne flammables. DO NOT operate Vacuum near flammable liquids or in areas with flammable gases, vapors, or explosive/airborne dust. Flammable liquids, gases, and vapors include: lighter fluid, solvent-type cleaners, oil-based paints, gasoline, alcohol, and aerosol sprays. Explosive dusts include: coal, magnesium, aluminum, grain, and gun powder.
DO NOT vacuum up explosive dusts, flammable liquids, or hot ashes.
WARNING - To reduce the risk of electric shock or injury:
- DO NOT expose to rain or allow liquid to enter motor compartment. Store indoors.
DO NOT handle plug, switch, or Vacuum with wet hands. - Unplug Vacuum before servicing. If your Vacuum is not working as it should, has missing parts, has been dropped, damaged, left outdoors, or dropped into water, return it to an independent service center or call customer service.
- When using an extension cord, use only outdoor-rated cords that are in good condition. DO NOT allow the connection to come into contact with liquid.
After you plug the power cord into the outlet, turn the unit on by pushing the switch from position "O" to position "I". The symbols used on the switch actuator are international "ON & OFF" symbols.
$$ \bigcirc = O F F \quad | = O N $$
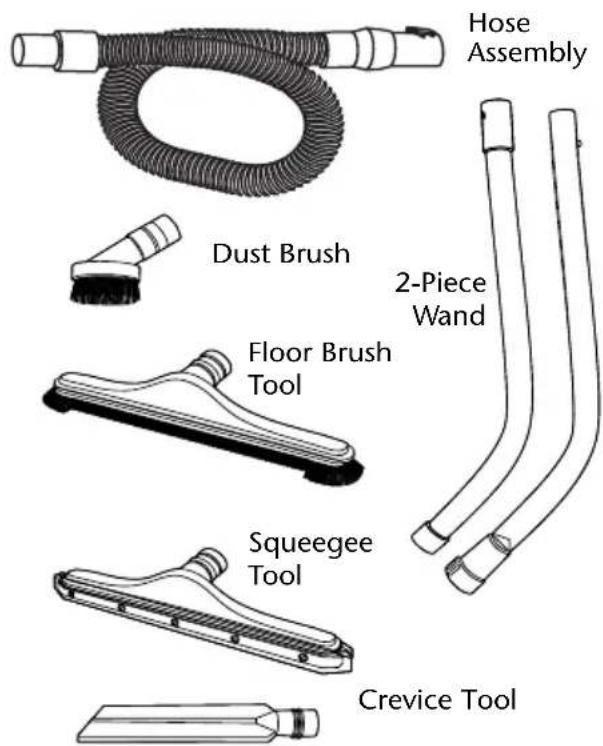
Familiarize yourself with the accessories included with the Vacuum. Each accessory may be used in various ways for vacuuming debris. Here is a list of possible accessories and their uses.
Hose Assembly - Provides transfer of vacuum capability to work site. Provides the means of attaching extension wands and hand tools.
Dust Brush - Use for detail cleaning in small spaces.
Floor Brush Tool - Use for large dry area clean-ups on smooth surfaces.
Squeegee Tool - Use for large wet area clean-ups on smooth surfaces.
Crevice Tool - Use to pick up debris in hard to reach locations.
2-Piece Wand - Use to connect hose to wet or dry floor tools.
OPERATION (Continued)
VACUUMING DRY MATERIALS
- The filter must always be in correct position to reduce the risk of leaks and possible damage to Vacuum.
- Your Wet/ Dry Vacuum comes with the Wet Filter installed. When using your Vacuum to pick up very fine dust, it will be necessary for you to change the dry filter and empty the drum and clean the filter at more frequent intervals to maintain peak vacuum performance.
NOTE: A dry filter is necessary to pick up dry material. If you use your Vacuum to pick up dust when the filter is wet, the filter will clog quickly and be very difficult to clean. Use the wet filter when picking up wet material.
VACUUMING LIQUIDS
NOTE: When picking up very small amounts of water, the Fine Dust Filter may be left in place.
- When picking up large amounts of liquid, the Fine Dust Filter should be removed and the mesh, Wet Filter (107177) should be installed. If the Fine Dust Filter is not removed, water could enter the motor housing which could overload and damage the motor. If the mesh, wet filter is not installed, small debris or soap suds may also enter the motor housing and cause damage to the motor.
- The float mechanism activates to prevent water from entering the motor housing. When the liquid in the tank reaches a predetermined level, the float mechanism will rise automatically to cut off airflow. When this happens, turn off the Vacuum, unplug the power cord and empty the tank. You will know that the float has risen because the Vacuum airflow ceases and the motor noise will become higher in pitch, due to increased motor speed.
IMPORTANT: To reduce the risk of damage to the Vacuum, do not run the motor with the float in the raised position.
3. After using the Vacuum, follow the filter maintenance instructions found on page 12 to reduce the risk of possible mildew and damage to the filter.
EMPTYING THE DRUM
WARNING: To reduce the risk of injury from accidental starting, unplug power cord before emptying the drum.
WARNING: To reduce the risk of back injury or falls, DO NOT lift a Vacuum heavy with liquid or debris. Scoop or drain enough contents out to make the Vacuum light enough to lift comfortably.
- The Vacuum comes equipped with a drain for easy emptying of liquids. Simply unscrew the drain cap and lift the opposite side slightly to empty the drum.
- Another option is to remove the powerhead assembly.
- Lay powerhead assembly aside on a clean area while emptying drum.
- Dump the drum contents into the proper waste disposal container.
MOVING THE WET/DRY VACUUM
Should it become necessary to pick the Vacuum up to move it, the handle on the sides of the dust drum are used to lift. To maneuver the Vacuum, the push/pull handle in the rear of the unit should be used.
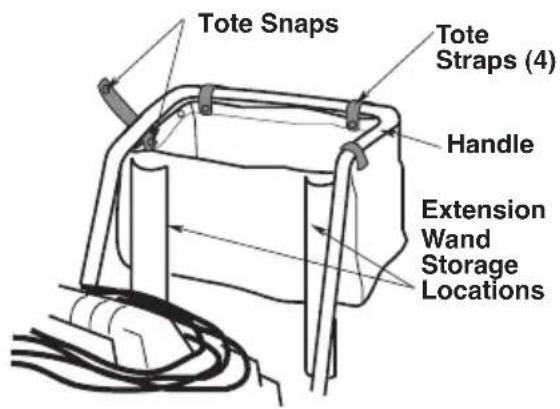
ACCESSIONS
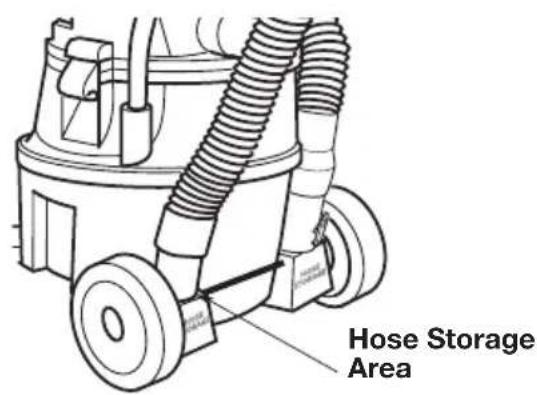
Your accessories may be stored in the removable tote. The hose may be stored by wrapping it around the unit and placing each end into the two areas marked Hose Storage.
NOTE: Insert male end of extension wand into the holder sleeve as shown.
The hose may be stored by wrapping it around the unit and plugging the open end into one of the storage locations on the caddy assembly.

CORD WRAP
When vacuuming is complete, unplug the cord and wrap it around the power assembly as shown. The cord should wrap under the pull handle (above the inlet) and around and under the cord wrap of the motor cover.

PREVENTIVE MAINTENANCE
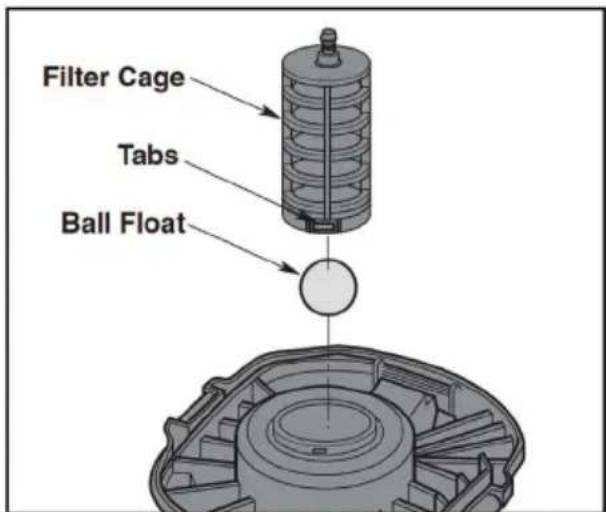
CLEANING THE FILTER CAGE AND FLOAT MECHANISM
- Remove the filter from the filter cage.
- Press removal tab inward and pivot the filter cage outward.
- Clean all debris from cage and float mechanism.
- Place the ball float over the opening in the center of the lid over the hole.
- Line up filter cage tabs with slots in the center ring of the lid.
- Push on the filter cage until the tabs snap into slots for a secure fit. (Refer to pg 8).
PREVENTIVE MAINTENANCE (Continued)
CLEANING THE FINE DUST FILTER
NOTE: Clean the filter in an open area.
Cleaning should be done outdoors.
- Remove filter from Vacuum. Gently tap the filter against the inside wall of the dust tank. The debris will loosen and fall.
- For thorough cleaning of a filter clogged with fine dust, (no surface debris), run water down the outside of the filter pleats and ensure the water pressure is not strong enough to damage the filter.
IMPORTANT: After cleaning, check the filter for tears or small holes. Do not use a filter with holes or tears in it. Even a small hole can cause a lot of dust to come out of the Vacuum. If damaged, replace the filter immediately.
CLEANING THE WET FILTER
For best cleaning results, clean the mesh filter in a utility sink or under a spigot.
- Remove the filter from the Vacuum. Gently tap the filter against the inside wall of the dust tank to loosen surface debris.
- For thorough cleaning of the wet filter, run water through it from the inside-out. While doing this run hand or soft brush over the surface to remove clinging debris.
- For a filter coated or clogged with floor wax, rinse the filter with a diluted floor stripper chemical. Using warm water and a soft brush should extend the life of the filter. Rinse the filter again with only warm water to remove any remaining chemicals.
IMPORTANT: If the sealing surfaces or mesh have been damaged, or if the filter is clogged beyond repair, replace the wet filter immediately.
IMPORTANT: The mesh, wet filter is multiple layers of fine and course mesh specially engineered to protect the Vacuum's motor. This filter has been designed to break up soap suds and capture floor stripper and most debris that may remain on a floor when wet cleaning. Using this filter does NOT replace pre-cleaning a floor prior to floor stripping.
PREVENTIVE MAINTENANCE (Continued)
CLEANING AND DISINFECTING THE WET/ DRY VACUUM
To keep your Wet/ Dry Vacuum looking its best, clean the outside with a cloth dampened with warm water and mild soap.
To clean the drum:
- Dump debris out.
- Wash drum thoroughly with warm water and mild soap.
- Wipe out with dry cloth.
Before prolonged storage or as needed (i.e., waste water pick-up) the drum should be disinfected.
To disinfect the drum:
- Pour 1 gallon of water and 1 teaspoon chlorine bleach into the drum.
- Let solution stand for 20 minutes, carefully swishing every few minutes, making sure to wet all inside surfaces of the drum.
- Empty drum after 20 minutes. Rinse with water until bleach smell is gone. Allow drum to dry completely before sealing the motor on the drum.
WARNING: To assure product SAFETY and RELIABILITY, repairs and adjustments should be performed by Authorized Service Centers, always using PROTEAM replacement parts.
CORD MAINTENANCE
When vacuuming is complete, unplug the cord and wrap it around the motor cover. If the power cord is damaged, it must be replaced by the manufacturer or their service agent or by similarly qualified personnel to reduce the risk of accident.
STORAGE
Before storing your Vacuum, the drum should be emptied and cleaned. The cord should be wrapped around the unit and the hose should be stored as described in this manual. Accessories should be kept in the same area as the Vacuum so they can be readily available. The Vacuum should be stored indoors.
CASTERS AND WHEELS
Should your cart squeak or become hard to roll, you should place two or three drops of general purpose oil on each wheel at the axle. If your casters are noisy, you may put a drop of oil on the roller shaft to make them quieter.
FRAME AND HANDLES
Your metal handle is painted to prevent rust, however, liquids and corrosive debris should be wiped off with a soft cloth should they come in contact with the handle.
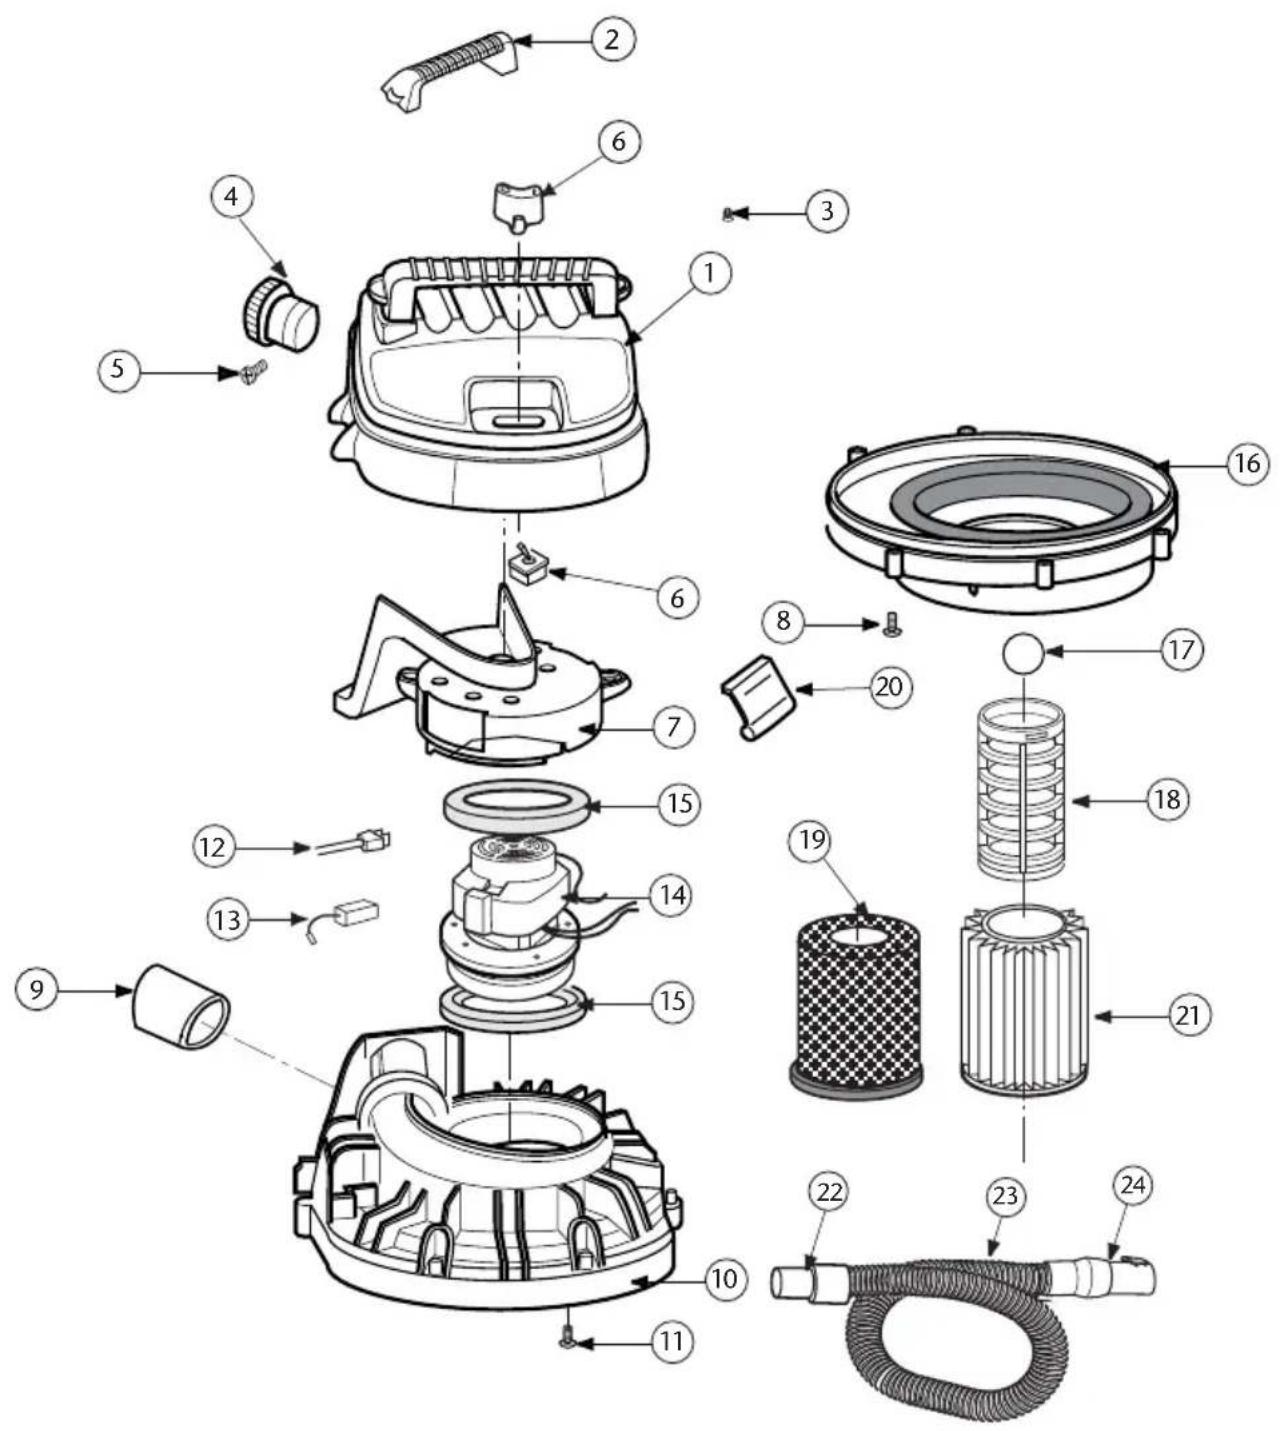
PROGUARD 16 MD REPAIR PARTS
ORDER # QTY.
ProGuard 16 MD
1 510286 Motor Cover Assembly 1 ea.
2 830565-2 Handle Motor Cover 1 ea.
3 820563-4 Screw Type AB #10 x 34 1 ea.
4 833600 Diffuser Assembly 1 ea.
5 820563-4 Screw Type AB #10 x 34 1 ea.
6 510127 Switch Assembly 1 ea.
7 831651 Duct Motor Exhaust/Cooling Fan 1 ea.
8 820563-4 Screw Type AB #10 x 34 1 ea.
9 830609 Exhaust Foam Pad
10 831653-1 Lid
11 826453-2 Screw 10 - 32× 3 / 4
12 831657-1 Power Cord Assembly
13 822374-8 Carbon Brush Set
14 831567 Motor Assembly Complete
15 827415 Gasket Motor
16 831659 Collector Assembly
17 833778 Ball Float
18 830101-1 Filter Cage
19 107177 Quick Lock Wet Filter
20 826387 Drum Latch
21 107175 Qwik Lock Fine Dust Cartridge Filter
22 831577 Swivel Hose Cuff
23 831337-6 Hose Assembly w/ Cuffs
24 829900 Locking Ring Cuff
1 ea.
1 ea.
1 ea.
1 ea.
1 set
1 ea.
1 ea.
1 ea.
1 ea.
1 ea.
1 ea.
1 ea.
1 ea.
1 ea.
1 ea.
1 ea.
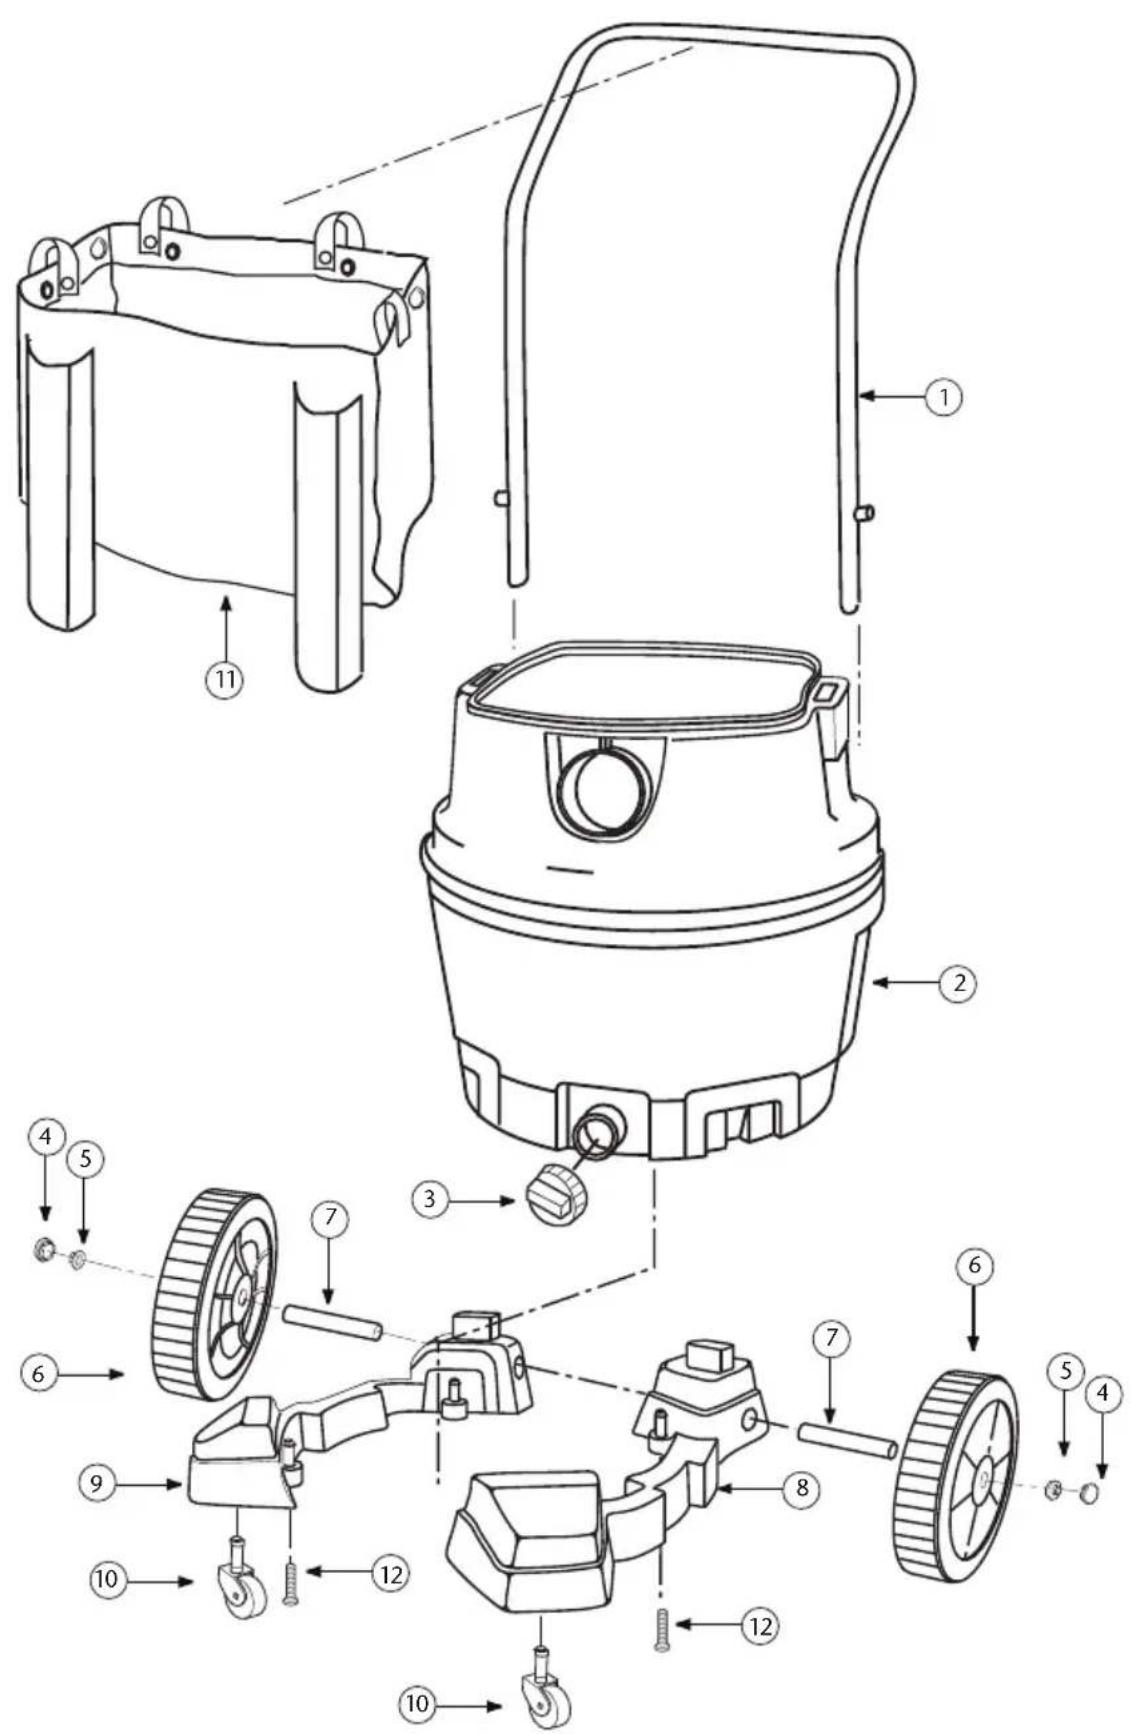
PROGUARD 16 MD REPAIR PARTS
ProGuard 16 MD
ORDER # QTY.
1 830686 Handle 1 ea.
2 831660-2 Dust Drum Assembly 1 ea.
3 73185 Drain Cap 1 ea.
4 830611 Wheel Cap 1 ea.
5 813836-1 Cap Nut 1 / 2^ 1 ea.
6 832190 8" Wheel Assembly (Includes: #4,5) 1 ea.
7 831024 Shaft 1ea.
8 830576 Caddy, Right 1 ea.
9 830577 Caddy, Left 1 ea.
10 832123 Caster 1 ea.
11 831668-1 Tote 1 ea.
12 820563-5 Screw Type "AB" #10 x 1-3/4" 1 ea.
509944 Bag of Loose Parts (Not Shown) (includes: #4, 5, 10, 12) 1 kit
PROGUARD 16 MD ASSEMBLY
LIMITED WARRANTY
This limited warranty applies to the following ProTeam, Inc. commercial PROGUARD® Wet/Dry Vacuums: ProGuard 16 MD.
If you have any questions or need assistance regarding the warranty of your product, please call ProTeam Customer Service department at (866) 888-2168 7:30 a.m. - 5:00 p.m. Mountain Time.
PROGUARD® - Limited Warranty
ProTeam, Inc., located at 8100 W. Florissant Avenue, Building T, St. Louis, MO 63136 ("ProTeam") warrants to the original purchaser only ("you") subject to the exclusions described below, that the ProGuard Product component parts and motors listed below will be free from defects in material and workmanship beginning on the original date of purchase and continuing for the period set forth below (each a "Warranty Period"). This limited warranty terminates if the original purchaser transfers the ProGuard Product to any other person or entity.
Parts Warranties - All ProGuard Products
Molded body parts on all ProGuard Products - Expected lifetime of the ProGuard Product.
All other component parts (excluding the motor) on all ProGuard Products - 3 years.
Motor Warranties - Specific to each ProGuard Product
ProGuard 16 MD 2-stage motor - 3 years or 1400 hours, whichever comes first.
*Conditions to above motor warranty coverage may apply. See "Motor Warranty Conditions" below. Motor Warranty Conditions - ProGuard 16 MD 2-stage motor.
- Warranty is subject to your compliance with the following carbon brush replacement and maintenance schedule. Proof of compliance may be required.
1st change - after the first 400 hours
2nd change - after the next 400 hours
3rd change - after the next 300 hours
What is Not Covered - Warranty Exclusions
This limited warranty does not extend to and expressly excludes:
- Normal wear and tear and/or replacement attachments or accessories, including, without limitation, extension cords, hoses, filters, switches, carbon motor brushes and other attachments to the ProGuard Product.
- Damage or burnout of the ProGuard Product motor resulting from failure to clear a blockage occurring during the normal course of use.
- Loss or damage to the ProGuard Product resulting from conditions beyond ProTeam's control including without limitation, misuse, accident, abuse, neglect, negligence (other than ProTeam's), over use beyond intended capacity, or unauthorized modification or alteration.
- Loss or damage to the ProGuard Product resulting from failure to follow the required maintenance schedule, or failure to use the ProGuard Product in accordance with ProTeam's written instructions, guidelines or the terms of its Owner's Manual.
What We Will Do to Correct Problems
If a claim made during the Warranty Period is covered under this limited warranty, ProTeam or your local ProTeam authorized dealer will, at ProTeam's sole option, (a) repair the defective portion of the ProGuard Product or (b) replace the entire ProGuard Product. THE SOLE AND EXCLUSIVE REMEDY FOR BREACH OF THIS LIMITED WARRANTY SHALL BE LIMITED TO REPAIR OR REPLACEMENT OF THE PROGUARD PRODUCT. No Other Express Warranty Applies
THE LIMITED WARRANTY PROVIDED ABOVE ARE THE SOLE AND EXCLUSIVE WARRANTYES PROVIDED BY PROTEAM TO THE ORIGINAL PURCHASER, AND ARE IN LIEU OF ALL OTHER WARRANTYES, WRITTEN OR ORAL, EXPRESS OR IMPLIED, WHETHER ARISING BY OPERATION OF LAW OR OTHERWISE, INCLUDING, WITHOUT LIMITATION, WARRANTYES OF MERCHANTABILITY OR FITNESS FOR A PARTICULAR PURPOSE, WHETHER OR NOT THE PURPOSE HAS BEEN DISCLOSED AND WHETHER OR NOT THE PROGUARD PRODUCT HAS BEEN SPECIFICALLY DESIGNED OR MANUFACTURED FOR YOUR USE OR PURPOSE. No employee, agent, dealer, or other person is authorized to alter this limited warranty or make any other warranty on behalf of ProTeam. The terms of this limited warranty shall not be modified by ProTeam, the original owner, or their respective successors or assigns.
How to Notify Us
If you discover that your ProGuard Product has a defect that you believe is covered by this limited warranty, you must notify ProTeam or the ProTeam authorized dealer who sold you the ProGuard Product within the applicable Warranty Period. You may contact ProTeam Customer Service department at (866) 888-2168 between the hours of 7:30 a.m. and 5:00 p.m. Mountain Time or at any time via the fax number or the email address listed in your Owner's Manual or on our website. In order for a warranty claim to be processed as quickly as possible, we suggest that you complete the "Registration Card" made available to you on the ProTeam website at www.pro-team.com. If you do not choose to register your ProGuard Product, in order to make a warranty claim, you will need to provide a copy of your sales receipt or other proof of purchase showing the purchase date to ProTeam or your local ProTeam authorized dealer.
Repair and Replacement Procedures
Please call the Customer Service department number above or visit the ProTeam website to find the ProTeam authorized dealer nearest you. If there is no local ProTeam authorized dealer, our Customer Service department will give you the name and address of the nearest field service representative or will provide you with instructions for shipping your ProGuard Product to the ProTeam repair facility. ProTeam or your local ProTeam authorized dealer will determine whether your claim is covered by this limited warranty, subject to the limitations or exclusions described in this limited warranty, or has exceeded the applicable Warranty Period. Your local ProTeam authorized dealer will repair your ProGuard Product, ship your ProGuard Product to the dealer's or ProTeam's repair facility, or contact ProGuard for a replacement ProGuard Product. The decision to replace your ProGuard Product is at the sole discretion of ProTeam. Repairs or modifications made to the ProGuard Product by other than ProTeam, its authorized repair facility or a local authorized dealer will nullify this limited warranty. Coverage under this limited warranty is conditioned at all times upon the original purchaser's compliance with these required notification and repair procedures.
Limitation of Liability
TO THE EXTENT PERMITTED BY LAW, IN NO EVENT SHALL PROTEAM BE LIABLE FOR ANY INCIDENTAL, SPECIAL, INDIRECT, OR CONSEQUENTIAL DAMAGES, INCLUDING ANY ECONOMIC LOSS, WHETHER RESULTING FROM NONPERFORMANCE, USE, MISUSE OR INABILITY TO USE THE PROGUARD PRODUCT OR PROTEAM'S NEGLIGENCE. SELLER SHALL NOT BE LIABLE FOR DAMAGES CAUSED BY DELAY IN PERFORMANCE AND IN NO EVENT,REGARDLESS OF THE FORM OF THE CLAIM OR CAUSE OF ACTION (WHETHER BASED IN CONTRACT, INFRINGEMENT, NEGLIGENCE, STRICT LIABILITY,OTHER TORT OR OTHERWISE),SHALL PROTEAM'S LIABILITY TO BUYER AND/OR ITS CUSTOMERS EXCEED THE PRICE PAID BY THE ORIGINAL OWNER FOR THE PROGUARD PRODUCT. The term "consequential damages" shall include, but not be limited to, loss of anticipated profits, business interruption, loss of use or revenue, cost of capital or loss or damage to property or equipment.
Some states do not allow the exclusion or limitation of incidental or consequential damages, so the above limitation may not apply to you. This limited warranty gives you specific legal rights, and you may also have other rights which vary from State to State.
MANUAL DEL USUARIO
customerservice.proteam@emerson.com
Quick Lock Wet Fine Dust Cartridge Filter - 107175
Quick Lock HEPA Media Filter - 107176
Quick Lock Wet Filter - 107177
UTILIZACION
$$ \bigcirc = \text {A R R E T} \quad | = \text {M A R C H E} $$
ProGuard 16 MD QUANTITE
customerservice.proteam@emerson.com
8100 W. Florissant Avenue, Building T
St. Louis, MO 63136
866.888.2168