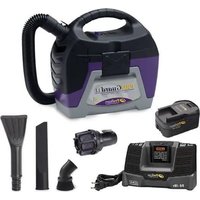
GoFit 3 PH - Vacuum Cleaner ProTeam - Free user manual and instructions
Find the device manual for free GoFit 3 PH ProTeam in PDF.


User questions about GoFit 3 PH ProTeam
0 question about this device. Answer the ones you know or ask your own.
Ask a new question about this device
Download the instructions for your Vacuum Cleaner in PDF format for free! Find your manual GoFit 3 PH - ProTeam and take your electronic device back in hand. On this page are published all the documents necessary for the use of your device. GoFit 3 PH by ProTeam.
USER MANUAL GoFit 3 PH ProTeam
natural_image
Technical line drawing of a mechanical component with no visible text or symbolsOperating Manual
WARNING
Read Owner's Manual before using this product. Failure to do so can result in injury or property damage.
TABLE OF CONTENTS
IMPORTANT SAFETY INSTRUCTIONS....3
ELECTRICAL INSTRUCTIONS....4
PART DESCRIPTION....5
POWER NOZZLE ASSEMBLY 6
POWER NOZZLE PARTS LIST....7
ELECTRIFIED HOSE ASSEMBLY 8
ELECTRIFIED HOSE PARTS LIST....9
WARRANTY INFORMATION....10
ESPAÑOL....11-19
FRENCH 21-29
INSPECTION UPON RECEIPT
Carefully unpack and inspect your new ProTeam power nozzle for shipping damage.
Each unit is tested and thoroughly inspected before shipping. For instructions regarding any shipping damage, contact ProTeam immediately (866) 888-2168. Keep this manual available at all times and instruct all operators to read this manual.
The contents of this manual are based on the latest product information available at the time of publication. ProTeam reserves the right to make changes or improvements to its machines or components without notice. The products that are covered by this instruction manual are intended for commercial use.
IMPORTANT SAFETY
When using an electrical appliance, basic precautions should always be followed, including the following:
WARNING
Read Owner's Manual before using this product. Failure to do so can result in serious injury or death. To reduce the risk of fire, electric shock or injury follow each of the listed items.
- DO NOT leave the power nozzle plugged in when not in use. Unplug before servicing.
- DO NOT use outdoors or on wet surfaces.
- DO NOT allow to be used as a toy. Pay close attention when using the vacuum near children.
- Use only as described in this manual. Use only manufacturer's recommended attachments and replacement parts.
- DO NOT USE A DAMAGED CORD OR PLUG. If the power nozzle or vacuum is not working as they should, or if they have been dropped, damaged, left outdoors, or exposed to water, return it to an authorized ProTeam Warranty Station for inspection (866) 888-2168.
- DO NOT pull or carry by the vacuum's cord or use the cord as a handle. Do not close a door on the cord or pull the cord around sharp edges or corners. Do not run over the cord. Keep the cord away from heated surfaces.
- DO NOT pull on the vacuum's cord to unplug. Grasp the plug at the outlet and pull.
- DO NOT handle the plug or vacuum with wet hands.
- DO NOT put any objects into openings. Do not use with any opening blocked; keep free of dust, lint, hair, and anything that may reduce air flow.
- This power nozzle creates suction and contains a revolving brush roll. Keep hair, loose clothing, fingers, and all parts of body away from openings and moving parts.
- Turn off all controls before unplugging.
- Use with extra care when cleaning stairs.
- The hose contains electrical wires. Do not use when damaged, cut, or punctured. Avoid picking up sharp objects.
- Always turn off this appliance before connecting or disconnecting either hose or motorized nozzle.
- The power nozzle is double insulated. Use only identical replacement parts. See instructions for servicing of double insulated appliances.
- DO NOT vacuum flammable or combustible liquids, such as gasoline, or use in areas where they may be present.
- DO NOT pick up anything that is burning or smoking, such as cigarettes, matches, or hot ashes.
SAVE THESE INSTRUCTIONS
Violation of any of these instructions may void any and all warranties.
SERVICING OF DOUBLE-INSULATED APPLIANCES
A double-insulated appliance is marked with one or more of the following: The words "DOUBLE INSULATION" or "DOUBLE INSULATED" or the double insulation symbol (square within a square).

In a double-insulated appliance, two systems of insulation are provided instead of grounding. No grounding means is provided on a double-insulated appliance, nor should a means for grounding be added to the appliance. Servicing a double-insulated appliance requires care and knowledge of the system, and should be done only by qualified service personnel. Replacement parts for a double-insulated appliance must be identical to the parts they replace.
WARNING
- Do not run power nozzle over extension cord.
- Unplug electrical appliances before vacuuming them.
OPERATION
To operate the power nozzle, first release the wand by depressing the handle release pedal on the power nozzle base. Turn on the power nozzle with the On-Off switch located on the handle.
■ To achieve the best results when cleaning carpet, slowly pass the power nozzle back and forth over the area to be cleaned.
■ To clean hard surfaces, simply move the power nozzle over the area to be cleaned with the vacuum on and the power nozzle on or off.
It is best to avoid cleaning carpet fringes with the rotating brush (to avoid damage to carpeting). When it is unavoidable, either turn off the power nozzle or place the power nozzle over the carpet and pull it over the fringe toward the uncovered floor.
INDICATOR LIGHT
■ The green lamp indicates that the nozzle is ON and operating normally.
The red warning lamp will light if the brush rotation is restricted. This can occur if an object causes brush speed reduction, thus overloading the drive motor. If this occurs:
- Turn off the vacuum cleaner and disconnect the power supply cord.
- Remove the object that is preventing the brush from rotating.
- Reconnect the nozzle and power cord.
CLEANING
It may happen that your brush roller becomes blocked or less effective. This may be caused by excessive hair and threads wrapped around the roller.
■ Turn off vacuum and always unplug the nozzle from the power supply first.
■ Cleaning the brush roller:
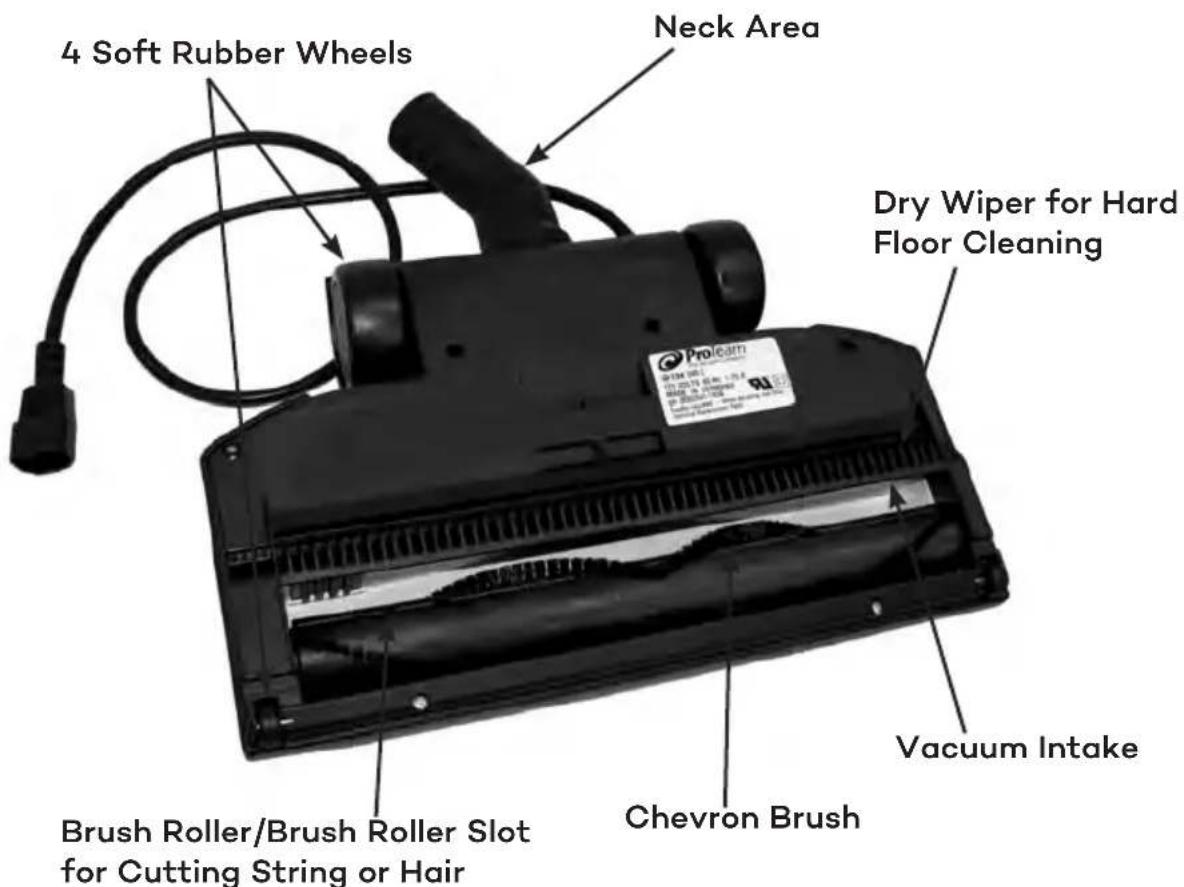
- Insert the points of a pair of scissors into the brush roller slot (see photo on following page). Move the scissors to catch the threads and hairs in the scissors.
- Cut the threads of hairs and remove them manually or by using a small sized pair of pliers.
■ Should your nozzle cease to pick-up debris:
This can be caused by an obstruction in the intake or neck of the power nozzle when excessively large or long debris is lodged in the intake or neck area.
■ Clearing an obstruction:
- Remove the wand from the nozzle by depressing the button on the nozzle neck and pulling the nozzle and wand apart.
- Look into the wand and nozzle's neck, and remove any visible debris.
- Look into the intake area of the nozzle, under the brush roller, and remove any visible debris.
Part Description - Top

text_image
Locking Pivot/ Swivel Neck Handle Release Pedal Indicator Lights Reset Button 4 Soft Rubber Wheels Wrap-A-Round BumperPart Description – Bottom
text_image
4 Soft Rubber Wheels Neck Area Dry Wiper for Hard Floor Cleaning Brush Roller/Brush Roller Slot for Cutting String or Hair Chevron Brush Vacuum IntakePOWER NOZZLE ASSEMBLY
text_image
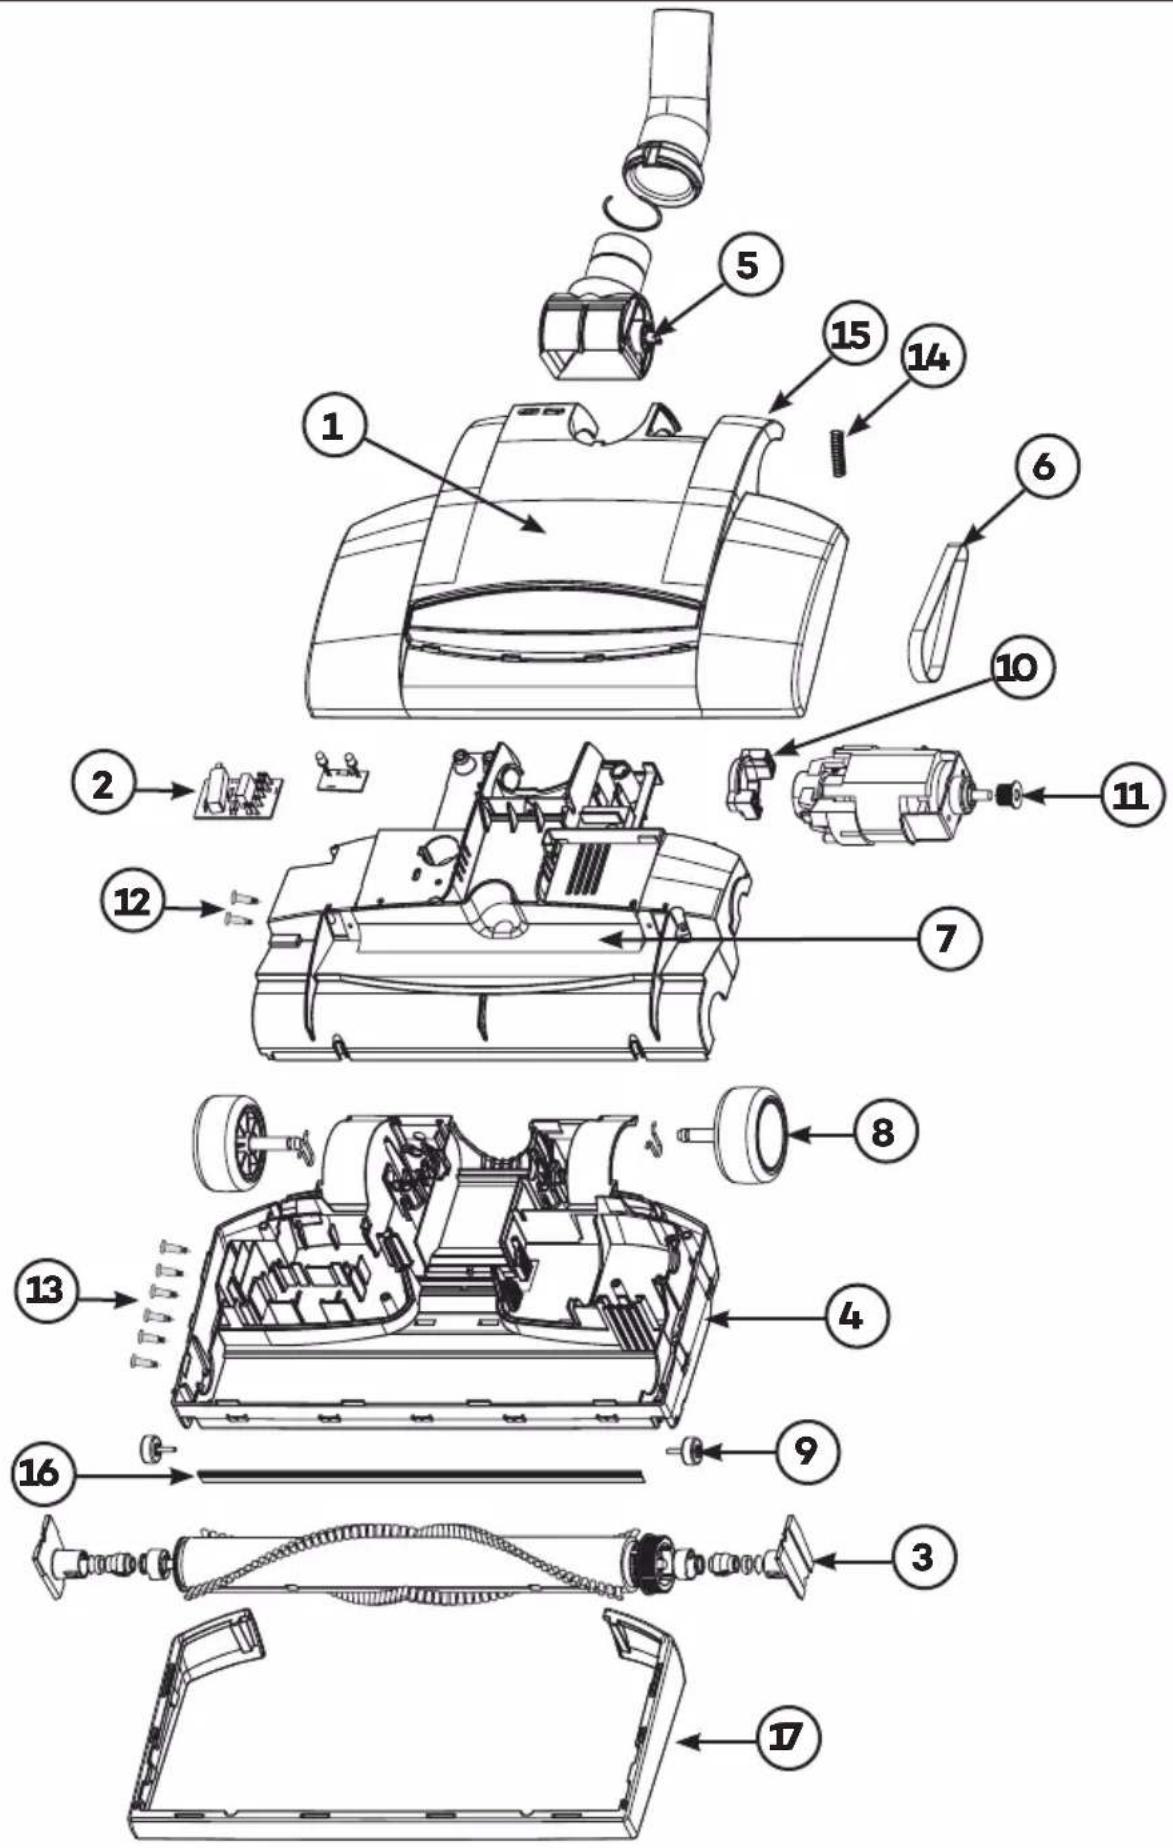
Exploded view diagram of a vacuum cleaner with numbered parts for identification and assembly reference.POWER NOZZLE PARTS LIST
| I.D. | Description Part# | |
| 1 Cover Complete – No Light – Black 106016 | ||
| 2 Circuit Board/Red Cap 120V (use only with manual reset switch with light and motor 105021) | 105012 | |
| Circuit Board/Red Cap 120V (use only with thermal reset switch with light and motor 106918) | 106917 | |
| 3 Brush Roll Complete 105013 | ||
| 4 Base Complete (Bushing/Bumper/Cable Tunnel/Counter Weight) | 106017 | |
| 5 Neck/Joint Complete W/Buttonhole 105015 | ||
| 6 Belt - Cogged 105016 | ||
| 7 Motor Cover for Units Without Light 105017 | ||
| 8 Rear Wheel – 2 Wheels/Axle 105018 | ||
| 9 Front Wheel – 2 Wheels/Axle 106983 | ||
| 10 | Motor Hardware- Clamp/Screw/Wedge | 105020 |
| 11 | Motor Complete 250W (use only with 105012 circuit board) | 105021 |
| Motor Complete 120W (use only with 106917 circuit board) | 106918 | |
| 12 | Screw Set (2) | 106525 |
| 13 | Screw Set (6) | 106524 |
| 14 | Compression Spring for Foot Pedal | 106933 |
| 15 | Release Foot Pedal | 106939 |
| 16 | Rubber Barrier | 106934 |
| 17 | Baseplate Bumper | 106940 |
| Power Nozzle Power Cord (not shown) | 106301 | |
ELECTRIFIED HOSE ASSEMBLY
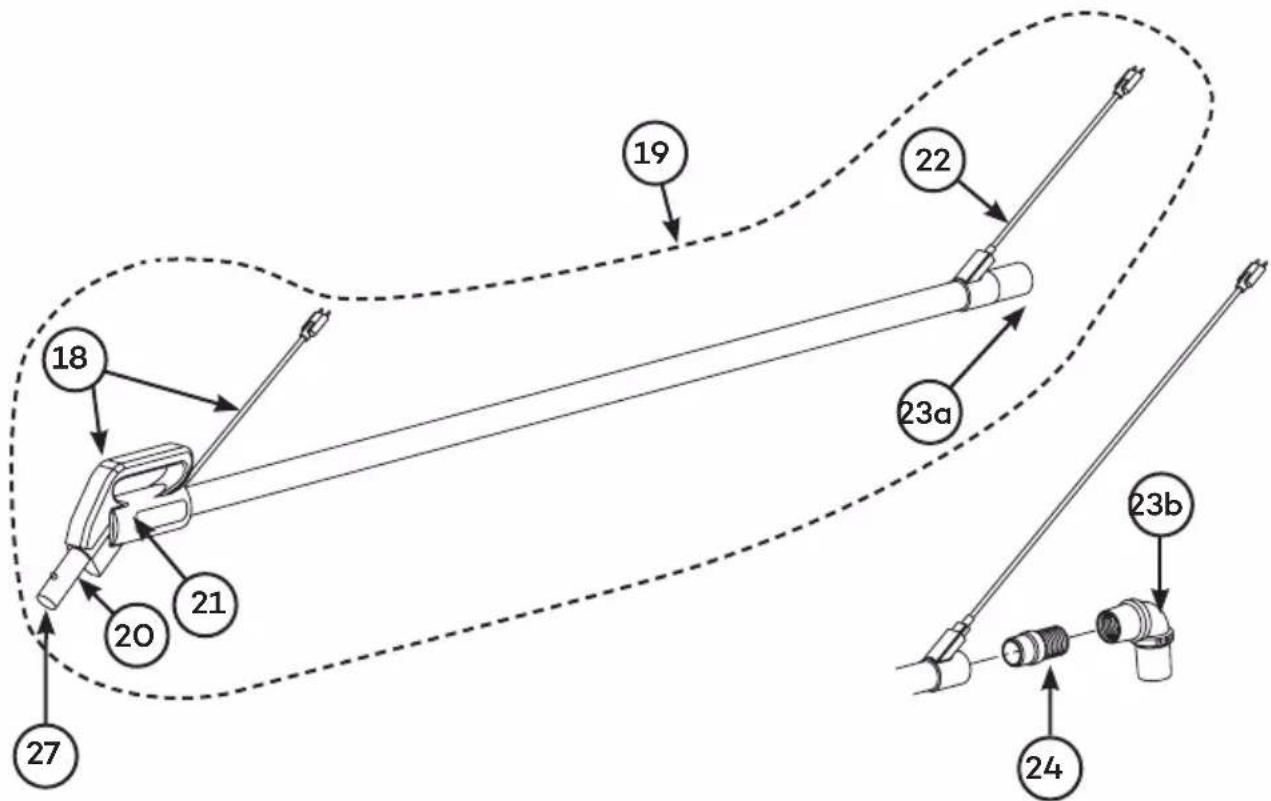
flowchart
graph TD
    A["18"] --> B["20"]
    B --> C["21"]
    C --> D["27"]
    D --> E["23a"]
    E --> F["22"]
    F --> G["19"]
    G --> H["24"]
    H --> I["23b"]
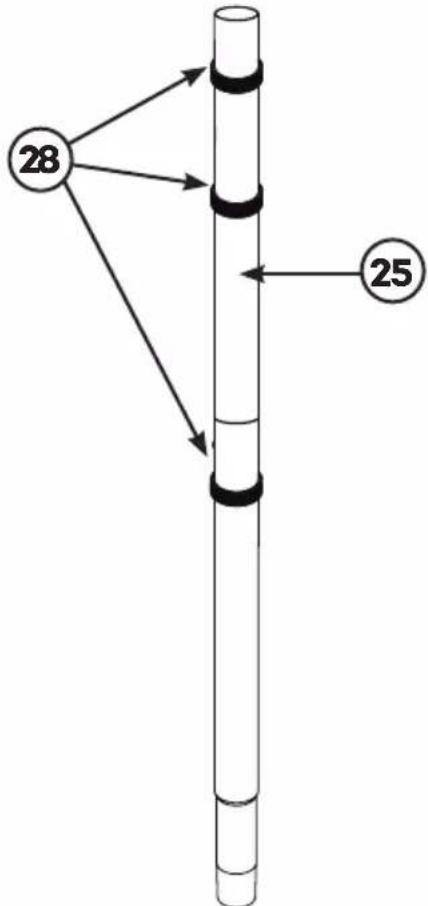
flowchart
graph TD
    A["28"] --> B["Vertical Column"]
    C["25"] --> B
    B --> D["Vertical Column"]
    style A fill:#f9f,stroke:#333
    style C fill:#f9f,stroke:#333
ELECTRIFIED HOSE PARTS LIST
| I.D. | Description Part# | |
| 18 | Switch Replacement Kit (includes on/off switch with circuit 1064 board and power cord) | 413 |
| 19 | 45" Electrified Hose 2-wire Assembly for Backpacks 105880 | |
| 20 | Stub Tube Kit (The 106941 Stub Tube fits only newer model units shipped June 2008 or later. Open the handle to see if yours has the second interior stabilizing pin. If it does not, the 106721 Stub Tube Kit must be ordered) | 721 |
| 21 | Handle Housing w/Screws (Two-button Stub Tube) 106955 | |
| 22 | 28" Power Cord for Backpacks 105898 | |
| 23a | Swivel Cuff for Alpine/ProVac CN (formerly ProClean) 103502 | |
| 23b | Elbow Swivel Cuff for Backpacks 102715 | |
| 24 | Swivel Cuff Adapter for Backpacks | 101950 |
| 25 | 2-Piece Wand w/Cord Holder | 106053 |
| 1-Piece Wand (2 wands make 106053) | 101784 | |
| 26 | Brass Contact Ring (inside handle) (not shown) | 106936 |
| 27 | 2-Pin Stub Tube (must have corresponding handle 106955) | 106941 |
| 28 | Velcro Straps (set of three) | 107026 |
| Bleeder Valve (not shown) | 106708 |
Limited Warranty
ProTeam, Inc., warrants this power nozzle to be free from defects in materials and workmanship arising under normal usage and care for the following terms:
The warranty period is for twelve (12) months on the power nozzle motor and for six (6) months on all other parts of the power nozzle, with the exception of the power cords and electrical connections to the wand, handle and electrified hose.
This warranty applies from the date of purchase and only when the power nozzle is used in accordance with ProTeam's operating instructions. Proof of purchase will be required to confirm all applicable warranty situations.
This warranty does not apply to:
- Ordinary wear and tear and blockages which occur during use.
- Damage due to unauthorized or improper use, modification, alteration, service or repair.
- Electrical connections from the power nozzle to the wand, handle and electrified hose. Warranty period for these items is for ninety (90) days from the date of purchase.
- Power cords are not covered by the Limited Warranty.
This warranty is extended only to the original purchaser of the power nozzle. If the power nozzle is found to be defective during the warranty period, it will be ProTeam's option to replace or repair it, without charge, if returned in accordance with the following instructions:
A Return Authorization Number (RAN) must be issued prior to returning equipment. Contact ProTeam's customer service department at 866.888.2168 to request a RAN that is required for all warranty correspondence.
The power nozzle should be cleaned and packed carefully in a well padded carton and returned, shipping charges prepaid. ProTeam will not be responsible for repairs to products due to improper packing. Consult ProTeam's website - www.proteam.emerson.com for authorized service centers.
If a completed product registration has not been received by ProTeam, a dated, written proof-of-purchase must be enclosed with a statement advising the nature of the malfunction with a Return Authorization Number. Go to proteam.emerson.com to register your product.
Any repair or replacement under this warranty shall not extend the warranty period.
THE FOREGOING WRITTEN WARRANTY SHALL CONSTITUTE THE EXCLUSIVE LIABILITY OF PROTEAM.
The above warranty is exclusive and in lieu of all other expressed warranties whether oral or written. Under no circumstances, whether alleged as a result of breach of contract or warranty, negligence or otherwise, shall ProTeam be liable to the purchaser or gift recipient or any other person for special incidental or consequential damages or nature, including, without limitation, damages to or loss of use of property. ProTeam's liability under any circumstances will not exceed the purchase price of the vacuum cleaner. No agent, employee, or representative of ProTeam, nor any other person, is authorized to modify this warranty in any respect.
INDICE
INSTRUCCIONES DE SEGURIDAD IMPORTANTES......12
INSTRUCCIONES ELÉCTRICAS....13
text_image
Exploded view diagram of a vacuum cleaner with numbered parts for identification and assembly reference.text_image
Exploded view diagram of a mechanical device with numbered parts for identification and assembly reference.PIÈCES DE L'ÉLECTROBROSSE ÉQUIÉE