Weedbrush - Electric gardening tool Eurom - Free user manual and instructions
Find the device manual for free Weedbrush Eurom in PDF.

User questions about Weedbrush Eurom
0 question about this device. Answer the ones you know or ask your own.
Ask a new question about this device
Download the instructions for your Electric gardening tool in PDF format for free! Find your manual Weedbrush - Eurom and take your electronic device back in hand. On this page are published all the documents necessary for the use of your device. Weedbrush by Eurom.
USER MANUAL Weedbrush Eurom
natural_image
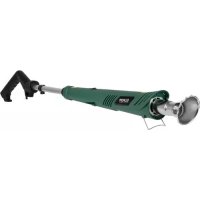
Exterior view of a modern electric tool with handle and blade (no text or symbols visible)Onkruidborstel / Unkrautbürste / Weed brush / Brosse de désherbage
Art.nr. 248104
Dank
natural_image
Simple line drawing of a trash bin with diagonal lines crossing it, no text or symbols present.natural_image
Simple line drawing of a trash bin with diagonal lines crossing it, no text or symbols present.Entsorgung
Thank you very much for choosing for a EUROM device. You have made a good choice! We hope you will be satisfied about its functioning.
To get maximum profit from your product, it is important to read this manual attentive and totally before use, and to understand what is written. Read especially the safety instructions: they are there to protect you and your environment.
Keep the manual in a safe place for future reference. Store also the package: that is the best protection for your product in times of no-use. And if you at any time pass the appliance on, pass on the manual and package too.
We wish you a lot of fun with the weedbrush!
Eurom
Kokosstraat 20
8281 JC Genemuiden (NL)
info@eurom.nl
www.eurom.nl
This manual has been complied with the utmost care. Nevertheless, we reserve the right to optimize this manual at any time and to adjust it technically. The image used may differ.
Technical data
| Power connection | 230 Volt |
| Frequency | 50 Hz. |
| Output capacity | 400 Watt |
| Free Speed | 2800 |
| Spindle dimension | 6 mm |
| Weight | 2,65 kg |
| Sound (in compliance with EN 60745) | L_pA 88 dB(A) L_WA 99 dB(A) |
Safety instructions and warnings
The device bears symbols that mean the following:
 | Wear protective goggles and hearing protection during use. |
 | Do not use the device in the rain. |
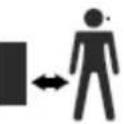 | Keep bystanders at a safe distance during use. |
 | Do not place your hands or feet on or near rotating and sharp parts in the device. |
 | The use of the weed brush can lead to objects being ejected at speed. Be aware of this! |
 | Switch off the weed brush and remove the plug from the wall socket before carrying out any maintenance or cleaning the appliance. |
 | |
 | Read the instruction manual. |
The following safety instructions also apply:
- Familiarise yourself with the device and the controls before using the weed brush.
-
The weed brush may not be used by children or persons that are not considered capable of doing so safely. Careless use can lead to damage and/or injury!
-
When using the device, always wear sturdy shoes or boots to protect your feet and long trousers to protect your legs.
-
Do not expose the device to rain or submerge in water or any other liquid, and avoid it getting wet.
-
Check the device before use. If you notice any damage, do not use it!
-
Damage or any other defects must be repaired by a competent mechanic.
-
Never use the device without the protective cover or with a badly fitting cover or a damaged, broken or worn cover.
-
Do not use the device if the electric cable or extension cable is damaged or worn. Check before use!
-
If you damage the electric or extension cable during use of the device, remove the plug from the socket immediately. Do not touch the cable until the power supply has been disconnected!
-
Do not use the weed brush near children or animals.
-
Only use the weed brush in daylight or in well-lit conditions.
-
Check to ensure that the weed brush has been assembled according to instructions.
-
If you assemble the weed brush, use the tools supplied to prevent damage to the device.
-
Wear protective gloves when assembling the brush.
-
Once you have assembled the device, leave it to tick-over in a safe environment for a while. If the device vibrates a lot, if you see damage to the brush or if you see other faults, switch the device off immediately and try to find the cause and solve it.
-
Do not use any worn brushes.
-
Do not use the device for removing wet weeds.
-
Before you start work with the device, remove stones, sticks, wires and other objects from the area you will be clearing.
-
Only use the device in a vertical position, with the brush directed towards the ground. Never switch the device on while it is in another position!
-
Do not rush when using the device.
-
Do not exert any pressure on the device.
-
Always keep your hands and feet away from the brush.
-
Avoid touching the brush.
-
Ensure that the electric cable does not touch the brush.
-
Before you set the device aside, always switch it off and wait until the brush has stopped turning. Never try to manually stop the brush turning!
-
Be aware that the brush will continue to rotate even after you have turned it off!
-
Only use the brushes recommended by the manufacturer.
-
Always remove the plug from the socket once you have finished with the device, when you wish to carry out maintenance or if the device is not being used.
-
After use, store the device in a safe place, outside the reach of children.
Electrical safety
- Before use, always check to ensure that the socket you wish to use provides the Voltage and Hertz detailed on the weed brush's specification plate.
- Preferably connect the weed brush to an electrical group that is protected by an earth leakage circuit breaker of max. 30 mA.
- Only use the following types of extension lead: H05VV-F, H05RN-F en H05RR-F.
Safety warnings
When you are using electrical devices, please read the following safety instructions to avoid electric shocks, injury or burns. Read the following carefully before using the device.
- Keep the working area clean. Too many obstacles could lead to accidents and injuries.
- Be aware of your surroundings. Electrical devices should not be used in the rain or in damp conditions or in the vicinity of flammable substances or gases. Make sure you have sufficient light.
- Keep children and visitors out of the vicinity of the working area. They should not touch the device or the extension cable!
- Adapt your clothing and hairstyle to your activities and do not wear loose clothing or hair, long chains or shawls when using devices with moving parts. Protective gloves and shoes and optionally goggles, ear mufflers and a dust mask are also recommended.
- Use the appropriate tools and do not use the device for tasks for which it is not designed. Do not make any changes to the device. Inappropriate use and making changes to the device will invalidate the warranty and release the supplier of any liability!
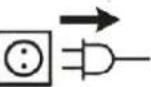
- Always put the plug into the socket and then switch the device on in order to avoid unintended operation.
- Make sure that you stand firm and do not overstretch yourself to reach an awkward spot with the device.
- Never force the device; it works best and most safely if used in the appropriate manner.
- Always be alert and use your common sense when working. Do not use the device when you are tired.
- Be careful with the electric cable. Do not pull it, over-run it or trip over it. Keep the cable away from heat, oil and sharp edges.
- Protect yourself from electric shocks and prevent bodily contact with earthed surfaces such as pipes, radiators, etc.
- Clear tools away immediately after use, to a dry, high or enclosed space out of the reach of children.
- Treat tools with care. Keep them clean and in good condition and replace any worn parts promptly. Check the device and the cable regularly and allow competent persons to carry out any maintenance. Never use the device if a part is damaged.
- Always remove the plug from the socket when the unit is not in use.
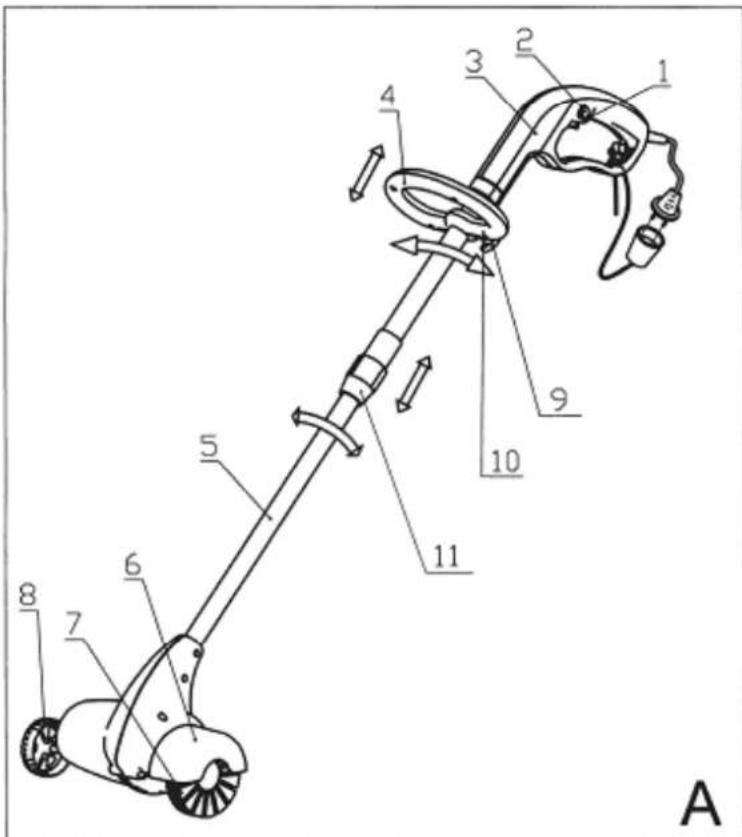
Description
Your weed brush has been designed to remove weeds from between tiles and on patios.
-
On/off switch
-
Unlocking
-
Main handle
-
Steering handle
-
Telescopic tube
-
Protective cover
-
Brush
-
Wheel
-
Knob
-
Screw
-
Compression fitting with locking ring
Assembly
Assembly and adjustment of the steering handle (fig. A)
- Mount the protective cover (4) on the device, as shown in drawing A.
- Attach the steering handle to the shank using both knobs (9).
The steering handle can be adjusted as follows to acquire a proper balance:
- Unscrew both knobs (9)
- Adjust the handle to the required height.
- Carefully tighten the knobs once more.
Assembly of the telescopic tube (fig. A)
- Turn open the locking ring of the compression fitting (11) and slide it back over the cable and the bottom telescopic tube (5).
- Now insert the bottom telescopic tube (5) into the inner section of the compression fitting. Attention: there is a lug inside the compression fitting, there is a groove in the bottom telescopic tube. The lug must engage with the groove!
-
Slide the telescopic tube into the compression fitting until the lug passes a stop in the groove. Now, the telescopic tube can no longer be slid out of the compression fitting.
-
Determine your desired length of the weed brush by sliding the telescopic tube in and out. When you have found the right length, slide the locking ring over the compression fitting again and tighten both sections again firmly.
- You can adjust the length by loosening the locking ring, sliding the telescopic tube and tightening the locking ring once more.
- Check before use that the tube is properly fastened!
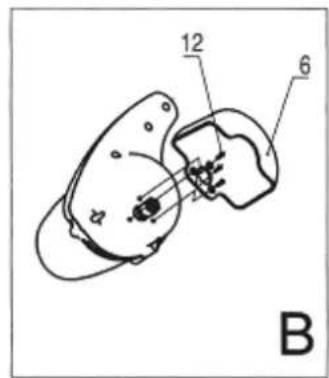
Assembly of the protective cover (fig. B)
- Mount the protective cover (6) on the device, as shown in drawing B.
- Secure the protective cover with the screws (12).
- Replace the cover when it gets worn.
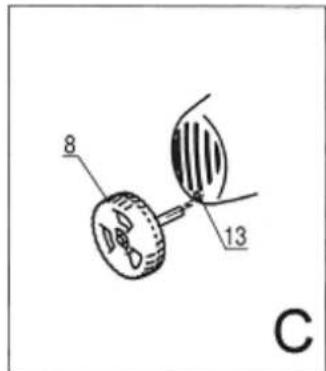
Wheel assembly (fig. C)
- Put the wheel axle (8) into the assembly hole (13) made for this purpose.
- Push the axle firmly into place.
Brush assembly (fig. D)
- The hard brush supplied is suitable for regular and stubborn weeds.
- Two brushes are supplied as standard.
- A worn brush must be replaced immediately.
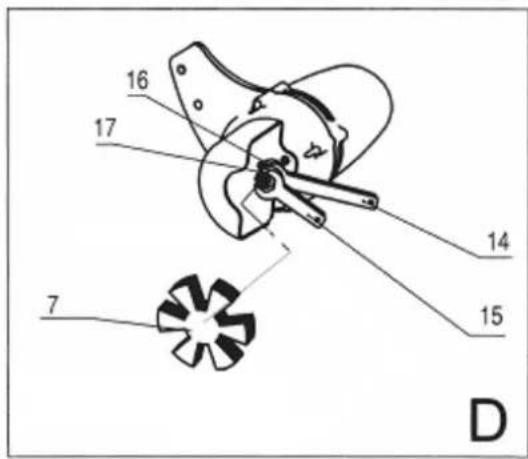
Before securing or changing a brush, always pull the plug out of the socket!
Wear protective gloves when assembling the brush.
The holder (16) to which the motor shaft is attached sticks out of the device. Check that the copper coloured compression bush is in the holder (or insert it). The hexagonal nut is now placed over the holder and the collar. Now insert the brush shaft through the back of the nut as far as possible into the collar. Finally, firmly tighten the nut (17) using both spanners (14 & 15).
To change the brush, loosen the nut once more and remove the worn brush. Before placing a new brush, check that the compression bush is in the holder!
User instructions
Before use
- Check that the steering handle, the wheel, the brush and the closure on the telescopic tube are secure and adjusted correctly.
- Check that the socket you are using provides the correct voltage (see specification plate on weed brush).
- Connect the weed brush to a suitable extension cable and hook the cable behind the clamp (see fig. A).
- Hold the device with both hands (one hand on each handle) and check that the underside of the device is flat and horizontal.
Operating
- If all checks are ok, you can insert the plug into the socket.
- Now press the unlocking device (2), press the ON/OFF switch (1) and keep it depressed.
- Release the ON/OFF switch in order to switch the device off. The device will lock automatically.
Use
Move the device over the surface area to be treated at a constant speed. For the best results, you are advised to test the device on a small area first. Check to ensure the tiles are not damaged.
Only use the device for dry weeds.
Keep the device out of the vicinity of hard objects and plants.
Brush the long edges first and then the short ones.
Do not use the brush in the same spot for too long. The brush will then push into the joints and will remove the sand/soil.
Regular brushing helps prevent stubborn weeds taking hold.
Cleaning and Maintenance
Always remove the plug from the socket if you are carrying out maintenance!
The weed brush needs special cleaning.
- Regularly clean the ventilation openings with a soft cloth.
- Regularly remove dirt from the cover with a soft brush.
Problems and solutions
Always pull the plug out of the socket if you establish or intend to solve a problem!
The brush won't rotate
- Check the electrical supply.
- Check to ensure the brush is attached properly.
The weeds are not removed
- Replace the brush
Removal
natural_image
Simple line drawing of a trash bin with diagonal lines crossing it, no text or symbols present.In the EU this symbol indicates that this product may not be disposed of as ordinary household waste. Old equipment contains valuable materials, suitable for recycling. These materials should be made suitable for reuse in order to prevent any adverse effects to health and the environment caused by unregulated waste collection. Therefore, please make sure that you bring old equipment to a designated collection point. Alternatively, contact the original supplier, who can make sure that as many of the components as possible can be recycled.
CE-statement
The undersigned Eurom, Kokosstraat 20, 8281 JC Genemuiden hereby declares that the below product electric weed brush known under the brand name EUROM complies with the European Directives MD 2006/42/EC and EMC Directive 2014/30/EU and conforms with the following requirements:
EN 60335-1:2012/A11:2014
EN 62233:2008
EN 1083-2:1997
EN ISO 12100:2010
EN 55014-1:2006/A2:2011
EN 55014-2:2015
EN 61000-3-2:2014
EN 61000-3-3:2013
RoHS 2011/65/EU&(EU)2015/863
Genemuiden, 29-01-2020
W.J. Bakker, alg. Dir.