
PMD661MKIII - Audio recorder MARANTZ - Free user manual and instructions
Find the device manual for free PMD661MKIII MARANTZ in PDF.
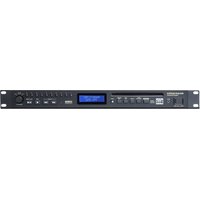
| Product Type | Portable Digital Audio Recorder |
| Brand | Marantz |
| Model | PMD661MKIII |
| Recording Formats | WAV (PCM 16/24-bit, 44.1/48/96 kHz), MP3 (32-320 kbps) |
| Built-in Microphones | Studio-quality Stereo Condenser Microphones |
| Mic/Line Inputs | 2 Combo XLR-6.35mm Inputs with +48V Phantom Power |
| Additional Line Input | Line In 2 Jack (3.5mm) |
| Digital Input | Digital In Jack (RCA S/PDIF) |
| Audio Outputs | Headphone Output (6.35mm), Line Output (RCA), Built-in Speaker |
| Recording Media | SD Card (FAT16/32) |
| Advanced Features | Pre-record, Back Skip, Pitch Control, Marking, File Copy/Divide, Password Encrypted Recording |
| Power Supply | 4 AA Batteries (Alkaline or Ni-MH) or AC Adapter (DC In) |
| Battery Life | Up to 7 hours of continuous recording on a set of batteries |
| Connectivity | USB Mini-B Port for File Transfer |
| Dimensions | Approx. 180 x 70 x 35 mm (estimated) |
| Weight | Approx. 350 g (without batteries, estimated) |
| Care and Cleaning | Clean with a soft, dry cloth. Do not use chemical products. |
| Safety | Do not expose to moisture or extreme temperatures. Use only the supplied adapter. |
| Spare Parts and Repairability | Contact Marantz Professional support for parts and repairs. |
Frequently Asked Questions - PMD661MKIII MARANTZ
User questions about PMD661MKIII MARANTZ
0 question about this device. Answer the ones you know or ask your own.
Ask a new question about this device
Download the instructions for your Audio recorder in PDF format for free! Find your manual PMD661MKIII - MARANTZ and take your electronic device back in hand. On this page are published all the documents necessary for the use of your device. PMD661MKIII by MARANTZ.
USER MANUAL PMD661MKIII MARANTZ
User Guide (English)
Introduction
Features:
• Built-in studio-grade condenser microphones
• WAV recording at 44.1/48/96 kHz, 16/24-bit
• MP3 recording at six selectable recording bit rates from 32 to 320 kbps
- Password-protected file encryption
• Dictation functions including Pitch Control and Skip Back
• (2) Balanced Combo XLR-1/4" (6.35 mm) mic inputs with +48 V phantom power
- Up to 7 hours of continuous recording time from a set of batteries
Box Contents
PMD661MKIII
Power Adapter
SD Card
Boundary Microphone (mini-XLR)
XLR-to-Mini-XLR Cable
RCA-to-1/8" (3.5 mm) Audio Cable
USB Cable
Carrying Case
Quickstart Guide
Safety & Warranty Manual
Support
For the latest information about this product (documentation, technical specifications, system requirements, compatibility information, etc.) and product registration, visit marantzpro.com.
For additional product support, visit marantzpro.com/support.
Features
Front Panel
- Microphones: Internal stereo condenser microphones.
- Display: The display shows the status and information of PMD661MKIII. See Display below for more information.
- Function Button: Press the Function button to change the functions of the F1 and F2 buttons with toggle operation. The functions are different depending on each operation mode.
- F1/F2 Buttons: The functions of the F1 and F2 buttons depend on each operation mode and the Function button. The function of F1/F2 is indicated on the bottom corners of the display. The functions change automatically when the status changes. The 2nd or 3rd function in the same operation mode can be selected by pressing the Function button.
- Display Button: Press the Display button to toggle the display contents such as the time information. The content is different depending on each operation mode.
-
◀◀◀/▶Button:
-
While in Stop, Playback, or Play-Pause Mode, press this button to choose the file (jump to previous or next file).
- In Play-Pause Mode, press and hold this for high speed Reverse/Forward searching without audio (Search -/+).
-
In Playback Mode, press and hold this to “rewind”/“fast forward” and do a 2X speed search (Audible Search -/+).
-
Pitch- Button: Press this button to slow down playback. During Menu Mode, this button is used to move down or change an item.
- Pitch+ Button: Press this button to speed up playback. During Menu Mode, this button is used to move up or change an item.
- Rec Button: Press this button to start recording from Stop or Rec-Pause Mode.
- Rec Pause Button: Press this button to enter the Rec-Pause Mode from Stop or Record Mode.
- Level LED (green, orange, red): When a sound is input during Record, Rec-Pause or Playabck Mode, these LED turn on.
- Skip Back Button: Press the Skip Back button to skip back during Playback or Play-Pause Modes. Also, the Retake Record Mode is set when this button is pressed during t Pause Mode.
- ▶/II/Enter Button: Toggles between Playback and Play-Pause Modes. During Menu Mode, this is used to select an option.
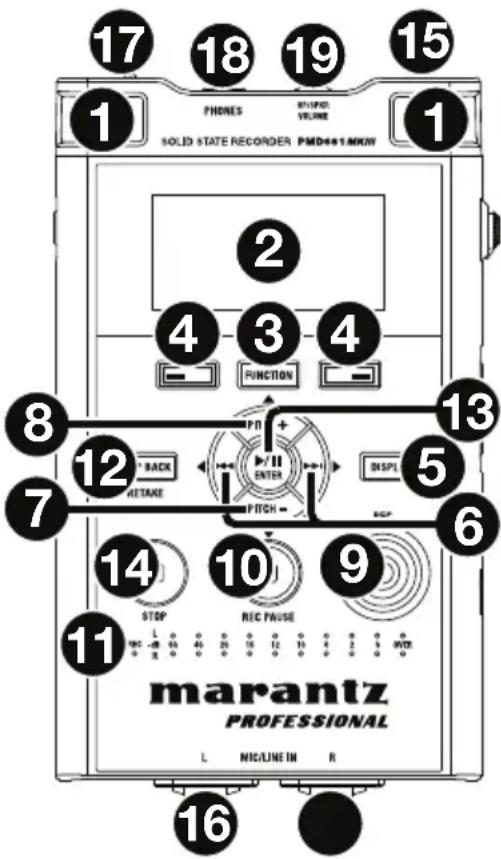
- Stop Button: Press this button to stop the playback or recording (Stop Mode) and to exit the Play-Pause or Rec-Pause Mode. During Menu Mode, press this button to exit Menu Mode without storing to memory.
- Remote Control Jack: This jack is for use with a third-party external remote control.
- Mic/Line In Jacks: Combo XLR-1/4" for mic/line level inputs.
- Phantom/Mic Slide Switch: 3-position slide switch: Phantom on, off or line. Phantom power supplies +48 V to external microphones.
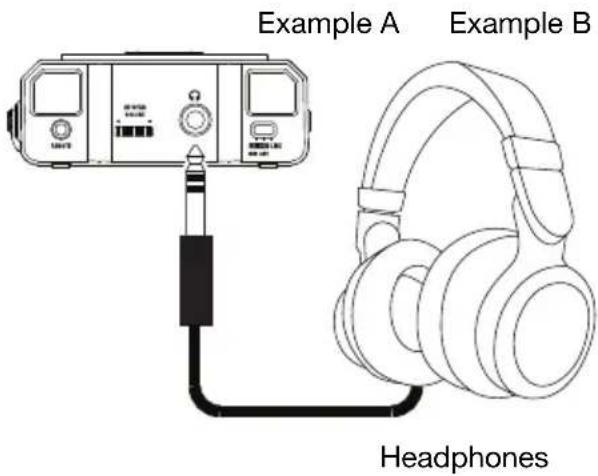
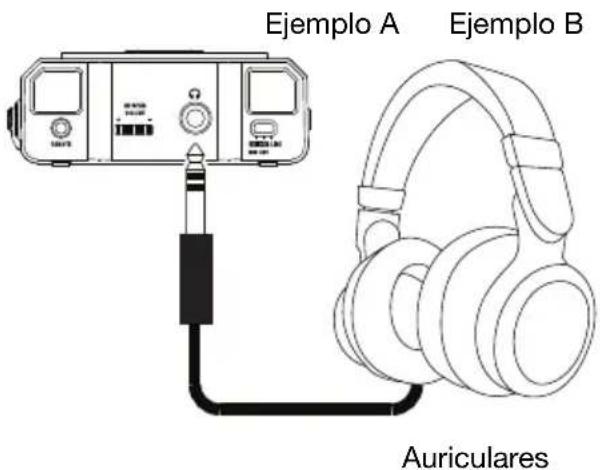
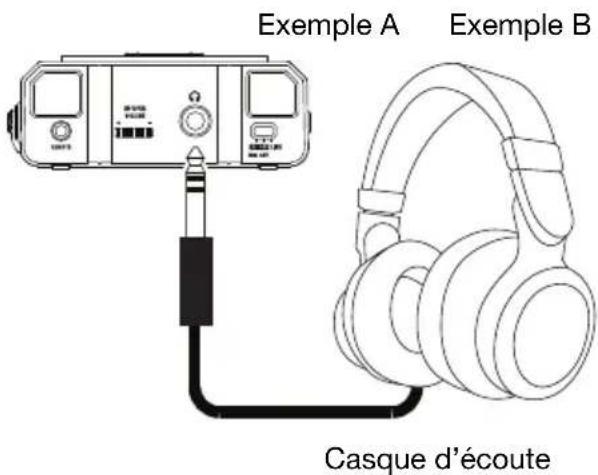
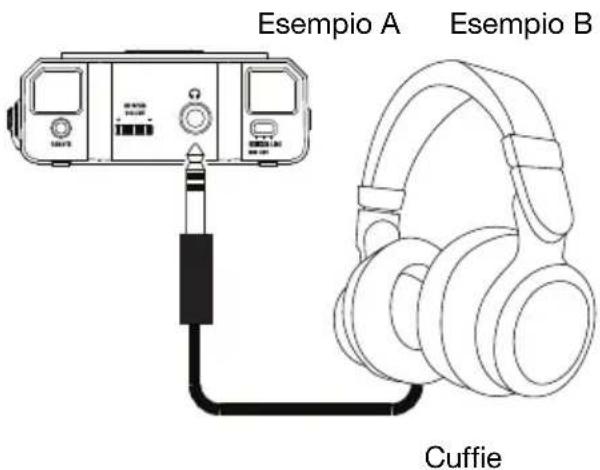
- Phones Jack (1/4" / 6.35 mm): For monitoring and private listening, you can connect your headphones to this jack.
- Hp/Spk Vol Control: Use this to adjust the output level of the headphones or internal speakers.
Warning: When using headphones, take care not to turn the volume too high. Listening at high volumes for extended periods of time may result in permanent hearing damage.
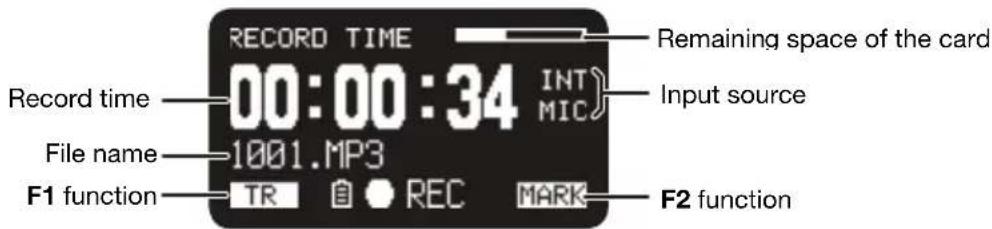
Display
-
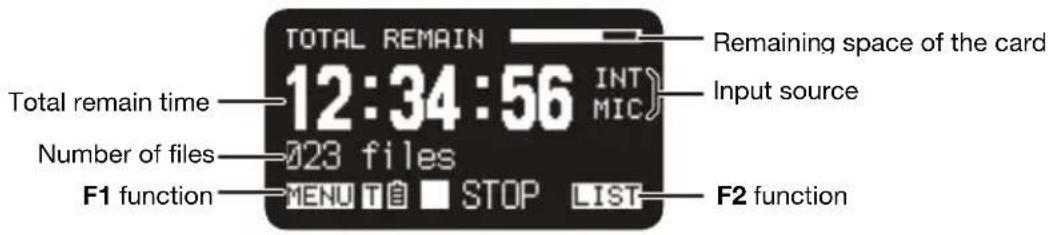
Remaining space of the card
-
Input source
-
F2 function
-
Status
-
Battery or AC icon
-
Timer icon (This icon appears if the Timer Record/Playback is set. During the Timer Record/Playback, it blinks.)
-
F1 function
-
Number of files
-
Total remain time
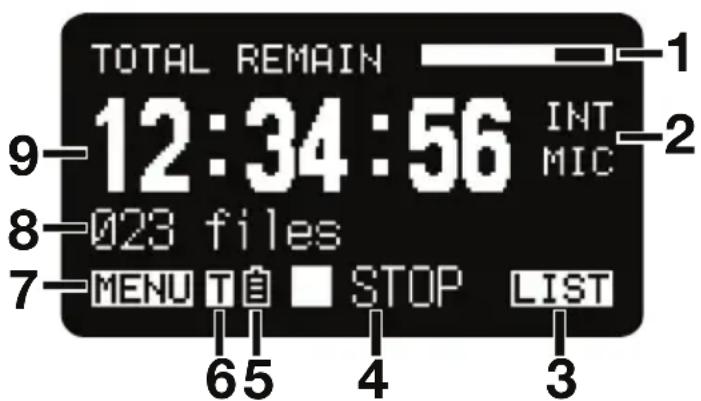
See Operation > Display Control for more information on the various Display screens.
Side Panels

Left
- Digital In Jack: Connect a digital audio cable with an RCA jack from an external device providing S/PDIF digital output.
- DC In Jack: Insert the provided AC adapter plug. If the AC adapter plug is inserted while using the recorder on battery power, the recorder will automatically switch to adapter power. Also, if the AC adapter plug is removed, the recorder will automatically switch to battery power.
- USB Port (Mini-B): While playback is stopped, connect the included USB Cable to a computer from this port to enter USB mode.
- Card Compartment: Open the lid to access an SD card.
- Speaker: Internal speaker of L channel.
Right
- Speaker: Internal speaker of R channel.
- Power Slide Switch: Slide and hold for a short time to turn power on. Slide to turn power off. During Record and Rec-Pause Mode, the Power switch is not operational.
- Key Lock Slide Switch: Slide switch for the Key Lock On and Off control.
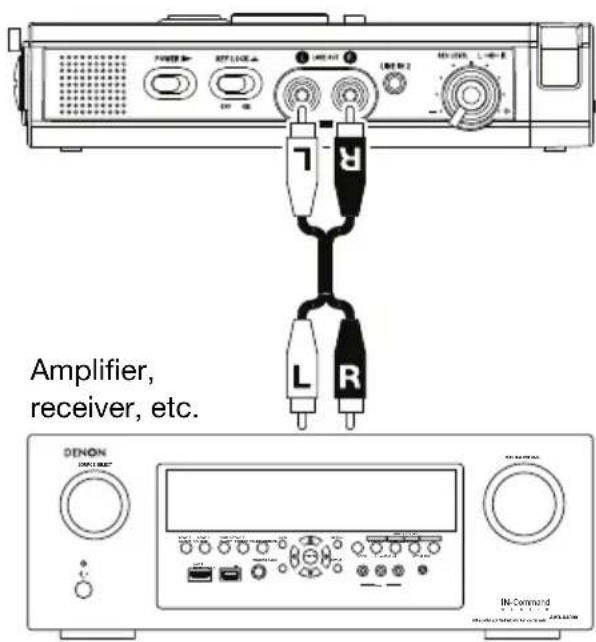
- Line Out Jacks (RCA): Insert an audio cable plug connected to an external audio device into these jacks to output audio signals to an external device (amp, etc.).
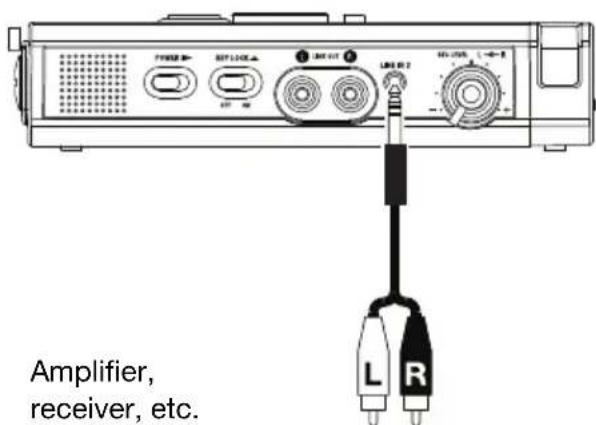
- Line In 2 Jack (1/8" / 3.5 mm): Insert an audio cable plug connected to an external audio device into this jack to input the signals from the external device into the recorder.
- Rec Level Control: Turn to adjust the record level when the Level Cont. in the preset menu is set to Manual. The inside control (Right channel) and outside control (Left channel) turn together unless you hold one while turning the other. The optimum recording level is when the level meter goes as close to 0 dB as possible but does not go over.
Setup
Items not listed under Introduction > Box Contents are sold separately.
Connection Diagrams
Recording
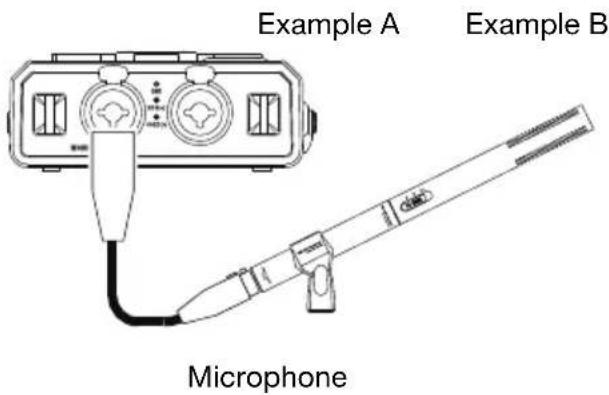

Playback
Clock Setting
The date and time are written on each audio track (file) when the track is started. When an audio track is viewed on a computer, this date and time appears as when the file was “modified.”
- While stopped, press the F1 (Menu) button.
- Press the Pitch- or Pitch- button to select Time/Date.
-
Press the ▶/II/Enter button to enter the Time/Date setting.
-
Press the Stop button to cancel.
- Press the ◀◀ or ▶button to select the item.
- When the hour is set, press the ◀◀◀ button to return to the top menu.
- When the year is selected, the ▶▶ button is invalid.
-
Press the Pitch+ or Pitch- button to select the value.
-
Press the F1 (Exit) button.
-
Store? appears on the display.
- Select Yes and press the ▶/II/Enter button to write on the Real Time Clock.
Note: If it happens to be the date which does not exist such as Feb. 31, it will be revised as Feb. 28.
Language
The Language menu item allows you to choose a display language.
- While stopped, press the F1 (Menu) button.
- Press the Pitch+ or Pitch- button to select Language.
-
Press the ▶/II/Enter button to enter the Language setting.
-
Press the Stop button to cancel.
- Press the Pitch+ or Pitch- button to select the item.
-
Press the ◀◀ button to return to the top menu.
-
Press the F1 (Exit) button.
-
Store? appears on the display.
- Select Yes and press the ▶/II/Enter button to store the change.
Operation
Recording
Audio Input for Recording
The audio input for recording is set from the Input menu.
Set the Rec Channel menu to Stereo to create a stereo (2-channel) sound file. Set it to D.Mono to create a "dual mono" sound file. In this mode, the left channel input is recorded to both left and right channels, but the right channel is attenuated by 20 dB—useful in situations where an unexpected increase in sound level may distort the non-attenuated input. Set it to Mono to create a monaural (1-channel) sound file. Note that all Mono settings use the left channel input only. The monaural file will be almost half the size of the stereo file.
Set the Phantom/Mic slide switch to ON to supply +48 V phantom power to condenser microphones, and adjust the level sensitivity. For dynamic microphones, set it to OFF to adjust the microphone level sensitivity. Set it to Line to select the input sensitivity of line level sources.
| # Input Rec | Channel | Phantom/Mic Switch | Description | |
| 1 | INT MIC | Stereo | Invalid | Left/Right channel stereo recording. |
| 2 | D.Mono | Left/Left channel attenuated by 20 dB. | ||
| 3 | Mono | Left channel monaural rec | ||
| 4 | MIC/LINE | Stereo | On Left/Right channel microphone level stereo redcording.+48 V phantom power is supplied for XLR inputs. | |
| 5 | Off Left/Right channel microphone level stereo recording. | |||
| 6 Line Left/Right channel line level stereo recording. | ||||
| 7 | D.Mono | On | Left/Left channel microphone level stereo recording.The Right channel is attenuated by 20 dB.+48 V phantom power is supplied for XLR inputs. | |
| 8 | Off Left/Left channel stereo recording. The Right channel is attenuated by 20 dB. | |||
| 9 Line Left/Left channel line level stereo recording. The Right channel is attenuated by 20 dB. | ||||
| 10 | Mono | On | Left channel microphone level monaural recording.+48 V phantom power is supplied for XLR inputs. | |
| 11 | Off Left channel microphone level stereo recording. | |||
| 12 | Line Left channel line level monaural recording. | |||
| 13 | LINE2 Stereo Invalid Left/Right channel stereo recording. | |||
| 14 | ||||
| 15 | ||||
| 16 | D.IN | Stereo | Invalid | Left/Right channel stereo recording. |
| 17 | D.Mono | Left/Left channel stereo recording. | ||
| 18 | Mono | Left channel monaural recording. | ||
Normal Recording
- Slide and hold the Power switch to turn on.
-
Press the Rec button to begin recording.
-
The Rec indicator will be lit and steady while recording.
- The display will show the information display of recording.
-
Press the Rec Pause button to pause recording.
-
Press the Stop button to stop recording and end the file (close the audio file).
You can press the ▶/II/Enter button to play the just recorded file or press the Stop button again to enter the Stop Mode. Then pressing the ▶/II/Enter button will play the beginning of the first audio file.
Retake Recording
The PMD561 has a retake recording function for recording over from any position in a file.
Retake recording operation during recording:
- Press the Rec button to begin normal recording.
- Press the Rec Pause button to pause recording.
- Press the Skip Back button to set the Retake Record Mode. The recording position skips back the amount of time set at Skip Back on the preset menu and playback starts.
-
While monitoring the sound being played, find the position at which you want to start retake recording.
-
Press the ▶/II/Enter button to pause playback.
- Press the Skip Back, ◀◀ or ▶button to search for the desired playback position.
- The playing speed can be changed using the Pitch+ and Pitch- buttons.
Press the Rec Pause button to set the retake starting position.
- Press the Rec button to start retake recording. The unneeded data (Take 1) is deleted and Take 2 is recorded in its place.
When recording of Take 2 starts, 0.5 seconds or the time set at PreRecord on the preset menu is prerecorded.
Retake recording operation during playback:
- Press the ◀◀ or ▶button to choose the file you wish to play.
- Press the ▶/II/Enter button to begin playback.
-
While monitoring the sound being played, find the position at which you want to start retake recording.
-
Press the ▶/II/Enter button to pause playback.
- Press the Skip Back, ◀◀ or ▶button to search for the desired playback position.
- The playing speed can be changed using the Pitch+ and Pitch- buttons.
Press the Rec Pause button to set the retake starting position.
- Press the Rec button to start retake recording. The unneeded data (Take 1) is deleted and Take 2 is recorded in its place.
When recording of Take 2 starts, 0.5 seconds or the time set at PreRecord on the preset menu is prerecorded.
Encrypted Recording
When Encrypt Rec in the preset menu is set to On, files recorded on SD cards are encrypted.
Encryption is performed based on the passcode (0000 to 9999) set in Passcode in the preset menu.
The correct passcode must be inputted to play back files recorded with encrypted recording. If you do not know the password for the encrypted file, press the Enter button without inputting a Passcode or inputting an incorrect Passcode. The Display will show "Password Fail" and the device will return to Stop Mode.
Files recorded with encrypted recording have the extension WAS for WAV files or MPS for MP3 files, according to the setting at Rec Format on the preset menu.
Use DMP Mark Editor to play files recorded with encrypted recording on a computer.
Playback
-
Slide and hold the Power switch to turn on.
-
Press the ◀◀◀ or ▶button to choose the file you wish to play.
Note: When the selected file has been recorded with encrypted recording, the correct passcode must be input. If an incorrect passcode is input, the file is not played.
- Press the ▶/II/Enter button to begin playback.
Press the ▶/II/Enter button again to pause playback.
When one file ends, the next file will start automatically. If the next file has been recorded with encrypted recording, playback will stop until the correct passcode is inputted.
- Press the Stop button to stop playback.
You can press the ▶/Ⅱ/Enter button to play the just played file, or press the Stop button again to enter the Stop Mode. Then pressing the ▶/Ⅱ/Enter button will play the beginning of the first audio file.
Note: The file sort order can be changed using the preset File Sort. When set to Alphabet, files are sorted in order of symbol, number, and alphabet. When set to Time/Date, audio files are sorted in the order in which they were created.
There are two ways to select the file you want to play. Either use the ◀◀◀ or ▶buttons during Stop Mode, or select the files from the File List:
- While stopped, press the F2 (List) button.
The file list appears on the display.
-
Press the Pitch+ or Pitch- button to select the audio file. Then press the ▶/II/Enter button to enter the File List Menu.
-
Press the Pitch+ or Pitch- button to select Play. Then press the ▶/II/Enter button to begin playback.
During playback, press the Stop button to return to the File list.
Passcode Input
The passcode, a number between 0000 and 9999 that is set in Passcode in the Preset menu, must be inputted when the Menu Lock setting is On and to play files recorded with encrypted recording.
When starting to change these settings or play such files, the passcode input screen appears on the display and the character selected with the cursor flashes. By factory default, **** is displayed.
To set a Passcode:
- From Stop, press the F1 (Menu) button.
- Press the Pitch+ or Pitch- button to select Preset Menu. Then press the Enter button to accept.
- Press the Pitch+ or Pitch- button to select Preset 1, 2, 3, or a renamed preset. Then press the Enter button to accept the selected Preset.
- Press the Pitch+ or Pitch- button to select Edit and press the Enter button to accept.
- Press the Pitch+ or Pitch- button to select Passcode and press the ◀◀◀ or ▶▶▶I buttons edit the passcode. You can now input a passcode (see below).
To input a Passcode:
-
Press the Pitch+ or Pitch- button to change the character.
The number increases between 0 and 9 each time the Pitch+ button is pressed, and decreases between 0 and 9 each time the Pitch- button is pressed.
Press the I or buttons to move the cursor. -
Press the Enter button with the cursor set at the last character to enter the passcode.
Inputting can be cancelled by pressing the Enter button without entering a Passcode or entering an incorrect Passcode. The Display will show "Passcode Fail" and return to Stop Mode.
- Press the F1 (Exit) button. The display will show "Store?". Select Yes and press the ▶/□/Enter button to store the change.
Note: If you have forgotten the passcode, restoring the PMD661MKII to the factory defaults will remove Passcode restrictions.
USB Mode
The PMD661MKIII records directly onto SD cards. Recordings can then be transferred to your desktop or laptop computer by removing the SD card from the PMD661MKIII, or by connecting the PMD661MKIII to your computer via the USB port. Audio recorded in the popular MP3 compression format is directly available for intranet or internet file sharing. The SD card in the PMD661MKIII appears as an external drive on a connected computer.
- Power up the computer.
- Insert an SD card.
- Power up the PMD661MKIII.
- While stopped, connect the cable to the PMD661MKIII and your computer.
- The SD card in the PMD661MKIII appears as a removable device on your computer.
Notes:
• USB power activates this function even without the AC adapter or batteries.
- No buttons other than the Power switch will function.
Caution:
- Do not remove the SD card during USB Mode. The data and the SD card may be damaged.
- During recording and playback, do not connect the cable to the PMD661MKIII and your computer. The PMD661MKIII may turn itself off or stop, by the USB power condition.
Advanced Features
Microphone(s)
Attenuator
The microphone attenuation setting permits the direct use of microphones that differ in sensitivity.
- 0 db: No microphone attenuation.
- -6 dB: Input from a microphone(s) connected to the Mic jack is cut by 6 dB.
- -12 dB: Input from a microphone(s) connected to the Mic jack is cut by 12 dB.
- -18 dB: Input from a microphone(s) connected to the Mic jack is cut by 18 dB.
Setup Mic Atten. in the preset menu.
Phantom Power
Slide the Phantom/Mic switch to On to provide +48 V of power for a condenser microphone(s).
- On: +48 V is supplied to power condenser microphone(s)
- Off: No microphone power is supplied.
Microphone Recommendations:
Professional condenser microphone(s) (which require additional power from either the PMD661MKIII's phantom power or from another source) are recommended because they provide greater sensitivity and higher quality audio recording.
Dynamic microphone(s) can be used, but they do not yield optimum audio quality recordings in some applications.
Consult with your local dealer to select the appropriate microphone(s) for your specific application. In many cases, they can demonstrate the various performances and characteristics of microphones for your use.
Pre Record
When PreRecord is on and the PMD661MKIII is in record pause, it listens to the selected audio input(s) and continuously buffers 2 seconds of audio. Then, when record is started, the PMD661MKIII writes the previously buffered 2 seconds of audio to the card and continues to record from there.
Setup PreRecord in the preset menu.
Audio Filter
Low Cut Filter
The bass region of the input audio is cut as the audio is recorded. Set to On to reduce noise, such as the sound of the wind when recording outdoors.
Setup Low Cut in the preset menu.
High Cut Filter
The treble region of the input audio is cut as the audio is recorded. Set to On to reduce high frequency noise from the ambient environment.
Setup High Cut in the preset menu.
Silent Skip
The Silent Skip function automatically pauses recording when there is a period of silence and resumes recording when sound resumes.
Silent Skip menu setting permits adjusting the sound level that defines silence as Off, -60 dB, -54 dB, -38 dB, -20 dB.
Setup the Silent Skip in the preset menu.
Manual Track
When the Manual Track (Manual Track incrementing) is on during recording, press the Function button until "TR" appears on the display, then press the F1 (TR) button to increment the audio file.
A new audio file is created at that point. The continuity of sound is not guaranteed and depends on the speed of a card or the audio file size.
Auto Track
With the Auto Track (Automatic Track incrementing) On, a new audio file is begun automatically at specified intervals of recording time. The Auto Track can be set to increment every 1, 5, 10, 15 or 30 minutes, or every 1, 2, 6, 8, 12 or 24 hours. The Auto Track makes finding a particular point in a recording easier. For example, if a new audio file begins every minute during playback, the Auto Track makes finding a particular passage easier because of the relationship between file numbers and time. During playback, you can select file number 3 to play approximately the 3rd minute of recording. To go directly to the beginning of the 10th minute, select file number 10, etc.
The continuity of sound is not guaranteed and depends on the speed of a card or the file size.
Setup Auto Track in the preset menu.
Note: New audio file starts automatically when the recorded file size reaches 4 GB.
Copy Segment
Copy Segment physically turns your “highlighted” section into a new and separate file, without destroying the original source file(s).
- "COPY" is displayed during playback. Press the F1 (Copy) button when the audio reaches your desired IN-point. "Set as IN?" is displayed.
- Press the Enter button to store the IN-point. "IN-" will flash on the display to indicate the IN-point has been stored and playback of the file resumes.
- Continue to let the PMD661MKIII play to your desired OUT-point, or use the standard transport controls like the ◀◀◀ or ▶buttons to span greater time lengths.
- When you have reached your desired OUT-point, press the F1 (Copy) button. "Set as OUT?" is displayed.
- Press the Enter button to store the OUT-point. "Copy Segment?" is displayed.
- Press the Enter button to start the Copy process. "Executing..." will be shown on the display. When the procedure is completed, the display will show "Completed" for one second, and then return to stop mode with your new file as the current file.
Notes:
- “_1” is added to the end of the file name of the new file. For example, the original file = “aaa.mp3”, the new file = “aaa_1.mp3”
- When a copy area spans across two or more files, the files are connected and copied.
- When the copy area spans across files of different Rec Format or Rec Channel settings, it cannot be copied.
- The copy area cannot exceed 80 minutes.
File Divide
The file divide allows you to divide a file at the position you want to divide.
- During playback, press the Function button until "DIV" appears on the display. Then press the F1 (Div) button.
“Divide?” appears on the display. Select No and press the Enter button to pause the playback.
- Select Yes and press the Enter button to start the Divide process.
"Executing..." will be shown on the display. When the divide process is completed, the display will show "Completed" for one second and the unit stops at the beginning of the second file of the divided files.
Notes:
- “_A” is added to the end of the file name of the first new file. For example, the original file = “aaa.mp3”, the new file = “aaa_A.mp3”
- “_B” is added to the end of the file name of the second new file.
- If the length of the file name with extension is already 63 characters or more, the Divide process cannot be executed. LongTitle message appears on the display and the playback is paused at the position you pressed the Enter button.
Marking
Marks can be added during recording or playback manually or automatically. The marking information is stored as an ID3 tag (Ver 2) in MP3 file or chunk in WAVE file. Marks help you find specific points in the recording.
- During playback, you can instantly locate marks.
- Up to 30 marks can be added to a file.
- Marks are numbered consecutively starting at one.
- During recording or playback, you can manually add a mark by pressing the F2 (Mark) button.
Add a mark manually
During recording or playback, press the Function button until "MARK" appears on the display. Then press the F2 (Mark) button to add a mark manually.
Add a mark automatically
The Auto Mark Menu item turns the automatic marking feature off or on.
- If Auto Mark is on and the machine is in Rec-Pause mode, a mark will be added when recording is resumed.
- If Auto Mark is on and the PMD661MKIII is recording audio below the sound threshold for more than three seconds, audio that crosses the threshold will cause a mark to be added.
The Auto Mark Menu setting permits:
- Turning Auto Mark on or off.
- Adjusting the sound level that defines silence as -60 dB, -54 dB, -38 dB or -20 dB.
Setup Auto Mark in the preset menu.
Search the marks
During play-pause or playback, press the Function button until "MK-" and "MK+" appear on the display. Then press the F1 (MK-) or F2 (MK+) button to select the mark you wish to access.
The PMD661MKIII is paused at the mark you selected. To start playback, press the Enter button.
Pitch Control
The Pitch Control enables the playback speed (pitch) to be varied over a -40% to +20% range in 5% increments.
During playback, press the Pitch+ button to increase the playback speed by 5%. The playback speed is increased up to +20%. Or press the Pitch- button to reduce the playback speed by 5%. The playback speed is reduced down to -40%.
Additional Features
Key Lock
Slide the Key Lock switch to lock the keys. The key lock secures the PMD661MKIII in the state it is in during recording, playback or stop.
During Record and Rec-Pause mode, the Power switch is always invalid.
Notes:
- If Key Lock setting is All, only input from a third-party external remote control is accepted.
- If Key Lock setting is Partial, the Rec, Rec-Pause and Stop buttons on the panel (or a third-party external remote control) are accepted.
• Key Locked is displayed for one second when any key is pressed during key lock.
Setup Key Lock in the preset menu.
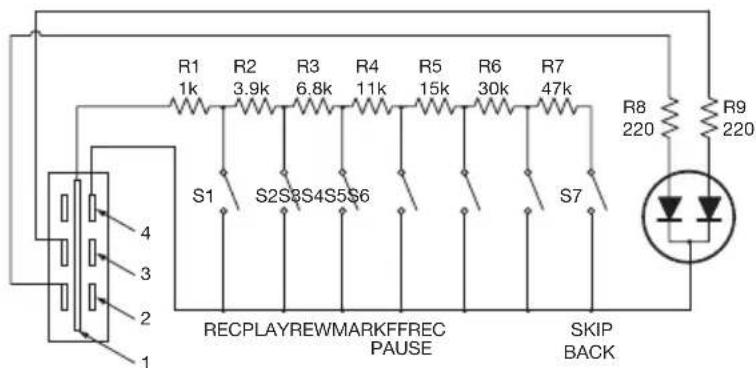
Extended Remote Jack
The Play, FF and Rew keys can be added to external remote control functions by using the equivalent circuit shown below:
Notes:
• We recommend using 1% or better resistors when building a remote to ensure correct functionality.
- The PMD661MKIII plays during closing and holding the Play switch, and skips back then pauses at the point when it is opened.
- Resistance error = within 5%.
- Never apply external voltage. Doing so will result in malfunction.
- Insulate the circuit so that it cannot be touched directly. Use a structure that protects the circuit from static electricity, which will cause malfunction.
- Do not operate the switches at the same time as the buttons on the unit.
- Marantz Professional accepts no responsibility whatsoever for any damages or infringements of patents or other rights resulting from the use of the circuits.
• This does not sanction patents or other rights of Marantz Professional or third parties.
- It is strictly forbidden to reprint or reproduce the circuit diagrams in part or in whole.
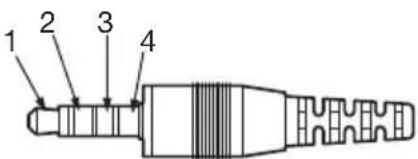
Plug Type (1/8" T-R-R-S Mini Plug)
∅3.5/4P (TMP-B66)
- Tip
- Ring
- Ring
- Sleeve
Display Control
Press the Display button to alternate information displays. Displays are slightly different in Stop, Record, and Playback modes.
Stop Mode
1. Total Remain
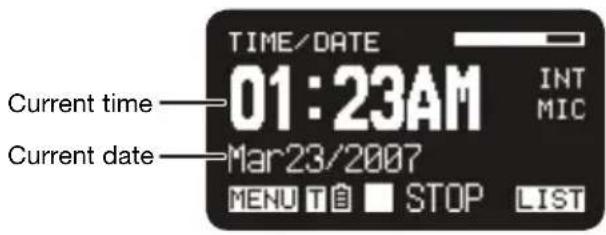
2. Current Time/Date
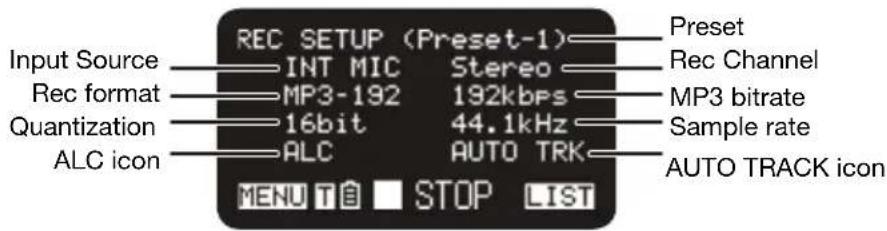
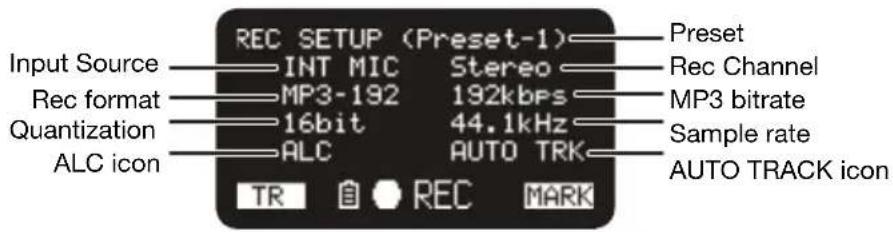
3. Record Setup
Record Mode
1. Record Time
2. Total Remain Time

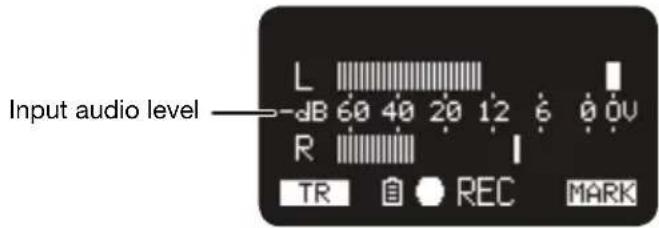
3. Record Level
4. Record Setup
Playback Mode
1. Elapsed Time

2. Remain Time

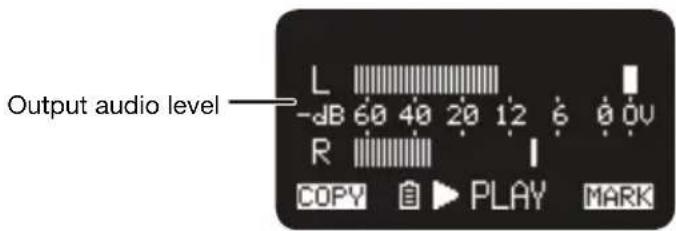
3. Output Level
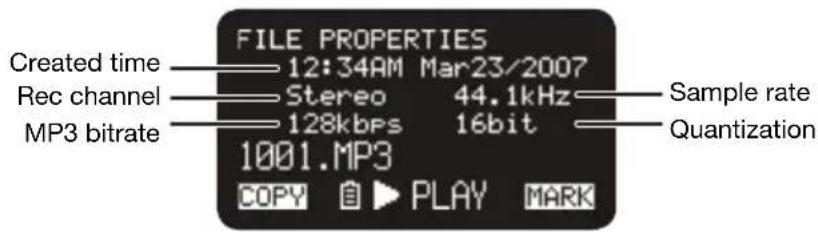
4. File Properties
Menu
Top Menu
-
From Stop, press the F1 (Menu) button.
-
The menu list appears on the display.
• The selected item is highlighted. - When the first item is selected, press the Pitch+ button to jump to the last item.
-
When the last item is selected, press the Pitch- button to jump to the first item.
-
Press the Pitch+ or Pitch- button to select the item.
-
Press the Enter button to confirm or execute the selected item.
Items and functions
| # Display Description | |
| 1 Presets Go to the Preset Menu. | |
| 2 Display Go to the Display Menu. | |
| 3 Time/Date Adjust the date and time. | |
| 4 Utility Go to the Utility Menu. | |
| 5 Language Choose the display language. | |
| 6 F/W Version Display the software version. |
Protecting the Menu Settings
When “Menu Lock” on the preset menu is set to On, the passcode is required to select items below the top menu, thereby protecting the settings.
The passcode is the number from 0000 to 9999 set in Passcode in the preset menu.
Preset Menu
You can store 3 detailed presets on the recorder for such settings as recording input, recording format, playback mode, etc. There are 20 setting items in the preset menu, and 3 presets can be set with the desired values.
Preset Select allows you to select a preset number.
-
From Stop, press the F1 (Menu) button.
-
The menu list appears on the display.
• The selected item is highlighted. - When the first item is selected, press the Pitch+ button to jump to the last item.
-
When the last item is selected, press the Pitch- button to jump to the first item.
-
Press the Pitch+ or Pitch- button to select Presets. Then press the Enter button.
- Press the Pitch+ or Pitch- button to select Preset 1, 2, 3, or renamed preset.
- Press the Enter button to accept the selected Preset.
• Action Menu appears on the display.
- Select "Select" item and press the Enter button to select the preset as the active preset.
- Select "Edit" item and press the Enter button to set or change the selected preset.
- Select "Rename" item and press the Enter button to change the name of the selected preset.
Action Menu Functions
| # Display Description | |
| 1 Select Preset is selected as the active preset. | |
| 2 Edit Set or change the selected preset. | |
| 3 Rename Change the title of the selected preset. | |
Preset Rename
- From Stop, press the F1 (Menu) button.
- Press the Pitch+ or Pitch- button to select Preset Menu. Then press the Enter button to accept.
- Press the Pitch+ or Pitch- button to select Preset 1, 2, 3, or a renamed preset. Then press the Enter button to accept the selected Preset.
- Press the Pitch+ or Pitch- button to select Rename and press the Enter button to accept.
- Rename the preset title.
Text can be changed and deleted. Press the ◀◀◀ or ▶button to move the cursor to the place you wish to change text or delete text from.
- To change the letter, press the Pitch+ or Pitch− button to select the character you want to change.
- To insert a letter, press the F1 (INS) button. A character is inserted into the left of the highlighted character and then it will be highlighted.
-
To delete the letter, press the F2 (DEL) button to delete the selected character.
-
Press the Enter button to store the changes.
Press the ◀◀ button to go back to the previous page without storing the changes when the first letter of the preset title is highlighted.
Notes:
- If the last letter of the preset title is a space character, the changed title does not include the last letter.
- The maximum length of a preset title is limited to 8 letters. When the 9th letter is inserted the last letter is deleted.
- The characters which you can insert are: A B C D E F G H I J K L M N O P Q R S T U V W X Y Z a b c d e f g h i j k l m n o p q r s t u v w x y z (space) ! “ # \$ % & ’ () + , - . ; = @ [ ] ^ _ ` { } \~ 0 1 2 3 4 5 6 7 8 9.
Preset Menu List
| # | Display Selectable Value | |
| 1 | Input INT MIC / MIC/LINE / LINE2 / D.IN | |
| 2 | Rec Format MP3-320 / MP3-256 / MP3-192 / MP3-128 / MP3-64 / PCM-16 / PCM-24 | |
| 3 | Rec Channel Stereo / Mono / D.Mono | |
| 4 | Sample Rate 44.1k / 48k / 96k | |
| 5 | PreRecord On / Off | |
| 6 | Level Cont. Manual / ALC | |
| 7 | Auto Track Off / 1min / 5min / 10min / 15min / 30min / 1hour / 2hour / 6hour / 8hour / 12hour / 24hour | |
| 8 | Auto Mark Off / -60dB / -54dB / -38dB / -20dB | |
| 9 | Silent Skip Off / -60dB / -54dB / -38dB / -20dB | |
| 10 | Mic Atten. 0dB / -6dB / -12dB / -18dB | |
| 11 | Low Cut On / Off | |
| 12 | High Cut On / Off | |
| 13 | Skip Back 0.5sec / 1sec / 1.5sec / 2sec / 2.5sec / 3sec / 3.5sec / 4sec / 4.5sec / 5sec / 5.5sec / 6sec / 6.5sec / 7sec / 7.5sec / 8sec / 8.5sec / 9sec / 9.5sec / 10sec / 15sec / 20sec / 25sec / 30sec / 35sec / 40sec / 45sec / 50sec / 55sec / 60sec | |
| 14 | Key Lock All / Partial | |
| 15 | Battery Alkaline / Ni-MH | |
| 16 | Auto Power Off Off / 5m / 15m / 30m / 60m | |
| 17 | Beep On / Off | |
| 18 | Menu Lock On / Off | |
| 19 | Passcode 4-digit number | |
| 20 | SP Mute On / Off | |
| 21 | Play Mode Single / Cont. | |
| 22 | MachineID Max 8 letters | |
| 23 | Encrypt Rec On / Off | |
| 24 | Preset Default | |
General Procedure in Edit Mode
- In the Preset Action Menu, press the Pitch+ or Pitch- button to select "Edit," then press the Enter button.
Action Menu list appears on the display.
-
Press the Pitch+ or Pitch- button to select the menu item. Then press the ◀◀◀ or ▶▶▶ button to select the input choices.
-
When changing the preset is completed, press the F1 (Exit) button.
-
Select Yes and press the Enter button to store the changes, or select No and press the Enter button to exit Menu Mode without storing any changes.
1. Input
Use this menu to select the audio input for recording.
| Set Value Description | |
| INT MIC Internal stereo | microphones |
| MIC/LINE | External microphone(s) (Mic/Line Jack) |
| LINE2 | Line Level Input (Line 2 Jack) |
| D.IN | Digital Input |
2. Rec Format
Rec Format allows you to select the record audio format (MP3 compression or high-fidelity PCM), the bitrate of the MP3 (320, 256, 192, 128 or 64 kbps) and the quantization of the PCM (16-bits or 24-bits).
| Set Value Description | |
| MP3-320 / MP3-256 / MP3-192 / MP3-128 / MP3-64 | (MP3)Mono: 160, 128, 96, 64, 32kbpsStereo: 320, 256, 192, 128, 64kbps |
| PCM-16 / PCM-24 (PCM)Quantization: 16bits, 24bits | |
3. Rec Channel
Use Rec Channel to select the recording modes from stereo 2-channel, monaural 1-channel, or monaural 2-channel (dual mono) with the second channel attenuated 20 dB.
| Set Value Description | |
| Stereo Stereo 2-channel | audio file |
| Mono Monaural 1-channel | audio file to left channel only |
| D. Mono Monaural 2-channel | (dual mono) audio file. The left channel input is recorded to both L & R channels—the right channel is attenuated by 20dB |
4. Sample Rate
The Sample Rate allows you to select the sampling frequency of the recording.
| Set Value Description | |
| 44.1k Sampling frequency for both PCM and MP3. | |
| 48k Sampling frequency for both PCM and MP3. | |
| 96k Sampling frequency for PCM. | |
5. PreRecord
PreRecord allows you to turn on or off the pre-record function.
| Set Value Description | |
| On Set the PreRecord on. | |
| Off Set the PreRecord off. |
6. Level Cont. (Level Control)
Level Cont. allows you to select the type of recording level control, Manual or ALC (Automatic Level Control).
| Set Value Description | |
| Manual | Manual Level |
| ALC Automatic Level Control |
Control
7. Auto Track
Auto Track allows you to set the Auto Track function off or on and select the time interval to create a new track automatically.
| Set Value Description | |
| Off Set the Auto Track function off. | |
| 1min / 5min / 10min / 15min / 30min / 1hour / 2hour / 6hour / 8hour / 12hour / 24hour | Set the Auto Track function on and the time interval to create a new file. |
8. Auto Mark
The “Auto Mark” menu item allows you to turn the auto mark function on and set the silent level, or turn the auto mark feature Off. The Mark is automatically added after the end of the silent period in which the input level is below the preset value (-60, -54, -38 or -20 dB) for more than 3 seconds.
| Set Value Description | |
| Off Auto mark function off. | |
| -60dB / -54dB / -38dB / -20dB Silent Level | |
9. Silent Skip
The “Silent Skip” menu item allows you to turn the silent skip feature on and set the silent level, or turn the silent skip feature Off. While the silent skip feature is on, the recording is automatically paused when the input level is below the preset value (-60, -54, -38 or -20 dB) for more than 3 seconds.
| Set Value Description | |
| Off Set the Silent Skip feature off. | |
| -60dB / -54dB / -38dB / -20dB Set the Silent Skip feature on and select the silent level. | |
10. Mic Atten. (Mic Attenuator)
The “Mic Atten.” menu item allows you to select the level of the Microphone Attenuator.
| Set Value Description | |
| 0dB Set the Mic Attenuator feature off. | |
| -6dB / -12dB / -18dB Set the Mic Attenuator. | |
11. Low Cut
The "Low Cut" menu item turns the low cut feature Off or On.
| Set Value Description | |
| Off Low cut filter off. | |
| On Low cut filter on. |
12. High Cut
The “High Cut” menu item turns the high cut feature Off or On.
| Set Value Description | |
| Off High cut filter off. | |
| On High cut filter on. |
13. Skip Back
The “Skip Back” menu item allows you to select the skip back time from 0.5 second to 60 seconds.
| Set Value |
| 0.5sec / 1sec / 1.5sec / 2sec / 2.5sec / 3sec / 3.5sec / 4sec / 4.5sec / 5sec / 5.5sec / 6sec / 6.5sec / 7sec / 7.5sec / 8sec / 8.5sec / 9sec / 9.5sec / 10sec / 15sec / 20sec / 25sec / 30sec / 35sec / 40sec / 45sec / 50sec / 55sec / 60sec |
14. Key Lock
The Key Lock secures the PMD661MKIII in the state it is in during Record, Playback or Stop.
| Set Value Description | |
| All All buttons are invalid. | |
| Partial | All buttons are invalid. But the Rec, Rec Pause and Stop/Cancel buttons are accepted. |
15. Battery
The “Battery” menu item allows you to set the battery type. The PMD661MKIII operates on 4 standard AA size Alkaline or Ni-MH batteries. The Battery setting is used for the battery remaining indicator in the display and “Low Battery” warning. If the setting does not match installed batteries the PMD661MKIII will not show the appropriate battery status.
| Set Value Description | |
| Alkaline Set the battery type to Alkaline battery. | |
| Ni-MH Set the battery type to Nickel-Metal Hydride battery. | |
16. Auto Power Off
If the PMD661MKIII is not operated for a long period of time during Stop or Play-Pause mode, the power can be automatically shut off to conserve battery life.
| Set Value Description | |
| Off Set the auto power off feature off. | |
| 5m / 15m / 30m / 60m | Set the feature on and select the time until the PMD661MKIII turns power off automatically. |
17. Beep
The “Beep” menu item allows you to turn the Beep alarm feature On or Off. When the feature is on, the unit beeps when the battery power becomes low (“Low Battery”) or when there is no more recording space on the SD card.
| Set Value Description | |
| On Set the Beep feature on. | |
| Off Set the Beep feature off. | |
18. Menu Lock
The “Menu Lock” menu item allows you to protect the settings below the top menu by password.
| Set Value Description | ||
| On | Enables | protection by password. |
| Off Disables protection by password. | ||
19. Passcode
This is the encryption key used for encrypted recording. When the Menu Lock is turned on, this is used as the password.
| Set Value |
| 4-digit number from 0000 to 9999 (initially set to 0000) |
20. SP Mute
The “SP Mute” menu item allows you to set the speaker mute function On or Off. When SP Mute is set to On, the sound being recorded is not output from the speaker. When set to Off, the sound is output from the speaker except when the sound is being recorded by the built-in microphone.
| Set Value Description | |
| On Speaker Mute On. | |
| Off Speaker Mute Off. |
21. Play Mode
The “Play Mode” menu item allows you to select the single playback mode or continuous playback mode.
| Set Value Description | |||
| Single | Single | playback | mode |
| Cont. Continuous playback mode | |||
22. Machine ID
An audio file created by the PMD661MKIII has Machine ID information. The information is included in the file name. For example, if the Machine ID is "aaaaa", the first file is numbered "aaaaa001.wav" or "aaaaa001.mp3". The Machine ID setting applies to all three presets.
- In the preset edit mode, press the Pitch+ or Pitch- button to select the "MachineID" item. Then press the Enter button to rename.
- Rename the Machine ID.
Refer to the procedure of the Preset Rename.
- Press the Enter button to return to the preset select menu then press the F1 (Exit) button to store the changes.
Notes:
- If the last letter of the Machine ID is a space character, the changed ID does not include the last letter.
- If number of letter is more than 8, last letter is deleted when a new letter is added.
23. Encrypt Rec
The “Encrypt Rec” menu item allows you to set encrypted recording. When the “Encrypt Rec” is turned on, recorded files are encrypted.
| Set Value Description |
| On Turns encrypted recording on. |
| Off Turns encrypted recording off. |
24. Preset Default
The “Preset Default” menu item allows you to return the settings of the selected preset to default.
- In the preset edit mode, press the Pitch+ or Pitch- button to select the "Preset Default" item. Then press the Enter button to initialize.
- While "Default?" message is displayed, select Yes and then press the Enter button. Preset values return to the default and the PMD661MKIII starts writing on non-volatile memory.
Preset Default Value List
| # | Display Preset-1 | Preset-2 Preset-3 | ||
| 1 | Input INT MIC INT | MIC INT MIC | ||
| 2 | Rec Format | MP3-128 MP3-320 | PCM-24 | |
| 3 | Rec Channel | Stereo Stereo | Stereo | |
| 4 | Sample Rate | 44.1k | 44.1k | 96k |
| 5 | PreRecord | On | Off | Off |
| 6 | Level Cont. | ALC | Manual | Manual |
| 7 | Auto Track | Off | Off | Off |
| 8 | Auto Mark | Off | Off | Off |
| 9 | Silent Skip | Off | Off | Off |
| 10 | Mic Atten. | 0dB | 0dB | 0dB |
| 11 | Low Cut | On | Off | Off |
| 12 | High Cut | On | Off | Off |
| 13 | Skip Back | 3sec | 3sec | 3sec |
| 14 | Key Lock | All | All | All |
| 15 | Battery | Alkaline | Alkaline Alkaline | |
| 16 | Auto Power Off | 15m | 15m | 15m |
| 17 | Beep | On | On | On |
| 18 | Menu Lock | Off | Off | Off |
| 19 | Passcode | 0000 | 0000 | 0000 |
| 20 | SP Mute | Off | Off | Off |
| 21 | Play Mode | Cont. | Cont. | Cont. |
| 22 | MachineID | 1 | 1 | 1 |
| 23 | Encrypt Rec | Off | Off | Off |
| 24 | Preset Default | Meeting Compressed | Music Compressed | Highest Quality Uncompressed |
Display Menu
You can store presets on the Display Menu for such settings as Brightness, Timer, LED, Time Format, Date Format, and File Sort.
-
From Stop, press the F1 (Menu) button.
-
The menu list appears on the display.
- The selected item is highlighted.
- When the first item is selected, press the Pitch+ button to jump to the last item.
-
When the last item is selected, press the Pitch– button to jump to the first item.
-
Press the Pitch+ or Pitch- button to select "Display".
-
Press the Enter button.
-
The number of a selected item blinks.
- The choice of the selected item is highlighted.
-
During Display menu mode, press the Stop button to return to the Stop mode.
-
Press the Pitch+ or Pitch- button to select an item. Then press the ◀◀◀ or ▶button to scroll through the choices.
- Press the Pitch+ or Pitch- button to select other menu choices. When changing the display menu is complete, press the F1 (Exit) button to store the changes, or press the Stop button to exit menu mode without storing any changes.
- While "Store?" is displayed, select Yes and press the Enter button to store the changes; or, select No and press the Enter button to return to top menu without storing any changes.
Display Menu Functions
| # Display Selection Items Default | |||
| 1 Brightness 1 to 8 5 | |||
| 2 Timer Off / 30sec / 60sec / 90sec Off | |||
| 3 LED On / Off On | |||
| 4 Time Form 12H / 24H 12H | |||
| 5 Date Form M/D/Y / D/M/Y | M/D/Y * | ||
| 6 File Sort | Alphabet / Time/Date | Time/Date | |
| 7 Default | -- | -- | |
* Factory default of "Date Form" setting for Europe is "D/M/Y".
1. Brightness
The “Brightness” menu choice allows you to adjust the brightness of the OLED (Organic Light-Emitting Diode) display on the PMD661MKIII.
| Set Value | Description |
| 1, 2, 3, 4, 5, 6, 7, 8 | (Dark) 1 – 8 (Bright) |
2. Timer
The “Timer” menu item allows you to set the timer function off or on with a selected time. While the Timer is on, the display will be turned off automatically when no button is pressed for the selected time (30, 60 or 90 seconds). The battery life will be extended if it is on.
| Set Value Description | |
| Off Set the Timer Off. | |
| 30sec / 60sec / 90sec | Set the Timer On and time. |
3. LED
The "LED" menu choice allows you to turn on or off the light of all LEDs.
| Set Value Description | |
| On Turn the LED On. | |
| Off Turn the LED Off. |
4. Time Form
The “Time Form” item allows you to select the format of the current time, 12-hour format with AM/PM (12H) or 24-hour format (24H).
| Set Value Description |
| 12H 12-hour format (12:00AM – 11:59PM) |
| 24H 24-hour format (00:00 – 23:59) |
5. Date Form
The “Date Form” item allows you to set the date order as month/day/year (M/D/Y) or day/month/year (D/M/Y).
| Set Value Description |
| M/D/Y Month / Day / Year |
| D/M/Y Day / Month / Year |
6. File Sort
The "File Sort" menu choice allows you to select the file order in the list by name (Alphabet) or time (Time/Date).
| Set Value |
| Alphabet or Time/Date |
7. Default
The “Default” menu item allows you to return the settings of the Display Menu to the default.
- From Stop, press the F1 (Menu) button.
- Press the Pitch+ or Pitch- button to select "Display". Then press the Enter button to accept.
- Press the Pitch+ or Pitch- button to select the Default item. Then press the Enter button to initialize.
- While Default? message is displayed, select Yes and then press the Enter button, then preset values return to the default and start writing on non-volatile memory.
Utility Menu
The record and play timer settings, the settings data load and save functions and the SD card format and card writing performance can be checked on the Utility menu.
- From Stop, press the F1 (Menu) button.
- Press the Pitch+ or Pitch- button to select "Utility".
- Press the Enter button. During Utility menu mode, press the Stop button to return to the stop mode.
- Press the Pitch+ or Pitch- button to select the menu item. Press the Enter button to enter the menu item.
Utility Functions
| # Display Description | |
| 1 Record Timer Set a start time and the duration for recording. | |
| 2 Play Timer 1 Set a start time of playback 1. | |
| 3 Play Timer 2 Set a start time of playback 2. | |
| 4 Play Timer 3 Set a start time of playback 3. | |
| 5 Load Settings Load setting data from an SD card. | |
| 6 Save Settings Save setting data to an SD card. | |
| 7 Card Check Check the SD card writing performance. | |
| 8 Card Format Delete all files. | |
1. Record Timer
The “Record Timer” menu allows you to set or change a recording start time and the duration.
-
Select the Record Timer menu.
-
When in Stop, press the F1 (Menu) button.
- Press the Pitch+ or Pitch- button until "Utility" appears, then press the Enter button.
-
Press the Pitch+ or Pitch− button until “Record Timer” appears, then press the Enter button.
-
Set the Record Timer On or Off.
-
Press the Pitch+ or Pitch− button until On or Off is highlighted. Then press the ◀◀◀ or ▶▶◀ button until On is highlighted to turn on the Record Timer function. Press the ◀◀◀ or ▶▶◀ button until Off is highlighted to turn off the Record Timer function.
-
Press the Pitch+ or Pitch− button to move to the other item. The selected item is highlighted.
-
Set the start time.
-
While "Start Time" is highlighted, press the Enter button.
- Press the ◀◀◀ or ▶▶◀ button to select the item.
- Press the Pitch+ or Pitch- button to select the value.
-
Press the Enter button to finish setting the time.
-
Set the duration.
-
While "Duration" is highlighted, press the Enter button.
- Press the ◀◀ or ▶▶I button to select the hour or minute.
- While the hour is highlighted press the Pitch+ or Pitch− button to select the hour from 000 to 999.
-
While the minute is highlighted press the Pitch+ or Pitch− button to select the minute from 00 to 59.
-
Store the changes.
-
During setting, press the F1 (Exit) button. "Store?" appears on the display. Select Yes to store the setting and return to Utility menu. Or, select No to return to the Utility menu without storing any changes.
- During setting, press the Stop button to return to stop mode without storing any changes.
2./3./4. Play Timer (1/2/3)
The “Play Timer” menus allow you to set or change a start time for playback and the filename of the playback file.
-
Select the Record Timer menu.
-
When in Stop, press the F1 (Menu) button.
- Press the Pitch+ or Pitch- button until "Utility" appears, then press the Enter button.
-
Press the Pitch+ or Pitch− button until “Play Timer 1” (or 2 or 3) appears, then press the Enter button.
-
Set the Play Timer.
-
Press the Pitch+ or Pitch- button until "Everyday," "Weekday," or "Weekend" is highlighted.
- Press the ◀◀◀ or ▶▶◀ button until Weekday is highlighted to set the playback from Monday to Friday.
- Press the ◀◀◀ or ▶▶◀ button until Weekend is highlighted to set the playback on Saturday and Sunday.
-
Press the Pitch+ or Pitch− button to move to the other item. The selected item is highlighted.
-
Set the start time.
-
While the "Start Time" is highlighted, press the Enter button.
- Press the ◀◀ or ▶▶I button to select AM/PM, hour or minute.
- Press the ◀◀◀ or ▶▶◀ I button to select the item.
- Press the Pitch+ or Pitch- button to select the value.
-
Press the Enter button to finish setting the time.
-
Select the file.
-
While "File Name" is highlighted, press the Enter button.
- The file list appears on the display.
-
Press the Pitch+ or Pitch− button to select the file you wish to play. Then press the Enter button.
-
Store the changes.
-
During setting, press the F1 (Exit) button. "Store?" appears on the display. Select Yes to store the setting and return to Utility menu. Or select No to return to the Utility menu without storing any changes.
- During setting, press the Stop button to return to the stop mode without storing any changes.
- While the timer is set, "T" icon appears on the display.
5. Load Settings
The “Load Settings” menu allows you to load all of the preset values from an SD card into the PMD661MKIII.
When performing load settings, use an SD card in which the preset contents from Save Settings are stored.
This function is particularly useful when setting multiple PMD661MKIIs with the same settings.
- From Stop, press the F1 (Menu) button.
- Press the Pitch+ or Pitch- button to select "Utility". Then press the Enter button to accept.
- Press the Pitch+ or Pitch- button to select "Load Settings."
- Press the Enter button. "Load?" message is displayed.
- Press the Stop button to cancel loading items and return to the stop mode.
- While "Load?" message is displayed, select Yes and press the Enter button to load the setting values in text format from a file in the root folder on the card. The title of the file load is "661preset2.txt". During load settings, it displays "Executing...". After the file load is completed, "Completed" is displayed for one second and PMD661MKIII returns to Stop mode.
6. Save Settings
Save Settings saves all of the preset values onto the SD card. To set the saved files onto the PMD661MKIII, perform Load Settings.
- From Stop, press the F1 (Menu) button.
- Press the Pitch+ or Pitch- button to select "Utility". Then press the Enter button to accept.
- Press the Pitch+ or Pitch- button to select "Save Settings".
- Press the Enter button. "Save?" message is displayed.
- Press the Stop button to cancel loading items and return to the stop mode.
- While "Save?" message is displayed, select Yes and press the Enter button to output preset values in text format into a file on the root folder of the card. The title of the file output is "661preset2.txt". During preset output, "Executing..." is displayed. After the file output is completed, "Completed" is displayed for one second and PMD661MKIII returns to Stop mode.
7. Card Check
The “Card Check” checks the writing performance of the SD card being used and displays the results, as shown below.
| Display Description | |
| Good Recording is possible without problems. | |
| Poor Writing problems | may occur during recording. It is recommended you use a different SD card. |
Notes:
- Do not turn the power off or open the SD card compartment's lid while the card is being checked. Doing so could damage the card or data. Also, it is recommended you use the AC adapter when checking the card.
- The check results are for reference purposes only; they do not guarantee operation.
8. Card Format
- From Stop, press the F1 (Menu) button.
- Press the Pitch+ or Pitch- button to select "Utility". Then press the Enter button to accept.
-
Press the Pitch+ or Pitch- button to select "Card Format."
-
Press the Enter button. "Card Format?" message is displayed.
- Press the Stop button to cancel a Card Format item and return to the stop mode.
- While "Card Format?" message is displayed, select Yes and press the Enter button to format the SD card. During formatting, "Executing..." is displayed. After displaying "Completed" for one second, PMD661MKIII returns to Stop mode.
File List Menu
The file list displays a list of file titles, MP3 and WAV in 'MPGLANG1' or other folders. The list can be used to play, rename or delete the selected file, or check the information of the file.
-
From Stop, press the F2 (List) button.
-
The menu list appears on the display.
• The selected item is highlighted. - When the first item is selected, press the Pitch+ button to jump to the last item.
- When the last item is selected, press the Pitch– button to jump to the first item.
-
Press the ◀◀ button to enter the Folder List.
-
Press the Pitch+ or Pitch- button to select the file you want to access. Then press the Enter button to enter the File List Menu.
- During File List Mode, press the Stop button to return to the stop mode.
File List Menu Functions
| # Display Description | ||
| 1 | Play Play the file. | |
| 2 | Information Display information of the file. | |
| 3 | Rename Rename the file title. | |
| 4 | Delete Delete the file. | |
| 5 | Copy Make a copy of a file in another folder. | |
| 6 | Move Move the file from the current folder to another folder. | |
| 7 | Delete Marks Delete mark(s) in the selected file. | |
1. Play
The "Play" menu item allows you to play the selected file.
-
In the File List Menu, press the Pitch+ or Pitch- button to select "Play."
-
Press the Enter button to start playback.
- Press the Stop button to stop playback and return to the File List.
2. Information
The “Information” menu item allows you to display the information of the selected file.
-
In the File List Menu, press the Pitch+ or Pitch- button to select "Information."
-
Press the Enter button to display the information.
- Press the ◀◀ button to return to the File List Menu.
- Press the Stop button to return to the stop mode.
3. File Rename
The “Rename” menu item allows you to change the file name of the selected file.
-
In the File List Menu, press the Pitch+ or Pitch- button to select "Rename."
-
Press the Enter button to access the rename window.
-
Rename the file title. Refer to the procedure of Preset Rename.
Press the ◀◀ button to go back to the previous page without storing the changes when the first letter of the preset title is highlighted.
Notes:
- If the last letter of the preset title is a space character, the changed title does not include the last letter.
- If the number of characters is more than 60, the last letter is deleted when a new letter is added.
4. Delete
The “Delete” menu item allows you to delete the selected file.
-
In the File List Menu, press the Pitch+ or Pitch- button to select Delete.
-
Press the Enter button. File Delete? appears on the display.
-
Select Yes and press the Enter button to delete the file. Or, select No and press the Enter button to return to the File List Menu.
- Press the Stop button to return to the stop mode.
5. Copy
The “Copy” menu item allows you to make a copy of a file from the current folder to another folder.
- In the File List Menu, press the Pitch+ or Pitch- button to select "Copy." Then press the Enter button.
- The folder list appears on the display.
-
Press the Pitch+ or Pitch- button to select the folder you wish to copy to. Then press the Enter button.
-
The copy starts. "Executing..." appears during the copy process.
- Press the Stop button to return to the stop mode.
6. Move
The “Move” menu item allows you to move a file from the current folder to another folder.
- In the File List Menu, press the Pitch+ or Pitch- button to select "Move." Then press the Enter button.
- The folder list appears on the display.
-
Press the Pitch+ or Pitch- button to select the folder you wish to move to. Then press the Enter button.
-
The move starts. "Executing..." appears during moving.
- Press the Stop button to return to the stop mode.
7. Delete Marks
The “Delete Marks” menu item allows you to delete all marks in the selected file.
-
In the File List Menu, press the Pitch+ or Pitch- button to select "Delete Marks." Then press the Enter button.
-
"MARK Delete?" message appears on the display.
- Select Yes and press the Enter button to delete marks. Or, select No and press the Enter button to return to the File List Menu.
- Press the Stop button to return to the stop mode.
Folder List Menu
The Folder List Menu allows you to display a list of folder titles. You can set the selected folder as a current directory, change the folder title, delete the folder and create a new folder.
-
While the File List is displayed in the "LIST" status, press the ◀◀ button.
-
The folder list appears on the display.
- The selected item is highlighted.
- When the first item is selected, press the Pitch+ button to jump to the last item.
-
When the last item is selected, press the Pitch– button to jump to the first item.
-
Press the Pitch+ or Pitch- button to select the folder you wish to access. Then press the Enter button or the F1 (Menu) button to enter the Folder List Menu.
-
Press the ◀◀ button or the F1 (Exit) button to return to the Folder list.
-
During Folder List Menu mode, press the Stop button to return to the stop mode.
-
Press the Pitch+ or Pitch- button to select the item you wish to access. Then press the Enter button to jump to the item or execute.
Folder List Menu Functions
| # Display Description | |
| 1 Select Set the selected folder as the current folder. | |
| 2 Make Folder Create a new folder. | |
| 3 Rename Change the selected folder title. | |
| 4 Delete Delete the selected folder. | |
1. Select
The "Select" menu item allows you to set the selected folder as the current folder.
-
In the Folder List Menu, press the Pitch+ or Pitch- button to choose "Select."
-
Press the Enter button to set the selected folder to the current folder.
2. Make Folder
The "Make Folder" menu item allows you to create a new folder.
-
In the Folder List Menu, press the Pitch+ or Pitch- button to choose "Make Folder."
-
Press the Enter button.
-
A new folder titled NewFolder is created.
- The folder list appears and the new folder is highlighted.
Notes:
- If the NewFolder already exists, "Already Exists" message appears for one second.
- If the number of folders is already 32, "Full Folder" message appears for one second.
3. Rename
- In the Folder List Menu, press the Pitch+ or Pitch- button to choose "Rename."
- Press the Enter button to access the rename window.
- Rename the file title. Refer to the procedure of Preset Rename.
- Press the Enter button to return to the Folder List Menu.
Press the ◀◀ button to go back to the previous page without storing the changes when the first letter of the preset title is highlighted.
Notes:
- If the last letter of the preset title is a space character, the changed title does not include the last letter.
- If the number of characters exceeds the limit of 32, the last letter is deleted when a new letter is added.
4. Delete
The "Delete" menu item allows you to delete the selected file.
- In the Folder List Menu, press the Pitch+ or Pitch- button to select "Delete."
-
Press the Enter button. "Delete?" appears on the display.
-
Select Yes and press the Enter button to delete the folder. Or, select No and press the Enter button to return to the Folder List Menu.
- Press the Stop button to return to the stop mode.
Note:
- You cannot delete the last folder remaining on an SD card. When the last folder remains, "Can not..." appears for one second.
Troubleshooting
If you encounter a problem, try doing these things first:
• Make sure all cables and other connected devices are properly and securely connected.
• Make sure you are using PMD661MKIII as described in this user guide.
• Make sure your other devices or media are working properly.
- If you believe PMD661MKIII is not working properly, check the following table for your problem and solution.
- If the PMD661MKIII exhibits erratic behavior, the microprocessor can be reset by powering off, disconnecting AC power and removing batteries.
| Problem | Solution |
| PMD661MKIII does not turn on. | Install fresh batteries.Make sure PMD661MKIII's power input is properly connected to a power outlet using the included power adapter. |
| PMD661MKIII turns on then turns itself off. | Install fresh batteries. |
| PMD661MKIII seems to record, but there is no sound on playback. | Check input settings. (For example, if the line input is selected and no input is connected to the line jack, the PMD661MKIII will record silence. The PMD661MKIII will not playback.) |
| There is no audio playback through headphones or internal speaker. | Check Hp/Spk Vol control setting.Check a different audio file or the card. |
| PMD661MKIII will not record. Check that the maximum of 999 files have not been recorded.Check that the PMD661MKIII acknowledges the card. | |
| No signal from microphone input. Check input selection.Check Rec Level control settings.Check if microphone(s) require(s) phantom power. | |
| There is excessive noise on PMD661MKIII. | Check cable connections and/or replace cable.Check for proper gain levels. |
| Playback on a computer results in poor sound. | Check quality of computer sound card and application.Check frequency conversion application. (PMD661MKIII records audio files with a sampling frequency of 48kHz. Some applications convert the files to 44.1kHz using a sample rate converter. Only high quality sample rate converters should be used.) |
| Computer cannot read files. Check the capability of the playback application. Some playback and editing applications do not support MP3 or Broadcast Wave (.wav) formats.Use DMP Mark Editor to play files recorded with encrypted recording on a computer. | |
Error Message
| Display Description | |
| No Card Card cannot be found | |
| Unformat Format other than FAT16/32, or card format error | |
| Full Card Memory is not enough | |
| Full 999 Number of files is already 999 (maximum) | |
| Full MARK Number of marks in the current file is already 30 (maximum) | |
| No File No file found | |
| Key Locked Operation during Key Lock | |
| Card Locked Prohibition of writing into the card | |
| VBR FWD or RWD of VBR file | |
| Can not... Command is invalid | |
| Need DC IN No DC input | |
| Low Battery (flashing highlighted) | Remaining battery is below set value |
| Low Battery Automatic power down in low battery level last time. | |
| No PresetFile No preset setting file is found | |
| ErrPresetFile File contents of preset setting has errors | |
| ErrUpdateFile | Version up file or file system does not function normally |
| Door Open | SD card door is open |
| Err Format Error in file format of MP3 or PCM | |
| Already Exists | Same file title is found |
| Limit 80m | Over 80 minutes in copy segment process |
| Long Title | File title exceeds 64 Bytes |
| Err Card Error is found in the card | |
| Err RTC Error is found in RTC | |
| Err SRAM | Error is found in SRAM |
| Err FlashROM | Error is found in Flash ROM |
| Need Update | Update is not completed |
| Unmatched | Setting of the preset is not correct |
| Passcode Fail | Passcode when playing WAS or MPS files is incorrect, or passcode when unlocking the "Menu Lock" is incorrect. |
Reproducción
Assistance technique
Lecture
Riproduzione
Technical Specifications
| Audio System | Solid-state recorder | |
| Media | Storage SD or SDHC cardRecording Formats MP3 (MPEG Layer III compression; 320, 256, 192, 128, 64, or 32 kbps)WAV (16- or 24-bit linear PCM) | |
| Sampling Rate | 44.1, 48, or 96 KHz | |
| Channels | 2 (stereo) or 1 (mono) | |
| Frequency Response | 20 Hz - 24 kHz ( ± 1 dB) | |
| Signal-to-Noise Ratio | 65 dB (Mic); 85 dB (Line); IEC-A-weighted | |
| THD (@ 0 VU) | 0.08% (Mic); 0.02% (Line); | |
| Dynamic Range | 85 dB | |
| Inputs | Microphone (XLR) Line (1/4" / 6.35 mm) Sensitivity: 0 dbu / 4.2 K Line 2 (1/8" / 3.5 mm) | Sensitivity: 1.2 mVrms / 4.2 K Sensitivity: 500 mVrms / 20 K |
| Outputs | Line (RCA stereo) Headphone (1/4" / 6.35 mm) Speaker (internal) | Standard Level: 2.0 V / 10 K Standard Level: 16 mW / 32 Standard Level: 450 mW / 8 |
| Power | Power Adapter: 5 V DC, 1.5 A, center-positiveBatteries: (4) AA batteries; approx. 7 hours of battery lifePhantom Power: +48 V, 10 mA (maximum)Consumption: 4.2 W (DC, recording & playback) | |
| Environmental Conditions | Operating Temperature: 32–104°F / 0–40°CStorage Temperature: -4–158°F / -20–70°COperating Humidity: 30–80% | |
| Dimensions(width x depth x height) | 4.1" x 1.6" x 6.7"105 x 40 x 170 mm | |
| Weight(without batteries) | 12.5 oz.353 g | |
Specifications are subject to change without notice.
Trademarks & Licenses
Marantz is a trademark of D&M Holdings Inc., registered in the U.S. and other countries. Marantz Professional products are produced by inMusic Brands, Inc., Cumberland, RI 02864 USA. SD and SDHC are registered trademarks of SD-3C, LLC. All other product names, company names, trademarks, or trade names are those of their respective owners.
marantzpro.com

- User Guide (English)
- Introduction
- Features:
- Box Contents
- Support
- Features
- Front Panel
- Display
- Side Panels
- Left
- Right
- Setup
- Connection Diagrams
- Clock Setting
- Language
- Operation
- Recording
- Audio Input for Recording
- Normal Recording
- Retake Recording
- Retake recording operation during recording:
- Retake recording operation during playback:
- Encrypted Recording
- Playback
- Passcode Input
- To set a Passcode:
- To input a Passcode:
- USB Mode
- Notes:
- Caution:
- Advanced Features
- Microphone(s)
- Attenuator
- Phantom Power
- Microphone Recommendations:
- Pre Record
- Audio Filter
- Low Cut Filter
- High Cut Filter
- Silent Skip
- Manual Track
- Auto Track
- Copy Segment
- File Divide
- Marking
- Add a mark manually
- Add a mark automatically
- Search the marks
- Pitch Control
- Additional Features
- Key Lock
- Extended Remote Jack
- Display Control
- Stop Mode
- Total Remain
- Current Time/Date
- Record Setup
- Record Mode
- Record Time
- Total Remain Time
- Record Level
- Record Setup
- Playback Mode
- Elapsed Time
- Remain Time
- Output Level
- File Properties
- Menu
- Top Menu
- Items and functions
- Protecting the Menu Settings
- Preset Menu
- Action Menu Functions
- Preset Rename
- Preset Menu List
- General Procedure in Edit Mode
- Input
- Rec Format
- Rec Channel
- Sample Rate
- PreRecord
- Level Cont. (Level Control)
- Auto Track
- Auto Mark
- Silent Skip
- Mic Atten. (Mic Attenuator)
- Low Cut
- High Cut
- Skip Back
- Key Lock
- Battery
- Auto Power Off
- Beep
- Menu Lock
- Passcode
- SP Mute
- Play Mode
- Machine ID
- Encrypt Rec
- Preset Default
- Display Menu
- Brightness
- Timer
- LED
- Time Form
- Date Form
- File Sort
- Default
- Utility Menu
- Utility Functions
- Record Timer
- 2./3./4. Play Timer (1/2/3)
- Load Settings
- Save Settings
- Card Check
- Card Format
- File List Menu
- Play
- Information
- File Rename
- Delete
- Copy
- Move
- Delete Marks
- Folder List Menu
- Folder List Menu Functions
- Select
- Make Folder
- Rename
- Note:
- Troubleshooting
- Assistance technique
- Trademarks & Licenses
- marantzpro.com
Brand : MARANTZ
Model : PMD661MKIII
Category : Audio recorder