
DigitRadio UP 55 - Radio TECHNISAT - Free user manual and instructions
Find the device manual for free DigitRadio UP 55 TECHNISAT in PDF.
| Brand | TechniSat |
| Model | DigitRadio UP 55 |
| Product type | DAB+/FM/Bluetooth radio |
| Speaker dimensions (WxHxD) | 70 x 70 x 44 mm |
| Radio unit dimensions (WxHxD) | 70 x 70 mm (mounting depth 30 mm) |
| Speaker mounting depth | 32 mm |
| Power supply | 230 V AC / 50 Hz |
| Power consumption operation | 6 W max. |
| Standby power consumption | < 0.5 W |
| Protection class | IP20 |
| DAB+ reception frequencies | 174.928 – 239.200 MHz |
| FM reception frequencies | 87.5 – 108 MHz |
| Bluetooth version | V4.1, class 2, max. +4 dBm |
| Audio power | 2 x 2 W RMS |
| Number of DAB+ presets | 20 |
| Number of FM presets | 20 |
| Main functions | DAB+/FM, Bluetooth, 2 alarms, sleep timer, time and date display, auxiliary input for external switch |
| Maintenance and cleaning | Clean with a soft dry cloth. Do not use abrasive products or solvents. |
| Safety | Do not open the device. Installation by a qualified professional. Use only indoors. Follow safety instructions. |
| Spare parts and repairability | Speaker available as accessory from specialized retailers. Repairs only by TechniSat after-sales service. |
| Package contents | Radio + control unit, speaker + cover, quick start guide, antenna |
Frequently Asked Questions - DigitRadio UP 55 TECHNISAT
User questions about DigitRadio UP 55 TECHNISAT
0 question about this device. Answer the ones you know or ask your own.
Ask a new question about this device
Download the instructions for your Radio in PDF format for free! Find your manual DigitRadio UP 55 - TECHNISAT and take your electronic device back in hand. On this page are published all the documents necessary for the use of your device. DigitRadio UP 55 by TECHNISAT.
USER MANUAL DigitRadio UP 55 TECHNISAT
Class 2, max. +4 dBm
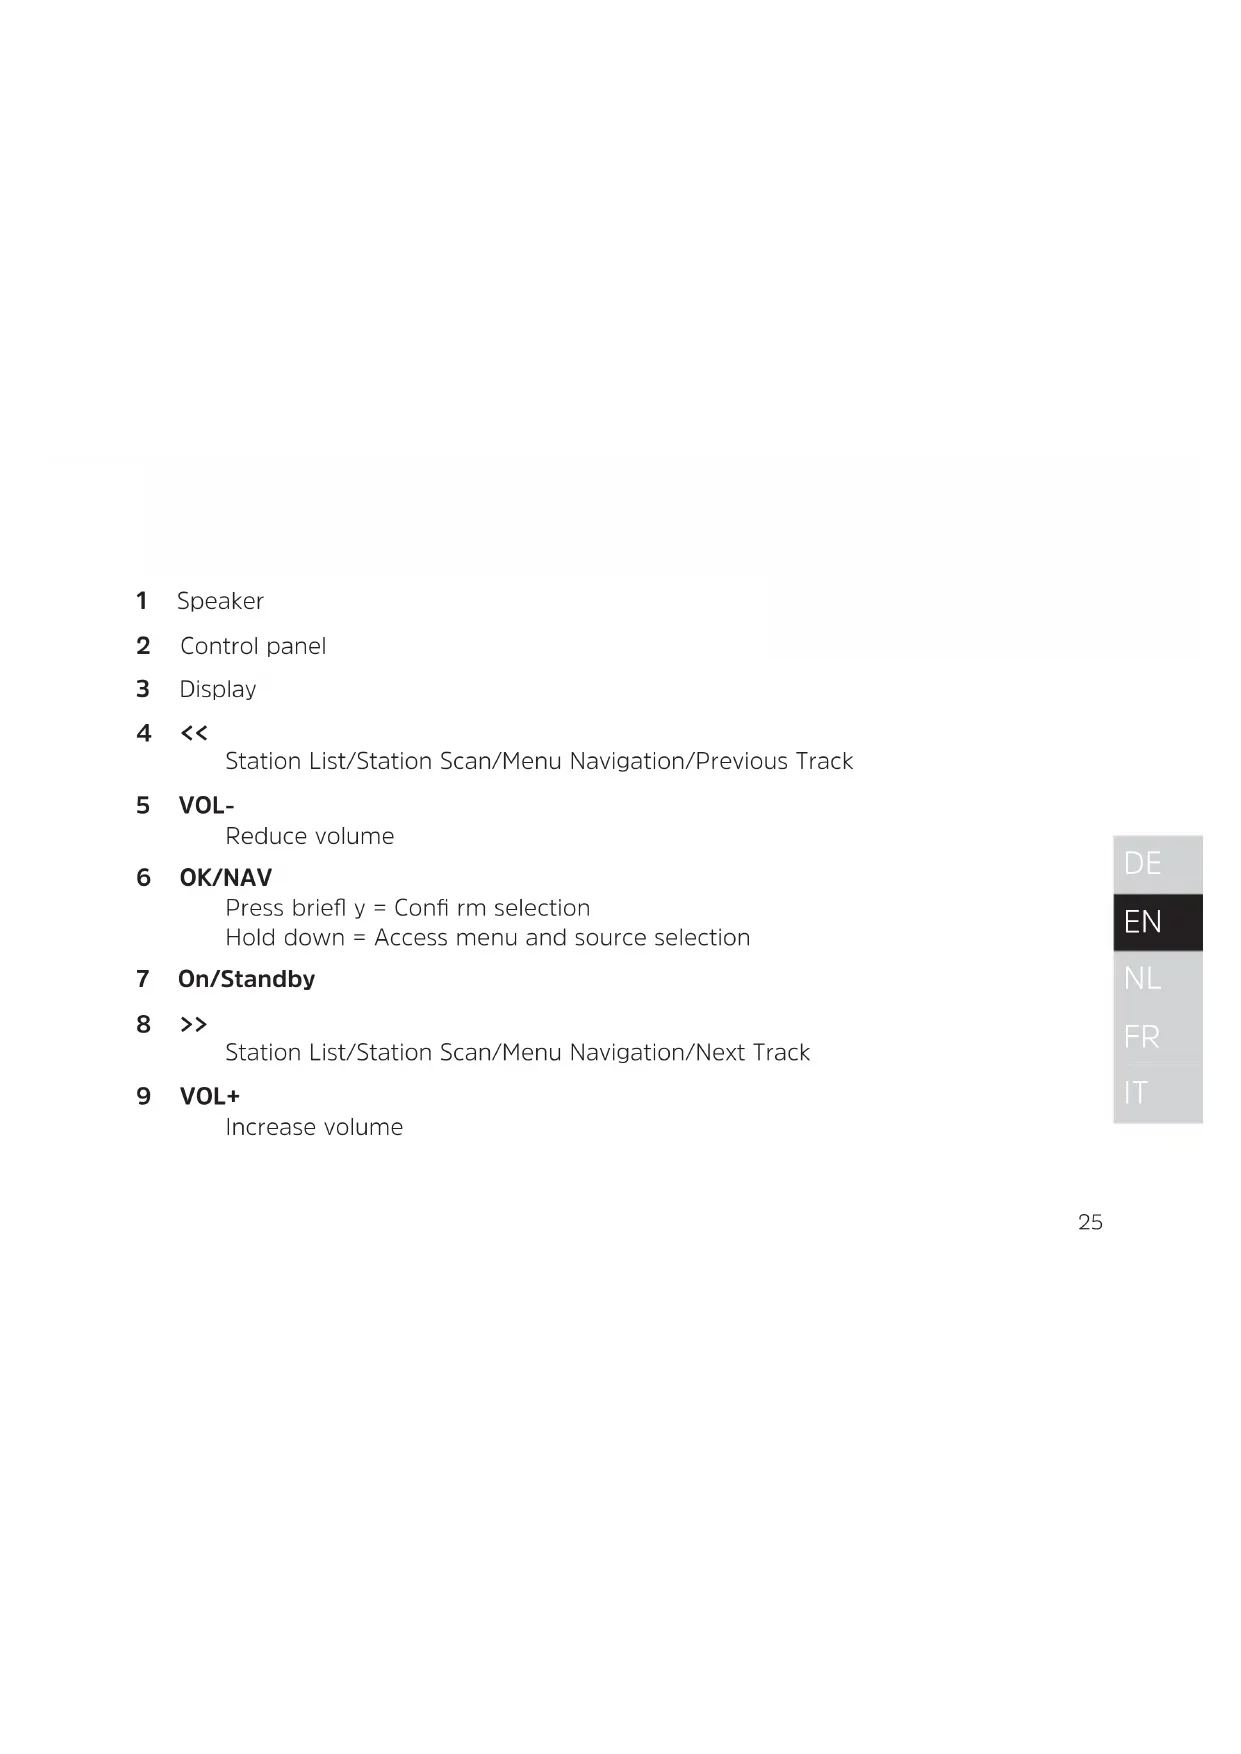
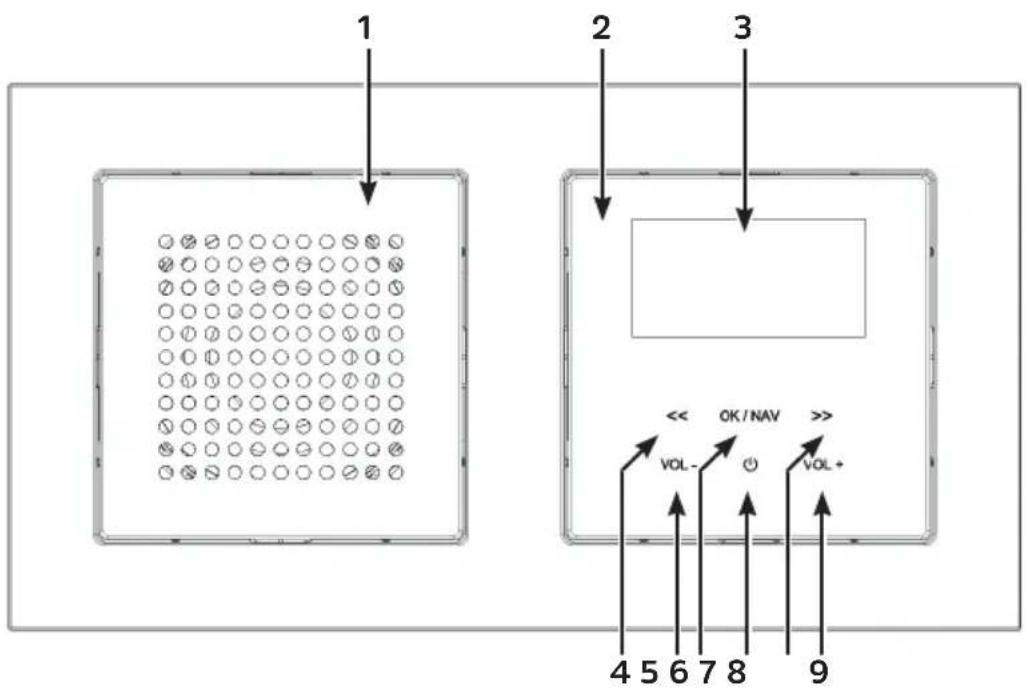
1 Speaker
2 Control panel
3 Display
4 << Station List/Station Scan/Menu Navigation/Previous Track
5 VOL- Reduce volume
6 OK/NAV Pressbriefly = Confirmselection Hold down = Access menu and source selection
7 On/Standby
8 >> Station List/Station Scan/Menu Navigation/Next Track
9 VOL+ Increase volume
2 Component overview
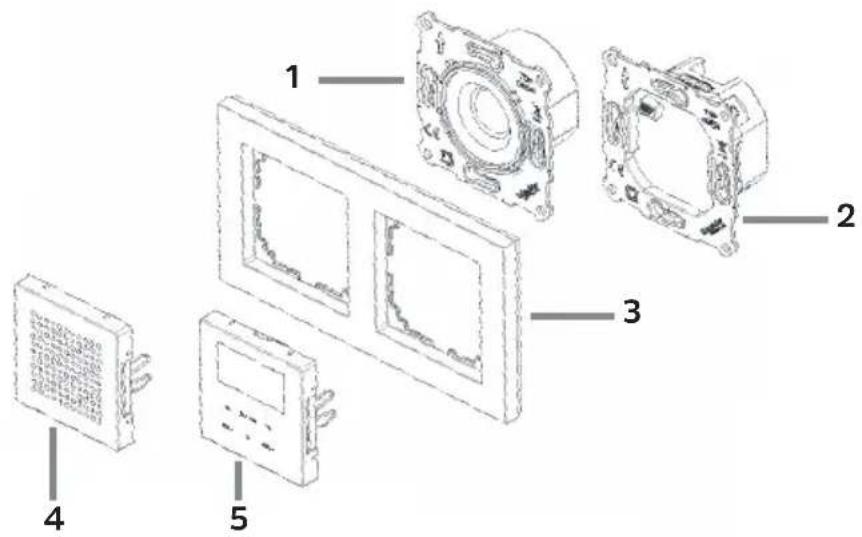
1 Speaker + 4 Speaker cover
2 Radio unit + 5 Control panel
3 Frame (not included)
3 Safety instructions
3.1 Signs and symbols used
In the Quick Start Guide:

Indicates a safety instruction which can lead to serious injuries or death if not observed. Note the following signal words:
DANGER - Serious risk of fatal injury
WARNING - Serious injury, possibly fatal
CAUTION - Injuries

This identifies information that must always be observed to prevent defects, data loss/misuse and undesired operation. It also describes other useful functions and instructions for using and operating your device.

Beware of electrical voltage. Follow all safety instructions to avoid electric shock. Do not open the device under any circumstances.
On the unit:

Indoor use - Devices with this symbol are only suitable for indoor use.

Protection class II - Electrical devices of protection class II are electrical devices with continuous double and/or reinforced insulation and no connection options for a protective conductor. The casing of an electrical device of protection class II, which is enclosed in an insulating material, can form part or all of the additional or reinforced insulation.

Your device bears the CE symbol and complies with all requisite EU standards.

Electronic devices do not belong in the household waste and must be disposed of properly in accordance with Directive 2012/19/EU of the European Parliament and of the Council dated July 4, 2012 concerning waste electrical and electronic equipment. Please return this unit to the designated public collection point for disposal at the end of its service life.

Observe all safety instructions in the documentation supplied.
3.2 Intended use
Please read this Quick Start Guide carefully. You can only connect the device safely and operate it correctly if you do so. Please also note the additional operating steps in the full operating instructions, which you can find in the download area for your product on the homepage. Keep the Quick Start Guide and instruction manual in a safe place for future reference.
The device has been designed to receive DAB+/FM radio programmes.
Furthermore, it can receive and play music streams via Bluetooth if another device is connected. The device is only designed for private (non-commercial) or comparable use.
Any other use is considered "not intended"!

WARNING!
This device is intended for fixed installation.
Only qualified personnel may install devices without a plug. Risk of electric shock! In the event of damage to the device resulting from incorrect connection, no warranty claim can be made.

WARNING!
Ensure that, prior to connecting the radio unit to the mains network or the domestic wiring, the power is disconnected and secured from being switched on. Risk of electric shock!
3.3 Target group for this instruction manual
The Quick Start Guide is intended for anyone installing, operating, cleaning or disposing of the device.
3.4 Using the DIGITRADIO UP 55 safely
Please take note of the following information to minimise safety risks, to prevent damage to the device, and to make a contribution to environmental protection.
Please read all of the safety information carefully and keep it for future reference.
Always follow all warnings and instructions in this Quick Start Guide and on the back of the device.

WARNING!
Never open the device!
Touching live parts can be fatal! Risk of electric shock!

Observe all of the following instructions for the intended use of the device and to prevent damage to the device and injury to persons.
- Do not repair the device yourself. Repairs should only be carried out by trained experts. Contact our customer service department.
-
The device should only be operated under the intended environmental conditions.
-
Do not expose the device to dripping or splashing water. If water has penetrated the device, disconnect it from the mains and inform the Service department
- Do not expose the device to heat sources which create extra heat and add to the temperature of the device in regular operation.
- If you detect noticeably defects, odour or smoke, a major malfunction, or damage to the housing, inform the Service department immediately.
- The device may only be operated using the mains voltage permitt ed for the device. Never try to operate the device at any another voltage.
- If the device shows signs of damage, It may not be switched on and operated.
- Do not operate the device near to or in bath tubs, showers, swimming pools, running/dripping or splashing water. There is a risk of electrical shock and of damaging the device.
- Foreign bodies, e.g. nails, coins, etc., may not be inserted or fall into the device. Do not touch the connection contacts with metal objects or your fingers. This could lead to short-circuits, and lead to an electrical shock.
-
This device is not intended to be used by people (including children) with limited physical, sensory or mental capacities or lack of experience and/or knowledge, unless they are supervised by a person responsible for their safety or they have been instructed by them as to how to use the device.
-
Never allow children to use the device unsupervised.
- Modifi cations to the device are prohibited.
4 Legal notices

TechniSat herewith declares that the radio system model DIGITRADIO UP 55 corresponds with Directive 2014/53/EU. The complete text of the EU Declaration of Conformity is available at the following web address:
TechniSat accepts no liability for product damage as a result of external influences, wear or improper handling, unauthorised repairs, modifi cations or accidents.

Changes and printing errors reserved. Version 08/21. Copying and reproduction are subject to the publisher's consent. The respective current version of the instructions can be downloaded in pdf format from the download area of the TechniSat Homepage at www.technisat.com.

TechniSat and DIGITRADIO UP 55 are registered trademarks of:
The names of the companies, institutions or makes referred to are trademarks or registered trademarks of the respective owners.
5 Service instructions

This product is quality-tested and provided with the legally-specific warranty period of 24 months from the date of purchase. Please keep your receipt as proof of purchase. In the event of warranty claims, please contact the product dealer.

Should you experience a problem with this unit, or for queries and information, our Technical Hotline is available:
Mon. - Fri. 8:00 am - 6:00 pm on:
+49 (0) 3925 9220 1800.

Repairs can also be ordered directly online at www.technisat.com.
If the device needs to be returned, please use the following address only:
39418 Stassfurt, Germany
6 Description of the DIGITRADIO UP 55
6.1 Scope of delivery
Before start-up, please check whether everything has been delivered:
1 x radio + operating unit
1 x speaker + speaker cover
1 x Quick Start Guide
1 x antenna
6.2 Special features of the DIGITRADIO UP 55
The DIGITRADIO UP 55 is comprised of a DAB+/FM/Bluetooth receiver with the following functions:
- You can store up to 20 DAB+ and 20 FM favourite stations.
- The radio receives on the FM 87.5-108 MHz (analogue) frequencies and DAB+ 174.9-239.2 MHz (digital).
- The device has a time and date display.
- 2 alarms
- Sleeptimer function
- Music playback via Bluetooth
7 Basic operation
Briefly press the On/Standby touch field (7) to switch the radio on and off.
To access the main menu briefly hold down the OK/NAV (6) touch field. You can then use << and >> to navigate in the main menu. You can make a selection and save settings by briefly pressing OK/NAV. To exit the main menu, hold down the OK/NAV touch field again or wait about 30 seconds until the menu closes automatically.
To change the playback source, first open the main menu. Use << or >> to select the Source item and tap on OK/NAV. You can then use << or >> to select a playback source and play by tapping on OK/NAV.
The volume is set by using VOL+ and VOL-.
For further operations, settings and functions, please refer to the full instruction manual, which you can find in the download area for your product on the homepage.
8 Connecting and assembling the DIGITRADIO UP 55
The device and speaker can be set up either horizontally or vertically.
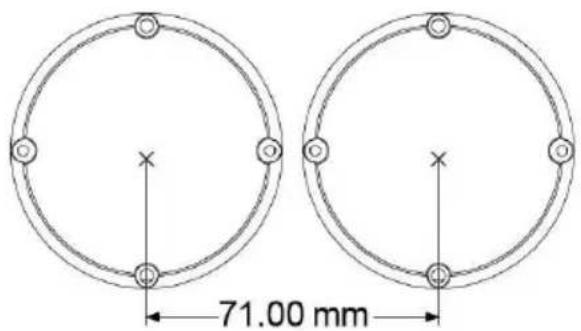
For flush-mounted boxes (DIN 49073), allow the correct distance (if the speaker and radio are to be installed directly adjacent to each other) according to the following illustration (grid dimension):
If the speaker and radio are being installed separately, the speaker cable may need to be extended accordingly (max. 5 m).
- Only the supplied speaker or a speaker approved for this product may be used.
- The loudspeaker cable may only be extended using cables that are suitable and dimensioned for the type of installation (either separately in an empty conduit or designed as a line for mains voltage).
8.1 Connecting the speaker unit
Connect the red speaker cable (+) to the speaker connection marked L+ or R+ (A) on the radio unit and tighten using a suitable flat-bladed screwdriver (B).
Then connect the black speaker cable (-) to the speaker connection marked L- or R- (A) on the radio unit and tighten using a suitable flat-bladed screwdriver (B).
i Only use connection cables with wire end sleeves or rigid wire.
- Playback is always in mono, even in 2-speaker mode (2nd speaker not included in the scope of delivery; can be obtained from specialist dealers as an accessory).
- Loudspeaker cables and mains voltage lines must be separated from each other inside the fl ush-mounted box by suitable measures (either by fi xing them with a cable fastener or using an insulating tube).
- It is not permitted to lay loudspeaker cables and mains voltage lines together outside the fl ush-mounted box. Separation must be ensured by suitable measures (e.g. separately in the empty conduit).
Speaker connection overview

8.2 Connecting the radio unit to the mains
Connect the phase for domestic wiring (230 V AC / 50 Hz) to the terminal marked L (C) on the radio unit and tighten using a screwdriver (D).
Connect the neutral cable to the terminal marked N (C) on the radio unit and tighten using a screwdriver (D).
The antenna is connected to the terminal marked on the radio unit.
i Only use connection cables with wire end sleeves or rigid wire.
- Only the supplied antenna may be used.
- The antenna must not be installed outside the wall and must be laid separately in an empty conduit or in a suitable insulating tube.
- The connection of stationary antennas or community antenna systems is not permitted ed.
- It is permissible to connect mains voltage lines (L or N) as an antenna. In the case of a external conductor, only the same external conductor as at mains connection L may be used.
- The extension input 1 may only be connected to the same phase as L, otherwise device defects may occur.
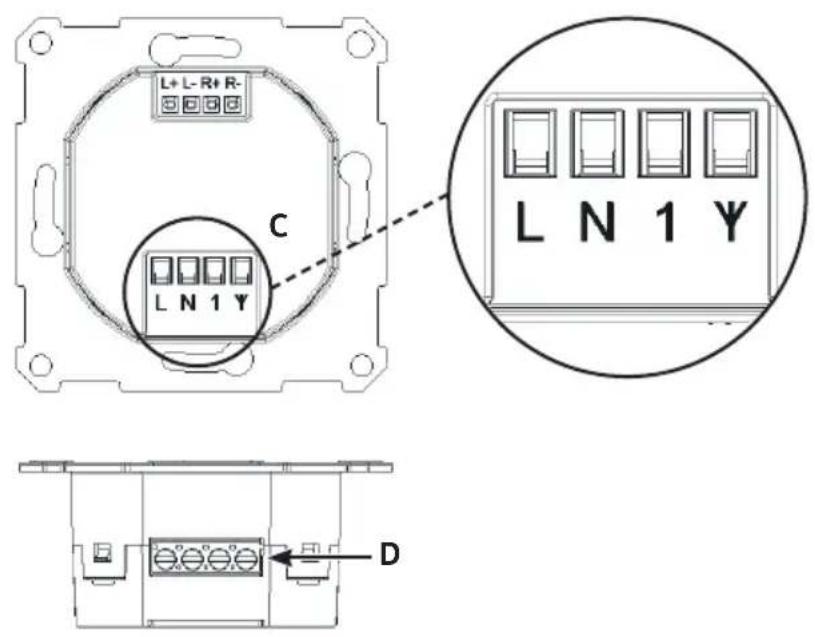
Radio unit connection overview
8.3 Final assembly
Both units (speaker and radio unit) are then inserted into the existing fl ush-mounted sockets and screwed in position with suitable fi xing material (not included).

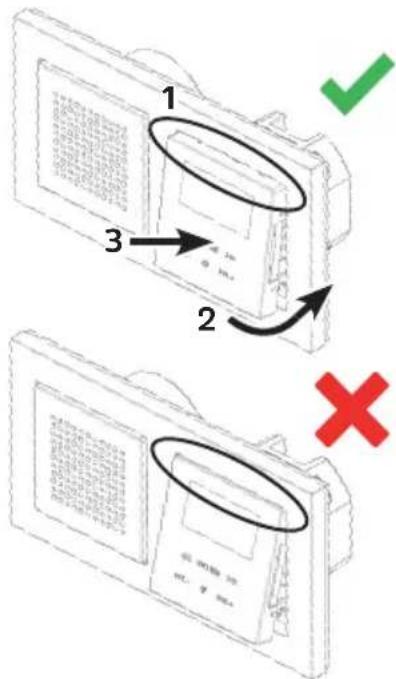
Ensure that the speaker and radio unit are aligned correctly. Both units are marked with TOP/OBEN.
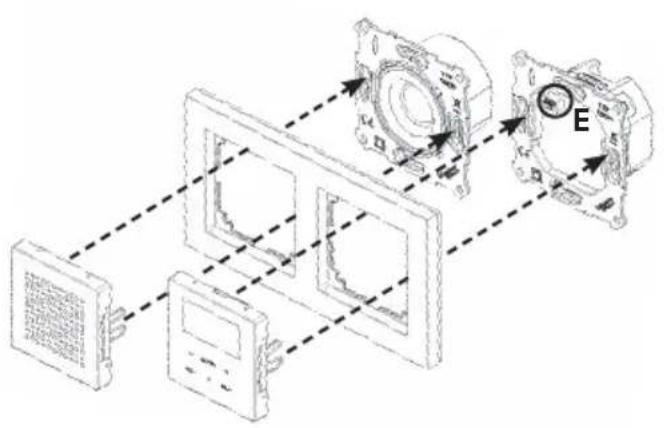
Aft er installing the radio unit and speaker, the frame (not included) is fixed by att aching the speaker cover and the control unit. To do this, push the speaker cover and the control unit gently and carefully onto the speaker and radio unit until they click into place.

Only switch the power back on once final assembly has been successfully completed. The operating unit must not be mounted/removed if the power is on. This can lead to device defects.
Final assembly overview

When mounting the control unit, ensure that it is correctly aligned with the plug contact strip (E) on the radio unit.
9 Technical data
Power supply: 230 V AC / 50 Hz
Power consumption during normal operation: max. 6 W
Power consumption when on standby: < 0.5 W
Protection class: IP20
Reception frequencies: DAB/DAB+ 174.928 - 239.200 MHz
FM: 87.5 - 108 MHz
Bluetooth: Version V4.1
2.402-2.480 GHz
Class 2, max. +4 dBm
Music output: 2 × 2W RMS
Extension input For external switch (Switches radio on/ standby)
Ambient conditions
Relative humidity: Operation: 10% -75% non
condensing
Storage: 5% - 90%
Temperature:
Storage: -20 °C - 60 °C
Dimensions W x H x D (installation depth):
Radio
Speaker
Operation: 5^ C - 35^ C
70mm× 70mm× 42mm(30mm)
70mm× 70mm× 44mm (32 mm)
1 Apparaatoverzicht
- Component overview
- Safety instructions
- Signs and symbols used
- In the Quick Start Guide:
- On the unit:
- Intended use
- WARNING!
- Target group for this instruction manual
- Using the DIGITRADIO UP 55 safely
- Legal notices
- Service instructions
- Description of the DIGITRADIO UP 55
- Scope of delivery
- Special features of the DIGITRADIO UP 55
- Basic operation
- Connecting and assembling the DIGITRADIO UP 55
- Connecting the speaker unit
- Speaker connection overview
- Connecting the radio unit to the mains
- Final assembly
- Final assembly overview
- Technical data
- Apparaatoverzicht
Brand : TECHNISAT
Model : DigitRadio UP 55
Category : Radio