Outdoor Heatpanel 3200 RC - Heating Eurom - Free user manual and instructions
Find the device manual for free Outdoor Heatpanel 3200 RC Eurom in PDF.

User questions about Outdoor Heatpanel 3200 RC Eurom
0 question about this device. Answer the ones you know or ask your own.
Ask a new question about this device
Download the instructions for your Heating in PDF format for free! Find your manual Outdoor Heatpanel 3200 RC - Eurom and take your electronic device back in hand. On this page are published all the documents necessary for the use of your device. Outdoor Heatpanel 3200 RC by Eurom.
USER MANUAL Outdoor Heatpanel 3200 RC Eurom
natural_image
Exterior view of a black rectangular electronic device with a curved top and side edge (no text or symbols visible)Outdoor Heatpanel 1800
Art.nr. 333947 / Art.nr. 334401 (Swiss plug)
natural_image
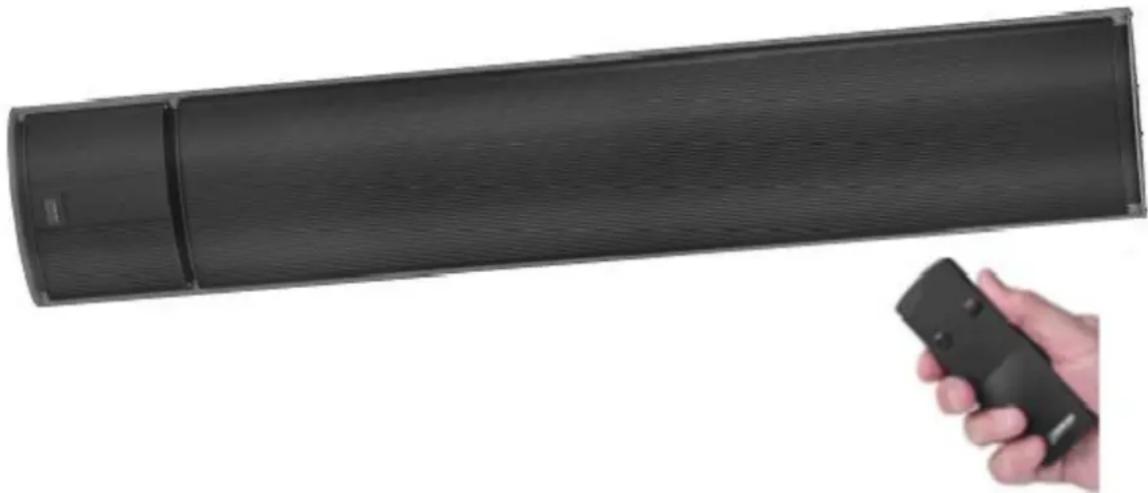
Black rectangular TV with a handle and a hand holding a remote control (no text or symbols visible)Outdoor Heatpanel 1800 (RC)
Art.nr. 333930 / Art.nr. 334326 (Swiss plug)
Outdoor Heatpanel 2400 (RC)
Art.nr. 334395
Outdoor Heatpanel 3200 (RC)
Art.nr. 334289
Dank
text_image
Prohibition sign with a diagonal line crossing over a document icon, indicating no text or symbols beyond the prohibition symbol.text_image
Warning sign with steam symbol inside a triangle, indicating hazardous materialnatural_image
Simple diagram showing a gray 'X' symbol and a mechanical component with mounting holes (no text or labels)text_image
Incorrect Installation Correct InstallationBevestiging Outdoor Heatpanel 1800
text_image
Y A D D Y A D D X A E X Y X Anatural_image
Symbol of a trash bin crossed with no text or numbers, representing waste sorting or disposal (no text present)types: Outdoor Heatpanel 1800, Outdoor Heatpanel 1800 (RC), Outdoor Heatpanel 2400 (RC),
Outdoor Heatpanel 3200 (RC)
text_image
Prohibition sign with downward arrow and document icon, crossed out by a diagonal linetext_image
Warning sign with steam symbol inside a triangle, indicating hazardous materialnatural_image
Simple diagram showing a gray 'X' symbol and a mechanical component with mounting holes (no text or labels)text_image
Incorrect Installation Correct Installationtext_image
Y A D D Y A D D X A E X Y X Atext_image
Technical diagram of a mechanical assembly with labeled components and cross-sectional viewsnatural_image
Symbol of a trash bin with no text or labelsTypen: Outdoor Heatpanel 1800, Outdoor Heatpanel 1800 (RC), Outdoor Heatpanel 2400 (RC), Outdoor Heatpanel 3200 (RC)
Thank you very much for choosing for a Eurom device. You have made a good choice! We hope you will be satisfied about its functioning.
To get maximum profit from your panel, it is important to read this manual attentive and totally before use, and to understand what is written. Read especially the safety instructions: they are there to protect you and your environment.
Keep the manual in a safe place for future reference. Store also the package: that is the best protection for your heater in times of no-use. And if you at any time pass the appliance on, pass on the manual and package too.
We wish you a lot of fun with the Outdoor Heatpanel!
Eurom
Kokosstraat 20
8281 JC Genemuiden (NL)
info@eurom.nl
www.eurom.nl
This manual has been complied with the utmost care. Nevertheless, we reserve the right to optimize this manual at any time and to adjust it technically. The image used may differ.
Explanation of symbols

text_image
Prohibition sign with a diagonal line crossing over a document icon, indicating no text or symbols beyond the prohibition symbol.To prevent overheating: Do not cover the device!
text_image
Warning sign with steam symbol inside a triangle, indicating hazardous materialBe careful: hot surface!
Steel housing
Aluminium housing
text_image
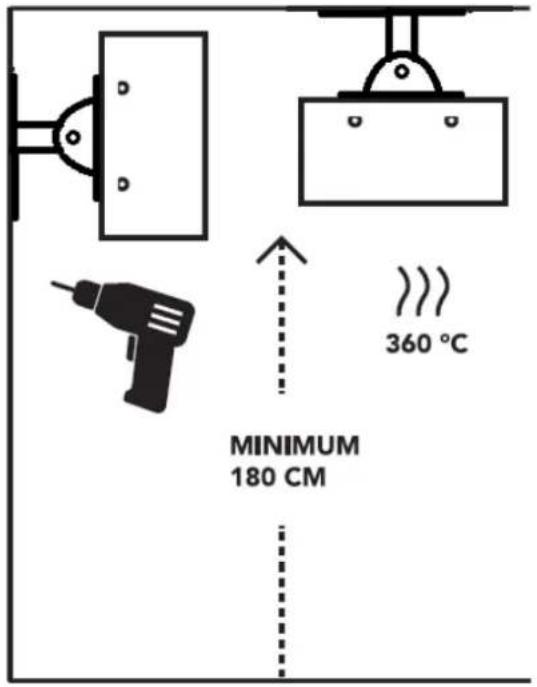
MINIMUM 180 CM 360 °C
text_image
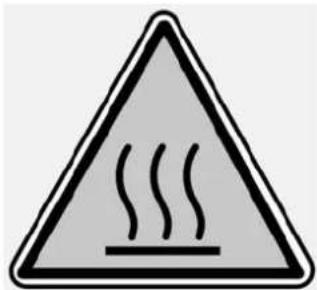
MINIMUM 180 CM 360 °CThe casing, particularly the front of the device, will get extremely hot, up to 360^ C! For safety reasons, the lowest point of the Outdoor heat panel must always remain at least 180 cm above the ground, whether secured to the wall or ceiling.
Production description
Your device is an elegant answer to all your heating needs, both indoor and out. The device can be secured to a wall as well as a ceiling or roof covering. It fulfils the CE standards and the IPX4 requirements and that means that it can also be mounted in a humid environment. The device is not designed to be exposed to heavy downpours or hang outdoors for the entire season without any protection. The device is best placed under a porch, car-port or other covering, i.e. in semi-open spaces/conservatories, workplaces and similar.
Use the device exclusively for the purposes for which it was designed, i.e. heating a household or semi-commercial space or terrace. Do not hang textiles or similar over the device to dry them and bear in mind the minimum distances to the device!
Technical data
| Type | Outdoor Heatpanel 1800 | Outdoor Heatpanel 1800 (RC) | Outdoor Heatpanel 2400 (RC) | Outdoor Heatpanel 3200 (RC) |
| Power | 1800 Watt | 1800 Watt | 2400 Watt | 3200 Watt |
| Voltage | 220/240V~50Hz | |||
| IP class | IPX4 | |||
| Front | Aluminium | |||
| Backside | steel | Aluminium | Aluminium | Aluminium |
| Dimensions | 114,5x17,2x4,5 cm | 114,8x20x4,8 cm | 144,5x20x4,8 cm | 148,5x20x4,8 cm |
| Weight | 9,2 kg | 6,8 kg | 8,2 kg | 10,5 kg |
Safety Warnings
Warnings for installation
- In the event of incorrect usage or installation, there is a risk of electric shocks and/or a fire hazard.
- The casing, particularly the front of the device, will get extremely hot, up to 360^ C. For safety reasons, the lowest point of the Outdoor heat panel must always remain at least 180 cm above the ground, whether secured to the wall or ceiling.
- The ceiling or the wall to which the device is mounted must not be made of flammable materials. It must be resistant to temperatures of at least 150^ C without burning, melting, deforming or bursting into flames. Check regularly to ensure that the surface is not overheating; this could be dangerous!
For ceiling mounting: maintain a minimum distance to all side walls of 100 cm.
For wall mounting: maintain a minimum distance to all side walls and ceilings of 20 cm.
-
Before use, check to ensure that the voltage, as indicated on the device, corresponds with the voltage from the electrical point to which it will be connected. The power supply and connection must fulfil the valid, legal standards and national regulations. Only use an undamaged, earthed socket that is protected with a 30 mA earth leakage circuit breaker.
-
When you are using the unit outside, it must be connected to a suitable, waterproof, earthed socket. All electrical connections must
remain dry under all conditions. Neither supplier, importer nor manufacturer is liable for incorrect connections!
-
Do not locate the device directly under, above or in front of an electrical socket.
-
When choosing the location of the device, make sure it is out of the reach of children. Make sure that they cannot play with the device.
-
Ensure that the electric cable does not hang off sharp edges, is not twisted around sharp corners, cannot be dragged along and does not come into contact with any hot surfaces. Roll the electrical cable out fully before you insert the plug into the socket. Do not place the cable under carpet, cover with mats, runners or similar and do not place in areas that are walked on frequently. Ensure that it cannot be stepped on and that no (garden) furniture is placed on top of it. Do not bend the cable around sharp corners and do not roll up too tightly after use.
-
Keep all flammable objects, such as (garden) furniture, curtains, clothing, paper, etc. and also electrical cables out of the vicinity of the device (at least one metre)!
-
If you are using the device outdoors, stow tent cloth/plastic etc. or ensure there is additional distance between this type of material and the heater.
-
Never place the unit above or within one metre of a tap or other source of water. Do not install the device in a damp environment, such as a bathroom, washing area or similar indoor environment. Despite the fact that the device is splash-proof, you must be careful with water. Make sure that the device cannot fall into water and never expose it to water jets. Do no operate or touch the device with wet hands. Install the device so that it cannot be operated or touched from a swimming pool, bath or shower.
-
The use of an extension cable or junction box is not advised as this can lead to overheating and fire. If the use of an extension cable is unavoidable, make sure that it is not damaged and that it is an approved extension cable with a minimum diameter of 3 × 2.5 mm^2 .
-
The electrical capacity of the extension cable and/or junction box must be more than adequate for the device to be connected and the voltage for which the extension cable and/or junction box is intended must correspond with the requirements of the device. Extension cables and junction boxes must fulfil statutory regulations.
-
Always fully extend the (extension) cable in order to prevent overheating!
- Only use the device if it has been properly secured to a wall or ceiling. Make sure that you always use attachment materials that are suitable for the surface you are working with; consult an expert if required.
- Never make any changes to the device, electrical cable or plug.
- If this device is directly connected to the cabling of your electricity installation, it must be installed by a competent specialist, taking account of the valid laws and regulations and the instructions from the energy company.
Warnings for use
- Never cover or block the device; it will overheat and this could lead to a fire risk. Never hang or place objects such as clothing, blankets, cushions, paper, etc. on the device. The minimum distance of 1 metre between the device and flammable materials must always be applied.
- The casing, particularly the front of the device, will get incredibly hot during use. Never touch the device when it is on or shortly thereafter; it could burn you! Make sure that the wind or other environmental factors do not move any flammable materials into the immediate vicinity of the device. This could include curtains, tent canvas, flags, plastic film, etc. This could lead to burns or fire. Make sure that they do not cover or block the device.
- Do not store any flammable liquids or materials, such as paint, petrol, gas bottles, etc. in the immediate vicinity of the device. Do not use the device in an environment that poses a fire risk, e.g. near gas tanks, gas pipes or aerosols. This is an explosion and fire risk!
- Never pull on the cable to remove the plug from the socket or to move the unit.
- Never stick fingers or pencils or any other objects into an opening in the device.
- Prevent the cable coming into contact with the device, oil, solvents and sharp objects or becoming hot. Unroll the cable in full before using the device. Check the cable regularly for damage.
-
Remove the plug from the socket if you do not plan to use the unit for an extended period.
-
Warning! Some parts of this device will get very hot and could cause burns. You must pay particular attention to children, vulnerable persons and pets that are present near the device.
- Make sure there is close supervision if this device is used when there are children, incapacitated person or pets present. Never leave them alone with a working device.
- Children younger than 3 must be kept out of the vicinity of the device unless they are continuously supervised.
- Children aged between 3 and 8 may only switch the device on and off if the device is installed at its usual workplace and they are under supervision or if they have received suitable instructions regarding safe methods for using the device and understand the corresponding dangers. Children between the ages of 3 and 8 may not insert the plug into the socket, adjust the device settings or clean or maintain it.
- This device is not suitable to be operated by children or those with physical, sensory or mental disabilities or by anyone who does not have knowledge about or experience with the device. The device may be used by children aged 8 or above and persons with reduced physical capacities, sensual or mental skills or a lack of experience and knowledge if they are under supervision or if they have received suitable instructions regarding safe methods for using the device and understand the corresponding dangers.
- Warning! This device is not equipped to monitor the ambient temperature in the room. Do not use the device in small rooms if these rooms are used by persons who are not capable of leaving the room independently, unless there is constant supervision.
- Warning! Never leave the device unattended if it is turned on. Do not use a programmer, timer or other facility that turns the device on automatically. Never use the device with an external voltage regulator such as a dimmer or similar, as this could be dangerous!
Warnings for maintenance
- Always keep the unit clean and free from dust.
-
Switch the device off and remove the plug from the socket if:
-
the device is damaged or has fallen over
- the device creaks or cracks or works intermittently
- you notice deficiencies or breakdowns when it's in use
- the casing, the front, the electrical cable or plug are damaged in any way
This could create a fire risk or a risk of injury or damage.
-
If the device, electrical cable or plug show signs of damage or breakages, consult your supplier, the manufacturer or an authorised service point for repairs or replacement. Do not carry out your own repairs as this could be dangerous! Repairs, carried out by unauthorised persons or changes to the device could damage the dust/waterproof capacity of the device and will nullify the guarantee and the manufacturer's liability.
-
Always turn the device off, remove the plug from the socket and leave to cool down before you touch it, install it, move it, clean it or carry out any maintenance.
Description
text_image
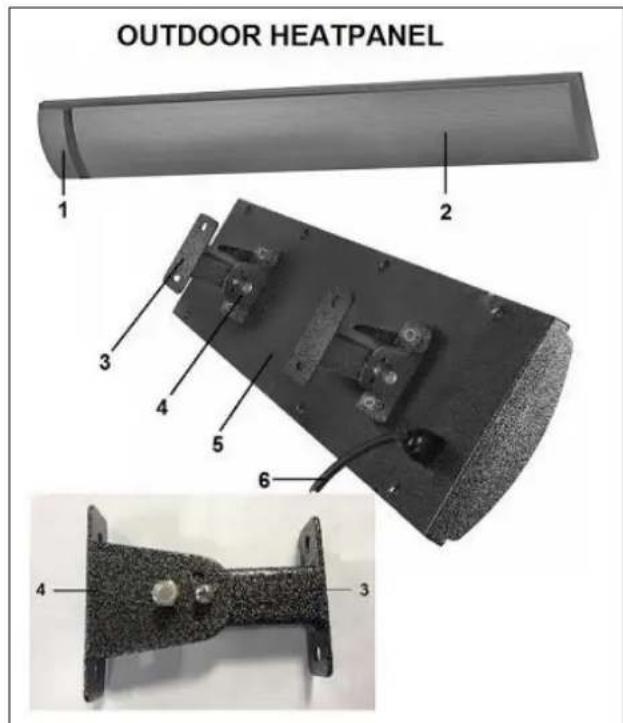
OUTDOOR HEATPANEL 1 2 3 4 5 6 4 3- Electricity connecting terminal
- Heat panel
- Wall/ceiling support (x2)
- Hanging bracket (x2)
- Back of heat panel
The device is made up of the following elements:
- The actual Heat panel with electrical cable and plug
- Remote control (only Outdoor Heat panel 1800+2400+3200 (RC)
- Two hanging brackets with attachment materials
- Two wall/ceiling supports
text_image
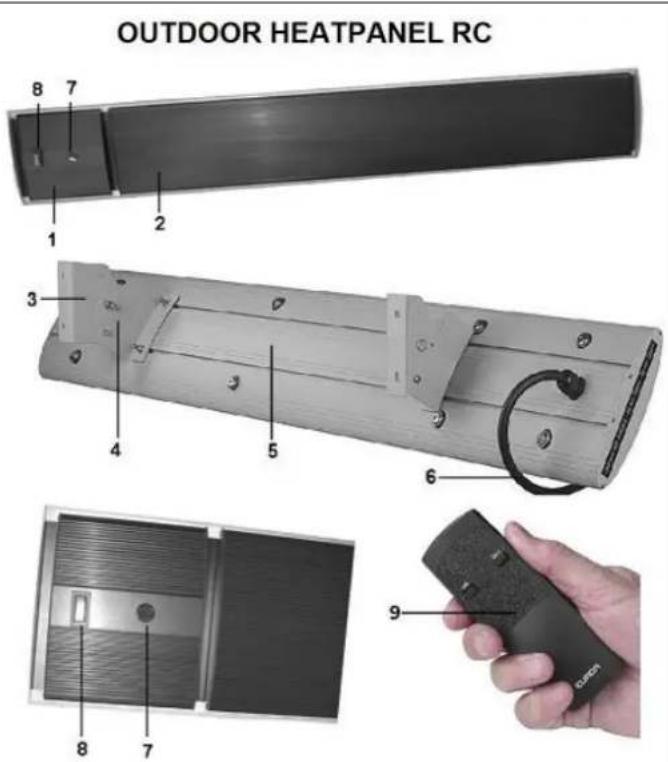
OUTDOOR HEATPANEL RC 8 7 1 2 3 4 5 6 8 7 9- Electrical cable with plug
- Control light
- Switch
- Remote control
Installation and mounting
Electricity supply
The device must be connected to an earthed socket.
Check that the socket you wish to use provides the voltage that is stated on the type plate of the device.
The electricity supply to which the device is connected must be protected by an earth leakage circuit breaker (max. 30 mA).
Permanent installation
The device is designed to be installed at a permanent location and connected directly to the electricity network. The installation must be equipped with an (RC: extra) on/off switch. For safety reasons, this installation must be carried out by a professional electrician.
Temporary installation
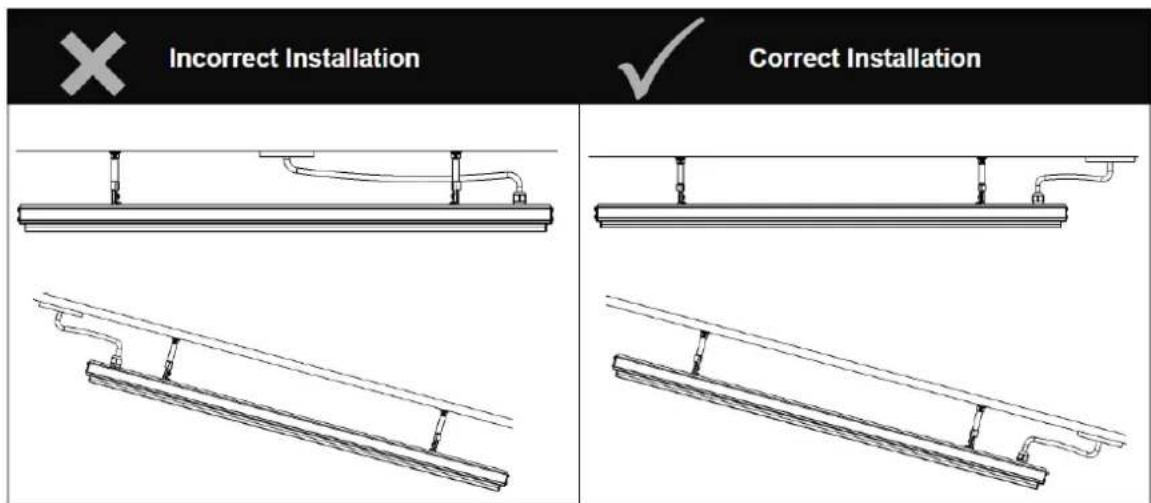
As a temporary facility, the device can be directly connected to a socket via its electric cable and plug. The device will then be switched on and off by inserting and removing the plug from the socket (RC-version has on/off switch). Ensure that the electric cable does not hang off sharp edges, is not twisted around sharp corners, cannot be dragged along and does not come into contact with any hot surfaces.
Important: electrical cable and plug form one, single unit. If the electric cable or plug becomes damaged, they must be replaced in their entirety by an electrician. Only allow original parts to be used!
Location
The device must be installed with its lowest point at least 180 cm from the ground (A) for both wall and ceiling installation.
The best efficiency will be obtained by placing the Outdoor heat panel horizontally against the ceiling or roofing. If you mount the device on the wall, the efficiency reduces by a max. 40%.
The ideal position for the Outdoor heat panel is directly above the area/persons to be heated. The maximum output point is located directly under the Outdoor heat panel; as the distance increases, the temperature decreases.
When installing outdoors, under a roof covering, the most effective installation height is between 220 and 270 cm. Never hang the device higher than 320 cm above the ground.
Ceiling installation:
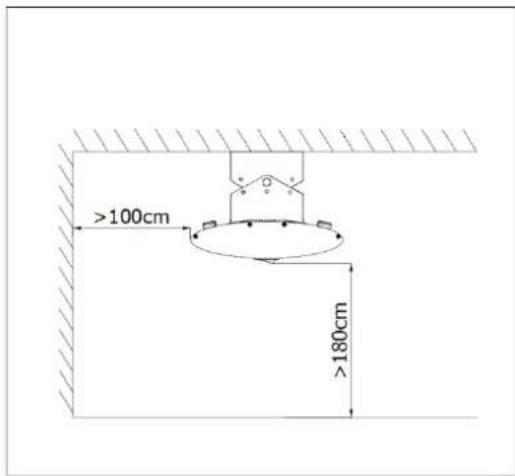
Maintain a minimum distance to all side walls of 100 cm, see diagram (model may vary!!) Also maintain a minimum of 1 metre around the device that is free from obstacles.
Wall installation:
Maintain a minimum distance to all side walls and ceiling of 20 cm, see diagram (model may vary!!) Also maintain a minimum of 150 cm around the device that is free from obstacles.
Ceiling installation:
Wall installation:
text_image
>100cm >180cm
text_image
>20cm >150cm 60° >180cmCarefully select the right position for your device, taking the regulations into account.
The ceiling or the wall on which the Outdoor heat panel is mounted must not be made of flammable materials. It must be resistant to temperatures of at least 150^ C without burning, melting, deforming or bursting into flames. Check regularly to ensure that the surface is not overheating; this could be dangerous! Fire risk! The surface must also be free from vibrations, completely vertical (when mounting on a wall) and sufficiently sturdy to bear the device correctly for the long-term.
Note:
- The device may never emit heat towards the ceiling or wall!
natural_image
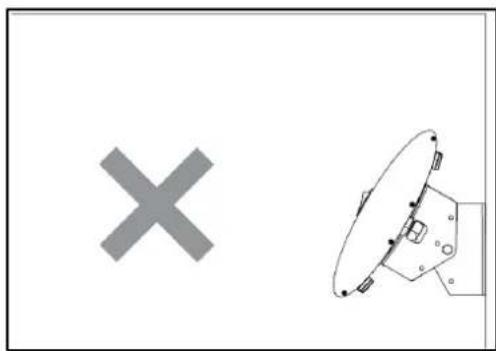
Simple diagram showing a gray 'X' symbol next to a circular device with a pointer and control points (no text or labels)- The device must not be installed right in front of, over or under an electrical socket.
text_image
Incorrect Installation Correct Installation- Never place the unit above or within one metre of a tap or other source of water. Do not install the device in a damp environment, such as a bathroom, washing area or similar indoor area.
- Ensure that no insulation material, cables, flammable materials or anything else can come into contact with device's surface.
- The device must not be hung in the vicinity of heat-sensitive or flammable materials.
Attaching
- Remove the packaging materials and keep out of the reach of children.
- Before use, check that all accessories are present and that there is no damage to the device itself. Do not use a damaged unit; take it back to your supplier.
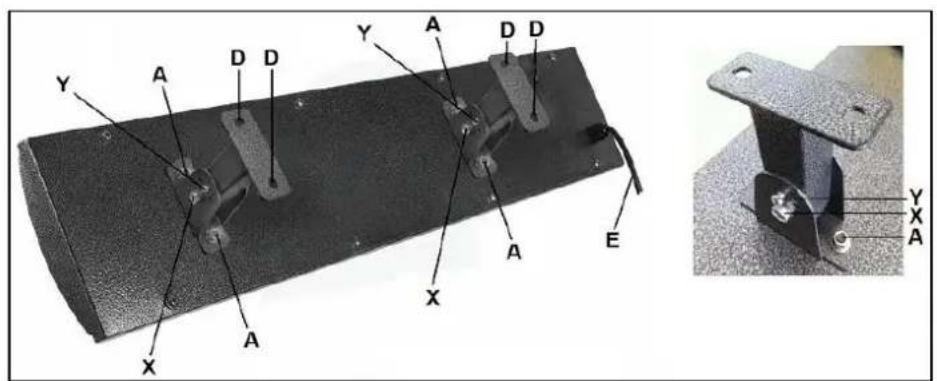
Attaching Outdoor Heat panel 1800
text_image
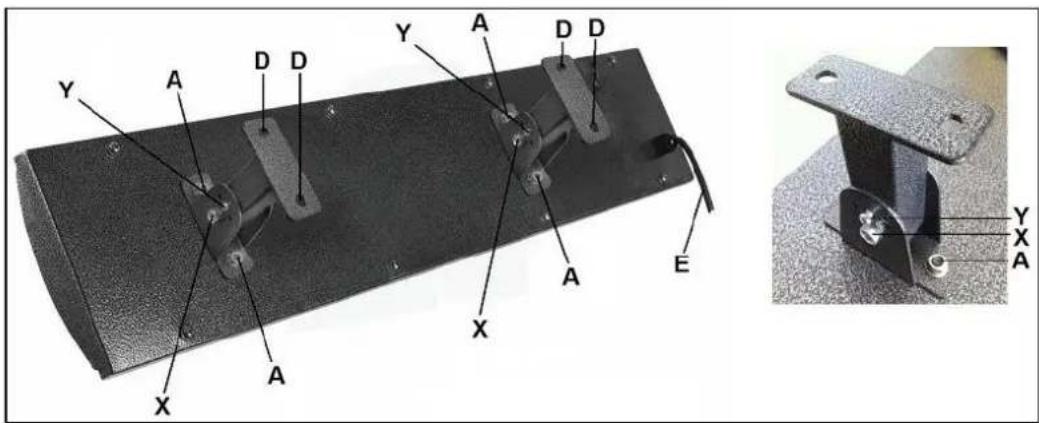
Y A D D Y A D D A E X A X Y X A- Attach both hanging brackets securely to the pre-mounted screws on the device with the 2x2 nuts (A) supplied.
Attaching Outdoor Heat panel 1800+2400+3200 (RC)
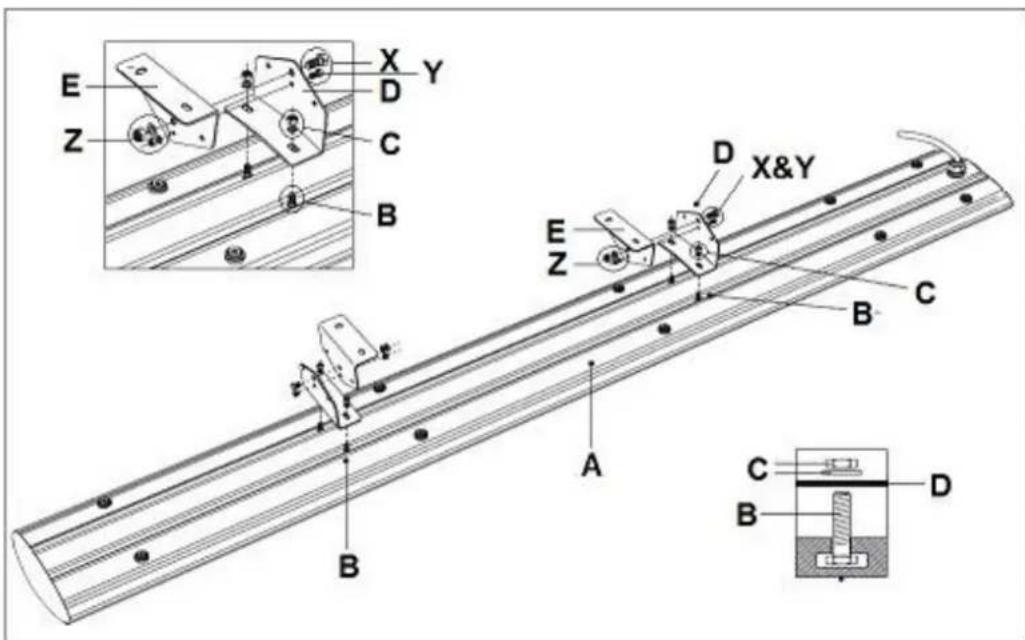
text_image
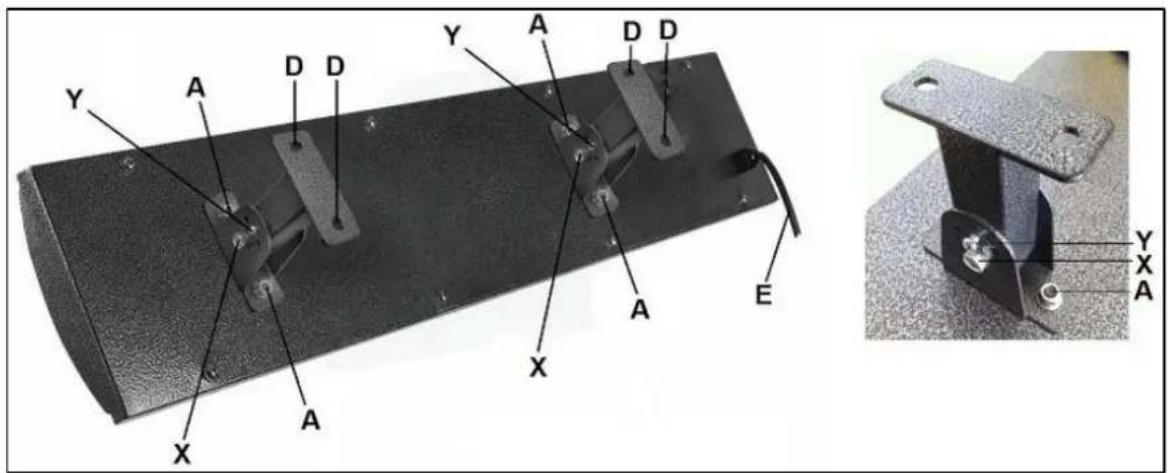
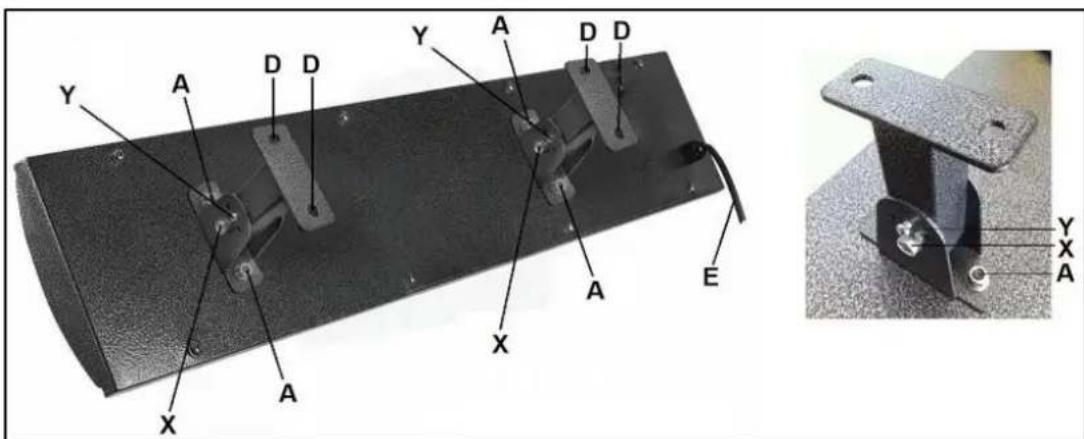
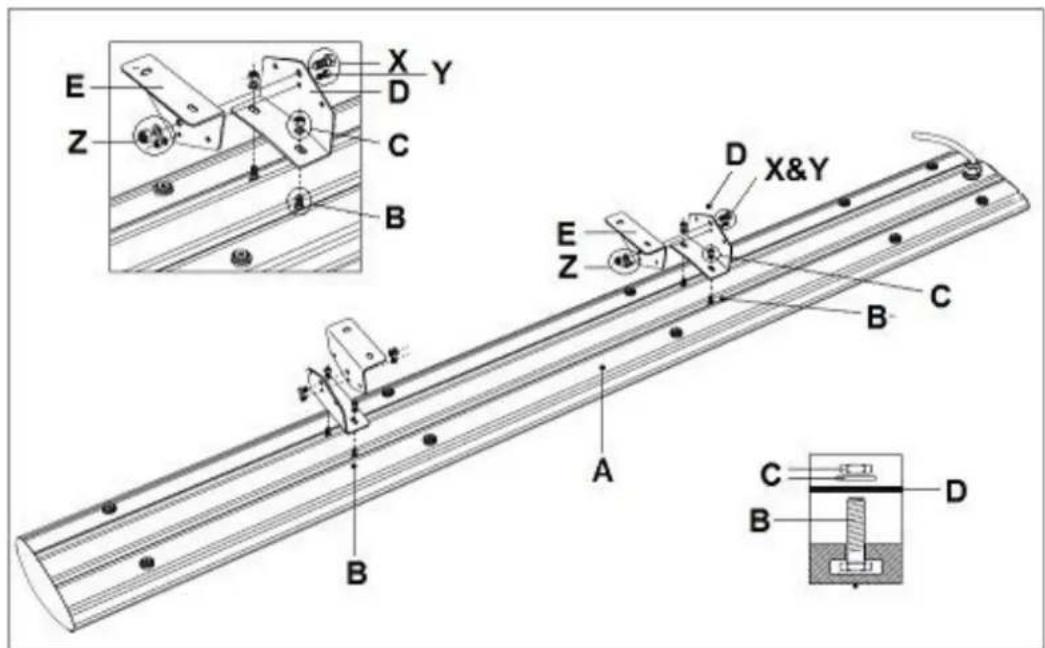
E X Y Z D C B D X&Y E Z B C A B C D B- The device has two rails on the back (A) which contain 2x2 sliding attachment bolts (B). Slide the rails to the place where you wish to secure the hanging brackets (D). The brackets must be at least 60 cm away from one another and the space between the brackets must be evenly divided between left and right.
- Place both hanging brackets (D) over the 2x2 bolts (B), place a ring over each bolt and screw them until secure with the 4 nuts (ring + nut = C).
• See diagram for whole installation.
The following applies to all four types
- Screw both wall/ceiling supports loosely between the hanging brackets with the 2 screws (X) and nuts (z) supplied.
- Secure the wall/ceiling supports using both small screws (Y) (RC: and nuts (Z)) in the middle position.
- Select the location for the device, taking all of the instructions into account. Mark the location for the 4 drilled holes on the wall/ceiling. Ensure that the device hangs horizontally!
- Unscrew both wall/ceiling supports and secure them firmly to the marked location on the wall/ceiling. Use wedge bolts for brick or concrete and ask for advice about attachment materials for any other surfaces.
- Now secure the device firmly to the wall/ceiling supports with the hanging brackets using both screws and bolts (X and Z).
- The direction of heat from the device can be set to 3 positions. Only change the setting if the device has cooled down completely and has been disconnected from the power supply. Secure the direction of heat at the desired angle using both small screws (Y) and the RC-version with the bolts, rings and nuts (Z).
- Check to ensure that the device is hanging firmly.
- You are advised to ask an electrician to connect the device to the mains and then operate via a switch. You could also connect an appropriate socket. Make sure that the electrical cable never gets too hot!
Important! If secured to the wall, the heat can radiate straight out and also around 35^ downwards and upwards. Upwards is pointless and is also strictly forbidden! This could overheat or melt the ceiling, lead to burn marks or even cause a fire. Water could also get into the device.
Use
Check before each use:
- whether the device is showing any signs of damage.
- whether the device is still secured properly. Wind or gravity could loosen the attachments over time.
- whether any objects, canvases, parasols, etc. have come within the safe distances.
- whether the socket you are using provides the correct voltage (220/240V-50Hz).
Using the Outdoor heat panel 1800
If this has all been checked, you can insert the plug into the socket. The device should now work. Once the device is connected, it will take around 15 minutes to heat up to its usual working temperature. To stop the device, switch it off or take the plug out of the socket. Always give the device time to cool down.
Using the Outdoor heat panel 1800+2400+3200 (RC)
Set the switch to position 0, i.e. off. When you've made all of the checks, you can connect the device to the mains using the external switch (or insert the plug into the socket). Use the switch to set the device to the appropriate setting:
I = manual controls
II = remote control
▶ Manual control
Set the switch to I: the control light will come on. The device should now work.
Once the device is connected, it will take around 15 minutes to heat up to its usual working temperature.
To switch it off, set the switch on the device back to 0. Then cut the power supply using the external switch or take the plug out of the socket.
Remote control
Set the switch to II: the device is now in stand-by.
Put 2 small batteries into the remote control (AAA-1.5V). Point the remote control at the device and push the ON button. The blue control light will come on. The device should now work. Once the device is connected, it will take around 15 minutes to heat up to its usual working temperature.
To switch the device off, point the remote control at the device and press the OFF button. The device is now in stand-by.
To switch it off, set the switch on the device back to 0. Then cut the power supply using the external switch or take the plug out of the socket.
If you are using the device for the first time (or when it has not been used for a while), you must keep a close eye on it for the first 20-30 minutes to ensure that it is working correctly. During initial use (and if the unit has not been used for a long period), white smoke may be emitted from the device. This is normal and will stop after a few minutes. During the warm-up period, the unit may sputter; this is nothing to worry about.
Cleaning, maintenance and service
It is important to clean the device regularly particularly if it hangs outdoors.
Cleaning extends the life-span of the device and ensures it works effectively. It is also a condition of the guarantee.
Clean the device every 2-3 weeks (depending on the environment); clean weekly in a salty environment. Salt in the air can penetrate the device and lead to rusting or erosion of the metal. In an urban environment, air pollution can also impact upon the coating and other materials which protect the device from rust and erosion.
You must thoroughly clean and inspect the device once every 3 months.
Be aware that, despite regular cleaning, the effects of weather, air pollution and salt, cigarette smoke, oil lamps, candles, barbecues etc. will leave their mark on the device over time.
Please note! Always turn the device off, take the plug out of the socket and leave the device to cool (1 hour) before cleaning.
The fact that the device is protected by IPX4 means that it can safely be cleaned with (warm) water. Do not use a pressure sprayer or similar; only use a wet cloth. If you use a mild cleaning agent, make sure that all of the residues are removed properly!
Dust the device with a clean, soft, lint-free cloth or soft brush. Do not use aggressive cleaning agents, scouring sponges, brushes or chemical cleaners as this could damage the materials. Never use flammable cleaning products such as benzene or methylated spirit. Keep the cable and plug dry.
Do not forget to clean the back of the device: insects, bird faeces, dust, salt and other dirt may gather here!
Check the device for damp and deficiencies before using again. Check the device regularly and always do so after high winds or unusual events that may impact upon the heating panel.
There are no components within the device that need maintaining or replacing/repairing by the user. Any repairs must be carried out by trained specialists (supplier or authorised electrician) to ensure safety.
Damage and breakdowns as a result of repairs made by the user or changes made to the device, accidents, misuse, negligence, incorrect/inadequate maintenance and commercial usage shall make the guarantee null and void.
Removal
natural_image
Symbol of a trash bin with no text or numbers presentIn the EU this symbol indicates that this product may not be disposed of as ordinary household waste. Old equipment contains valuable materials, suitable for recycling. These materials should be made suitable for reuse in order to prevent any adverse effects to health and the environment caused by unregulated waste collection. Therefore, please make sure that you bring old equipment to a designated collection point. Alternatively, contact the original supplier, who can make sure that as many of the components as possible can be recycled.
CE-declaration
Undersigned: Eurom, Kokosstraat 20, 8281 JC Genemuiden-NL declares that the product below
product: Infrared heaters
known under the brand: Eurom
types: Outdoor Heatpanel 1800, Outdoor Heatpanel 1800 (RC), Outdoor Heatpanel 2400 (RC),
Outdoor Heatpanel 3200 (RC)
fulfils the requirements of the norms below:
LVD 2014/35/EU
EN60335-1:2012+A11:2014
EN60335-2-30:2009+A11:2012
EN62233:2008
EMC 2014/30/EU
EN55014-1:2017
EN55014-2:2015
EN61000-3-2:2014
EN61000-3-3:2013
RoHS 2011/65/EU&(EU)2015/863
Genemuiden, 28-09-2020
W.J. Bakker, alg. dir.
text_image
akker.Merci
text_image
Prohibition sign with a diagonal line crossing over a document icon, indicating no text or symbols beyond the prohibition symbol.text_image
Warning sign with steam symbol inside a triangle, indicating hazardous materialnatural_image
Simple diagram showing a gray 'X' symbol next to a mechanical device with a circular component (no text or labels)text_image
Incorrect Installation Correct InstallationFixation Outdoor Heatpanel 1800
text_image
Y A D D Y A D D A E X A X Y X Atext_image
Technical diagram of a mechanical assembly with labeled components and cross-sectional viewsnatural_image
Symbol of a trash bin crossed with a diagonal line, representing no waste or discharge (no text or labels)
type: Outdoor Heatpanel 1800, Outdoor Heatpanel 1800 (RC), Outdoor Heatpanel 2400 (RC), Outdoor Heatpanel 3200 (RC)
text_image
Prohibition sign with a document and downward arrow symbol, crossed out by a diagonal linetext_image
Warning sign with steam symbol inside a triangle, indicating hazardous materialVarning: het yta!
text_image
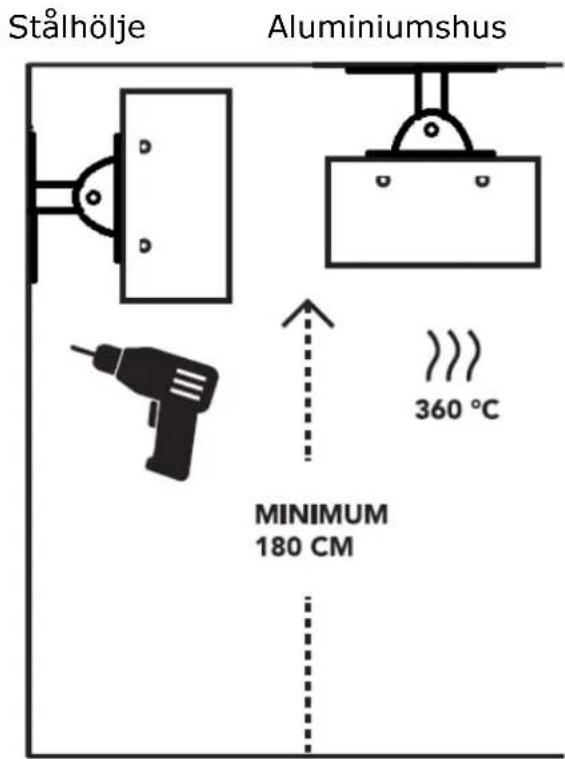
Stålhölje Aluminiumshus 360 °C MINIMUM 180 CM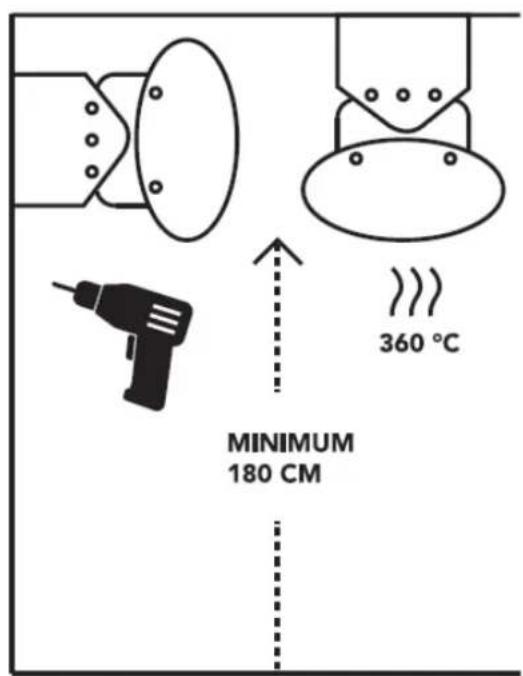
text_image
MINIMUM 180 CM 360 °Cnatural_image
Simple diagram showing a gray 'X' symbol and a mechanical component with a circular arrow (no text or labels)text_image
Incorrect Installation Correct InstallationMontering Outdoor Heatpanel
text_image
Y A D D Y A D D X A E X Y X AMontering Outdoor Heatpanel 1800+2400+3200 (RC)
text_image
E Z X Y D C B D X&Y E Z B C A B C Dnatural_image
Symbol of a trash bin crossed with a diagonal line, representing waste sorting or anti-smoking (no text present)
typer: Outdoor Heatpanel 1800, Outdoor Heatpanel (RC), Outdoor Heatpanel 2400 (RC), Outdoor Heatpanel 3200 (RC)
text_image
Prohibition sign with a diagonal line crossing over a document icon, indicating no text or symbols beyond the prohibition symbol.text_image
Warning sign with steam symbol inside a triangle, indicating hazardous materialnatural_image
Simple diagram showing a gray 'X' symbol and a mechanical device with mounting holes (no text or labels)text_image
Incorrect Installation Correct Installationtext_image
Y A D D Y A D D A E X X A Y X Anatural_image
Symbol of a trash bin with crossed lines indicating no waste or discharge, and a solid black rectangle below (no text or labels)typy: Outdoor Heatpanel 1800, Outdoor Heatpanel 1800 (RC), Outdoor Heatpanel 2400 (RC), Outdoor Heatpanel 3200 (RC)
text_image
Prohibition sign with a diagonal line crossing over a document icon, indicating no text or document.text_image
Warning sign with steam symbol inside a triangle, indicating hazardous materialnatural_image
Simple diagram with a gray 'X' symbol and a mechanical component outline (no text or labels)text_image
Incorrect Installation Correct Installationtext_image
Y A D D Y A D D X A E X Y X Atext_image
Technical diagram of a mechanical assembly with labeled components and cross-sectional viewsnatural_image
Symbol of a trash bin with crossed lines indicating no waste or discharge, and a solid black rectangle below (no text or labels)typy: Outdoor Heatpanel 1800, Outdoor Heatpanel 1800 (RC), Outdoor Heatpanel 2400 (RC), Outdoor Heatpanel 3200 (RC)
text_image
Prohibition sign with downward arrow and document icon, crossed out by a diagonal linetext_image
Warning sign with steam symbol inside a triangle, indicating hazardous materialnatural_image
Simple diagram showing a gray 'X' symbol and a mechanical component with mounting holes (no text or labels)text_image
Incorrect Installation Correct Installationtext_image
Y A D D Y A D D X A E X Y X Atext_image
Technical diagram of a mechanical assembly with labeled components and cross-sectional viewsnatural_image
Symbol of a trash bin crossed with a diagonal line, representing no waste or discharge (no text or labels)
tipuri: Outdoor Heatpanel 1800, Outdoor Heatpanel 1800 (RC), Outdoor Heatpanel 2400 (RC), Outdoor Heatpanel 2400 (RC)