BIK5 DH8FS PT CH - Cooker BAUKNECHT - Free user manual and instructions
Find the device manual for free BIK5 DH8FS PT CH BAUKNECHT in PDF.
| Product type | Cooker |
| Brand | Bauknecht |
| Model | BIK5 DH8FS PT CH |
| Category | Cooker with oven and hob |
| Power supply | 230 V ~ 50 Hz, 16 A (adjustable 13 A) |
| Manual cooking functions | Traditional, Grill, Turbo Grill, Hot Air, Forced Convection, Eco Hot Air |
| Automatic functions | Stew, Meat, Large Roast, Bread, Pizza, Cakes |
| Special functions | Rapid preheat, Keep warm, Dough rising, Diamond Clean |
| Cleaning type | Diamond Clean (low-temperature steam, 200 ml water) |
| Oven light | 25-40 W / 230 V bulb, type E-14, T300 °C or 20-40 W / 230 V halogen, type G9, T300 °C |
| Oven door | Removable for easy cleaning |
| Upper heating element | Lowerable for cleaning the top wall |
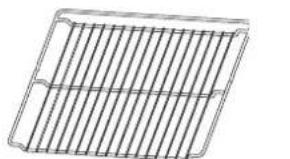
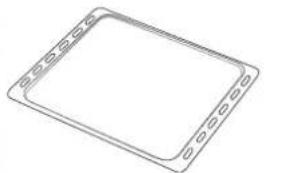
| Supplied accessories | Wire shelf, drip tray, baking tray |
| Sliding grids | Available depending on model |
| Cooking chart | Indicates function, temperature, duration and level for different dishes |
| Dimensions (estimated) | Width 60 cm, Depth 60 cm, Height 85 cm (standard) |
| Weight (estimated) | Approximately 50 kg |
| Oven capacity (estimated) | Approximately 71 L |
| Clock setting | Yes, via the control panel |
| Key lock | Yes, press the BACK button for 5 seconds |
| Delayed start | Yes, for certain functions |
| Safety | Automatic shutdown in case of overheating, key lock |
Frequently Asked Questions - BIK5 DH8FS PT CH BAUKNECHT
User questions about BIK5 DH8FS PT CH BAUKNECHT
0 question about this device. Answer the ones you know or ask your own.
Ask a new question about this device
Download the instructions for your Cooker in PDF format for free! Find your manual BIK5 DH8FS PT CH - BAUKNECHT and take your electronic device back in hand. On this page are published all the documents necessary for the use of your device. BIK5 DH8FS PT CH by BAUKNECHT.
USER MANUAL BIK5 DH8FS PT CH BAUKNECHT
THANK YOU FOR PURCHASING A BAUKNECHT PRODUCT
To receive more comprehensive help and support, please register your product at www.bauknecht.eu/register

You can download the Safety Instructions and the Use and Care Guide by visiting our website docs.bauknecht.eu and following the instructions on the back of this booklet.

Before using the appliance carefully read the Health and Safety guide.
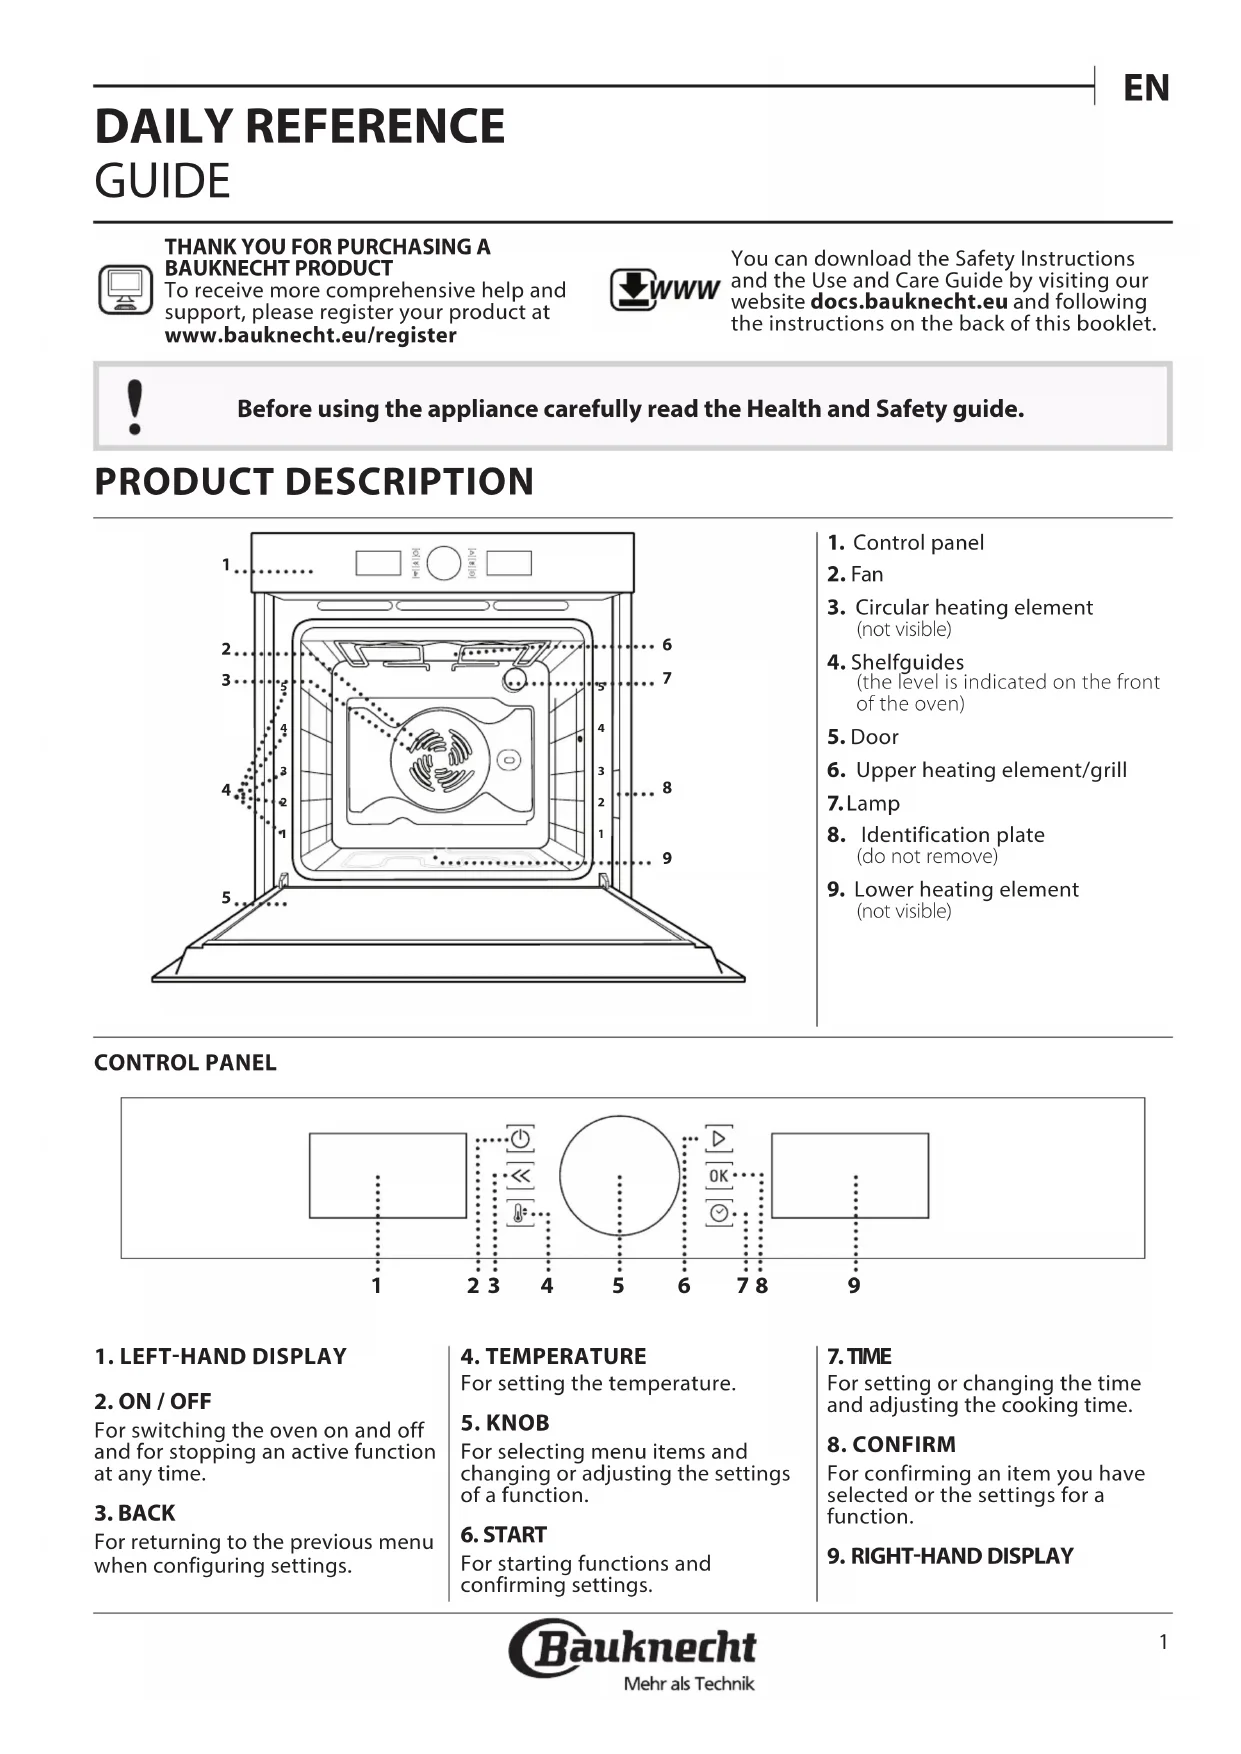
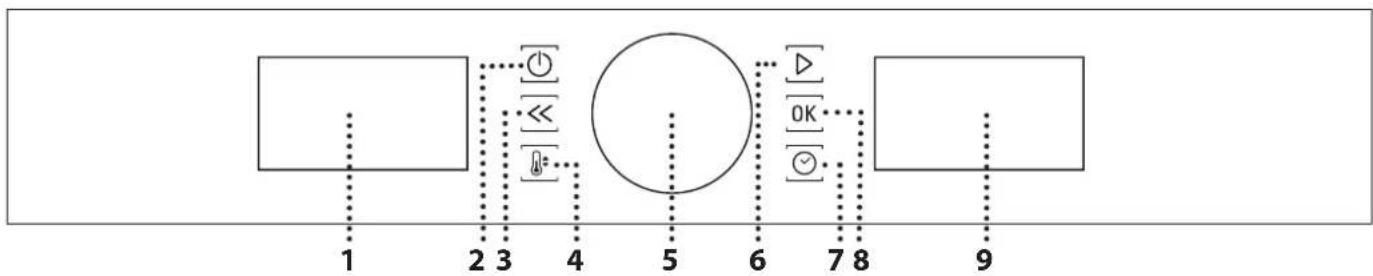
PRODUCT DESCRIPTION
- Control panel
2.Fan - Circular heating element (not visible)
4.Shelfguides (the level is indicated on the front of the oven) - Door
- Upper heating element/grill
7.Lamp - Identification plate (do not remove)
- Lower heating element (not visible)
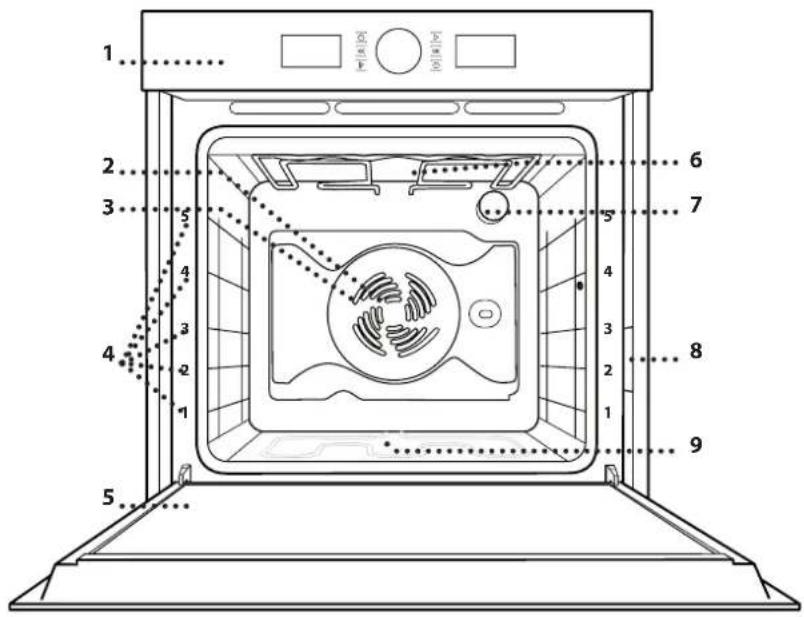
CONTROL PANEL
1. LEFT-HAND DISPLAY
2.ON/OFF
For switching the oven on and off and for stopping an active function at any time.
3. BACK
For returning to the previous menu when configuring settings.
4. TEMPERATURE
For setting the temperature.
5.KNOB
For selecting menu items and changing or adjusting the settings of a function.
6. START
For starting functions and confirming settings.
7. TIME
For setting or changing the time and adjusting the cooking time.
8. CONFIRM
For confirming an item you have selected or the settings for a function.
9. RIGHT-HAND DISPLAY
| ACCESSIONS | www | Download the Use and Care Guide from docs.bauknecht.eu for more information |
| WIRE SHELF DRIP TRAY BAKING TRAY SLIDING RUNNERS * | ||
The number of accessories may vary depending on which model is purchased.
Other accessories can be purchased separately from the After-sales Service.
- If present
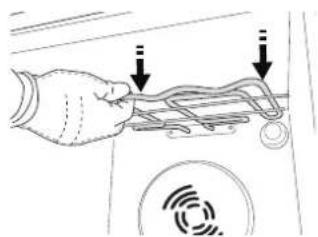
INSERTING THE WIRE SHELF AND OTHER ACCESSORIES
Insert the wire shelf horizontally by sliding it across the shelf guides, making sure that the side with the raised edge is facing upwards.
Other accessories, such as the drip tray and the baking tray, are inserted horizontally in the same way as the wire shelf.
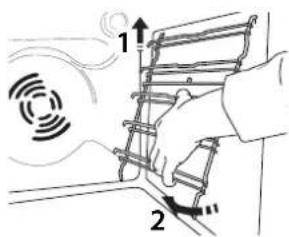
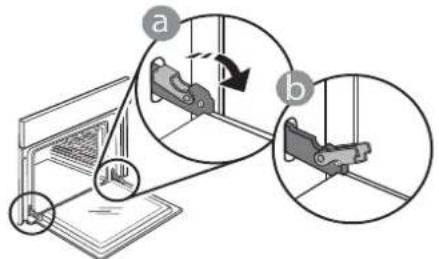
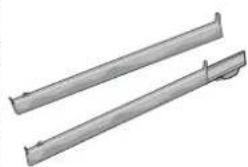
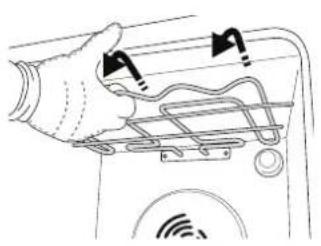
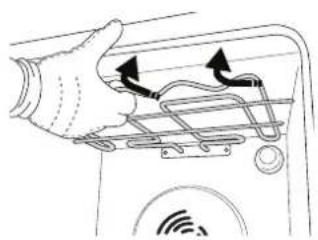
FITTING THE SLIDING RUNNERS (IF PRESENT)
Please note: The sliding runners can be already mounted on the shelf guides: to remove them, pull outward, releasing first the lower clip.
Remove the shelf guides from the oven and remove the protective plastic from the sliding runners.
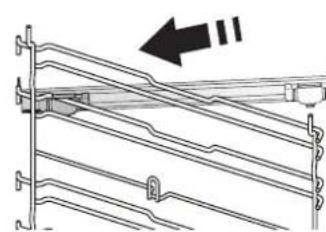
Fasten the upper clip of the runner to the shelf guide and slide it along as far as it will go. Lower the other clip into position.
To secure the guide, press the lower portion of the clip firmly against the shelf guide. Make sure that the runners can move freely. Repeat these steps on the other shelf guide on the same level.
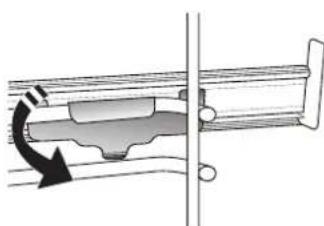
Please note: The sliding runners can be fitted on any level.
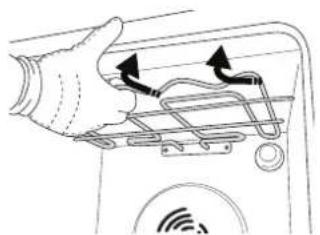
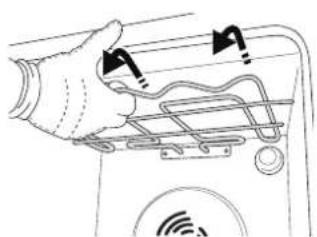
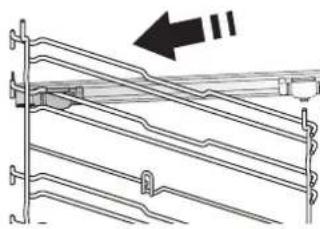
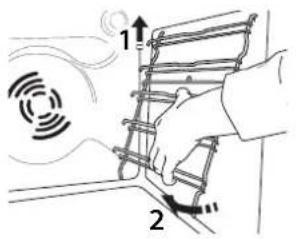
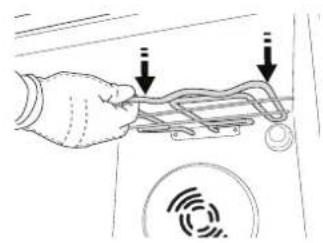
REMOVING AND REFITTING THE SHELF GUIDES
. To remove the shelf guides, remove the fixing screws (if present) on both sides with the aid of a coin or a too, lift the guides up and then gently pull the lower part out of its seating: the shelf guides can now be removed.
. To refit the shelf guides, first fit them back into their upper seating. Keeping them held up, slide them into the cooking compartment, then lower them into position in the lower seating.
Refit the fixing screws.

CONVENTIONAL
For cooking any kind of dish on one shelf only.

GRILL
For grilling steaks, kebabs and sausages, cooking vegetables au gratin or toasting bread. When grilling meat, we recommend using a drip tray to collect the cooking juices: Position the tray on any of the levels below the wire shelf and add 500ml of drinking water.

FORCED AIR
For cooking different foods that require the same cooking temperature on several shelves (maximum three) at the same time. This function can be used to cook different foods without odours being transferred from one food to another.

CONVECTION BAKE
For cooking meat, baking cakes with fillings or roasting stuffed vegetables on one shelf only. This function uses gentle, intermittent air circulation to prevent food from drying out excessively.

AUTOMATIC FUNCTIONS

CASSEROLE
This function automatically selects the best temperature and cooking method for pasta dishes.

MEAT
This function automatically selects the best temperature and cooking method for meat. This function intermittently activates the fan at low speed to prevent the food from drying out too much.

MAXI COOKING
The function automatically selects the best cooking mode and temperature to cook large joints of meat (above 2.5kg ). It is advisable to turn the meat over during cooking, to obtain even browning on both sides. It is best to baste the meat every now and again to prevent it from drying out.

BREAD
This function automatically selects the best temperature and cooking method for all types of bread.

PIZZA
This function automatically selects the best temperature and cooking method for all types of pizza.

PASTRY CAKES
This function automatically selects the best temperature and cooking method for all types of cake.

SPECIAL FUNCTIONS

FAST PREHEATING
For preheating the oven quickly. Once preheating has finished, the oven will select the "Conventional" function automatically. Wait for preheating to finish before placing food in the oven.

TURBO GRILL
For roasting large joints of meat (legs, roast beef, chicken). We recommend using a drip tray to collect the cooking juices: Position the pan on any of the levels below the wire shelf and add 500ml of drinking water. The turnspit (if provided) can be used with this function.

ECO FORCED AIR*
For cooking stuffed roasting joints and fillets of meat on a single shelf. Food is prevented from drying out excessively by gentle, intermittent air circulation. When this ECO function is in use, the light will remain switched off during cooking. To use the ECO cycle and therefore optimise power consumption, the oven door should not be opened until the food is completely cooked.

KEEP WARM
For keeping just-cooked food hot and crisp.

RISING
For optimal proving of sweet or savoury dough. To maintain the quality of proving, do not activate the function if the oven is still hot following a cooking cycle.

DIAMOND CLEAN
The action of the steam released during this special low-temperature cleaning cycle allows dirt and food residues to be removed with ease. Pour 200 ml of drinking water on the bottom of the oven and only activate the function when the oven is cold.
USING THE APPLIANCE FOR THE FIRST TIME
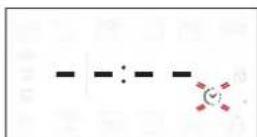
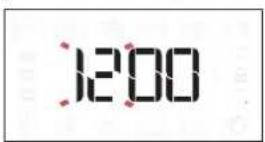
1. SET THE TIME
You will need to set the time when you switch on the oven for the first time.
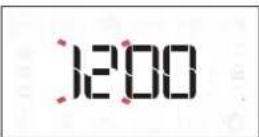
The two digits for the hour will start flashing: Turn the knob to set the hour and press OK to confirm.
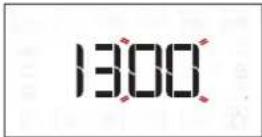
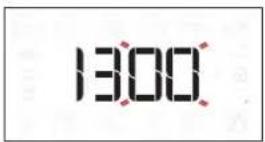
The two digits for the minutes will start flashing. Turn the knob to set the minutes and press OK to confirm.
Please note: To change the time at a later point, press and hold for at least one second while the oven is off and repeat the steps above.
You may need to set the time again following lengthy power outages.
2. SETTINGS
If required, you can change the default unit of measurement, temperature (^) and rated current (16 A).
With the oven off, press and hold for at least 5 seconds.

Turn the selection knob to select the unit of measurement, then press OK to confirm.
16 8
Turn the selection knob to select the rated current, then press OK to confirm.
Please note: The oven is programmed to consume a level of electrical power that is compatible with a domestic network that has a rating of more than 3kW (16 A): If your household uses a lower power, you will need to decrease this value (13 A).
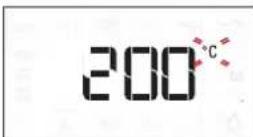
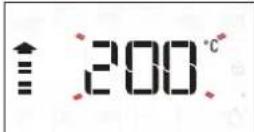
3. HEAT THE OVEN
A new oven may release odours that have been left behind during manufacturing: this is completely normal.
Before starting to cook food, we therefore recommend heating the oven with it empty in order to remove any possible odours.
Remove any protective cardboard or transparent film from the oven and remove any accessories from inside it.
Heat the oven to 200^ for around one hour, ideally using a function with air circulation (e.g. "Forced Air" or "Convection Bake").
Follow the instructions for setting the function correctly.
Please note: It is advisable to air the room after using the appliance for the first time.
DAILYUSE
1. SELECT A FUNCTION
When the oven is off, only the time is shown on the display. Press and hold 0 to switch the oven on. Turn the knob to view the main functions available on the left-hand display. Select one and press OK
To select a sub-function (where available), select the main function and then press OK to confirm and go to the function menu.

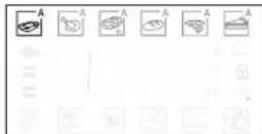
Turn the knob to view the sub-functions available on the right-hand display. Select one and press OK to confirm.
2. SET THE FUNCTION
After having selected the function you require, you can change its settings.
The display will show the settings that can be changed in sequence.
TEMPERATURE/GRILL LEVEL
When the ^ C / ^ icon flashes on the display, turn the knob to change the value, then press OK to confirm and continue to alter the settings that follow (if possible).
You can also set the grill level (3 = high, 2 = medium, 1 = low) at the same time.
Please note: Once the function has started, you can change the temperature or the grill level by pressing by turning the knob directly.
DURATION
When the ion flashes on the display, use the adjustment knob to set the cooking time you require and then press OK to confirm.
You do not have to set the cooking time if you want to manage cooking manually: Press to confirm and start the function.
In this case, you cannot set the end cooking time by programming a delayed start.
Please note: You can adjust the cooking time that has been set during cooking by pressing. turn the knob to change the hour and press confirm.
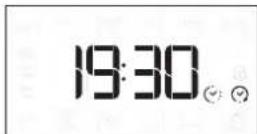
SETTING THE END COOKING TIME/ DELAYED START
In many functions, once you have set a cooking time you can delay starting the function by programming its end time.
Where you can change the end time, the display will show the time the function is expected to finish while the icon flashes.
If necessary, turn the knob to set the time you want cooking to end, then press to confirm and start the function.
Place the food in the oven and close the door: The function will start automatically after the period of time that has been calculated in order for cooking to finish at the time you have set.
Please note: Programming a delayed cooking start time will disable the oven preheating phase. The oven will reach the temperature you require gradually, meaning that cooking times will be slightly longer than those listed in the cooking table.
During the waiting time, you can use the knob to change the programmed end time.
Press or change the temperature and cooking time settings. Press confirm when finished.
Please note: Delay to start functionality is not available for Grill and Turbo Grill functions.
3. ACTIVATE THE FUNCTION
Once you have applied the settings you require, press to activate the function.
You can press and hold at any time to pause the function that is currently active.
4. PREHEATING
Some functions have an oven preheating phase: Once the function has started, the display indicates that the preheating phase has been activated.

Once this phase has finished, an audible signal will sound and the display will indicate that the oven has reached the set temperature.
At this point, open the door, place the food in the oven, close the door and start cooking by pressing D.
Please note: Placing the food in the oven before preheating has finished may have an adverse effect on the final cooking result.
Opening the door during the preheating phase will pause it. The cooking time does not include a preheating phase.
You can always change the temperature you want to reach using the knob.
5.END OF COOKING
An audible signal will sound and the display will indicate that cooking is complete.

To extend the cooking time without changing the settings, turn the knob to set a new cooking time and press
AUTOMATIC FUNCTIONS
TEMPERATURE RECOVERY
If the temperature inside the oven decreases during a cooking cycle because the door is opened, a special function will be activated automatically to restore the original temperature.
While the temperature is being restored, the display will show a "snake" animation until the set temperature has been reached.

While a programmed cooking cycle is in progress, the cooking time will be increased according to how long the door was open in order to guarantee best results.
. SPECIAL FUNCTIONS
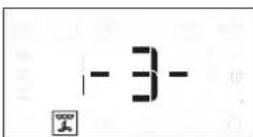
DIAMOND CLEAN
To activate the "Diamond Clean" function, with the oven cold, distribute 200 ml of water on the bottom of the oven cavity, then close the oven door.
Access special functions and turn the knob to select from menu. then press confirm.
Press to start immediately the cleaning cycle, or press OK to set the end time/start delayed.
At the end of the cycle, let the oven coiling down and remove any residual water in the oven and start cleaning using a sponge moistened with hot water (cleaning could be compromised if delayed by more than 15 minutes).
Please note: The duration and temperature of cleaning cycle cannot be set
. KEY LOCK
To lock the keypad, press and hold for at least 5 seconds.
Do this again to unlock the keypad.
Please note: The key lock can also be activated while cooking is in progress.
For safety reasons, the oven can be switched off at any time by pressing.
HOW TO READ THE COOKING TABLE
The table lists the best function, accessories and level to use to cook different types of food. Cooking times start from the moment food is placed in the oven, excluding preheating (where required). Cooking temperatures and times are approximate and depend on the amount of food and the type of accessory used. Use the lowest recommended settings to begin with and, if the food is not cooked enough, then switch to higher settings. Use the accessories supplied and preferably dark-coloured metal cake tins and baking trays. You can also use Pyrex or stoneware pans and accessories, but bear in mind that cooking times will be slightly longer.
COOKING DIFFERENT FOODS AT THE SAME TIME
Using the "Forced Air" function, you can cook different foods which require the same cooking temperature at the same time (for example: fish and vegetables), using different shelves. Remove the food which requires a shorter cooking time and leave the food which requires a longer cooking time in the oven.
MEAT
Use any kind of oven tray or pyrex dish suited to the size of the piece of meat being cooked. For roast joints, it is best to add some stock to the bottom of the dish, basting the meat during cooking for added flavour. Please note that steam will be generated during this operation. When the roast is ready, let it rest in the oven for another 10-15 minutes, or wrap it in aluminium foil.
When you want to grill meat, choose cuts with an even thickness all over in order to achieve uniform cooking results. Very thick pieces of meat require longer cooking times. To prevent the meat from burning on the outside, lower the position of the wire shelf, keeping the food farther away from the grill. Turn the meat two thirds of the way through cooking. Take care when opening the door as steam will escape.
To collect the cooking juices, we recommend placing a dripping pan filled with half a litre of drinking water directly underneath the wire shelf on which the food is placed. Top-up when necessary.
DESSERTS
Cook delicate desserts with the conventional function on one shelf only.
Use dark-coloured metal baking pans and always place them on the wire shelf supplied. To cook on more than one shelf, select the forced air function and stagger the position of the cake tins on the shelves, aiding optimum circulation of the hot air.
To check whether a leavened cake is cooked, insert a wooden toothpick into the centre of the cake. If the toothpick comes out clean, the cake is ready.
If using non-stick baking pans, do not butter the edges as the cake may not rise evenly around the edges.
If the item "swells" during baking, use a lower temperature next time and consider reducing the amount of liquid you add or stirring the mixture more gently.
For desserts with moist fillings or toppings (such as cheesecake or fruit tarts), use the "Convection bake" function. If the base of the cake is soggy, lower the shelf and sprinkle the bottom of the cake with breadcrumbs or biscuit crumbs before adding the filling.
PIZZA
Lightly grease the trays to ensure the pizza has a crispy base. Scatter the mozzarella over the pizza two thirds of the way through cooking.
RISING
It is always best to cover the dough with a damp cloth before placing it in the oven. Dough proving time with this function is reduced by approximately one third compared to proving at room temperature (20 - 25^) . The rising time for pizza starts at around one hour for 1kg of dough.
COOKING TABLE
| RECIPE FUNCTION PREHEAT. | TEMPERATURE(°C) | COOK TIME(Min.) | LEVELAND ACCESSORIES | ||
| Leavened cakes | A | -160 - | 180 30 - 90 | 2/3 | |
| B | Yes 160 - | 180 30 - 90 | 4 1 | ||
| Filled cake(chese cake, strudel, fruit pie) | A | -160 - | 200 30 - 85 | 3 | |
| B | Yes 160 - | 200 35-90 | 4 1 | ||
| Biscuits/tartlets | A | - | 170 - 180 | 15 - 45 | 3 |
| B | Yes | 160-170 | 20-45 | 4 1 | |
| B | Yes | 160-170 | 20-45 *** | 5 3 1 | |
| Choux buns | A | - | 180-200 | 30-40 | 3 |
| B | Yes | 180-190 | 35-45 | 4 1 | |
| B | Yes | 180-190 | 35-45 *** | 5 3 1 | |
| Meringues | B | Yes | 90 | 110-150 | 3 |
| B | Yes | 90 | 130 - 150 | 4 1 | |
| B | Yes | 90 | 140-160 *** | 5 3 1 | |
| Pizza (Thin, thick, focaccia) | A | -220 - | 250 20 - 40 | 2 | |
| B | Yes | 220 - 240 | 20-40 | 4 1 | |
| B | Yes | 220 - 240 | 25-50 *** | 5 3 1 | |
| Bread loaf 0,5 kg | A | - | 180 - 220 | 50 - 70 | 2 |
| Rolls | A | -180 - | 220 30 - 50 | 2 | |
| Bread | B | Yes | 180-200 | 30 - 60 | 4 1 |
| Frozen pizza | A | - | 250 | 10 -15 | 2 |
| B | Yes | 250 | 10 - 20 | 4 1 | |
| Salty cakes(vegetable pie, quiche) | B | Yes 180 - | 190 45 - 60 | 2 | |
| B | Yes | 180-190 | 45 - 60 | 4 1 | |
| B | Yes | 180-190 | 45-70 *** | 5 3 1 | |
| Vols-au-vents/puff pastry crackers | B | Yes 190-200 | 20-30 | 3 | |
| B | Yes | 180-190 | 20-40 | 4 1 | |
| B | Yes | 180-190 | 20-40 *** | 5 3 1 | |
| Lasagne/soufflé | A | - | 190-200 | 40 - 65 | 3 |
| Baked pasta/cannelloni | A | - | 190-200 | 25 - 45 | 3 |
| Lamb/veal/beef/pork 1 kg | A | -190 - | 200 60 - 90 | 3 | |
| Roast pork with crackling 2 kg | A | - | 170 | 110-150 | 2 |
| Chicken / rabbit / duck 1 kg | A | - | 200 - 230 | 50 -80 | 3 |
| Turkey / goose 3 kg | A | - | 190 - 200 | 90 - 150 | 2 |
| Baked Whole Fish (fillet, whole) | Yes | 180-200 | 40-60 | 3 | |
| Stuffed vegetables (tomatoes, courgettes, eggplants) | Yes | 180-200 | 50-60 | 2 | |
| Toasted bread | - | 3 (High) | 3-6 | 5 | |
| Fish fillets/slices | - | 2 (Medium) | 20-30 * | 4 3 | |
| Sausages / kebabs / spare ribs / hamburgers | - | 2 - 3 (Medium - High) | 15 - 30 * | 5 4 | |
| Roast chicken 1-1.3 kg | - | 2 (Medium) | 55-70 ** | 2 1 | |
| Roast beef rare 1 kg | - | 2 (Medium) | 35 - 50 ** | 3 | |
| Leg of lamb/knuckle | - | 2 (Medium) | 60-90 ** | 3 | |
| Roast potatoes | - | 2 (Medium) | 35-55 ** | 3 | |
| Vegetable gratin | - | 3 (High) | 10-25 | 3 | |
| Lasagne and meat | Yes | 200 | 50-100 *** | 4 1 | |
| Meat and potatoes | Yes | 200 | 45-100 *** | 4 1 | |
| Fish and vegetables | Yes | 180 | 30 - 50 *** | 4 1 | |
| Complete meal: Fruit tart (level 5)/ lasagne (level 3)/meat (level 1) | Yes | 190 | 40-120 *** | 5 3 1 | |
| Stuffed roasting joints | - | 200 | 80-120 *** | 3 | |
| Cuts of meat (rabbit, chicken, lamb) | - | 200 | 50 - 100 *** | 3 | |
- Turn food halfway through cooking.
Turn food two-thirds of the way through cooking (if necessary).
* Estimated length of time: dishes can be removed from the oven at different times depending on personal preference.
Download the Use and Care Guide from
docs.bauknecht.eu for the table of tested recipes, compiled for the certification authorities in accordance with the standard IEC 60350-1.
| MANUAL FUNCTIONS | Conventional | Grill | Turbo Grill | Forced Air | Convection Bake | Eco Forced Air |
| AUTOMATIC FUNCTIONS | A Casserole | A Meat | A Maxi Cooking | A Bread | A Pizza | A Pastry cakes |
| ACCESSORIES | Rack | Baking tray or cake tin on the wire shelf | Drip tray / Baking tray/ Cake tin on wire shelf | Drip tray | Drip tray with 500 ml water | Baking tray |
MAINTENANCE AND
CLEANING
Make sure that the oven has cooled down before carrying out any maintenance or cleaning.
Do not use steam cleaners.
Do not use wire wool, abrasive scourers or abrasive/corrosive cleaning agents, as these could damage the surfaces of the appliance.
Wear protective gloves.
The oven must be disconnected from the mains before carrying out any kind of maintenance work.
EXTERIOR SURFACES
- Clean the surfaces with a damp microfibre cloth. If they are very dirty, add a few drops of pH-neutral detergent. Finish off with a dry cloth.
- Do not use corrosive or abrasive detergents. If any of these products inadvertently comes into contact with the surfaces of the appliance, clean immediately with a damp microfibre cloth.
INTERIOR SURFACES
After every use, leave the oven to cool and then clean it, preferably while it is still warm, to remove any deposits or stains caused by food residues. To dry any condensation that has formed as a result of cooking foods with a high water content, let the oven to cool completely and then wipe it with a cloth or sponge.
- Clean the glass in the door with a suitable liquid detergent.
- Activate the "Diamond Clean" function for optimum cleaning of the internal surfaces.
- The oven door can be removed to facilitate cleaning.
- The top heating element of the grill can be lowered to clean the upper panel of the oven.
ACCESSIONS
Soak the accessories in a washing-up liquid solution after use, handling them with oven gloves if they are still hot. Food residues can be removed using a washing-up brush or a sponge.
REPLACING THE LIGHT
- Disconnect the oven from the power supply.
- Unscrew the cover from the light, replace the bulb and screw the cover back on the light.
- Reconnect the oven to the power supply.
Please note: Only use 25-40 W/230 ~ V types E-14, T300°C incandescent bulbs or 20-40 W/230 ~ V type G9, T300°C halogen bulbs. The bulb used in the product is specifically designed for domestic appliances and is not suitable for general room lighting within the home (EC Regulation 244/2009). Light bulbs are available from our After-sales Service.
- If using halogen bulbs, do not handle them with your bare hands as your fingerprints could cause damage. Do not use the oven until the light cover has been refitted.
LOWER THE TOP HEATING ELEMENT
- Remove the lateral shelf guides.
- To reposition the heating element, lift it up, pulling it slightly towards you, making sure it comes to rest on the lateral supports.
- Pull the heating element out a little and lower it.
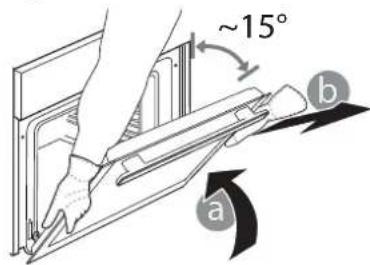
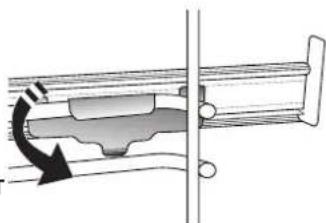
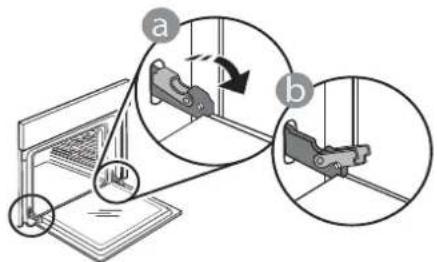
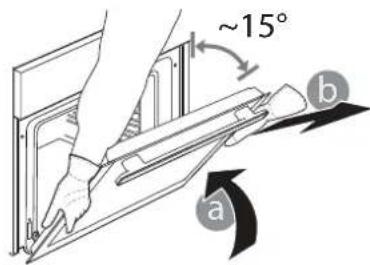
REMOVING AND REFITTING THE DOOR
- To remove the door, open it fully and lower the catches until they are in the unlock position.
- Close the door as much as you can.
Take a firm hold of the door with both hands - do not hold it by the handle.
Simply remove the door by continuing to close it while pulling it upwards at the same time until it is released from its seating. Put the door to one side, resting it on a soft surface.
-
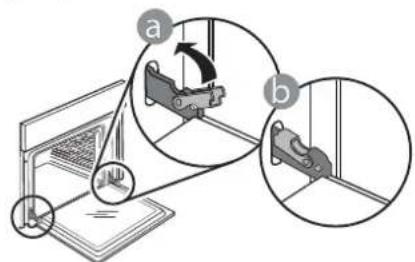
Refit the door by moving it towards the oven, aligning the hooks of the hinges with their seating and securing the upper part onto its seating.
-
Lower the door and then open it fully.
Lower the catches into their original position: Make sure that you lower them down completely.

Apply gentle pressure to check that the catches are in the correct position.
- Try closing the door and check to make sure that it lines up with the control panel. If it does not, repeat the steps above: The door could become damaged if it does not work properly.
| Problem Possible cause Solution | ||
| The oven is not working. Power cut. | Disconnection from the mains. | Check for the presence of mains electrical power and whether the oven is connected to the electricity supply. Turn off the oven and restart it to see if the fault persists. |
| The display shows the letter “F” followed by a number or letter. | Software problem. Contact | you nearest Client After-sales Service Centre and state the number following the letter “F”. |
PRODUCT FICHE
The product fiche with energy data of this appliance can be downloaded from the website docs.bauknecht.eu
HOW TO OBTAIN THE USE AND CARE GUIDE
Download the Use and Care Guide from our website docs.bauknecht.eu (you can use this QR Code), specifying the product's commercial code.
Alternatively, contact our Client After-sales Service.


CONTACTING OUR AFTER-SALES SERVICE
You can find our contact details in the warranty
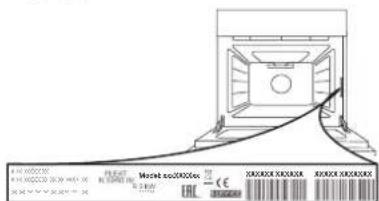
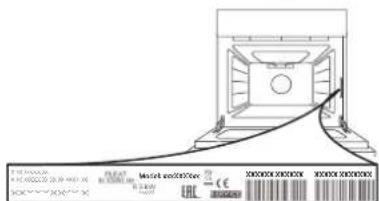
manual. When contacting our Client After-sales Service, please state the codes provided on your product's identification plate.

GUIDE D'UTILISATION QUOTIDIENNE

MERCI D'AVOIR ACHETÉ UN PRODUIT BAUKNECHT
- This functionality automatically makes the best temperature and the optimal method of cooling for all users.

CÓMOPONERSE EN CONTACTO CON NUESTROSERVICIO POSTVENTA
YcTaHOBka NImMeHeHne BpeMeHN, YcTaHOBKa DnITeJIbHOCTN npIroTOBJIeHNA.
8. NOДТВЕРЖДЕΗΝΕ
IoiTBepeKdHeNBEb6paHHoro nyHKTa MeHIO NIN BbINOJIHeHHoH NaCTpOKN peKIMa.
9.ПРАБын ДИСПЛЕN
PEWETKA IPOTNBEHb


BCTABHON IPOTUBEHb
TELECKONNUECKNE HANPABJIOUHE*
KolnueCTBO npHnAdNexHOcte MoKeT BapbIpOBAtbcB 3aBNCIMOCn OT pno6peTeHHoM OMeJI.
DOnonHnteIbHbIe npHaNdxKHOCTn
MOXHO npnoobpctu B CepBnCHOM LHeHTpe.
- Пин Нличим
YCTAHOBKA PEWETKU IN DPYUNX IPNHAIDLEKHOCTEI
BctaBbTe peWetky rOpn3OHTaIbHO B depXaTeN, pacnoIarag ee TaK, YTO6bl npInoNDHrTbe Kpa 6blnn o6paueHb BBepx.
Дугп epнадлжно, takne kaK noДон npOTnBeHb, BCTaBЯTc rOpN3OHTaJIbHo TEM JKe cnOCo6om,чTo n peWetka.
YCTAHOBKA TEJIECKONMUECKNX HANPABJIOUxN (PIPNHANIyIN)
PnmeuHHe:TeNeckOnuYeCKne HApBaJIIOUeMOrT 6bIb yXe yCTaHOBJIeHb Ha DepeKaTeIN NOLOK: DnA CHrTIN HApBaJIIOUxNOTAHIne INB HApBaJIeHN HApKy, OTOeDHHB HNXHNI 3axm.
BbHbTe DepeKaTeN NOJOK n3 dYXOBKn n CHIMnTe nnactNKOByIO 3aunTy C TeJeCKOnNuYeCKNX HapabJIoux.
3aKpeNtE BepxHn 3aJHM HapabIoueHa
dePkaTeJe noJOK u
CdBnHbTe ee BrIy6b Do
ynopa. OnycTte BTOPOJ
3aKIM B npedymOTpeHHoe
noJoxHe.
YTo6b3aKpeNtB HAnpaBJIIOUyIO, CcNIOJ HaXMMTe Ha HxHJIOU YaCTb 3aKIMa B HApBaJIeHNOT DePkaTeJI NOLK.
y6eHntecb,yTO NOBnKHa
auctb HappaBnIooJe MoKeT
CBO6oNDHO nepemuaTbcra.
Iobtopte 3Tu Je DeicTBnA DnB BTOPO DEpKaTeN PON
PpmeaHne:TeeckoNueeCKne Ha npabnaIOuie MoryT KpeNTbcra Ha IIObOM yPOBHe.
CHRTNE UYCTAHOBKA DEPKATEJEI NOJOK
.ДЯСЧТУДЕРЖATEEN NOJOK BbIBePHTe ydepxkBaIOUne BuNTbI (npn HAnuyn) C 06eNX CTOpOH, nCNoJIb3y MoHETy NIN INHCTpyMeHT. 3aTeM OCTOPOXHO N3BNeKITE HxKHO YoACTb N3 rHe3da. Tenepb DEpXaTeN NOJOK MOXHO BbIHyTb.
.Дя yctaHOBKn DePkaTeJe NOOK CHaYana BCTaBbTe INX B BepxHee rHe3do.BDbHbTe DePkaTeIN NOLOK B KaMepy DyXOBKn B npnNoDHTOM NOLOKeHN, a 3aTeM ONyCTnte INx TaK, YTO6bl OHN 3aHJIIM MeCTO B HNXHEr3de.
YctaHOBNTe Ha MeCTO yIepKnaIOUcne BNHTbl.

ObliHbI
TOJIbKO Ha OJHOM yPOBHe.

TnIb
PexnM nI npuroTOBHeHnHa rpuJe 6nΦwTeKcOB, WauNbIka, KOn6aCOK, OBOuHbIX 3aNeKaHok u XLe6HbIX TOCTOB. Ppi npuroTOBHeHn MraCa Ha rpuJe peKOMeHnyETcNcNoIb3ObaTb NODOH nIy c6opa coka: Pa3MeCTnte NOdoH Ha IIO6oM yPOBHe nOd peWetKo, HAIIB B Hero 500 mI NITBeBOI BObl.

KOHBEKLIM
PexnM nI npuROToBHeHn6IIOI npOOnHaKOBoTemNepaType Cpa3y Ha HeCKoJbKnxypOBHx (He 60one Tpex).3TOT pexm No3BOJAreODHOBeMeHHo roTOBHTb pa3HbIe 6IIOda 6e3NepeHoCA 3anaxOB C OdHOro Ha dpYro.

KOHBEKUHOHHOE BbIeKAHNE
PexnM Jnla 3aneKaHnMaCa, BbineKaHnN nIporOB C NaunHKo N KApKn φapwnpoBaHHbIX OBOuE ToBko Ha ODHOM yPoBHe. Jnla 3aunTbI npOdyKTOB OT nepeCyuWnBaHnN cNoJb3yEtCn DeNKaTHa npepbIBnCTa BeHTnJIa.

ABTOMATUQUECKNE PEXKIMbl

3ANEKAHKN
3TOT pexn m abTomatnueckn Bbl6npaet HannyuTo TEMnepaTy n MeToD nI npuroTOBneHn 6nO uN3 MaKapOH.

MRCO
3TOT pexm aBtOMaTnueckn Bbl6npaet HannyuTo TemnepaTy n MeToD nI npiroTOBHeHnMa ca. IpepbIBnCToe BKIOUeHne BeHTnIaTopa Ha Hn3KoN CKOpOCTn IpeDoTbPaaAe TpecyuBaHnE 6JIoDa.

BOJIbIe IOPUIN
ABTomatnueckn Bb6op Hannyuweo pexma n TemnepaTypbI dI npuroTOBneHna 60JIbux KyckoMca (60Jee 2.5 Kr). PekomeHdyetc nepebopaunBaTb MRCO BO BpeM npuroTOBneHna, UTo6bl OHO paBHomepHo IPOXkapnIOocb C o6eHX CTOpOH. NepnoDnueckn erO cneJeT cMaunBaTb, UTo6bl MRC He OKa3aIOocB CNIuKOM cyxIM.

XJEB
3TOT pexn m ABTomatneckn Bbl6npaet HannyuTo TEMnepaTy n MeToD nI npuroTOBHeHn BCEx TINOB Xne6a.

NiuuCA
3TOT pexn m abTomatneckn Bbl6npaet HannyuTo TEMnepaTy n MeToD nI npuroTOBHeHn BCEx TINOB NnCbl.

ABTOMATUQUECKNE PEXKIMbl

CIAKARBbINEKA
3TOT pexn m aBtOMaTnueckn Bbl6npaet HaunyyuTo TemnepaTy n MeToD nI npuroTOBJeHn BCex TINOB TOPTOB.

CNEUINAbHbIEPEXIMbl

BbICTbI INPOΓPEB
BbICTpbn npedBapnteHbHn HarpeB dYxOBKn. Nocne 3aBepWeHn nporpeBa dYxOBKa ABTomatueckn Bbl6npaet "ObuHb" peKm. DoJNTecb 3aBepWeHn nporpeBa nepeTem, KaN NOMeaaTb npOdyKTb B dYxOBky.

TYPBOFPGNJIb
PeknM nJ KApKn KpyNbIX KyCKOB
mca (poct6nΦ, 6apaHbN HOxKn, ubiInra).
PeKomeHnyetc uCNoB3ObaTb NOdOH dNc60pa
coKOB. Pa3MeCTnte NOdoH NaIO6OM yPOBHe NOd
peWetKo, HAnuB B Hero 500 Ml NITbeBOB BObl. B
3TOM peXnme MoXHo NoIb3ObaTbcBepTeJom (npn
HaNuyn).

KOHBEKUЯ 3KO*
PexnM dna 3aneKaHnHa apwnpoBaHHoro
mca n MChbix hne Ha ODHOM yPOBHe.
DnKaTHa npepbIBnCTa uNpKyJauCn BO3dyXa
npedOTbpaaaet nepecyuINBaHne npOdyKTOB.
B npoecce npiroTOBHeHn6blnB pexnMe
"KO"OCBeueHne KamepbI DxyOBKn OCTaETcR
BbIKIOeHHbIM. Pn INcNoJIb3OBaHNn peXnMa
"KO", npedycmATpNBauOero ONTUMn3aUIO
3heprONOTpe6JeHn, DBepua DxyOBKn DOJnxHa
OCTaBaTbC3AkpyToI Do Tex NOp, Noka 6IIOHO He
6yDet nonHOCTbIO rOTBO.

COXPAHEHNE TEPJIA
PeknM, no3BOJIAUH COxpaHbT bopuHM TOIbKO uTO npriROBHeHHbE 6JIQA.

IIObEM TECTA
Pexm, oecneuBaOuN ONTumalbHbIe ycnoBnI NaDbema Tecta. INa NOnyehn KaueCTBeHHoro Tecta He NCNoJIb3yIte pexm, ecnI dYxOBKa He OCTbla Nocne npuroTOBHeHn.

DIAMOND CLEAN
Nap, o6pa3yUoHnC8 BO Bpem Hn3KOTempePAtypHOuNCtKn, No3BOJAE TJeKO ydaIbTgpr3b nOCTaTKn NnI. HaJeIte 200 Mn BOblB HnXKnIOU qAcTb DyXOBKn. BkIouaTe pexm, TOIbKO KOrDa DyXOBKa XOnODHa.
ПЕРBOЕ ИСПОЛьЗOBAHNE ПРИБОРА
1.yCTAHOBITE BPEM
Pn nepBOM BKNIOeHn DyXOBKn Heo6xOIMO yCTaHOBNb BpeM:
Ha nncnnee HaCyHT mRaTb DBe CnΦpbl yaca. YcTaHOBNTe 3HaYeHne yaca BpaUeHneM pyKu HaxMMTE OK
HaHyT MuraTb DBe UΦpbl MNHyT. YcTaHOBnTe 3HaueHne MNHyT BpaueHnem pyuKn HaXmnte OK
PnmeaHHe:EcnnBdaJIbHeIWeBAMNotpe6yETc
m3MeHHTb Bpem,HaXMMTeN yIepKINBaNTe MeHee
OHOH CeKYHDbI pIn BBIKIOUeHHoI dyXOBKe, NOCNE Yero
NOBOTOpTE BblweONCaHHBe DeiCTBnA.
Bcnyae dInTeIbHOrO OTKIOUeHnE 3JIeKTPuYeCTBa MoKeT IOTpe6oBaTbCn IOBtOpHaY yCTaHOBkA BpEmEHN.
2. HACTPOIKN
Ecn Heo6xOdmo, Bbl MoKeTe n3MeHnTb 3aBODckne HAcTPOkN DnIe eHNu c N3MeHeHn TEmpePaTypbl (°C) HOMHaJIbHO r ONotpe6JrEmoro ToKa (16 A).
Pn BbIKIOueHHOI dyXOBKe HaxMnte N ydepxnBaHTe He MeHee 5 ceKyHd.

Bb6epnte eHnucbl n3MepeHnBpaueHnem pyKn HaxMNTe OK dIy NOdTBePckDeHn Bb6opa.
16 8
Bb6epnte HOMHaHbHbI TK BpaueHneM pyKu HaxMMTe OK dI NaDTBePckDeHnB Bbl6opa.
PnmeuHne:B3aBODCKHX HAcTPOKAX DxyOBKN yCTaHOBNeH yPOBeHb NOTpe6bnEMO MOUHOCTN, COBMECTMbI C DOMaHHMN 3JIeKTPOCETAMC HOMHaJIbHOH MOUHOCTbIO 60nee 3 KBT (16 A).Ecnn 3JIeKTPoCeTB B BaIem Dome paccHTaHa Ha MehBuYMOUHOCTb, yMeHbWNTe DaHHoe 3NaueHne (13A).
3.ПОРPEИТЕДУХOBКY
HobayuXOBka MoKet ABnTbCn ICTOuyHKOM 3anaxOB,CB3aHHbIX C npoueccom npOn3BOcCTBa.3To HOpMaJIbHOe ABLHeHne.
Ipeed NaJalom npiroTOBLeHn6Ioud peKomeHdyETc nporpeTb NyctyO uXOBky dnydaJeHn BO3MOxHBix OCTaTOUHbIX 3anaxOB.
YdaIte c dyxOBKn 3aunTHbIK KapTOH n npOzpaHyo
nHeKy, BbIHbTe BCE npHaJdHexHOCTN.
IporpTe dyxOBKy npi Temnepatye 200 ^ C B
TeueHne npImepHo oHoro yaca, Lyuwe BCero -B
peKmE C BeHTnJIaCnei (HanpUmep, "KohBeKunra" nn
"KOHBeKUnOHoe BblKeKaHne").
3aaine npabnlbHbI peKm, cJeDy uHCTpyKunM.
PnmeuHne: Pocne nepBoro nCNoJb3OBAHnA DyXOBKn peKomeHnyETc npOBeTpntb NOMEueHne.
He ncpnoJIb3yIte npaoOuNCTnTeH.
He nCnoJb3yIte a6pa3NBHbIe ry6Kn, cTaNbHbIe MoaJIKN, arpeccNBHbIe n a6pa3NBHbIe MOUcne cpeICTBa, TaK KaK OHN MOryt NOBpeIITb NOBepXHOCTn np6opa.
HaedeHbTe 3aunTHbIe nepuATKn.
OTKIOUHTe DyXOBky OT 3JIeKTpOcETn nepei BbINONHeHMeM IIO6bIX DeIcTBn NO O6CnyKuBaHNU.
BHEWHNE NOBEPXHOCTN
- PpOtnpaTe NOBepxHOCTn Pnp60pa BnaJXHOI caNpEeKoN3 MmKpOBOLOKHa. Pnp CnIbHOM 3aRpy3HeHnn Do6aBbTe HeckoNbKO KapeJIb MoIOUeRo cpeIcTBA C HeITpaJIbHBIM pH. PpOTpuTe NOBepxHOCTn HAcyxo CyXoi TKaHbIO.
He noIb3yIreCb arpeccuBbIMn nIa6pa3NBbIMMoUoIIMn cpeIcTBamn. Pnp cnyuHOM nonaHaHnTaKnx cpeIcTB Ha NOBepxHOCTb npN6opa HEmeJIeHHO npOTpnte erO BnaXHo caNΦeTKoN n3 MINKPOBOJOKHa.
BHYTPEHHNE IOBEPXHOCTN
- Nocne kaxdoRo nCnObl3OBaHnJaTe DyXOBKe OCTbIb, Nocne yero Ouncntte ee, XeJalTeJIbHO Noka OHa ee TeNla,OT OTIOKeHn I NaTeH, 6pbazyUxnc npn npiroTOBLeHn Niun. JnydaneHn KOHdeHcata, BO3HnKaIOUeBOpe3yIbTaTe npriroTOBHeHn npOdyKToB C6oJbWm CoepkaHnEM BODbl,DOxKnTeCb NOHOrO OxJaXDeHn DyXOBKn,a 3aTeM npoTpnte ee CTeHKn caFetKo nn rY6koi.
-ДячNTKnCTeKNa DBepcI NOJb3yntecb CneuaNbHbIMN KINKDUMMOIOUMM CpeCTBaMn.
-Дя ONTIMaIbHOJ OUHCTKN BHyTppeHHNX NOBepxHOCTe BKNIOHTe peKm "Diamond Clean".
-Дяуdo6CTBa YnCTKn DBepuy DyXOBKn MoXHO CHrTb
BepxHn HarpBeBaTeIbHbI 3JemeHT rpnJa MoXHO onyCTNTb BHN3 dIyO6CTBa YNCTKN BepxHe n aHeJI dyXOBKn.
ПИHAДЛЕЖHOCTN
Cpa3y Je nocne nCnoJb3ObaHn 3aMoUHTe npHaJnxKHOCTN B BOe CO CpeDCTBOM JnMblTbny NocdyI. Ecn npHaJnxKHOCTn eue ropayne, noJb3yITeCb KxOHbIMn pyKaBnCaAMn. OcTaTKn PnUu ydaJIOTcA C NOMoJbIO UeTKn IINrY6Kn.
3AMEHA JAMNBI
- OTKHIOUHTe DyXOBky OT 3JIeKTKpOceTu.
- OTBepHnTe nlafoh, 3aMeHnTe JAMny nHaBepHnTe nlafoh B nCXoHoe NOLOKeHne.
3.ПоДКЛIOUHTe dYxOBky KэнeKTPocetN.
PnimeuHHe: NcNoB3yIe ToJbKO lamnbHaKaANBaHnA 25-40 B/230 B~,UOKoNb E14,T300°C nnn ranoreHHbIe lamnb20-40 B/230 B~,UOKoNb G9,T300°C. lamna,ncnoB3yeMaB Hn3JeHH, npedHa3NaueHa dJa 6bTobbIX npnbopOB u He NOxOHT dJa OCBeSeHHa NOMeHn (PerJamEHT EC 244/2009). lamNbYkAsaHHOrTo TnTa moXHO pnpO6pcttn B HaNX CepBnCHbIX cEHtpax.
- Pn yctaHOBKe rIIOReHHbIX IaMII He KacaITcB IX FOJIbIMN pyKaMn, TaK KaT OTneayATKn paIbueB MOrY TnpNBecTn K IOBpeXeHNeHIO IaMII. He NOLb3yIteCb dYxOBKOJ Do yCTaHOBKn INaΦOHa Ha MeCTO.
ПОИХЕНЕ BEPXHETO HAFPEBATEHBHOТЗЛEMEHTA
1.BbInbTe 60KOBbIe IepKaTeNn noNok.
- CnErKa BbITaHNTe HarpeBaTeIbHbI 3JIeMeHT IN onyCTnte erO.
3.ДЯ yctaHOBKn HArpeBaTeJbHOro 3NeMeHTa Ha MeCTO npINoDnHMITE erO, CnerKa NOTaHyB Ha Ce6r; npOBepbTe, UTo6bl 3NeMeHT OINpaLCHa COOTBeTCTByUOuIe 6OKOBbl DePkaTeiN.
CHATNE UYCTAHOBKA DBEPUbl
1.ДЯСТЯДВЕРЦI NOHOCTbIO OTKpoIe ee n OTKINHbTe ΦИКCaTOPbI B NOLOXeHne pa36NOKpOBKn.
2.ПикpoIte DBepuy,HACKOBKO 3TO BO3MOxHO.HaTeJHo 3axBaTnte DBepuy o6eMn pykamn (He 3apyuKy).
Chmnte Dbepuy, OJHOBpeMeHHO 3aKpbBaN cMeuae ee BBepx. Nonoxxte Dbepuy Ha MmRkyIO nobepxHOCTb.
3.ДЯ yctaHOBKn DBepCuI NOdHecnte ee K dYxOBKe, COBMeCTnTe KpOKN PeTEnb C rHe3dAmN BCTaBBTe BepXHne Yactn NeTeNb B rHe3da.
- Onyctnte DBepy, a 3aTeM NOnHOCTbIO OTKpOInTe ee.
IobepHnTe fKCaTopb I nCxOJHoe NNoXKeHne: BHN3
do ynpa.
Cnerka HanaBnte Ha KcTOpbl, yTo6bI y6eNTbcra, YTO OH 3aHJIIN npabunbHOe NOJoxKeHne.
5.3akpoTe DBepu N y6eDntecb, YTO OHa HaxoDNTcB OOnHn PNOCKOCTn C nAHeNbU ynpabNeHnE.Cnn 3TO He TaK, NOBTopTE BblweOpNCaHHbIe DeNCTBnH. HenpaBnBHo yCTaHOBneHHa DBepu MoxkET BbiTn n3 CTPO.
ПОИСК И YYSTРАЕНЕ HENСПAPВHOCTЕN
CNOOCbI NOJUyEHHRA PYKOBODCTBA "NCIOJIb3OBAHHe N YXOD
3arpy3nte pykoBOcTBO "UcnOJIb3OBAHne u yxoD" c HaWero caTa docs.bauknecht.eu (ncnoJIb3yIte 3OT QRKOJ), yka3aB KOMMepueckn KoN n3dennr.
PyKOBOJCTBO MOxHO TaKKe NOnyUHTb, 06paTnBUnCb B NaH CepBncBHy cHTp.

OBPAUHNEBCEPBNC
KoHTaKTHa HOpMaUn npedCTabHeBa
rapaHTnHOM 6yKlTe.
Pn o6paueHnn
B haw CepBnchbni
UeHTp,coo6uNTe
KOdbI,yKa3aHHbIe Ha
naCnpTHO Ta6nUKe
n3dEJn.