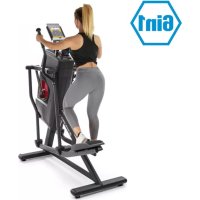
Helix Star DR - Elliptical bike Capital Sports - Free user manual and instructions
Find the device manual for free Helix Star DR Capital Sports in PDF.

User questions about Helix Star DR Capital Sports
0 question about this device. Answer the ones you know or ask your own.
Ask a new question about this device
Download the instructions for your Elliptical bike in PDF format for free! Find your manual Helix Star DR - Capital Sports and take your electronic device back in hand. On this page are published all the documents necessary for the use of your device. Helix Star DR by Capital Sports.
USER MANUAL Helix Star DR Capital Sports
2. Cardio-Trainingsphase

Download on the App Store

Download on the AppStore

Berlin Brands Group UK Ltd
PO Box 1145
Oxford,OX19UW
United Kingdom
Congratulations on the purchase of your device. Please read the following instructions carefully and follow them to prevent potential damage. We accept no liability for damage caused by disregarding the instructions and improper use. Please scan the QR code to access the latest operating instructions and further information about the product.

CONTENTS
Safety Instructions 46
Device Overview 48
Assembly 51
Overview of cardio training 61
Warm-up before the training 64
Console and button functions 67
Training via KINOMAP App 70
Care and Maintenance 82
Disposal Considerations 83
Declaration of conformity 83
TECHNICAL INFORMATION
| Product code 10032744 | |
| Power supply 220-240 V ~ 50/60 Hz |
SAFETY INSTRUCTIONS
Read the operating instructions carefully before using the appliance and keep them for future use. Product features may differ slightly from those shown in the illustrations. Changes can be made by the manufacturer without notification.
- Keep the operating instructions in a safe place so that you can access them at any time.
- Do not assemble the appliance until you have read the operating instructions completely. The safety and efficiency of the appliance can only be guaranteed if the appliance has been correctly assembled and is properly maintained and used. It is your own responsibility to ensure that all users of the appliance are informed of warnings and precautions.
- The appliance must be placed on a stable and straight surface to be used safely. Protect the floor with a mat. Do not use the appliance in humid environments, such as pools, etc. The safety distance around the appliance must be at least 0.5 metres.
- Before using the exercise programmes, it is essential that you consult a doctor to determine whether you have any physical or health problems that could pose a risk to your health and safety by using the machine or prevent you from using the machine properly. Your doctor's advice is vital if you are taking medication that affects your pulse, blood pressure or cholesterol levels.
- Pay attention to your body's signals. Exercising incorrectly or excessively can be detrimental to your health. Stop exercising if any of the following symptoms occur: pain, tightness in the chest, irregular heartbeat, extreme shortness of breath, dizziness or nausea. If you experience any of these conditions, you must consult a doctor before continuing your training.
- Do not exercise directly after meals.
- The device may only be assembled by adults. Keep children and pets away from the appliance.
- The device may only be used in domestic areas.
Note: maximum user weight: 150 kg( 330lbs) .
- The device is not suitable for therapeutic use. It can only be used for the exercises shown in the instructions.
- Wear adequate exercise clothing and exercise shoes when using the machine. Avoid loose clothing as it may get caught in the appliance or clothing that may restrict your movement.
- Keep your back straight during exercise.
- Before each use of the device, always check that the handles, saddle, nuts and bolts have been properly tightened.
- Observe the maximum position for adjustable parts of the appliance and never go beyond the "Stop" mark as this would pose a risk.
- Only use the appliance as shown. If you notice any defective parts during assembly or inspection, or if you hear strange noises coming from the appliance during use, stop use immediately. Do not use the machine again until the problem has been corrected.
- Take care when lifting or moving the unit so that you do not injure your back. Always use back-friendly lifting techniques and seek help from another person if necessary.
- All moving parts of the device (e.g. pedals, handles, saddle... etc.) must be serviced weekly. Check these before each use. If something is broken or loose, repair or fix the relevant part immediately. Do not continue using the appliance until you have restored it to a good initial condition.
- Look out for the absence of a freewheel system, which is a serious risk.
- Keep the power cord away from heat sources.
- Do not insert any objects into the machine openings.
- Switch off and unplug the appliance before moving or cleaning the appliance. To clean, rub the surfaces with a mild detergent and a damp cloth. Do not use solvents under any circumstances.
- Do not use the appliance in places that are not temperature-controlled, such as garages, verandas, bathrooms, carports or outdoors.
- Only use the appliance as described in the operating instructions.
- Incorrect repair and structural modifications (e.g. removal or replacement of original parts) may put the user of the device at risk.
- The flywheel becomes very hot during use.
- Activate the key lock when you are not using the machine.
DEVICE OVERVIEW
Parts list
| No. N | Name/ Feature Pc. | |
| 1 | Crank cover 2 2 | |
| 2 | Mounting part left handle bar 1 | |
| 3 | Left pedal bar 1 | |
| 4 | Pivot 2 | |
| 6 | Front floor mounting part 1 | |
| 8 | Hexagon round head screw M10*100 4 | |
| 9 | Domed spring washer 6 | |
| 10 | Washer 5 | |
| 11 | Right pedal bar 4 | |
| 12 | Nylon lock nut 6 | |
| 13 | Rail tube mounting part 1 | |
| 14 | Spring washer 10 | |
| 17 | Right pedal bar 1 | |
| 18 | Mounting part right handle bar 1 | |
| 19(a) | Main frame(a) Roller arm assembly part | 12 |
| 20 | Spring washer Ø 10 | 1 |
| 21 | Large washer | 6 |
| 22 | Hexagon head screw M8x16 | 2 |
| 23 | Console column | 1 |
| 24 | Hexagon head screw M8x20 | 6 |
| 25 | Domed spring washer Ø 8x17x1.5 | 4 |
| 26 | Console group 1 | |
| 27 | Mounting part for fixed handle bar | 1 |
| 28 | Shaft cover | 2 |
| 29 | Hexagon head screw M8x25 | 2 |
| 30 | Hexagon head screw M10x65 | 1 |
| 31 | Crank cover | 2 |
| 32 | Cross recess thread cutting screw ST 4.2x19 | 10 |
| 33 | Cross recess screw ST 4.2x19 8 | |
| No. | Name/ Feature Pc. | |
| 34 Left pedal 1 | ||
| 39 Right pedal 1 | ||
| 40 Wavy elastic washer Ø25x19.5x0.3 2 | ||
| 41 Console column cover 2 | ||
| 42 Rotary shaft cover 2 | ||
| 43 Rubber ring 1 | ||
| 44 Cover 1 | ||
| 45 a/b/c console cable 1 | ||
| 46 CHR cable 2 | ||
| 47 Cross recess screw M5x10 4 | ||
| 48 Adapter 1 | ||
| 124 Roller cover left | 2 | |
| 125 Roller cover right | 2 | |
Assembly aids
| 1 Phillips spanner |
| 1 Phillips spanner |
| 1 Phillips spanner |
ASSEMBLY
Assembly instructions
- Please use an underlay, such as cardboard, to avoid scratching the floor during assembly.
- The screws and nuts are provided with a little grease to protect them from corrosion. Please have a cloth ready to wipe your hands.
- Some plastic end caps and plugs were fitted to the unit before delivery. They are indicated on the assembly drawings as a reference in case spare parts are needed.
- The unit uses several different screw lengths. Pay attention to the correct screw length for each assembly step.
Before you start the assembly
Find a comfortable place to work. Place your cross trainer in an open space with adequate ventilation and lighting. As the cross trainer is portable to a certain extent, you do not have to assemble it exactly where it is to be used. For your comfort, however, you should avoid dragging the bicycle over too great a distance, through narrow corridors or up stairs after assembly. If the unit is to be installed in a living area, protect the floor or carpet with a large mat before removing parts from the box.
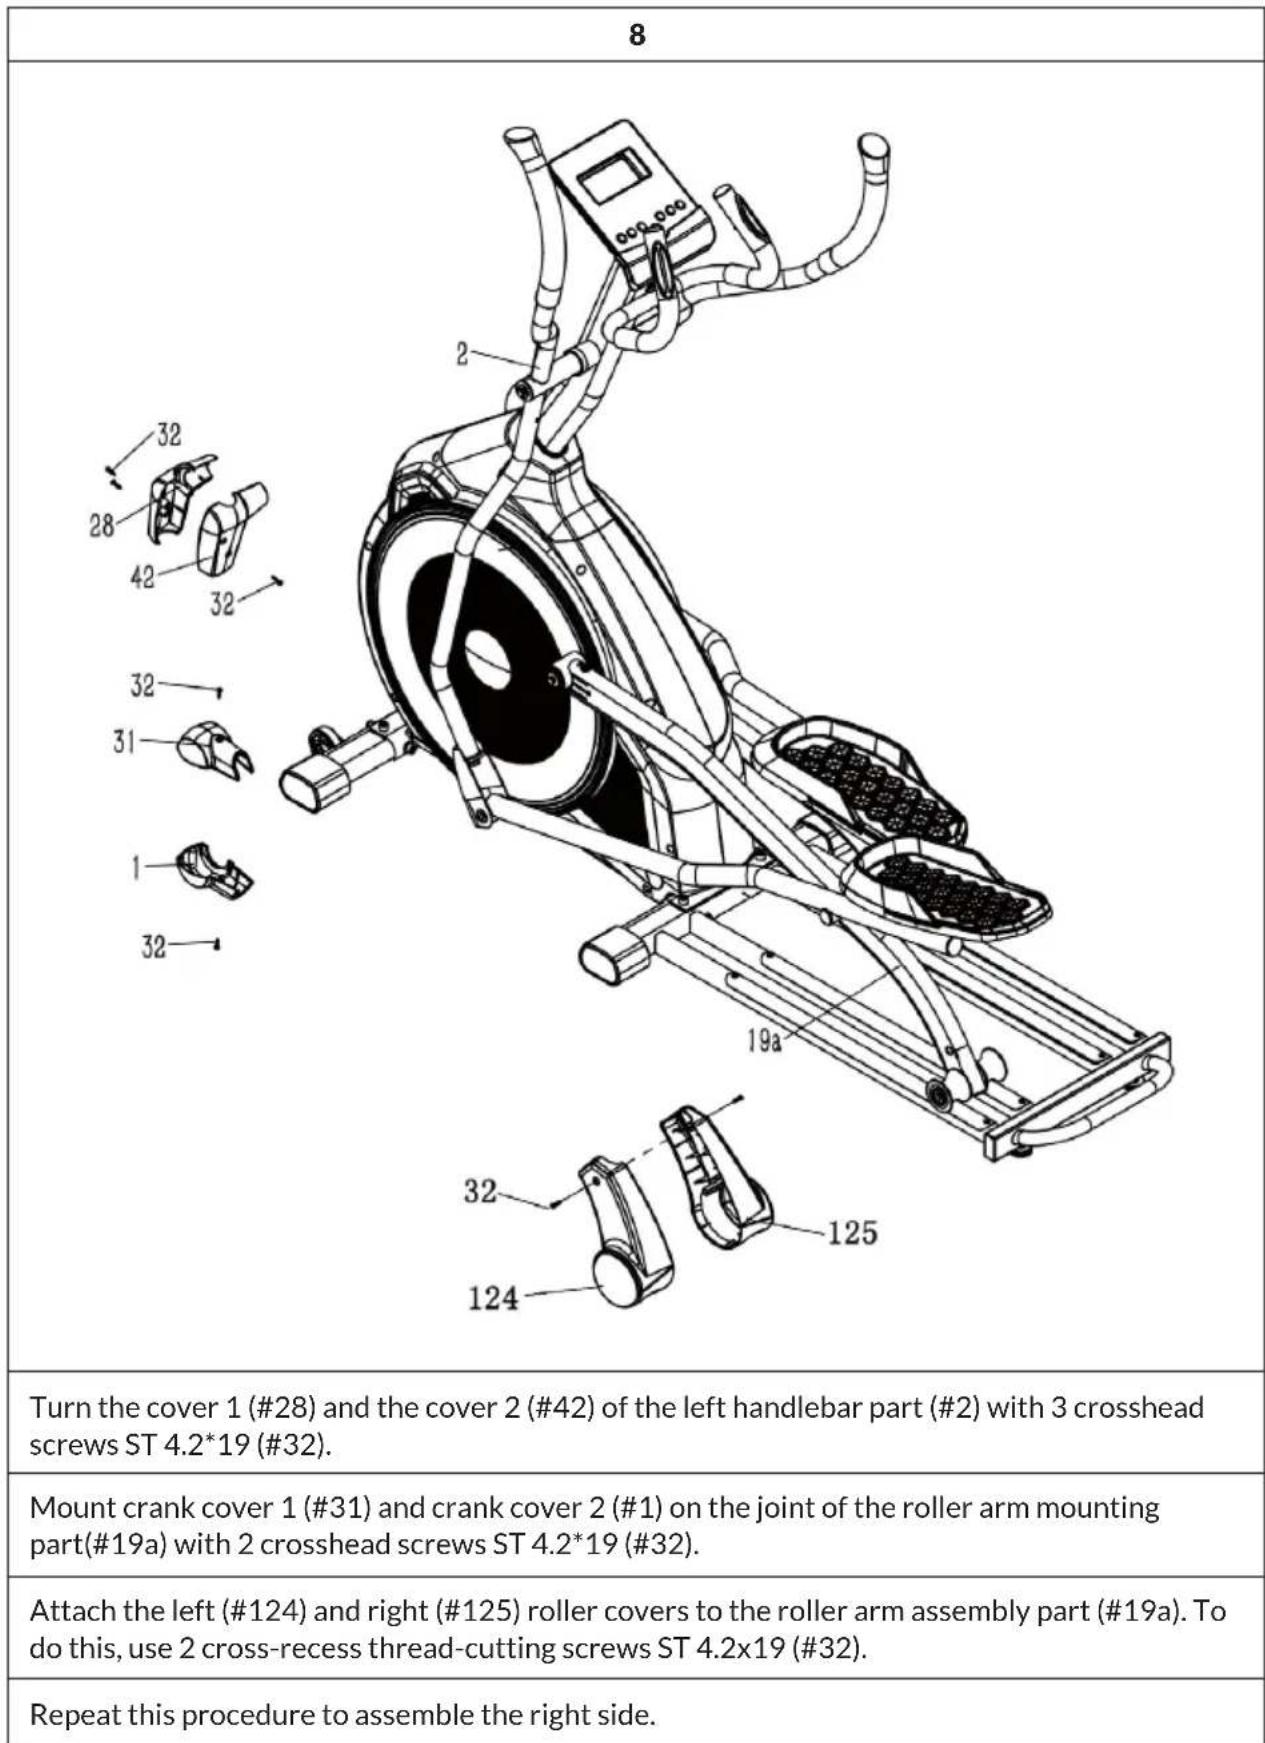
| 1 |
| 45d 19 12 9 12 10 12 13 10 8 #11 2 M10*100 hex bolts (#8), 4 flat washers (#9), 2 flat washers (#10) and 4 M10 nylon lock nuts (#12). |
| Attach the front base section (#6) to the main frame section (#19) using 2 M10*60 hex bolts (#11), 2 M10*100 hex bolts (#8), 4 flat washers (#9), 2 flat washers (#10) and 4 M10 nylon lock nuts (#12). |
| Attach the track tube assembly (#13) to the main frame assembly (#19) with 2 allen button head screws M10*60 (#11), 2 allen button head screws M10*100 (#8), 2 washers (#9), 2 washers (#10) and 2 nylon lock nuts M10 (#12). |
| 2 |
| 45b 45c 45d 19 43 44 45c 29 14 25 30 45c 19 44 45c 29 14 25 30 45c 19 44 45c 29 14 25 30 45c 19 44 45c 29 14 25 30 45c 19 44 45c 29 14 25 30 46 45c 29 14 25 30 45c 19 44 45c 29 14 25 30 45c 19 44 45c 29 14 25 30 45c 19 44 45c 29 14 25 30 45c 29 14 25 30 45c 19 44 45c 29 14 25 30 45c 19 44 45c 29 14 25 30 45c 19 44 45c 29 14 25 30 45c 0 45c 19 44 45c 29 14 25 30 45c 0 45c 19 44 45c 29 14 25 30 45c 0 45c 19 44 45c 29 14 25 30 45c 0 44 45c 29 14 25 30 45c 0 44 45c 29 14 25 30 45c 0 44 45c 29 14 25 30 45c 0 44 45c 29 14 25 30 45c 19 44 45c 29 14 25 30 45c 19 44 45c 29 14 25 30 45c 19 44 45c 29 14 25 30 4 5c 45c 19 44 45c 29 14 25 30 45c 19 44 45c 29 14 25 30 45c 19 44 45c 29 14 25 30 45c 19 44 45c 29 14 30 45c 19 44 45c 29 14 30 45c 19 44 45c 29 14 30 45c 19 44 45c 29 14 30 45c 19 44 45c 29 14 30 45c |

4
Connect the left pedal (#34) to the left pedal rod (#3) using the 4 Phillips screws M6*12 (#33).
Connect the right pedal (#34) to the right pedal rod (#3) using the 4 Phillips screws M6*12 (#33).
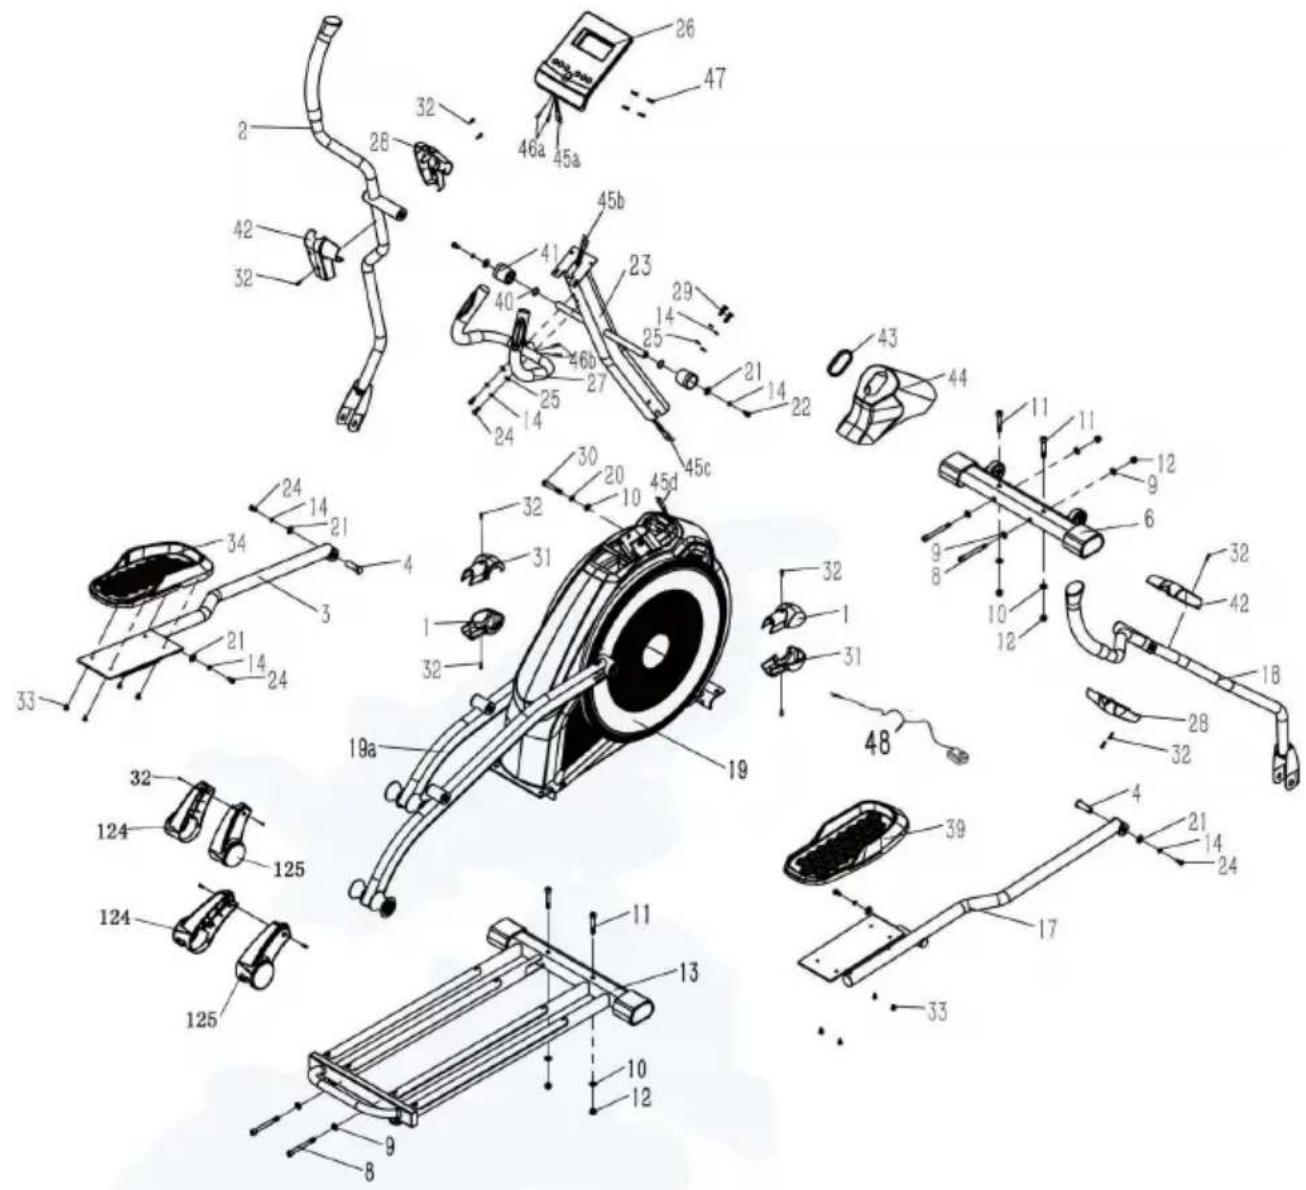
| 5 |
| 45b 18 17 19a 20 21 22 23 24 25 26 27 28 29 30 31 32 33 34 35 36 37 38 39 40 41 42 43 44 45 46 47 48 49 50 51 52 53 54 55 56 57 58 59 60 61 62 63 64 65 66 67 68 69 70 71 72 73 74 75 76 77 78 79 80 81 82 83 84 85 86 87 88 89 90 91 92 93 94 95 96 97 98 99 100 101 102 103 104 105 106 107 108 109 110 111 112 113 114 115 116 117 118 119 120 121 122 123 124 125 126 127 128 129 130 131 132 133 134 135 136 137 138 139 140 141 142 143 144 145 146 147 148 149 150 151 152 153 154 155 156 157 158 159 160 161 162 163 164 165 166 167 168 169 170 171 172 173 174 175 176 177 178 179 180 181 182 183 184 185 186 187 188 189 190 191 192 193 194 195 196 197 198 199 200 201 202 203 204 205 206 207 208 209 210 211 212 213 214 215 216 217 218 219 220 221 222 223 224 225 226 227 228 229 230 231 232 233 234 235 236 237 238 239 240 241 242 243 244 245 246 247 248 249 250 251 252 253 254 255 256 257 258 259 260 261 262 263 264 265 266 267 268 269 270 271 272 273 274 275 276 277 278 279 280 281 282 283 284 285 286 287 288 289 290 291 292 293 294 295 296 297 298 299 300 301 302 303 304 305 306 307 308 309 310 311 312 313 314 315 316 317 318 319 320 321 322 323 324 325 326 327 328 329 330 331 332 333 334 335 336 337 338 339 340 341 342 343 344 345 346 347 348 349 350 351 352 353 354 355 356 357 358 359 360 361 362 363 364 365 366 367 368 369 370 371 372 373 374 375 376 377 378 379 380 381 382 383 384 385 386 387 388 389 390 391 392 393 394 395 396 397 398 399 400 401 402 403 404 405 406 407 408 409 410 411 412 413 414 415 416 417 418 419 420 421 422 423 424 425 426 427 428 429 430 431 432 433 434 435 436 437 438 439 440 441 442 443 444 445 446 447 448 449 450 451 452 453 454 455 456 457 458 459 460 461 462 463 464 465 466 467 468 469 470 471 472 473 474 475 476 477 478 479 480 481 482 483 484 485 486 487 488 489 490 491 492 493 494 495 496 497 498 499 500 501 502 503 504 505 506 507 508 509 510 511 512 513 514 515 516 517 518 519 520 521 522 523 524 525 526 527 528 529 530 531 532 533 534 535 536 537 538 539 540 541 542 543 544 545 546 547 548 549 550 551 552 553 554 555 556 557 558 559 560 561 562 563 564 565 566 567 568 569 570 571 572 573 574 575 576 577 578 579 580 581 582 583 584 585 586 587 588 589 590 591 592 593 594 595 596 597 598 599 600 601 602 603 604 605 606 607 608 609 610 611 612 613 614 615 616 617 618 619 620 621 622 623 624 625 626 627 628 629 630 631 632 633 634 635 636 637 638 639 640 641 642 643 644 645 646 647 648 649 650 651 652 653 654 655 656 657 658 659 660 661 662 663 664 665 666 667 668 669 670 671 672 673 674 675 676 677 678 679 680 681 682 683 684 685 686 687 688 689 690 691 692 693 694 695 696 697 698 699 700 701 702 703 704 705 706 707 708 709 710 711 712 713 714 715 716 717 718 719 720 721 722 723 724 725 726 727 728 729 730 731 732 733 734 735 736 737 738 739 740 741 742 743 744 745 746 747 748 749 750 751 752 753 754 755 756 757 758 759 760 761 762 763 764 765 766 767 768 769 770 771 772 773 774 775 776 777 778 779 780 781 782 783 784 785 786 787 788 789 790 791 792 793 794 795 796 797 798 799 800 801 802 803 804 805 806 807 808 809 810 811 812 813 814 815 816 817 818 819 820 821 822 823 824 825 826 827 828 829 830 831 832 833 834 835 836 837 838 839 840 841 842 843 844 845 846 847 848 849 850 851 852 853 854 855 856 857 858 859 860 861 862 863 864 865 866 867 868 869 870 871 872 873 874 875 876 877 878 879 880 881 882 883 884 885 886 887 888 889 890 891 892 893 894 895 896 897 898 899 900 901 902 903 904 905 906 907 908 909 910 911 912 913 914 915 916 917 918 919 920 921 922 923 924 925 926 927 928 929 930 931 932 933 934 935 936 937 938 939 940 941 942 943 944 945 946 947 948 949 950 951 952 953 954 955 956 957 958 959 960 961 962 963 964 965 966 967 968 969 970 971 972 973 974 975 976 977 978 979 980 981 982 983 984 985 986 987 988 989 990 |
| Connect the left pedal support (#3) to the roller arm assembly (#19a) using the M8*20 hex bolt (#24), spring washer (#14) and large flat washer (#21). |
| Connect the left pedal support (#3) to the left handlebar bracket (#2) using the pivot pin (#4), M8*20 hex head screw (#24), spring washer (#14) and large flat washer (#21). |
| Repeat this procedure to assemble the right side. |
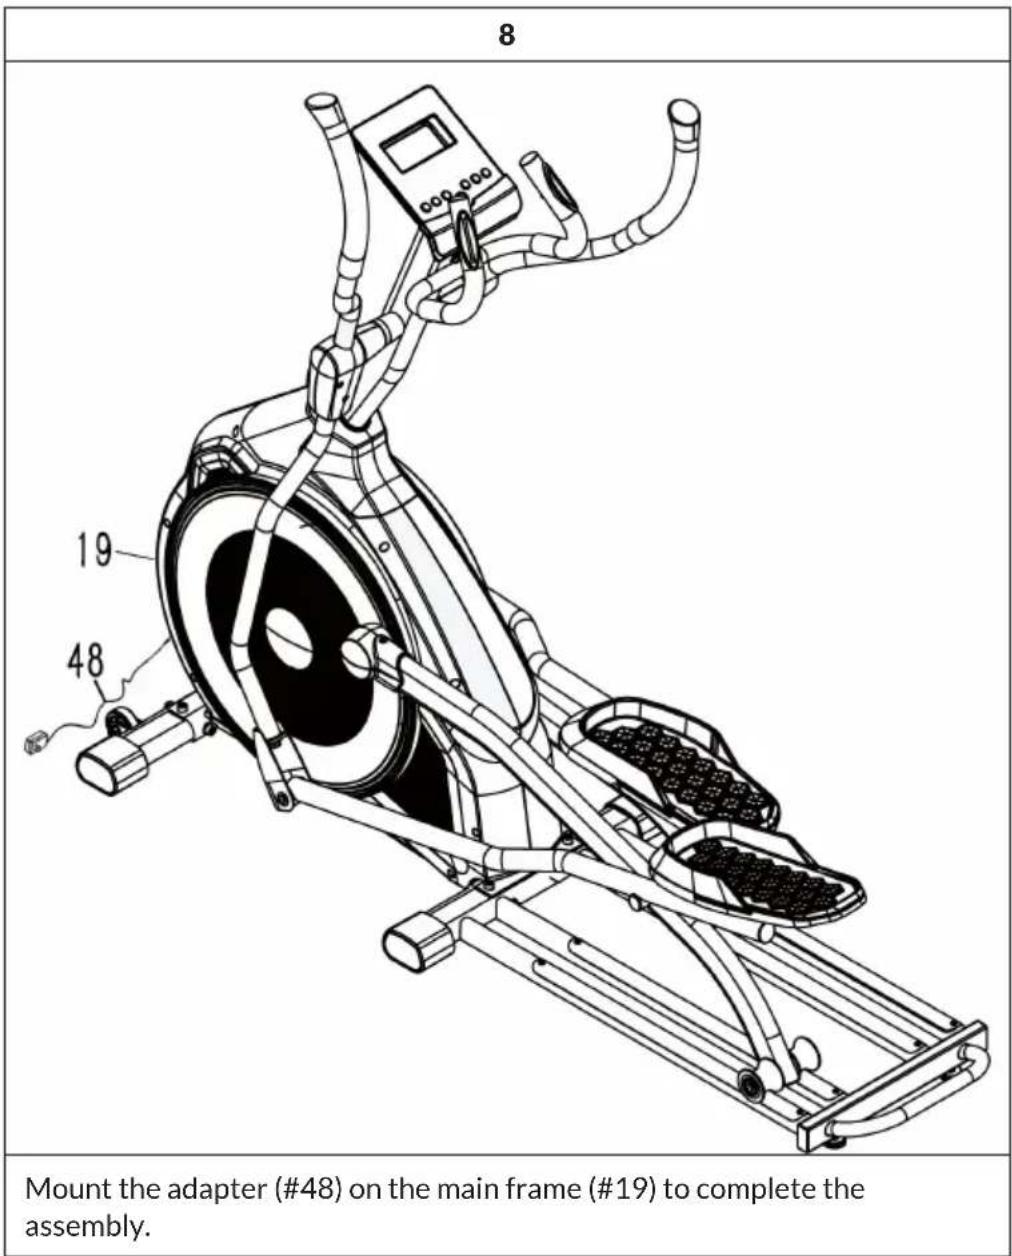
6

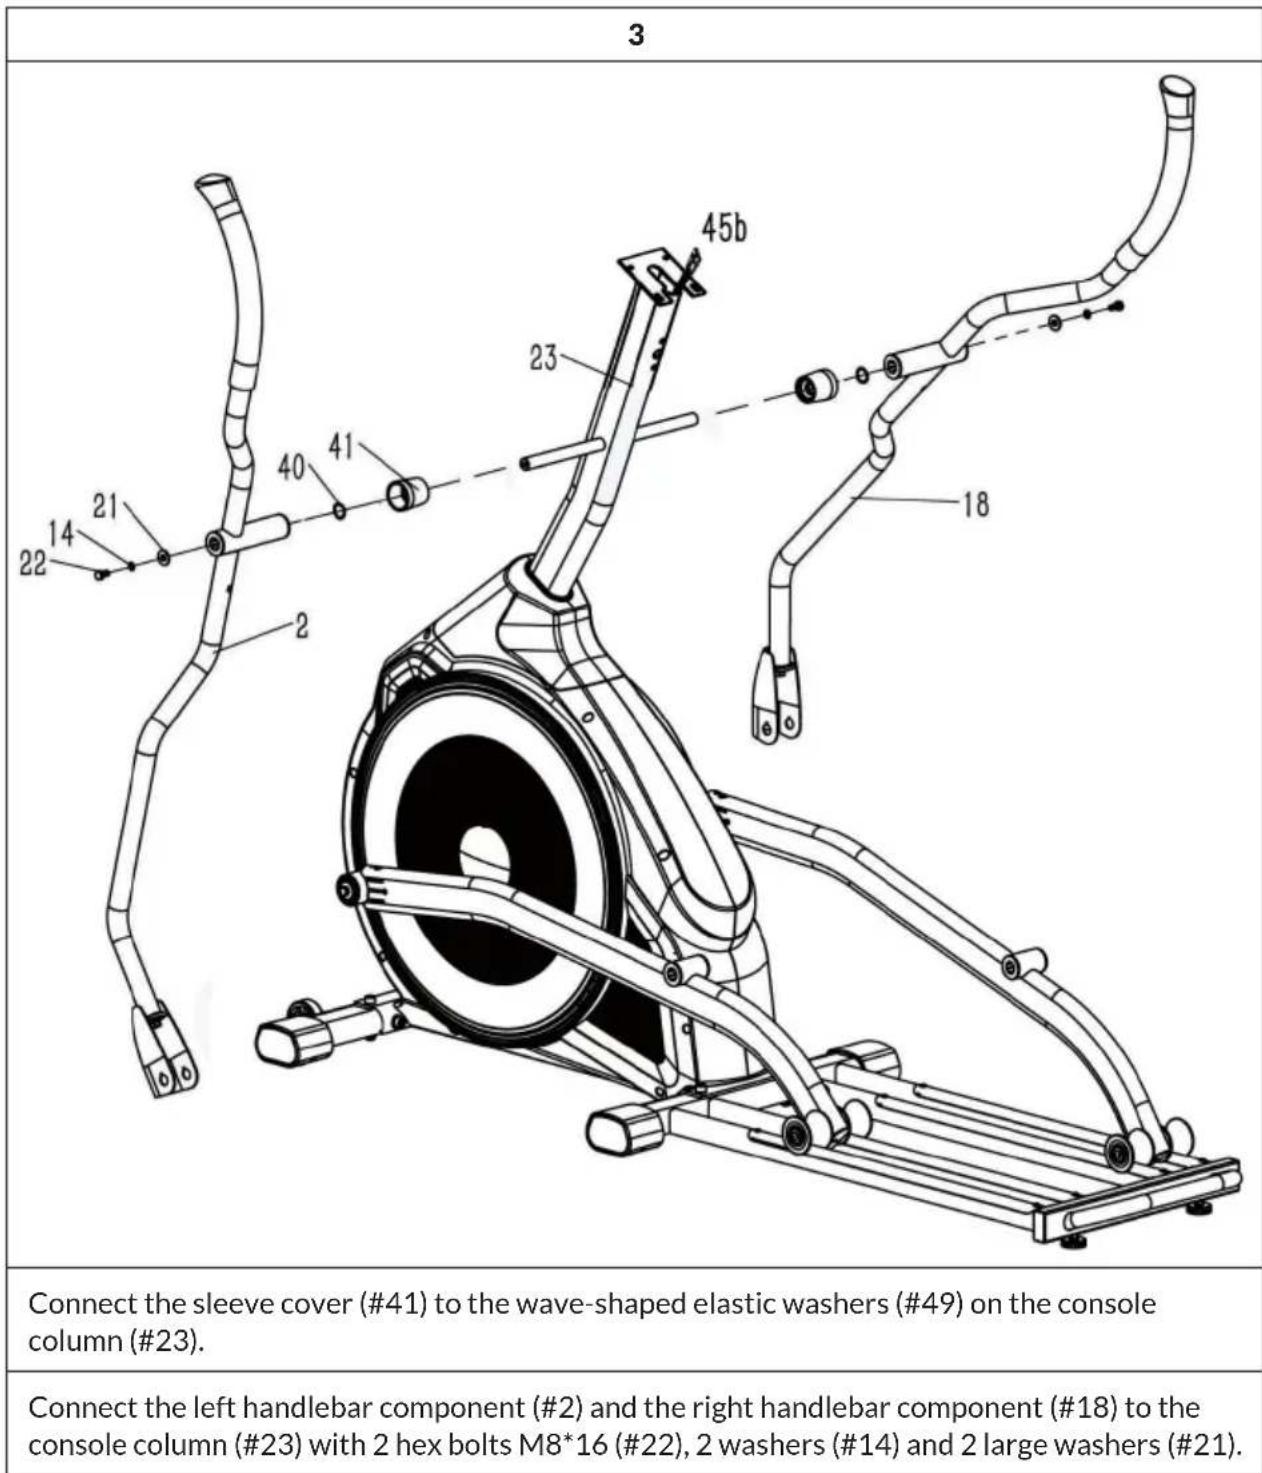
Connect the mounting part for fixed handle bar (#27) to the console column (#23) using the 2 hex screws M8*20 (#24), 2 spring washers (#14) and the domed spring washer.
Regular cardio training stimulates the cardiovascular system (heart and respiration). You improve your fitness, lose weight and burn fat. So this is the recommended workout if you want to lose weight. During exercise, glucose is burnt first, then the fats stored in the body are burnt through the exercises.
Demanding cardio training (e.g. interval training, training with high resistance and over a longer period of time) requires more effort and also trains the muscles in addition to endurance. As a rule, the more regular the training, the more efficient it is (even for short 20-minute sessions).
During the training
The resistance during the cardio training phase decisively determines the training intensity and the related training results.
Optimal training includes a warm-up phase (1), a more intense cardio training phase (2) and the final recovery phase (3). If you want to make progress or burn calories, you should go through these 3 phases and train on the ergometer for at least 20 - 30 minutes.
1. Warm-up phase
Always start your workout with a low resistance. A warm-up of 5-10 minutes is important because your muscles need to be warmed up. Especially during the warm-up phase, you should give the circulation and muscle groups time to adjust to the subsequent workout. As a beginner, you can train for the first 3 minutes at the easiest level and increase gradually according to your personal well-being.
2. Cardio training phase
After about 10 minutes you can then switch to the cardio training phase. If you are using interval training programmes, the training computer controls the resistance according to the type of interval, simulating changing demands.
The cardio training phase is assigned to the aerobic or anaerobic training range depending on the energy consumption. These areas are defined as follows:
Aerobic training area
In this zone you improve your cardiovascular system and burn fat.
Despite the slight exertion with increased heart rate, deeper breathing, getting warm and light sweating, you do not feel very exerted, however, breathing is not significantly accelerated so that you could still have a conversation with someone without getting out of breath, and you feel that you could sustain this exertion for a longer time without getting exhausted. It is like walking uphill at a leisurely pace.
The muscles and heart work more intensively and can obtain the majority of their energy requirements from aerobic energy production using oxygen. Anaerobic energy production is activated to a small amount, but only to the extent that all the lactic acid produced can be broken down again at the same time. You should do the majority of your training in this aerobic training zone.
If you continue to increase the load, then at some point you will reach a limit where oxygen-based energy production is no longer able to increase energy production, so anaerobic energy production has to join in to a greater extent. You are now entering the anaerobic training zone.
Anaerobic training area
In this zone you improve your performance and speed.
Once you increase your training again in this phase, the physical activity becomes much more strenuous because of the rising lactate level, you start to sweat more, your breathing speeds up, and after more or less time, depending on the training condition, the muscles get tired, you feel exhausted overall and can no longer continue at this level.
3. Recovery phase
Finally, remain in the recovery phase for at least 5 minutes and again use low resistance levels without high effort. The recovery or recuperation phase is also helpful in preventing possible muscle soreness after training. After an intensive training session, active regeneration is also highly advisable, such as a hot bath, a visit to the sauna or a massage.
Training progress
Your training can be increased monthly in this way, especially by extending the cardio training phase or performing a higher resistance level (or more challenging interval training).
Food and drink
- Drink before, during and after exercise.
- Drink at least 2 sips of water (10 to 20 cl) every 10-15 minutes during exercise.
- If your workout lasts longer than 1 hour, you should drink a sports drink to prevent the body from becoming dehydrated during exercise.
- For optimal cardio training, it is very important to have an aligned diet both before and after physical activity.
Before training, you should preferably eat carbohydrates, which can be found in rice and pasta, for example, as they provide the body with an important amount of energy.
After training, you need to "refuel" with proteins, which you can find in eggs, yoghurt and dried fruits. Even if you want to lose weight, it is absolutely necessary to eat after training so that your body regenerates.
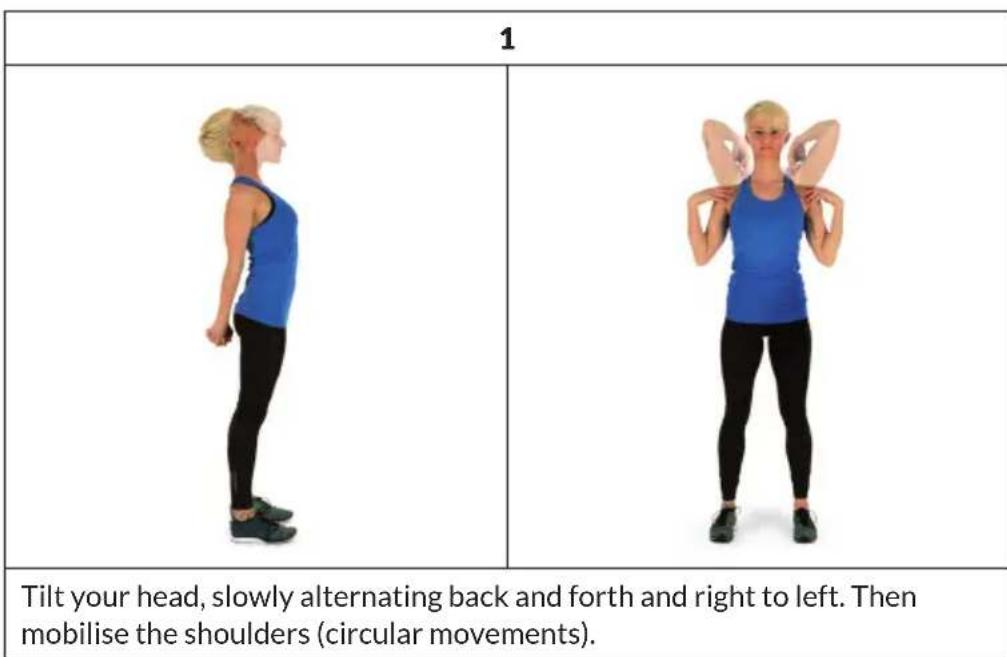
WARM-UP BEFORE THE TRAINING
Perform the warm-up movements before each training session. In this way you mobilise your joints and activate the muscles.
If you feel discomfort or pain during individual movements, skip this exercise and consult your doctor or fitness trainer about specific warm-up training.
Each movement should have a few repetitions (right and left) allowing you to start your cardio workout feeling relaxed.
Take about 5 minutes for the following Capital Sports workout routine:
| 2 | 3 |
| Rotate the hips while the arms are extended. The feet are not firmly fixed to the floor (the ankles accompany the body rotation). | Bend hips, one arm stretched upwards. Remain in this position for a few seconds on each side. |
| 4 | |
| Stand on one leg and hold the instep with your hand. Here you mobilise your ankle and stretch your thigh slightly. Support yourself if necessary to keep your balance. Remain on one leg and now rotate the ankle in a circular motion in both directions. | |
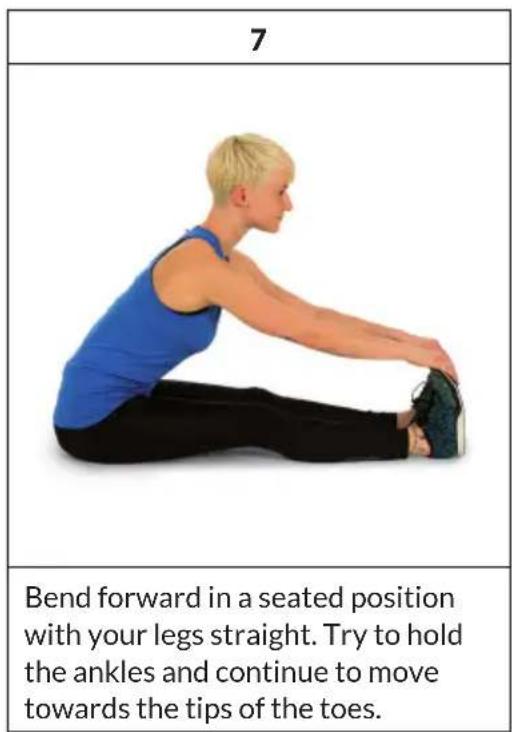
| 5 | 6 |
| When squatting, place your feet about shoulder-width apart and lower your hips with your arms straight. Try to keep your back straight while doing this. | Sit with your legs bent so that the soles of your feet touch. Bounce lightly with your knees. Here you mobilise not only the ankles but also the entire outer thigh. Hold the ankles with the back straight. |
CONSOLE AND BUTTON FUNCTIONS
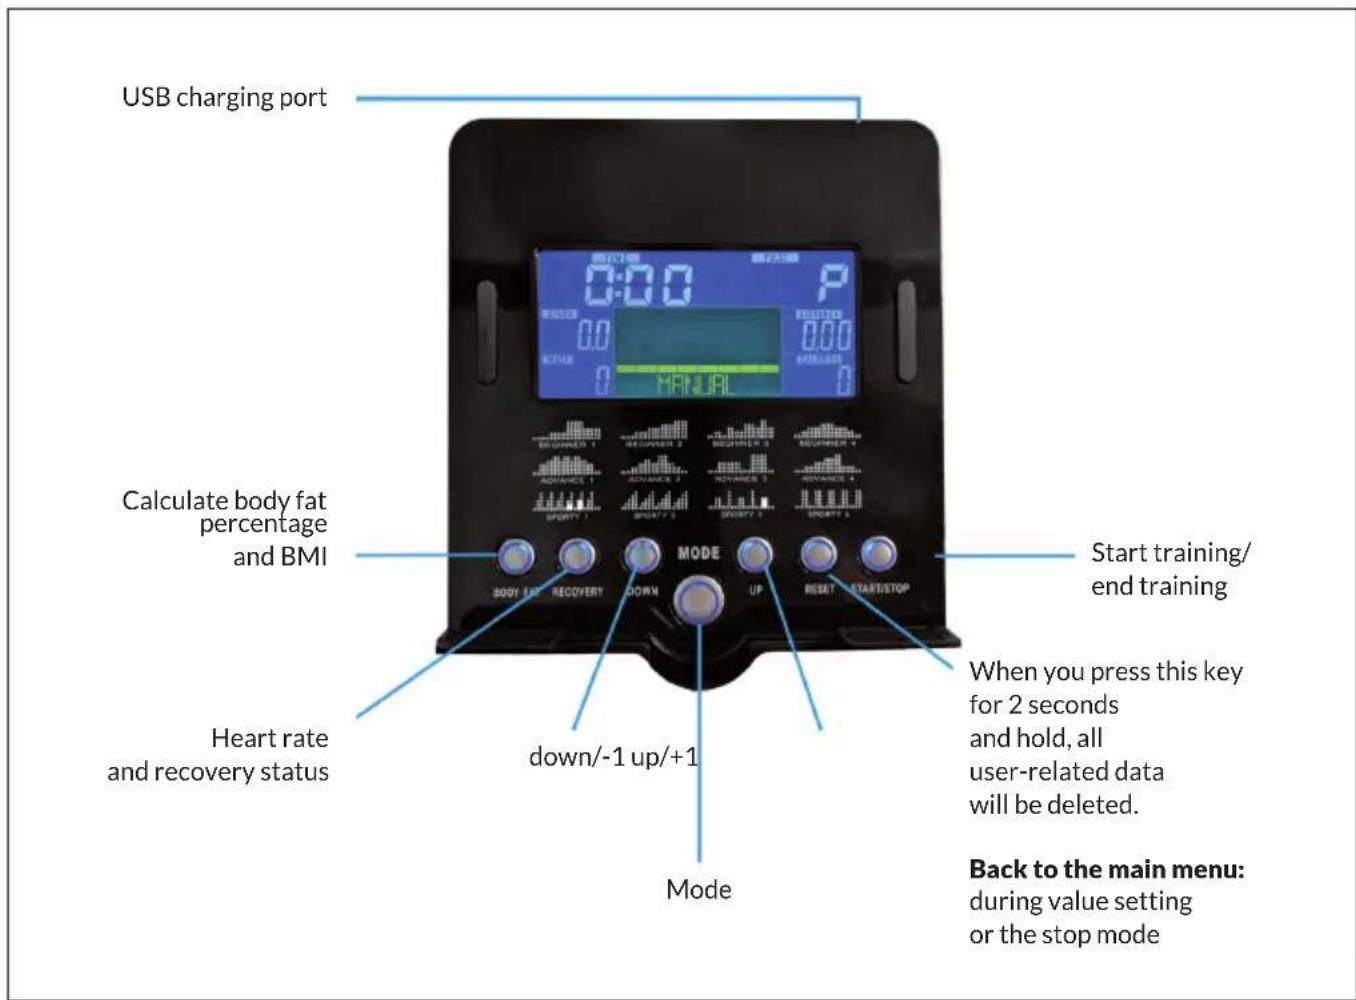
Switch on
When you plug the machine's power plug into the wall socket, the control computer is switched on and all the elements light up on the LCD screen for 2 seconds. After 4 minutes, the device switches to energy-saving mode if the device is not used and no pulse is recorded. Press any button to exit the energy-saving mode.


Selection of the training programme
Press the UP and DOWN buttons to select Manual > Beginner > Advanced > Sporty > Cardio > Watt.
Manual Mode
In the main menu, press the START button to begin training in manual mode.
1 Press the UP or DOWN buttons to select your training programme, select MANUAL and press the MODE button to confirm.
2 To set TIME, DISTANCE, CALORIES, PULSE, press the UP or DOWN buttons and press the MODE button to confirm.
3 Press the START/STOP button to begin training. Press the UP or DOWN buttons to adjust the load level.
4 Press the START/STOP button to pause training. Press the RESET button to return to the main menu.
Example Watt Mode
1 Press the UP or DOWN buttons to select your training programme, select WATT and press the MODE button to confirm.
2 Press the MODE button to set the target wattage (default: 120).
3 Press the UP or DOWN buttons to set the time.
4 Press the START/STOP button to start training. Press the UP or DOWN buttons to adjust the watt level.
5 Press the START/STOP button to pause training. Press the RESET button to return to the main menu.
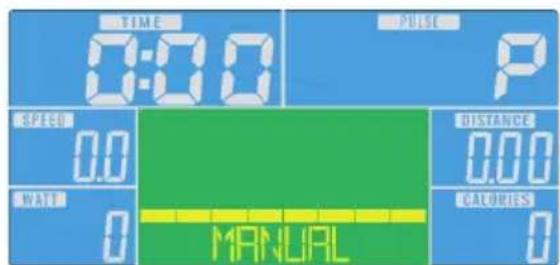
Display indications and functions
| Function Description | |
| TIME Time already passed during trainingRange: 0:00 ~ 99:59 | |
| SPEED Training speed | Range: 0.0 ~ 99.9 |
| DISTANCE Training distance | Range: 0:00 ~ 99:59 |
| CALORIES Calories burned during trainingRange: 0 ~ 999 | |
| PULSE Heartbeats per minute are displayed during exercise.Alarm when the pulse is higher than the target pulse. | |
| RPM Revolutions per minuteRange: 0:00 ~ 99:59 | |
| WATT In the Watt programme, the unit maintains a preset Watt value (adjustable range: 0 ~ 350) | |
| MANUAL Training in manual mode. | |
| PROGRAM Choose between "Beginner", "Advanced" and "Sporty" programmes. | |
| CARDIO Training mode with the target heart rate. | |
iConsole and App
Activate BT on your tablet, search for the device in the list and press connect (password:0000).


Download on the AppStore

Download on the App Store

Note: As soon as the console is connected to the tablet via BT, the tablet switches off. Close the app and switch off BT on the iPad. The console then switches on again automatically.
TRAINING VIA KINOMAP APP
With the KINOMAP app, you can walk, ride or row more than 100,000 km of motion videos around the world, updated daily by the users themselves. Try to follow their pace under the same conditions as they were recorded. Use the KINOMAP portal and choose your own Real Life Video. Increase your fitness by using your own interval in resistance or power mode.
Connect your compatible devices directly. Alternatively, you can use the

camera, which gives you an optical cadence, step or rowing stroke sensor. Join our multiplayer sessions and try to be the first to the finish.
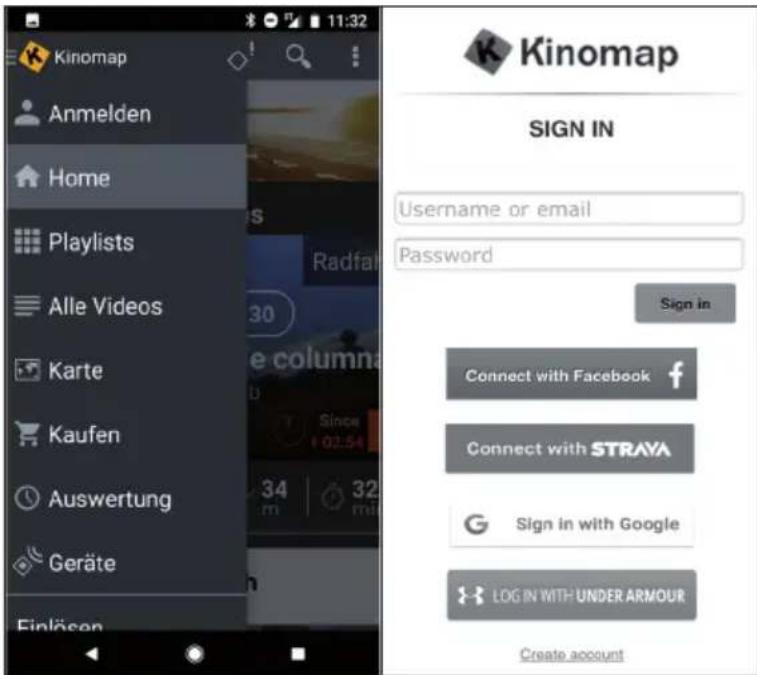
Create account
If you want to use KINOMAP, you must first connect to your KINOMAP account. Once you have successfully registered, you can start training. If you do not log out, you will remain logged in the next time you start the app. If you don't have a KINOMAP account yet, please sign up to get a free account.
Activation code
- The standard version is free and gives you access to a range of free videos as well as interval workouts (currently not available on all devices).
- A subscription will be required later to access all eligible content, including thousands of real-life videos, a multiplayer mode and much more.
- After the first login, the app may ask you for an activation code. If you have one, enter it in the relevant settings to activate your subscription to the app.
- You can access the "Add Activation Code" option at a later time.
Enter activation code
Subscription note: You can also subscribe to the service on a monthly or annual subscription basis, which gives you access to advanced features. Go to "Subscribe to settings".
After activation, you will see your subscription on "My subscription":
Connect to the training device
To connect the unit to the KINOMAP app:
1 Go to the "Equipment" menu.
2 Add new devices with the + button
3 Select your equipment type from the list (ergometer for the CapitalSports Helix Pro).
4 Select the CapitalSports brand.
5 Select the Helix Pro model.
6 When the device has been recognised, confirm by touching the field.
7 Now simply press SAVE. Your device has now been added.
Note: Even if your fitness device does not have a BT connection, you can train on Kinomap.
Preview the data
With the "Preview data" function, you can immediately see the data sent by the unit. This function is particularly useful if you have problems starting an activity. Depending on the equipment, the app must receive some values from this.

Training
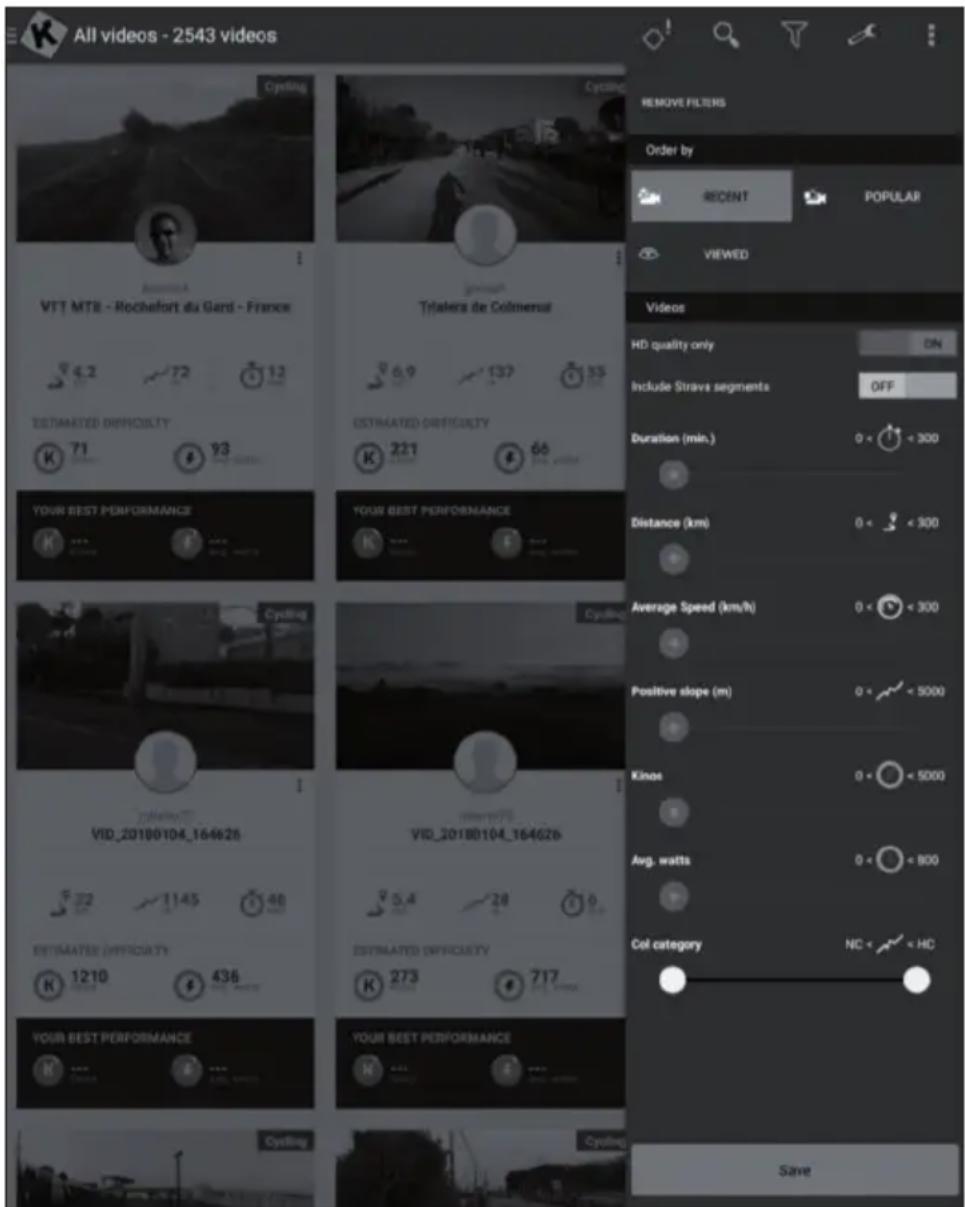
Video selection
- Several lists of videos are available from which you can select the video you want.
- To train with it during the workout. There is a filter function to ensure you get access to the videos you are looking for (featured, popular, most viewed, most recent, duration, distance, incline....).
- For each video you can see relevant information: its name, the contributor (who published the video), country, duration, distance, average positive slope, average speed.
Playlists
- There are also many playlists here that have been created by Kinomap or the users themselves.
Each playlist has a specific theme, for example, to exercise for 30 minutes or to visit a country. - You can track your progress on every playlist and video it creates.
- At the moment, you cannot manage your playlists directly from the app.

Start of training

Select the video you want to train with.
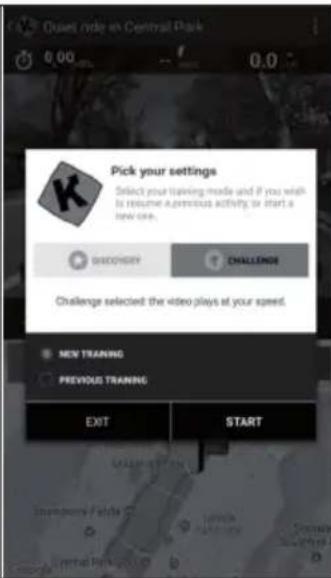
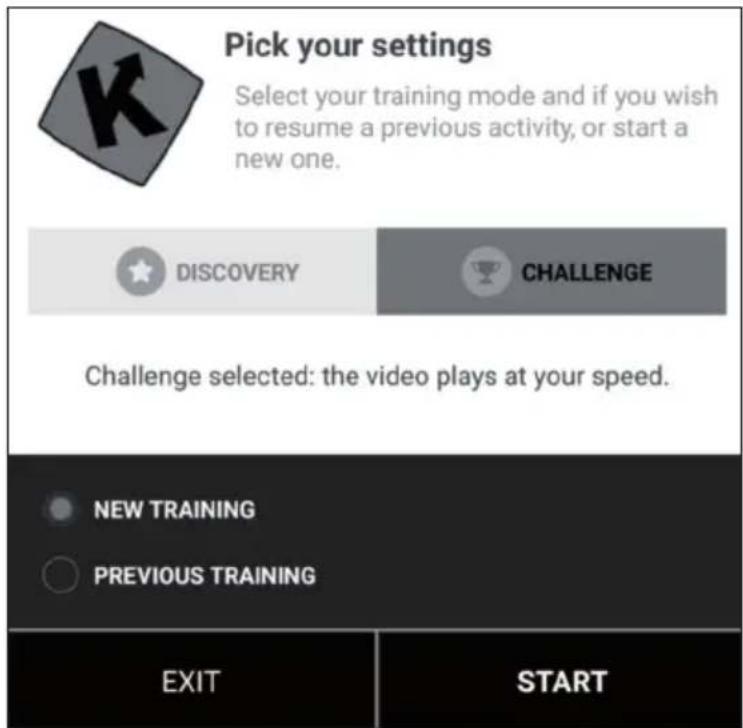
Select the mode you want to train in.
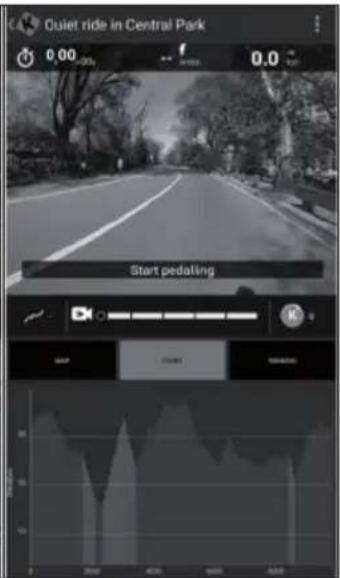
Just start pedalling to begin the workout.
Discovery and challenge mode
Challenge mode: The video plays at your speed so that you can achieve the same overall performance as the video producer. If you are not fast enough, the video slowly reduces the frame rate. With good performance, the frame rate can be increased up to twice the original speed. Use this mode to participate in challenges such as Indoor Challenges and to export to third-party websites such as Strava with full coordinates and a map of your virtual ride.
Discovery mode: The video plays at the original speed and pauses when your speed reaches 0. Whatever your performance, the frame rate is not changed. But you will still see if you are performing well by looking at the energy performance measured in cinemas. Note that the export on third-party websites like Strava is limited to watts and additional data like cadence, heart rate, but does not show coordinates or a map.
Training display
Relevant information is displayed at the top of the screen:
The duration
The electricity generated immediately
The instant speed
- Your heart rate (only if you add an additional heart sensor strap or if your equipment has one built in)
The instant cadence
The distance
- Your map position is synchronised with the video.
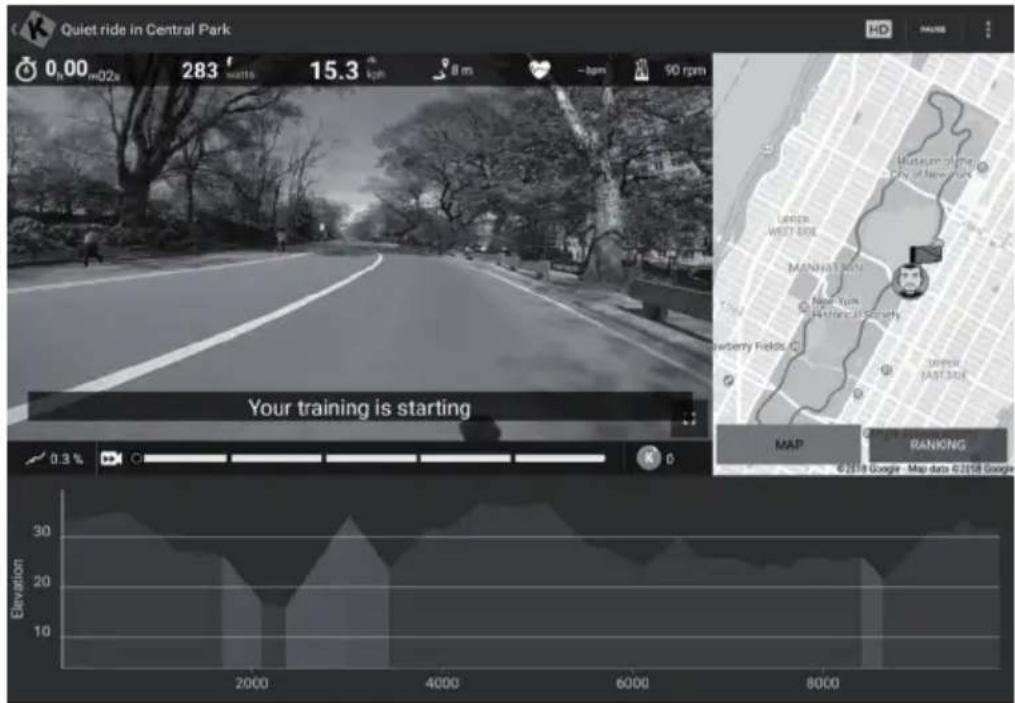
The "Ranking" tab is only available in multiplayer mode.
- Abscissa: height in metres
- Ordinate: distance in KM in challenge mode.
- Duration: in seconds in Discovery mode.
Set resistance / gears
The screen will instruct you how to set the resistance according to the elevation profile (altitude) if you are using a speed/cadence sensor or an optical sensor.
End training
If you want to pause or stop the workout, simply stop pedalling or use the pause button in the corner of the workout. Click on the "Resume session" button to continue an unfinished training. If you want to end this activity, simply confirm by tapping "Save and exit".
Profile training

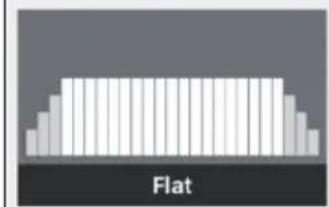


Profile training is a form of training that involves a series of low to high intensity workouts and rest or relief periods.
Varying the intensity of your effort trains the heart muscle, provides a cardiovascular workout, improves aerobic capacity and allows the person to exercise longer and/or more intensely.
Profile training is not yet available for all devices. You can easily check it in the main menu: If you see the profile training menu, it means that the function is available for your equipment. You can choose between two modes, depending on your device.
Resistance: You define a resistance level and we send the instructions to the home trainer, regardless of the power produced.
Target power: You define a target power and the resistance changes automatically so that you generate it.
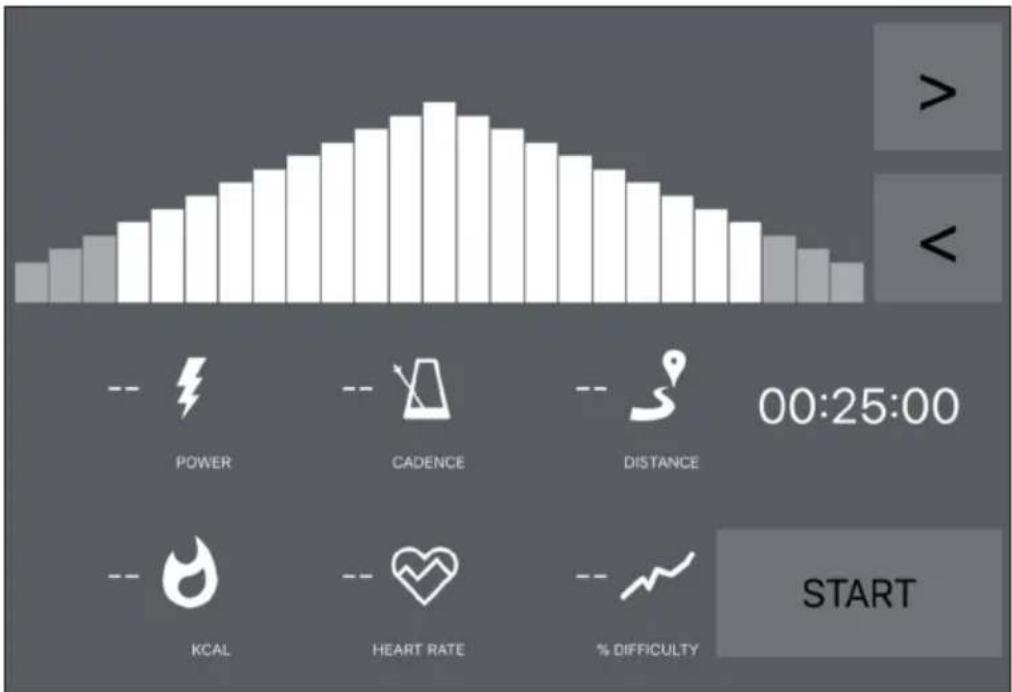
- If you see an orange line, it means you are close to your destination.
- Conversely, the orange line means that you are moving away from your target. (Increase or slow down target power)
- All you have to do is select the time (< >) for the countdown and start training.
- Once the activity has started, you can increase or decrease the target power or resistance according to the mode you have chosen.
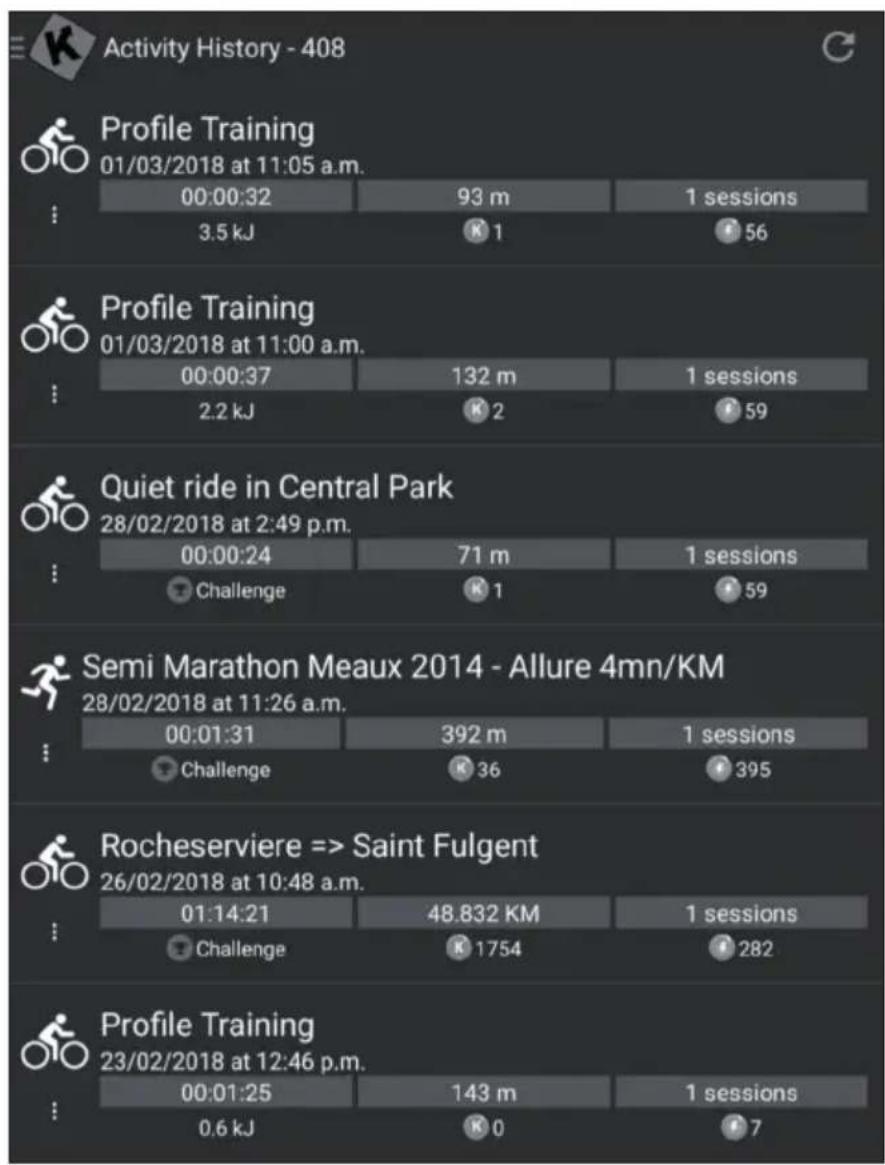
Evaluations
Training protocol
- Open the main menu on the left to click on "Training log".
- You can see the history of your past training sessions here, including the name of the video you trained, the date of the training, the duration and the distance.
- Click on a specific training to get all the information.
- You can also go to http://www.kinomap.com/myactivities.
- Your training log includes a map, a summary and a series of detailed graphs showing your previous speed, power, cadence and heart rate. Note that the training log can be automatically exported to various platforms such as RunKeeper, Strava or Under Armour.
Search
This button is always available in the top right corner to browse videos no matter what menu you are in.
There are several ways to find the right video:
- You can search by clicking on the Search button. As soon as you have entered at least 3 characters, an automatic completion search is carried out.
- You can also perform a geographical search. Select "Map" in the main menu.
- You can explore all available videos by clicking on "Public Playlists" or "All Videos".
Settings
User settings
- Go to the Settings menu and set your user data, including units, height, weight, birthday, gender and frontal area.
- This information influences the speed calculation.
External display
Follow the instructions to view via Chromecast or Apple TV on your TV.
CARE AND MAINTENANCE
Note: As with all exercise equipment with mechanical, moving components, this product may have screws that loosen due to frequent use. We therefore recommend that you check them regularly and tighten them with a suitable key if necessary. Clean your exercise equipment regularly with a damp cloth to remove sweat and dust from the surfaces.
- Remove the control panel battery if you are not going to use the unit for a long period of time.
- Clean the unit regularly with a clean cloth to maintain its clean appearance.
- Safe use of the device can only be guaranteed if the device is regularly checked for damage and wear (for example on handles, pedals, saddle, etc.). It is essential that damaged parts of the appliance are replaced and that the appliance is not used again until it has been repaired.
- Check regularly that bolts and nuts are properly fixed.
- Grease moving parts of the appliance regularly.
- Pay particular attention to components that are especially susceptible to wear and tear, such as the brake system, footrest, etc.
- As sweat is very aggressive, it must not come into contact with the enamelled or chrome-plated parts of the appliance, especially the computer. Wipe the device immediately after use. The enamelled parts can be cleaned with a damp sponge. All aggressive or corrosive products must be avoided during cleaning.
- Store the appliance in a clean and dry environment out of the reach of children.
If there is a legal regulation in your country regarding the disposal of electrical and electronic equipment, this symbol on the product or on the packaging indicates that this product must not be disposed of with household waste. Instead, it must be taken to a collection point for the recycling of electrical and electronic equipment. By disposing of this product in accordance with the regulations, you protect the environment and the health of those around you from negative consequences. For information on recycling and disposal of this product, contact your local government or household waste disposal service.
This product contains batteries. If there is a legal regulation in your country regarding the disposal of batteries, the batteries must not be disposed of in household waste. Consult your local regulations for the disposal of batteries. By disposing of this product in accordance with the regulations, you are protecting the environment and the health of those around you from negative consequences.
DECLARATION OF CONFORMITY
CE UK CA
Manufacturer:
Chal-Tec GmbH, Wallstraße 16, 10179 Berlin, Germany.
Importer for Great Britain:
Berlin Brands Group UK Ltd
PO Box 1145
Oxford,OX19UW
United Kingdom
The complete manufacturer's declaration of conformity
can be found at the following link:
use.berlin/10032744
Cher client, chere clientele,

Download on the AppStore

Download on the App Store


Download on the AppStore

Download on the AppStore

Berlin Brands Group UK Ltd
PO Box 1145
Oxford,OX19UW
United Kingdom

Download on the AppStore

Download on the AppStore