AC212916 - Air Conditioning Emerio - Free user manual and instructions
Find the device manual for free AC212916 Emerio in PDF.
User questions about AC212916 Emerio
0 question about this device. Answer the ones you know or ask your own.
Ask a new question about this device
Download the instructions for your Air Conditioning in PDF format for free! Find your manual AC212916 - Emerio and take your electronic device back in hand. On this page are published all the documents necessary for the use of your device. AC212916 by Emerio.
USER MANUAL AC212916 Emerio
Instructions for use
Air cooler 60W
Gebrauchsanleitung
Luftkühler 60W
Instruction manual – English ...... - 20 -
natural_image
Close-up of a device component with labeled parts (1, 2), no readable text or symbols beyond labelsVOOR GEBRUIK
text_image
Technical line drawing of a car air conditioner unit with labeled parts and component annotationsGEBRUIK
natural_image
Interior view of a white industrial air purifier with internal grating and labeled components (no text or symbols visible)text_image
Technical diagram of a dual air conditioner unit with numbered components and a control panel labeled in Chinese.Panneau de contrôle
natural_image
Diagram of a device with labeled parts and directional arrows, no readable text or symbols presentAVANT L'UTILISATION
text_image
Technical line drawing of a car air conditioner unit with labeled parts and component annotationsFONCTIONNEMENT
natural_image
Exterior view of a white industrial air purifier with internal grid compartments and labeled parts (1, 2), no readable text or symbols beyond labels.Power consumption: 60W
SAFETY INSTRUCTIONS
Before use make sure to read all of the below instructions in order to avoid injury or damage, and to get the best results from the appliance. Make sure to keep this manual in a safe place. If you give or transfer this appliance to someone else make sure to also include this manual.
In case of damage caused by user failing to follow the instructions in this manual the warranty will be void. The manufacturer/importer accepts no liability for damages caused by failure to follow the manual, a negligent use or use not in accordance with the requirements of this manual.
- This appliance can be used by children aged from 8 years and above and persons with reduced physical, sensory or mental capabilities or lack of experience and knowledge if they have been given supervision or instruction concerning use of the appliance in a safe way and understand the hazards involved.
- Children shall not play with the appliance.
- Cleaning and user maintenance shall not be made by children without supervision.
- If the supply cord is damaged, it must be replaced by the manufacturer, its service agent or similarly qualified persons in order to avoid a hazard.
- Unplug the appliance during filling and cleaning.
- Before inserting the plug into the mains socket, please check that the voltage and frequency comply with the specifications on the rating label.
- If an extension cord is used it must be suited to the power consumption of the appliance, otherwise overheating of
the extension cord and/or plug may occur. There is a potential risk of injuries from tripping over the extension cord. Be careful to avoid dangerous situations.
- Disconnect the mains plug from the socket when the appliance is not in use and before cleaning.
- Ensure that the mains cable is not hung over sharp edges and keep it away from hot objects and open flames.
- Do not immerse the appliance or the mains plug in water or other liquids. There is danger to life due to electric shock!
- To remove the plug from the plug socket, pull the plug. Do not pull the power cord.
- Do not touch the appliance if it falls into water. Remove the plug from its socket, turn off the appliance and send it to an authorized service center for repair.
- Do not plug or unplug the appliance from the electrical outlet with a wet hand.
- Never attempt to open the housing of the appliance, or to repair the appliance yourself. This could cause electric shock.
- Never leave the appliance unattended during use.
- This appliance is not designed for commercial use.
- Do not use the appliance for other than intended use.
- Do not wind the cord around the appliance and do not bend it.
- Never insert fingers, pencils or any other object through the holes of the plastic shell.
- The appliance should be placed on a flat and stable surface when operating to avoid overturning.
- Do not put on the product in wet place. For example, bathroom etc.
- Do not use it in the cook-room in order that keeping the plastic part away from greasy dirt.
- Do not use the appliance near window when it rains or thunders, in order to prevent risk of fire and electric shock.
PARTS DESCRIPTION
- Control panel
- Infrared receiving window
- Handle
- Louver
- Louver adjustment tab
- Water level window
- Power cord
- Water tank
- Water tank knob
- Filter cover
- Slot to store remote control
- Remote control
Control panel
A. On/off button
B. Mode button
C. Cool function button
D. Swing button
E. Timer button
F. Speed button
G. Natural mode indicator light
H. Cool mode indicator light
I. Timer function indicator light
J. Sleep mode indicator light
K. Swing function indicator light
L. Speed indicator light

text_image
Technical diagram of an air conditioning unit with numbered components and a control panel labeled in Chinese.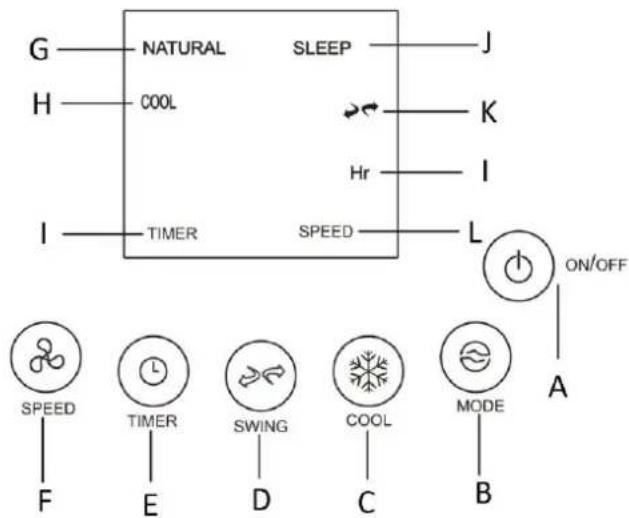
text_image
G H I NATURAL COOL TIMER SLEEP J K Hr I L SPEED ON/OFF A SPEED F E SWING D COOL C MODE BREMOTE CONTROL
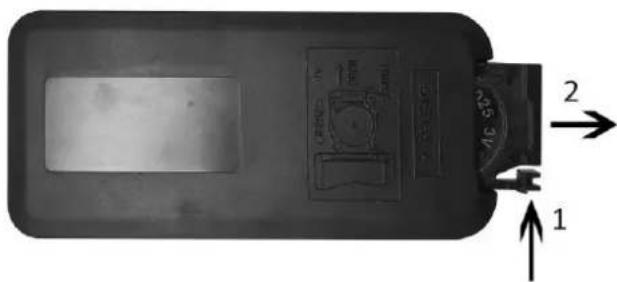
This appliance has a remote control. One piece of CR2025 battery will be provided with the remote control.
Before starting to use the remote control, remove the plastic protection from the battery.
If you want to change the battery, push the button 1 and pull out the battery holder 2 at the same time. Please refer to the arrow in below picture. Keep button cell batteries out of reach of small children.
The functions of the remote control buttons are the same as the functions of the buttons on the control panel.
You can store the remote control in the small slot (11) of the back side of the appliance.
text_image
Diagram of a device rear panel with labeled components and directional arrows indicating movement or forceBEFORE USE
- Pull the appliance out from the carton and place it on a solid heat-resistant horizontal surface.
-
Check if the accessories are complete including: one remote control and four wheels.
-
Place the product upside down, insert the metal part of the four wheels into the four hexagonal holes of the bottom cover, and then put the product in a straight position.
- Rotate the water tank knob to the horizontal position (2) and pull out the water tank, slowly pour in the clean cold water. Make sure the water level is between the MIN and MAX line marked on the water tank; push back the water tank and close the water tank by rotate the knob to the vertical position (1). (Fig. 1).

natural_image
Technical line drawing of a vehicle chassis with multiple camera modules and mounting brackets (no text or symbols)
natural_image
Line drawing of a portable air conditioner unit with a side panel showing a bucket pouring liquid (no text or symbols)OPERATION
Connect the appliance to a suitable power source. Then press the control panel or the remote control to choose your desired functions.
- ON/off: Press ON/OFF button “☐” to turn the appliance on. Press the button again to turn off the appliance. The appliance will be in standby mode.
- Speed: Press SPEED button "∞" to adjust the speed: "1" = low wind; "2" = Medium wind; "3" = high wind.
- Louver direction (air vertical adjustment): Lift up or press down the louver adjustment tab to get your desired louver direction.
- Swing (air horizontal adjustment): Press SWING button “💡” to make the air swing left and right and the indicator “ ➕ is on; press the button again to cancel the swing.
- Mode: Press MODE button “💡” to choose the mode functions from Normal → Natural → Sleeping → ... (Repeating).
1) Normal: under this mode, the motor works with the preset speed. You can press the speed button to choose speed Low/Mid/High.
2) Natural: under this mode, the display of "NATURAL" is on. The appliance runs according to the natural mode program. It is generating softer and more comfort air volume, you will feel like the wind from the nature. You can press the speed button to choose Low/Mid/High natural wind.
3) Sleeping: under this mode, the display of "SLEEP" is on. The appliance runs according to the sleeping mode program. Air volume will weaken with the decrease of body temperature when you fall asleep, which will protect you from catching cold. You can press the speed button to choose Low/Mid/High sleeping wind.
-
Timer: Press TIMER button “☐” to set your desired working time from 1h →2h →3h ... →8h →off. When the set time has elapsed, the fan will be off and under standby condition.
-
Cooling: press COOL button “☐” to start the cooling function. The indicator “COOL” will be on. Press again the button to cancel the function.
Note: Please make sure there is enough water in the water tank, otherwise there will be no cooling effect.
CLEANING AND MAINTENANCE
Unplug the appliance during filling and cleaning.
• Clean the honeycomb filter (2) and filter cover (1)
- Unplug the appliance.
- Unscrew the screw which is in the middle of the filter cover, then take off the filter cover.
- Take out of the honeycomb filter.
- Rinse the filter and filter cover under water to wash away the dust.
- Put back in place after cleaning. If you will not use the appliance immediately after cleaning, please dry them before putting back.
Note: After long time operation, the filter becomes clogged with dust and dirt, which will greatly affect the performance of the appliance. It is recommended to clean the filter frequently.

natural_image
Exterior view of a white industrial air purifier with internal grid structure and labeled components (no text or symbols visible)- Clean the water tank
After some time operation, the water tank may have dust and dirt. It is recommended to change water and clean the water tank with a clean cloth frequently.
- Clean the main body
- Unplug the appliance.
- For slight dirt, wipe it off with a soft damp cloth. For greasy dirt, squeeze a little mild detergent on a soft damp cloth, then wipe the dirt off.
- Let the main body dry completely before next use.
RECYCLING
This product bears the selective sorting symbol for waste electrical and electronic equipment (WEEE).
This means that this product must be handled pursuant to European Directive 2012/19/EU in order to be recycled or dismantled to minimize its impact on the environment.

For further information, please contact your local or regional authorities.
Electronic products not included in the selective sorting process are potentially dangerous for the environment and human heath due to the presence of hazardous substances.
Never throw empty batteries away, but deposit them in special battery boxes or hand them in as domestic chemical waste at your municipal depot.
QUALITY
Safety and quality is very important to HEMA. We have our own laboratory, which assesses all equipment in terms of electrical safety and ease of use, before it is included in our range. HEMA also monitors the product quality in collaboration with the manufacturer.
SECURITY
This HEMA item may be fitted with a plastic anti-theft strip. You will find the strip on the bottom of the product. This strip does not influence the quality or the operation of the product and can be removed without a problem.
FAULTS AND REPAIRS
If this device needs to be repaired, you can hand it in at a HEMA branch after packing the product securely. Do not try to repair this product yourself. For repairs that fall within the warranty period, you will need to show a proof of purchase and the warranty document. Regularly check the power cord for damage. If there is any damage to the cord set, please return the item to a HEMA branch for repair. Do not try to replace it yourself. For safety reasons we recommend that you do not carry out any repairs to an electrical device yourself.
WARRANTY
The warranty period is 2 years from the date of purchase. Always keep your receipt in a safe place. It's handy if you take a picture of the receipt and save it somewhere. Then you will always have an easy-to-read receipt in your possession.
WARRANTY CONDITIONS
HEMA quality guarantee
HEMA guarantees that the product you have purchased meets the standards our customers are entitled to expect in terms of quality and product properties. These warranty conditions do not affect your statutory or consumer rights and apply in all countries where there are HEMA branches.
Warranty claims
If you wish to make a warranty claim, please return the product with proof of purchase to one of our stores. The store will determine whether to replace the product (with an identical or equivalent product), accept the product for repair within a reasonable period of time or refund the price of the product.
Invalidation of warranty
The warranty on this article is invalidated if the fault or defect is caused by:
a) normal wear and tear
b) external damage (for example, damage caused by exposure to sand or moisture or due to falling of the product, etc.)
c) improper or inappropriate use
d) overdue or incorrect maintenance, including repairs that were not authorised by HEMA
The above list does not exclude other possible reasons for defects not being covered by the warranty.
Added confidence when choosing a HEMA product
You may swap or return the product within 30 days after purchase (provided it is undamaged and you have proof of purchase).
1 November 2019
HEMA BV
PO Box 37110
1030 AC Amsterdam
The Netherlands
These warranty conditions apply without prejudice to the customer's statutory rights or any other claims by the customer.
ERP information (EN)
Supplier: Hema BV
PO Box 37110
1030 AC Amsterdam
Netherlands
Declare that the product detailed below:
Information requirements
| Information to identify the 80.06.0020 to which the information relates to[Air cooler] | |||
| Description | Symbol | Value | Unit |
| Maximum fan flow rate | F | 3.1 | m^3/min |
| Fan power input | P | 48.27 | W |
| Service value | SV | 0.06 | (m^3/min)/W |
| Standby power consumption | P_SB | 0.19 | W |
| Fan sound power level | L_WA | 59.1 | dB(A) |
| Maximum air velocity | c | 0.96 | meters/sec |
| Measurement standard for service value | (EU) No 206/2012 + (EU) 2016/2282EN ISO 5801: 2017EN 50564: 2011EN 60704-1:2010+A11:2012EN 60704-2-7: 1998 | ||
| Contact details for obtaining more information | Hema BVPO Box 371101030 AC AmsterdamNetherlands | ||
Satisfies the requirement of the Council Directives:
COMMISSION REGULATION (EU) No 206/2012 of 6 March 2012 and Amending COMMISSION REGULATION (EU) 2016/2282 implementing Directive 2009/125/EC of the European Parliament and of the Council with regard to ecodesign requirements for air conditioners and comfort fans
Regarding information for consumers on how to install, use and maintain the product, WEEE information, please check the instruction manual provided with packaging.
Art.-Nr. 80.06.0020
TECHNISCHE DATEN
text_image
Diagram of a device component with labeled parts and directional arrows indicating flow or movementVOR DEM GEBRAUCH
natural_image
Technical line drawing of a vehicle air conditioner unit with mounting holes and ventilation system (no text or symbols)
natural_image
Line drawing of a portable air purifier with two labeled buttons (1 and 2) and a funnel pouring liquid into the base (no text or symbols on the device itself)BETRIEB
natural_image
Interior view of a white industrial air purifier with labeled components (1, 2), showing internal structure and housing (no text or symbols beyond labels)• Wassertank reinigen
natural_image
Close-up of a black electronic device with a labeled component and directional arrows (no readable text or symbols)ANTES DE USAR
natural_image
Technical line drawing of a vehicle front panel with multiple sensor components and directional arrows indicating motion (no text or symbols)